Cherry Pie
[donotprint]
I’ve made some delicious pies with bright and bold flavors lately (see coconut cream and key lime), but there’s one main problem. Those pies only have one crust, on the bottom, and in both cases it was made of graham cracker crumbs. Now, I love a graham cracker crust as much as the next person, but I’ve been seriously craving some honest-to-goodness flaky, buttery pie crust. Top and bottom preferred. I’ve done a lot of baking with blueberries and strawberries, and have even dabbled with raspberries and blackberries, but aside from the cherry crisp that I made last summer, my cherry baking has been lacking. Given my urge to eat pie crust and my desire to delve into some cherry baking, I decided that it was high-time I made a cherry pie.
I love pretty much all fruit, including cherries, however on my quest to make my first-ever cherry pie I quickly found out what a cherry novice I am. I’m very familiar with the Bing cherry (nice, dark and sweet – a favorite for snacking), as well as the Rainier cherry, which is more yellowish-orange in color, but still sweet. I figured I would pop into the store, buy a bag or two of cherries, and be on my merry pie-making way. Not so fast. I hit up almost 10 (yes, 10!) cookbooks scoping out cherry pie recipes and every.single.one called for tart or sour cherries. Whaaaaat?! I’m obviously in a cherry bubble. So, I went to multiple stores looking for fresh sour cherries. No dice. Then, I looked for frozen sour cherries. I couldn’t find those either. Finally, in one of the books they laid it on me that sour cherry season lasts only a couple of weeks, and so it’s likely that jarred or canned cherries would need to be used for a good cherry pie. I headed to the canned fruit aisle and found canned sour/tart cherries that were packed in water, which is what I used for this recipe.
Along with needing pie crust in my belly and wanting to bake with cherries, I thought I was about due to re-visit the beauty that is a lattice-top pie crust. I’ve only made one once before, waaaaaay back in the dark ages of 2008 when I made a blueberry pie, but I just adore the look. It feels like a throw back – retro, vintage, very 1950’s and Donna Reed – when you had the extra few minutes to do something fancy with the top of your pie. It really does only take a few extra minutes of time and isn’t difficult (I included a series of step-by-step photos below in the recipe), but gives a pie that extra kick of pizzazz. Who doesn’t love pizzazz?
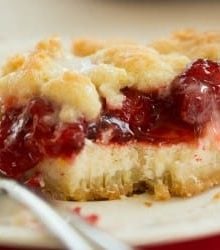
This pie is packed with cherries, which are sweetened just the right amount, kicked up a bit with a splash of almond extract and thickened with cornstarch. It’s a quintessential summer pie and would be perfect served with a big scoop of vanilla ice cream or a tower of whipped cream (or both!).
One year ago: Angel Food Cake
Two years ago: Monster Cookies
Three years ago: No-Bake Chocolate, Peanut Butter & Oatmeal Cookies[/donotprint]
Cherry Pie
Ingredients
For the Pie Dough:
- 3 cups (375 g) all-purpose flour
- 1 teaspoon salt
- 2 tablespoons granulated sugar
- 10 tablespoons cold unsalted butter, cut into ¼-inch pieces
- 7 tablespoons vegetable shortening
- 10 tablespoons ice water
For the Pie Filling:
- 1¼ cups (250 g) granulated sugar
- ¼ cup (32 g) cornstarch
- ¼ teaspoon (0.25 teaspoon) ground cinnamon
- Pinch salt
- 6 cups (828 g) sour cherries, pitted (See note below.)
- ¼ teaspoon (0.25 teaspoon) almond extract
For the Topping:
- 1 tablespoon water
- 1 tablespoon granulated sugar
Instructions
- 1. Make the Pie Dough: Process the flour, salt and sugar in a food processor until combined. Add the shortening and process until the mixture has the texture of coarse sand, about 10 seconds. Scatter the butter pieces over the flour mixture; cut the butter into the flour until the mixture is pale yellow and resembles coarse crumbs, with butter bits no larger than small peas, about ten 1-second pulses. Turn the mixture into a medium bowl.
- 2. Sprinkle 8 tablespoons of the ice water over the mixture. With a rubber spatula, use a folding motion to mix. Press down on the dough with the broad side of the spatula until the dough sticks together, adding up to 2 tablespoons more ice water if the dough will not come together. Divide the dough into 2 balls, one slightly larger than the other. (If possible, weigh the pieces; they should weigh 16 ounces and 14 ounces.) Flatten the larger piece into a rough 5-inch square and the smaller piece into a 4-inch disk; wrap separately in plastic and refrigerate at least 1 hour, or up to 2 days, before rolling.
- 3. Remove the dough from the refrigerator (if refrigerated longer than 1 hour, let stand at room temperature until malleable). Roll the larger piece of dough to a 15x11-inch rectangle, about 1/8-inch thick; transfer the dough rectangle to a baking sheet lined with parchment paper. With a pizza wheel, fluted pastry wheel or paring knife, trim the long sides of the rectangle to make them straight, then cut the rectangle lengthwise into 8 equal strips.
- 4. Next, roll the smaller piece of dough on a lightly floured work surface to a 12-inch circle. Transfer the dough to a 9-inch pie plate. Working around the circumference of the pan, ease the dough into the pan corners by gently lifting the edge of the dough with one hand while pressing into the pan bottom with the other hand. Leave the dough that overhangs the lip of the pie plate in place. Place the baking sheet with the strips of dough in the freezer and the dough-lined pie plate in the refrigerator; chill for 30 minutes.
- 5. Make the Pie Filling: Meanwhile, adjust an oven rack to the lowest position, place a rimmed baking sheet on it and preheat the oven to 500 degrees.
- 6. In a small bowl, whisk together the sugar, cornstarch, cinnamon and salt; set aside. Place the cherries in a large bowl and stir in the almond extract. Sprinkle the sugar mixture over the cherries and using a rubber spatula, gently mix together until combined.
7. Turn the cherry mixture into the dough-lined pie plate, remove the strips of dough from the freezer (if they are too stiff to be workable, let stand at room temperature until softened slightly but still very cold) and top with a lattice design as described below:
- 8. Lay 4 strips of dough, evenly spaced, across the pie horizontally. Fold the first and third strips back, then place a strip of dough slightly to the right of the center, perpendicular to the others. Unfold the first and third strips over the perpendicular strip and fold the second and fourth strips back. Add a second perpendicular strip. Now unfold the second and fourth strips. Repeat this process with 2 more perpendicular strips (you will have 4 strips of dough running in each directions).
- 9. Trim the lattice strips and crimp the pie edges. Lightly brush the lattice top with the water and sprinkle with sugar.
- 10. Lower the oven temperature to 425 degrees. Place the pie on the baking sheet and bake until the crust is set and begins to brown, 25 to 30 minutes. Rotate the pie and reduce the oven temperature to 375 degrees; continue baking until the crust is deep golden brown and the juices bubble, 25 to 30 minutes longer. Cool the pie on a wire rack for at least 2 hours before serving.
Notes
Did you make this recipe?
Leave a review below, then snap a picture and tag @thebrowneyedbaker on Instagram so I can see it!


Hi – I came to you looking for a cherry pie recipe, and discovered I may be able to help you with cherry sourcing. I just ordered ten pounds of frozen Montmorency cherries this morning from Brecknock Orchards in Michigan (http:///www.brecknockorchard.com), They’ll be delivered tomorrow. A miracle I thought of ordering cherries at a time when they are actually available! Good luck!
Hi there , I was wondering if you can substitute normal cherries for sour in this recipe?
thanks!
Hi Natalie, Definitely!
I made this pie tonight using frozen cherries, and while it was delicious, it was cherry soup inside the pie! Should I try it again letting the cherries defrost and drain first? I was expecting it to sort of “gel” up around the cherries, but it didn’t even after sitting for four hours.
Hi Sarah, Ahhh yes you would want to thaw and drain; the cherries released all that liquid into the pie when it baked.
Thanks for the reply! The flavour was just so wonderful I didn’t want to try someone else’s recipe. Your cake and cupcake recipes have never failed me. I’ll try this one again with the mod. Thank you!
Yeah I was looking at your recipe for sour cherry pie and you do not give any directions on how to make the pie filling all you want to do is give directions on how to make the pie crust. Your page says you can take and use can cherish packed in water but other than that you don’t give any directions on how much water to drain or anything else by that way anyway I find it irritating I’ll try in the future not to get on your website
The instructions for the pie filling start at #5.
is it ok if i used strawberry filling instead ????
Hey — I found a 5 lb bag of them frozen at Gordon Food Service. So you can make this year-round!
Does the bottom crust come out crispy without baking it before adding the filling?
Hi Adrien, Yep, it does!
Hi, I am just wondering if you can tell me which is your favourite pie crust recipe? You always seems to make small alterations to the pie crusts for different recipes. I notice that you used vegetable shortening in the crust for this cherry pie recipe and I wanted to know if that makes the crust taste better or makes it more flaky as opposed using only butter.
Hi Jazz, I like both for different reasons – I love the flavor of an all-butter crust, but the vegetable shortening does add some tenderness, which I like sometimes, too. If I had to pick one favorite, foolproof crust, it would be this one, which uses the vodka trick (and also includes both butter and shortening): https://www.browneyedbaker.com/2014/02/12/french-silk-pie-recipe/
This is why we planted six sour cherry trees in our front yard–not only yummy for pies but also lovely trees with thick white spring blossoms, attract all kinds of birds–(yet there are always enough cherries for everyone,birds and people alike)! Plus, easy to care for!
Hi, I am planning on making this pie this weekend. Just so I am clear… 72 ounces would be 5 cans of cherries, right? It just seems like a lot! Thanks!
Hi Michelle, It depends on the size of the jar or can! Just make sure they add up to 72 ounces :)
Amazing recipe! Was tasked with making a cherry pie for my boyfriend’s thanksgiving. Cherry is his dad’s favorite so I wanted to impress. Mind you I’m not a huge baker- I only really started in the past year and normally stick to cheesecakes, cookies, etc. To be honest I never baked pies because I never really liked them (never had a good one til now!) Anyways I was tasked with making my first pie from scratch. Thankfully I stumbled upon your site. The recipe was amazing! Since it’s fall, I used canned cherries. I accidentally grabbed 2 cans of sweet cherries to 3 cans sour so I reduced the sugar to taste. I also added a squeeze of fresh lemon juice and a little zest. Even though I was incredibly nervous and second guessing myself, the pie turned out amazing! It was the first dessert to go and My bf’s dad hid a piece for himself for later;). My bf’s grandmother who is an amazing southern cook & baker (and the standard by which all all other pies are judged) had a big slice and gave her stamp of approval. The crust and filling turned out perfect! (my lattice work wasn’t as pretty as yours but it wasn’t bad for my first pie crust either). Thank you for sharing this amazing recipe. I Bookmarked your site and am looking forward to expanding my baking repertoire! Thanks!
In your recipe you say to use “frozen” not thawed cherries. Can you elaborate here? I actually bought sour pie cherries from local farmers. I pitted and froze them with my food saver. I packaged between 6 -7 cups per bag as I prefer deep dish 10″ pies and like a nice “full” pie. So what do you mean by “not thawed”? Thank you in advance for your timely response and or advice.
denise
Hi Denise, I just mean do not thaw them. The cherries should still be frozen when you use them for the recipe.
Here’s an excellent sweet cherry pie recipe for you to try — a bit sweeter than a traditional tart recipe but not cloying. It was a huge hit with my cherry pie-loving family this past weekend.
http://www.annies-eats.com/2010/07/02/sweet-cherry-pie/
Good luck!
Can a differrent fruit filling be substituted for the cherries, to make say a raspberry pie?
Hi Kathryn, I usually stick to substituting the same types of fruit – i.e. berries (raspberries, blueberries, blackberries), stone fruits (peaches, cherries, plums, apricots), etc. You could try raspberries here, but I’m not sure how it would work out.
I have made this pie twice and it has been a huge hit. I used jarred sour cherries and just cut out the pie crust into shapes for the top (stars for Christmas and poka-dots for my sisters birthday) Suburb pie, the combination of cherries with the Almond is truly delicious!
10 tablespoons butter??????
Yes, it’s a double crust.
America’s Test Kitchen just came out with a new recipe for cherry pie using sweet cherries! See: http://www.americastestkitchen.com/recipes/detail.php?docid=25348
Oooh, thank you Annie!
My husband and I were just in Door County, WI for a few weeks–the pinky-finger sticking out into Lake Michigan, if you will. This is tart cherry country out here–they’re everywhere! Pies, salsa, barbeque sauces, mustards, wines, and, of course, pie fillings. The weather was rough on them this year, though. If you’re ever looking for a tart cherry haven, though, this is a GREAT place to be!
Cherry is my husband’s favorite type of pie and this is the exact brand of canned cherry I have been using for almost 20 years. It will be in the canned fruit section of your grocery, not in the baking/pie filling section. I just use the recipe on the back side of the label, which uses flour for thickener. I leave out any red food coloring (which some versions call for) but also use almond extract. Dead easy and always gets rave reviews from people who really like cherry pie.
That is perfection!
Stunning pie! Cherry is one of my favorites. I have actually made pie with bing cherries in the past… just cut back on the sugar, and it will work out beautifully!
didn’t realize there was such a thing as sour cherries… seeing as I’ve never heard of them, I will be on the prowl now to find them!
This looks fantastic! I just attempted my first pie a couple weeks ago, and the crust didn’t come out as one would hope. Been looking for different crust recipes to try, and this one looks so beautiful in your photos – will be trying this one soon!
Hello Michelle
Thanks for the cherry pie recipe.
I’ll create one for sure, my kids are gonna like it :)
If you don’t mind, can you submit your cherry pie photo in http://www.foodporn.net ?
It’s a food photography site full of all DIY food pictures from members around the world. submit by yourself and let me know when you did, so I can share it.
Looks wonderful!!!
I’m so jealous of your crust, it’s perfect! There will definitely be cherry pie involved on my 4th of July!
Very nice! I got a great deal on some fresh sweet cherries and made a pie recently. It definitely see the wisdom in using tar cherries; mine was more like blueberry pie.
It is definitely pie season, what great photos.
Thanks so much for this, I LOVE cherry pie and the step-by-step lattic guide is a great idea!!
Hey brown eyed baker…I love your recipes! I just shared your link on my blog after making three of your terrific cupcake recipes. Please visit my blog sometime for some great ideas and recipes as well! Happy graceful living!!!
Sour cherries are not something we find fresh here in Quebec (Canada) although I would LOVE to try this recipe! (I’ll try with canned cherries I guess) It looks amazingly good!
We just bought sour cherries at the farmers market last weekend. They are in season now :) The pie looks great! You did a beautiful job with the crust.
Sour cherries? Never heard of them! I love learning about new fruits :) Thanks!
Such a classic! I love cherry pie!
That looks amazingly good. I lived in Oregon for many years. I miss it.
Thank you for the note regarding sour cherries. I didn’t know…
This pie is absolute perfection! :)
I love cherry pie! And yours looks fabulous! I have yet to make a sour cherry pie because they are so difficult to find, though a few orchards around me have them for a couple of weeks. They are not at all tasty eaten as is and have many more flaws than Bing or Rainier, but they do bake up nicely in cakes and muffins. I have found that Bing and Rainier cherries also make excellent pies. Love that you use butter and shortening in your crust; together they make the best crust.
Will you come teach me to make pie? Pretty please:)
Yes! That would be fun! :)
Have made this pie twice , the flavor is the best- however the inside looks like cherry soup- my filling doesn’t thicken at all, all fresh ingredients
Delicious pie!! We LOVE cherries & yes, tart or sour cherries are really hard to find. So hard, in fact, that when we recently visited Michigan (tart-cherry capitol of the world!) we stocked up – our entire large cooler was full of bags of tart frozen Montmorency cherries (8 bags)!! Now I have the perfect use for them.
GORGEOUS pie Michelle! I think making a pie look that beautiful would take me hours beyond hours. Cherry pie is my favorite kind, too :)
That is one beautiful pie! Love it!
That is one darn good looking pie. I love the lattice crust! I don’t think mine would turn out quite that pretty – lol.. Have a good weekend!
Fresh Montmorency Cherries are the all time best for cherry pies, in my opinion.
I would love to plant one of these trees, but then we move! My dad has a couple of these trees, but unfortunately they did not produce fruit this year because a freeze we had right after they bloomed.
But if you can get some fresh Montmorency cherries, I guarantee you will fall in love with them! :)
Marla
As a child, I always asked for cherry pie for my birthday, instead of cake. (And even though my birthday is in September.) And for the life of me I can’t remember what kind of cherries my mother used; I just know it wasn’t canned filling. This pie screams “Happy Birthday” to me! (And reminds me of my mom, the best pie baker.)
We are lucky enough to have a sour cherry tree in our yard. The season was a little early this year here in Nebraska, so we picked our cherries a few weeks ago. I’ve never seen sour cherries fresh in the grocery store, so I’m glad I can just pull a bag out of the freezer whenever we need our fix. Cherry pie is a favorite at our house, along with sour cherry jam and pie bars.
Simple Sweet and All American!! Love it!
Hi there!
I, too, live in the Pittsburgh area and the only place I’ve ever been able to find fresh sour cherries is from a friendly vendor at the North Side Farmer’s Market. They are open on Friday’s only from 3:30 to 7:30 pm. I was thinking of heading over there today, actually, to scope them out! Good luck!
Oooh, thanks for the tip, I’ll have to check it out! Stay cool!
I’ve never made cherry pie before, but something about its American/retro nature really appeals to me! Seeing as it’s cherry season I think I might have to give it a go!
For such a classic, I’ve never even tried cherry pie! Your recipe looks fabulous. Yum!
I had no idea there were sour cherries either! My hubby would love this, he’s a big fan of cherry pie :)