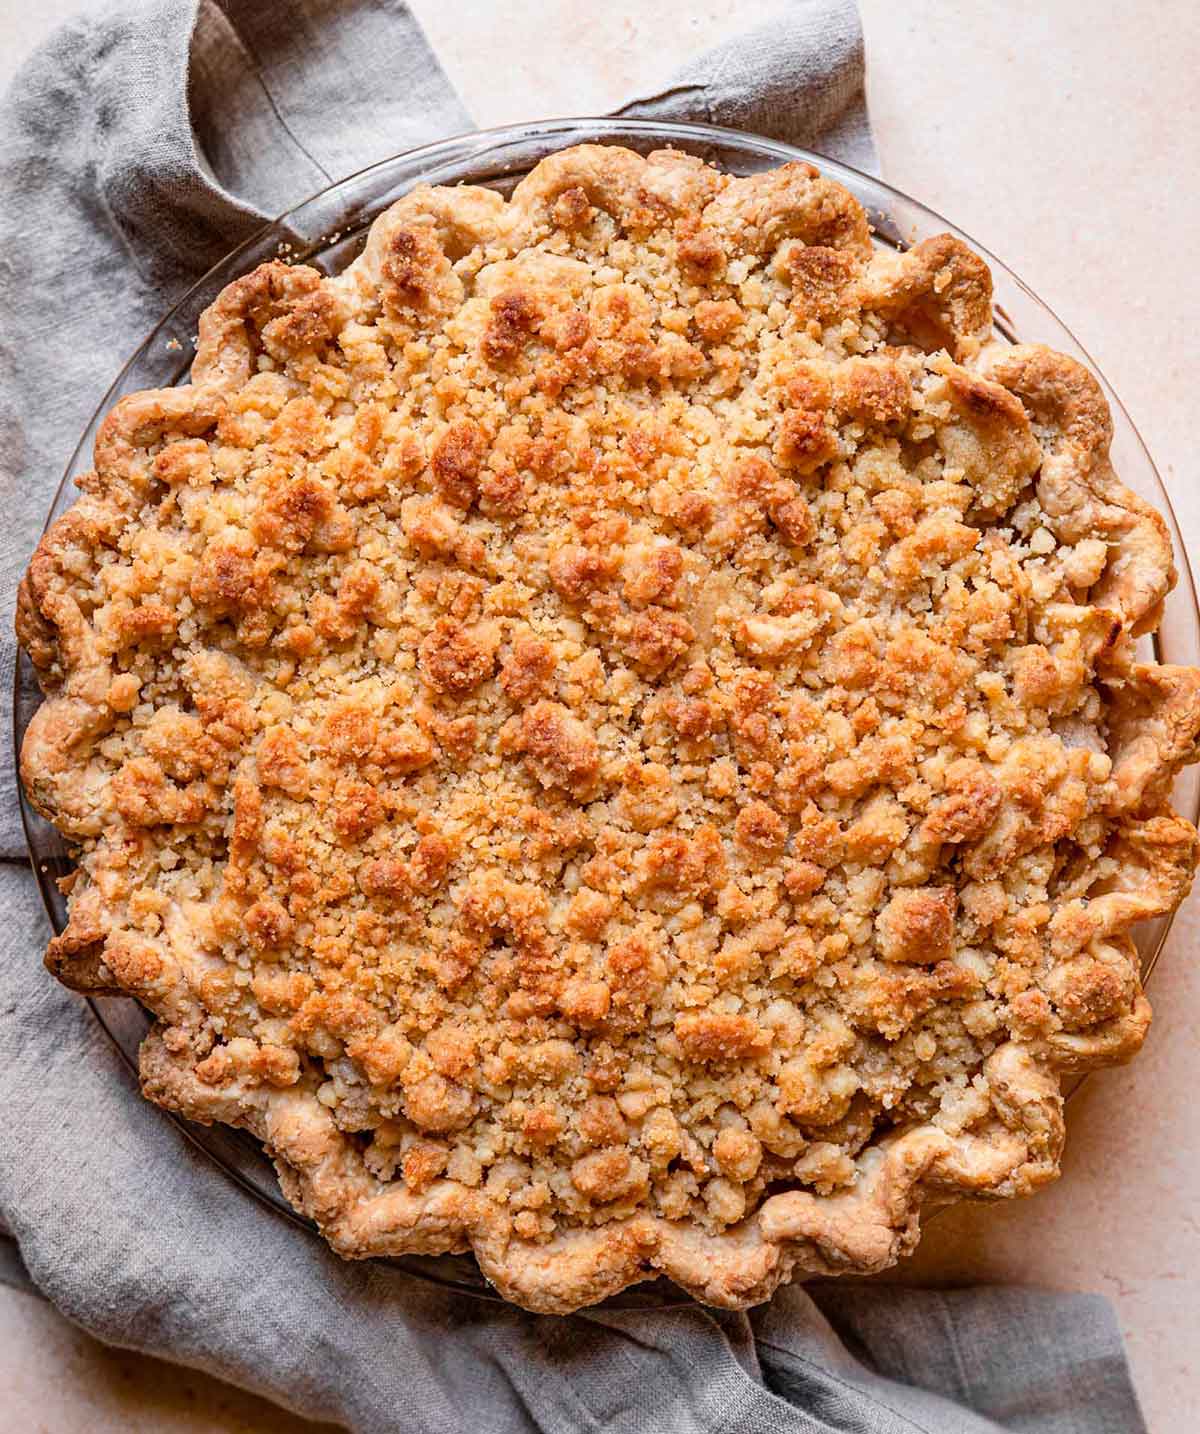
The Best Dutch Apple Pie Recipe
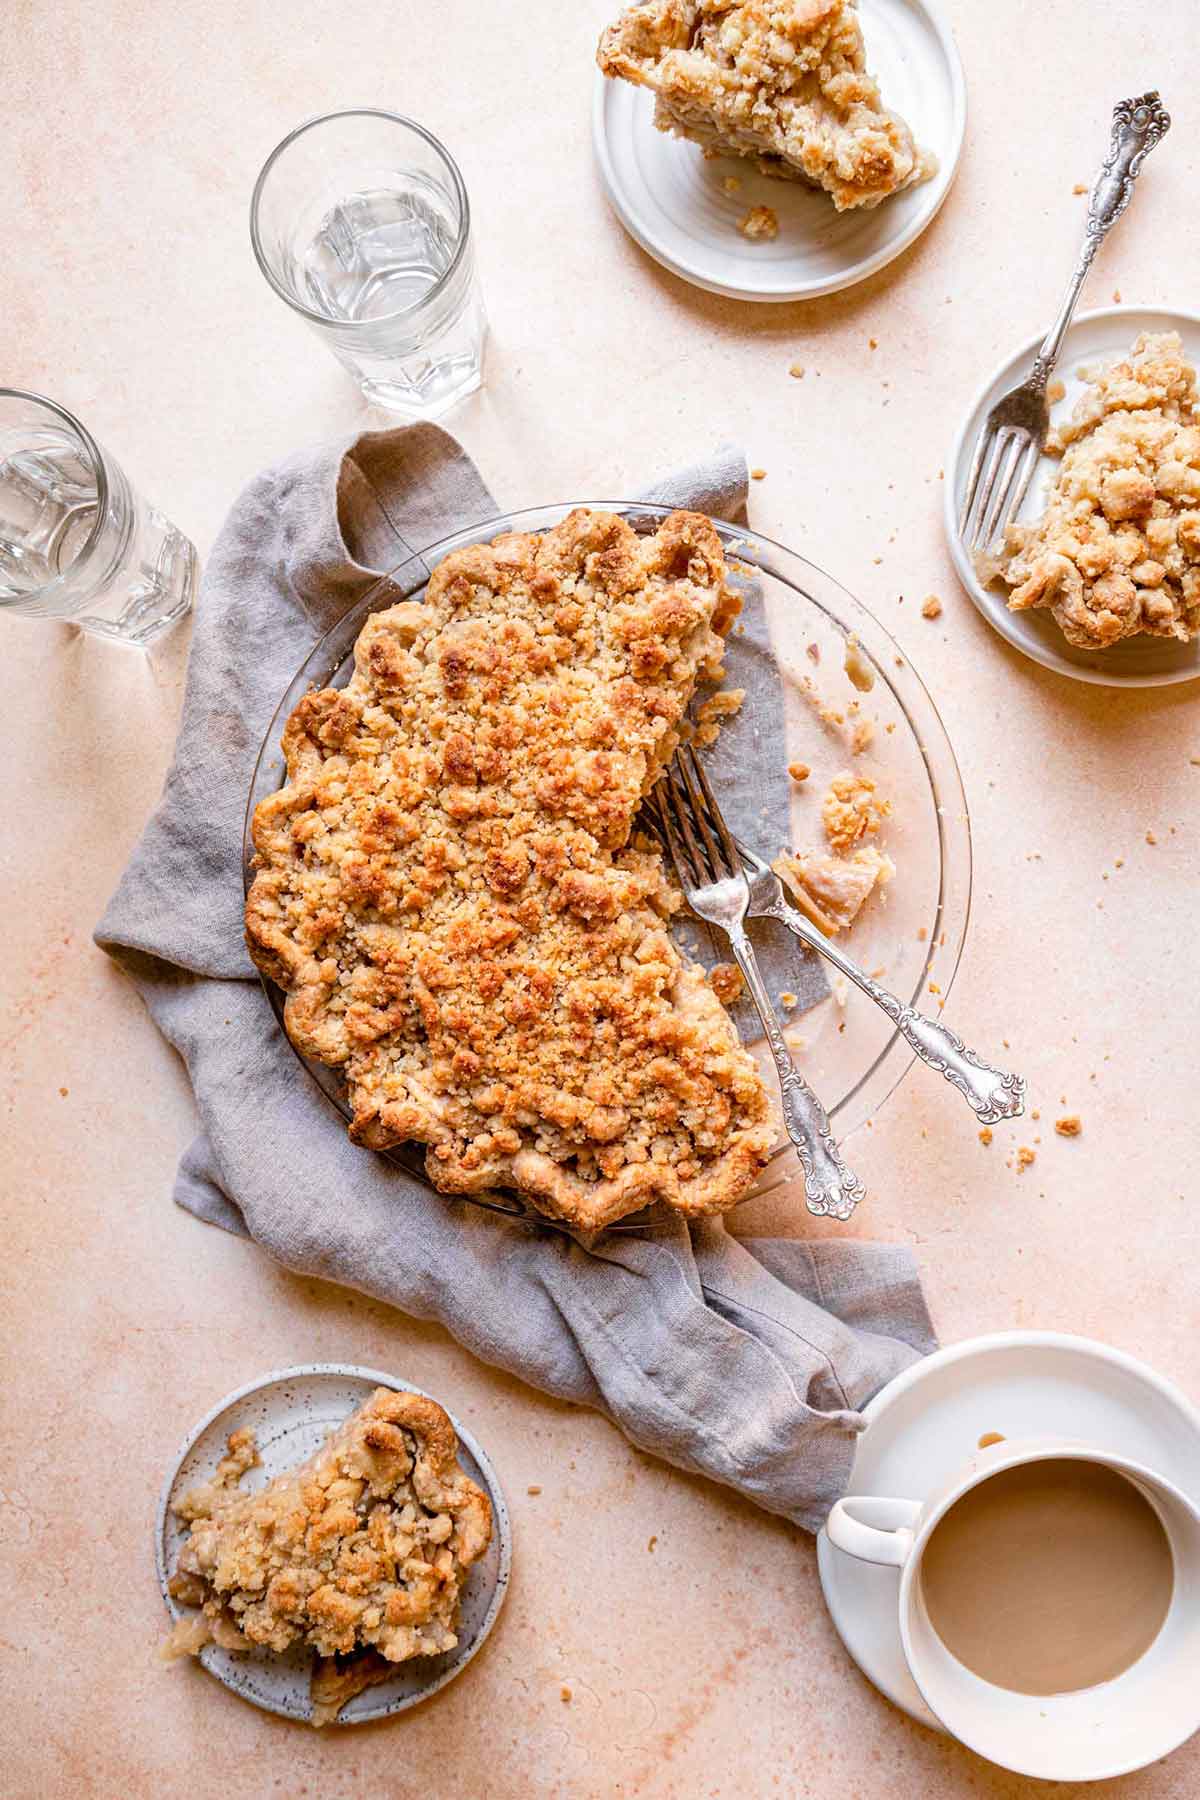
A Dutch apple pie with a perfectly cooked apple filling, flaky crust, and tons of crumble topping. Apple pie meets apple crisp for the best of both worlds. The quintessential fall dessert and the epitome of pie perfection!
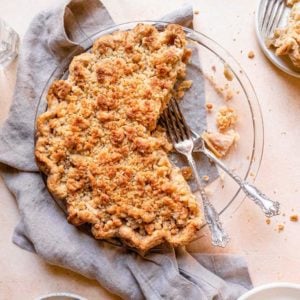
Apple picking has begun, and my pie-loving heart is so happy! It is no secret that I love sky-high pies with all kinds of buttery crusts, crumbles, and streusel toppings. This recipe’s topping is so incredible it now outranks one from a favorite local bakery.
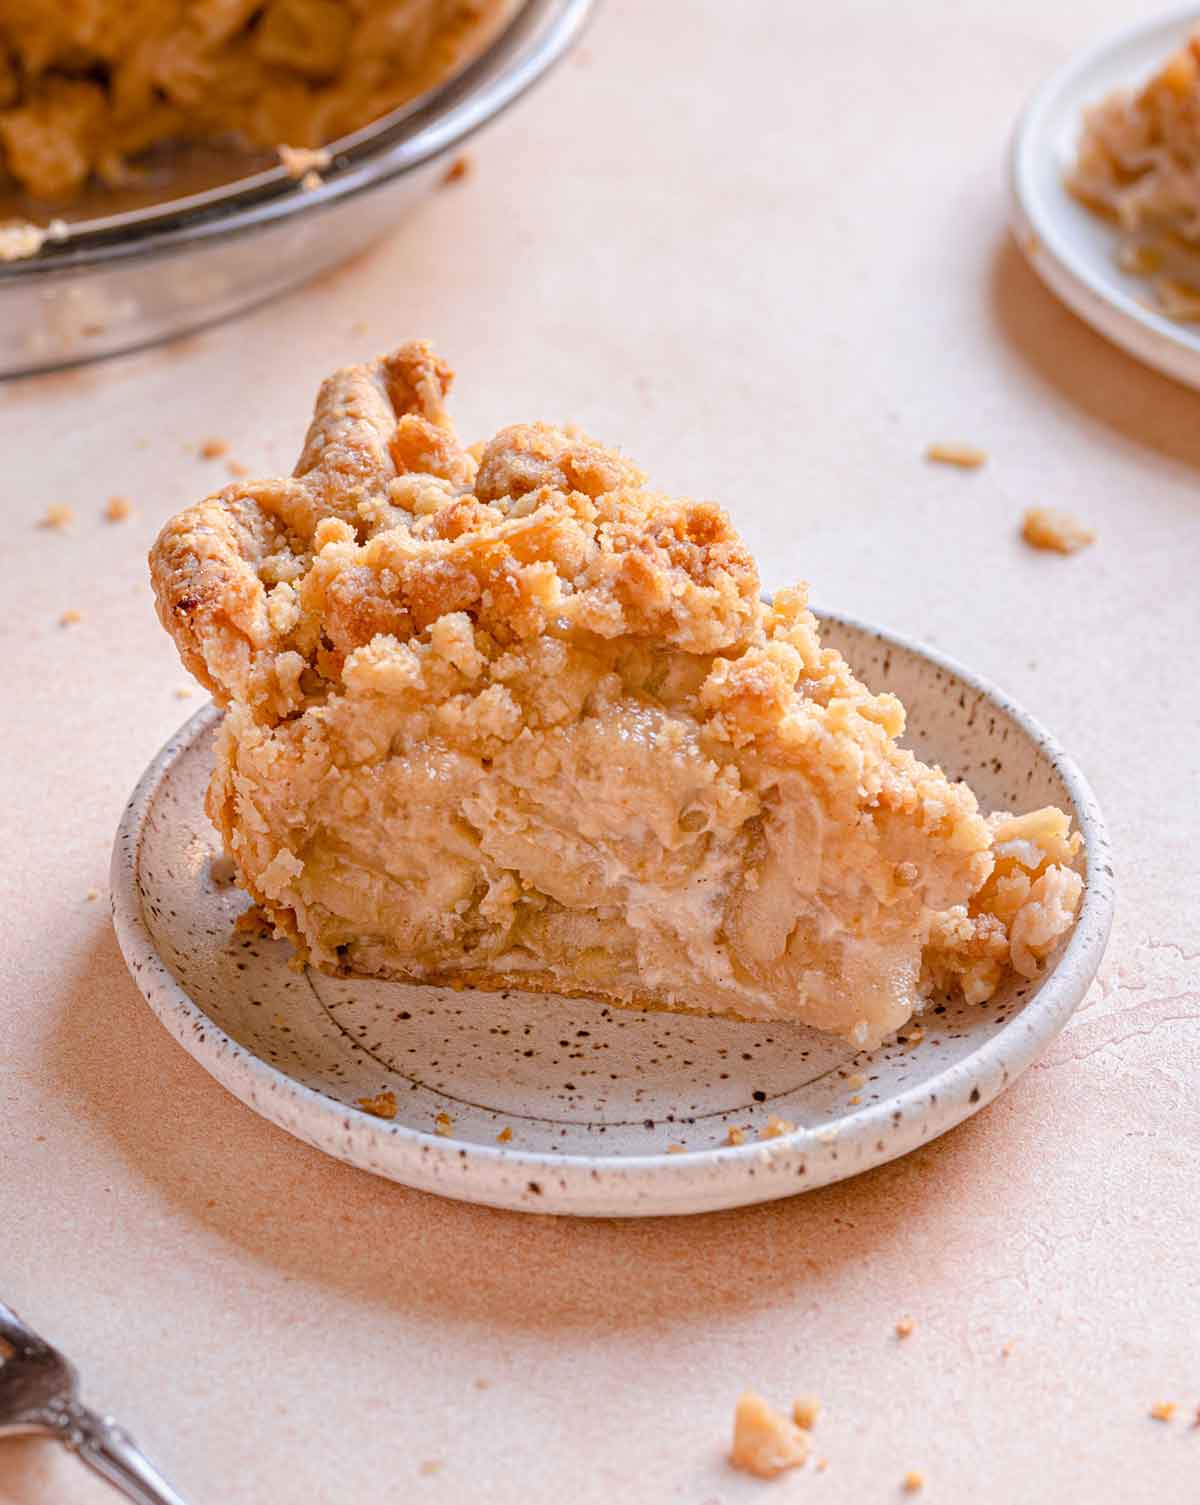
Of course this boasts a flaky, buttery base, soft and sweetened apples, a creamy filling, and those crumbs! Oh, those crumbs! It’s truly a pie lover’s dream and I am so excited to share it with you!
What Makes it “Dutch”?
The unique crumb topping of butter, sugar, and flour is what sets this dessert apart.
While traditional apple pie boasts a regular double crust (a crust on the bottom and a crust on top), a Dutch apple pie has a regular bottom crust, but a crumble topping.
Dutch apple pie has been recorded in recipe books as far back as the early 1500s, but eventually, it made its way to the northeastern U.S., where it is sometimes called Pennsylvania Dutch Apple Pie.
Why This is the BEST Dutch Apple Pie Recipe
- The best crust plus a foolproof method for blind baking gifts you a fantastic base on which to build the actual pie filling and topping.
- A combination of apples creates an amazing complexity in terms of both flavor and texture.
- Cooking the apple pie filling ensures that the apples won’t be too raw when the pie is finished, and also that all of the moisture is cooked out, eliminating a runny filling when the pie is sliced.
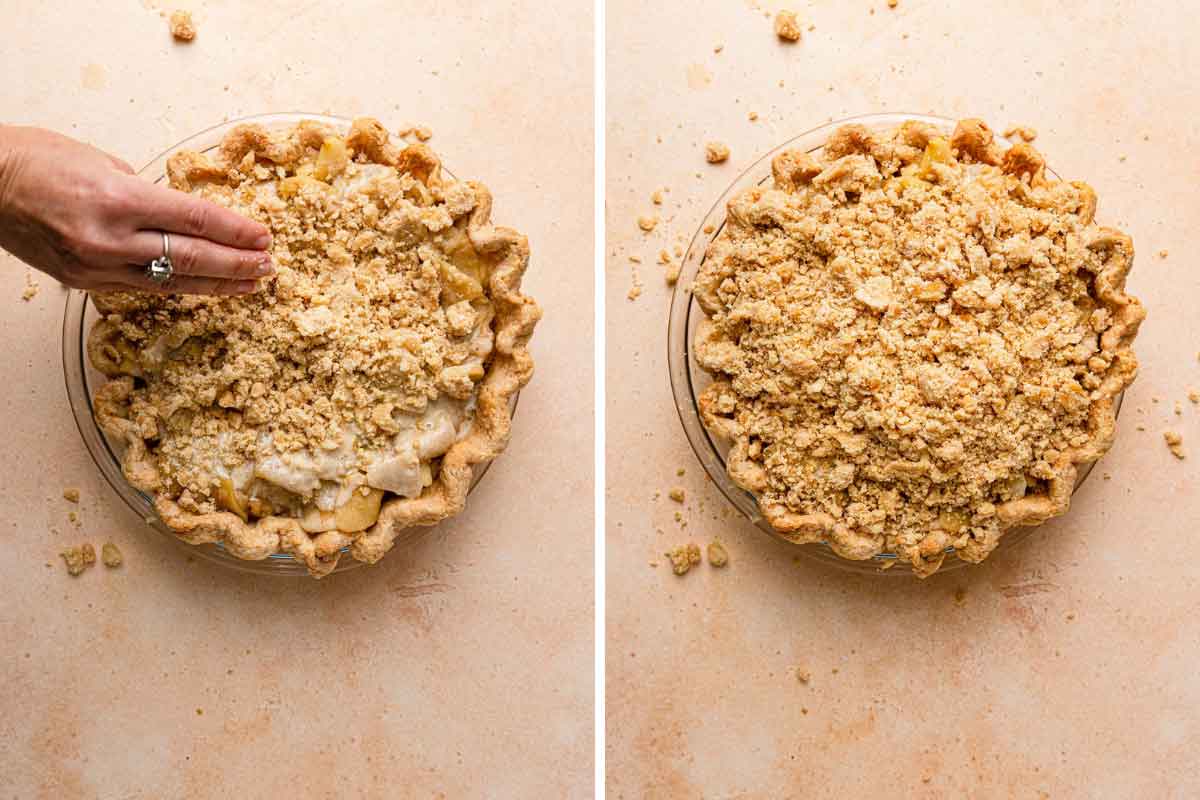
- The crumble topping is NOT skimpy! I love a hearty crumb topping and this pie is completely covered.
- Many components, plus the entire pie, can be made ahead!
The Pie Crust
For this pie, I use none other than my all-time favorite, hands-down best ever foolproof pie crust recipe. It uses an ingredient that surprises most people (vodka!), which creates less gluten development that using all water, and the alcohol vaporizes in the oven, which makes for a wonderfully flaky crust.
You’ll also see that I use my favorite method for blind baking the pie crust. This involves rolling out the crust and lining the pie plate immediately, then letting it chill for a couple of hours. Then, you’ll cover the pie dough with foil and fill it up the whole way with sugar, then do a partial bake in the oven, keeping it covered and weighted the entire time.
I was blown away the first time I tried this method and have used it exclusively since; it creates the most perfectly blind-baked crust!
The Apple Pie Filling
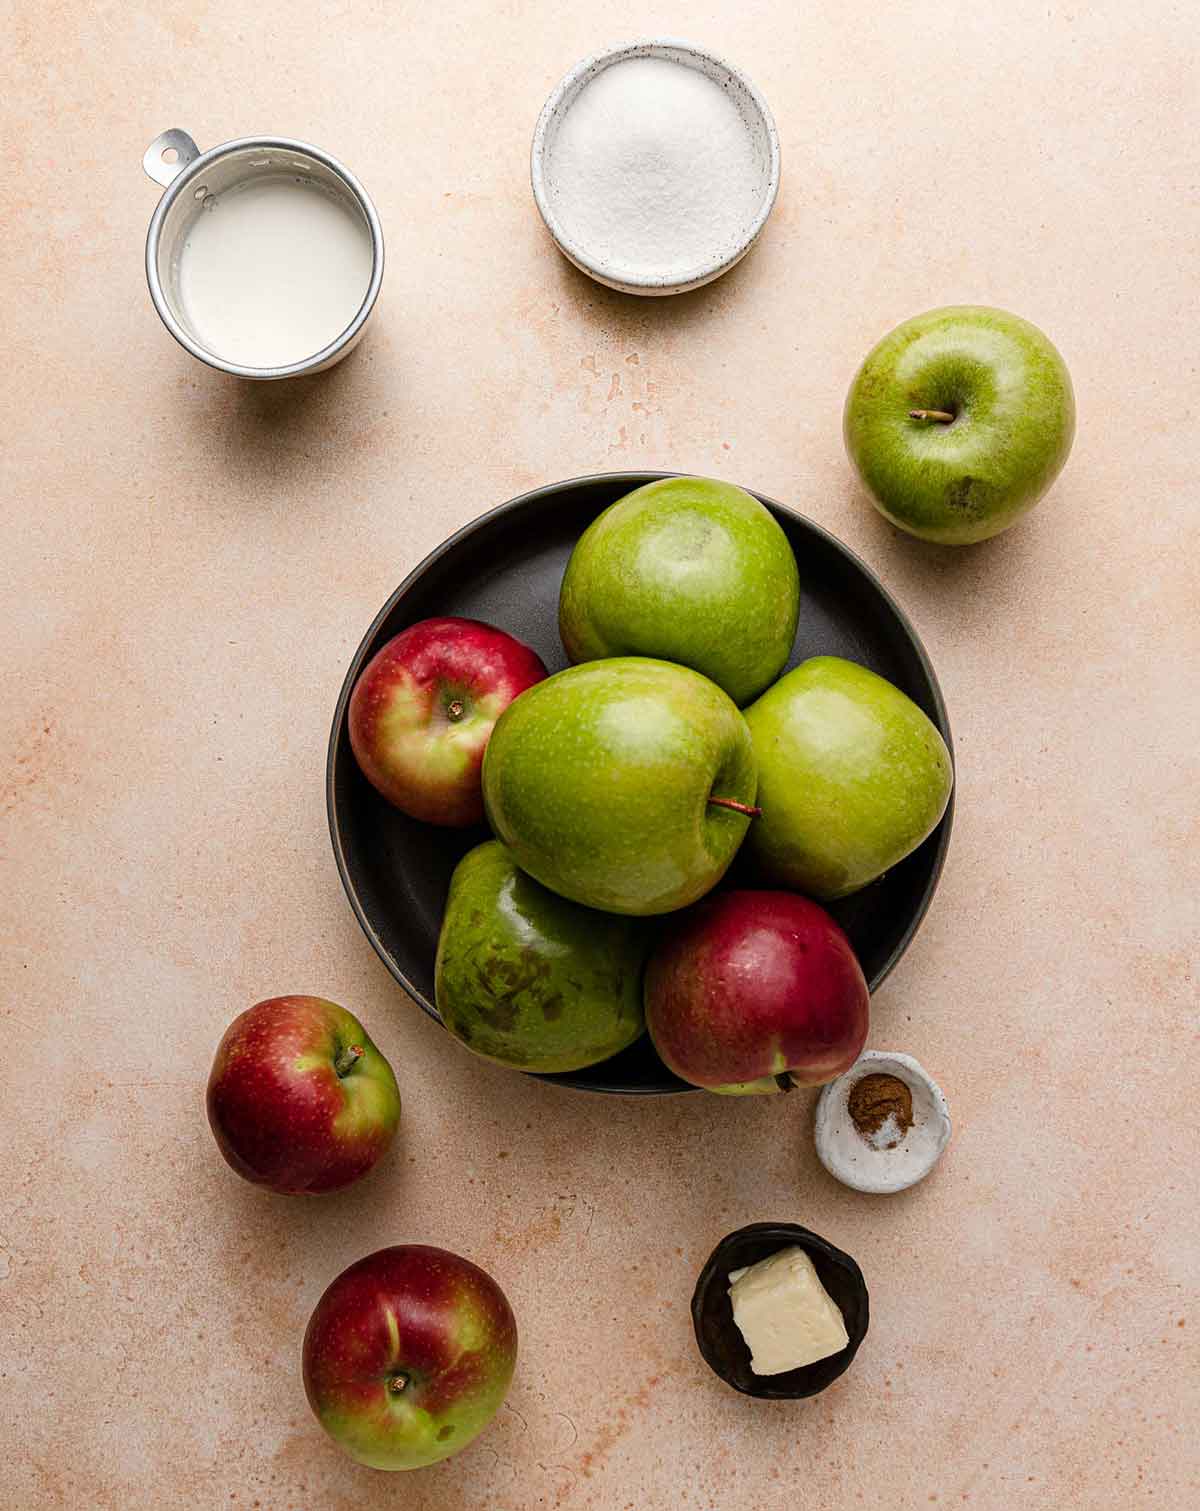
The Best Apples to Use
I prefer a mix of sweet and tart apples and recommend McIntosh and Granny Smith for this pie.
If you cannot find McIntosh apples, the following are good substitutes:
- Honeycrisp
- Cortland
- Empire
- Pink Lady
If you are working with mostly tart apples, you may want to add additional sugar.
This Dutch Apple pie recipe calls for you to peel, core, and quarter a total of nine apples – which may look like a lot! However, we are going to be cooking these down before baking, which helps us keep the bottom of the crust flaky and strong enough to hold the delicious filling and crumb!
To prepare the apples, you will peel them, quarter them, core them, and then slice them crosswise into ¼-inch slices (shorter slices make for cleaner slices of pie!)
I like to use this swivel peeler, but if you do a ton of apple baking, you may want to invest in a tabletop apple peeler.
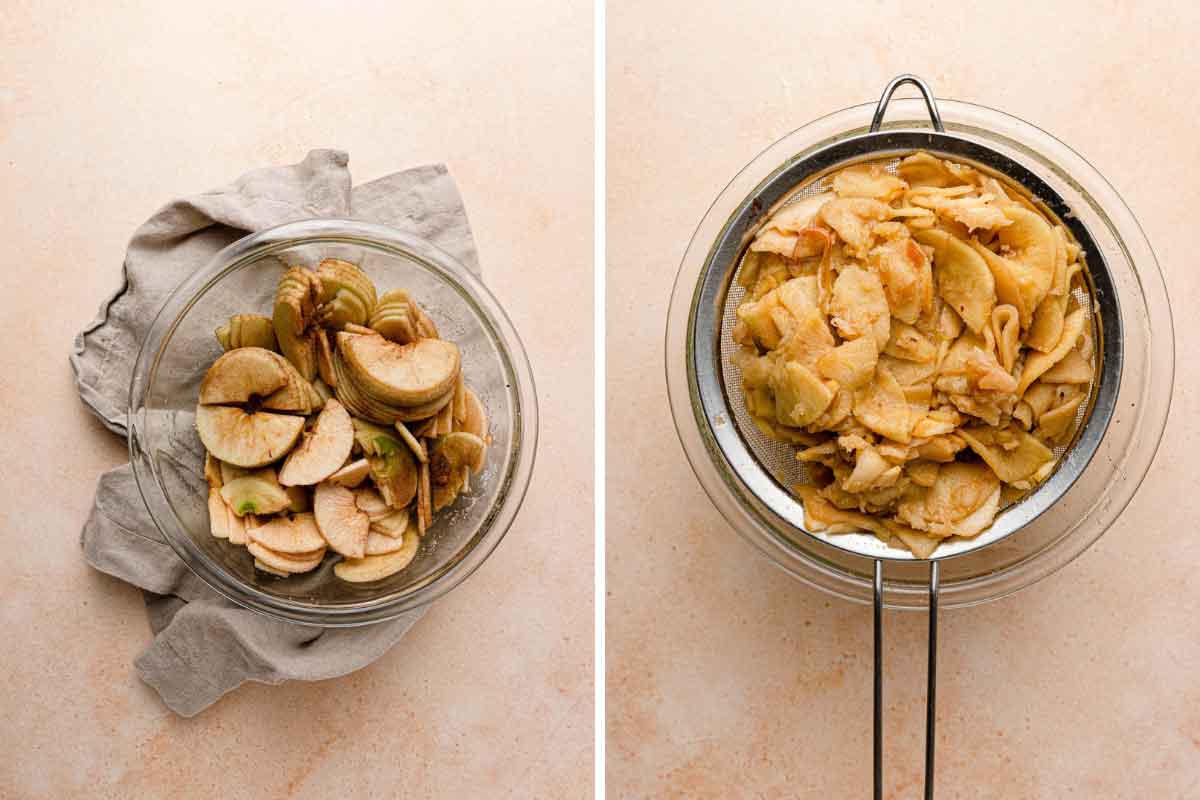
We Cook the Filling!
Unlike a regular apple pie, where you toss fresh apples with sugar and spices then pile into the crust, the apple filling for a Dutch apple pie is first cooked on the stovetop with butter, sugar, and seasonings.
This accomplishes two important things:
- Cooking the apples first ensures that the moisture is cooked out prior to baking, which ensures a less runny filling (the worst when you bake a pie!).
- Doing this means that the pie doesn’t need a long baking time, just long enough to brown the crumble topping and not have it burn or overcook.
The Crumble Topping
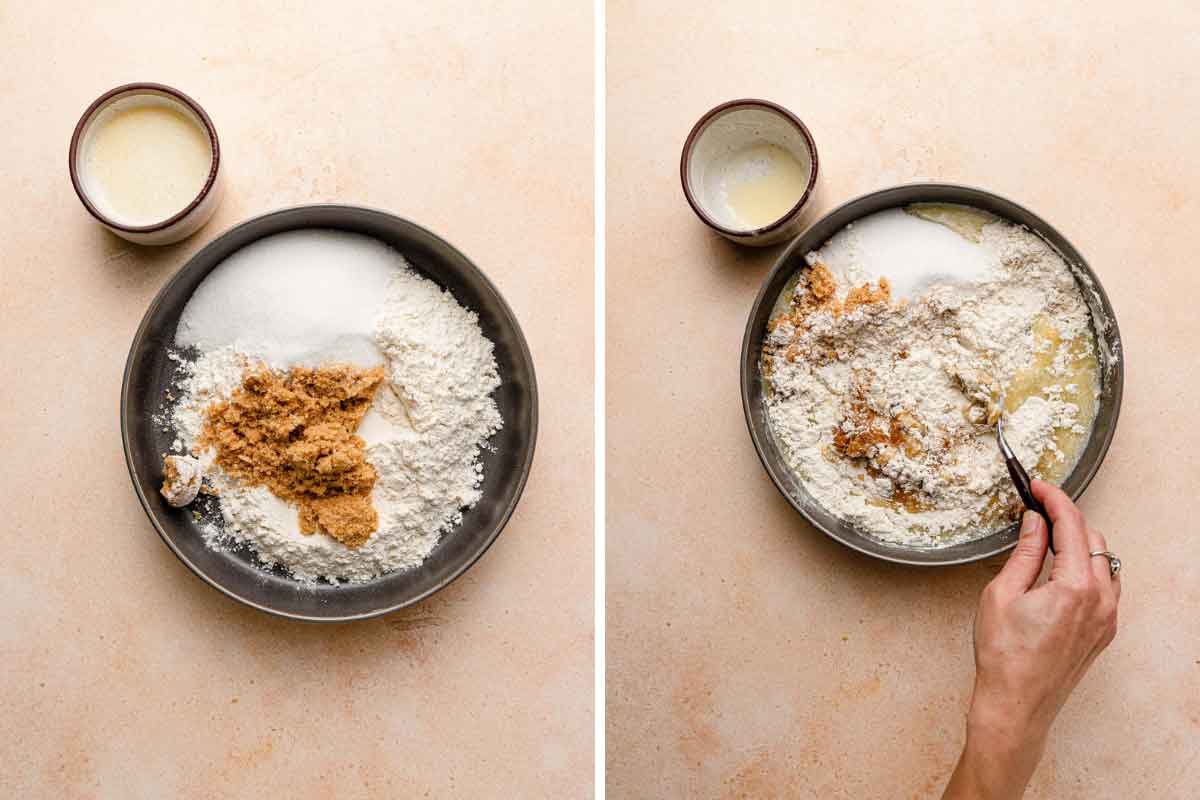
I LOVE this crumb topping! It does not skimp on coverage and is just absolutely delicious. You simply whisk together flour, brown sugar, and white sugar, then stir in melted butter. It makes the BEST crumbs!
If you like extra crunch in your crumb topping, you could add about ¾ cup of chopped walnuts or pecans.
What Pie Pan to Use
First and foremost, you want to be sure you have a quality pie plate. Glass is great for fruit pies, as you can see exactly what your crust is up to!
I use and recommend a classic glass 9-inch Pyrex pie dish.
How to Make the Pie, Step-by-Step
A quick overview of how you will make and assemble this delicious pie!
- Make the Crust: I have a lot of detail you can read about the crust on the page for the foolproof pie crust and very detailed instructions for blind baking the pie crust on that dedicated page, as well, though you will still find full instructions for both below.
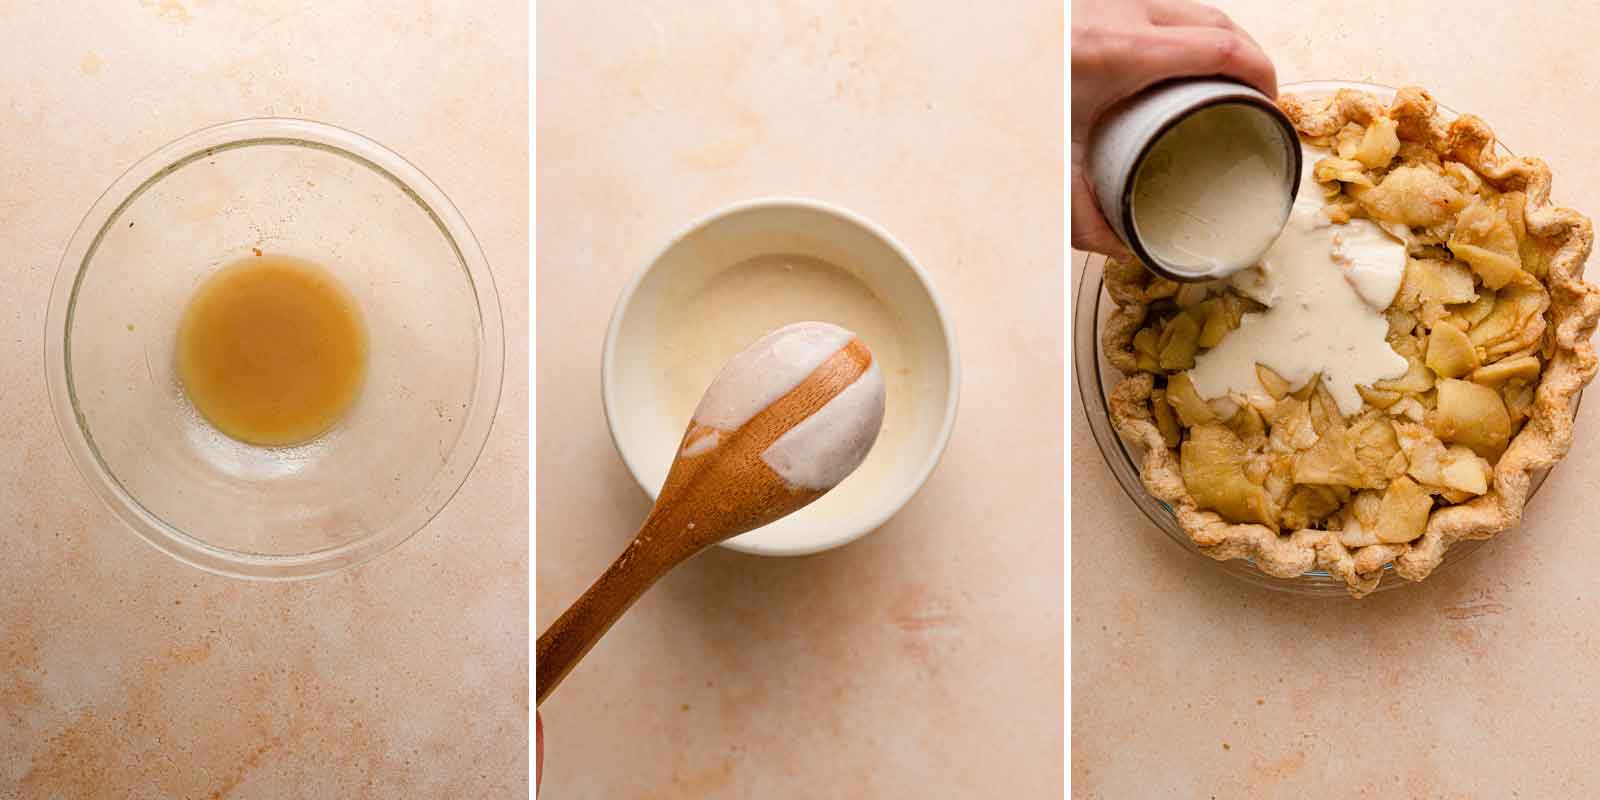
- Make the Filling: The sliced apples get tossed with sugar, cinnamon, and salt, and are sauteed in butter until the begin to soften. The cooked apples are transferred to a colander set over a bowl to drain. Once drained, the apples are added to the partially-baked pie crust.

- Cook the Juices: The reserved juice from the drained apples is combined with heavy cream in the pot and boiled until thickened. The mixture is then drizzled over the apples in the pie dish.

- Make the Crumble Topping: You mix together the flour and sugars, then stir in melted butter until everything is melted and holds together clumps. Sprinkle the crumb mixture evenly over the top of the pie.
- BAKE! The pie only needs about 10 to 20 minutes in the oven since the filling is already cooked. We’re just looking to brown the topping and get that filling nice and bubbly.
- Cool and Serve: The pie will set up best if you hold off slicing it until it has cooled to room temperature, usually at least 2 hours.
Dutch Apple Pie Prep Tips + Make-Ahead Notes
This is an amazing recipe, but quick it is not. Buckle up for some kitchen time when you decide to make this. There is quite a bit of inactive and baking time, but if you plan to make it start-to-finish all at once then plan on at least 4 hours of time for this apple pie.
I promise those four hours go by quickly when your kitchen smells this good! However, I know that time can be hard to find, so here are some tips for getting ahead:
- The crust here can be made ahead of time, wrapped tightly in plastic wrap, and refrigerated for up to 2 days. It can also be wrapped tightly and put inside of a freezer bag, and stored in the freezer for up to 3 months. Transfer to the refrigerator to thaw overnight before proceeding with the recipe.
- The crumble topping can be made up to 2 days in advance, covered, and refrigerated until ready to use.
- The pie can be baked, cooled, then stored at room temperature (tented loosely with foil) up to 1 day in advance. You can reheat briefly (10 minutes) at 375 degrees for a fresh-tasting pie.
Suggestions for Serving
If you ask me, pie is great every which way… warm, room temperature, chilled – any time!
This Dutch Apple pie is phenomenal fresh, right after it’s cooled, and you just HAVE to have it with a big scoop of vanilla ice cream. Or whip up a quick batch of homemade whipped cream to dollop on top, OR drizzle with salted caramel sauce!
Though it likely won’t last long enough, leftovers will keep well for up to 2 days at room temperature lightly covered with foil.
Looking for more apple pies? I’ve got you covered!
- Dutch Apple Pie Bars
- Apple Hand Pies
- Salted Caramel Apple Pie
- Caramel Apple Cheesecake Pie
- Classic Apple Pie
- Maple-Apple Crumble Pie
If you make this Dutch apple pie recipe and love it, remember to stop back and give it a 5-star rating – it helps others find the recipe! ❤️️
Dutch Apple Pie Recipe
Ingredients
Pie Crust
- 1¼ cups (162 g) all-purpose flour, divided
- 1 tablespoon granulated sugar
- ½ teaspoon salt
- 6 tablespoons (85 g) cold unsalted butter, cut into ¼-inch slices
- ¼ cup (46 g) vegetable shortening, chilled, cut into 2 pieces
- 2 tablespoons ice water
- 2 tablespoons vodka, chilled
Apple Filling
- 5 large Granny Smith apples, about 2½ pounds
- 4 large McIntosh apples, about 2 pounds
- ¼ cup (50 g) granulated sugar
- ½ teaspoon ground cinnamon
- Pinch of salt
- 2 tablespoons (28 g) unsalted butter
- ½ cup (120 ml) heavy cream
Streusel Topping
- 1¼ cups (162 g) all-purpose flour
- ⅓ cup (71 g) light brown sugar
- ⅓ cup (66 g) granulated sugar
- 7 tablespoons (99 g) unsalted butter, melted
Instructions
- Make the Pie Crust: Process ¾ cups of the flour, the sugar, and salt together in a food processor until combined, about 2 one-second pulses. Add the butter and shortening and process until a homogenous dough just starts to collect in uneven clumps, about 7 to 10 seconds (the dough will resemble cottage cheese curds with some very small pieces of butter remaining, but there should be no uncoated flour). Scrape down the sides and bottom of the bowl with a rubber spatula and redistribute the dough evenly around the bowl. Add the remaining ½ cup flour and pulse until the mixture is evenly distributed around the bowl and the mass of dough has been broken up, 4 to 6 quick pulses. Empty the mixture into a medium bowl.
- Sprinkle the vodka and water over the mixture. With a rubber spatula, use a folding motion to mix, pressing down on the dough until it is slightly tacky and sticks together. Turn the dough out onto a lightly floured work surface and bring it together with your hands, pressing it into a 6-inch round. Lightly flour the top and gently and quickly roll it out to a 13-inch circle, picking it up and doing a quarter turn after every couple of rolls to keep it from sticking.
- Transfer the dough to a 9-inch pie plate and gently press it into the bottom and up the sides. Trim the dough to 1 inch beyond the lip of the pie plate, then tuck it under itself so it is flush with the edge of the pie plate. Flute the edges or press with the tines of a fork, then refrigerate the dough-lined plate for at least 2 hours.
- Blind Bake the Pie Crust: Preheat oven to 350 degrees F. Line the chilled pie dough with aluminum foil and use granulated sugar to fill the whole pie plate. Bake for 40 minutes; remove the foil and sugar and place the crust on a wire rack while you make the filling.
- Increase the oven temperature to 425 degrees F.
- Make the Apple Filling: Peel, quarter, and core the apples; slice each quarter crosswise into pieces ¼ inch thick. Toss the apples, sugar, cinnamon, and salt in a large bowl to combine. Heat the butter in a large Dutch oven (or pot) over high heat until foaming subsides; add the apples and toss to coat. Reduce the hat to medium-high and cook, covered, stirring occasionally, until the Granny Smith apple slices are tender and the McIntosh apple slices are softened and beginning to break down, about 10 minutes.
- Set a large colander over a large bowl; transfer the cooked apples to the colander. Shake the colander and toss the apples to drain off as much juice as possible. Bring the drained juice and the cream to a boil in the now-empty Dutch oven over high heat; cook, stirring occasionally, until thickened and a wooden spoon leaves a trail in the mixture, about 5 minutes. Transfer the apples to the prebaked pie shell; pour the reduced juice mixture over and smooth with a rubber spatula.
- Make the Streusel Topping: Combine the flour and sugars in a medium bowl; drizzle with the melted butter and toss with a fork until evenly moistened and the mixture forms many large chunks with pea-sized pieces mixed throughout. Sprinkle the streusel evenly over the pie filling.
- Bake the Pie: Set the pie plate on a baking sheet and bake until the streusel topping is deep golden brown, 10 to 20 minutes. Cool on a wire rack to room temperature and serve.
Notes
- Crust: Use the included crust or my all-butter pie crust.
- Make Crust by Hand: If you do not have a food processor, use this method to make the pie dough: In a large bowl, whisk together the flour, sugar and salt. Scatter the shortening and butter over the dry ingredients and, using a pastry blender or your fingers, work the fat into the flour mixture until it looks like coarse sand. Then sprinkle the water over the mixture and use a fork to incorporate until it is evenly moistened and the dough will hold together when pinched between your fingers.
- Equipment: Pie plate / Food processor / Peeler / Colander
- Apples: A mix of sweet and tart apples is recommended, but any combination of apples will work!
- Serving Suggestions: Top the pie with Cinnamon Ice Cream, homemade whipped cream, or a drizzle of salted caramel sauce!
- Make-Ahead: The pie crust dough can be refrigerated for up to 4 days or frozen for up to 3 months. The par-baked pie crust can be cooled, wrapped in plastic, and refrigerated for 1 day or frozen for up to 3 months. The baked pie can be cooled completely, then refrigerated for 1 day prior to serving.
- Storage: You can store leftovers, covered, in the refrigerator for up to 3 days.
- Freezing Instructions: You can freeze the unbaked pie by wrapping it in plastic wrap, then in foil, and placing it in a freezer bag.
- Recipe adapted from Cook’s Illustrated.
Did you make this recipe?
Leave a review below, then snap a picture and tag @thebrowneyedbaker on Instagram so I can see it!
[Photography by Dee of One Sarcastic Baker]


😋
Bringing this to share with friends tonight. I made it for Pi (3.14) day and looking forward to tasting it. The crust looks great, I wish I had sliced the apples thinner because I am not sure they cooked. Great recipe and instructions as always from the Brown Eyed Baked
What does this mean, “Line the chilled pie dough with aluminum foil and use granulated sugar to fill the whole pie plate.” Are you using the sugar to weight down the aluminum foil?
Yes, you use the sugar to weigh down the foil and pie crust.
Very nice pie; I pre-baked my crust and it has held up great!
i’m in the UK and have just made (yesterday) and eaten (today) this fabulous Dutch Apple Pie after being inspired by a recent short holiday in Ansterdam. I didn’t find it too difficult and, other the delay whilst the pastry rested in the refrigerator, it wasn’t too time consuming. The only exception to that was the 45 minutes spent peeling, coring and slicing the apples. Maybe I’ll look into buying one of those apple peeling contraptions. The end result was perfect. It looked just like it was meant to and tasted just as good or even better than what I’d eaten in Ansterdam.
I used the all butter pastry recipe (which was delicious). I had just about enough for my deep ceramic 9″ pie dish.!Next time I’ll increase the quantity by about 20% so i have a bit to spare or maybe roll it just a touch thicker – which would help if serving it warm.
I had slightly more apple than I needed but I enjoyed eating the small excess of cooked apple. I used Granny Smith and Pink Lady apples. The amount of sweetness was just right but next time I will add a bit more cinnamon. I added a heaped half teaspoon but next time I’ll add a full teaspoon.
I added 100g of coarsely chopped pecan nuts to my streusel which was a great addition giving another texture. There was a perfect quantity of streusel.
Being in the uk I had to convert the oven teperatures to centigrade for a fan oven so I blind cooked the pastry at 160 deg. fan. When I took it out and removed the foil and sugar I thought the pastry looked a bit wet so I put it back in the oven uncovered for 5 minutes at 180. That seemed to do the trick. By the time I had cooked the apples the pastry had cooled a bit so I assembled it and then baked it for 20 minutes at 200 deg. fan. Once cooked I left if to cool then covered it with foil and stored it in the larder until the next day.
I wanted to serve it warm so put it back in the oven for 25 minutes at 170 deg. fan. which was just about right. I was a little disappointed that it didn’t hold together that well when cut and served but, nevertheless, everyone agreed it was delicious served with a scoop of clotted cream icecream. Subsequent to that I’ve been back for another slice and now it has cooled it cuts beautifully without falling apart. To be honest it tastes just as good cold so I may not bother to warm it in future or if I do I’ll try cutting into individual slices first. A slightly thicker pastry base would also help if serving warm.
All in all this recipe is a triumph and one that I will definitely make again – most likely very soon! Thank you.
The pie looked great. The crust was good. The taste I thought was just bland. I would use more cinnamon and a bit of nutmeg to the filling as well as some lemon zest and fresh lemon juice. The topping was just sweet needing more spices. I was surprised the filling was not ‘gooey’, which would have added to the flavor.
Very good! I’ve seen this pre- cooking the filling technique in America’s Test Kitchen. However, 4.5 lbs apples for one pie? I wanted to double but had to stop because it was just an incredible amount. I had 6 lbs, enough for 3pies! Is there something gone awry with th website?
Just made this, can’t wait for it to come out of the oven. It really was a lot of work but hoping it’s the best one I’ve ever made.
Love love love it. My husband said hands down the best thing I have ever made
Wow! This pie is wonderful. The apples are the perfect balance of tart and sweet. The crumb topping is not overly sweet. I will be making this for Thanksgiving. Thank you!
Am I able to pre make the filling/sauce and add it to the pre baked crust later?
Best apple pie I’ve ever made! Thank you for a fabulous recipe!
This pie was so good! I originally was just looking for a crumb topping for my usual apple pie recipe, but then decided to give this one a try. I never tried the blind bake before. I used a premade crust (shhhh) and it even turned out great! Cooking the apples and simmering the juice with cream makes a huge difference.
This pie was so good! I never tried the blind bake before. I used a premade crust (shhhh) and it even turned out great! Cooking the apples and simmering the juice with cream makes a huge difference.
I made this pie today and it is delicious! I had a couple extra pears laying around so I decided to toss them in. Best decision ever because it took this pie to a whole new level! :)
xoxo Angel
first time ever that I like the crust in a pie I baked! Please advise if it would be wise to use the crust recipe to make empanadas
This recipe holds a very special place in my life:
I started making this recipe when it was first posted ~15 years ago. My now-husband said his favorite kind of pie was Dutch Apple so I went on a search for a good recipe.
When we got married, we decided not to have a traditional wedding cake, but a selection of pies. Including a Dutch Apple I spent the day before making. That was the pie we cut into together.
I now make this every year for our Anniversary. It is also my go-to pie to bring to gatherings, as it is always a hit.
Thank you for creating a recipe that is so fool-proof and delicious!
I was surprised that you used MacIntosh apples; I don’t think of them as being good cooking apples with their tendency to turn to mush. But I suppose cooking them turns them to mush anyway and I expect it doesn’t really matter in this recipe. The recipe sounds wonderful and I look forward to trying it – but I expect I will substitute Cortlands for the Macs!
I will never even look at another apple pie recipe. This one is perfect! This is the second year I have used this recipe for thanksgiving – it may take a while to bake, but it sure disappears quickly!
Funny, I live in the Netherlands for 51 yrs. and have never seen apple pie baked like this, not blind baked or baked with so much cream. I have seen it quite often in Germany, streusel is a German word. They also have a delicious cream apple cake (Rahm-Appel kuchen) According to Food52, apple pie originated in England. It arose from culinary influences from France, the Netherlands, and the Ottoman Empire as early as 1390—centuries before the Pilgrims set foot on Plymouth Rock.
I know I shouldn’t review a recipe if I haven’t tried it. However, I baked a Dutch Apple Pie last night and after reading this recipe I know what I did wrong. Thank you for such a detailed description of every step in baking this pie. I will definitely use it next time.
Best Dutch apple pie I’ve made! Everyone in the family agrees that the crust, topping and filling were perfect. I’m asked to make this pie for all family gatherings.
I agree with you, this is nice article dutch apple pie.
I have been making this pie yearly for maybe 5 or 6 years! It’s my aunts favorite and requests it frequently!
I made this a few days ago. It’s all gone! This pie was perfection. The crumb topping was so good. I had some crumb left over, but I freeze them for other recipes (apple crumb muffins)! The crust was the best I have ever made. It was first time I combined shortening and butter and it was the most flaky, delicious crust. I mixed by hand instead of using food processor. Thank you so much for a wonderful recipe.
I love apples but am not normally a fan of apple pie. This recipe was different so I decided to give it a try and it is delicious! It is the only apple pie recipe I use now, and when the apples on our apple trees get ripe, I always make a few to freeze for later. Awesome recipe – thank you!
Really, I love these types of pie…..!!!
Your recipe is so great and easy to make. I want to add more eggs to the recipe, is that okay? What do you think about this? Give me useful advice. Thank you!
Is there anyway to make this pie more diabetic friendly? Can you a sugar substitute or alamic?
I’ve made this pie several times now, and it is absolutely the best pie I’ve ever had! People request it at all family gatherings,. It is absolutely scrumptious, and well worth the time involved to prepare it. Good job!
The combination of crispy dry food and wet food, this must Apple Pie delicious
The combination of crispy dry food and wet food, this must be delicious
The Best Apple Pie Ever!!!!
I’ve probably made a couple thousand apple pies and tartes over the course of my life: American, Tatin, Marlborrough, and Normande, plus various galettes, dumplings, strudels, and cobblers. I’d never made a Dutch apple pie, but took this recipe as a bit of a challenge – partly because of Michelle’s warning that it was a lot of work. But I’m retired now, and I love having friends over, so what’s four hours spent on a pie? The thing is, I spread it out so as hardly to notice the time. I made the streusel and the pastry, rolled out the pastry and stuck it in the freezer the day before, then baked the pie shell, made the filling, and topped it with the streusel the second day. I make a quick caramel sauce a few minutes before serving. I just have to say, this was the best apple dessert I’ve ever eaten – and no soggy bottom! My only modification was to use Chinese five-spice instead of cinnamon, and maybe a little nutmeg and ginger. While the recipe seemed a little daunting, the task itself was not, and the rewards were many. I honestly don’t think I’d change a thing next time I make it .
This pie is AMAZING!! We just finished Christmas dinner and I had made this delicious pie for dessert and EVERYONE was impressed…even me!
There were additional steps, that before I had even decided to make the pie I thought they made perfect sense of the end result is a delicious pie with a nice crust (not soggy at all) and yummy apples.
5-stars all the way!
I did make the pie crust and the apple filling the night before which gave me time to complete the rest of my Christmas menu
Oh my gosh! I made this for Thanksgiving this year! I had another Dutch Apple Pie recipe that I had used for years but thought I would give this one a try. It is the BEST Apple Pie we have ever had. I will never go back to my old recipe. Thank you Browneyedbaker for sharing this!
I’ve made this pie several times now, and it is absolutely the best pie I’ve ever had! People request it at all family gatherings,. It is absolutely scrumptious, and well worth the time involved to prepare it.
The only change I make to the recipe is that I use a vodka pie crust, which is the flakiest pie crust ever. Last Christmas I added a jar of of mincemeat to the apples, and omg was it delicious!
Thank you Brown Eyed Baker for this incredible recipe!!
Hello! Is it possible to leave out the heavy cream? I would like to make this vegan using earth balance butter but I don’t know if soy milk would be a good replacement for the cream or if I can just omit? Thanks!!
Made this pie tonight to take to share with family tomorrow. (Actually made it as a “trial run” for a possible Thanksgiving pie contender.). I was a little concerned about the cream/apple liquid part of this when I read the recipe thinking it might be custard like (not a fan of custardy desserts)… After making – I’m not so concerned. It’s not custardy at all and that “sauce” I’ll call it tasted delicious. So anxious to serve this tomorrow while we root for a Steelers win!!! I’ll update my comments with a rating and additional info after we are able to taste this beauty!
Quite simply, a very, very good apple pie.
Is there anyway to make this pie more diabetic friendly? Can you a sugar substitute?
This looks so yummy.
Thanks to you I finally bought my very first pie plates. I have no excuse now not to make any of your beautiful pie recipes. I bought the kind and size you recommended (thank you). Macys actually had a great sale. I was able to get 2 really pretty pyrex pie plates for a great price. So now I look forward to making recipes like this, your quiche recipes and more.
Hello .. I would like to say to all bakers and would-be bakers….try things and ENJOY! the baking. The difference is technique, not just “recipe” instructions. Develop your techniques, and enjoy your style and discoveries. Be fearless..this is not rocket science. Repetition and attention to details is where you develop intuitive technique. If
you are looking for perfection, likely that is only accomplished in a factory or at The French Laundry.
50 years in the Kitchen..wishing you all the same.
Great reminder and encouragement. 😊
This pie sounds sooo delicious. I am definitely going to try. I also wanted to make the Dutch Apple Pie Bars, but the link took me to a different recipe.
Your recipe is so great and easy to make. I want to add more eggs to the recipe, is that okay? What do you think about this? Give me useful advice. Thanks.
I am making the pie ahead for husbands birthday which is the day after we’re having friends over for Backyard Get Together. Wanted to save time. Is there any part that I could freeze? Maybe the cooked apples? Your help would be appreciated. Thanks!
Although I needed my mom’s help a few times, this is my proudest backing accomplishment. It ranks right up there with Magnolia Bakery’s banana pudding for my favorite recreated desserts!
Just made this for the umpteenth time and it is always a winner. I pull out this recipe for every Thanksgiving, Christmas, and birthday. Thank you, Michelle, for giving us just one more thing to be thankful for this holiday! You are my go-to source for baked goods because all your recipes are so well tested. Snickerdoodle and Chocolate chip cookies? Brown Eyed Baker. Cookie butter and Chocolate ice cream? Brown Eyed Baker. Apple and Pecan Pie. Has to be Brown Eyed Baker. Any time I’m looking for a new recipe, your blog is my first stop!!
Happy Thanksgiving and Happy Holidays to you and yours!
Thank you, Carly, for the incredibly kind comments, you have totally made my day! xo
I absolutely love this pie. I am German, so Dutch isn’t far off:) been told by life long american Apple pie lovers this is the best they have had. Thanks for sharing this great treat❣️
This was really amazing, and I’ll be making it for Thanksgiving. Have you every assembled it, then frozen it prior to baking? If so, what are the baking instructions for a frozen version?
I couldn’t find a baking temperature for the final step. 350? 400?
425… the end of step #4 :)
Can I make this the night before serving it the next day? Must it then be refrigerated until serving?
Hi Mary, You can definitely make this the night before. Storing at room temperature is fine.
I have read the recipe about 4 times. I do not see where you put in the heavy cream? I assume, it is after you coat the apples and are cooking them down until tender. Could you please edit the instructions to include this? Thanks!
It is in the instructions – step #5 – you add it with the accumulated juices.
Do you think this recipe would turn out as good if I were to use honey crisp apples? I have an abundance that I can’t seem to eat my way through lol
Hi Casey, I’m sure!! I love honeycrisps :)
Can this be made a day ahead? If so, store in the fridge and then warm it up when ready to serve? Thanks!
Hi Harmony, You can make this a day in advance, but no need to refrigerate or reheat, you can simply serve at room temperature.
I used to be a pastry chef, and I gotta say this was without a doubt the best apple pie I’ve ever made or eaten.
The only changes I made to the recipe were that I added more cinnamon, and I made a vodka pie crust. Google the pie crust; the science behind it makes sense. I followed the recipe instructions to chill and bake the crust, and it was the quintessential flaky pie crust that every baker strives for.
This recipe is time consuming, but not difficult at all, and the end result is totally worth the extra time!
I just slid one of these beauties in the oven, and it smells heavenly! I can’t wait to try it!
Just finished two of these pies, so perhaps tomorrow after tasting I can share a review of the results! I used the pie crust recipe with vodka and found it a bit tricky to roll and place in the pan without much trial and error. The baked product seems quite flaky, but I really would be interested in some tips on how to avoid slippage as it bakes. It was chilled and placed in the freezer well beyond the recommended time, but that didn’t seem to help. I’m curious why you recommended leaving it on the counter overnight, given the use of heavy cream. Shouldn’t it be stored in the refrigerator?
Hi Kathryn, I use this pie weight and haven’t had any issues since I started using it: http://amzn.to/2AlFaTi. As for storing, the cream mixture gets cooked into the pie, so there is not an issue storing it at room temperature.
I made this pie for Thanksgiving last year and got raves! I’m definitely making it again this year!! Really delicious!!!
Do you add the filling into the pie crust while it’s still hot? Or do you let it cool to room temp?
Hi Lisa, You should prepare the filling after the pie crust comes out of the oven per the recipe, but it’s not necessary to let it cool completely to room temperature.
Thanks for recipe
Loved this recipe. Made as written. I will definitely make again, but I think I will add a tad more sugar to the filling and possibly the crust. I don’t love things that are too sweet, but I just felt like it was a little on the very tart side and needed something to cut it; however, it could have been the apples, so next time I make it, I will taste the filling once cooked and add additional sugar as needed to ensure the ratio is accurate. Thank you for sharing..
Total blonde moment. Pie turned out great! Thank you!
This looks amazing! My fiance doesn’t like apple pie (I know…. How is that possible) except, apparently, the apple pie his grandmother made.she made a cream Dutch apple pie. I am going to make this, hopefully you it’s as good as hers!! But I do have a question…. It is Tuesday and I would like this for Thanksgiving. Will it still be as yummy in two days? Thanks so much!
Hi Jessica, I would only recommend making it 1 day in advance for the best flavor!
Did you use a regular 9″ pie plate or a deep dish pie plate? I had a deep dish one I wanted to use for Thanksgiving, but wasnt sure if/how to adapt the recipe.
Hi Diane, I used a regular 9″ pie late. The recipe probably won’t need much altering; it just won’t be as high of a pie.
Can the crust be baked the day before?
Hi Katie, I think baking the crust the day before would be just fine. Enjoy the pie!
Thanks! It’s in the oven now. I’m so excited for this recipe! When you say quarter the apple and then slice crosswise, does that mean you will then get 8 pieces of apple from one whole apple? Or will their be more? Sorry I’m a little confused
Hi Katie, No, you will get way more than that. You’re slicing them crosswise into ¼-inch thick slices. So, you will have a ton of sliced apples!
My mom and i are enjoying looking at your recipes and she wants me to make this Dutch Apple for sure for Thanksgiving. Do you make this with the pie crust in the recipe or do you use the one with vodka? Thanks.
HI Kathy, I now make it with the vodka crust, but either one will work!
Went apple picking this weekend so I had to make this recipe and it turned out great!! The pie crust was flaky and the filling was the perfect consistency! I ended up not using pie weights and my crust turned out fine; I just baked it for 30 min uncovered. Will definitely make again, this recipe is definitely a winner!
Wow! This apple pie looks so good! Thanks for sharing! :D
I am a baker and specialize in pies….I must tell you your pie looks so delicious that I must try it!!
Looks delicious!! Can this be made a day ahead? Would you store it in the fridge or on the counter. What about freezing? Thanks!
Hi Sarah, Yes, this can be made a day in advance (I do this all the time). You can just leave it on the counter!
Have anyone even made this recipe? I only see comments about how great it looks. I followed the recipe to a tee and my pie crust still was all poofy despite the weights and after I made the sauce, I decided against it, seems it would make the whole thing too soupy. Ten minutes for the topping wasn’t enough! I had to double the time. I’m disappointed!! Lots of work for crappy results!
Hi Heather, There are tons of comments from readers who have made this recipe already. I’m sorry that this recipe didn’t work for you.
This looks amazing! Once you cook the apples and put them in the pie crust, add the topping, it only bakes for 20-30 minutes? I’m used to apple pies baking for longer, just want to make sure I do it correctly!
ps. your blog is my go-to for most recipes, so thank you!!
Hi Sarah, Yes, that’s all it takes since you cook the apples on the stove before it goes into the oven. Enjoy!
I agree that this is the best pie ever! I’m curious about how it was adapted from the Cooks Illustrated recipe as it looks like a carbon copy. Having said that, I appreciate the access to the recipe as I have lost my copy over the years and Cooks Illustrated charges an arm and a leg for online recipes these days! Thanks!
This pie looks fabulous, but I do have a question. Does it set up okay, despite not having any thickener in the filing? From the pictures it looks like it does, but I want to check before making it! Thanks.
Hi Charlotte, It does! It doesn’t run at all.
I make a French apple with thinly sliced Granny Smith and similar crumb topping which is my signature pie but yout Dutch Apple loos too good not to try. Thanks for sharing!
7 tablespoons of butter for the topping? I ended up with a glob. Is this correct?
Hi Sarah, Yes, that is correct. It should moisten the dry ingredients and come together in a stiff mixture that you should be able to break apart into a streusel.
This was the BEST Dutch apple pie I have ever had! When I first read the recipe it seemed a little time consuming,but it wasn’t. It is fantastic!
The next time you make this, could you possible update with pictures of steps numbers 2 and 3? I have a difficulty time visualizing in my head exactly how much over-hang to leave and how to arrange the foil and pie weights. The pie looks amazing!!
Thanks so much.
Hi Annie, I will do that, but I’m also working on a pie tutorial for Thanksgiving, so stay tuned!
I love apple pie. It’s my go to favorite~ this looks extra yummy! I love the crumb topping!
I sure love the look of that gorgeous crumb! Thank you for sharing
Looks great, I have a 10″ pie plate to use for this. Will the filling be enough? Do you know how much I should increase for this if not? I think I could increase by %25 easily enough.
Hi Heather, I think it would be fine, it really maxes out a 9″, especially with the filling.
Incredible Apple Pie! And the height of it is seriously amazing.. I so want a slice right now.
Wow – this looks amazing! (Please go check out my new blog!!)
Great pull from the archives, a perfect fall recipe!
This with that cinnamon ice cream sounds divine!
xoxoBella | http://xoxobella.com
Even though this recipe is 5 years old, I’m making it for the 4th time this weekend for a pot luck, and I figured you’d like to hear that it is my go-to show stopper apple pie recipe. It’s the best apple pie I’ve ever had, and there are never any leftovers.
I have bumped up the cinnamon and used brown sugar before, but it is also wonderful as written.
Thanks for the first and only apple pie recipe I’ve used!
I just made this pie. There are more steps than I’m used to for an Apple pie. I followed it exactly and I will never make any other! It was worth the extra time. The best I ever ate. I was too good to put ice cream on the first slice but I did put dulce de leche on my next one later! Thanks for all your wonderful apple recipes. I can’t go wrong when I make one of yours!
This pie has become a Thanksgiving family tradition. So delicious and perfect! What is the name of the Italian grocery outside of Pittsburgh with the 2nd best Dutch apple Pie?
Hi Cheryl, Labriola’s – they have a few different locations – Aspinwall, Wexford, Penn Hills and Monroeville.
Wanting to make mini pies, tiny tins. How do I need to alter the cooking times? Thanks
Hi Sarah, Unfortunately, I have no idea, I’ve never tried to make mini pies out of this recipe. You will of course need to reduce the baking time, but I couldn’t say by how much.
Mini Pies Tips- Instead of rolling the dough; press with fingers into small pie foil tins. Bake Pies with empty pie tin pressed into the top to hold its form for 10 minutes. I did notice that to fill all the mini pies ( recipe makes about 12-14) you need extra filling sauce and less apples. I took extra cooked apples and added an extra half cup of cream and used an immersion blender to puree it as I cooked it down. Once the extra tins are removed and apples, sauce and topping are on bake for 15 minutes, rotate and bake for 15 more minutes.
Hi Michelle,
Thank you so much for this recipe. I’m planning on making it next week. Quick question: can I use the recipe for your Perfect Pie Crust which contains only butter and no shortening? If so, will any of the time requirements change?
Happy holidays!
Hi Nicole, Yes, you can substitute any pie crust you would like. No changes are necessary for the rest of the pie. Enjoy!
Hello Michelle,
could you tell me when I have to add the heavy cream? I have read the directions and I don´t find any mention to the heavy cream.
Thank you very much
Hi Monica, It is in step #5.
Sorry. I´ve missed it.
hi
i love this recipe. we are hosting christmas and i would like to plan ahead and make the desserts a week ahead. have you tried freezing a week before? any suggestions?
thanks
Hi Marina, I have not tried freezing this. I think you could set the assembled pie on a baking sheet in the freezer until completely frozen (maybe 1-2 hours). Remove and wrap well in plastic wrap and foil, then when ready to bake, remove them. You may need to add some extra minutes to the bake time.
I made this for Thanksgiving and it was a hit! I will definetely make this again, delicious!
Hi. Just wanted to say that I made this pie yesterday for thanksgiving and everyone loved it. I made it exactly like you said. Your site will always be my go to recipe site. Thanks for all you do.
A perfect pie. Very easy with little time commitment… Definitely a recipe to keep – bookmark on iPad.
This is the best apple pie I have ever eaten! It was definitely time consuming and my crust shrank a bit (anyone know why that might have been?) – but totally worth it. I can’t recommend it enough. Another winning recipe Michelle!
Hello, I have another issue with your ingredients, all are in cups and tbsp, and in europe we are use to grams at least where I live. What is the ratio? because in google some says: 1 cup : 130 grams, other 128, 200, I get so confused. Thanks so much.
It depends on what you’re measuring, as volume measurements can vary depending on the ingredient. Please see the conversions page for additional resources: https://www.browneyedbaker.com/conversions/
Hello, if I dont have what you called vegetable shortening, what could I use?
You can substitute butter.
I made this tonight and it was FANTASTIC!! I used Pillsbury Ready-Made Pie Crust to cut down on time and I used 10 medium sized Honeycrisp apples (got a ton of them from a friend and needed to use them up). Very simple recipe (using a ready-made crust), and very delicious! Will definitely be keeping this one!
I made 3 of these at once. Toooooo much work but well worth it. Next time I would only make one at a time.
Fabulous!! Thanks for the recipe!!
Hi Michelle! I am planning on making this recipe for christmas…the problem is that we have to travel 5 hours away a few days before chrisy for the festivities! I know that I can premake the dough and store for up to 2 days, but is it possible to fully bake the base and transport that ready to fill? Also, how long will the pie last for once its fully preapred? Not that i anticipate any leftovers! Sorry if these questions have already been answered by yourself during previous comments…
Hi Pru, I don’t see why you couldn’t pre-bake the crust, but you might want to warm it up first before you fill it. Once the pie is assembled, it needs to be baked immediately, but leftovers should last a good 2 to 3 days.
Oh wow! Just made this for Thanksgiving. It was worth the extra time. Amazing recipe!
Making this and your pumpkin cheesecake recipe for tomorrow! Can’t wait! so far they both smell delicious! So excited to try them both :)
i’m making this pie for thanksgiving… can i premake it and refridgerate it until thursday then reheat?
Hi Aubrey, I’m not sure how far ahead you plan to make it, but you could definitely make it on Wednesday and then just leave it at room temperature until you serve it Thursday; no need to refrigerate and re-heat.
Awesome recipe! I made it last month but could find mcintosh apples. I don’t remember what I had substituted it for but worked. I am going apple picking this weekend and am planning on making it again. Thank you!
After the pumpkin granola bar disaster this recipe restored all my faith in you, and more :) It’s probably the most time-consuming apple pie recipe I ever used, but it was worth every minute. It was everything I ever wanted from an apple pie: a thin, crunchy crust (but a firm one that doesn’t fall apart during cutting!), a plethora of apples and the crumbs… oh boy, the crumbs. My family, who have already eaten quite a number of my pies couldn’t stop praising it. At first I was a bit afraid that a 23 cm tin wouldn’t hold 2 kilograms of apples, but cooking them in butter compressed them nicely. I increased the amount of cinnamon to a heaping teaspoon (come on – two kilograms of fruit! Them apples need their spices), and it still wasn’t nowhere near too much. I liked that the recipe calls for two different types of apples – it makes for a more interesting texture. All in all, it was an absolutely wonderful recipe, one that’ll definitely bear repeating.
Looking for a killer Dutch Apple Pie recipe for Labor Day. Bookmarking! :)
What does chilling and freezing the pie crust do? I just made this, but, as you said, it took forever. So, I was wondering what would happen if I skipped those steps next time.
Hi Laura, Chilling and freezing the crust allows the butter to become ice cold, which is what creates the flaky and tender texture when it’s baked. If the butter is warm or room temperature when it goes into the oven, there is no steam created and you could end up with a tough dough in the end.
Can i make this without the pie crust? Would the cream moxture set enough to be able to cut or scoop it out? Im just not a fan of pies but love everything else about this dish :)
Hi Lisa, Hmm, I suppose you could try it, but I don’t know how it would turn out! It sounds like you might want to look for a Dutch apple crumble or crisp recipe, if you you are opposed to using a bottom pie crust.
I don’t have a 9 inch deep dish pie plate and I think those are too much apples for the pie plate I have here. Do you think it’s okay if I half the recipe? for a 9 inch pie plate that isn’t deep dish?
Hi Kath, I would not cut it in half, I think you would be left with a pretty slight pie. I would make the whole recipe, but just pile on as much of the apple filling as you can fit. It should be a bit of a higher pie.
I thought so too kath! I just took the pie out the oven and it is a high pie! The good thing is you can always be creative and make it fit to your liking! Next time I’ll use hemp butter!
I made this pie for an in- law gathering and everyone couldn’t stop saying how good it was! Thanks for the recipe! …and some “points” with the in-laws for a fantastic dessert!
I’d love to know the name of that Italian bakery. Do they use fresh cram? ;)
Hi Mira, the name of the bakery is Labriola’s.
Made this for Thanksgiving this year, and it was a huge hit. Thank you so much for this fabulous recipe!
Thanksgiving is such a crazy time and I’d love to prepare some items ahead of time. One of the items I am making is apple pie and I was wondering if the apples would spoil if I made the pie 2 nights ahead of time. If I make my pie ahead of time, should I go ahead and bake the pie 2 days ahead and then just warm it up the day we are serving? Or, should I make the pie and then freeze it, and bake it the day we are serving. Or really should I just nix the idea of making the apple pie in advance and just make the pie the day of Thanksgiving? :) Thanks in advance for the advice!
I haven’t tried assembling this ahead of time, but I feel like the topping could get soggy. If you google freezing pies you might find some suggestions, but I’ve never done it so I couldn’t say for sure what the results would be.
Ehow recommends freezing without the topping then adding it before you bake it.
Bake the crust and fill with the apples, then freeze. When you’re ready to bake, let thaw for a couple hours, then top with the streusel, then bake. Depending on how cold the pie is, you might have to bake it a little longer. Or make the pie a couple of days ahead and refrigerate, then top and bake on Thanksgiving. It will keep fine in the fridge for a few days.
Made this on a chilly day. It came out amazing!!! It was my first go at a homemade pie crust but not to shabby if you ask me. Only going to get better. Looking at more of your recipes that have homemade pie crust – can’t wait to try the pumpkin pie. Also you are 100% correct – it may take extra prep time (the crust) but it’s all worth it!!!
Hey there!
I remember trying this pie when I was in The States during the Summer and I loved it. Thanks for the recipe!
I have a question about the vegetable shortening – I live in Europe and I think I’ve never seen vegetable shortening in my life here… what can I add instead of the shortening? xx
I used all butter and it turned out just fine.
Thank you! xx
Hi Meg, You can use all butter. The use of shortening creates a slightly tender crust, but I have done all-butter crusts and they are just as fabulous – very flaky.
This recipe is perfect. Typically in a good pie recipe there is one good thing: great filling and mediocre crust or vice versa, but in this recipe I only have good things to say. The crust was easy to work with and after baking was flaky and buttery, the filling was absolutely delicious (I made it with Antonavka apples-they’re the best apples for pies, I assure you) with the heavy cream addition working wonderfully with the other contents, and the struesel topping was the perfect texture, not too floury and tasted just the way a struesel should. Absolutely fantastic, thank you so much!
Haha I’m Dutch and these apple pie looks like nothing the Apple Pies in de the Netherlands, wondering why you call it a dutch apple pie??
Hi Inge, Dutch apple pie is the common term used to describe an apple pie with a crumb topping in place of a double crust.
Maybe you could do a ‘real’ dutch apple pie this fall? I could translate one for you as I’m from Holland too.
OHMIGOSH halfway through making this recipe. I just finished coring and slicing the apples and … do you have a deep dish pie plate or something?? This many apples could fill like three of my pie plates! I might have to make more crust and go to the 24-hour grocery store to get temporary pie plates ’cause I don’t want to waste these apples :o
(won’t complain about accidentally having too much pie, though)
lol put an “I am” between “OHMIGOSH” and “halfway” please :)
The pie is intended for a regular 9-inch pie plate and is definitely meant to be piled high!
I wanted to make this but am opposed to shortening. Could I make the whole thing with butter? Will it still taste as good? Thanks!
Yes, you can definitely use all butter!
Just want to know if I can substitute fresh apples for tinned pie apples ? Not sure what those apples are in your recipe as we don’t have them here.
Hi Claudine, Yes, definitely fresh! The apples in the recipe are fresh apples, you can just substitute whatever is in season and available where you live.
Hi Michelle! I’ve been visiting ‘The Brown Eyed Baker’ on a daily basis and cannot stop drooling over the gorgeous photos and scrumptious-sounding recipes! I’ve made the Quintuple Chocolate Brownies which gave Ina’s a run for the money. I baked this pie an hour ago and am patiently waiting for my kids to come home so we can dig in together. I’ve always been a wee intimidated by pie crusts but this one was a no-brainer. Thanks so much for the detailed instructions and tips, and for generously sharing all these wonderful recipes!!
Hi Siunna, Thank you very much for the kind comment! I’m so happy to hear you’ve been loving the recipes; I hope you enjoyed the pie!
I am making your pie and was wondering about step number 3…i dont have pie weights or anything …is there something i can use in place? this is my first pie! Thanks so much!
Hi Tasha, You can use dried beans or even rice in place of the pie weights.
Oh yes – this is a fantastic way to usher in fall. The streusel topping is so appealing.
I totally made this yesterday. I decided to make mini pies because im giving them away to be frozen and didnt want them to have to worry about eatting a whole pie quickly. I added imitation brandy and vanilla to my apples and it was SO good. I apparently didnt put enough of the sauce in the pie as mine didnt look that that but were apparently tasty anyways.
I bottled the left over sauce and its SO GOOD! I poured in on some cinnamon buns.
Miranda, so glad you liked the pie… I *LOVE* the idea of the brandy/vanilla addition to the sauce. Super yum!
That crumb looks gorgeous, Michelle. Lovely pie :)
I’ve always had a hard time with pie crusts. They always turn out too tough or they fall apart or both. In fact, the day before this recipe was posted, I had another disaster! Then I saw this recipe and I knew I had to try it again. It was a success! In fact, it was by far the best pie I’ve ever made. The only changes I would make in the future would be to add more spices to the apple mixture; more cinnamon, nutmeg, maybe clove. But that’s just because I love spices. Thanks for the amazing recipe!
Liz, so happy you finally had pie crust success! It’s such a great feeling! So glad you loved this recipe.
I made this last night for our Sunday family dinner. The crust was crispy – even this morning. We all agreed that it was the best apple pie/crisp ever. I didn’t use brown sugar in the topping, and I used Gravenstein Apples. Yum, yum, yum!
Hi Lavonne, Yay! So happy you loved this as much as I did!
Dutch apple pie is one of my favorite pies of all time. Your version looks so delicious. I hope mine will come out just as good as yours. Thanks for sharing this wonderful recipe!
Ooh… This apple pie looks amazing. I almost always make a double crust apple pie, but now I’m craving one with a streusel topping. Yours looks absolutely beautiful!
The more streusel topping the better!! Apple Pie is my all time favorite.
My husband loves this type of pie, so I am in process as we speak! Just put the crust in the refrigerator.
I do have a quick question though… is it going to be okay to stick the cold pie plate (mine is glass) into the heated oven? Doesn’t glass crack when you do that?
Hi Ginger, I have always done the cold pie dish (also use glass Pyrex) into the hot oven thing (it helps make it super flaky!), and have never had one crack on me. If you’re nervous about it though, then I would just leave it in the refrigerator for a full hour and skip the freezer. It will still be delicious :)
Okay, I’ll try it. Thanks!
Dutch apple pie is mine and hubby’s favorite kind of apple pie! I definitely want to give your recipe a try…I’ll keep it in mind when I go apple picking next week! :-)
It is because of things like this that fall is my absolute favorite season! This looks amazing!
I’ve always made Apple Crisp at my Son’s request, but I’ll have to make this one for him.
Wonderful!
I’d really like a slice of that with my coffee please. Please?
Now this is my kind of pie! I love the dutch crumb variety of apple pies.. there’s just something about that crumb topping that gets me every time! Yours looks to die for!
I’m so excited for apple season! This looks fantastic
Um, hi. Can I have two pieces? For dinner? I think this pie will go smashingly with my red wine…Yum! These pics are divine too!!!
That looks awesome! I love fall. All the apples and pumpkins and fall spices! It’s my favorite time of the year!
I was just searching for Dutch apple pie recipes last night – it’s like you read my mind! I’m actually not a crust fan, but love crumble toppings. My husband loves crust, so I was thinking of compromising :)
Hmmmm – awesome recipe Michelle. This looks like the perfect Fall apple pie. (and I love the pic with ice cream on top)
That is a beautiful apple pie. The crumb top looks so crunchy and good too!
For those bemoaning pastry crusts, America’s Test Kitchen developed a recipe for Never Fail Pie Crust that substitutes water and vodka in equal amounts and in a greater volume than normal. The vodka doesn’t activate the gluten protiens like water, so you can add more liquid without it resulting in a tough crust; the vodka evaporates when baking, so the crust is flaky. I’ve always felt my pastry crusts were the worst things I made. This recipe changed that.
Instead of vodka, I use apple jack —- just a little extra apple flavor and aroma!
Any tips on how to make pie crust without a food processor? I only have a mini one and really want to try one this week with a pie crust from scratch. :)
Hi Emily, To make crust without a food processor follow this method: In a large bowl, whisk together the flour, sugar and salt. Scatter the shortening and butter over the dry ingredients and, using a pastry blender or your fingers, work the fat into the flour mixture until it looks like coarse sand. Then sprinkle the water over and use a fork to incorporate until it is evenly moistened and the dough will hold together when pinched between your fingers.
I will add this to the recipe above!
Thanks Michelle! I am making another version of an apple pie tonight for my boss’ bday tomorrow. He found me his favorite crust recipe that has been adapted from his mom so hope it turns out ok. Somehow I smell a pie disaster on my hands…
Do you deliver? ;)
That pie is gorgeous. My husband asked for apple pie on Labor Day, so I made him an apple-almond tart that tasted great, but I’m pretty sure this is more like what he had in mind. :)
Sounds like a weekend project to me! I want that pie… NOW!
Mmmm! You’ve hit upon my all time favorite pie! I used to ask my mom to make this for my July Birthday when I was little and she always did. Gorgeous shots! Gorgeous pie! I don’t usually add cream to mine, but I’m really liking that idea…
delicious we make similar
Looks mouthwatering!!!
I want to make this pie!! But making pie crust gives me the willies! I’ve never had luck in the past. Any chance you can provide a pie crust post?
LOVE your site!
Hi Jen, Yes, absolutely! I will put that on the list for next week or the week after! Great idea!
I have an apple tree that I threaten to remove EVERY fall. The squirrels ruin most of the applies; one bite and then thrown to the ground. But I get enough for a couple of good dishes (OK, desserts) and this sounds right up my alley; I love an crumb topping on my apple pie!
That looks awesome! I just made something very similar, but in tart form!
http://eatrunread.blogspot.com/2010/09/cake-of-week-caramel-apple-tart-with.html
Great minds think alike, huh?
Mollie – That looks fabulous! Your crust looks perfect!
This looks dangerous… I think i owuld eat the whole thing on my own. WOW! I wish you lived near me!!!!
Oh, wow. This looks divine. Seems like it’s well worth the extra time in the kitchen. I may just have to give it a go during an upcoming October weekend!
I’ve never made apple pie like this before, but there’s no better time than fall to try! Awesome recipe and beautiful photos, Michelle. Thanks for sharing!
Dutch apple pie has always been my favorite! Can’t wait to try this.
i wish i had that waiting for me in my kitchen right now!
oh.
my.
gosh.
i need this now.
Absolutely beautiful pie. I always like a nice chunk of cheddar cheese with my pie and your post has got me craving for both :)
Dutch Apple Pie is one of our favorites! Wonderful Photo!!
I need a piece of this right now for breakfast! It looks divine! :)
That looks delicious! I’m so excited that it’s finally time for pies filled with cinnamon! YUM!
Oh baby this is so calling my name! Gorgeous!
This pie is getting me so ready for fall baked goods! They are my favorite. I can smell that baking through my computer! Yum.
This pie looks absolutely incredible! Love apple pie
I love my mom’s apple pie. This is exactly how she makes it, with the crust on the bottom and a streusel on top. Delicious!
xoxo
Lila Ferraro
I can’t tell you how much I love your recipes. Thank you so much.
btw — you probably meant for people to “Bring the drained juice and the cream to a boil”, and not “the cram”! When I first read it, I thought “Cram? Is that some new, exotic ingredient I’ve never heard of? Oh, happy day!” I had already thought of preparing an entire menu of dishes containing cram…then came bitter realization!
Have a great day.
Lol, that’s hilarious!
This pie looks amazing. It’s perfect for fall. YUM!
I ‘ve been through foodgawker and all of those sites, but that is by far the most appetizing apple pie I’ve seen.
This is going on the absolutely must try list. I love this blog…I visit every morning with my cup of coffee. Thanks so much for all your hardwork.
Must make these immediately! :)
looks so yum with the icecream,..
What beautiful pictures. Dutch apple pie is one of my favorites.