French Silk Pie
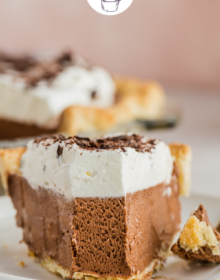
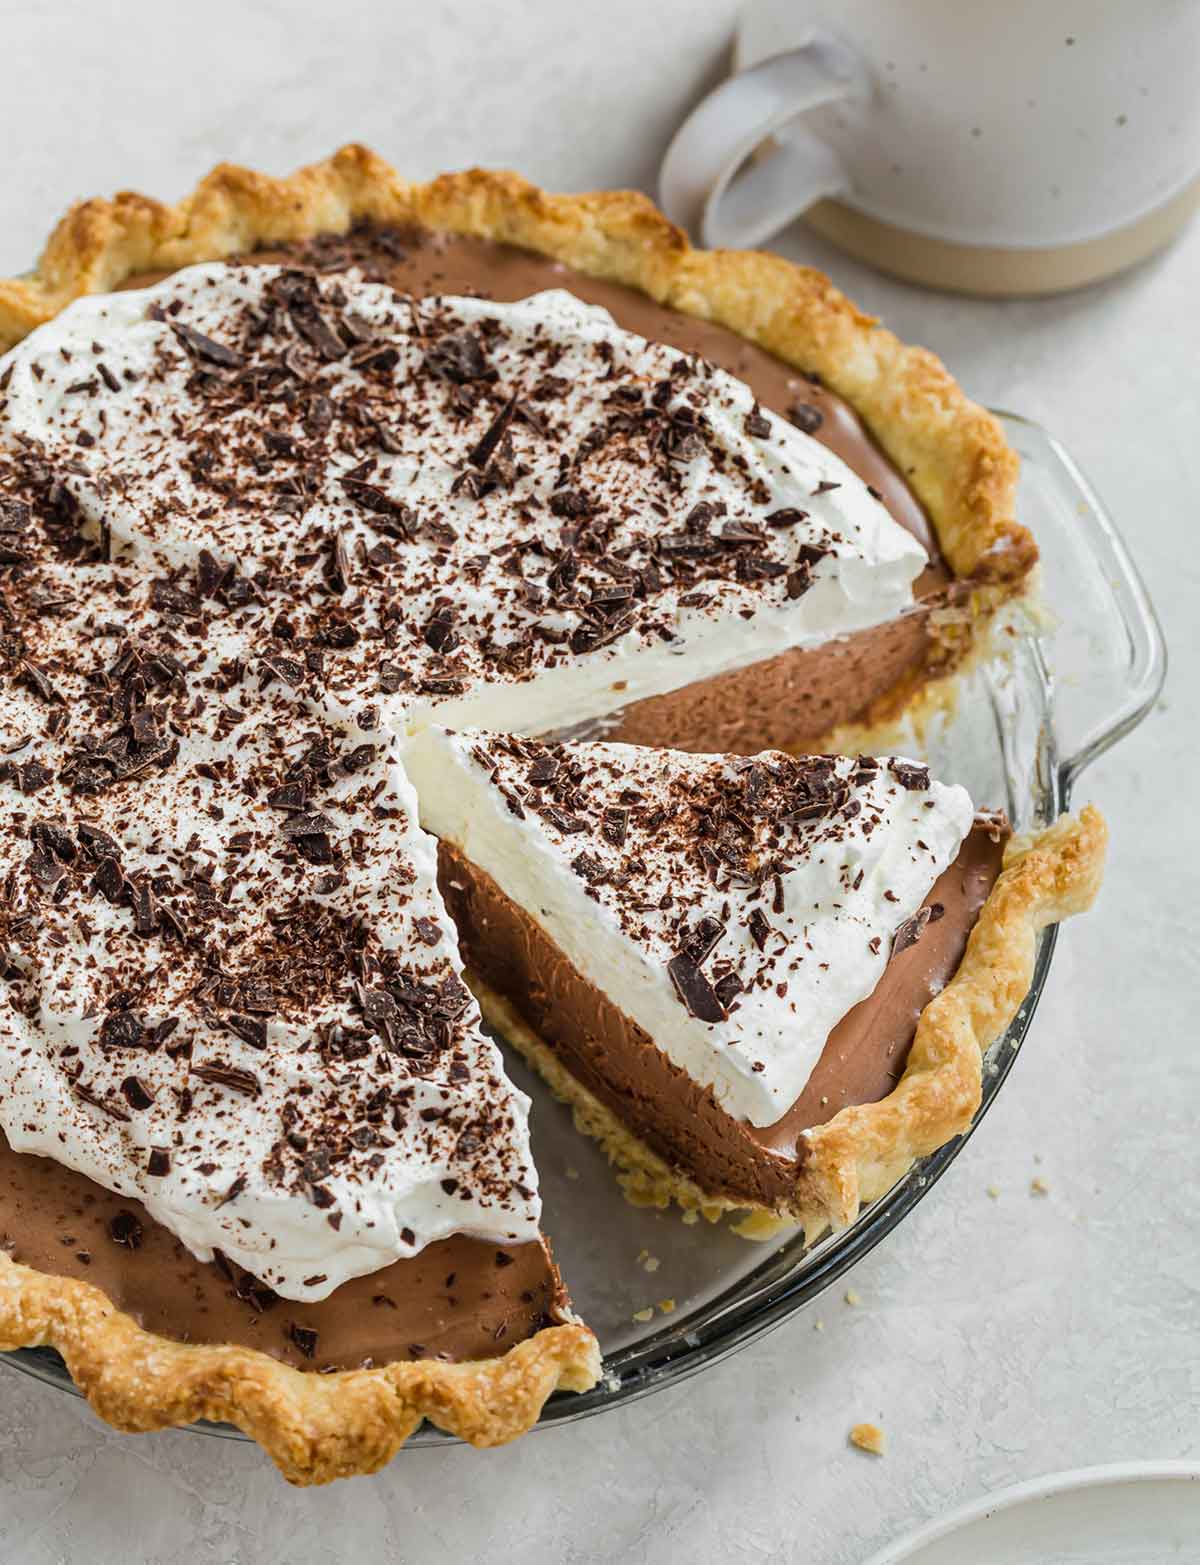
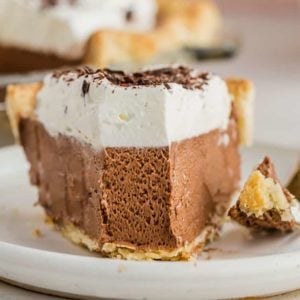
Rich and creamy French silk pie features my best pie crust, a silky smooth, mousse-like chocolate filling, and homemade whipped cream. Sprinkle with some chocolate curls and you have an absolutely unbelievable make-ahead dessert. The best part? No raw eggs!
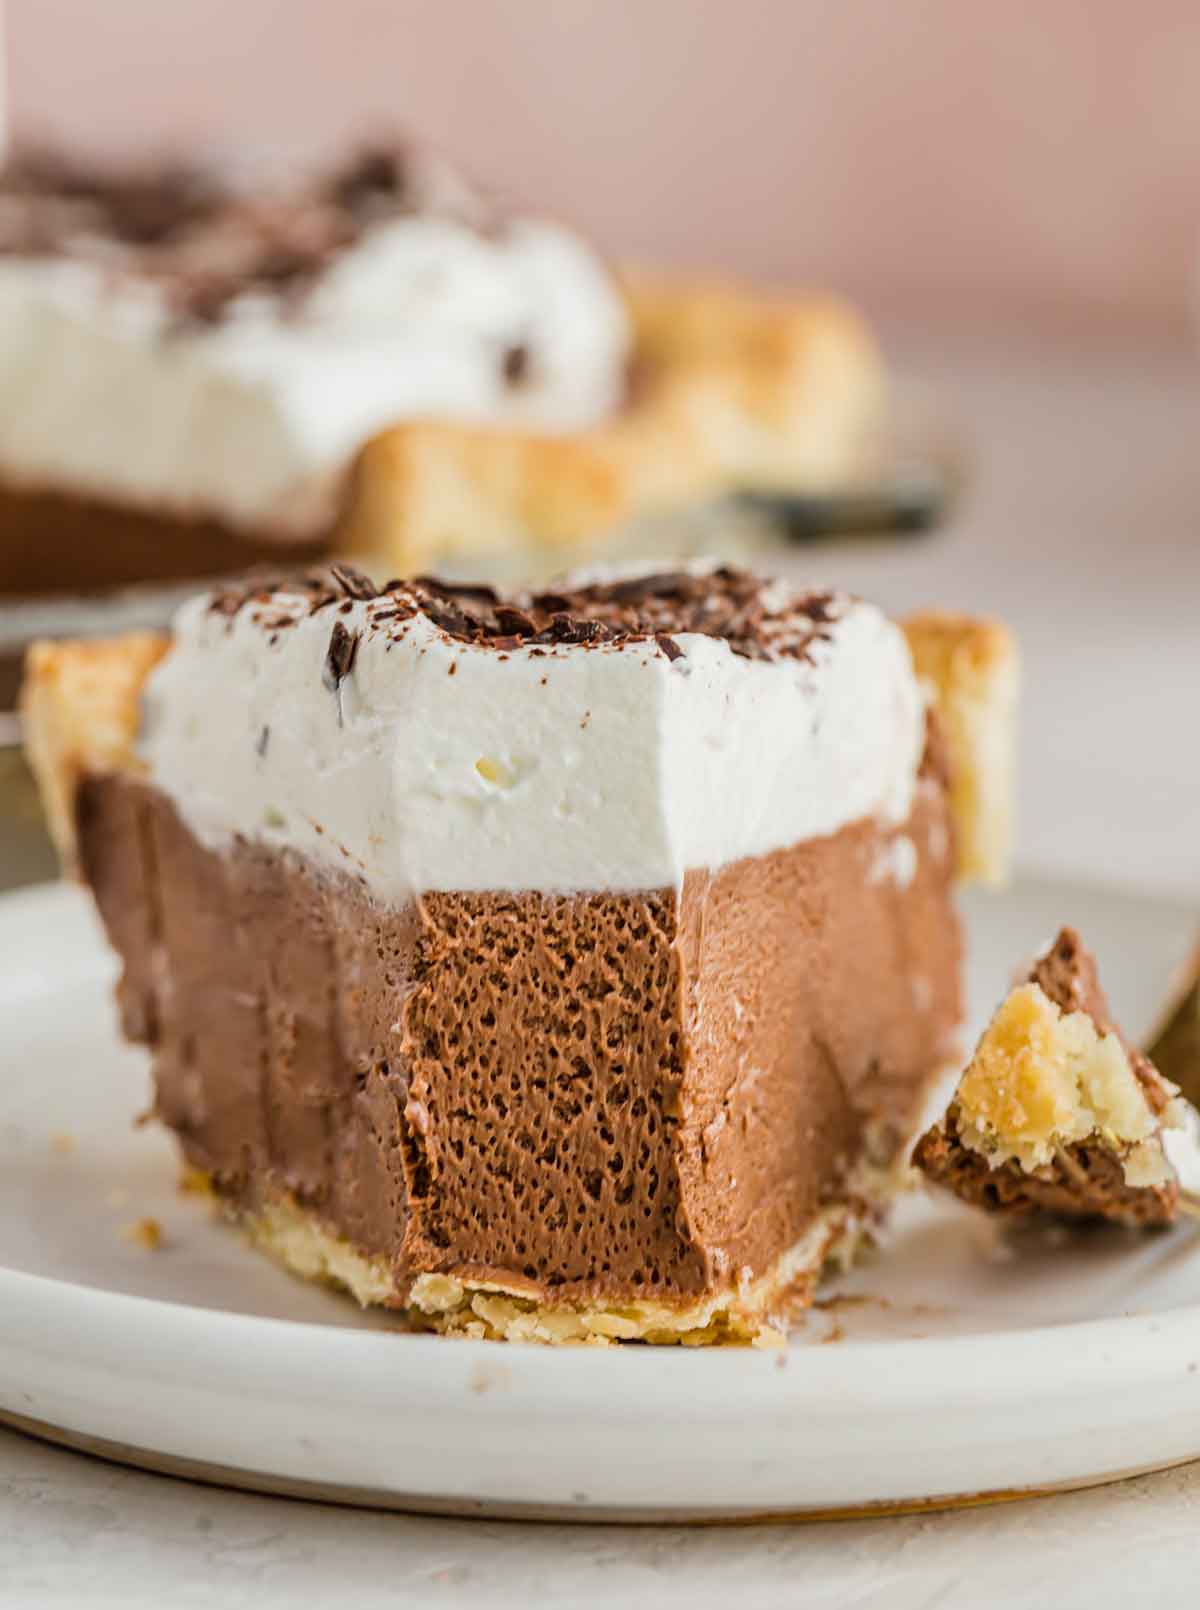
Buttery, flaky pie crust makes a phenomenal vessel for velvety smooth chocolate mousse filling.
You may be wondering what the difference is between this and chocolate cream pie; there are two key differences:
- The Crust: Chocolate cream pie traditionally sits on a cookie crumb crust, while French silk pie traditionally sits on a pastry crust.
- The Filling: Chocolate cream pie filling has a denser, pudding-like consistency, while French silk pie filling has a lighter, airier, more mousse-like consistency.
This is the perfect pie to serve year-round (and especially in the summer since you only need to bake the crust and the filling is cool and creamy), but consider giving it a spot alongside the traditional Thanksgiving offerings of pumpkin pie, apple pie, sweet potato pie, and pecan pie.
Why You’re Going to Love It
Here’s why you’ll love this easy French silk pie:
- Each part is made completely from scratch
- No raw eggs in the chocolate filling!
- A wonderful make-ahead dessert
- Always impresses a crowd
- Great for holidays, celebrations, and whenever that chocolate craving hits
Ingredient Notes
I highly recommend using quality ingredients; you’ll certainly taste the difference! Here are a couple of notes on the key ingredients (full recipe and ingredients found below):
- Pie Crust: I love using my all-time favorite pie crust for the base of French silk pie. However, you can also use my all-butter pie crust, or another recipe of your choosing (you can even use an Oreo cookie crust or graham cracker crust if you’d like).
- Heavy Cream: It can be labeled heavy cream, heavy whipping cream, or whipping cream; any of these will work!
- Chocolate: Make sure to use bittersweet chocolate for the chocolate filling. I recommend Ghirardelli 60% Cacao Bittersweet baking bars.
No Raw Eggs!
Most French silk pie recipes use raw eggs without any sort of tempering to bring them up to a safe temperature. I’m not one to shun a few beater licks of raw cookie dough, but I just couldn’t get past a pie made with completely raw eggs.
I was thrilled when I saw this filling recipe from Cook’s Country that calls for heating the eggs to a safe 160 degrees F as part of the recipe. It appeased my raw egg neurosis and the final product is so silky smooth; holding its own in comparison to its raw egg counterpart.
How to Make French Silk Pie
Let’s talk about how this French silk pie comes together:
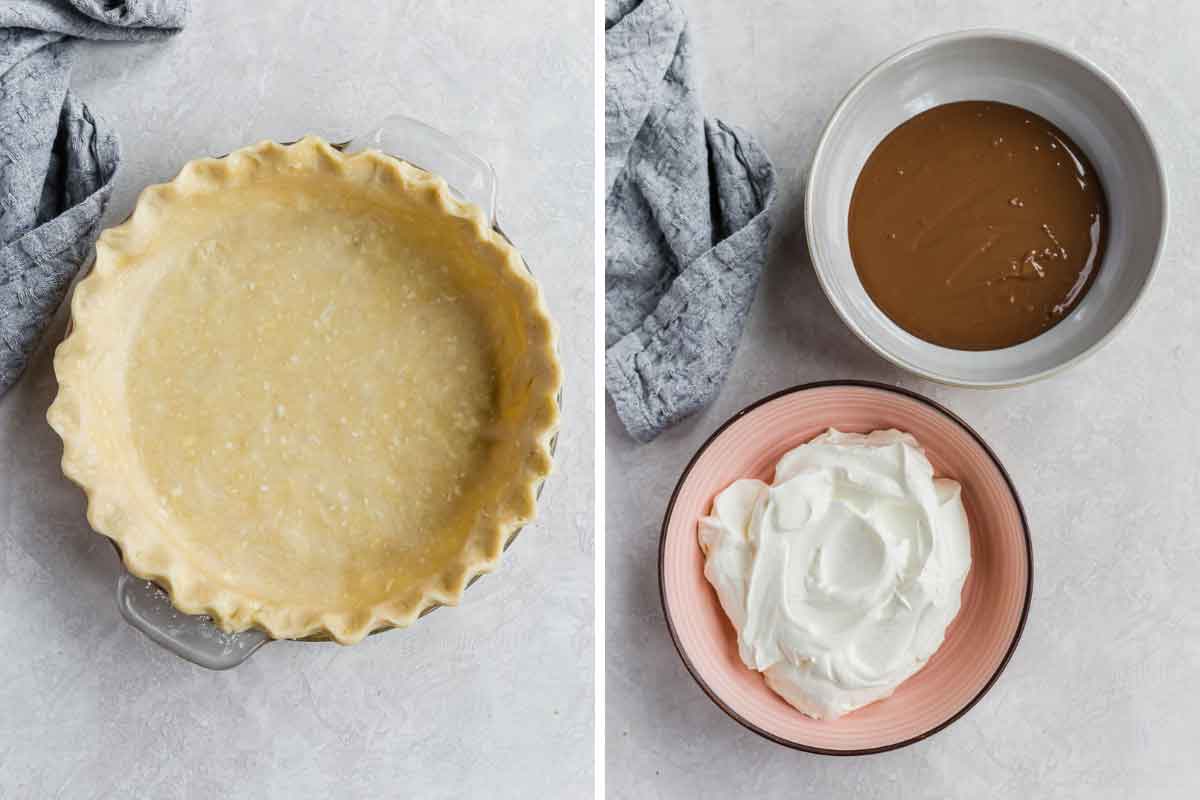
- Pie Crust: Prepare and bake pie crust. I recommend my favorite pie crust for this recipe, but use your favorite version. You can even buy a store-bought pie crust for a shortcut. You will need a fully-baked pie crust; the instructions are below, but if you are new to par-baking a pie crust, see my tutorial on how to blind bake pie crust.
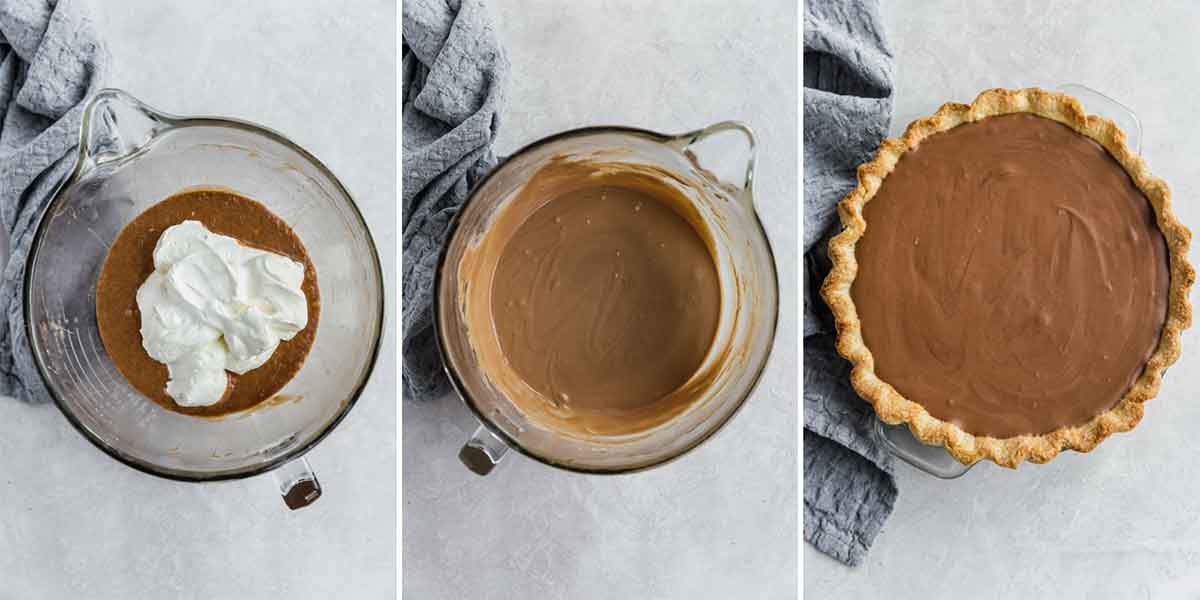
- Whip Cream and Melt Chocolate: Separately, you will beat whipped cream to stiff peaks and then melt the chocolate until smooth.
- Make the Filling: Warm the eggs and beat until they’re light and fluffy. Add the melted chocolate, vanilla, and butter. Once everything is combined and smooth, fold the whipped cream into the chocolate mixture.
- Fill the Pie: Spread the chocolate filling in the baked pie shell and refrigerate for at least a few hours or overnight.
- Serve: When ready to serve, top with fresh whipped cream and chocolate curls, chocolate shavings, or chocolate chips!

Note: I do believe that the silky texture of French silk pie is best enjoyed when served at room temperature. Let the chilled pie sit out for 20-30 minutes before serving.
Recipe Tips
- Pie Dish: I use and recommend a classic 9-inch glass pie plate.
- Make Ahead: This is a wonderful dessert to prepare ahead of time! There are a couple of ways to do it: (1) Make the pie crust 1-2 days in advance, then prepare the pie the day before you need it and refrigerate overnight, or (2) Freeze the prepared pie for up to 3 months (see below for more details).
- Storage: French silk pie must be refrigerated. Keep any leftovers in the refrigerator for up to 3 days.
- Freezing Instructions: Once the pie has been chilled in the refrigerator, cover tightly with plastic wrap, then foil, and freeze for up to 3 months. Thaw overnight in the refrigerator, then top with the fresh whipped cream and serve.

More Chocolate Pies You’ll Love
And if this pie has you craving mousse, be sure to check out my dark chocolate mousse and triple chocolate mousse cake.
Watch the Recipe Video:
If you make this French silk pie and love it, please stop back and give it a 5-star rating – it helps others find the recipe! ❤️️
French Silk Pie
Ingredients
For the Pie Crust:
- 1¼ cups (163 g) all-purpose flour
- ½ teaspoon salt
- 1 tablespoon granulated sugar
- 6 tablespoons (85 g) unsalted butter, chilled, cut into ¼-inch slices
- ¼ cup (46 g) solid vegetable shortening, chilled, cut into 2 pieces
- 2 tablespoons (30 ml) vodka, chilled
- 2 tablespoons (30 ml) ice water
For the Filling:
- 1 cup (240 ml) heavy cream
- 8 ounces bittersweet chocolate, finely chopped
- 3 eggs
- ¾ cup (149 g) granulated sugar
- 2 tablespoons water
- 1 tablespoon vanilla extract
- 8 tablespoons (113 g) unsalted butter, at room temperature, cut into ½-inch pieces
For the Whipped Cream Topping
- 1 cup (240 ml) heavy cream
- ½ cup (57 g) powdered sugar
- ½ teaspoon vanilla extract
To Garnish
- Chocolate curls, optional
Instructions
- Make the Crust: Process ¾ cups of the flour, the sugar and salt together in a food processor until combined, about 2 one-second pulses. Add the butter and shortening and process until a homogenous dough just starts to collect in uneven clumps, about 7 to 10 seconds (the dough will resemble cottage cheese curds with some very small pieces of butter remaining, but there should be no uncoated flour). Scrape down the sides and bottom of the bowl with a rubber spatula and redistribute the dough evenly around the bowl. Add the remaining ½ cup flour and pulse until the mixture is evenly distributed around the bowl and the mass of dough has been broken up, 4 to 6 quick pulses. Empty the mixture into a medium bowl.
- Sprinkle the vodka and water over the mixture. With a rubber spatula, use a folding motion to mix, pressing down on the dough until it is slightly tacky and sticks together.
- Roll out on a generously floured work surface to a 12-inch circle. Transfer to a 9-inch pie plate, leaving at least a 1-inch overhang on each side. Working around the circumference, ease the dough into the plate by gently lifting edge of the dough with one hand while pressing into the plate bottom with other hand. Dust off any excess flour with a pastry brush. With scissors or kitchen shears, trim the edge so that it overhangs by 1 inch. Fold the overhang under itself; the folded edge should be flush with edge of pie plate. Flute the dough or press the tines of a fork against dough to flatten it against the rim of pie plate. Wrap with plastic and refrigerate at least 2 hours and up to one day in advance.
- Bake the Pie Crust: Adjust oven rack to lower-middle position and preheat to 350 degrees F. Remove the chilled pie shell from the refrigerator and line with a large sheet of aluminum foil, pressing it so it conforms to the pie plate, and over the edges of the pie. Fill the whole way to the top with white granulated sugar, then transfer the pie plate to a rimmed half sheet pan and bake for 55 to 60 minutes, then remove the foil and sugar and allow the pie crust to cool completely.
- Make the Filling: Pour the heavy cream into a large mixing bowl and whip on medium-low speed until foamy, about 1 minute. Increase the speed to medium-high and continue to whip until stiff peaks form, 2 to 4 minutes. Transfer the whipped cream to a small bowl and refrigerate until needed.
- Place the chocolate in a microwave-safe bowl and microwave on 50% power in 30-second increments, stirring after each, until completely melted and smooth. Set aside.
- In a large, heatproof bowl, whisk together the eggs, sugar and water. Beat the mixture on medium speed until pale yellow and thick, about 5 minutes. Set the bowl over a medium saucepan filled ½-inch of barely simmering water over low heat, and warm the mixture, stirring occasionally, until it reaches 160 degrees F on an instant-read thermometer. Remove the bowl from the heat and beat the mixture on medium speed until it is light and fluffy and cooled to room temperature, about 8 minutes.
- Add the melted chocolate and vanilla extract to the cooled egg mixture and beat until incorporated. Beat in the butter, a few pieces at a time, until well combined. Using a rubber spatula, fold in the whipped cream until no white streaks remain. Scrape the filling into the pie shell and refrigerate until set, at least 3 hours or up to 24 hours.
- Make the Whipped Cream: When ready to serve, beat the cream, sugar, and vanilla on medium speed and whip. The cream will start to get frothy, and then will begin to thicken (around the 2-3 minute mark). Increase the speed to medium-high and beat for another 30 seconds to 1 minute, or until the cream looks billowy and there are distinct trails left by the whisk in the whipped cream. If you remove the whisk from the mixer and turn it upside down, the whipped cream should remain upright and not droop off. Spread or pipe the whipped cream over the chilled filling and serve. Leftovers should be stored, covered, in the refrigerator for up to 3 days.
Notes
- Pie Dish: I use and recommend a classic 9-inch glass pie plate.
- Pie Crust: I love using my all-time favorite pie crust for the base of French silk pie. However, you can also use my all-butter pie crust, or another recipe of your choosing (you can even use an Oreo cookie crust or graham cracker crust if you’d like).
- Heavy Cream: It can be labeled heavy cream, heavy whipping cream, or whipping cream; any of these will work!
- Chocolate: Make sure to use bittersweet chocolate for the chocolate filling. I recommend Ghirardelli 60% Cacao Bittersweet baking bars.
- Make Ahead: This is a wonderful dessert to prepare ahead of time! There are a couple of ways to do it: (1) Make the pie crust 1-2 days in advance, then prepare the pie the day before you need it and refrigerate overnight, or (2) Freeze the prepared pie for up to 3 months (see below for more details).
- Storage: French silk pie must be refrigerated. Keep any leftovers in the refrigerator for up to 3 days.
- Freezing Instructions – Once the pie has been chilled in the refrigerator, cover tightly with plastic wrap, then foil, and freeze for up to 3 months. Thaw overnight in the refrigerator, then top with the fresh whipped cream and serve.
- Recipe from Cook’s Country
Did you make this recipe?
Leave a review below, then snap a picture and tag @thebrowneyedbaker on Instagram so I can see it!
Photography by Ari Laing.


Forgot the FIVE STARS :D
This is the best!! I make it crustless and just put the filling in a 8×8 pan but follow everything as is minus the crust. When my hubby wants chocolate mousse, this is my go to!
I have made this pie twice in the last week. The first was raved as “The best pie I have ever put in my mouth!” by one of my relatives. The second was drier. I have a huge issue with the fact it took 2 hours for the first batch of eggs to reach 160 degrees. The second took almost that long and I believe that is why it was drier. I put the egg-filled mixture in a glass bowl and had it over simmering water. Any idea why it would take sooo…long? When I tried to increase the heat is when it was drier. The first was more delicious and I would love to make this a favorite, but said if I have to wait that long for the eggs to heat-up again, I will scream!! Lol. Please advise. Thank-you.
It was a delicious and stunning for Thanksgiving dinner.
This pie is delicious, I’ve made it several years in a row for holidays and special occasions. I’ve even messed up the steps when making the filling and it still comes out perfectly smooth. Great to make ahead and freeze too.
Hi what can I use as a substitute for Shortening ? Margarine? Also can this pie crust be used for savouries too or is too sweet for that? Do you also have a good moist love cake recipe ?
You definitely are not alone in your food combo issues. My list was much longer, but age has made me relax and try things I never would have before. Glad you gave the pie crust a try! French silk is an amazing pie. Now you’ve inspired me to make it. 😂
This is probably the best silk pie I’ve ever had in my life. Made it EXACTLY as the recipe calls for and it was amazing. It’s a lot of work, but definitely worth it. Very rich, but texture is light and fluffy. I’ve made it twice now and both times my family was fighting over the last piece.
Please post hot cross buns thanks so much. Love all your recipes
Hi Rose! I’ve got you covered :) Here is my hot cross buns recipe: https://www.browneyedbaker.com/hot-cross-buns-recipe/ Enjoy!!
Made this today – so yummy! I did wonder what the butter added in the filling- I cut it back to 1/4 c instead of 1/2c and felt like it was just extra calories. Also, I wondered why it wasn’t added to the warm egg mixture- sorry to be so inquisitive. The pie is amazing and whole family loved it!
I do not have a glass bowl to put over the sauce pan. Can I just put the mixture into the saucepan and then transfer it to another bowl afterwards? Let me know! Thank you!
Very good recipe but definitely different texture than the traditional French Silk using raw egg. I will use this when I have guest that might be a high risk..
Such amazing timing for this recipe, thank you! My husband and I, along with our two boys, just spent 3 weeks in Florida and Perkin’s pie was our evening treat more than a few times. We are Canadian but my husband spent a couple weeks each summer in Florida and French Silk Pie is super nostalgic for him. I also had the same issues as you when I saw it was a regular pie crust filled with chocolate but after that first bite I was hooked! I love your recipes and can’t wait to make this for him!
thanks for sharing. i will try do this.. looks delicious
was making this for the hubs and recieved a last minute dinner invite so brought this pie for desert. our friends were blown away by this bad boy. so rich and creamy. crust was flaky and buttery. I’ve used that crust recipe before and its always perfect. thanks for sharing this! utterly amazing.
Oh my gosh my mouth is salivating just reading this post! Thank you so much for sharing your recipe. I’ve never tried a French Silk Pie before, but it sounds incredible xo
Makeup Muddle
This looks amazing! French Silk Pie is one of my favorite treats! I might have to make one of these for Valentine’s tomorrow!
Paige
http://thehappyflammily.com
Hi! How would you describe the difference in this filling vs the chocolate cream pie? Did you prefer one over the other?
Hi Carolyn, I would describe the chocolate cream pie as more of a chocolate pastry cream, while this has more of a mousse consistency, if that makes sense. They’re both delicious!
I made this at Christmas. SO delicious! The only change I made was to add 1 T. instant white chocolate pudding mix to the whipped cream, to stabilize it. You could use vanilla or even chocolate pudding mix. The whipped cream lasts for days refrigerated and doesn’t separate or weep on the pie. It was easy to pipe also.
Hi Diane, I’m so thrilled that you enjoyed this pie! Thanks for sharing your tip on the instant pudding in the whipped cream!
I found this recipe when my pregnant daughter wanted French Silk Pie. The cooked eggs were the key. I have made this recipe dozens of times. The texture is amazing, the flavor is wonderful. This is the ONLY French Silk Pie I will EVER make!
This is Excellent!
I believe they sell Pasturized eggs at the grocery store. Then we would’t need to ‘temper’ the eggs and skip that step?
Taste is great but the texture doesn’t come close to my original recipe that I’ve been making since I was 9. I think I’ll keep trying, tho! It would be nice to go to my grave knowing none of my descendants will suffer on account of the raw eggs in their great-great-great grandma’s classic French silk pie recipe! I think the whipped cream got too cold and took too long to fold into the moisture, breaking down the air worked into it.
I usually make Averie Cooks French Silk pie, but I couldn’t find pasteurized eggs anywhere this year. Your recipes are always great so I decided to try your version instead. It came out fabulous! It felt like there were a few more steps in this version, but the results are very similar. I used Averie Cooks chocolate oreo crust just because I love the combination and topped with fresh whip cream and chocolate shavings. To die for. I use a combination of 72% and 85% dark chocolate from Aldi’s and the filling is a little darker her, but really rich. Thanks for coming to the my rescue with a great recipe.
I’m gearing up for Thanksgiving and was wondering if this pie could be frozen ahead of time at all? I’m going to have a bunch of people over and want to plan accordingly. I FINALLY found a pie I’m confident wont run AND doesn’t have raw egg in it (we have some concerned people in the mix this year)
Hi Cindy, I have not tried to freeze this pie, so I can’t give you a 100% guarantee, but I *THINK* it should be okay.
LOL – I thought the same thing about the crust! We love the Chocolate Cream Pie from the America’s Test Kitchen Family Cookbook with that wonderful oreo crust, but we tried both recipes side by side and my husband and I both preferred this one – and considering how good the chocolate cream pie is, you know that’s saying a LOT! What an amazing texture, SO good with the pie crust, and so chocolately. This is a truly amazing pie!
Can you use a store bought pie crust?
Michelle – I made this pie recently with a regular pie crust and it was fabulous! I make bean-to-bar chocolate and I used a 70% Venezuelan organic chocolate, which increased the “decadence factor” tremendously! Since it’s so rich I made it in a tart pan and it served 24 people. I want to try making it with a crushed shortbread crust next time. Thank you!
This looks delicious! I would totally make this. Unfortunately, don’t even have a whisk in my house, let alone a mixer.
great recipe – i too have had french silk pies on the brain of late as i have just had my first one and it was amazing! definitely will be recreating a silk pie this week – thanks for sharing your recipe and inspiration!
Loved it!! Made it a couple of days ago and refrigerated overnight and it was the best Chocolate Silk Pie ever!! I tried about 2 or 3 before this one that were to rich to heavy or tasted like I just melted a chocolate bar ugh! This now was fluffy light and tasty and the pie crust so yummy. Stocking up on the Vodka! Thank you I will be posting in IG in a while. Carols_got_cakes
Just bit into the pie, made in place of a bday cake. Deliiiicious, rich, and incredibly decadent. I made my own crust recipe but the filling is top notch! Served with whipped cream and shaved chocolate :)
this pie looks so delicious i got chills when i saw the photo
I’ve made french silk on more than one occasion, but… it has a tendency to set more like a pudding, lacking the silky rich mousse-like texture. What might I be doing wrong?
Hi Yacoub, I think it definitely depends on the recipe and how it is prepared. If you’re trying different recipes, that could be the reason. A recipe where whipped cream is folded into the mixture (like this one) creates a lighter, silkier, mousse-like consistency.
Ok so I was wondering that if I were to substitute the bittersweet chocolate for semi-sweet chocolate, what would I add/minus in the recipe
Hi Mary, I don’t think you would need to make any alterations to the rest of the recipe.
i don’t have heavy cream in my fridge. can i subtitute it with full cream whole milk instead?
Hi Mimie, Unfortunately that won’t work, as milk won’t whip up into whipped cream the way heavy cream will.
Hey Michelle, haven’t you ever had a chocolate filled croissant before? It’s basically the same idea.. Flaky pastry, chocolate deliciousness
This pie looks really amazing and I plan on making as soon as the right opportunity presents itself. Like you, the idea of a completely raw egg pie always grossed me out, but I do believe this may be a perfect recipe. Can’t wait to try!
I actually have not had a chocolate croissant ;-)
Made this pie for a Valentines party and it was a hit!!Definitely adding it to the repetoire!
First, I want to say thank you again for sharing this recipe. Second, OMG. I made it for Valentine’s Day dessert and my husband and I were in heaven. His face as I poured the chocolate into the pie crust was that of awe and wonder haha. Just typing this is making me want a slice!
I made this for Valentine’s Day, and WOW was it good! Thanks, Michelle!
What can I substitute the vodka with?
Hi Diana, I really recommend using it – this is a fabulous pie crust! If you really want to leave it out, then just replace it with more ice water.
sorry for asking, but can you try to translate in french please, just to help a little our ” gourmande française”, ( the quantity and the MO) please, please,please,,, thank you for answer quickly, i juste want to taste eat, it look so “hum”(great)
:)
Hi Bagoo, Unfortunately, I don’t know French, so I am in no way qualified to translate.
vodka in pie crust?! This is so intriguing I just have to put aside my perfect pie crust recipe for a minute to try this.
Too funny. I saw the title of your post and thought, “hmmm. Pie crust and chocolate…..not sure about that.” So glad I read your introduction and recipe. I think I can overcome my initial aversion!
See what you have been missing all these years with your crazy notion about chocolate and pie crust not going together? Growing up my mom would always let us choose our birthday dinner and guess what I always requested for dessert? You guessed it! Chocolate Pie!
I love Cook’s Country and your blog – thanks for reminding me of the special birthday treat I enjoyed growing up. Now, I’ll just have to make it for myself on my birthday.
It’s 8 o’clock in the morning and now I want pie!
it looks delish!
Loved the fact eggs are cooked as I also don’t prefer raw eggs . Gorgeous shots and great recipe would surely give a try :)
That looks so great, but I think I would add a tablespoon or two of brewed coffee to the filling! The crust looks excellent!
Oh yes, thank you for the super close ups of that velvety chocolate filling! Like you, I’d be very tempted to just spoon the filling directly into my face sans pie crust. :D
I love your site, have you ever considered using butter, lard or coconut oil in place of shortening? I have such a difficult time getting into recipes when I see that such talented bakers are still using trans-fat laden ingredients such as shortening. Even a tiny bit of the stuff is seriously damaging to the body (the FDA has it on a track to be banned). Please consider using the real stuff for your health and that of your readers!! Your site is a go-to for me and I care that you live a long, healthy life :)
You could certainly replace the shortening with lard if you prefer. Crisco actually doesn’t contain trans-fat anymore, as of about 10 years ago. I do realize that they it still has hydrogenated oils, which are not necessarily super foods. However, shortening is not part of my everyday diet, and I use it sparingly when baking, so if I put ¼ cup of shortening into one pie every few months, of which I might have one or two pieces, I don’t have much of a problem with it.
Hey Michelle,
Have you tried using a pretzel crumb crust? There is a baker who sells a chocolate cream pie at the Brooklyn Flea; she breaks thin pretzels and pours homemade dulce de leche over the crust, then puts in strained chocolate cream and whipped cream to top. Just a thought. Thanks again for the wonderful recipes and congrats on 7 years!
Emily
Hi Emily, I used a pretzel crust for my Take 5 Candy Bar Pie, but haven’t used it for anything else. Such a fabulous idea!
My friends have recently converted me to chocolate mousse-texture desserts, which I had always avoided before. I can’t wait to get my fix of this combo–pinned!
This looks like it turned out beautifully!
This looks absoulotly divine. I’m wondering why it says vanilla exract two times in the filling? Why doesn’t it say it two times in the directions?
Hi Margaret, My apologies, that was a typo. I have now corrected it, thanks so much for catching it!
I completely agree – never second guess something that involves chocolate! This looks amazing!!
Glad you came to your senses. But you know, I bet a shortbread crust would be awesome with that, too! Thanks for the yummy recipe!
This looks light and just perfect!
Wow, well I definitely know now what I’ll be making for Valentine’s Day dessert! I’ve never used vodka in pie crusts so I’m really curious/excited to try that. Thanks for posting this!
What a dreamy pie, I love the velvety filling!
If the ones listed in the post are your only chocolate pies (except I thought that I’ve seen Derby Pie here before, which has a little chocolate), then you should make a chocolate meringue pie! One of my favorites from my grandmother and childhood!
Absolutely love the vodka pie crust recipe. Found one a year or so ago and have never looked back. I am so making this for dinner Friday night. Perfect Valentine’s Day Dinner dessert! Simple and yummy!
Wow, that pie looks crazy good! My sister used to make a pie like this, I had forgotten all about it. I can’t wait to give it a try, YUMMY!!
Looks absolutely amazing :)
Oh my!! Loving this pie :)
That filling looks perfectly light and fluffy!
Looks amazing! I totally get your aversion. I had long felt the same way until my husband reminded me of a classic example in premade form that changed my thinking: chocolate pop tarts :) Opened-faced chocolate hand pie with extra filling then? Yes please!
Absolutely delicious!!!
I’ve been making Chocolate Pie for ages but this looks perfect for Valentine’s Day! And I love that you put vodka in the pie crust! I use Whipped Cream flavored all the time. :)
I’ve never made french silk pie either and I’m really not sure why….I need to get on it! This looks like a perfect Valentine’s Day dessert!
I made a similar pie a few weeks back and felt the same way about the crust. My 2yr old turned the page in the cook book and there was a chocolate pastry crust that was amazingly flaky and delicious with the filling! It was in an old “Pillsbury family cook book” that I received from my mother.
I’ve been making French Silk pie for almost 30 years and have never had a problem with the eggs, just use really fresh ones; but will try this one to compare. Love a flaky crust!
I feel the same way about pie crust. I always switch a recipe to graham cracker or oreo unless it’s fruit or pumpkin filling.
I’m trying this for sure. Looks so creamy and delicious. I too have always had an issue with whole raw eggs.
I’m wondering about the vodka too?
Can this be done without it?
Hi Zainab, Vodka does not promote gluten formation, so using vodka for half of the liquid in the pie crust helps to ensure a totally flaky, yet still tender crust. You can use ice water in its place, but I really, really recommend the vodka. It makes the BEST pie crust. It burns off in the oven.
This recipe looks absolutely amazing! Perfect for a romantic dinner for two :) I have never had the chocolate and pie crust issue… but I am with you on the eggs.
Looks absolutely tempting.. yummy!
Oooooooh! This looks great! Why vodka though?
Hi Orla, This is a pretty popular pie crust recipe from Cook’s Illustrated, where they use vodka for half of the liquid in the crust, instead of all ice water. The reason is that the alcohol doesn’t promote gluten formation, so it helps the pie crust remain both flaky and tender.
I love this pie with a graham cracker crust, but I add a hint of cinnamon to the crust. So yummy!!
“buttery, flaky pie crust makes an absolutely phenomenal vessel for the velvety smooth chocolate filling” – amen to that! And I have been wanting to make french silk pie for ages. One of those bucket list recipes…’one day’. Well, you inspire me to get cracking on it and make it! pinned
this looks absolutely gorgeous! i so want to make it right away
This recipe looks divine. Using pasteurized eggs should resolve any raw egg squeamishness.
Valentines dessert sorted!! My mouth is wateing just reading this, sod the diet xx
I have crazy food combination issues, too. Is there a 12 step program for us? I love chocolate but I’ve never even tasted a chocolate pie (I’m told my mom made outstanding ones), never eaten chocolate pop tarts, only eat warm chocolate pudding if it’s made from scratch and have never eaten chocolate cereal. I don’t know why, it just doesn’t sound good to me but I’ll take your word on the pie and I’ll be making one very soon. My family will love it!
No, you’re not the only one with “crazy” food combination issues. In fact, had I not read your thoughts on the recipe, I would never have even considered the combination of pie and chocolate either. But as always, I trust your tastebuds 100%, so I will probably try this one!
Thanks for pushing the limits for me;)
G.
This looks positively indulgent but light and not too rich.
I think this might just be the perfect dessert to make on Valentines Day!
The Macadame. xx
http://www.creamstop.com
FYI, it’s delicious, but it is definitely NOT light. It is absurdly rich. I’ve made this exact recipe before (yay Cooks Country) and everyone ends up only eating a little tiny slice because it’s so rich. But that just makes it last longer
Really? I have been craving a good chocolate pie for a really long time, you just made my day!