How to Stock and Organize Your Freezer
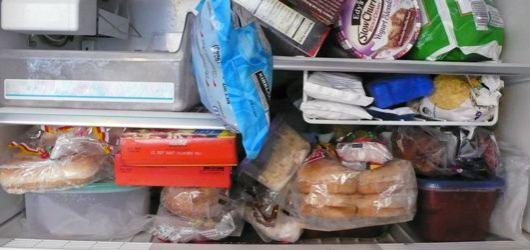
Does your freezer look like this?
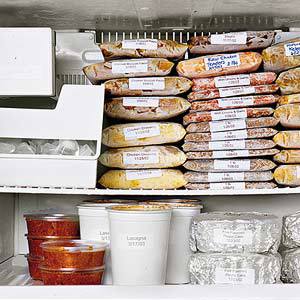
Do you wish it looked like this?
(Images above courtesy of Google Images; neither are my freezer, that is coming up!)
I think we’ve all had a moment when we’ve unearthed something from the depths of our freezer only to wonder not only when it was put there, but what in the world it was! As I was cleaning out my own freezer and ridding it of remnants of last summer’s ice cream bounty, I thought that perhaps it was time to talk about freezer organization here on Brown Eyed Baker. (I also thought it was time that I whip up a fresh batch of vanilla bean ice cream.) A freezer can be a lot like a vacant spare bedroom that usually meets one of two fates: (1) A nicely organized space that allows you to store things that you don’t use everyday but want to keep for when you need them; or (2) A space so disorganized and messy that you don’t want to open the door for fear of what may fall on your head (or toe), and if you can get the door open safely you probably can’t get very far into the mess to even figure out what’s in there.
The first part of this post will be dedicated to organizing your freezer – figuring out what you have in there and going over some food safety guidelines for proper food storage and how long different types of food can last safely in a freezer.
The second part of this post will help you re-stock your freezer with food that you can prepare and have ready to heat up at a moment’s notice. These will be particularly useful on nights when you get in late but don’t want to pick up fast food. Also, if you know someone who is expecting, a nice gesture may be to prepare one or two dishes that are ready to freeze so once the baby arrives the new mom can pull it out of the freezer, pop it in the oven, and have a warm, homemade dinner with no effort.
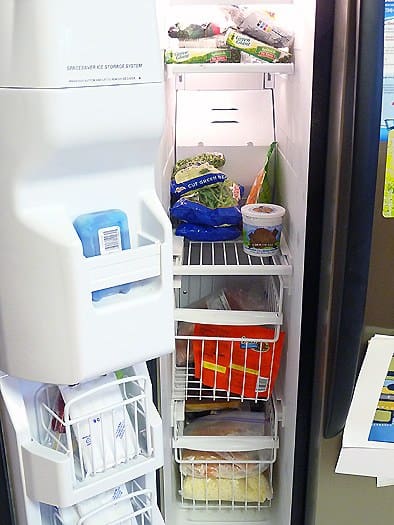
Okay, so after the great big purge that banished all of my old ice cream to the garbage disposal, this is what my freezer is now looking like:
Oops, I may have lied. There is ice cream in there. But, it’s only from November. And, I paid good money to have it packed in dry ice so I could drive it home from the Berkey Creamery at Penn State, where I made a pit stop on my back to Pittsburgh from delivering a cake order on campus.
But, I digress…
Freezer Storage – Safety and Guidelines
A freezer can be your best friend if you are aware of how to properly store your food. Coming from a baker, it can be the difference between needing to consume an entire cheesecake within two days and being able to eat one piece each day for two weeks. The latter is a much better option, no? Here are some general tips and guidelines for ensuring that your food is ready to be stored in the freezer:
♦ Make sure that your freezer is set to 0°F and no higher.
♦ Wrap food (especially meats) in plastic wrap and then in heavy-duty foil, or place in a freezer bag.
♦ If you open packages of vegetables and don’t use the entire package, reseal as tightly as possible.
♦ Freeze meat products before the “sell by” date on the package.
♦ Always label a package or container with the food and date it was stored.
♦ For things like cake, cookies, and brownies, I find it best to cut into regular serving sizes, and then wrap each individually and store in a freezer bag. They are then much easier to thaw one at a time. I defrost either at room temperature or in the refrigerator. For instance, if I want cheesecake for dessert, I may take it out of the freezer in the morning and stick it in the fridge. For cookies or brownies, I’ll take one out and leave it at room temperature for an hour or so. If I’m really craving one, I’ll throw it in the microwave ;-)
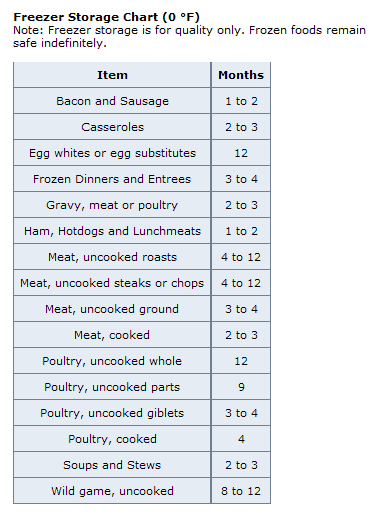
Below is a general guide to the length of time that you can expect different types of food to maintain their optimum quality while stored in the freezer:
Freezer Meals and Organization
Now that we have plan to keep all of the food fresh, let’s move on to some good ideas for what to actually freeze and how to get it ready for easy re-heating. Each recipe varies slightly, but for the most part casserole-type dishes can be assembled up until the point you would bake them, and then can be easily frozen. First up are some recipes that are easily made to freeze:
♦ Any type of casserole (baked mac ‘n cheese counts!)
♦ Lasagna, baked ziti, stuffed shells, etc.
♦ Meatloaf
♦ Chili
♦ Soups
I have found that the best way to package and organize prepared meals such as these is to use disposable containers. For the casseroles, baked pastas, enchiladas and things that you would normally bake in a baking dish, prepare in a freezer-safe foil disposable container. Be sure that it is sealed tightly and label it. You should include the baking temperature and time on the label, that way you don’t have to go searching for a recipe when you want to pull it out and make it. They are easily stacked and once you use it you can throw it away – no dishes!
The second method is with more liquid-type foods such as sauces and soups. I follow the route that you see illustrated in the “neat freezer” pictured at the top of the post. Put the sauce or soup into a freezer bag, squeeze out all of the extra air, and then lay flat to freeze. You can easily stack these packages or even sit them upright like you would books, depending on the space in your freezer. They also thaw much, much faster this way then having a big plastic container full of food.
So there you have it – a rundown on all of the ways that you can make your freezer a less scary place and use it to your advantage. You could spend a couple of hours on a Saturday or Sunday putting together a few meals and a pot of soup and have a well-stocked freezer for those nights when the last thing you want to do is cook!


Hi my loved one! I wish to say that this article is amazing, nice written and include almost all important infos.
I’d like to look more posts like this .
Thank you for the chart. My husband and I freeze our vegetables from the garden. How long can they be stored safely in the freezer? Getting ready for another Midwest winter.
Thanks for that helpful chart on how long to freeze foods and not compromise quality. Very useful.
So glad you didn’t throw out ice cream from The Creamery!
We just got our first upright…and I can’t wait to organize it…and my regular freezer, too!
Ugh, I dread going into my freezer because it’s crammed full of things and I know I need to go through and throw away/organize it all. One problem I have is that I’ve frozen some meat, but left it in the original store packaging which makes for a much more space stealing package. Do you unpackage fresh meat and rewrap it with a label for optimal space saving? I might need to start that. Thanks for the tips!
Hi Kristin,
I only repackage purchased meat if I buy it in bulk, then I will put more manageable servings into gallon-size freezer bags. Otherwise, I just keep it in the original packaging. Hope that helps!
40F is the safe storage minimum. Storage at 0F is the minimum if you want to prevent bacteria from growing.
Frozen foods aren’t safe indefinitely, particularly if the food harbours bacterium prior to it being frozen. This is a really common mistake that catches people out. Thawing it out means that it reactivates (unless you cook it above 140F prior to eating it). Additionally, while the food keeps, the quality diminishes – something that should be mentioned.
Likewise, thawing an item out ‘for an hour or so’ at room temp encourages bacterial formation and growth (again, unless you subsequently cook it over 140F). It’s better to defrost and then cook in the microwave or on a stove.
One can never be too careful with food safety.
I thought it was going to be a handful of boring old post, but it really compensated for my time. I will post a link to that page on my blog. I am sure my visitors will discover that extremely practical.
Hi Rachael,
That’s a great question, and I’m going to add it into the post. I defrost either at room temperature or in the refrigerator. For instance, if I want cheesecake for dessert, I may take it out of the freezer in the morning and stick it in the fridge. For cookies or brownies, I’ll take one out and leave it at room temperature for an hour or so. If I’m really craving one, I’ll throw it in the microwave ;-) Hope that helps!
Hi Angie,
I would say 1-2 months, leaning toward the latter if you wrap them really well. Admittedly, I’ve never had anything last longer than about a month because I eat it ;-)
I would love to use your entry for my blog as I just wrote one on organizing the fridge door. Send me an email and I would love to connect with you!
Love this post. I’m Dying for a stand alone freezer, stuffing my little freezer is a task all in its own. I freeze a lot of different dishes but I’ve never thought about freezing things like cake, cookies, and brownies. You mentioned the best way to do this, but whats the best way to defrost. I’d be afraid of the texture not being the same, or the goodies getting mushy. Do they taste the same?
My freezer is tiny and sadly, looks just like that first photo. Thanks for the tips!
I got totally nostalgic thinking about Penn State Creamery ice cream. I grew up in State College and when I go back, that is a place where I have to go.
My freezer used to make the first picture look neat. But as I am baking more and doing home cooking to keep from going to fast food or chain restaurants, I have experimented with some other freezing containers. They are very inexpensive and available at restaurant supply stores. I have been using Chinese food containers and round waxed type soup containers with lids. When I put the food in the Chinese food containers, I place a small piece of waxed paper on top of the food, close, mark the ingredients and date on the outside and freeze. I just defrosted some chicken and rice and it was excellent, no freezer burns. As an aside, I am trying to phase out plastic from my life…too many chemicals.
My freezer looks like the first photo above. :D Thanks for the post.
Hi Diane – I can appreciate your point, however I have yet to find any alternative that keeps food as fresh as plastic wrap, foil and freezer bags do. Unfortunately, Tupperware-type containers that aren’t packed full allow too much space and air in, and as a result, ice crystals and freezer burn.
All food safety websites that I have read recommend these methods for keeping foods the freshest for the longest.
Do you have any alternatives that you could recommend?
I like you post, but it is really too bad that you are encouraging using disposable bake-ware and wraps! It all ends up in the landfill after-all :(
Hi Shoshona,
I would assemble it, freeze it, and then bake it (adding some time to make sure it’s warmed through).
I love this post! I am in the process of feeding my family from the freezer instead of continually adding to it, but I love your suggestions for when I make some space in there again. Do you bake the mac ‘n cheese before freezing it, or do you freeze it and then bake it?
Great tips.
I bought baskets to put in the freezer for special things – butter, twd leftovers, etc. but then they would just fill up with stuff. Ah, well.
Need to reorganize it again. THanks for the motiviation.
We have a huge problem with our freezer: it makes everything smell funny or taste funny. We’ve tried cleaning it out and keeping baking soda in it but that doesn’t help! So in turn we really don’t have anything in it! I liked this post though and it’ll help if we ever figure out what the problem is or get a new fridge!
Ah! I know what works!!! (We had one of our little darlings leave our freezer door partly open while we were out of town and had a babysitter with the 5 kids There was fish at the top of the freezer. Yuck! No amount of cleaning with any cleaning product would get rid of the stink.) Real vanilla, applied with a washcloth to all the surfaces and left on there for a little while then washed off took care of it!!! It was like a miracle. Actually, it was an answer to prayer. PTL
This is what I needed right now. I was just thinking about how my freezer is a mess and I have no idea what’s even in it. Thanks!
Yeah, what they said! It is a great post–thanks for the information. Now, can you come and do that magic to my freezer, pretty please?
Great post! I’ve been freezing more and more. It’s so convenient to have soup and various doughs on hand (pizza dough, cookie dough balls, pie crust, etc). I really wish my freezer looked like that “perfect” one…
Great tips! I need to do some organizing this weekend. We have two freezers, but I still run out of space!
What an awesome post Michelle. My little, crammed freezer thanks you.
I have a chest freezer with a full lamb, half a cow, and quite a few veggies from last year’s garden. It always starts out very well organized, but then the boxes start to fall apart and the million packages of meat just become a great big pile.
I have been planning to organize my freezer. Hurricane season is practically over and has been such a downer for local weather celebrities that I feel it is now safe to stock my freezer with a bounty of savings without running the risk of losing it all to a power failure. Perhaps this was a nesting instinct because when the Winn Dixie ad arrived yesterday, I nearly fell off my chair.
Another great how-to post! How long do you think baked goods can be stored individually? I’ve been contemplating making some small cheesecakes to freeze in to slices so we have some if we want them but I wasn’t sure how long they’d be good for? I’ve found a few different answers on google.
I just have a deep freeze… solves the whole problem until you actually have to FIND something in it. ;)
Awesome post! When it comes to freezer storing, I need all the help I can get!
This is such a great post! You have inspired me – I wish I were at home to organize my freezer right now! :)
I’m glad that you pointed out the freezing dates are for quality only, not safety. That always confused me why something wouldn’t be safe after only a few months in the freezer.
I generally use the freezer paper to re-wrap meats from the store. It’s cheap, you can write on it and it can go directly into the microwave for thawing. The only down side to freezer paper (opposed to plastic bags) is that you can’t thaw under water but if I take my meat out the night before and thaw in the fridge while I’m at work, it’s not an issue.
great post! freezing soups in freezer bags is a great idea. Most of the time I just think my freezer is too small. I would love to have another freezer in the basement to store meat and all the berries I pick each summer.
Hi Kalleigh,
I have actually never used freezer paper, as I usually go the plastic wrap and foil or freezer bag route, but my understanding is that freezer paper is a plastic-coated paper that you can use to wrap foods for freezing. The plastic coating will provide a barrier to air and moisture, so that the food stays fresh longer. Hope that helps!
Very helpful post! At times my freezer looks like a bomb hit it, but I am trying to be better about organization so I don’t forget what I have in there.
Okay, what about freezer paper? What’s the purpose of that other than for craft purposes? (It usually stays in my sewing room but I hear it’s actually got to do something with a freezer.)
Great info. My freezer usually just contains ice, chicken finger and fish sticks. LOL I do have some peppers from my garden last Summer. I have always had issues with freezing food and remembering it is up there. I really have to get organized
Oh the creamery!! Gosh i miss that place!
I think I may have drooled a little bit at the sight of the “organized” freezer…. if only….
And I also drooled a bit at the thought of Penn State creamery ice cream – I lived there for 5 years and have never tasted better ice cream anywhere!! Don’t throw it out!! :)
Hey! When did you sneak into my house and take a picture of my freezer?
Hahaha even AFTER I organize, my freezer usually reverts back to that first picture within days. :)