Peach Pie Tartlets
[donotprint]
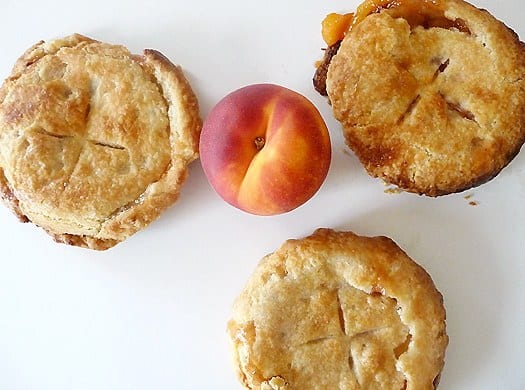
We’ll call these rustic peach pie tartlets. Rustic is a great adjective for any type of food that looks a little disheveled but that keeps taunting you to take another bite until you have polished off waaaay more than your fair share. Say hello to my peach pie tartlets and all of the glorious overeating evil that they represent.
I’ve been dreaming of making a peach pie since about this time last year. Last year around Labor Day my Chief Culinary Consultant and I took a road trip down to Florida and while driving through Georgia, all we could talk about was peach pie. We never stopped while in the state so once we got to Florida peach pie was certainly on the brain. It only took a day or two and we finally got into the kitchen and made one, and it was fabulous. I was still craving peach desserts when we got back, so I made Peach Crumb Bars, but I have been sans peach dessert since then. I snagged a crate of peaches last weekend while bulk-shopping and they were just begging to be made into a pie – you barely had to get close to them for the perfectly sweet aroma to tickle your nose. So peach pie brainstorming ensued.

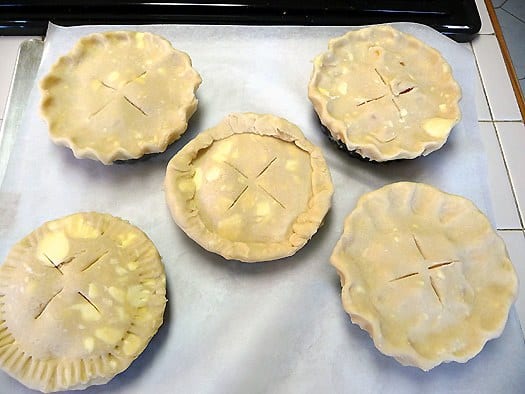
I ran into a pickle when I realized that all of the people that I was excited about sharing peach pie with weren’t all in the same place. I couldn’t exactly bring half a pie to someone (or could I?), and I didn’t want to hack one into pieces, so I came up with the idea of individual pies. I made these in miniature tart pans and made 5, but I think the crust and filling could be stretched to make 6 easily. Now, I’m not going to lie – making individual pies did take a bit longer than just one big one would have. And the crust obviously wasn’t perfect (I probably overfilled them), but whether you make individual desserts or one large pie, you are going to want to finish yours and then steal from the person next to you.
I wrote the recipe for a regular (read: whole) peach pie. The ingredients and process is exactly the same if you want to go the individual route – just repeat the procedure for each mini pie. I used 4-inch-x-1-inch tart pans and found that I needed to bake them for just a tad less than it calls for for the large pie; just keep an eye on them.
My current problem – I’m now craving apple pie. It’s an endless circle!
What’s your favorite type of pie?
P.S. If you received the Brown Eyed Baker weekly newsletter last week, you know that the baking theme for the week was peaches. Did you bake anything with peaches in the last week? If so, tell us and share a link (if you blogged about it) in the comments section below, and add your photos to the Brown Eyed Baker Weekly Baking Themes Flickr group! If you aren’t receiving the newsletter yet, sign up now!
One year ago: Arancini (Italian Rice Balls)
Two years ago: Black-Bottom Cupcakes
Three years ago: Parmesan Chicken & Rice[/donotprint]
Peach Pie
Ingredients
- 1 recipe Basic Pie Dough, follows
- 6 medium-sized peaches, about 7 cups when sliced
- 1 tablespoon lemon juice
- 1 cup (200 g) plus 1 tablespoon granulated sugar
- Pinch ground cinnamon
- Pinch ground nutmeg
- Pinch salt
- 4 tablespoons instant tapioca, ground for 1 minute in food processor or spice grinder
- 1 egg yolk
- 1 tablespoon heavy cream
Basic Pie Dough for 1 double-crust 9-inch pie:
- 2½ cups (312.5 g) all-purpose flour, plus more for dusting the work surface
- 1 teaspoon salt
- 2 tablespoons sugar
- 1 cup (205 g) vegetable shortening, chilled
- 12 tablespoons cold unsalted butter, cut into ¼-inch pieces
- 6-8 tablespoons (6 to 8 tablespoons) ice water
Instructions
- 1. To make the dough: Process the flour, salt and sugar in a food processor until combined. Add the shortening and butter and process until the mixture resembles coarse crumbs, about 10 seconds. With the machine running, pour ice water through the feed tube in a steady stream until the dough just holds together without being too wet or sticky; do not process more than 30 seconds. test the dough by squeezing a small amount together: If it is crumbly, add a bit more water. turn out the dough onto a work surface. divide in half. Place each half on a sheet of plastic wrap; flatten into disks. Wrap in plastic, and refrigerate at least 1 hour or up to 2 days. Dough can be frozen, wrapped in plastic, up to 3 weeks; thaw in refrigerator.
- 2. Adjust an oven rack to the lowest position, place a rimmed baking sheet on it, and heat the oven to 500 degrees F. Remove one piece of dough from the refrigerator (if refrigerated longer than 1 hour, let stand at room temperature until malleable.
- 3. Roll the dough on a lightly floured work surface to a 12-inch circle. Transfer the dough to a 9-inch pie plate, leaving the dough that overhangs the lip of the pie plate in place; refrigerate the dough-lined pie plate.
- 4. Bring 3 quarts of water to a boil in a large saucepan and fill a large bowl with 2 quarts cold water and 2 trays ice cubes. With a paring knife, score a small x at the base of each peach. Lower the peaches into the pan of boiling water with a slotted spoon. Turn the peaches occasionally and simmer until their skins loosen, 30 seconds to 1 minute, depending on the ripeness of the peaches. Transfer the peaches to a bowl of ice water. Let stand to stop the cooking process, about 1 minute and cool. Starting from the scored x, peel each peach. Use a paring knife to lift the skin from the flesh and pull the skin off in strips. Halve, pit, and cut each peeled peach into 3/8-inch slices.
- 5. Toss the peach slices, lemon juice, 1 cup granulated sugar, cinnamon, nutmeg, salt and instant tapioca in a medium bowl.
- 6. Roll out the second piece of dough to a 12-inch circle. Turn the peach mixture into the dough-lined pie plate. Place the second piece of dough over the filling. Trim the top and bottom edges to ½ inch beyond the pan lip. Tick this rim of dough underneath itself so that the folded edge is flush with the pan lip. Flute the edge or press with fork tines to seal. Cut 4 slits in the dough top. In a small bowl, whisk together the egg yolk and heavy cream to make the egg wash. Brush the entire surface of the pie with egg wash, and sprinkle with the remaining 1 tablespoon granulated sugar.
- 7. Lower the oven temperature to 425 degrees. Place the pie on the baking sheet and bake until the crust is set and begins to brown, 25 to 30 minutes. Rotate the pie and reduce the oven temperature to 375 degrees; continue baking until the crust is deep golden brown and juices bubble, 25 to 30 minutes longer. Cool the pie on a wire rack for at least 2 hours before serving.
Did you make this recipe?
Leave a review below, then snap a picture and tag @thebrowneyedbaker on Instagram so I can see it!


This recipe sounds great, I’d like to try it. I have frozen peaches. Any advice on using those vs. the fresh? Should they be defrosted first? Thanks so much!
Hi Allison, I’ve never made peach pie with frozen peaches. I would be inclined to think you could use them frozen. If you thaw them first, be sure to drain them.
Hello There!
Here’s a fantastic substitution and complement to the basic and classic Peach Pie or Cobbler:
Substitute the 1 cup of sugar in your peach recipe for 1+ cup(s) of fresh/homemade, or as close to that as possible, Peach Jam. It adds the sweetness but also intensifies the “peachiness” of the pie/cobbler itself.
Another tip?:
try adding one of these flavorings in the smallest amount for a spin on the classic peach pie: almond extract, amaretto, etc.
Anyhoo, the Peach Jam is an outstanding substitution and complement to the classic Peach Pie or Cobbler. It will up its “Peachiness” to Peach Heaven!!!
Enjoy!
Hey There!!
I made the full sized peach pie for Father’s Day this weekend and my dad (and whole family!) RAVED about it!!
I abasolutely LOVE your recipes, and use your site as a go-to must read!
Thanks for sharing your recipes! :)
I made this recipe into a full-sized pie. It was THE best ever! My husband loves peach pie, and I generally don’t care for it much. But, I couldn’t stay away from the buttery, tender crust filled with sweet, juicy peaches! Yay – now we can enjoy peach pie together. Thank you!
Thank you so much for sharing this recipe. I tried making this for a small get together and my family definitely loved it. My grandmother even asked for the recipe. Thank you so much for sharing. Kudos!
Aw, how wonderful that your grandma asked for the recipe! I love it! So happy you all enjoyed it!
I love mini desserts, but I especially love little pies like this. You get to eat a whole pie all by yourself, which is awesome, and that’s a lot of buttery, flaky crust just for me. Yea!
These look absolutely beautiful and I’m sure they tasted wonderful too.
These look fantastic! Over the weekend, I went peach picking with my mom and came home with 20 pounds of peaches. I’ve used a lot of them already (salsa, peach butter, and a peach crumble), but now I’m thinking I might have to make some tartlets, too!
These tartlets are super cute and they look oh-so-yummy!
These looks great – love the spots of butter in the uncooked dough. I recently made two peach recipes: http://thedailybatch.blogspot.com/2010/08/plum-and-peach-crumble.html and http://thedailybatch.blogspot.com/2010/07/everything-is-sweeter-when-small.html
These look wonderful. I recently started baking with peaches, I’m hooked! I made a galette a while ago – http://yumsiliciousbakes.blogspot.com/2010/07/peach-pear-plum-galette.html
Those are adorable! I love your little ramekins. Very nice recipe and great pics.
Ummmmm, yes please? When are you bringing me MY pie? :)
These look delectable. If I made them they would end up being just for me. No one in the house like peach pie or fruit pie – only pumpkin pie and pecan pie.
Those look soooo good! We don’t get peaches down here in southern Mexico, so no peach baking for me right now. As for favorite pie, I love pies made with love and fresh seasonal temperate fruit… especially blueberries. :)
lovely tarts
My husband would be your instant best friend if you set one of these beauties in front of him. Great use of sweet, summer peaches!
Rustic or not these beauties look incredibly tasty :)
These are so super cute! What great little treats to share!
You’re so generous… a peach pie for everyone! Wish I was your friend/neighbor. I just made individual peach cobblers myself.
I’ve enjoyed your Tweets – love your blog! What fantastic photography. The peach tartlets look amazing. Not sure I can recreate them but will be trying this weekend. I’ve never attempted pie dough in the food processor although I’ve seen it mentioned numerous times. Going to give that a go, too.
what is it about small foods that make them look that much more delicious?? your peach tartlets look fabulous!! :-)
Oh wow. these look so …… AMAZING. I love peaches and i love pie. what i do with peaches, is freeze them and use them as ice cubes in my wine when it gets a little warm……
Peaches really are the best. I love making crumb bars! I make them with homemade jam in the center when no fresh fruit is around and then have made them with raspberries too! delicious and so pretty!
My fav fruit hands down. How cute and delish these look!!! Now I must find these tart pans because i’m def trying these this weekend!
Cute little pies! My mom made peach cobbler this weekend, and I’ve been wishing for more ever since! These would surely quell that craving- thanks!
These are adorable and look so yummy!!
Yum! I love all things “mini” – especially things with crust, because I like more crust than filling! And also I somehow feel less guilty eating a couple (or more) little pies than I would if I downed one whole regular pie. You know.
I am pretty sure I could one all by myself. Love these!
oh my gosh they’re beautiful!!! i need to make these soon, i’ve been missing peach pie lately!
If only I get to stop myself from eating up the entire bag of peaches… I never have any left to make pies. But yours look so cute and enticing… maybe next time I’ll try my best to save some for these cute as a button pies!
Hi, your little peach pies look so cute! The filling looks lovely too. I loved your newletter and dutifully made Peach and Sour Cream Ice Cream. Looking forward to the next bulletin!
http://sallyinthegalley.blogspot.com/2010/08/peach-sour-cream-ice-cream.html
Oh these look so good ! Wonder how they would freeze ? I’m the only one that loves any kind of cooked fruit in this house ! Maybe I need to find a new family ! LOL!
They are adorable! Reminds me of the peach cream cheese tart I just made for Project Pastry Queen, though yours are much more perfect. Mine was a debacle but all was well in the end! And I totally called it rustic.
http://www.20somethingcupcakes.com/2010/08/fredericksburg-peach-cream-cheese-tart/
These look fantastic, Michelle! I baked something very similar just the other week (Mini Peach Tarts). You can see them here: http://comfortofcooking.blogspot.com/2010/07/mini-peach-tarts.html