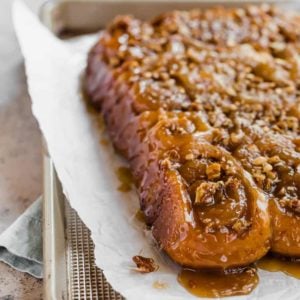
Sticky Buns
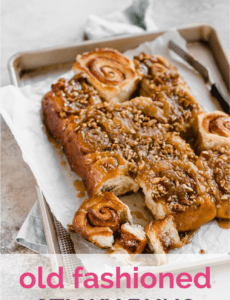
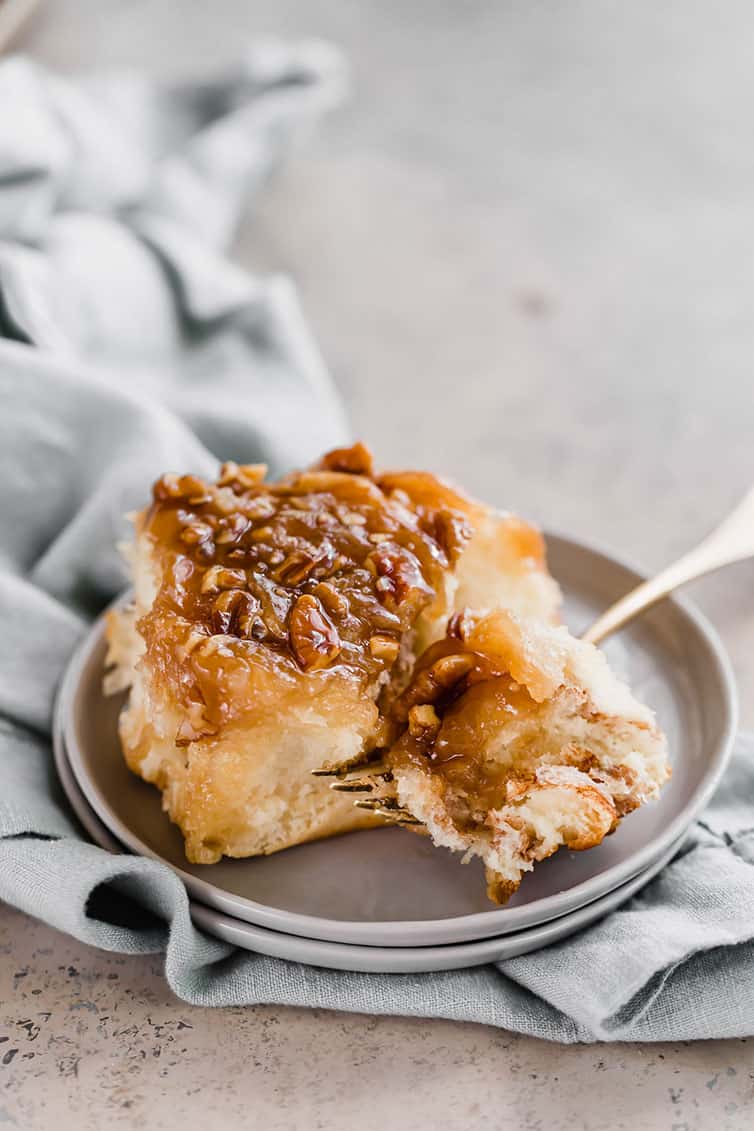
This old-fashioned sticky buns recipe comes complete with a decadent caramel glaze and chopped pecans. Made completely from scratch with a make-ahead option, these are a wonderful choice for holiday brunches, weekend breakfasts, or an extra-special dessert.
Now that the chilly weather is right around the corner (hopefully? It’s supposed to be 90 here today, eek!), I wanted a caramel-y, cozy recipe and these sticky buns fit the bill.
For the longest time, I couldn’t go to the mall without being lured into the cinnamon roll shop by that all-too-familiar intoxicating aroma of butter, sugar, and cinnamon. Nearly impossible to walk away, am I right? Luckily, I started making homemade cinnamon rolls and didn’t need to practice self-restraint every time I went to the mall, but there was yet another recipe I wanted to master at home.
Let me introduce you to cinnamon roll’s tawdry cousin – the sticky bun.
Sticky Buns vs. Cinnamon Rolls
Sticky buns and cinnamon rolls start out as the exact same being – the same master dough recipe is used, and even the cinnamon-sugar filling is identical. Aaaaaand that’s where the similarities stop. Let’s go discuss the differences…
- Cinnamon rolls can be baked on a baking sheet or nestled together in a pan, and then covered in icing or glaze once they come out of the oven.
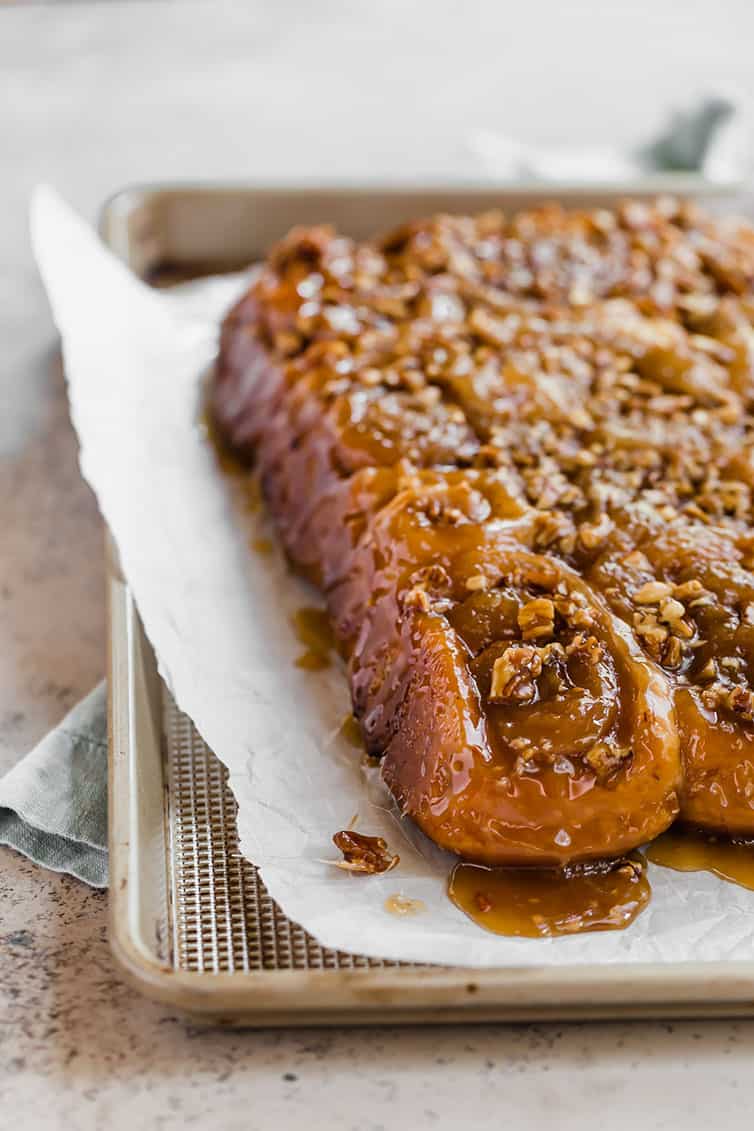
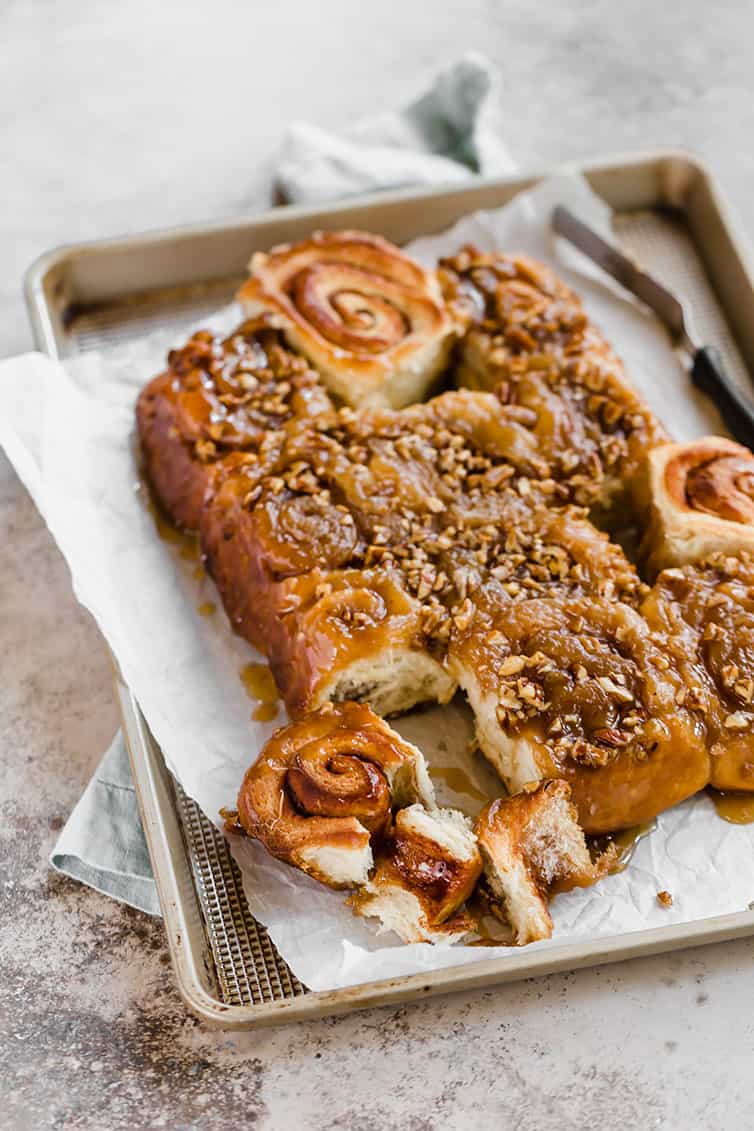
- Sticky buns, on the other hand, are baked on top of a butter, sugar, and corn syrup combination (with pecans!) that turns into an absolute dream caramel situation in the oven. Once they are finished baking, they are flipped upside-down so that all of the caramel they had been sitting in while baking is now drenching the top of them.
- And if you want to go one step further down the caramelized pastry rabbit hole, you must put kouign-amann on your baking list! It’s a fabulous hybrid of a sugared croissant and sticky bun.
I tested caramel glazes that were cooked and went into the pan in a liquid state, and this creamed-together mixture was, HANDS-DOWN, the absolute best at creating a wonderfully thick glaze that was the perfect consistency at both warm and room temperature.
Walking Through the Sticky Buns Recipe
Before you get the whole way down to the bottom and start reading the recipe, let’s give it a quick overview so you know what you’ll be doing:
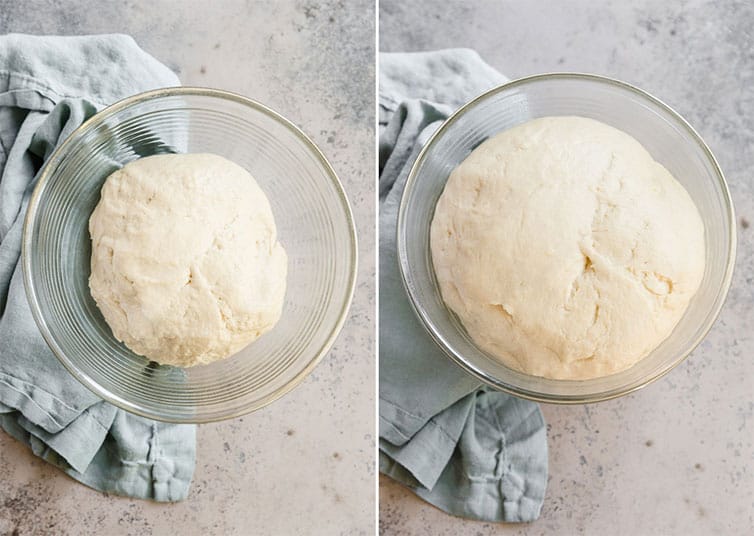
- Make the Dough – This is an enriched dough with butter and egg, which means that it’s silky smooth and a dream to work with. It also means that the fat keeps it from rising quickly, which is why the rise times you’ll see below are slightly longer than other recipes you may have made with instant yeast. I also use bread flour in this recipe, as all-purpose flour created way too much “fluff” in the buns; a denser version is what I was after and the bread flour delivered.
- Allow the Dough to Rise – The dough needs to double in size and this can take upwards of 2 hours (see above as to why!).
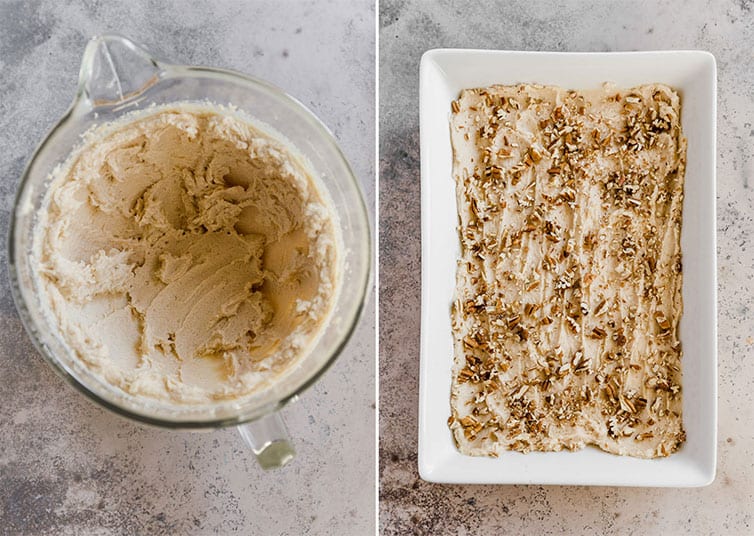
- Make the Caramel Glaze – While the dough is rising, get the caramel glaze ready to go by creaming together butter, granulated sugar, white sugar, and corn syrup until light and fluffy. If you’re planning to use pecans, you can get them chopped up now, as well.
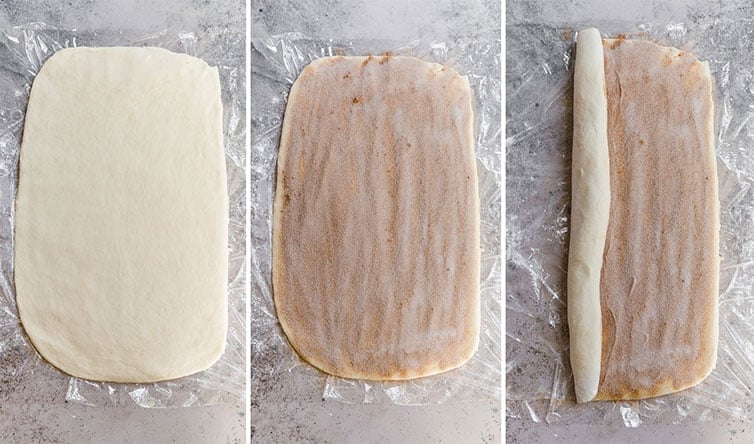
- Roll and Shape the Dough – Next, we’ll roll out the dough into a rectangle, sprinkle it with an obscene amount of cinnamon-sugar (yes, use it all!), roll it up, and cut it into rolls.
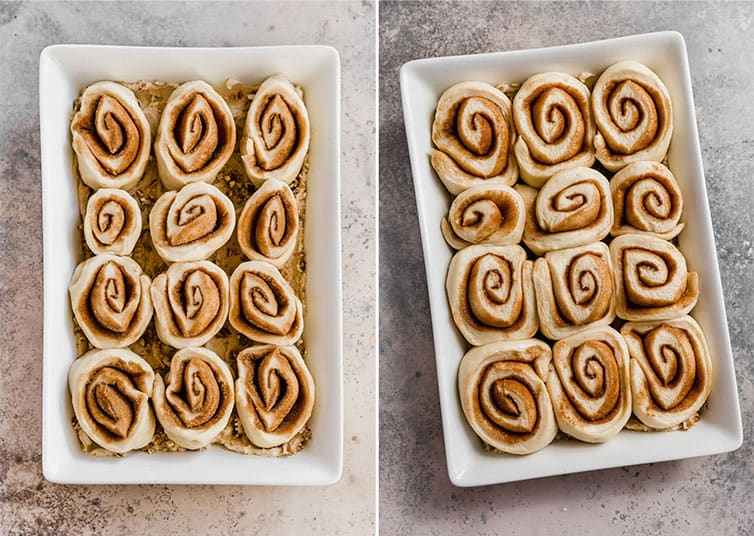
- Get Everything in a Pan – Spread the caramel glaze in your pan, sprinkle with pecans, then place the rolls on top, evenly spaced out.
- Rise #2! – Time to let those rolls puff up and smash into each other.
- Bake – Total bake time takes around 30 to 40 minutes (mine usually clock in right at the 35-minute mark), then let them cool in the pan for 5 minutes.
- Flip! – Take that pan and flip it over, either onto a serving platter or another pan (a rimmed half sheet pan is perfect). Scoop up any caramel glaze that runs off and plop it back on the top of the sticky buns. Allow them to cool a bit, then dig in while still warm or let them cool to room temperature.
Here in Pittsburgh, there is a popular local diner chain (Eat n’ Park); along with their meals, you receive two rolls – one a regular dinner roll and the other, a sticky bun (at least, that’s what they used to do; I haven’t been to one in years!). It’s always such a nice surprise to get to enjoy a pseudo dessert with dinner. In the event you want to get dessert, too… well, there are sticky buns for that! They are famous for their Grilled Stickies a la Mode – sticky buns topped with vanilla ice cream.
Biting into these sticky buns had me remembering the good ol’ days… Those early days in high school before we were old enough to drive when my friends and I would get dropped off at the movies, and then walk to Eat n’ Park for a bite to eat afterward. Then, we’d take turns using the pay phone (gasp!) to call our parents to tell them we were ready to be picked up.
More Decadent Breakfast Recipes:
Watch How to Make Sticky Buns:
If you make this recipe and love it, remember to stop back and give it a 5-star rating – it helps others find the recipe! ❤️️
Sticky Buns Recipe
Ingredients
For the Dough:
- 6½ tablespoon (6.5 tablespoon) granulated sugar
- 5½ tablespoons (5.5 tablespoons) unsalted butter, at room temperature
- 1 teaspoon salt
- 1 egg, slightly beaten
- 1 teaspoon vanilla extract
- 3½ cups (437.5 g) bread flour
- 2 teaspoons instant yeast
- 1 cup (244 ml) + 2 tablespoons whole milk, at room temperature
For the Cinnamon Sugar:
- 6½ tablespoons (6.5 tablespoons) granulated sugar
- 1½ tablespoons (1.5 tablespoons) ground cinnamon
For the Caramel Glaze:
- 1 cup (227 g) unsalted butter, at room temperature
- ½ cup (100 g) granulated sugar
- ½ cup (110 g) light brown sugar
- ½ teaspoon (0.5 teaspoon) salt
- ½ cup (170.5 ml) light corn syrup
- 1 teaspoon vanilla extract
- ½ cup (49.5 g) coarsely chopped pecans
Instructions
- Cream together the sugar, butter, and salt on medium-high speed in an electric mixer with a paddle attachment. Whip in the egg and vanilla extract until smooth. Then add the flour, yeast, and milk. Mix on low speed until the dough forms a ball. Switch to the dough hook and increase the speed to medium, mixing for approximately 10 minutes (or knead by hand for 12 to 15 minutes), or until the dough is silky and supple, tacky but not sticky. You may have to add a little flour or water while mixing to achieve this texture. Lightly oil a large bowl and transfer the dough to the bowl, rolling it around to coat it with oil. Cover the bowl with plastic wrap. Let the dough rise at room temperature for approximately 2 hours, or until the dough doubles in size.
- Meanwhile, make the Caramel Glaze: In the bowl of an electric mixer, combine the butter, granulated sugar, brown sugar, and salt, and cream together for 2 minutes on high speed with the paddle attachment. Add the corn syrup and vanilla extract, and continue to cream for about 5 minutes, or until light and fluffy.
- Transfer the dough to the counter. Roll out the dough with a rolling pin, lightly dusting the top of the dough with flour to keep it from sticking to the pin. Roll it into a rectangle 18 inches wide by 9 inches long. Sprinkle the cinnamon sugar over the surface of the dough (use it all!), and roll the dough up with the long side facing you, creating a cinnamon-sugar spiral as you roll. With the seam side down, cut the dough into 12 even pieces.
- Coat the bottom of a 9×13-inch baking dish with the caramel glaze, then sprinkle the pecans evenly over the surface. Lay the pieces of dough cut-side-up on top of the caramel glaze, evenly spaced throughout the pan. Cover loosely with plastic wrap and allow to rise at room temperature for 75 to 90 minutes, or until the pieces have grown into one another and have nearly doubled in size.
- Make-Ahead Note: Instead of the second rise, you can place the shaped buns in the refrigerate for up to 2 days, pulling the pan out of the refrigerator 3 to 4 hours before baking to allow the dough to proof at room temperature.
- Preheat the oven to 350 degrees F and adjust the oven rack to the lowest shelf.
- Bake the sticky buns for 30 to 40 minutes, or until golden brown. Cool the buns in the pan for 5 to 10 minutes, and then remove them by flipping them over onto another pan or serving platter. Carefully scoop any run-off glaze back over the buns with a spatula. Wait at least 20 minutes before serving. The sticky buns are best eaten the day of baking but can be stored, covered, at room temperature for up to 2 days (see notes below on reheating).
Notes
- While you may substitute all-purpose flour for the bread flour, know it will produce a slightly different texture than what you see here.
- The corn syrup is a key ingredient in getting the exact right texture for the caramel glaze and I don’t recommend making any substitutions.
- Make-Ahead Note: You can prepare the sticky buns through placing the rolls into the pan, then cover and refrigerate for up to 2 days before baking. Bring to room temperature prior to baking as directed in the recipe.
- Once the sticky buns have cooled to room temperature, I recommend a quick reheat in the microwave for 10 seconds for optimal enjoyment :)
Did you make this recipe?
Leave a review below, then snap a picture and tag @thebrowneyedbaker on Instagram so I can see it!
Update Notes: This recipe was originally published in May 2012; it was updated in October 2019 with new photos, a video, and extensive better recipe instructions.
[photos by Ari of Well Seasoned]


Wonderful, a hit at work and home. I am a beginner baker and these are pretty easy especially the way the directions are written.
Love this recipe
And very easy
Hi. I just made these over the weekend. Delicious! My only issue was that my sticky buns were light colored, not dark. I did use a clear glass baking dish. Could this be the reason?
Thank you.
By white sugar, do you mean confectioner’s sugar or 10x?
My hisband and I agree that these are best sticky buns we’ve ever had. The recipie was spot on and easy to follow. It’s time consuming to be sure, but so worth the effort!
can honey be substituted for syrup ?
These are amazing! Would love to see all the ingredients listed with the gram equivalent.
Oh my goodness! These were to die for!
Happy Sticky Bun Day!
Awesome…. Your article gives very clear data
https://www.seabreezedentistry.com.au/department/clear-aligners/
Great blog thanks for this content i really like it this type of blogs.
https://www.seabreezedentistry.com.au
Question about printing the recipe. When I look at the recipe, it has both metric and US. But when I go to print the recipe, I have to select US or metric. I always weigh out my flour, sugars, etc, but I always look at US amounts needed, so I don’t need an extra amount of butter. Is there anyway to print both amounts? The Sticky Buns recipe was fantastic. Love your recipes. Happy New Year!
So I’ve made these the past couple of Christmases and they are a HUGE hit! This year, we are running into some scheduling issues. Do you think making them three days ahead would work? Would it mess up the rise? Thank you!!
I have used two nine-inch cake pans instead of a 9×13 pan. This works well.
This recipe sounds delicious. I’m wanting to make mini sticky buns in a 6-inch pan to give as Christmas gifts. Any thoughts on how to adapt the recipe?
This was a big hit at a party. Served them still a little warm. Making them again today. This is an awesomely decadent sticky bun! Much better than the honey-based glazes I’ve tried before.
AH-mazing!!! I only had enough ingredients to make half of the glaze and it was perfect! My husband always prefers about half of the frostings on cakes and such so this worked out great for us. Buns took 30 minutes to bake! Everything done as instructed and it was SO fun! Thank you!
There are a few problems with this recipe compared to the Philadelphia sticky bun I grow up with.
1. No corn syrup in the glaze. Add a tablespoon of of water to the glaze and bake in a black metal pan. Then the glaze caramelizes and becomes a little chewy. The glaze should not be running but caramel.
2. Roll up most of the pecans with the cinnamon sugar. You can also add raisins to the roll.
3. Use only brown sugar.
Yes yes and yes! How my mother made them in the 50’s!
I have made these several times. They have never failed me and by using the bread flour the texture of the buns are so light and yummy! Getting ready to make again for Christmas morning!
These are hands down the best Sticky Buns I’ve ever made. They remind me of my childhood and my grandmother having a warm pan of gooey sticky buns ready when I visited.
My husband and my neighbor both told me these cinnamon rolls are the best they ever had! It was great because it was also my first time making any cinnamon roll not from a package. Excellent recipe, very good instructions.
I love these and want to make some ahead for after the baby comes. Is there any advice you could give for freezing these or if I even could?
Hi Danielle, Yes! You can bake them and then once cooled, freeze individually (wrap in plastic wrap) and place in a resealable ziploc bag. Thaw at room temperature or in the microwave. You can also follow the make-ahead note in step #5 and instead of putting it in the fridge, put them in the freezer. Thaw overnight in the refrigerator and then proceed as directed by taking them out of the fridge to rise at room temperature for 3 to 4 hours before baking.
Made these two weeks ago. They were absolutely delicious! Very similar to a variety I would get at the Jersey shore from a bakery called Mallon’s. Did have some problems though – the butter liquid in the pan while cooking rose up over the sides of the pan and burned my over floor. I used a 9 x 13 pan cake pan. Do I need a different kind of pan? I froze half of them for a few weeks from now when we have some some guests coming. This recipe was time consuming, but really worth it. So wonderful!
These buns caramelized perfectly! Sticky, gooey and crunchy perfection.
I haven’t made these yet, will definitely for New Year’s Day, but will substitute (real) maple syrup for the corn syrup. Growing up in NYC, I am also partial to raisins in sticky buns.
Hi,,, thanks so much….can’t wait to try…BUT: what is the window pane tes?
Happy New Year.
Phyllis B
how do i know if it is better to bake something in a glass pan or metal pan?
I just completed the second rise, but now it’s 8pm and I’d rather wait until morning to bake them so everyone has fresh buns for breakfast. Will it work to put them back in the fridge until morning and then let them come back to room temp before baking?
I have never baked anything like this, but do know that I want a tighter spiral, By that I mean I don’t want the bread part of the roll to be more than 1/4” thick when cooked. How do I do that?
Thanks,
‘Daniel
Try rolling your dough thinner, like a 12 or 14×18″ rectangle. Continue as usual. That will give you 12-14″ of dough to roll for your increased spiral.
Made this dough last week for a batch of cinnamon rolls and they were SO good (better than the ones from Robin’s!). I used the filling from one of your cinnamon roll recipes, but I did almost double the cinnamon (😋) plus adding nutmeg and a bit of cloves. For anyone interested: I’ve been using sprouted whole grain (wheat) flour in a lot of my baking bc it’s easier on people who are sensitive to gluten. For this recipe I used half sprouted flour and half all purpose flour (didn’t have bread flour). It came out beautifully. The only difference in making the rolls was a bit longer kneading time. They rose well and the finished rolls were very tender. I have found that the sprouted flour makes lovely moist and tender baked goods. I’ve made brownies, chocolate cake, chocolate chip cookies, chocolate cookies, and pizza dough using ONLY sprouted flour; all worked very well. The pizza crust comes out the color of a whole wheat crust, but the texture is nice. I’ve just made the dough for babka using half sprouted/half all purpose, so I’ll see how that turns out.
I substituted 1.5 cups of flour with all all purpose flour and 1/4 cup of maple syrup for 1/2 cup of maple syrup. I also used 2 5 x 7 pans and they baked evenly and perfectly for 35 minutes at 350 deg F. Thank you for this recipe, this is a keeper.
Followed this recipe to a T, and the end result was 100% worth the time it took to create this masterpiece. Perfect liquid to dry ratio. Did not need to add more liquid or more flour! It was perfect. I wish I could add a photo! You know how sometimes you make a dessert/meal and after you finish your serving, you say… “that wasn’t really worth the calories”? This is TOTALLY worth every calorie I inhaled!!!
I’m an old Pennsylvanian , I used the recipe ,but assembled a little different, first the milk was scalded and the butter,salt and sugar added and let cooled and the active yeast added (didn’t have instant) let bloom 5 minutes. Added to two cups of the flour in mixer with dough hook. Let combine and added the egg and kneaded 5 to 8 minutes and gradually added balance of flour as needed . Took ninty minutes to rise. Made Carmel sauce in saucepan , cutback quarter cup butter and light and dark brown sugar and added rum extract to both instead of vanilla. (low on vanilla) and dissolved sugar over medium heat. Doubled the pecans. Turned out perfectly, I like your dough.
I’ve made other sticky bun recipes before, but this one is crazy-crazy-good. I wouldn’t call this a beginner project — I’ve made 4 batches in varying climates (humid coastal and dry desert) and had to add an astonishing amount of extra flour (yes, bread flour) to get the dough to what I thought was the proper consistency, and that’s after I already dropped the milk down to 1 cup! It doesn’t matter to me because I know what I’m looking for. I also know to knead the dough to the windowpane stage which is much more specific than “silky & supple.” Sorry, I’m a total nerd…
Anyway, I will never look for a better recipe – this is it!!!
Awesome recipe! It was really easy to make this vegan, using aquafaba instead of an egg (2 tablespoons), almond milk and plant based margarine.
Thanks!
I made these once just to try something different..now i cant make enough of them….i am making three and four dozen at a time for my dad and his friends!!!!
The dough is perfect! Will be making again with less caramel glaze (was too much for us) and with a few more minutes in the oven after turning over to brown the center
Same! I’m glad it wasn’t just me.
Made these for Christmas morning, and they were so good! First time I’ve ever made sticky buns. The recipe was easy to follow and worked great as a do ahead one. I made them Christmas Eve, put them in the refrigerator and pulled them out for the second proof before I went to bed. Baked them in the morning and they came out perfect! Everyone loved them. Definitely will make again.
The most heavenly , delicious and everything I wanted recipe. I’m making some more today ♥️♥️
This recipe is absolutely perfect! A great change of pace from the canned cinnamon rolls my family normally enjoys. The caramel glaze is killer!!!! Thanks so much for such a phenom recipe!
these are the best. took me back to childhood. thank you
I make sourdough bread quite often and with that you do not use anything metal. However, my mixer has a metal bowl. I just tried this recipe and it was a fight because my glass bowls do not fit my mixer. Question is, can this dough be made in a metal bowl?
I just made a batch yesterday and mixed it in my regular Kitchenaid metal bowl and let the dough rise in it as well. It came out perfectly fine… out of this world, actually.
Made mine in metal kitchenette bowl. Never made before turned out awesome!
Professional bakeries only use huge stainless steel bowls with their Hobart mixers for all their dough items. Give it a try.
This recipe is amazing! Well worth it ! Yummmmmmm!
HELP!!! Would like to make these but do not have bread flour. Can I use only regular flour?
Hi Tanya, Yes you can still use all-purpose flour, the texture of the sticky buns will be a bit fluffier, but they should still be delicious :)
I was very disappointed with the outcome. The middle seemed still raw. I think there was too much goo. Won’t be making again.
This recipe took a while but it was worth the wait. Absolutely delicious! I like the vanilla in dough. I might put in a bit more cinnamon. This is going in my covid-29 diary of greats.
These take a long time and a lot of effort to make but they sure do pay off! These are absolutely delicious and I’ve received a lot of compliments!!
although I have found flour to be bought, YEAST is not available…. I think everyone is baking bread,and more during the Corona virus awful time….BUT…. I found regular active yeast….. can this recipe be made with that? what to change re timing?
thanks
Phyllis
Hi does the baking dish have to be Pyrex ? Would it affect the caramel glaze If it was a non stick metal baking tin ??
I don’t have corn syrup, and certainly not heading to store for this under these circumstances. What can I use as a substitute??
I used maple syrup and it turned out great!
You can also substitute molasses or honey. I agree with the previous post- maple syrup would be lovely! Some people have also used pancake syrup which usually is mostly corn syrup. We are using molasses today mixed with some maple syrup.
Wonderful recipe! I normally try to “healthify” most of my baked goods (by replacing half of the flour with whole wheat, cutting sugar in half, replacing most of the butter with EVOO, etc.) but I decided to follow the recipe as written for the first time, because sticky buns aren’t really supposed to be healthy, y’all know? They were so good! I have a wildly inconsistent oven, so the tops browned before the bottom really cooked, so I popped them back in the oven with just the bottom heating element turned on, and they were perfect!
My dough only has 10 minutes left to rise and it has not bloomed AT ALL. I followed the recipe but used regular flour. I did need to add more flour during the needing part of the recipe. What did I do wrong? Tips? Do I need to trash and start over?
I loved the recipe, just one missed information… Depends of the baking dish that you uses I recommend put a sheet pan under to bake, because the caramel over flooded and drip on the bottom of the oven creating a lot of smoke and a very dirty oven.
This is a fantastic recipe! I followed instructions exactly and they turned out great. I really love that the caramel doesn’t need to be cooked in advance and, even better, that it doesn’t get super hard after it comes down to room temp.
Quick question…
After flipping these I found that the buns in the middle were still very pale. Luckily I flipped it onto an oven safe platter and was able to throw it back in the oven for 10 minutes to brown the top, but wondering if you know why this happened?
Can I make the dough in my bread machine?
I’ve typically avoided yeast and rolling pin required recipes. But, the craving and need to prove to myself if I could make them or not, I searched for and stumbled across this recipe for sticky buns. Off the bat it was appealing because it didn’t require the milk to be heated to a certain temperature (I’ve had to start recipes over many times by screwing up this first step) From A to Z this recipe was easy to follow and the results were amazing. I will definitely be making this again!! Thank you!
I was looking for a recipe for a sticky bun like my grandmother used to make. This is the closest i have found yet. She had her’s memorized and never wrote it down for us. Sadly it is gone but i will be trying these soon. Thank you for posting the recipe.
this is a keeper! Thank you! I am a cinnamon roll fanatic and have made oodles of recipes over the years. This is the best sticky bun I’ve come across! I baked mine for thirty three minutes. Perfecto! Oh and next day they were still TDF warmed for a few seconds in the microwave! Thank you Michelle for another fantastic recipe!
Sooooooooo delicious!😍 them… I love to bake and bake all kinds of stuff but have always avoided (like the plague) yeast doughs. They just seem so fussy. Any time I tried to “bloom” yeast in the past I’ve been afraid the liquid is too warm or too cool and it isn’t working so I’ve just kind of sworn them off…. until this bake- along. I just can’t resist a great sticky bun so I decided to give it ago today. But I didn’t have bread flour! Ugh! BUT – I had the time and everything else today so I made them with AP flour. O my gosh! We love, love, love these sticky buns! I can’t believe I made a yeast dough and it rose (no blooming necessary 🤯). Sooo good! I’m excited to try them with bread flour soon to see if I like them even better – but that’s hard to imagine! Thanks, Michelle, for the great recipe and the confidence to try a yeast dough since the recipe came from you!
These sound really yummy. I don’t have a mixer with a hook. Can I make the dough in my bread machine?
I’m going to try this but use my regular cinnamon roll recipe. I noticed you don’t use butter on your rectangle of dough before you put on the cinnamon/sugar mixture. Does that mess with the caramel glaze in some way?
Hi Ellen, The first iteration of this that I did just came out way too soupy, but I think there was too much butter and it was too soft. If you do a moderate slathering, I think it would be fine if you prefer it!
While I have not made this exact recipe I have been making cinnamon/sticky rolls for Christmas morning for the last 45 years! I have never used corn syrup for my glaze, have always used melted butter, brown sugar and chopped pecans. I am going to make your version soon as a trial before the holiday. I also have only used white flour. I make huge quantities for each of my 3 children’s families and end up like a crazed lunatic on Xmas Eve. How can I make this easier? Is there a way to make ahead and freeze or would they loose the just baked deliciousness? Please help me find a way to keep the tradition and not run myself ragged this year! I love your posts and your recipes are great. Thanks, Tired Grandma
Hi Jeanne, You can make ahead! You can bake them, let them cool completely in the pan, then cover tightly and freeze for up to 3 months. Thaw overnight in the refrigerator and then reheat, covered, at 350 until warmed through. What an awesome grandma you are!
In what amounts do you use the butter/sugar ratio. My gma never used corn syrup either and I want to keep it as close as possible but she never wrote down the recipe. TIA!
These were amazing!! I did have trouble with the glaze running over and out of the pan. But even with that mess and the smoke alarm going off – these are definitely a make again. Thanks for another great recipe!!!!!
Oh no, smoke alarms are the worst! But so glad you enjoyed the sticky buns! :)
This recipe looks great! Can’t wait to try this dish.
yummy buns, very well you explained.
Ooooooh. Caramel…warm caramel. Something I learned to like as I got older. My sister calls them “old lady taste buds” lol. Things I started to like later in life, maybe after 40. And I’m well past 40😊 things like caramel, coconut, to reeeeeeaaaally liking eggs, and of course butter pecan icecream. One of my Grandma’s faves.
Wow!! Can’t wait to bake it & most importantly eat it! :D
Do you have to use instant yeast or can you use regular dry yeast that I buy in bulk at Costco
Hi Mary, I really recommend the instant yeast with this enriched dough since it already takes awhile to rise. If you use regular dry yeast, you’ll need to warm the milk to about 110 degrees F and bloom the yeast in the milk before using, and expect longer than noted rise times.
OMG. I was JUST craving EatNPark grilled stickies. A friend asked how she could get smiley cookies sent to her in Michigan and I commented that I wanted stickies. Lo and behold- I googled “Eat N Park Grilled Stickies” and you came up. MY HERO!
Hi! Is it possible to freeze the sticky buns once you have assembled them for the second rise? If so, how long can they be frozen and how would you proceed in baking them?
Hi Hannah, I’ve never done that so I can’t give you a definite answer, but it SHOULD work. I would freeze for up to 2 months, and then I would thaw in the refrigerator overnight, and bring to room temperature before baking, then proceed as directed.
My sister makes sticky buns every Sunday morning with frozen (commercial) rolls. Her method is to make the caramel topping, spread it in the prepared pan, place the frozen rolls on the caramel, cover and let rest on the counter overnight. They thaw and rise perfectly and are ready for the oven in the morning.
Hi Michelle love this recipe looks absolutely perfect for breakfast, would you be able to tell me the measurements in grams? Because I know size of cups differ thank you :)
I started these last night to have ready for breakfast this morning. A little treat for my husband who would be shoveling snow all morning. Holy cow! These are ridiculously amazing. And dangerous:) As I took them out of the pan I thought to myself “Oh-oh. What was I thinking making these!” Also, you inspired to to buy The Bakers Apprentice. Great book. So glad you brought my attention to it:)
Hi Michelle,
im a huge fan of your blog — like HUGE !!!! i had an idea and wanted to know what you thought. Id like to make your Cream Cheese Cinnamon Rolls Recipe (sans cream cheese because i dont have any right now ;) ) So basically – make cinnamon buns, but then use the caramel glaze to create a sticky bun instead of the classic cinnamon roll.
Would this work? I dont see why it wouldnt but i wanted to get your professional opinion.
Hi Duby, Thank you! I think you could definitely do this! Let me know how they taste :)
hi Michelle,
it worked out great !!! i had a small issue that the buns in the middle were sunken in and raw. The outer buns were perfect but the inside ones werent. Im wondering if i squeezed too many in one pan? They were golden brown on top so i figured they were baked enough. Hmm… they definitely tasted great, i’ll just have to practice again to get it perfect.
Thanks for your awesome blog !!!!
I was looking for the recipt from the people that did the Renissance Faire in So Cal. Best sticky buns I have ever eaten. But these also look good, so I will give it a try.
Thanks for posting the recipe! I don’t have a bread maker or a dough hook attachment and so if i knead the dough by hand, should I be aiming for a pass on the window pane test? Thanks!
Hi Stephanie, I double-checked the original dough recipe from Peter Reinhart because he mentions the windowpane test often, but he didn’t for this one. Just if you knead by hand to knead for 12 to 15 minutes, until the dough is supple and tacky, but not sticky. Hope that helps!
Thanks Michelle!
These look amazing and I’m looking forward to trying these! Quick question… I noticed that you don’t “proof” the yeast by mixing it first with warm milk and then adding it to the flour, etc… like you would when making other yeasty doughs. I’m new at yeast doughs so I’m just a little concerned and a bit afraid to waste all those ingredients. Will the dough definitely rise even if not proofed beforehand?
Thanks so much!
Hi Margaret, When you use active dry yeast, it must be proofed in warm liquid to activate it. However, when using instant yeast, you can just whisk it into the dry ingredients; no need to proof it first. This recipe uses the instant yeast, which is why you don’t need to combine it with a warm liquid first.
Ohhh… I just learned something new! :) Thanks so much for the quick reply and for clearing that up for me. Now I’m anxious to try out this recipe!!
Having moved away from western PA years ago, I rarely get to an Eat ‘n Park to enjoy their Sticky Buns. I love anything that even looks like a cinnamon roll so when I saw this recipe on Pinterest, I repinned it right away! I made these today and they are WONDERFUL! My husband loved them! I made the dough in my bread machine and used mostly all purpose flour as I was almost out of bread flour. I made 24 smaller rolls and baked them all in a 13×9 pan for 30 minutes. I will definitely be making these again soon! Thanks for giving us a little taste of “home”.
I made these for breakfast and it is one of the best things I have ever tasted. Thank you for posting this recipe. My 2 year old Emma declared them delicious!
I made these last night and brought them into the office. Both my kids and my co-workers said they were delicious. Thanks for sharing the recipe!
Perfect! Ahh, Eat N Park…18 high schoolers piled into 3 cars after a Friday night football game to eat dessert and french fries and drink copious amounts of soda. If only I had that metabolism again.
I think my wife wants to make these…
drooling…
Okay, this recipe makes me want to run to my kitchen and make these right now! How about this for a blast from the past? ( You will get this being a Burgh girl) Calling my dad from the pay phone to pick me up in front of Joseph Horne’s !WOW !How fun !
Haha! I totally remember Joseph Horne’s! Love it!
I’m usually not a huge fan of sticky buns because they’re swimming in pecans, but yours look amazing! I love that you added a scoop of vanilla ice cream on top, that’s my kind of breakfast :)
You had me at sticky. *sigh*
They look gorgeous!
My husband would jump up and down for these.
I’m with you on being drawn to the mall cinnamon rolls as well as the hot pretzels slathered in melted butter! The sticky rolls look and sound just perfect!
Oh gosh, the pretzels! Very rarely can I go through an entire mall trip (or outlet shopping) without getting one!
You are right, the cinnamon aroma is something that we cannot resist. I remember that at Miami Airport there was a cinnamon roll shop, so each time I traveled to the US (Miami is the main entrance for most of the LA countries), that smell makes me stay there.
The same happens on the malls, I don’t know, between the cinnamon and cookies smell.
This recipe is amazing, I’m just imagine me eating…it’s really mouth-watering…
Yum! These look amazing!!
I have the same memories if Eat N Park. Love the smilie cookies!
:-)
Ooooh your buns look amazing! I meant your Sticky Buns, of course! I’ve make this often and cannot agree with you more. These are hard to resist. Thanks for sharing the recipe :-)
Yum! I love sticky buns and these look amazing!
Oh, I miss good sticky buns…we used to get ours from the Amish at the Reading Terminal Market and they were just the best!! Yours look amazing :)
A restaurant that gives you a sticky bun with your meal?! I love that! And I have never tried a sticky bun topped with ice cream but I’m pretty sure it would be a piece of heaven.
Wow. these sticky buns looked so delicious and then I saw that you put ice cream over the top. that sealed the deal for sure. Looks amazing.
Yum! I’ve been craving Cinnabon for about six months, but haven’t been able to find one around me. It means I’ll have to visit one the next time I’m on the east coast..
Also, was watching a movie this weekend where I saw a payphone in the middle of Brooklyn! Can’t remember the last time I saw a payphone anywhere!
My FAVORITE smell- next to freshly brewed coffee- when I walk around NYC in the early morning is cinnamon buns. Heavenly.
These might need to make an appearance in my kitchen, pronto.
Pretty sure that these could help me get up in the morning!
I am so happy that you have posted this recipe, I love sticky buns, and when topped with ice cream it looks like a dream of mine came true!
These look SO much better than my oatmeal:)
For those like me who are “yeast killers”, I’ve found that refrigerated crescent & pizza dough can be used to make pretty good cinnamon rolls. The corn syrup is the secret to keeping the glaze gooey.
I’m so glad you posted this recipe! My family has a farm in Pennsylvania and we’d always pick up a pack of sticky buns from the Farmer Martin’s every time we went out. Are these technically supposed to be for dessert? Because we always ate them for breakfast. They are not the same as cinnamon rolls, and I’m so glad to have found a recipe to make at home!!
Hi Ali, I eat them for breakfast, snacks, and dessert. No rules, as far as I’m concerned :)
Oh yum! I haven’t had sticky buns since my Grandma would make them when I was a kid. What a wonderful recipe!!
I hate to admit this, but I don’t think I’ve ever eaten a sticky bun before. Now I feel like I should make this recipe just so I can try one. They look amazing!
Mmmm that cinnamon flavour and oozing caramel glaze are to die for! These look incredibly delicious, and you are definitely not alone in experiencing the temptations for the cinnamon bun stores.
Thank you for the recipe but i want to know if it is possible to change shortening for butter in the dough
Hi Maria, Yes, you can use butter (unsalted, at room temperature) in place of the vegetable shortening.
These look sooo sticky! A must for sticky buns. Awesome.
Ice cream on sticky buns??? I’m a Pennsylvanian, but this is news (great news!) to me.
Speaking of pay phones. I was travelling this weekend and I actually saw…wait for it…a BANK OF PAY PHONES at a rest top in South Carolina. I should have taken a picture.
What’s a pay phone?? (Haha) these look amazing! I’m a huge sucker for cinnamon and sticky buns. They are one thing I can never refuse…
Wow, these look deadly! If I could wake up to this, getting up at 4:45 AM would never be a problem.
I am all about the stickiest & gooey-est cinnamon buns. These have me drooling!