Homemade Choco-Bliss Snack Cakes
[donotprint]
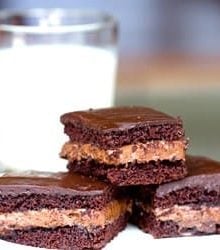
Raise your hand if you remember the Hostess Choco-Bliss snack cakes from the glory days of the ’80s. These were one of the many “junk foods” that were seen few and far between at my house. I could probably count on one hand (maaaaaybe two) how many times I actually ingested a Twinkie, Ding Dong, Hostess Cupcake, Fruit Pie or any snack cakes during my entire childhood. They were always so tempting in the checkout line, but were usually off-limits. I didn’t even know the glory that was Little Debbie until I was in high school! Our high school somehow managed its class schedule so that every single Friday was a half day. Don’t ask me how it was done – it was a small, Catholic high school – but, suffice it to say, everyone was pretty happy with that arrangement. For four whole years, I never had school past 12:20pm on a Friday. Upperclassmen (juniors and seniors) were dismissed at 11:20 and freshmen and sophomores at 12:20. It was a tradition for the junior class to raise money for the prom by selling snacks and pop to the underclassmen to eat during their final period on Fridays. This is where I discovered the land of snack cakes, and there was no going back! Little Debbie managed to undo all of my mom’s previous 14 years of discipline. Oops! When I saw a recreation of the Choco-Bliss snack cakes – moist, chocolate cakes with a fluffy chocolate filling and rich chocolate icing – on King Arthur Flour’s website, I had to bake them up. Immediately.

These little babies are some of the most amazing chocolate treats that I have ever baked up. The chocolate cake is so incredibly moist and the filling is totally irresistible. It’s fluffy, sweet and incredibly chocolate-y. I couldn’t help taking taste after taste while I was assembling the cakes. It took so many tastes, in fact, that I totally ruined my dinner that day. No matter, it was absolutely worth it. On top of the filled chocolate cakes is a rich chocolate icing that sets firm and completes the snack cake recreation. No snack cake was complete without that fudgy icing on top, right?!
These are cut into snack cake-size portions, but there are two important things you should know: (1) With all of that chocolate, you’ll definitely want to eat these with a glass of milk; and (2) I have an extremely hard time eating just one at a time. Needless to say, I absolutely loved these chocolate snack cakes – they were a perfect replication of the original, and they brought back fun memories of high school and carefree Friday afternoons. I love when food can trigger memories!

One year ago: Homemade Primanti Bros. Sandwich
Two years ago: Savory Corn and Pepper Muffins
Three years ago: Ultimate Ginger Cookies[/donotprint]
Homemade Choco-Bliss Snack Cakes
Ingredients
For the Cake:
- 1 cup (227 g) unsalted butter
- ⅓ cup (28.67 g) Dutch-process cocoa powder
- 1 cup (250 ml) hot water
- 2 cups (250 g) all-purpose flour
- 1 teaspoon espresso powder
- 2 cups (400 g) granulated sugar
- 1 teaspoon baking soda
- ½ teaspoon (0.5 teaspoon) salt
- ½ cup (120 ml) buttermilk
- 2 eggs
- 1 teaspoon vanilla extract
For the Filling:
- ⅓ cup (28.67 g) Dutch-process cocoa powder, sifted
- ½ cup (90 g) semisweet chocolate chips
- ¼ teaspoon (0.25 teaspoon) salt
- ½ cup (119 ml) heavy cream
- 1 teaspoon vanilla extract
- ¼ cup (56.75 g) unsalted butter, at room temperature
- ½ cup (102.5 g) vegetable shortening, at room temperature
- 4 cups (480 g) powdered sugar, sifted
For the Icing:
- 1 cup (180 g) semisweet chocolate chips
- 1 tablespoon light corn syrup
- ½ teaspoon (0.5 teaspoon) vanilla extract
- ⅓ cup (79.33 ml) heavy cream
- ¾ cup (90 g) powdered sugar, sifted
Instructions
- 1. Preheat oven to 350 degrees F. Line a 9x13-inch pan with parchment, then grease and flour the pan; set aside.
- 2. Make the Cake: In a small bowl, melt the butter, then stir in the cocoa powder and hot water until the cocoa is completely dissolved; set aside.
- 3. In a large bowl, whisk together the flour, espresso powder, sugar, baking soda and salt; set aside. Pour the cocoa mixture over the dry ingredients, stirring to blend completely. Add the buttermilk, eggs and vanilla, and stir with a rubber spatula until completely combined.
- 4. Pour the batter into the prepared pan. Bake for 30 minutes, or until a toothpick inserted in the center comes out clean and the cake begins to pull away from the edges of the pan. Remove from the oven and cool completely on a wire cooling rack.
- 5. Make the Filling: Place the cocoa powder, chocolate chips, salt and heavy cream in a microwave-safe bowl. Microwave until the cream is very hot, and the chips have softened, about 1 minutes. Remove from the microwave and stir until the chips are melted and the mixture is smooth, microwaving again briefly if necessary. Stir in the vanilla and set aside.
- 6. In a large bowl, beat together the butter, shortening and half of the powdered sugar on medium speed until fluffy, about 3 to 5 minutes. Add the chocolate mixture and continue beating until smooth. Scrap the sides of the bowl and add the remaining 2 cups powdered sugar. Beat again until the filling is fluffy.
- 7. Assemble the Cakes: Turn the cooled cake out of the pan and cut it in half crosswise, to make two 9"x6.5" rectangles. using a long serrated knife, slice through the middle of each rectangle to make two halves (a top and a bottom).
- 8. Spread half of the filling on one bottom piece to the edge of the cake. Repeat with the other bottom piece. Top the bottom pieces with the top pieces. You should now have two chocolate-filled 9"x6.5" cakes.
- 9. Make the Icing: Combine the chocolate chips, corn syrup vanilla and heavy cream in a microwave-safe bowl. Microwave until the cream is very hot, and the chips have softened, about 1 minute. Stir till the chips have melted and the mixture is smooth, microwaving again briefly if necessary. Add the powdered sugar and beat on medium speed until smooth.
- 10. Spread the icing evenly over the two cakes. Working with one cake at a time, slice into nine 2x3-inch snack cakes. Repeat with the remaining cake for 18 total snack cakes.
- Store the cakes at room temperature in an airtight container (you can wrap them individually in plastic wrap to keep them extra-fresh) for up to 3 days.
Notes
Did you make this recipe?
Leave a review below, then snap a picture and tag @thebrowneyedbaker on Instagram so I can see it!


I am so excited to see a recipe for a chocolate-bliss remake! I was in junior high when these were popular. 😛
Stumbled across this while having flashbacks of Choco-bliss / Choco-licious. I do want to add though, that it wasn’t Little Debbie that released and marketed these. It was Hostess.
hi , i haven’t microwave for making the filling , is there any other way that i can do it?
thank you
Hi Peri, You can do that step with a double boiler set up on the stovetop.
Hiya, I’m new to baking and can’t wait to try some of your recipes. However I’m from England and I just wanted to know what all purpose flour is? In England we have either plain flour or self raising flour.
Thank you.
Mari
Hi Mari, You would want to use plain flour when all-purpose flour is called for.
I went over to my mothers today and we made these. They came out INCREDIBLE! I’m glad we added the espresso powder. It definitely enhances the chocolate. But it is okay if you don’t have it. Some say its optional. And the dutch cocoa powder was hard to find for us, so we were told we can substitute it for Dark Chocolate Cocoa powder (Hershey’s). It worked wonderfully. We will definitely be making these again. I grew up in the 80’s and I remember eating Chocobliss all the time. Deeeeeelicious! Thank you for this recipe!
I was wondering about the difference between baking soda and baking powder.. Would it be possible to use baking powder instead of baking soda?
Also, does the baking powder lose its effect if it is opened and refrigerated?
Thanks! :)
You usually cannot interchange baking soda and baking powder. Here is a good write-up on the differences: http://www.seriouseats.com/2010/06/what-is-the-difference-between-baking-powder-and-baking-soda-in-pancakes.html. If you scroll towards the bottom, you’ll see a succinct summary of the differences, as well as how you can test each to make sure it’s still active.
I have no memory of the 80’s for anything! Where did the time go and what happened to me? These look yummy and may make for Christmas as one of the desserts I’ll be bringing for dinner. Thanks for the recipe!
Made these today. The cake is super moist! This cake would also make a perfect Suzy Q with vanilla creme filling. Think I will try that. If you have trouble splitting the cake, dental floss will do the trick. Easy to hold even while running through the cake.
Slu…rrrp! I just HAVE to make this! Is there any alternative to heavy cream? I’m not quite fond of the greasy taste it sometimes tends to have…
Hi Shreya, I would use the cream; I’ve never experienced any type of greasiness from it. Cream is the common ingredient used when making a ganache or thick icing.
these look so yummy!
I don’t remember these… but they look delicious! I’ll try anything chocolate!
I have been searching for this recipe for months! Thank you so much!
Yum these look delicious! This will probably be the first recipe I try after my vegan challenge! Definitely something to look forward too.
I am not a huge fan of baking with shortening, is there a work around or do i just need to get over it :P ?
Hi Barb, I don’t bake with it often, but there are definitely some recipes that work better with shortening, as it’s not 100% interchangeable with butter – they have different properties and you’ll get different results. I think as long as you’re not eating it everyday, a once in a while treat is okay :)
These look delicious!
I am going to have to make these in the next week or so for my son who will be leaving for college. Michelle do you think these might survive in a care package if they were wrapped really really well?
Hi Lori, Yes, if you wrap each one individually and then store them in an airtight container or bag, they will definitely last. I hope your son enjoys them, I always loved goodie packages from my mom when I was in college :)
Wow! I’ll have to try these when I have some serious time – but they look well worth the effort! yummy
They look delicious! Knowing how much you like peanut butter & chocolate, I’m surprised that you didn’t post a PB version.
I am not a fan of using shortening in recipes…..reassure me that i really need to use it in this one ;)
Hi Barb, Well, the good news is that Crisco no longer contains trans fats. So there’s that. Honestly, I hardly ever use it, but there are some recipes that are just so much better when it is used. It has different properties than butter and creates a different texture. As long as you’re not putting it in everything and eating it every single day, I think it’s okay for the occasional recipe. And this one is DEFINITELY worth it :)
These look fanatstic!! I am an 80’s girl and definitely remember these snack cakes. I try to stay away from Hostess, Tasty Kakes, Drakes, and Little Debbie these days, as I don’t have the metabolism I enjoyed in the 80’s, but If something is homemade it’s healthy right? And fat free right?? Who cares, these are on my to make list next time a chocolate craving hits.
Absolutely! :) Happy baking!
These look amazing!! I’m getting hungry!!
My mother and I shared an obsession with the Hostess Choco-Bliss bars. Why on earth did Hostess discontinue them? I may have to make these in her memory, trans fats be damned.
Actually, Crisco doesn’t have trans fat anymore, so there’s that :)
I tend not to comment on chocolate desserts because I’m allergic to chocolate, but these look so unbelievably amazing that I couldn’t resist. I’m this close to throwing my allergy out the window to make them. Have you ever used carob? Do you think it would work in this recipe?
I remember eating all the Hostess sweets when I was way younger, but as I have grown, I’d much rather eat homemade goods. And, your blackberry pie bars just came out of the oven. Can’t wait to try them :)
Hi Laura, I have never tried baking with carob. If you have before and it’s been successful you could try it here. Let me know how it goes!
So many layers of chocolate! Loving it!
Our family was actually a big fan of Little Debbie snack cakes. Always got one in with my lunch :) These kind were always my favorite, two layers of cake, with creme filling! I’ve got to give these a try and then take them to work so I don’t eat all of them.
ahhh yes, these are taking me back :)
So delicious!
Oooooh, these bring back memories! Look heavenly!
Oh. My. Goodness. These look sooooo good!!!
Yes, I do remember these snack cakes! My mom packed them in my lunch for me :) I haven’t thought about them til this post. Michelle, I have to send this recipe to my sisters. We all LOVED them!
I’ve always wanted to make these off the KAF website. And you make these look super yummy too! I think I’ll finally have to do it!
How is it that I have never had one of these??? Impossible!!
They look like absolute perfection.
These look yummy. I am thinking I could just bake the cake in a jelly roll pan and then just cut it in half to stack. I always mess up whan I try to cut one layer of cake in half.I will have to try these very soon.
Hi Nancy, I think you could do that, but this is already baked in a 9×13, so be sure the sides of your pan is high enough, and watch the bake time so you don’t overbake it – the cake should be really moist.
Wow, I’ve just been transported back in time. I had pretty much the exact same Catholic school Choco-Bliss obsession — mom didn’t allow them, so I’d buy them at 7-11 on the early dismissal days (my weekly opportunity to buy junk food, since I didn’t have a bus to catch). Additionally, I remember that they were my go-to snacks for our classroom “Read n’ Feed” sessions, when we were allowed to bring in snacks and read quietly for a half-hour. These days tended to coincide with “jean days” and as such were extra-super special. Now I simply gotta make these, and be further transported. Thanks so much for the trip down memory lane!
Looks like pure heaven!!!!!!!!!!
Yum! This sounds fabulous!
Oh my Lord, you are a temptress!!! This looks absolutely delicious.
These look awesome! I could take down a box of Little Debbie, Hostess anything, Twinkies, you name it after sports practice when I was growing up like nobody’s business..but don’t buy them now for that reason – I love them so much! These look fabulous!!
I just wanted to let you know how much we all loved the cake.Your cakes were a HUGE hit! Not only were they perfect,they tasted incredible as well. People that don’t even like cake were coming back for seconds…………
Wouldn’t these be great to serve at a bridal shower with a nostalgic/retro kind of vibe?
Yes, for sure!
Oooh, I’ve made these too, and they are so awesome! There’s definitely a fair amount of work involved in putting them together, but well worth it :)