Kouign-Amann

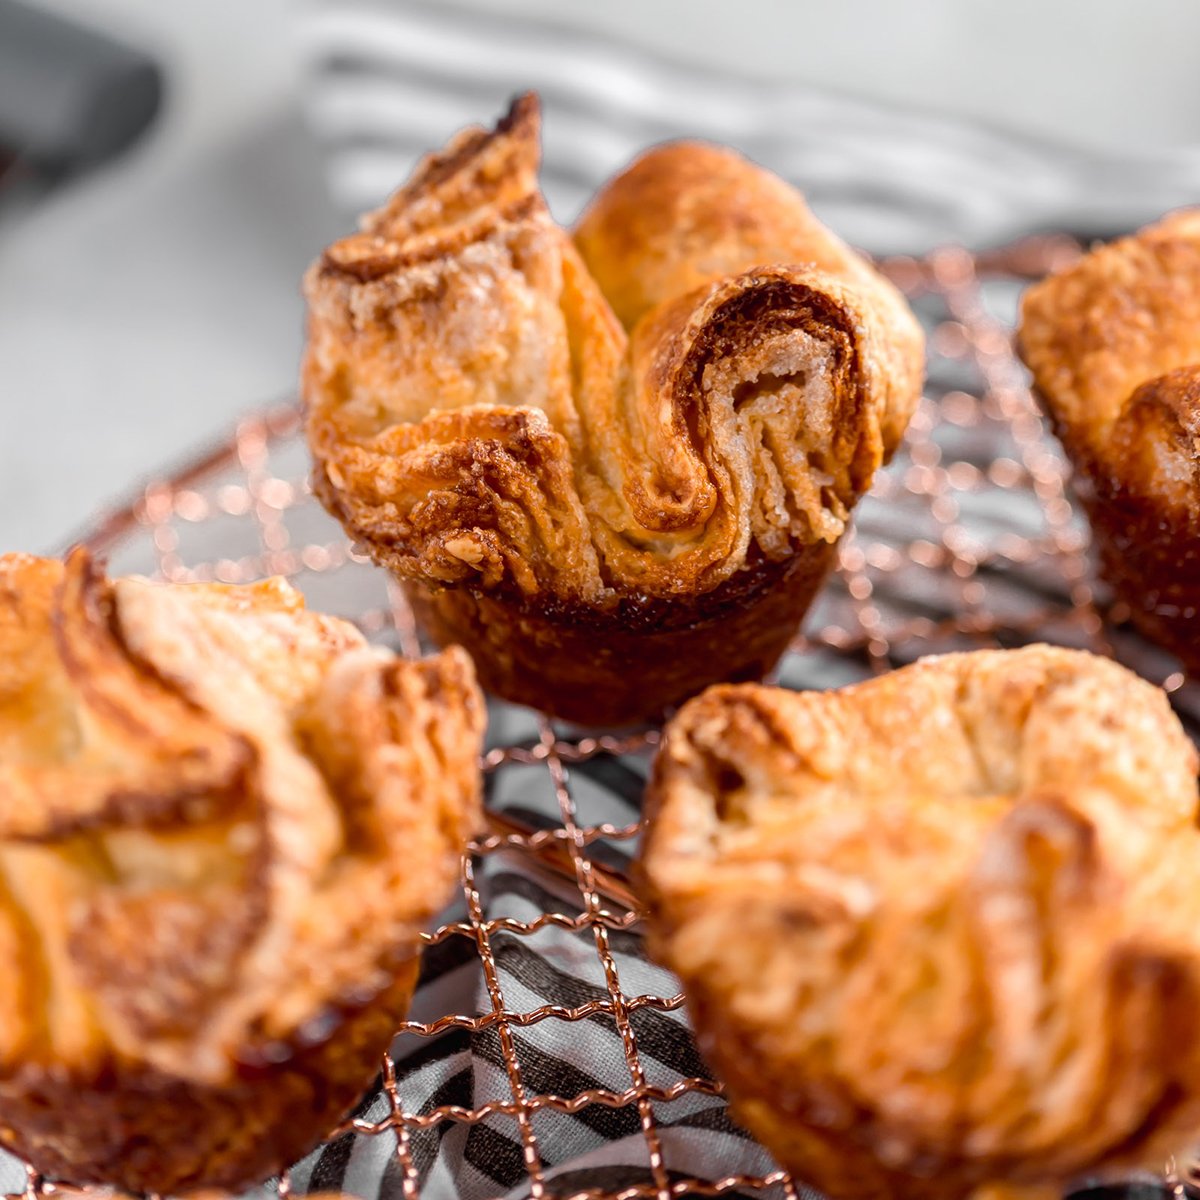
Kouign-Amann is made with sugared, laminated dough baked in muffin tins. These mini buttery, flaky pastries taste almost like sugared croissants and are absolutely delicious! This recipe includes many step-by-step photos and recipe notes to walk you through making these amazing pastries at home!
If you’ve never heard of kouign-amann, these beauties hail from the Brittany region of France. The name comes from the Breton language words for “butter” and “cake,” with the literal translation being “butter cake.”
They are made from laminated dough, which you would use for croissants or puff pastry, but then towards the end, sugar is folded into the dough, which is the key difference between croissant dough and kouign-amann dough.
You may hear the words “croissant” and “laminated dough” and feel intimidated, but YOU CAN DO THIS! I will talk you through it step by step, with tons of instruction, notes, photos, and a video so you’ll feel 100% confident marching into your kitchen to conquer kouign-amann.
How to Make Kouign-Amann
Let’s get right to it and and talk through how to make these glorious French pastries!
The Base Dough
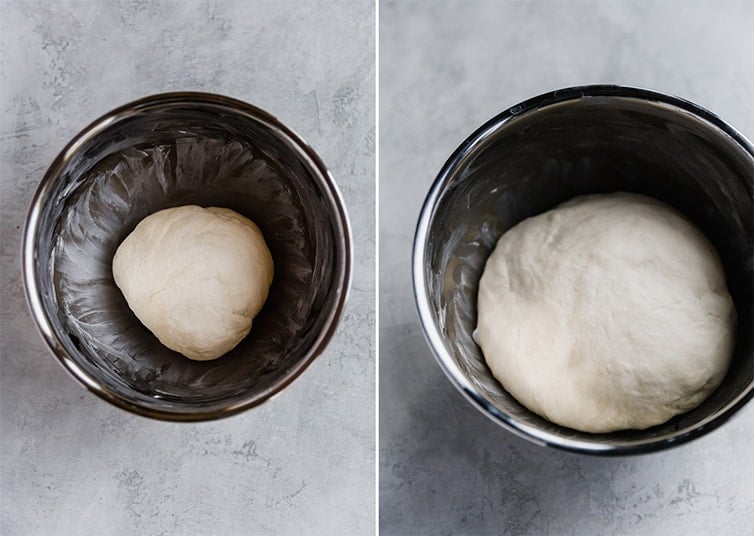
We start with a basic yeast dough recipe – water, yeast, salt, and flour. It’s as basic as it comes; we mix it up until a smooth, supple dough forms and we let it rise until doubled, then refrigerate it for about 30 minutes so it’s a little bit easier to roll and work with.

The Butter Block
There are many different methods for incorporating butter into the dough for kouign-amann, but this method from Bon Appetit was the easiest I tried.
You will take cold butter, cube it, and beat it until there are no more lumps. Then press it into a rectangle, wrap it in parchment paper, and use a rolling pin to spread it into a really even layer with perfect edges and corners. You’ve made a butter block! It then gets refrigerated for a short amount of time.

Incorporating the Butter Block into the Dough
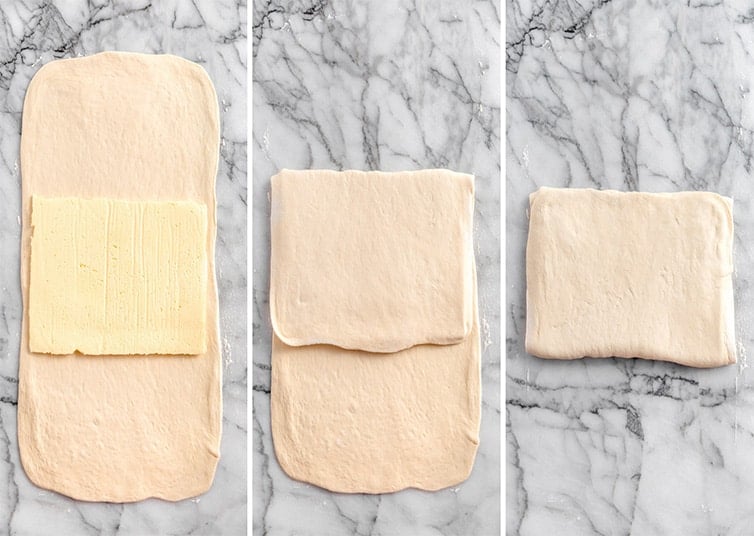
To initially get the butter working with the dough, we take the chilled dough and roll it out, then place the chilled butter block right in the center. Fold down the dough over the butter block, then fold the bottom part up over it (like folding a letter). We’ll roll it out a little bit to press the layers together, then fold it into thirds one more time.
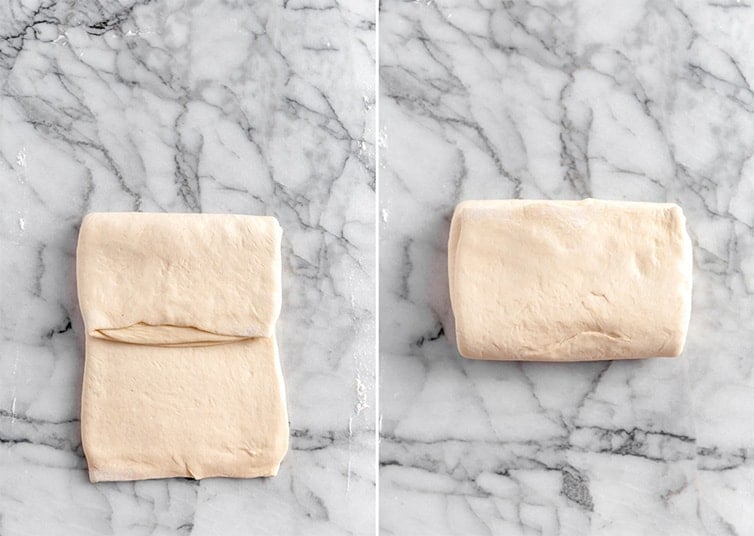
Laminating the Dough via “Turns”
THIS is where the magic happens! If you’ve ever wondered how croissants or puff pastry get so many incredible flaky layers, this is precisely how! Laminating the dough refers to repeatedly rolling out the dough, then folding it into thirds and repeating (that entire step – rolling and folding – is referred to as a “turn”). This creates many alternating layers of dough and butter, making those pastries so flaky, buttery, and delicious.
In this recipe, we use four total turns to create those flaky layers. This first time or two that I tried making these, the recipes only called for refrigerating after the 2nd and 4th turns, but I found the dough got very difficult to work with, and the butter was squeezing through because it got too warm. As a result, I refrigerated for 30 minutes after each turn, and it was a phenomenal difference – I never had an issue with the dough.
The first two turns here are rolling and folding, but the last two turns are what make kouign-amann a step-above pastry – you sprinkle the entire surface of the dough with sugar and THEN fold. This creates super flaky, sugary layers that are utterly amazing.
Shaping and Baking
Once the turns are completed, the dough is rolled out one last time and cut into squares. To shape the pastries, you fold the corners into the center and tuck them into a buttered muffin tin. They are left to rise at room temperature until nice and puffy, about 30 to 45 minutes, then are ready to bake.
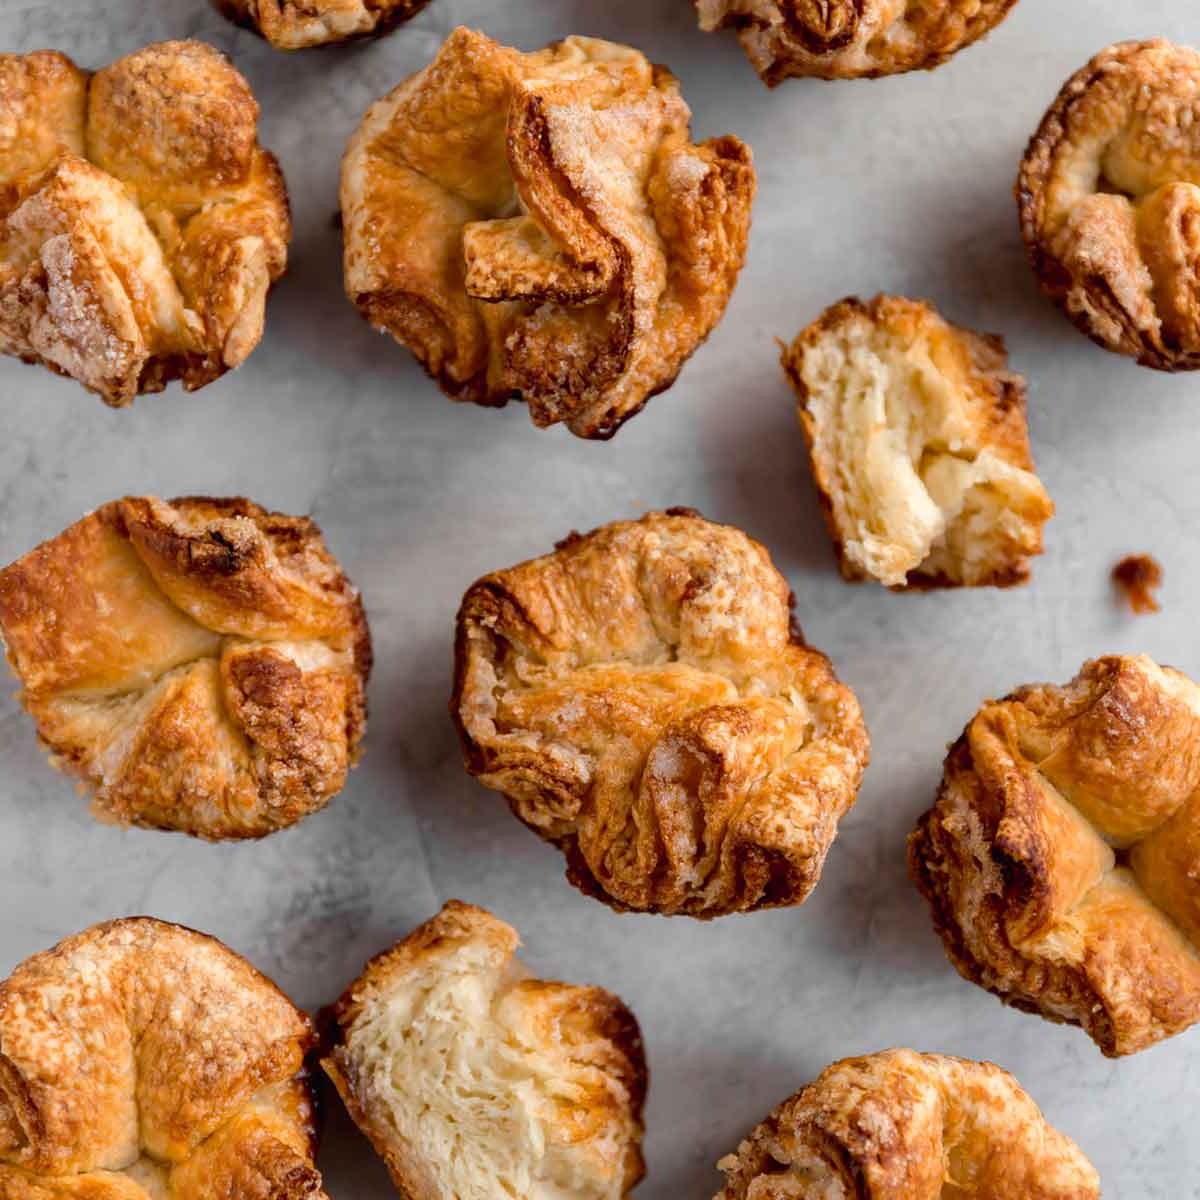
Kouign-amann are done when they are wonderfully golden brown and the edges are juuuuuuuust about to look burnt. As soon as you’re safely able to handle them, you need to remove them from the muffin tin to a cooling rack because the caramelized sugar in the bottom of the pan will turn rock solid as it cools and the pastries will be impossible to remove without tearing apart.
I tasted these when they were still warm and then cooled completely. The warm one was good; the completely cooled kouign-amann was FANTASTIC. It takes cooling down to really get that crunchy, sugary, flaky texture to all come together, so I implore you, even though they will be so tempting to eat warm (especially with that sticky bun vibe going on the bottom), let them cool off so you can enjoy them in all of their sugary, crunchy, flaky glory.
While these do take a large chunk of time to make, the actual hands-on time is minimal and there are many places where you can stop and refrigerate or freeze, so be sure to watch for those “Make-Ahead” notes within the recipe if you need to break it up!
Recipe Notes
A few quick tips and tricks to help you make the most delicious kouign-amann possible!
- Use the best butter you can find! European butter tends to have higher fat content, which makes it ideal for a recipe like this. I use Kerrygold at home for baking and eating, and used it for this recipe. It’s sold at my local grocery store.
- If you do not have a mixer, you can pound the butter by hand. If you use this method, use two sticks of butter, do not cube it. Sprinkle the counter with a tablespoon or two of flour. Lay the butter on top and sprinkle with another tablespoon or two of flour. Gently begin tapping the top of the butter with your rolling pin, and then pound more forcefully once the flour sticks to the butter. Pound the butter flat, then fold it in half using the pastry scraper. Try not to touch the butter with your hands. Pound the butter flat and fold it in half again. Repeat another 2 to 3 times until the butter is very supple, flattens within a few hits of the rolling pin, and folds easily. Sprinkle with additional flour as necessary to prevent the butter from sticking or smearing on the counter or rolling pin. Pound the butter into a rectangle roughly 6 inches by 10 inches. Transfer to a baking sheet and refrigerate while you roll out the dough. (Do not refrigerate the butter for longer than 15 minutes or you will need to pound it again.)
- When you refrigerate the dough between “turns”, do not keep it in the refrigerator for much longer than 30 minutes, or the butter will become too stiff to work with easily.
- Make a cinnamon-sugar version by mixing ground cinnamon into the sugar before sprinkling it onto the dough.
- Possible Add-Ins: If you’d like, you can put a little something extra into the centers – a spoonful of jam or salted caramel, some chocolate chips or a small piece of chocolate. I would suggest doing this once they are cut into squares, then fold the corners into the center over whatever filling you have placed in the center.
- Do not let the pastries cool too long in the pan or the sugar will harden and make them nearly impossible to remove neatly.
- While these are absolutely best when eaten the same day they are baked, I found them still near perfect the next day after being stored in an airtight container at room temperature. However, after that, they softened quite a bit and lost that flaky/crunchy texture they had on the first two days.
- You can freeze the baked pastries by letting them cool completely, then wrapping individually in plastic wrap and placing in a freezer-safe bag; freeze for up to 3 months. Thaw at room temperature or place in a 325-degree oven for 10 minutes. (I DO NOT recommend freezing shaped, unbaked pastries; the sugar will liquify in the freezer and turn to syrup.)

More Delicious Homemade Pastries:
Watch the Kouign-Amann Video:

Kouign-Amann
Ingredients
For the Dough:
- 1 cup (240 ml) water, at room temperature
- 2 teaspoons instant yeast
- 2½ cups (355 g) all-purpose flour
- 1 teaspoon salt
For the Butter Block:
- 8 ounces (227 g) salted butter, chilled and cubed
For the Pastries:
- 1½ cups (298 g) granulated sugar, divided
Instructions
- Make the Dough: Combine the water and yeast in the bowl of a stand mixer (or a mixing bowl, if kneading by hand). Add the flour and the salt. Stir with a wooden spoon until a shaggy dough is formed.
- Fit the mixer with a dough hook attachment and knead the dough at low speed until the dough is slightly tacky but smooth, 3 to 5 minutes. If the dough sticks to the sides of the bowl, add 1 tablespoon of flour at a time and knead until the dough is smooth. If the dough feels very stiff and dry, add 1 tablespoon of water at a time and knead until the dough is smooth.
- Transfer the dough to a clean bowl that has been lightly greased with butter, turning the dough to coat it with butter. Cover the mixing bowl with plastic wrap and let the dough rise until doubled in size, about 1 hour.
- Once the dough has doubled in size, place it in the refrigerator for at least 30 minutes. [MAKE-AHEAD NOTE: At this point, you can refrigerate the dough overnight, then proceed with the recipe.]
- Make the Butter Block: Beat the butter on low speed until it’s homogeneous and waxy in texture, about 3 minutes, scraping the beater and bowl as needed to break up the cubes. Turn the butter out onto a piece of parchment paper and shape into a rectangle about 6 inches by 10 inches. Wrap up the butter in the parchment paper, pressing out any air. Gently roll a rolling pin over the butter packet, pushing the butter into the corners to create a perfect rectangle with even thickness. Refrigerate until firm yet still pliable, about 25 to 30 minutes.
- Roll out the Dough: Place the chilled dough onto a floured work surface and roll into a rectangle 12 inches by 20 inches. Remove the butter from the refrigerator and place it in the middle of the dough. Fold one half of the dough over the butter, then fold the other half on top, like folding a letter. Roll it out slightly to press the layers together, then fold it again into thirds like a letter.
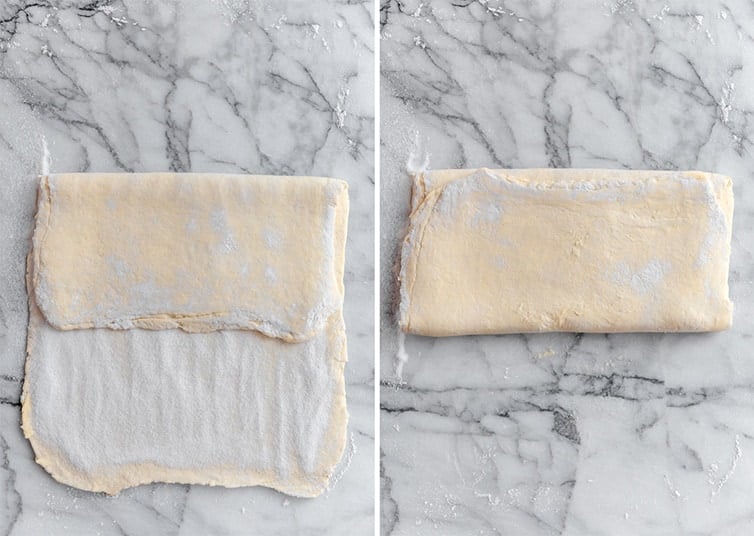
- “Turn the Dough” #1: Rotate the dough so that the open, narrower edge is facing you. Roll the dough out to a rectangle 12 inches wide by 20 inches long. Fold the top third down and bottom third up, again like folding a letter. Place the packet of dough on a baking sheet, cover with plastic wrap, and refrigerate for 30 minutes.
- “Turn the Dough” #2: Place the packet of dough on a floured surface with the open, narrower edge facing you. Roll the dough out to a rectangle 12 inches wide by 20 inches long. Fold the top third down and bottom third up, again like folding a letter. Place the packet of dough on a baking sheet, cover with plastic wrap, and refrigerate for 30 minutes. [MAKE-AHEAD NOTE: At this point, you can wrap the dough in plastic wrap, place in a freezer-safe bag and freeze for up to 2 months. Thaw in the refrigerator overnight, then proceed with the recipe.]
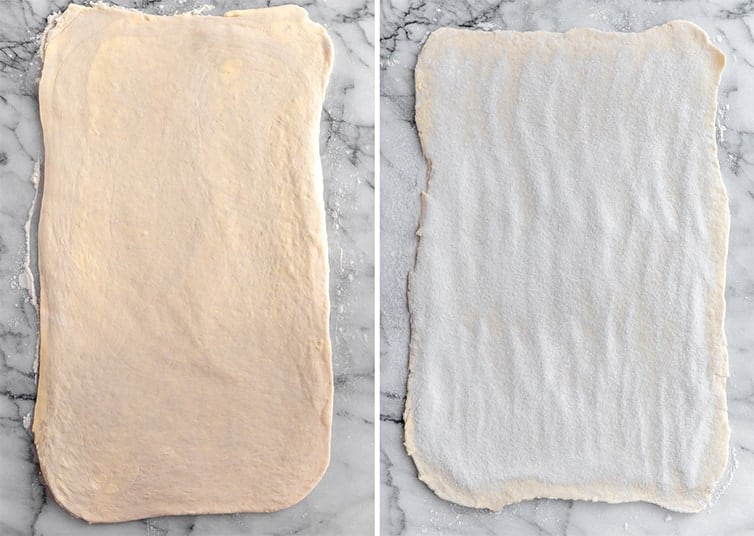
- “Turn the Dough” #3: Place the packet of dough on a floured surface with the open, narrower edge facing you. Roll the dough out to a rectangle 12 inches wide by 20 inches long. Sprinkle the entire surface of the dough with ¾ cup of the sugar, then press lightly to help it stick to the dough. Fold the top third down and bottom third up, again like folding a letter. If any sugar falls out, press it back into the folds. Place the packet of dough on a baking sheet, cover with plastic wrap, and refrigerate for 30 minutes.
- “Turn the Dough” #4: Place the packet of dough on a floured surface with the open, narrower edge facing you. Roll the dough out to a rectangle 12 inches wide by 20 inches long. Sprinkle the entire surface of the dough with ¾ cup of the sugar, then press lightly to help it stick to the dough. Fold the top third down and bottom third up, again like folding a letter. If any sugar falls out, press it back into the folds. Place the packet of dough on a baking sheet, cover with plastic wrap, and refrigerate for 30 minutes.
- Prepare the Muffin Tin: Grease the insides of a standard 12-cup muffin pan generously with butter. Set aside.
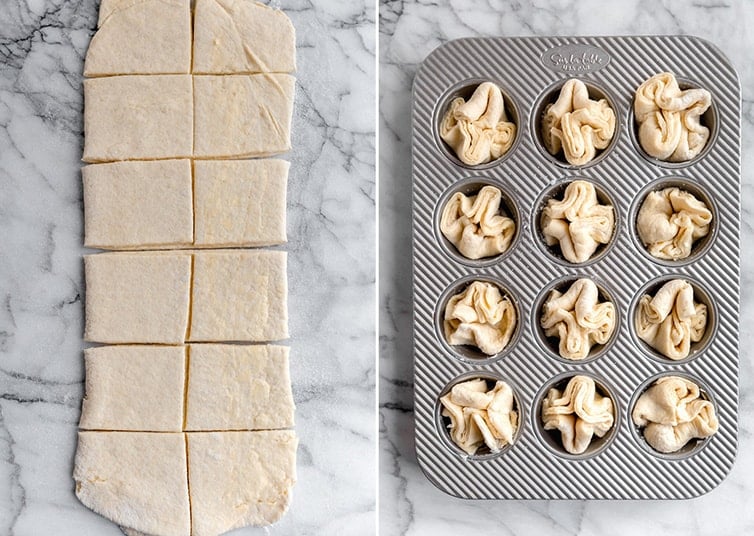
- Shape the Kouign-Amann: Sprinkle the work surface with sugar. Remove the dough from the refrigerator and transfer it to the counter. Sprinkle a little additional sugar over the top of the dough. Roll the dough out to a rectangle 8 inches wide by 24 inches long.
- Slice the dough down the length to form two strips that are 4 inches wide by 24 inches long. Cut each strip into 4-inch squares to create 12 squares. Fold the corners of each square toward the center. Pick up each pastry and tuck it firmly into the muffin pan; it will feel like you’re squishing the pastry in there! [MAKE-AHEAD NOTE: At this point, you can cover the pan with plastic wrap and refrigerate overnight. The next day, allow the pastries to come to room temperature and rise for 1 hour before baking.]
- Cover the pan loosely with plastic wrap and let them rise until slightly puffy, 30 to 40 minutes.
- Meanwhile, preheat the oven to 400 degrees F.
- Bake the Kouign-Amann: Set the muffin pan on a rimmed baking sheet, place in the oven and immediately reduce the heat to 350 degrees F. Bake until the pastries are deep golden brown and tips are very dark brown, 40 to 45 minutes, rotating the pan halfway through baking.
- Transfer the pan to a cooling rack and let the pastries stand until they are just cool enough to handle, about 5 minutes. Gently remove them from the muffin pan and set them on the cooling rack to finish cooling completely. The kouign amann can be served warm or at room temperature. They are best served the same day they are made.
Notes
- Use the best butter you can find! European butter tends to have higher fat content, which makes it ideal for a recipe like this. I use Kerrygold at home for baking and eating, and used it for this recipe. It’s sold at my local grocery store.
- If you do not have a mixer, you can pound the butter by hand. If you use this method, use two sticks of butter, do not cube it. Sprinkle the counter with a tablespoon or two of flour. Lay the butter on top and sprinkle with another tablespoon or two of flour. Gently begin tapping the top of the butter with your rolling pin, and then pound more forcefully once the flour sticks to the butter. Pound the butter flat, then fold it in half using the pastry scraper. Try not to touch the butter with your hands. Pound the butter flat and fold it in half again. Repeat another 2 to 3 times until the butter is very supple, flattens within a few hits of the rolling pin, and folds easily. Sprinkle with additional flour as necessary to prevent the butter from sticking or smearing on the counter or rolling pin. Pound the butter into a rectangle roughly 6 inches by 10 inches. Transfer to a baking sheet and refrigerate while you roll out the dough. (Do not refrigerate the butter for longer than 15 minutes or you will need to pound it again.)
- When you refrigerate the dough between “turns”, do not keep it in the refrigerator for much longer than 30 minutes, or the butter will become too stiff to work with easily.
- Make a cinnamon-sugar version by mixing ground cinnamon into the sugar before sprinkling it onto the dough.
- Possible Add-Ins: If you’d like, you can put a little something extra into the centers – a spoonful of jam or salted caramel, some chocolate chips or a small piece of chocolate. I would suggest doing this once they are cut into squares, then fold the corners into the center over whatever filling you have placed in the center.
- Do not let the pastries cool too long in the pan or the sugar will harden and make them nearly impossible to remove neatly.
- While these are absolutely best when eaten the same day they are baked, I found them still near perfect the next day after being stored in an airtight container at room temperature. However, after that they softened quite a bit and lost that flaky/crunchy texture they had on the first two days.
- You can freeze the baked pastries by letting them cool completely, then wrapping individually in plastic wrap and placing in a freezer-safe bag; freeze for up to 3 months. Thaw at room temperature or place in a 325-degree oven for 10 minutes. (I DO NOT recommend freezing shaped, unbaked pastries; the sugar will liquify in the freezer and turn to syrup.)
Did you make this recipe?
Leave a review below, then snap a picture and tag @thebrowneyedbaker on Instagram so I can see it!
[photos by Ari of Well Seasoned]


These pastries are BEYOND delicious! I recently fell in love with them at a nearby European style bakery. They also put a little bit of flaked SALT on theirs, and the sweet, flaky pastry with the slightly salty surprises is OUTSTANDING!
So excited to see this recipe! They are my favorite pastry (following closely by a morning bun) and hard to find, even in the Washington DC Metro area where I live. Your recipe seems approachable, and I might be brave enough to give it a try. Croissants and their relatives have always seemed to be a bridge too far for this baker, but I think that with your detailed instructions I might be able to do it. Hoping that your son continues to do well. It is always great to read an update about his progress and I’m encouraged for you all about positive results from his treatment.
These turned out amazing! So flakey and beautiful! Time consuming but worth it! One tip – put a baking sheet under the muffin tin because I had some butter spillage. Thanks for the recipe!
Hello! I just have a question, I want to make these for tomorrow morning so was going to complete them up to the point of putting them in the pan and letting them rise overnight–just curious if you’ve tried this because I’m wondering if being overnight would change the texture of the sugar/caramelization factor? Thank you! Can’t wait to make these!
This will be my 4th time using this recipe in last 2-ish years. These are super delicious and worth the time to create. They are pretty D*** close to the ones I had in the Breton region of France, so I’m thrilled. C’est magnifique! Merci beaucoup.
I don’t think you should fridge the dough after you sprinkle sugar. I did exactly that and the sugar completely liquified in the fridge.
So eager to try this, but what to do if I don’t have salted butter on hand? What’s the recommended way to substitute unsalted butter … eg add salt to a particular step??
These were amazing! I have never tried these pastries but the description appealed to me. They are time consuming to make but not hard. The directions are great as well. If you like a croissants with perfect, sweet crispy edges, these are for you. Will 100% be making these again and again.
Just finished baking this today. Prepped over the course of three days, kudos for the make-ahead tips! It was perf, as good as I’d had in Brittany about 20 yrs ago. The chilling between folding and rolling made it foolproof. Will be buying almond paste to tuck into my next attempt. A thousand thanks.
I have never made pastry before but just had to try this. If I can do it anyone can! I put 1/2 teaspoon of cinnamon in with each addition of the sugar. Sooo good. We are them straight out of the oven with the hit butter still dripping out.
My Mom and I made this last night (& I am also a Brown Eye Baker ;-) The recipe was easy to follow, results were delicious and the video was helpful. We added in cinnamon into our sugar which was delightful!
I’m so excited to make these! All I have is active dry yeast. Is it okay to use that in this recipe? Is there a conversion or any alternative steps that would need to be followed?
I was so grateful to find your recipe. I first tried another one, for a single large Kouign Amann, and it was a disaster. This recipe was a godsend, because I really wanted individual pastries, and because it’s much better detailed and more logical than the one I tried first. I will say I reduced the amount of sugar, and I used a salted Breton butter, sold at Trader Joe’s under the brand Trader Jacques. In addition, I sprinkled the butter block with about a teaspoon of kosher salt before wrapping it in the yeast dough. The result was actually better than the ones made by my local (very good) French bakery.
Although I’ve been baking my whole life (67 years this week), this was my first attempt at any laminated pastry. I’m not sure why I waited so long. I’m starting today on Michelle’s croissant recipe. What’s next? Puff pastry?
This was absolutely amazing! Easy to make and so delicious. I was so impressed with myself. I only used a tablespoon of sugar on roll 3 & 4 and it was plenty sweet. Just shared the recipe with my
mom. The funny thing is, we were in Brittany France last year and never tried one of these. Now it is a family staple….
I am unable to find the video for this recipe and honestly I don’t feel confident making it without some visual guidance. Has it been removed?
To raise the fat content, could you gently melt a larger amount of butter, chill it and THEN measure (or weigh) the solids?
This is the second time making them, and they are absolutely amazing. Thank you!
OMG! I can not wait to make these! Thank you so much for the video tutorial. I’m so excited to give this a go.
First try at anything like this and they came out great! Thanks so much for the thorough recipe, video and pictures. Very clear. And they were super delicious.
I am in lockdown due to coronavirus so a 6 hour recipe was the perfect way to pass the time. They were beautiful and delicious. I used 1 cup of sugar instead of 1.5, and sprinkled salt on each of the sugar layers.
I would love to make something like this but with almond flavor.
This is a great idea! I notice in Michelle’s baking tips section, above, she suggests putting a teaspoon of jam, caramel, or some chocolate chips into the center before folding the pastries. What if you used a teaspoon of frangipane? It’s really easy to make, and leftovers freeze well.
I applaud your efforts but this is not Kouign Amann. Kouign Amann is known for its sweet, savory taste, which comes from at least 2 tsp of finely ground sea salt being added to 2/3 cup sugar. In fact, in Breton where this pastry hails from it is more savory than sweet. If you omit the salt you are really missing a pastry that is extra special and different from any other pastry you will ever make. Try it!
I MADE THESE TODAY!! I put that in caps because a lot of people review a recipe without making it. I followed it to the letter including removing them 5 minutes after baking so it didn’t stick to the pan and putting them in cupcake liners to cool.
It’s incredible and easier than it looks-it really is just something that you do over the course of a day but not difficult.
The one time it became harder was when the sugar went in as it made the dough sticker than without so just be mindful of that. Enjoy and thank you BEB!!
Hi Amanda
Thank you for this!
Any thought on using a food processor for the butter, and if so the best method? I often use food processors instead of mixers for dough with no issue, but not butter on its own. I figure I could cube it and then process until its small pea size, turn it out and then roll it together in the parchment paper? Thanks!
I only put sugar in the last turn because I thought it’d be too sweet. Turned out yummy and perfect and so worth the work!
So everything was going well until I put them in the oven. When I just checked halfway through to turn the pan, it looked like the dough and butter had completely separated and they were just blobs. I’m going to keep baking them, but I have little hope. I did everything as the recipe said, step-by-step with the turns and chilling in between. This is my first time dealing with laminating dough, but I want to try again. What did I do wrong? Thanks!
Hey, I know its been months since you posted this comment but I thought I’d reply just in case no one else has!
I’d say you weren’t chilling the dough enough between turns. I make a small amount of laminated dough professionally and we chill the dough at least an hour between turns. if you use a quality butter then it will not get to hard to sheet. It acutely makes the dough easier to sheet because it helps the gluten relax.
Hope this helps!
I made these the other day, and this recipe is really fantastic. I’ve made croissants before, but the methods outlined here made working with laminating dough so much easier to do. Refrigerating the dough between each turn was a great idea and I didn’t have any problems with the dough getting too soft. I just wanted to say much I appreciate the time and effort you put into researching the recipe and making it fool-proof. We only really see the end result, but it’s obvious you went through many iterations to achieve this product. So thank you! I will be making these again, and experimenting with fillings like cinnamon and pistachio.
This was the first time I have ever made laminated dough. I definitely was certain I messed it up once the sugar was added, but I continued on anyway because I’d already invested so much time. I am so glad I did! These turned out beautiful, flakey, buttery and delicious. I would definitely make these again. Thank you for using this for the March challenge and expanding my horizons!
Thank you so much for this recipe! I can’t wait to try.
The instructions were excellent and the pastries came out fantastic. I’ve had them at high end bakeries and never thought I could get close at home. Thanks for the challenge!
Thank you for this one! I am an experienced baker with a small baking business and have not been brave enough to try laminated dough. Happy for this challenge! it has been on my bucket list for years.
Help!. my butter is coming out. what do I do!
I’m making them now, and the same thing is happening to me. I’m rolling it gently, but some butter oozed out. What did you do?
They came out great!
Assuming same as you, just kept moving forward. With ever subsequent turn in got folded under. Still good but I would love someones input on what I am doing wrong. This happened to me when i made croussanrs.
Katelyn and Ilene,
I know its been ages since you posted these comments but thought I’d put my two cents in. I believe your butter is to soft. you want the butter and the dough to be about the same consistency when you start the lamination. if the dough is stiffer that the butter then the butter oozes out. I always pound my butter between silicone mats with a rolling pin instead of beating it in the mixer.
Hope this helps!
Your tutorial and video is award winning!
Blue Ribbon! Blue Ribbon!
I’ll be giving these a go and will post pic.
….now feeling pressured..
I have never heard of this deliciousness and am unsure how to pronounce it. Can you spell it out phonetically? Thanks so much.
I know this is late, but per the Great British Baking Show addiction that I have – queen amahn. There are probably some nuances to the pronunciation that are missed there, but that’s what it sounds like to me!
Michelle In the recipe it calls for 8 oz butter which is 2 sticks and uses the mixer but in the recipe notes it says use 2 sticks if doing by hand not a big deal . I don’t think to much butter would hurt I am starting the dough today and make tomorrow
Oh, wow! Another baked item I have never heard of! (I’d never heard of gougeres.) You are definitely stretching my baking knowledge, which is one of the main reasons I took on this monthly challenge this year. So I offer you a timid thank you, and I hope it will turn into a resounding THANK YOU once I’ve completed this month’s challenge. ;-)
Have you ever watched Great British Bake Off with Mary Berry and Paul Hollywood?
They have some great recipes
I love The Great British Baking Show and ready to make this lamented dough
I’m sorry but I’m going to have to cheat on this one. I’ll be calling William & Sonoma to place my order. 😉
I’ll get mine from a local bakery. There are probably extremely few, if any, French women who would attempt to make this at home. “What I learned living in Paris, traveling through France, and writing Baking Chez Moi, is that French people don’t bake … at least they don’t bake anything fussy, finicky, tricky, or unreliable. When they bake, they bake the simple stuff.” Dorie Greenspan
I never heard that quote from Dorrie, but that is a great one! Thanks for sharing, Sally :) and I’m impressed that you could recall it! Point me to whatever high-quality bakery you go to. They must have some way-too-tempting treats.
I have a knack for remembering things I don’t need to know!
The bakery is Circle City Sweets in the City Market in Indianapolis. They used to have a booth at the farmer’s market I went to and that’s where I first had kouign-amann. For various reasons I rarely get to the bakery.
Oh my gosh!!!! I just put this on my “baking bucket list” for this year!!! I can’t wait to try it. Thank you, Michelle!
Michelle, I could never do this, but please note that I am too scared to even stir and bake up a banana bread. You are so incredibly talented and I clicked back to your Cucidati Cookies from 10 years ago, and I am in awe of your depth of knowledge, your skill, the traditions you stick to, the instructions your provide to your readers, and your serious CIA-level creations. To all of your faithful followers who attempt (and succeed) at these kouign-amanns, “Bravo.” I can only dream and admire their ability to be undaunted. Yes, you definitely have earned the reputation as the “go-to” baker from many of your fans.