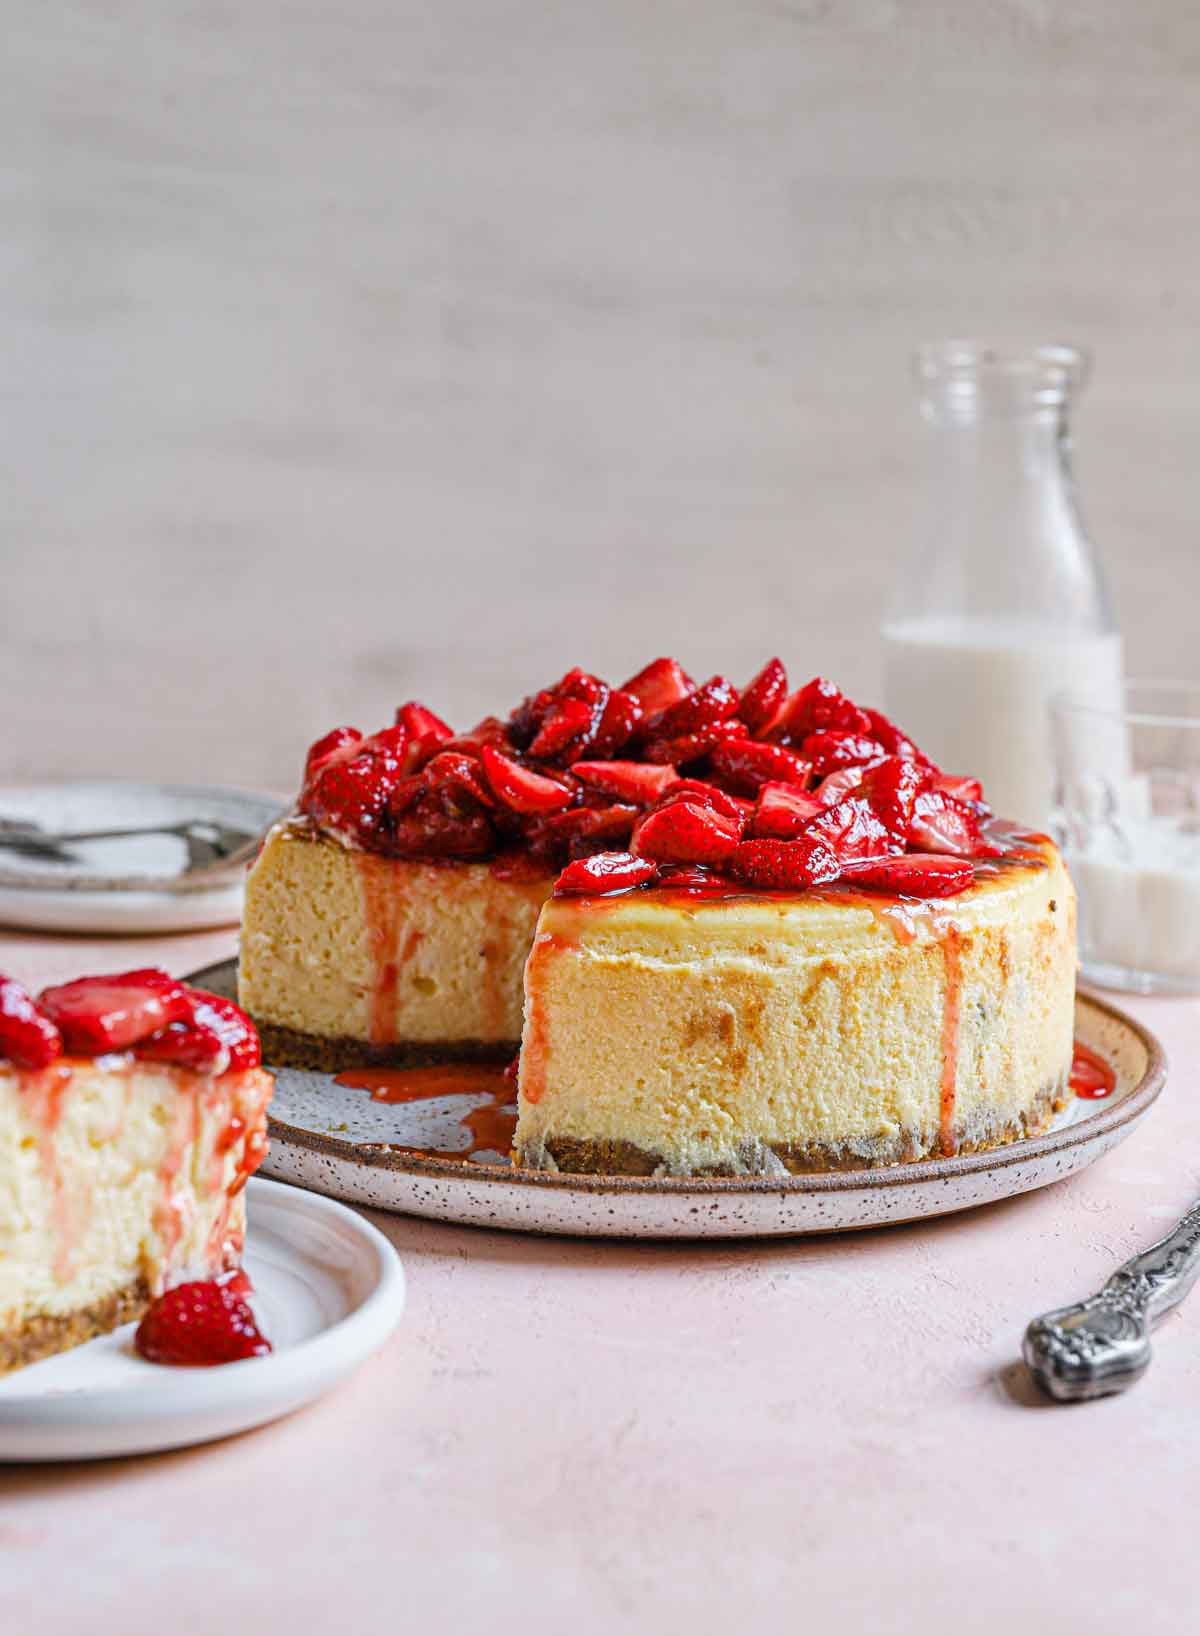
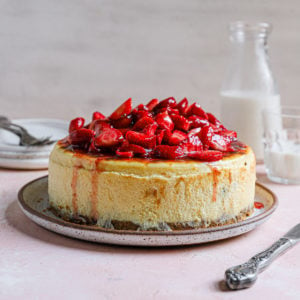
New York Cheesecake
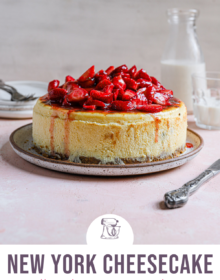
Follow this classic New York Cheesecake recipe for a creamy, rich, and decadent dessert. Serve it plain or with your favorite cheesecake toppings (lots of suggestions below) for an impressive holiday, birthday, dinner party, or special occasion dessert!
Cheesecake is one of my great loves. Over the years, I’ve shared many, many cheesecake recipes, including brownie cheesecake, Oreo cheesecake, fig almond cheesecake, pumpkin cheesecake, red velvet cheesecake, and peanut butter fudge cheesecake (among others!).
Today, we’re taking a deep dive into the ultimate cheesecake recipe: New York–style cheesecake with a classic graham cracker crust and a sky-high cheesecake filling.
Why Homemade Cheesecake Is the Best
While homemade cheesecake can be a little time-consuming and look a little intimidating, it’s a great recipe for bakers of any level. It doesn’t require very much hands-on time. Many cheesecake recipes require baking cheesecake in a water bath to ensure an even bake and reduce the risk of cracks forming on the top of the cake, but you won’t need to use a hot water bath to make this recipe (which is one of the things I love about it)!
There are two parts to cheesecake – both simple to make with basic baking ingredients; a traditional graham cracker crust and ultra-creamy cheesecake filling.
If you’ve ever tasted cheesecake from scratch, you know the results are absolutely, 100% worth it!
“Regular Cheesecake” vs New York Cheesecake
Almost every style of baked cheesecake has a base of cream cheese and eggs. The difference lies in the amount of cream cheese and the addition of sour cream.
“Regular” cheesecake is traditionally lighter in texture and baked to pale perfection. For a classic cheesecake recipe (not New York style) try my Oreo cheesecake recipe. Simply omit the Oreo cookies for a plain version.
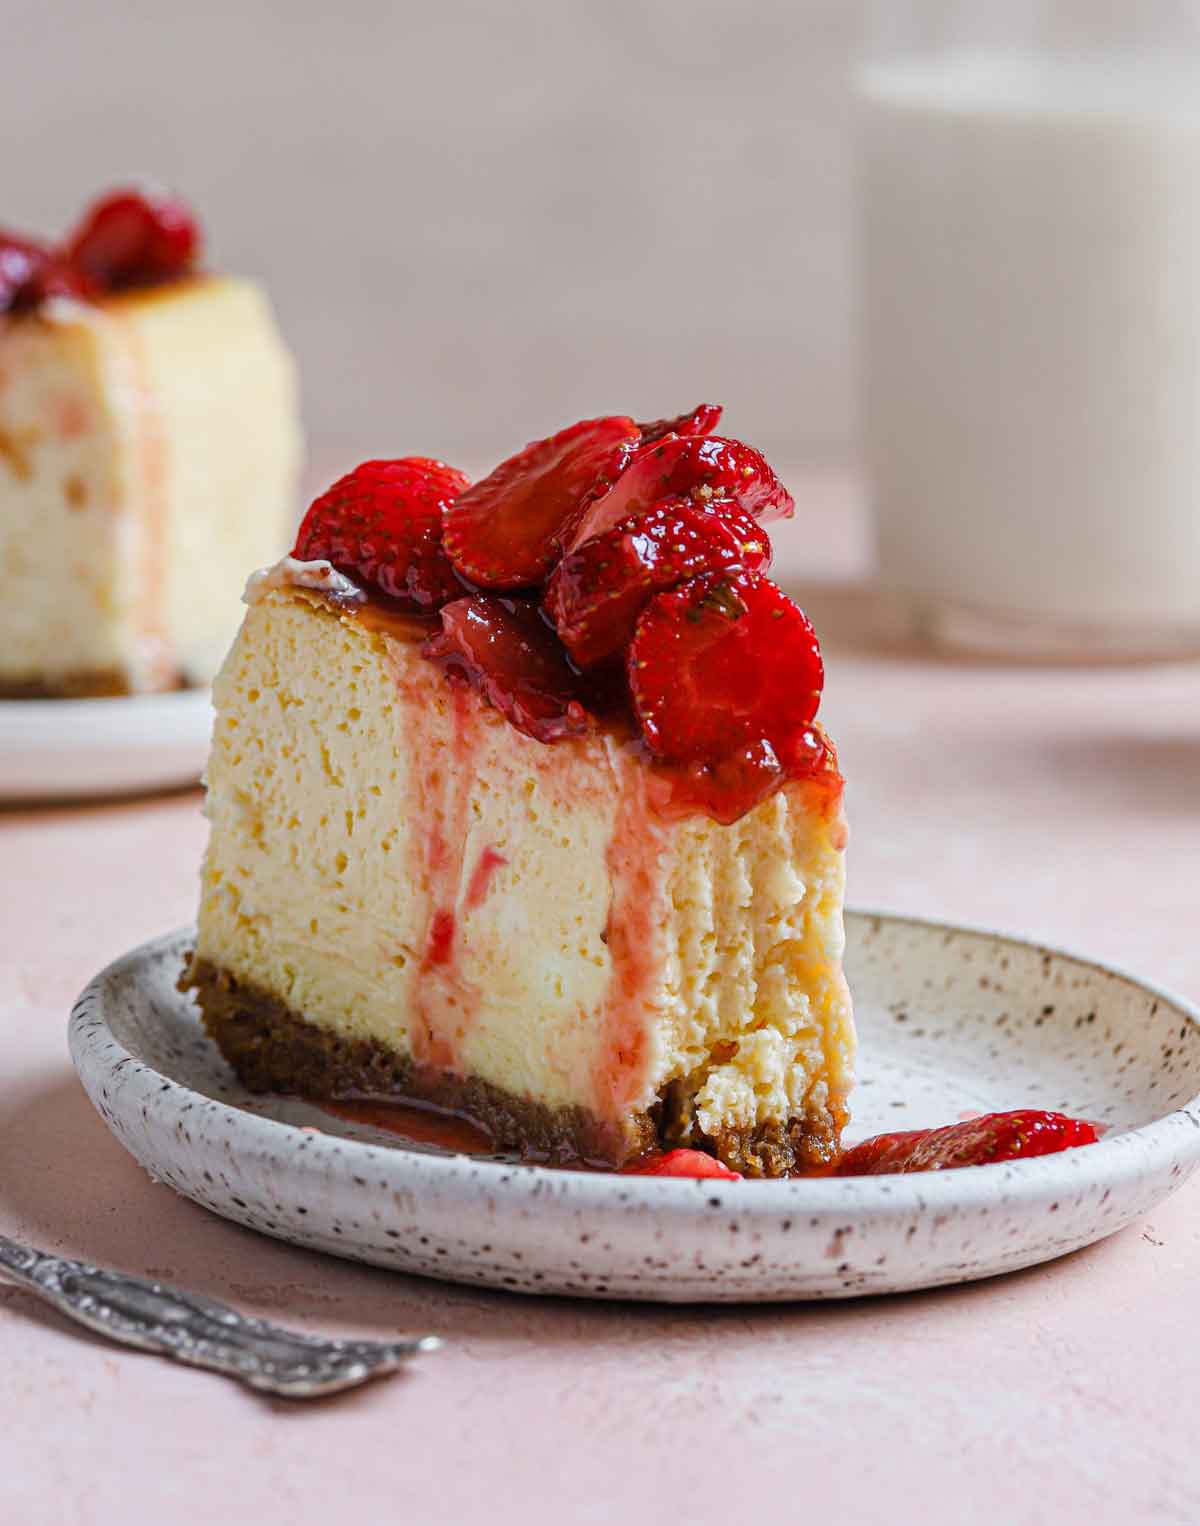
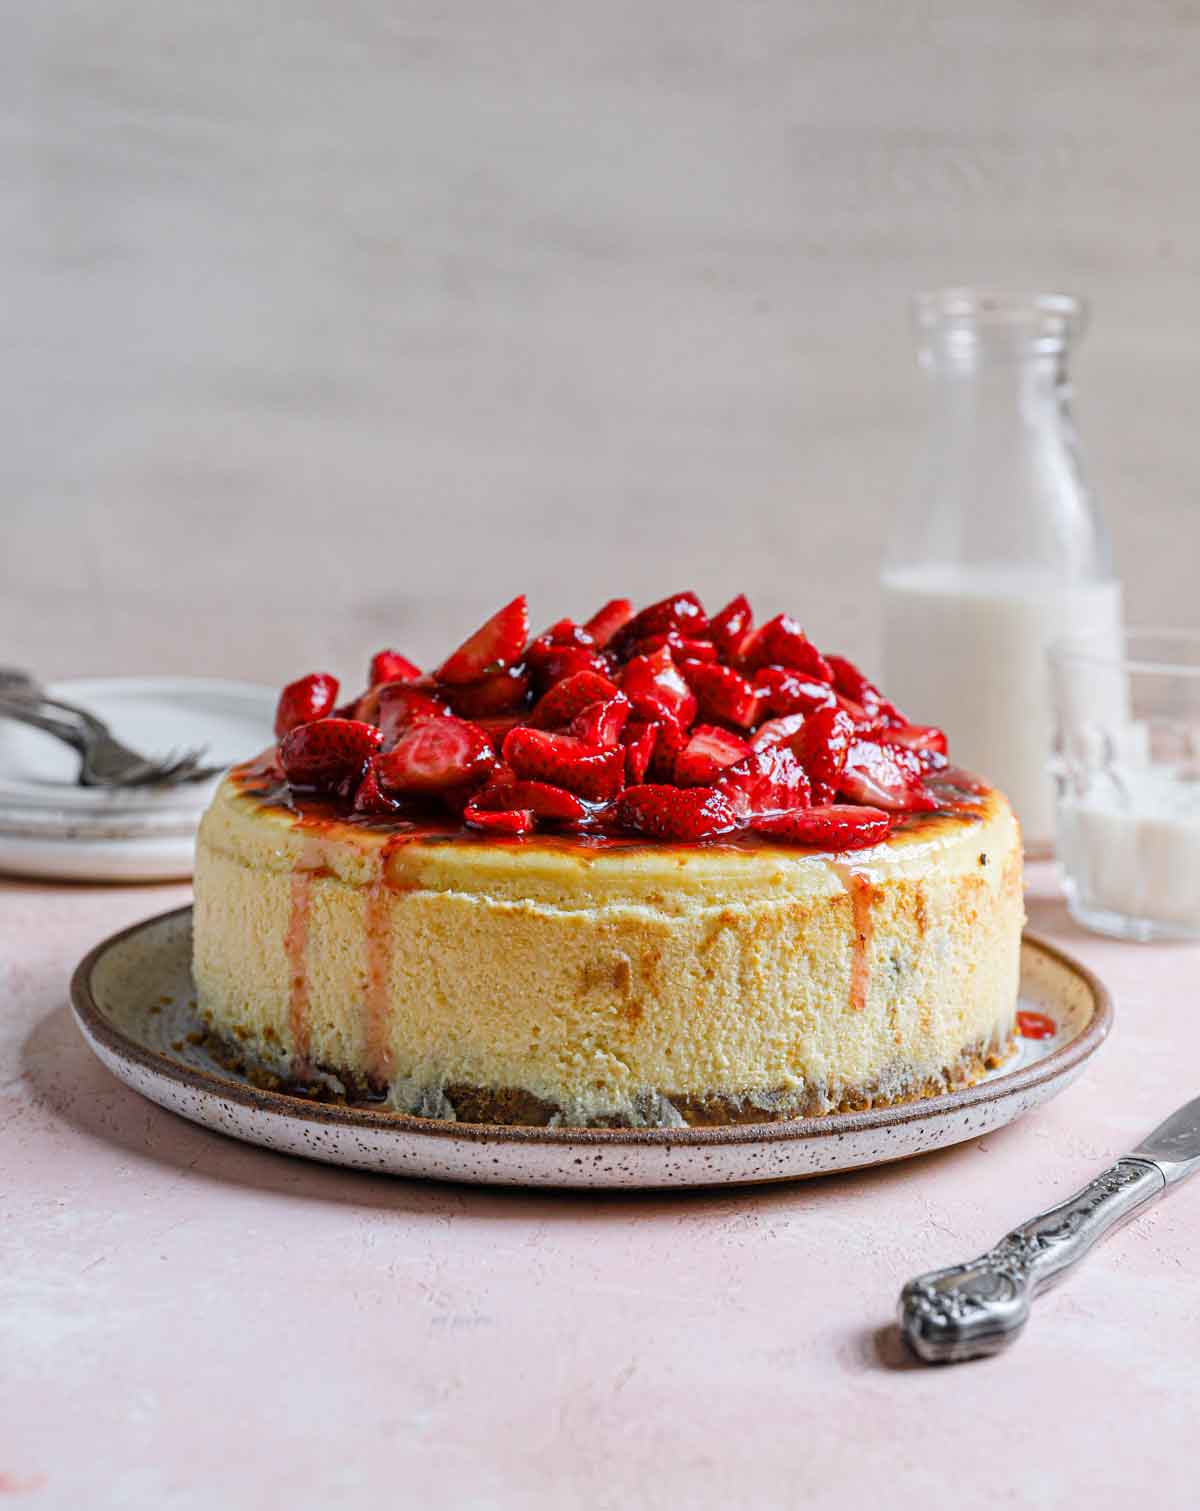
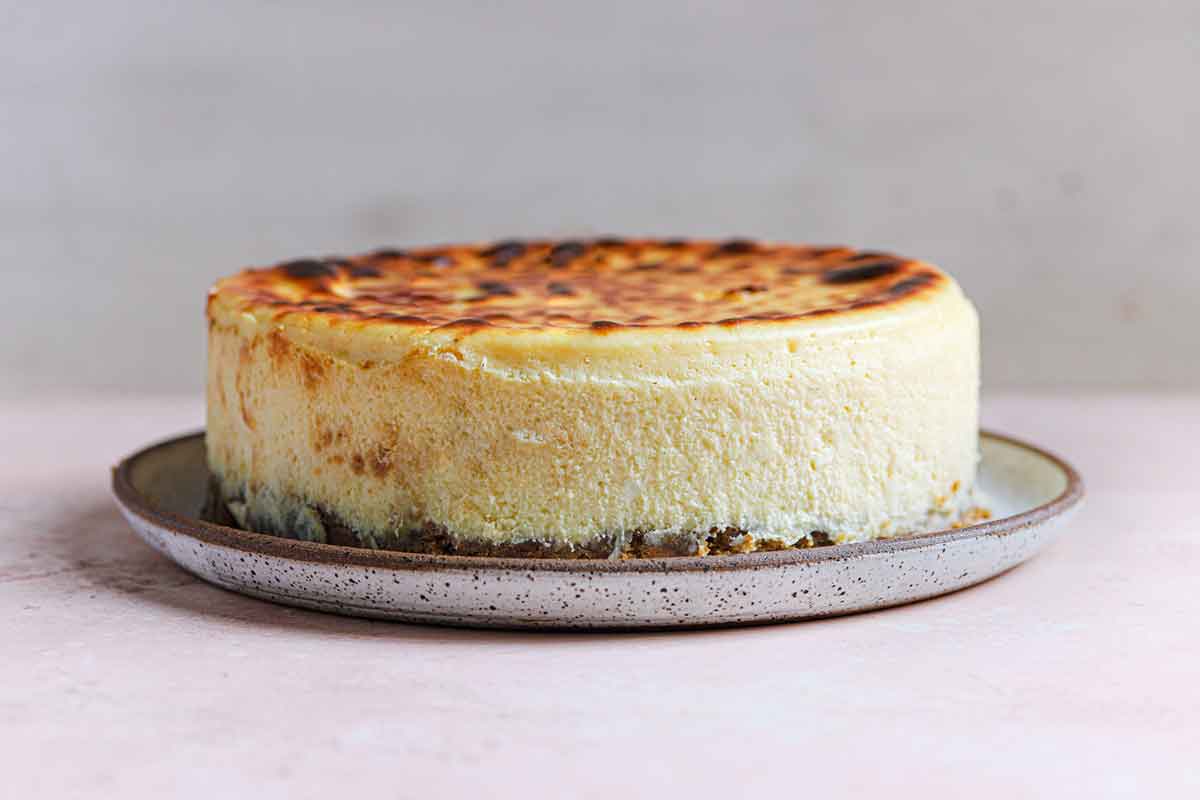
New York-style cheesecake is made with more cream cheese than regular cheesecake; it’s typically denser and richer and is sometimes browned on top. (Side note: another variation of New York cheesecake involves baking a layer of sour cream on top of the cheesecake at the end.)
Simple Ingredients
The beauty of a classic cheesecake is that it relies upon a simple list of ingredients to create rich decadence! I’ve highlighted some of the important ones below. As always, check the recipe card below for a full list of ingredients and quantities.
- Graham Crackers (for the crust) – You can use store-bought graham cracker crumbs or crush up whole graham crackers.
- Cream Cheese – Be sure to use full-fat cream cheese for a cheesecake that is firm and creamy, not watery or runny.
- Sour Cream – Again, use full-fat sour cream.
- Lemon Juice – Fresh or bottled is fine; the flavor is very subtle, but you can omit it if you prefer.
How to Make New York Cheesecake
Complete instructions for making this delicious New York cheesecake recipe are in the recipe card at the bottom of this post, but here’s a quick recap:
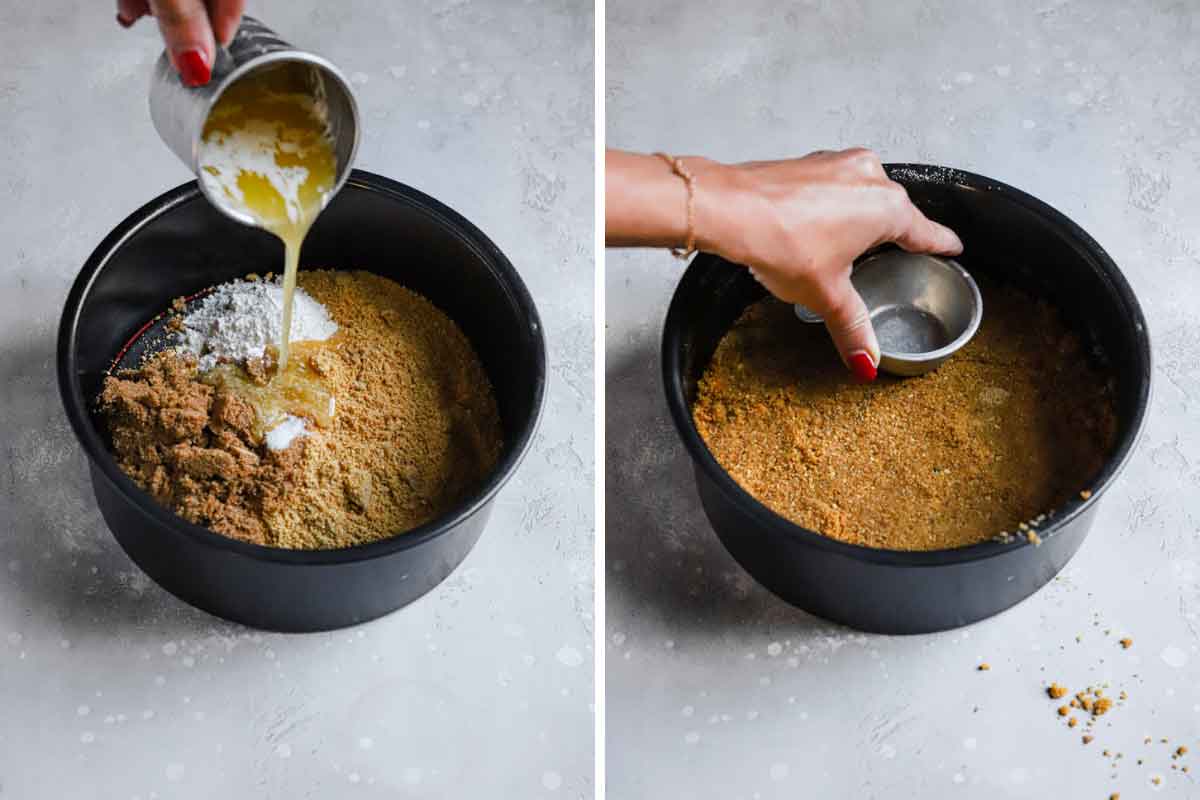
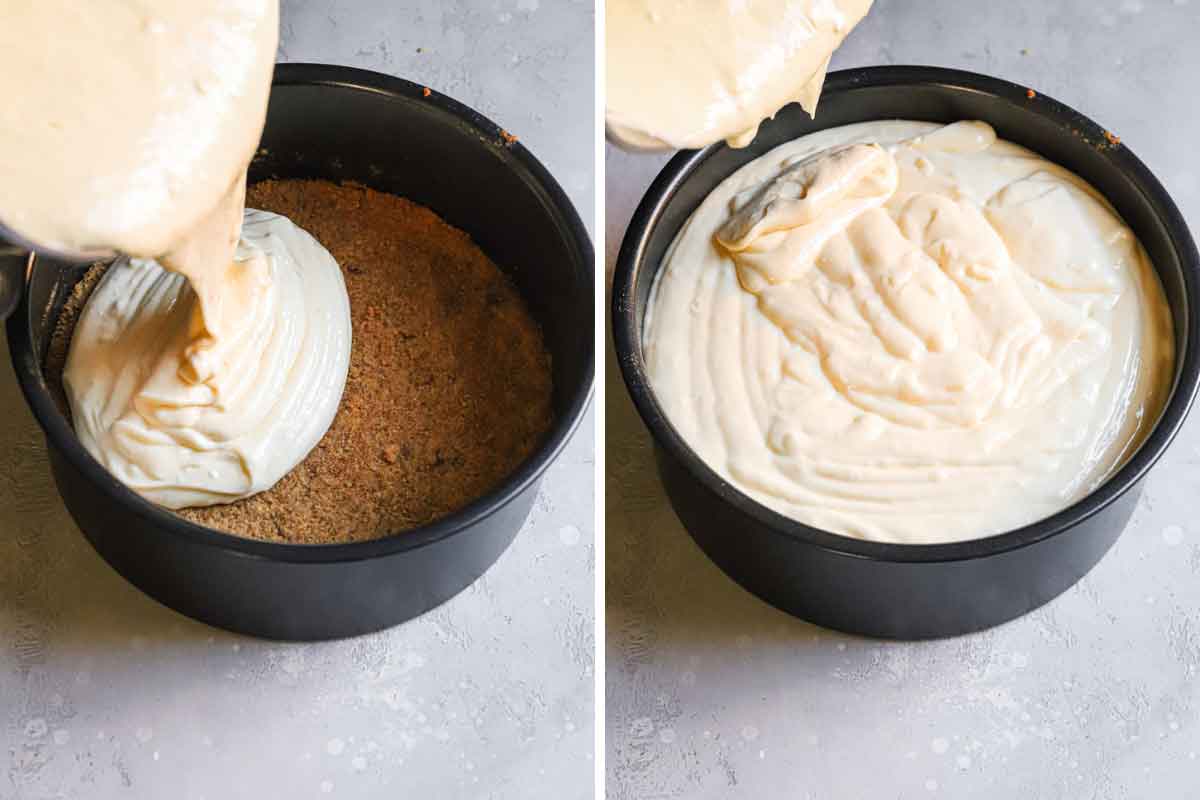
Step #1: Make the Crust – Mix together the graham cracker crumbs, brown sugar, salt, and melted butter, then press into the bottom and about an inch of the way up the prepared pan. (If you want to double the crust, you can press it higher up the pan.) You will then bake the crust and set it aside to cool while you make the filling.
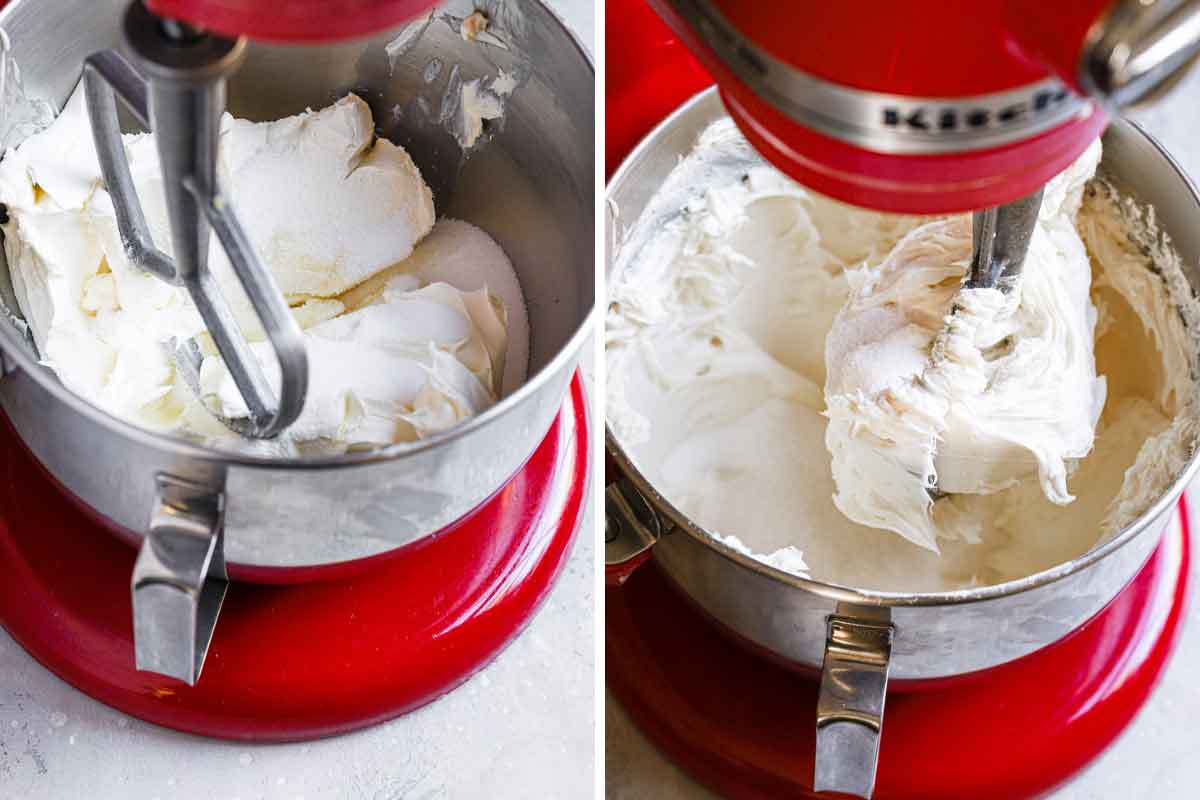
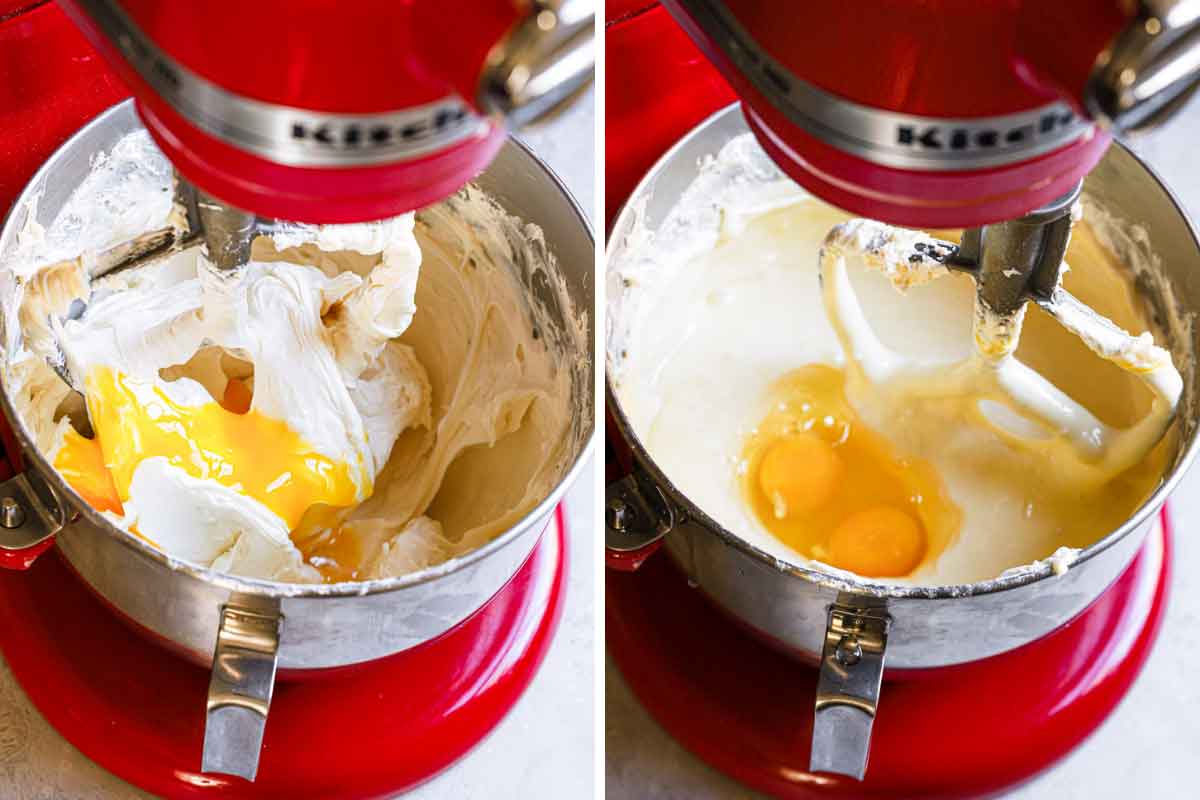
Step #2: Make the Cheesecake Filling – You will mix together the filling ingredients (cream cheese, sugar, sour cream, lemon juice, vanilla extract, and eggs), then pour the cheesecake batter into the prepared crust.
Step #3: Bake Low and Slow – Bake at 200 degrees F until the cheesecake reaches 150 degrees F on an instant-read thermometer. This takes anywhere from 2 hours 15 minutes to 3 hours.
Step #4: Brown the Top – Increase the oven temperature to 500 degrees F and pop the cheesecake back in the oven for a few minutes to get a classic browned top (or skip this step if you prefer a paler top!).
Step #5: Chill – This is a crucial step! Let the cheesecake cool completely to room temperature, then refrigerate for at least 6 hours or overnight.
Revised and Updated Cheesecake Baking Method
The Original Recipe: Many of you may be familiar with the original form of this cheesecake recipe that I published in 2013. That recipe required you to start baking the cheesecake at 500 degrees F for 10 minutes, then lower the temperature to 200 degrees F for the remaining baking time. I’ve received a mixed bag of comments and reviews over the years – some readers comment that it turns out perfectly, while others say the cheesecake was completely burnt on top. I couldn’t identify where to make changes to the recipe because every time I made it, it turned out wonderfully.
So, I re-tested it in a new-to-me oven. And it burned… and cracked. I was stumped after making so many successful cheesecakes following this method, so I did a ton of reading and research.
As it turns out, the time it takes your oven to drop in temperature makes all the difference. All ovens vary in the amount of time it takes to drop in temperature, and in this particular recipe, we’re dropping the temperature by 300 degrees F. If your oven lowers in temperature quickly, you likely would not have had a problem. However, if an oven takes a long time to drop the temperature, the cheesecake bakes at a higher temperature for too long, resulting in a too-dark and cracked top.
The Updated Recipe: Since a slightly toasted top is characteristic of a New York cheesecake, I wanted to figure out how to make this work. As it turns out, Cook’s Illustrated also re-visited this recipe and flipped the order of baking. START the cheesecake in an oven at 200 degrees F and finish the cheesecake at 500 degrees F for a few minutes to get that classic browned top.
This also provides another benefit – if you like a purely pale cheesecake without any color on top, you can completely skip the last step of browning with no other adjustments needed!
Topping Ideas
While a fabulous cheesecake can absolutely stand on its own, sometimes it’s nice to dress it up a bit when serving to others (you could even set up a cheesecake topping bar!). You’ll find a recipe for fresh strawberry topping included with the cheesecake recipe below, and here are some other cheesecake topping ideas:
- Homemade whipped cream (or from a can!)
- Salted caramel sauce (homemade is linked, or store-bought)
- Hot fudge sauce (homemade is linked, or use store-bought)
- Chocolate ganache
- Fresh fruit – Blueberries, cherries, raspberries, blackberries, etc.
- Canned pie filling – Spoon some over top of the entire cheesecake, or just individual slices.
- Fruit compote
- Powdered sugar
- Crushed Oreos or other cookies/candy
- Chocolate shavings
How to Store and Freeze Cheesecake
- Storage: Keep the cheesecake in an airtight container or wrapped in plastic wrap in the refrigerator for up to 4 days.
- To Freeze the Entire Cheesecake: Chill overnight in the refrigerator, wrap in plastic, then wrap in aluminum foil, and place in a zip-top freezer bag. Freeze for up to 3 months. Thaw in the refrigerator overnight before serving.
- To Freeze Slices of Cheesecake: Wrap each slice individually in plastic wrap, then place in a zip-top freezer bag. Freeze for up to 3 months. Thaw in the refrigerator overnight or at room temperature for about 45 minutes.
Recipe Notes & Success Tips
- Mixer: This recipe comes together best when you use an electric mixer; while a stand mixer makes an easy job of it, you can also use a hand mixer if that is all you have, just be sure to use a large mixing bowl!
- Springform Pan: To make this deep dish New York cheesecake recipe, a springform pan is essential. Using this pan will give your cheesecake height and, because the outer ring is separate from the base, the sides stay smooth when you release it after cooling. (It’s impossible to get a baked cheesecake out of a regular cake pan without it breaking apart into pieces.)
- Thermometer: An instant-read thermometer is the absolute best way to ensure your cheesecake is done but not overdone. The cheesecake will continue to cook as it cools, so we’re looking for 150 degrees F; baking to this internal temperature will give you the most amazingly creamy cheesecake. If you do not have an instant-read thermometer, gently shake the pan – you want a circular area of about 2 inches in the center to still jiggle slightly.
- Browned Top: As mentioned above, you can skip the browning step completely if you’d like. If you DO plan on browning the top, be sure to keep a close eye on it because it will brown quickly. I find that it darkens a shade or two after cooling, so keep that in mind, as well. Err on the side of removing it earlier rather than later.
- Chill: A thoroughly chilled cheesecake is best! While 6 hours is the minimum, overnight is even better. (Which is awesome, because cheesecake is the ultimate make-ahead dessert!)
Watch the Recipe Video:
If you make this New York cheesecake recipe and love it, remember to stop back and give it a 5-star rating – it helps others find the recipe! ❤️️
New York Cheesecake Recipe
Ingredients
For the Crust:
For the Cheesecake Filling:
- 40 ounces cream cheese, at room temperature and cut into 1-inch pieces
- 1½ cups (298 g) granulated sugar, divided
- ⅛ teaspoon salt
- ⅓ cup (76 g) sour cream
- 2 teaspoons lemon juice
- 2 teaspoons vanilla extract
- 2 egg yolks
- 6 eggs
For the Fresh Strawberry Topping:
- 2 pounds strawberries, hulled and cut into ¼-inch slices (about 3 cups sliced strawberries)
- ½ cup (99 g) granulated sugar
- Pinch of salt
- 1 cup (340 g) strawberry jam
- 2 tablespoons lemon juice
Instructions
- Preheat oven to 325 degrees F. Lightly grease the bottom and sides of a 9-inch springform pan.
- Make the Crust: In a medium bowl, stir together the graham cracker crumbs, brown sugar, and salt. Pour in the melted butter over the mixture and stir with a fork or rubber spatula until the entire mixture is moistened. Press evenly into the bottom and up the sides of the prepared springform pan and bake until the edges begin to lightly brown, 11 to 13 minutes. Set aside to cool completely.
- Reduce oven temperature to 200 degrees F. Adjust oven rack to lower-middle position.
- Make the Cheesecake Filling: Beat the cream cheese, ¾ cup of the sugar, and the salt on medium-low speed until combined, about 1 minute. Beat in the remaining ¾ cup of sugar until combined, about 1 minute. Scrape down the sides of the bowl and the beater. Add the sour cream, lemon juice, and vanilla extract and beat on low speed until combined, 1 minute. Add the egg yolks and beat at medium-low speed until thoroughly combined, 1 minute. Scrape the bowl and beater well. Add the whole eggs two at a time, beating for 30 seconds after each addition.
- Pour the filling over the crust and place the springform pan on the lower-middle rack. Place a rimmed baking sheet on the rack below to catch any drips. Bake until the cheesecake registers 150 degrees F on an instant-read thermometer, 2 hours 15 minutes to 3 hours.
- Remove the cake from the oven and increase the oven temperature to 500 degrees F (leave the rimmed baking sheet on the bottom rack).
- Once the oven reaches 500 degrees, place the cheesecake on the upper-middle rack. Bake until the top is lightly browned, 3 to 8 minutes. Remove from the oven, place on a wire rack and allow to rest for 5 minutes. Run a paring knife between the cheesecake and the side of the springform pan, then allow to cool to room temperature, at least 3 hours. Cover with plastic wrap and refrigerate until completely chilled, at least 6 hours but ideally overnight.
- Remove the sides of the springform pan and allow to sit at room temperature for 30 minutes before serving.
- To Make the Fresh Strawberry Topping: In a large bowl, toss together the sliced strawberries and the sugar. Let sit for 30 minutes, stirring occasionally to combine.
- Process the jam in a food processor until smooth, about 10 seconds (or, whisk vigorously until the jam is completely smooth). Place the jam in a small saucepan and bring to a simmer over medium-high heat. Simmer, stirring frequently, until the jam is dark and no longer frothy, about 3 minutes. Stir in the lemon juice, then pour over the strawberries and stir to combine. Allow to cool to room temperature, then cover with plastic wrap and refrigerate until cold, at least 2 hours or up to 12 hours (the strawberry topping is best served within 1 day of making it).
Notes
- Springform Pan: To make this deep dish New York cheesecake recipe, a springform pan is essential. Using this pan will give your cheesecake height and, because the outer ring is separate from the base, the sides stay smooth when you release it after cooling. (It’s impossible to get a baked cheesecake out of a regular cake pan without it breaking apart into pieces.)
- Thermometer: An instant-read thermometer is the absolute best way to ensure your cheesecake is done but not overdone. The cheesecake will continue to cook as it cools, so we’re looking for 150 degrees F; baking to this internal temperature will give you the most amazingly creamy cheesecake. If you do not have an instant-read thermometer, gently shake the pan – you want a circular area of about 2 inches in the center to still jiggle slightly.
- Browned Top: As mentioned above, you can skip the browning step completely if you’d like. If you DO plan on browning the top, be sure to keep a close eye on it because it will brown quickly. I find that it darkens a shade or two after cooling, so keep that in mind, as well. Err on the side of removing it earlier rather than later.
- Chill: A thoroughly chilled cheesecake is best! While 6 hours is the minimum, overnight is even better. (Which is awesome, because cheesecake is the ultimate make-ahead dessert!)
- Storage: Keep the cheesecake in an airtight container or wrapped in plastic wrap in the refrigerator for up to 4 days.
- To Freeze the Entire Cheesecake: Chill overnight in the refrigerator, wrap in plastic, then wrap in foil, and place in a zip-top freezer bag. Freeze for up to 3 months. Thaw in the refrigerator overnight before serving.
- To Freeze Slices of Cheesecake: Wrap each slice individually in plastic wrap, then place in a zip-top freezer bag. Freeze for up to 3 months. Thaw in the refrigerator overnight or at room temperature for about 45 minutes.
Did you make this recipe?
Leave a review below, then snap a picture and tag @thebrowneyedbaker on Instagram so I can see it!
This recipe was originally published in April 2013.
Photography by Dee Frances.


I have a recipe for cheesecake, and it is easy and without the best cheesecake I’ve ever baked. My oven has been running hot lately and it’s a little dry.
I plan to use your directions next time.
I have made this and it is really delicious. Best New York Cheese Cake my Husband and I have had. give it a go
can this recipe be converted for a 6 inch springform pan – If so, what changes would I have to make in ingredient measures as well as bake time
Adorei a receita. Magnifico!
Muito obrigada.
Aparecida
I’m really bummed because I thought this recipe would be promising, but it’s been baking for over 4 hours at 200 degrees F and is still not even close to done. I won’t be able to have it on time for our birthday party tonight. What did I do wrong?
Use an over thermometer to check the temperature of your oven. Maybe it took so long because your oven isn’t heating properly.
How do i make this recipe in a 4 inch springform pan ?
I just want to say thank you. Having this recipe is like being the keeper of the key to cheesecake heaven. It’s honestly priceless.
I have not baked it yet, but I wanted to let you know the metric conversion isn’t working for oz of cheese to grams. My cheese comes in 250g blocks. It would be nice to have the ability to round numbers for eggs and blocks too and to do that on individual ingedients in case you measure a mixture…ie: cups of flour and grams of cheese.
Interesting that this is the same
recipe as America’s Test
Kitchen’s recipe.
She probably should give credit where it is due.
I’ve been using this recipe for over a decade and it is a hit every time! my go-to crowd-pleaser, I don’t know what I’d do without it. Simply amazing
This is my Go To Cheesecake
Recipe. I have always had great success with it and it always
gets rave reviews. I have tried a
few others over the years and I
always come back to this one.
The best cheesecake I’ve ever made. Hands down! A bit time consuming but totally worth the wait!
What if I want to put the crust up the sides as well. Should I double the crust
This is my go-to cheesecake recipe and my daughters request every year instead of birthday cake.
Sometimes we do a plain cheesecake with a variety of different toppings so everyone can have their favorites on their slice. I was wondering if anyone has updated the recipe to a Pumpkin Cheesecake? I’d really like to make it for Thanksgiving this year.
I had to go back and read the revisions you made to this. I’ve made this recipe several times over the years and I knew I used to put the oven to 500 and then lower it. Lol
Thank you for this recipe. My family loves it.
Great recipe. Very precise directions. Foolproof.
do u need a mental health check? people could burn their house down.YOU DONT COOK ANY FOOD AT 500F!!! WHAT PLANET DID U COME FROM? do u have ocd’s? totally irresponsible 2 post a temp like that 2 cook something..there r stupid people out there who dont know how 2 cook.
What an asinine comment. Plenty of foods get cooked at 500 F or higher – ever seen how hot a pizza oven gets? How about a broiler? You are clueless.
Your comment is incredibly rudeand unnecessary. I’ve made this recipe at least 5 or 6 times
including yesterday and have
never burned my house
down. It always turns out
amazing. If you don’t like how a
recipe is written then move on
to a different site or start your
own cooking blog since you’re
such an expert.
Maybe you’re from outside the US? It’s 500° fahrenheit. Totally safe. That would be 260° Celsius to the rest of the world.
Hi! I’m a bit confused about where in the oven to bake the cake
If you place racks in the upper and lower middle positions, how can the cake be baked in the lower rack with a dripping tray beneath it? Should it be baked on the upper middle rack with a tray on the lower middle rack?
Thank you!
This is so delicious! It took me longer than 3 hours to get to 150 degrees but it was so with it. I knew we would not finish the entire cheese cake in one sitting so I poured the strawberries on to each slice as I served it. Definitely make this again and again!
I just made this and I have a few questions. 1. I could not figure out how to avoid the cracking on top once I took it out of the oven. Should it be left in the oven for a bit?
2. When i took out the cheesecake it had gotten tall, however, as soon as it was out for a few minutes it deflated. What did I do wrong?
It cracks when it cools too fast, turn the oven off when it’s
“done” and leave the cheesecake in the oven for 90 minutes to cool off slowly. You may find that leaving it in the oven with the oven off to cool slowly helps it retain some of its’ height.
Great recipe, Michelle! My family could never resist a classic New York-style cheesecake. We always order from our local baker but I guess it was time for me to test my baking skills with your recipe. It turned out very creamy and delicious. However, I didn’t really achieve that brown top. I was too scared it might get burnt. Nonetheless, thank you for the recipe!
I have a lovely Thermoworks ChefAlarm Cooking Alarm Thermometer & Timer, and I thought this in-oven thermometer might be the perfect solution to halting the heating when the cheesecake reaches 150°.
That does sound perfect!! Enjoy!
Uh, where and how did you stick the probe in the cake while baking?
This looks so good and I’d love to make it but it’s just so big! Do you think the timings/temp would be the same if I scaled the whole thing back by a third? Anyone else had any success doing so?
About to try making this, but wanted to comment about/question something… the flour in the crust says 1/2c (1tbsp). Am I correct in assuming that there’s a typo there and you meant 1/2c and intended to include a weight and the 1tbsp can be disregarded? (It doesn’t look like 1tbsp in the pictures).
Thanks!
This recipe is so good! I’ve been making it for years and my mom always wants me to make it for her birthday. Super easy recipe and everyone who’s ever tried it says it’s the best cheesecake they’ve ever had.
Yes that’s correct and I’ve fixed the error. So sorry about that!
I love the recipe and I’ve made it several times. But my crust sticks to the pan every time. I can’t figure out what I’m doing wrong. I do grease the pan.
Hi Catrina – Have you tried using a water bath before you remove your cheesecake? If not, do a Google search on how to do this and give it a shot 😊
Wonderful wonderful recipe! It has become my family’s very favorite! I have a probably very dumb question: do to the long baking time and refrigeration time I don’t always have enough time to make it. Is it possible I could make the cheesecake filling ahead of time and refrigerate it until the next day then assemble and bake the cheesecake?
Hi Karen, I have not done that personally so I can’t give you a guarantee, but I think it should be fine. So glad you enjoy the recipe!
Can i use this recipe to make individual cheesecakes baked in disposable mini aluminum pans?
Hi Trina, Sure, I don’t see why not!
Made this for my husband’s birthday It was creamy and delicious and he LOVED it Im not a huge cheesecake fan- I can take it or leave it but even I really liked it Easy to make and the crust was delicious also. This is my new go to for cheesecake recipe. Really delicious!
I have been searching the internet for your New York Cheesecake Recipe you posted back in 2013. I believe when you posted it then it had a picture of the cheesecake with the strawberry topping? I had great success with that recipe but haven’t made it in a long time and unfortunately didn’t save the recipe. I see that you recently updated the recipe. Did it always have sour cream in the filling?
Hi Candice, Yes, it’s the same recipe, the method of baking has just been reversed so that it starts in a cooler oven until it is finished baking THEN browned on top instead of vice versa. Enjoy!!
This is like a chapter in a book. Good lord. It’s a cheesecake recipe. Between all the ads and the ridiculous length of this article.. you barely can get to recipe.
You don’t have to write a novel for every recipe. You recipe bloggers for some reason feel you have to say every recipe “it’s the best” or “my absolute favorite” followed by a long drawn out story. *yawn*
#JustSaying
Easy to just hit the button that says “jump to recipe”
You’re welcome
surely you can find a recipe elsewhere that doesn’t anger you to the point of rudeness?
Wow.
Why do people feel the need to be so rude? Makes our world that much harder to live in. Keep it to yourself, or just get off the site!
This was sooo good! The flavor and texture were exactly like cheesecake straight from NYC. The crust was perfect (not too thick). It turned out gorgeous with no cracks (and no water bath!).
I’m a pastry chef who has been searching and experimenting a long time to rediscover a New York style cheesecake that I was familiar with as a child, and you’ve hit the mail on the head! I used this to make 4 massive 4 inch thick wedding cheesecakes! In total a 7 times batch of this recipe for all the cheesecakes, and wow! Just wow! The crust I love because it’s kind of like a shortbread cookie, and I didn’t want to worry about graham cracker crumbs falling off or getting stuck on the side of the cheesecake as they are wedding cakes so perfection is a must!!! It’s so structurally sound!
I tried this recipe, and Wow! was it good! I’ve never made a real cheesecake before, only the Jello pudding kind. This turned out excellent, better than I ever expected. I am planning to bake another one and take it to my friend’s house for the pot luck Thanksgiving meal. There will just be 5 of us, so there will plenty. Thank you for such a creamy, mouth-pleasing cheesecake recipe. I love it!!!!!
may i know how many inches of cake mold this recipe uses?
I’m a single empty nest cook and use an 8 inch springform pan instead of the larger 9 inch. I cut the recipe down by a brick of cream cheese (32 vs. 40oz) and then cut by a quarter the other ingredients- though not the crust, which I love a good thick crust and kept it same.
It’s in the oven now and I’m trying an oven temp not at 200 but at 225 since it seems to be a thicker version with the 8 inch pan. I’ll do the temp increase at the end and we’ll see how it works. I love your recipes. Thanks!!!
It was very good ! My husband gave it great reviews 😍
Hello!
I’m confused, 40 ounces cream cheese?? How many packages??
Hi Veronica, Most packages of cream cheese are 8 ounces, so you would need 5 packages.
Bummed . I made your original New York cheesecake for years And it never failed . From my old stove to my new Thor stove and always perfect . It is beautiful however something that I won’t serve . Can you repost the old recipe as well . It was flawless
She explains it’s the same recipe, just cooked in reverse. Start at a lower temp and finish with high.
Very very sweet. I would cut back the sugar by 1/4cup next time because I like a subtle tang from the cream cheese to shine through in a cheesecake. Crust flavor is great.
Michelle, I’ve made a lot of your cheesecake recipes but this was my first time making a NY style one. I seriously can’t believe I waited this long. The instructions were perfect and it turned out even better. Everyone raved most about the crust, but I think every part was amazing… especially the caramelized top.. yum!!!
So good. Perfect, really. Everybody at the birthday insisted it could not be improved upon. Follow the directions and I don’t see how it wouldn’t turn out. Perfectly creamy and tender, simple, yet full of flavor.
I loved this recipe , it works ! And my family loves the cheesecake ! Thanks for the tips
My very first attempt at cheesecake of any sort. Don’t know that I will ever try another.
If I prefer a thicker crust would you suggest just doubling all ingredients including the butter? Seems like a lot of butter but I don’t want it crumbly either. I also prefer not to brown the top….so I am thinking of cooking low and slow instead. Thoughts?
Hi disregard the browning comment but let me know about the crust question when you get a moment, please. Thank you and have an awesome day!
I have been using this recipe for a couple of years. Sometimes the top would be beautiful and sometimes it would crack but it always tastes delicious!
I tried it the way you revise it and it looks as gorgeous as it tastes!
I made your NY Cheesecake without a crust because my 7 year old grandson did not want a crust. I buttered the pan very well. I did not add the salt or lemon juice and I used 1 cup of sugar. I used 6 eggs and did not separate any of them. When I cooked it, I used a water bath and had covered my springform pan with tinfoil. I baked it in a 325 oven for 15 minutes then in a 225 oven for 30 minutes. Then turned oven off for 30 minutes and I did not touch the cheesecake. After 30 minutes I then opened the door and left it ajar for 45 minutes. Then I took the pan of water out and left it in oven with door ajar for 2 hours. At that point it went in the fridge overnight. The cheesecake had pulled away from the sides. My family does not like the graham cracker crust. Normally I butter the pan and sprinkle Oreo crumbs in the pan, enough so that there is no space not covered with Oreos. I have also used gingerbread cookie crumbs with crushed walnuts, sprinkled the same way I did the Oreos. So I changed a few things but ultimately the same. The cheesecake was awesome. Smooth, creamy, crust less,, heaven! I served it for Mother’s Day and it was gone by Monday.
Made this last night! A few things: I checked for the internal temp of 150 degrees after I had baked for 2 hours 15 min at 200 and it was exactly 150. So I removed it and did the rest of the recipe. The cake was delicious, but pretty soft/custardy in the center. I think it would definitely have benefited from another half hour in the oven.
Also, with the topping recipe, a pinch of salt is mentioned in the ingredients but not put in the directions. When should I add it? Thanks and I’ll make this recipe again with a few tweaks!!!
I made it and completely forgot to take a picture!!!!! It was the best cheesecake I have ever made! I will never make another recipe again!
What size springform pan? I have 3 sizes. I’m making this today. Can’t wait!
Step 1 says 9 inch
I’ve been making this “Lindy’s style” cheesecake for over 40 years. It’s the very best cheesecake recipe by far. Feeds a lot of people!
What brand of instant read thermometer do you recommend?
Hi! I took your challenge and put a twist on it. I made a “White Chocolate Raspberry Cheesecake” instead. I saw it on the cover of a Ghiradelli white chocolate baking bar. I made a video of it and put it on my facebook page and credited you for the inspiration. It was delicious!!
I have made your New York Cheesecake twice now. I used the original recipe starting with the 500 degree oven. It is
perfect! So perfect that I’m afraid to change a thing! My
family, friends and co-workers agree it is the most delicious, creamy cheesecake ever. I love the fact you don’t have to
use a water bath. Thank you so much for this amazing recipe.
I was wondering what the measurements for this variation would be.
“The second variation is one in which a mixture of sour cream, sugar, and vanilla is combined and spread on top of the almost-baked cheesecake, then returned to the oven to finish baking.”
Thanks so much!
The cheesecake looks devine! I would typically have my uncle over for Easter dinner and , and I thought about making the cheesecake. Since my uncle isn’t allowed to leave his assisted living facility at this time, I’m going to wait till we can all be together again, and we’ll have a wonderful celebratory dinner complete with cheesecake!😁
If using a a convection oven how long do you cook the crust then the cheesecake and what temperature
Hey Michelle
In step 9, what do you mean by “Remove the sides of the pan?”
Also, how do you slide the spatula in between the crust and the ‘pan bottom?!’
Please answer soon
Thanks!
You use a spring form pan for this recipe. A spring form pan is a two part pan where you can remove the sides from the bottom.
I read all the comments about how dark the top of the cheesecake would be so I expected that. What I forgot to do was to check the doneness before 1 1/2 hr of baking so I hope it’ll be ok. It did not crack at all which pleased me but unfortunately because of the dark top I will be covering it up…actually decorating it festively!
Oops I put 2 tablespoons of lemon juice instead of 2 tsp. Will this be gross lol? I’m bringing it to family’s house for Christmas Eve and don’t want to be embarrassed lol
One hour and thirty minutes was way too long for me. Make sure you check the cake as you bake it, as I did not. Still looks edible, we’ll find out tomorrow.
I used a gas oven. It looks absolutely perfect. When I ran the paring knife around the edge to loosen it, it didn’t even need it. The butter on the edges was helpful to keep it from sticking. I had a small amount of leakage from the bottom of the pan, but I put tin foil underneath to catch it. It stopped leaking after about 14 minutes. Zero cracks at all. I know the importance of room temperature cream cheese and eggs. I can’t wait to taste it!
Can you use frozen strawberries for the topping?
Out of this world. The best cheese cake I’ve ever made. So any compliments received I’ve made this 10 times over. It becomes a great and appreciative gift.
Any idea why every time I make this the top is dark and it gets some cracks?? Love the recipe and it always taste amazing just wish it looked prettier!
Is your oven a convection oven?
Best cheesecake I’ve ever made or eaten, and I’ve had a few!
Hi, this is always my go to recipe for cheesecake! I love it. I am going to be making a new recipe for my YouTube channel and blog but I will be using your method for baking. I would love to give you credit and put up a link if that’s okay with you. My channel is EverydayGlutenFreeByKaren if you’d like to take a look and my blog is the same @blogspot.com. Thank you!
Karen
500 F is too high. I turned the oven down after 6 mins. when it started to burn. the entire cake is charred. Complete waste of expensive ingredients. do not follow this recipe.
Hi! I love your recipes, they are my go to when making desserts! :) My question is one that you have sort of answered before but wondering if you had any other insight. So I’m using this recipe to make cupcake sized cheesecakes and making a variety of sauces to choose from (like a cheesecake bar) :-) I was wondering if you had insight into how long and what temp to cook the crust and cheesecake? Should I use your tiramisu cheesecake cupcakes recipe as a guide? Also, I have a regular and convection oven…would you recommend using one over the other?
Thanks for your input! :-)
Hi Heather, Yes the tiramisu cheesecakes would be a great guide! I always use my regular oven, I haven’t seen consistent good results with convection yet (although it could just be my oven!).
This is the platonic ideal of cheesecake. Look no further.
Flavor and texture are wonderful. More cream cheese than seems reasonable, because this is a Cheese Cake, not a cake with cheese. Enough sugar, not too much. Lemon is not really detectable, but it brightens and balances everything perfectly. I used homemade Tahitian vanilla extract (upped it to 1 tbsp) – if you have fancy vanilla, now’s the time to bust it out, this is the perfect vehicle to show it off. I imagine other extracts would be good here too, if you wanted to experiment with flavors.
The top gets quite brown during the initial 500° bake, but it doesn’t burn, don’t worry. I did get a couple cracks, and some air bubbles due to overzealous mixing of the batter. But I’m not making this for the cover of Cheesecake Magazine, and the aesthetic “problems” don’t bother me or my cheesecake-eaters at all. I checked doneness via thermometer, and the only time it came out slightly less than perfect was when I overshot the end temperature: the outer edges got a bit firmer and cakey-er than the silky creamy center. This was only noticed, by my cheesecake-connoisseur husband, because the first two times the whole cake had the texture of a Lindor Truffle.
This is the platonic ideal of cheesecake.
I’m so thankful to have found this on your website!! Your chocolate ganache cheesecake has been the only cheesecake EVER that has turned out for me. I seem to fail at water baths every. Single. Time.
And then my mother-in-law requested a standard traditional cheesecake with strawberries for her birthday…
I was terrified I was hosed. I brought up your trusty chocolate recipe hoping I could maybe just omit the chocolate only to find this one!! And it doesn’t require a water bath!! Thank you thank you!!
I made this recipe as written except I added orange and lemon zest. My topping was a mixture of raspberry mango jam and strawberries. My nephew loves cheesecake, he requested one for his birthday. It was amazing.
Throwing away old recipe per my families request and using this going forward! Awesome recipe!!!!
After the 10 minutes the top looks burnt :(
Do you happen to use a convection oven?
This was my first attempt at making a cheesecake and it turned out fabulous! Thank you so much for sharing your recipes with everyone. It was perfect!!!
I’ve made this twice and both times I still ended up with cracks. I may just have to try the water bath method to see if the result is any different.
what pan size would you recommend to use for this recipe?😅
Hi Kristian, A 9-inch springform pan (noted in step #1).
The 500 degrees is NOT a good idea. It will turn the top of the cheesecake like it did mine.
Hi! I made this cheesecake for my sons 18 birthday, it was amazing!!!!! 😋😍Thanks for recipe. Definitely my all time fav recipe for NY style cheesecake. 😎
Hi, Michelle!
This recipe states that it needs 2 pounds of strawberries for topping about 3 cups, but 3 cups of sliced strawberries is only one pound not two. So, how many pounds of strawberries exactly one has to use in this recipe? Thank you. Please, answer. I lately do not get any answers to my questions. I’d highly appreciate it. I like your recipes.
Hi Yelena, The size of the strawberries and how they are sliced could definitely affect the yield you get. I would go with the 3 cups sliced, however many pounds it is. I list both to help guide how many strawberries should be purchased. And I apologize about any unanswered questions; I do try to reply to any questions within 48 hours, so apologies if one of your slipped through the cracks!
So, I’ve made this a couple of times because I really love it. Thing is, every time I’ve made it the top is browning a decent amount. The consistency is coming out great, it doesn’t appear to be overcooked or anything. Is there anything else I could change to help w/ this? Would I wanna adjust the high temp cooking time or the low temp cooking time or something else?
Hi Amanda, You could try covering the top with foil during that initial hot burst, which could help keep it from browning so much. If you do that, let me know how it works for you!
polish restaurant in New Britain, CT “Staropolska Restaurant” has used your picture on their facebook page. Did you allow them to use it or they just simply stole it? Go to their fb page and find post from June 9th 2017
I love how this looks in your pictures! Mine is currently baking at 200 degrees after the initial 10 mins at 500. I do have an oven thermometer and I’m experiencing the same problems as others – Dark brown top after 20 mins in oven and cracks. So sad. Foil is on so I’m hoping for some salvaging…sighhhh
I wonder how wiggly it should be after the suggested bake time. I didn’t use a water bath. But I did put o pan of water on the bottom of the oven. And mistakenly used 1/2 cup of sour cream.
Hi Maureen, I definitely use the thermometer for this recipe to ensure it will set properly, but it should jiggle slightly… it shouldn’t be firm but not totally liquid.
Could you make a sugar Free cheese cake?
Hi Deborah, I never have, I’m not sure how it would turn out!
I made my first cheese cake ever with this recipe! Ingredients and flavor were great (though I would use 1/4 of the sugar in a future strawberry topping.) One big problem: the baking time. The cake was really dark after 45 min of baking. I followed the directions and turned the oven down to 200 after 10 min, I had even bought an oven thermometer to make sure the temp was on track. I ultimately registered the temp in the center of the cake, it was 160. I took it out after only 50 minutes. The sides of and external edges of the crust were burnt. Cheese cake a bit over done, but still got rave compliments :)
Hello, the joyofbaking website has actually this same recipe more or less, but also an added “topping” which i would say is essential.
Very strange that this isnt in this recipe as that process with taking the cake shortly out to add a thin top layer with lemon/vanilla sourcream makes alot for the cake.
This cheesecake looks perfect!!
My most requested cake is the snickers cake that you posted, it’s absolutely fantastic so I’ll follow any recipe of yours :)
My question is, can I double or triple the crust portion and bring it all the way up the sides? Do you think that will work out?
Thanks!
Hi Carolyn, Yes, you could definitely increase the crust (a girl after my own heart!).
The crust up the sides worked out very well, but the same as quite a few comments above, the top is very dark brown and the top of the crust I built is BLACK.
What I should have asked you is if there is a high altitude difference? That’s the only thing I can think of.
I live at 5500ft
Hi Carolyn, Yes, it’s absolutely likely that altitude could have played a factor. I did a post on adjustments for high altitude baking here:
https://www.browneyedbaker.com/high-altitude-baking-tips/
Hello! I was wondering if it would be possible to fold in some strawberries into the cheesecake before baking.
Hi Kayla, I haven’t tried it, but I think it should work. The only issue I could see is that they might release too much liquid during baking, which might make for a runnier batter and it could take longer to bake.
Hi,
I love this cheesecake, the texture is wonderful. I have also made a Cooks Illustrated Lemon cheesecake that I love, but you do have to use a water bath, and I prefer the texture of your New YorkStyle Cheesecake.
I would need to add more lemon juice and 1 TBS lemon zest. Do you think I will need to adjust any of the ingredients to do this? Any suggestions would be appreciated.
Thank you, I love your recipes,
Jo
Here is the recipe:
Lemon Cheesecake – Cook’s Illustrated –Made this one Dec. 2011
I have a lemon cheesecake recipe from Cook’s Illustrated, and it’s the one that everyone usually goes nuts for. They are big on ”instruction” so it looks far more complicated than it really is.
Serves 12 to 16
While this recipe takes several hours from start to finish, the actual preparation is simple, and baking and cooling proceed practically unattended. The finished cheesecake should be chilled for at least 4 hours before being sliced, and it can be made up to a day in advance. Leftovers can be refrigerated for up to 4 days, although the crust will become soggy.
Crust
5 ounces Nabisco’s Barnum’s Animals Crackers or Social Tea Biscuits
3 tablespoons sugar
4 tablespoons unsalted butter, melted and kept warm
Filling
1 ¼ cups (8 ¾ ounces) sugar
1 tablespoon grated zest plus ¼ cup juice from 1 or 2 lemons
1 ½ pounds (three 8-ounce packages) cream cheese, cut into rough 1-inch chunks and left to stand at room temperature 30 to 45 minutes
4 large eggs, room temperature
2 teaspoons vanilla extract
¼ teaspoon salt
½ cup heavy cream
Lemon curd
1/3 cup juice from 2 lemons
2 large eggs plus 1 large egg yolk
½ cup (3 ½ ounces) sugar
2 tablespoons unsalted butter, cut into ½-inch cubes and chilled
1 tablespoon heavy cream
¼ teaspoon vanilla extract
Pinch salt
1. For the crust: Adjust an oven rack to the lower-middle position and heat the oven to 325 degrees. In a food processor, process the cookies to fine, even crumbs, about 30 seconds (you should have about 1 cup). Add the sugar and pulse 2 or 3 times to incorporate. Add the warm melted butter in a slow, steady stream while pulsing; pulse until the mixture is evenly moistened and resembles wet sand, about ten 1-second pulses. Transfer the mixture to 9-inch springform pan; using the bottom of a ramekin or a dry measuring cup, press the crumbs firmly and evenly into the pan bottom, keeping the sides as clean as possible. Bake until fragrant and golden brown, 15 to 18 minutes. Cool on a wire rack to room temperature, about 30 minutes. When cool, wrap the outside of the pan with two 18-inch-square pieces of heavy-duty foil; set the springform pan in a roasting pan.
2. For the filling: While the crust is cooling, process ¼ cup sugar and lemon zest in a food processor until the sugar is yellow and the zest is broken down, about 15 seconds, scraping down the bowl if necessary. Transfer the lemon sugar to a small bowl; stir in the remaining 1 cup sugar.
3. In a standing mixer fitted with the paddle attachment, beat the cream cheese on low to break up and soften slightly, about 5 seconds. With the machine running, add the sugar mixture in a slow steady stream; increase the speed to medium and continue to beat until the mixture is creamy and smooth, about 3 minutes, scraping down the bowl with a rubber spatula as needed. Reduce the speed to medium-low and add the eggs two at a time; beat until incorporated, about 30 seconds, scraping the sides and bottom of the bowl well after each addition. Add the lemon juice, vanilla, and salt and mix until just incorporated, about 5 seconds; add the heavy cream and mix until just incorporated, about 5 seconds longer. Give the batter a final scrape, stir with a rubber spatula, and pour into the prepared springform pan; fill the roasting pan with enough hot tap water to come halfway up the sides of the springform pan. Bake until the center jiggles slightly, the sides just start to puff, the surface is no longer shiny, and an instant-read thermometer inserted in the center of the cake registers 150 degrees, 55 to 60 minutes. Turn off the oven and prop open the oven door with a potholder or wooden spoon handle; allow the cake to cool in the water bath in the oven for 1 hour. Transfer the springform pan without the foil to a wire rack; run a small paring knife around the inside edge of the pan to loosen the sides of the cake, and cool the cake to room temperature, about 2 hours.
4. For the lemon curd: While the cheesecake bakes, heat the lemon juice in a small nonreactive saucepan over medium heat until hot but not boiling. Whisk the eggs and yolk in a medium nonreactive bowl; gradually whisk in the sugar. Whisking constantly, slowly pour the hot lemon juice into the eggs, then return the mixture to the saucepan and cook over medium heat, stirring constantly with a wooden spoon, until the mixture registers 170 degrees on an instant-read thermometer and is thick enough to cling to a spoon, about 3 minutes. Immediately remove the pan from the heat and stir in the cold butter until incorporated; stir in the cream, vanilla, and salt, then pour the curd through a fine-mesh strainer into a small nonreactive bowl. Cover the surface of the curd directly with plastic wrap; refrigerate until needed.
5. To finish the cake: When the cheesecake is cool, scrape the lemon curd onto the cheesecake still in the springform pan; using an offset icing spatula, spread the curd evenly over the top of the cheesecake. Cover tightly with plastic wrap and refrigerate for at least 4 hours or up to 24 hours. To serve, remove the sides of the springform pan and cut the cake into wedges.
Hi Jo, I don’t think you would need to make any alterations to add the lemon juice and zest.
OMG!!! This looks amazeballz :-) Can I use Oreo instead of the graham cracker? And if so do I have to keep the Oreo cream? I hate too sweet a dessert.
Thanks,
Shonann- Jamaica
Hi Shonann, Sure you could use an Oreo crust! I’ve never made an Oreo crust and removed the cream centers, but I’m sure that would be fine.
I have made this recipe several times using various toppings. However, I made it with store bought crust and only used half of the recipe for a smaller cake. In addition, I surround the stawberries with crushed walnuts to finish this off. I’d love to share my pics if it’s possible.
I started making this cake, but I realized I don’t have enough time to bake it because I have to go to work in an hour. Would you suggest I leave the crust and filling separate and refrigerate the filling? or should I cover it and leave it on the counter? Help!
Hi Emily, I would keep the crust and filling separate and refrigerate.
HOLY COW. This was the best cheesecake I’ve ever made! SO SO good. Seriously- it was amazing. This is my new cheesecake recipe and I don’t see myself going back to the 1/2inch chunky pathethic stuff I used to call cheesecake any time soon. Thanks for the awesome recipe.
What method were you using to heat up your kitchen towel before wrapping it around the pan?
Hi Lisa, I run it under scalding hot water then wring it out really well.
hey Michelle, I really do love the recipe and I can’t wait to try it out this weekend. just wanted to ask, is it possible to change this recipe into cupcakes instead? is there anything I need to change? thanks so much!!
Hi Shanice, I haven’t tried making this recipe into cupcakes. I would drastically reduce the baking time and maybe omit the high temperature start.
at what temperature should I bake the cupcakes at then and for how long? how would I have to modify step 6? so sorry for the many questions, I’m just worried that it’ll turn out all mushy!
Hi Shanice, I would recommend 350 degrees F for the entire time. Yeah I wouldn’t start it high then reduce, I would just bake it at 350. As for the time, I couldn’t say since I haven’t tried to do it, but I would probably start checking around 15 minutes or so to make sure you don’t overbake them.
hey I just wanted to ask if it’s possible to make the cheesecake without crust? thanks so much! :-))
Hi Nicole, You could, it just might be slightly more difficult to remove from the pan cleanly.
Hi Michelle
I want to thank you so much for this amazing blog, there’s not one day that goes by that i do not check it and it’s my go to blog for cooking/baking ideas.
I’m also crazy about cheesecake and i’ve been trying all the cheesecake recipes that you have on here, my friends just go crazy for them. I do have a question, i think this is the only recipe that does not use a water bath for the cheesecake, to be honest, i hate using water baths, I think you mentioned that in one of your posts how your crust gets soggy, I get the same issue. I was wondering, does this way of baking work for all cheesecakes? or specifically this one? for example other cheesecakes I tried from your blog that came out amazing but crust were a bit soggy due to water bath were the pumpkin and the layered espresso one (that one was a major hit)
I was just wondering if I can use this form of baking for the other cheesecake recipes?
thank you so much for your amazing blog.
Hi Lein, You could try baking as directed with the temperature in any given recipe, omit the water bath, and when the cheesecake is just set around the edges and still jiggles in the center, turn off the oven, but leave the cheesecake in there until it cools to room temperature. Then chill in the refrigerator for at least 4 hours (preferably overnight).
I just made this a few days ago, and it is GONE. It was seriously the best cheesecake I have ever tasted, and the easiest recipe. The texture was perfect, everything you want a New York cheesecake to be, and the flavor, oh my gosh! I made a different recipe last month, and I had a hard time getting us to finish it; in fact, I had to throw some away. It was TOO dense, so much so that I couldn’t slice it without the slice breaking into pieces as I did so, and the feel of it in the mouth wasn’t good. Also the flavor was bland. The lemon and vanilla in this are just enough to enhance the flavor of the cream cheese and make it addicting; we couldn’t stop eating it. The guys at work loved it, too. It went SO fast, that I was begged by my family to immediately make another one; the cream cheese is now in the fridge, waiting for me to make it tomorrow. Also, the height went all the way up to the very top of my pan, which I also loved. I will be making no other cheesecake recipe. Thank you!
Amazing! my first time trying to make a cheesecake and wit worked perfectly!
thanks!
For anyone who wants to use the store bought graham cracker crumbs, 8 graham crackers is about 1 1/3 cups.
Hi! I’ve made this several times and it’s a fantastic recipe. I also make your red velvet cheesecake a lot as well. My question is- I’ve been requested to make this cheesecake AND the red velvet cheesecake for two separate Easter dinners for each side of my family. Do you think I could make two of the NY cheesecakes, leaving the crust off one, bake them at the same time, and cut one in half for the red velvet cake, or would this recipe not slice as well as the recipe in your red velvet cheesecake? I’m trying to avoid having to bake the cheesecakes separately. Suggestions?
Hi Katie, I think you could definitely use the same cheesecake recipe! Enjoy! :)
Hello,
I tried this recipe yesterday and half way through I realized my oven doesn’t go as low as 200F!!
So i had to improvise and check on it a lot!!!
And when the cake itself reached 150F, it was still soupy so I had to leave it until almost 170F. The end result was good however I am wondering if there is a more scientific way of baking it, my oven minimum temp is 266F (130C)
Thanks!
hey Michelle I just wanted to ask if there was another way to unmold the cheesecake? I don’t have a springform pan and I’m afraid of cracking the cheesecake as I’m baking it as a present!
Hi Malia, Unfortunately, unless you use a springform pan, I don’t know how you could unmold it without it breaking.
What a disaster. I’ve never been so embarrassed about anything I’ve ever made in my kitchen. I followed directions to a T and I’ve got a disgusting horrible mess that I wouldn’t serve to a dying dog. So awful.
Yeah this one is NOT working for me. 10 mins at 500F has left me with a burnt top. At 10pm for a birthday tomorrow. Awesome.
You are wrong. The classic New York Cheesecake does not have a graham cracker crust. It has a type of pie crust with lemon zest that makes the entire experience lucious.
Ok I followed the recipe to a T! After the 10mins of cooking at 500 the cheesecake was a dark dark brown and cracked. Pretty sure it will be going in the trash. I’ve made cheesecakes for many years and love all your recipes, but this one did not work for me.
Yum. My son asked for cheesecake for his bday. I have never made it before so I made 3 of this recipe and had blueberry topping, cherry and strawberry available for our guests. I received so many compliments on these and no one could believe it was the first cheesecake I had ever made. Thanks so much. I absolutely love your site.
I made this for my mother’s birthday. Everyone loved it! It was super moist & tasted like it came from a New York Bakery.
I love this recipe. I made it last year for my son’s birthday and it was a hit. Everyone loved it. Now, I’ve committed to bake this cheese cake for a silent cake auction to benefit a sweet lady battling breast cancer. I’ll make the cheesecake a day ahead of time, but my concern is that it will be sitting out for several hours on a table while people bid on it. Do you think it will be okay after that length of time at room temp? Any suggestions?
Hi Beckie, I’m so glad you enjoy this cheesecake! I think it should be fine, as long as the table isn’t outside in really hot temperatures.
AMAZING!! Made this last night and served it tonight, everybody LOVED it. BEST cheese cake I ever made!! I loved the easy to follow steps, this is a keeper!!!
Can you use 6 large eggs instead of 6 eggs and 2 egg yolks?
Hi Simony, No, it will affect the texture of the cheesecake.
wow is all i have to say .. i tried this first time without water bath and its came out wonderful.. i definitely recommend this recipe :) thanks so much.. company tomorrow will love it !!
Hey! This is in the oven now I’ve just turned the temperate down to 200 but it looks burnt after being in on 500!
I just made this for my husband for Father’s Day, and his is a very happy Dad-thank you! My thermometer lied, though, and when I sliced it, we had cheesecake soup in the middle. I’m hoping that’s at least partly because I didn’t have time for it to chill partly. It still tasted fantastic!
The cheesecake turned out great, except mine was not as pretty as yours. Mine browned up quite a bit on the top? I checked it at 1 hour and 20 min. but it was not done so I baked it for 1 1/2 like you said. I do not have an instant read thermometer. Just not sure why it browned so much? I baked it on the lower rack just like all cakes I make? Any suggestions? Thanks, Kathie
This is absolutely a treasure of a recipe. I followed it precisely, without even trying to deviate, and the result was one of the best cheesecakes I’ve ever made or eaten. It strikes the perfect balance between sweet and the tart, the denseness of the cheese with the fluffiness of the egg and sugar. Simply perfect. I’m making my second one this week, and added just a pinch of nutmeg. Other than that, I see or have no need to mess with perfection. Scrumptious. My thanks, and greetings from Toronto Canada.
We followed the cheesecake portion of this recipe to a tea, timing how long we blended the filling at each minute or 20 second interval. We baked as directed and after the 1.5 hours at 200, our cheesecake was still super jiggly. I’m not sure if our oven can’t hold 200˚F or 200˚F wasn’t warm enough. We wanted to make sure the cheesecake was fully cooked because I’m pregnant (no raw eggs) so we turned the oven to 275 and cooked it until it another 45 minutes until it just barely jiggled. We don’t have an instant read digital thermometer so we stuck our meat thermometer in the cheesecake and it wouldn’t get above ~120˚F. I think we overcooked the cheesecake a bit- it cracked, but not enough to change the taste or texture. The cheesecake is amazing! Our cheesecake got golden brown on top but is firm and delicious. We simplified the strawberries by adding only sliced strawberries, a couple tablespoons of sugar, and a couple tablespoons of lemon juice. We also added just a little more than half a cup of sugar to the cheesecake filling at each step (instead of 3/4 cup) and it was plenty sweet. We LOVED this recipe! We can’t wait to try your other cheesecakes!
My cheesecake came out of the oven looking a bit spotty brown in places and golden on top which is ok with me, but sadly sometime during the last hour of cooling a big crack erupted on the surface. I’m so bummed because i made this as a gift and wanted it to be as pretty as the photos:(
My question is why do cheesecakes crack? i’ve heard it’s over beating which i def didn’t do, or too quick of cooling? I followed the directions completely and i plan to “frost” the center of the cake with a sweetened sourcream to camoflage the crater. My fingers are crossed…
Hi Lisa, There are tons of reasons that cause cheesecakes to crack – overbeating is one of them. Also, can be due to how quickly it cools and pulls away from the sides. If it sticks to the sides, it will cause cracks as well.
I made this for the second time (the first time turned out fabulously!) and when I went to turn down my oven after the 10 min, My cheesecake had completely risen above my pan looking like a souffle and was completely brown on top. What happened?!?
I have to tell you, I’ve tried more cheesecake recipes than I can count and when I found this one I never made another one again. This is by far the best cheesecake recipe that I have found and every time I make it it’s a huge hit! I highly recommend it!!
Perfect recipe Every time, Michelle! I’m an American, recently transplanted to the UK, so I had to do the conversions. I followed your recipe to a “t” and made 5 of these as Christmas presents, and all of them have turned out perfect EVERY SINGLE TIME! Thank you so much for creating this! Plain NY style is my favorite! :)
If I wanted a chocolate chip cheesecake, can I just add some mini chips into the batter?
Hi Kristen, Yes, you could do that, but I would probably toss them to coat with a little flour so they don’t sink to the bottom.
This recipe is fantastic! very detail oriented for some of us that aren’t the best cooks/ bakers. I made this for valentines day last year as a surprise for my girlfriend who worked all day. She was floored. I made a blackberry sauce because that’s her favorite. I have tried other recipes and absolutely nothing stands up to this recipe.
Hello Michelle! I tested this recipe but have a few questions:
The top got too brown so I will foil tent it. However my oven temperature drops at a super slow pace. Is this super slow drop in temperature what is required for the cheesecake?
Also I am using a convection fan oven. Do I need to adust the twmperature for the same?
Thanks, love your website :)
Hi Simran, Usually adjustments do need to be made for convection; I would follow the recommendation in your oven’s manual.
I want to make just half of this cheesecake recipe. Can I still make it in a 9in springform pan? How much would I have to change the baking time?? Thanks!
Hi Jenn, If you cut the recipe in half, you will have a very thin layer of cheesecake. If you go this route, you will need to reduce the baking time.
Now, I have never been confused for a baker, but I was supposed to have a dinner date and found this recipe. After reading some conflicting reviews I decided I would try it. This cheesecake is of the highest quality. When you go to a fancy restaurant and order a New York style cheesecake, this right here is what they will serve you. I have never even made a normal cake before let alone a cheesecake, but I nailed this one thanks to your excellent recipe. Thank you. I’m not sure where the bad reviews come from, they can safely be ignored.
How long can I store this cheesecake in my fridge??
Hi Bella, I’d say up to 5 days or so.
Hello!! This is the first recipe I find of yours and I can not wait to try it out! It’s looks deeeelicious! :) I just have one question…. What are the measurements of the pan that you used? Please answer when you have the time! Thank you so much!!
Hi Jenn, A 9-inch springform pan.
I did everything it says and the cake looks amazing except for the fact there’s a crack in the top of it. Is it supposed to do that or did that happen bc of air bubbles?
Hi Miranda, Cracks are always a possibility with cheesecakes; I can make the same recipe multiple times and sometimes the top will be completely smooth and sometimes it will crack.
The top of the cheesecake burned a little.
I don’t understand the burning at 500 degrees, mine was still white. I cooked it for 2 hours at 200 and it came out looking just like the picture and no cracks. Because I am used to using to a water bath, I did place a large pan of boiling water on the lower shelf under the cheesecake. Next time I will try it without the water. I do think brushing the sides of the pan with butter did help the cake to pull away from the sides of the pan to prevent cracks. Ate it the next day with strawberry sauce–perfect, delicious.
Hi and greetings from Finland :) after lots and lots of searching for perfect NY style cheesecake recipe, I finally found yours. This cake looks just like I’ve always imagined a cheesecake would look like! I also love the texture, it looks so soft, creamy and delicious!
Hi Michelle, I’m a long-time admirer of your blog and love to see pics of your beautiful dogs. This is my first time making one of your recipes and I LOVE IT!! This cheesecake is the BOMB! Its the perfect light, creamy texture and slightly tangy as well. It came out beautiful to rave reviews…I’m going to make the Monkey Bread next… THX!
Okay, so I haven’t tried this recipe. And I’m really wanting to. The reviews make it sound amazing though I have never made a cheese cake before but the only concern I am having is that people are stating that once the cheese cake is in the oven it gets dark really fast in top or black. I don’t want to waste money and buy ingredients if this is the case. Is this something that can be avoided? Is the tempature to high? I haven’t ever of a cheese cake baking at 500 degrees!!
Ok
I have made this twice now and it is hands down the best Cheesecake ever. The only problem is I could eat an entire Cheesecake You will not be sorry if you make this!!!
Disappointed :( my cheesecake is still in the oven but after ten minutes at 500 degrees, the top is way too brown and looks nothing like your gorgeous photos!
Hi Michelle,
I made this yesterday (the first cheesecake I’ve ever made:) and, as usual with your recipes, it tastes absolutely divine. My one question is about cracking. When I pulled it out of the oven, it was crack free. However, several minutes after I’d put the thermometer in, a crack developed; could this have been caused by the hole from the thermometer?
Hi Zena, Yes, that definitely could have been the case.
Is there a way to avoid this for next time (how do you test the inner temp)?
Hi Zena, I do always use a thermometer and sometimes it cracks, sometimes it doesn’t. It doesn’t really bother me, but if you want to skip the thermometer, you can use the “jiggle test” – the outside rim of the cheesecake should be set, but the center should still jiggle just a tad when the pan is moved. Hope that helps!
I made this cheesecake to my husbands birthday. It was perfect. Everyone loved it.
Thank you for the recipe. I followed the recipe to a T. Mine had no cracks. My oven may be a tad bit hot so next time I’d check it around an hour and 15 minutes as the top was a little darker than I prefer. Taste was excellent. Texture not quite as dense as many, so, a nice change. The topping was a nice surprise and easy. A keeper for true!
This cheesecake is by far the best one I have ever made. It is foolproof every time but this is the first time I have made the strawberry topping. I can’t wait for my husband to try this!
Wow. I was hesitant because of no water bath but this was fantastic and is now my go to cheese cake recipe. Thanks
Hi Michelle. I just made this cheescake and I have a concern. I cut into my cake and its pudding like inside. I cooked it at the stated temperatures and even checked it with a digital thermometer. Can I put it back in the oven? Its my first time and I was very excited to make it. This kind of disappointed me but I want to fix it because I really want it! Help! Thank you.
Hi Kristeena, Oh no! It definitely should not be like pudding. Did you allow it to cool at room temperature for 3 hours and then chill for at least 3 additional hours in the refrigerator before cutting it? It almost sounds like it’s still too warm.
I did. I popped it back in the oven for about 45 more minutes, I have cracks mow but thats ok. Its definatlwy less jiggly. Im going to leave it out again for the 3 hrs then refrigerate again. I had it cooling in the fridge over night ao im not sure what happened. Im still keeping my fingers crossed. Thank you so much for your quick response. On a side note: it still tasted heavenly, well see if chilling it again helps!
Hey Mitchell last question I hope, can I substitute vanilla bean past for vanilla extract and if possible what 1 do you prefer?
You can use either; vanilla bean paste is a great alternative if you want to see the specks of vanilla bean in the finished product. If you don’t, use extract.
Hey Mitchell thank for getting back to me ASAP with a response I’m baking your beautiful cheesecake tomorrow, was woundering what you thought of a sour cream glaze for the top?
Hi Courtney, Totally a personal preference; I don’t like them, but if you do, go for it.
Hey Mitchell was just wondering if the cheesecake would be equally as delicious without the strawberry topping ?
Hi Courtney, Absolutely!
The picture looks amazing. The steps are easy to understand. I’m just little bit confuse on strawberry step, but i’ll try my best to get my cheese cake looks like yours :)
This recipe is fantastic! I used it to make my first cheesecake ever yesterday and everyone absolutely loved it, it was easy to make and super delicious! I made two, and with the second one I lturned off the oven and let the cake sit in the oven for a while before taking it out to cool, and it kept the second one from cracking. Thank you so much for this recipe, the cheesecakes are practically perfect!
I’ve made this recipe and it is to die for!!! Thank you for sharing, I was wondering how long should I bake it if I’m using a 4 inch pan? I’d like to make a few individual size cheescakes but don’t know how long to bake for? Please help! This cheescake is a-freakin-mazing!!!!!
Hi Monique, I have never made a miniature version of this, so I’m not sure what the exact baking time would be. You’ll need to do some trial and error and start checking early…
I made this today and when I cut into it the center is still a bit wobbly. However, it tasted so rich and perfect that I am sticking with this recipe. I might just need to leave it in the oven longer. The top of my cake almost burned as well. Should I cover the pan in foil when baking?
Just wondering if I could use strawberry preserve instead of jam?
Hi Mary, I think that would be fine.
Hi! Can I divide the recipe for smaller cheesecake? because our cream cheese here are very expensive but I still want to try this out. if i will divide it into 2 will the cooking time also changes?
Hi Andrea, Yes, you can. You will need to decrease the baking time if you make smaller cheesecakes.
Followed your directions ver batim …… I have a huge x-shaped crack in my cheesecake. :(
I had never made a “real” cheesecake before, so I was looking for a recipe to make a real NY-style cheesecake for my husband – a New Yorker. This is by far the VERY best cheesecake I’ve ever eaten, and my husband loves it, too! The *only* thing I changed was making the crust thicker. The rest is pure perfection!
I love the look of your cheesecake. It is white on the top but mine turn dark brown while baking under 500F. Is there a way to solve this problem?
Hey,
I’m new to your wonderful website. Absolutely amazing cheesecake recipe! I just love love love your recipes :)
And also how at the end of each recipe you’ve included 1,2,3 or 5 yr old recipes.
This recipe is a joke. I prepare it and baked it exactly how it saids in the recipe, but the texture it’s watery. As I looked at other recipes on the internet, most of them have different temperature to cook, higher, not at 200 F like this one.
So dissapointed!!!
Hi Michelle,
I love cheesecake no doubt.. but I like the DRY DENSE and CRUMBLY kind..not of the super soft runny kind…I like light and airy too but still prefer the dry kind..not sure if its a New York style kind? how is this one in comparison? I just don’t want to make it and be disappointed in the texture..also some add flour and some don’t..and some use a water bath and other don’t..i don’t know the difference?
Hi Delia, I don’t think that I’ve ever had a cheesecake that could be described as “dry and crumbly”. Dense, yes, but all the ones I’ve had are smooth and creamy. I’ve never added flour; some say that water baths help to alleviate cracks, but I’ve had both smooth and cracked cheesecakes using both methods.
Is 40 ounces of cream cheese the correct amount? that is a lot of cream cheese…
Yes, that is the correct amount. This is a large cheesecake.
What did I do wrong!? It still turned out delicious, but I put the cheesecake in the oven at 500 degrees for 10 minutes and it turned a very dark brown, almost too dark, and then turned down oven to 200 as directed for hour and a half. Still very very good, but in your pictures the cheesecake does not look dark at all.
Hi Loretta, My cheesecake definitely got a toasted look around the edges and about an inch in from the edge. The photo of the recipe from Cook’s Illustrated shows a toasted-looking top, as well.
I made this yesterday for Easter, today! Everyone LOVED it. Thank you SO much!!!
I am making this cheesecake for the 2nd time tonight. I filled my spring form pan with the cheesecake filling and popped it in the oven at the 500 degree setting. About 5 minutes later, I started hearing sizzling. I ran to the oven and turned on the light. The cake had risen sooo much that it was overflowing the pan, falling off the edge, and burning at the bottom of the oven. LoL. I am not criticizing this recipe, just commenting on my fail. I think that the first time I made this, I didn’t use the whole batter. My current cake looks terrible, but I’m really hoping that it will taste ok. Fingers crossed!!
Is this for two cheesecakes?
Hi Kelly Ann, No, just one cheesecake.
I made this cheesecake and it came out great except for one thing, there was a crack right down the middle. Do you know what might have went wrong? I followed the recipe to a t. The crack didn’t appear until after I took it out of the oven and placed it on the wire cooling rack.
Thanks,
Lucy
Same thing happeneded to me! I was so sad. Someone suggested making sure the CC is at room temp but mine was definitely at room temp! However, my eggs and sour cream were not.
Love your recipes!!!! Any suggestions on cook times for 4 4.5″ spring foam pans? Should I still start them off at 500 degrees or do you think they will burn easily?
Thank you!!!!!
Hi Michelle, I’m really not sure for a time, as I haven’t tried it. I think that I would still do it at 500 degrees, but only for a few minutes.
Any advice as to how I can adjust this recipe for mini cheese cakes? I don’t own a springform pan, and I don’t plan on buying one soon
Hi Anne, You could try making little ones in muffin cups, if you’d like. You’d have to reduce the baking time significantly.
Wonderful recipe. Thanks for sharing that.
My husband requested cheesecake for his birthday cake. I had never made one before, so I was a bit nervous! I have to say, this cheesecake turned out marvelously! It was stunningly delicious! Every. Single. Recipe of yours I try is a total winner! I kid you not, in the last three days alone I have made your thick and chewy chocolate chip cookies (my go-to recipe,) your breakfast sausage bake (another family favorite,) and now this cheesecake! I will be making it again for sure! It’s absolutely perfect! Wow. Thank you for doing what you do!
I made this for a friend’s birthday last week and it was awesome :-) I browsed no less than 15 recipes for NY style cheesecake but yours looked yummy and approachable. I was a little nervous since it was only the second full-sized cheesecake I’ve made and others seemed to have browning issues with it. No cracks and did not get too brown! I’ll definitely be making it again. Thanks!
I followed the recipe exactly and the top of mine is super dark after only an hour after turning the oven to 200, i have a small apartment sized oven, does this affect it? please help :(
This is in the oven now. Glad I found a good recipe to try. My only complaint is…I never knew spring form pans existed. So when the recipe called for it I had to Google it then run out and buy one. I now know why many Google pics had the pan wrapped on the outside w foil. I stuck this in at 500°f and within seconds I could smell something burning. The pan leaks and bits of this precious batter were burning on the bottom. I stuck a round pizza pan under it, and I’m hoping it won’t drastically affect the outcome. This is my very first try at making a cheesecake so, trial and error lol. Hopefully it turns out semi decent because its for my hubbys b-day tomorrow!
I have made this recipe a couple of times and everyone always LOVES it. I am concerned about the cosmetic look of it, I always get a giant crack in the center. Any suggestions or recommendations? Should I try baking it in a water bath to eliminate the cracks? Thanks!
Hi Angela, I haven’t had any issues with cracks; you can try a water bath, although you may need to adjust the baking time.
Hey Angela! I just finished making my third last night (no expert) but hopefully this will help… Make sure the cream cheese is room temperature. The second one I made came out with two cracks. I did everything the same but I was in such a rush I didn’t let the CC warm to room temp. Hopefully that helps! My other two didn’t come with cracks (but they were a bit more brown on top.)
Pls help!! Trying to do this for my dad’s bday but I don’t understand this part:
6. Without touching the crust, brush the sides of the inside of the pan with melted butter. Pour the filling into the pan and bake for 10 minutes. Without opening the oven door, reduce the oven temperature to 200 degrees F and continue to bake until the center of the cheesecake registers 150 degrees F on an instant-read digital thermometer, about 1½ hours.
Thanks so much for the recipe and help!!! My mouth is already watering and I’ve only read the post!! :)
Wooowwwww, I just realized that the graham cracker crust is only on the bottom!!!! Not with sides like a pie. I’m super embarrassed … I promise I’m pretty intelligent! Lol, can’t wait to see final product, I just put the crust in the oven! :)
This cheesecake recipe was the worst ever! 500 degrees – – – really. The top and bottom was SCORCHED! Yes, I did have it on the recommended oven rack height. What a total waste of time and ingredients! It went into the garbage can. Never again!
Mines in the oven doing just that. Not impressed.
Hi I wanted to make this recipe in muffin tins so I can freeze and eat later. Any recommendations for baking time? I assume it would differ since there will be a thinner later of batter sitting in the oven. Thank you!
Hi Shira, You will definitely need to reduce the baking time, but since I haven’t done this, I don’t have a specific time to give you.
After experimenting a few times I ended up baking the crust for just 3-4 minutes, and then between 8-10 minutes at 250 degree celsius, and 13 minutes at 90 degrees celsius using the muffin tins. I also added more sour cream to the recipe and they came out great!
My oven max is 220 degree celsius, 500 F is about 260 C. How do I go about adjusting the cooking time? Appreciate your input.
Hi Celia, I would bake it at your max temperature for the same amount of time, but you may need to add some time at the end of baking (at the lower temperature) to make up for it.
My cheesecake is still in the oven ( it’s been an hour). But it got cracks at the center. Do you know why? It smells good thou, hope it will taste good!
Can you use the 1/3 fat cream cheese called Neufchatel Cheese? I use it in all my dips, but I was unsure if it would affect the taste or consistency of a cheesecake. Please help! :)
Hi Lisa, I highly discourage the use of low-fat cream cheese in baking. Because it is low-fat, it has a much higher water content than full-fat cream cheese, which can greatly affect texture in baked goods.
I made this yesterday as instructed in the recipe and it turned out the most beautiful cheesecake I’ve ever made, and it seems like I’ve tried thousands of recipes. The cake was such a beautiful golden color, I couldn’t believe that I had baked it. When my husband ate his slice today, he broke out with “this is the best you’ve ever made”. This recipe is a keeper.
Hi! I made this cheesecake for my husbands birthday! The cheesecake was to die for ! However, I put he oven on 500 degrees and then down to 200 after that. Just after turning down my foil on bottom of oven caught on fire ! I ended up with a burned crust only on the bottom. I felt. 500 was too high and not sure if it spilled over. What do u think about going to 400 then down to two hundred? Please advise! Thank you !
Hi Beth, I have not tried baking it at 400 then 200, but you could certainly try it. You may need to bake it for a longer period of time at 200 degrees. Let me know if you try it!
I can’t wait to make this cheescake for a valentines desert and of course strawberry topping. I was just wondering instead of sourcream do you think I can use plain Greek yogurt instead?
Hi Amanda, While I haven’t tried it, I think that would work okay.
Thanks Michelle will try I know most desserts Splenda measures cup for cup.
Hi! So I’ve been struggling with cheesecakes, either the water bath makes them soggy (like a boston style) or my cheesecake get riddled with cracks, This recipe looks a ton different than other ones I’ve used so I’m hoping for success!
I do have a question, If I do a raspberry puree and swirl on top of the cheesecake, do you think it will still come out ok with the blast of heat at the beginning?
Hi Lauren, I think it will be okay. Enjoy!
I love the sound of this cheesecake but, I was wondering if I could substite Splenda in place ofregular sugar ? I have a diabetic friend that loves cheesecake.
Hi Melisa, That’s a tough question; I don’t typically test my recipes with substitutes like Splenda, so I can’t guarantee what the outcome will be and if there will be a difference in taste or texture. If you give it a try, though, I’d love for you to share your feedback!
Made this two days ago for a late Christmas celebration. Followed the directions exactly and got rave reviews, including “Best Cheesecake Ever”. Only change I would make in the future is to make a thicker crust to support the luscious filling. Thank you for sharing this recipe.
When I initially commented I clicked the “Notify me when new comments are added”
checkbox and now each time a comment is added I get four emails with the same comment.
Is there any way you can remove people from that service?
Bless you!
Hi Leilani, Unfortunately, I don’t have the ability to manage those subscriptions, for privacy reason for readers.
I JUST MADE THIS WONDERFUL CHEESECAKE TONIGHT AND IT IS COOLING NOW, I FOLLOWED THE RECIPE TO A T AND IT LOOKS AND SMELLS FANTASTIC, CAN’T WAIT UNTIL OUR DINNER PARTY TOMORROW. THANK YOU SO MUCH . . .
I did everything right but this turned out horrible!!!
Hey there,
I made your AMAZING cheesecake for my parents when they came over. It is soooooo yummy and creamy and and and just amazing!
However, I put it in the oven for 10 minutes at 500 and OMG it turned brown (burnt)… everywhere… but the inside was cooked perfectly!! How can I avoid the ugly cheesecake?
Thanks a bunch for sharing this!
– Anna
Hi Anna, I would make sure that you know for sure what the accurate temperature of your oven is by using an oven thermometer. Many ovens can run hot. While my cheesecake did get golden and dark around the edges, it did not (and should not) burn on top.
When adding the sour cream topping that you mentioned to use for salvaging a too-brown or cracked cake, do you bake more after adding the sour cream mix?
Hi Kimberly, I have never used a sour cream topping, but I do believe that it needs to be baked a bit after it is added. You might try Googling a recipe for sour cream-topped cheesecake and see what comes up.
@ 150* this was a runny mess after 5 hours in the fridge. Disappointed.
My cheesecake also turned dark brown within minutes of cooking at 500. I have had much better luck cooking at 200-225 for 2-2.5 hours (just til center is still slightly jiggly) and had not a single brown spot. I’ll go back to my old method.
I am making this for the first time and followed directions as stated. However being concerned of excess Browning I covered it in foil to start with. Now 90 minutes later it is not near done. Did I ruin it? I have continued the cooking so hopefully it turns out. Also I noticed the high heat caused a bad smell in my kitchen. Will that heat/smoke smell be stuck in my cheesecake? I am making this for somebody for tomorrow! Any suggestions are welcome as I think I will cry if it doesn’t turn out!
Hi Sarah, Covering the cheesecake for the entire cooking time will definitely impede it cooking properly, which is why it is taking much longer. I don’t think you have ruined it, though.
I read somewhere you can shut the oven off and leave the cheesecake in the cooling oven and that helps stop the cracks and the cake doesn’t settle. Do you think I can do this with cooking it at 200 for so long?
Hi Heather, Yes, you could do that.
Hi, Michelle. This looks so delish!! I have a couple quick questions. A lot of other New York cheesecake recipes I found online requires anywhere between 1 to 3 tablespoons of (all-purpose) flour. Would you recommend me add flour into your recipe? What would adding flour do to the cheesecake?
Thanks in advance and happy holidays!!
Hi Eric, I have seen (and made) similar recipes that call for flour. Most recipes that do so end up with a little bit more of a cake texture, but I much prefer those without – they are smoother, creamier and more dense. Enjoy!
HELP!! trying this recipe for family Christmas get together and the top of mine turned
DARK BROWN?!?!?!? Is it ruined?
I wouldn’t think so. I’ve had a lot of cheesecakes that get brown in the oven, and they are always delicious.
I was so excited to make this cheesecake after seeing your pictures, but it is turning out nothing like the pictures. After just 10 minutes at 500 and 5 minutes at 200 the top is actually burnt. I tossed a piece of foil on top and am hoping that it is still edible after another hour and 25 minutes. I planned on giving this as a gift for the holidays, but it looks terrible. What a waste of ingredients. I’m so disappointed.
Next time, if you want to salvage a less-than-perfect cheesecake due to cracks, browning, etc, I have topped with this mixture before. It made it nice and white and did not change the pure cheesecake flavor like a fruit topping:
Sour cream topping:
1 pint sour cream
1/4 cup sugar
1 tsp. pure vanilla extract
Thanks! What a good idea.
Can’t wait to try this! Just want to clarify – is it 6 WHOLE eggs plus 2 egg yolks? Or just 6 egg whites and 2 egg yolks?
Hi Aislinn, Yes, it is 6 whole eggs, plus an additional 2 egg yolks. Enjoy the cheesecake!
I just make her half recipe without crust !!! So delicious!!!
Just what i was looking for!!! I just wish you (and so many others) would put exact weight measurements on everything… What does 8 graham crackers mean???? I live in italy so i’m using ikea ginger snaps but there are mini, giant, normal, chocolate etc…..
While this cheescake was baking at 500 degrees, I had one bubble that kept bubbling and made an ugly wart. I lowered the oven to 200 and cooked as directed but I got a big crack about 1/2 inch that followed the shape of the pan. The wart turned almost black but the rest of the top of cake was a really beautiful caramel color. It’s cooling right now and smells fantastic. Could you recommend a caramel sauce topping, something thick and not runny?
Hi Jen, I love this homemade salted caramel sauce: https://www.browneyedbaker.com/2012/05/22/homemade-salted-caramel-sauce-recipe/. Once it is made, let it sit and as it cools, it will thicken.
This is my 3rd cheesecake I’m making today .It’s a hit ! I also make hom emade blueberry topping YUM!
This recipe sounds great and I’m planning to make it, but I don’t have an instant read thermometer so I was just wondering if there is another way to check if the cheesecake is done. I am also planning to double the crust because I’m making it for my sister, who loves crust :)
Thanks!
Hi Leilani, The edges should be set and the middle should still jiggle a bit when you remove it from the oven.
Wanted to give this a whirl… however just want to clarify something in regards to the base. I am reading that right… only 8 graham crackers? If we are using store-bought ones… just 8?
Hi Brenna, Yes, 8 whole graham crackers.
Years (and years) ago, I made a cheesecake that DIDN’T crack. Every time I made it, I used a diff. recipe – probably the one on the Philadelphia package.
Just the other day I heard a renowned chef talking about the cracking problem. He IT’S BECAUSE WE’RE BEATING THE EGGS INTO THE CHEESE MIXTURE. It adds “fluff, air” and that’s what causes the cracks. Sooo, I guess the eggs should be slightly beaten by hand in a separate bowl and then blended into the cream cheese, sour cream batter. I’ll try it and see what happens!
Oh my stars, this cheesecake is DIVINE!!! I made it last night and I am pleased to report it has been exceptionally well-received by my co-workers this morning :) This recipe is now my ‘go-to’ recipe for cheesecake. I cannot overstate how DELICIOUS this is!!! My baking level is advanced-beginner, so if I can duplicate this recipe, it is VERY likely you can as well. You will NOT be disappointed!
Hi,
I love your site and I come back to it really often because the directions are really clear and usually accurate.
However, I just made this cheesecake for the first time and it baked waaaay faster than you said it would. After turning the temp down to 200 it was probably in there for 20 min and no more than 30 (I realized that I didn’t set a timer, but I’m certain that no more than 30 min passed). When I checked it the top was really brown (it was on the 3rd from the bottom rack) and my thermometer read 154 degrees. I chilled it as described in the directions, but when I cut into it the center was still uncooked. It was just the very center though, so the outside was perfect.
I thought you should know so perhaps you could modify the cook time and add additional directions for the case that it browns on top too quickly. If I hadn’t realized that I didn’t set a timer and jumped up to check on it I would have left it in there for at least an hour (since the directions said about 1 1/2 hours) and it would have been burnt on top and really firm in the center.
I’m not sure what to make of the thermometer reading 154 degrees and then the center not being fully cooked. I’m going to get a new thermometer incase that’s the problem and next time I’m only going to cook it for 5 min on 500 degrees and then cover the top with foil if it starts to brown too quickly.
Keep up the awesome work! Like I said, I love your site. I used a couple of your recipes for the cupcakes at my wedding!
I have mine in the oven now! It’s the first time I’ve ever made cheesecake so I don’t really know if that I’m doing is right. I think I seriously messed something up because I had a LOT of leftover filling when I poured it into my pan. Like seriously enough for another half a cheesecake! What did I do wrong? I followed the recipe exactly.
I read another person’s review that it souffled and I’m a little afraid now it’s too full and will get messed up! My oven is a really old gas one and has no light or window so I can’t see what’s going on! I also didn’t have a springform pan, but I did have a 9in cake pan.
After I took it out of the oven it looked puffy and was brown on the top. It looked like a baked Alaska or something! It smells a little strange, too, more like a quiche than a cheesecake. It didn’t puff over too bad, but isn’t even on the top either. Perhaps I baked it for too long?
It’s cooling right now, and will continue to do so overnight since it’s getting late, so I’ll have to wait and see how it tastes. Hopefully not as bad as it looks! Haha.
Hi Dakota, If you used a regular cake pan instead of a springform pan, that’s why you had leftover batter. A springform pan has higher sides than a cake pan. Since it’s a smaller pan and you used less batter, if you baked it for the entire time, it was likely baked too long as well.
Hey Michelle!
Since this recipe was so yummy the first time around I decided to buy a spring form pan and give it another try! This time all the batter fit right in. I baked it for the same amount of time and it’s even more over done than the first time?! I don’t really understand how this keeps happening to me. It’s cooked all the way through and still tastes good, but why do they keep turning out brown and cracked? This one was REALLY dark brown along the edges. Is it just that my oven must be very different than yours? I cooked it for the right times at the instructed temperatures. It’s hard because, like I mentioned previously, there’s no window. Should I risk opening the door once and a while to check on it?
Hi Dakota, Do you have an oven thermometer? It’s quite common for ovens to run hotter or cooler than the temperature they’re set at. If you use an oven thermometer, you can be sure that the temperature is accurate.
Just made this and it’s still cooling on the counter. One thing that I was NOT expecting was to remove a cheesecake souffle from the oven. I swear the thing was double the height of the springform pan. But as it cooled it lost height and is starting to look like a real cheesecake :D Can’t wait to cut into it tomorrow morning for breakfast!
I am about to get started on this recipe as I am typing this!! I will let you know how it goes!!!
Could this be made in a 9×13 or 8×8 pan? I do not have the traditional cheesecake pan. What adjustments would need to be made – such as ingredient amounts, cook times/heat, etc? Thanks
Hi DJ, I have not tried adapting this recipe to a different pan type. Keep in mine that when baked in a springform pan, you can easily remove the sides and then slice it. If you bake it in another type of pan, you won’t be able to do that and might have difficulty getting the slices out. You would definitely need to adjust the baking time, but unfortunately I can’t advise on precise times since I have not made that modification before.
I made this tonight. My oven must be way different than yours. It was very brown within a few minutes and totally cooked in 45, even with me following your directions completely. And the top still cracked. But it smells amazing and hopefully will taste as good as it smells. :)
My cheesecake is very brown on top- what did I do wrong and how can I avoid this?
Hi Lorie, Heating elements in all ovens are different, but for the next time, if you think the cheesecake is browning too fast, you can place a piece of foil loosely over the top of the cheesecake.
just finished a piece of this heavenly delight! it’s actually the first cheesecake I ever made and it’s so much better than the no-bake version. sour cream isn’t available where I live so I put greek yogurt instead. it didn’t crack or turn brown at all on top as I’ve seen in other recipes and didn’t know if I got it right but my taste buds say “nailed it”!
could you use sliced frozen strawberries instead of fresh, i normally always have frozen strawberries in my freezer
Hi Emily, I think that would be fine.
Its in the oven as we speak and the top is ridiculously too too brown. With an hour still to go! UGH
I tried this and loved it but i also had a problem with it being really brown on top, so I’m going to try the foil tonight.
We made this cheesecake last night. This was our first time to make a cheesecake. My problem is that my electric oven takes forever to cool down. So when my daughter checked on the cheesecake after 45 minutes at 200 it was very, very brown across the entire top of the cheesecake. We decided to remove it from the oven even though it still had 30 minutes more baking time. It cracked shortly after that. I cooled it on the counter and refrigerated a few hours later. I tried a slice this morning, after removing the browned top layer. Tastes delicious. Could I skip the 10 minutes at 500?
Hi Cassi, The blast of heat at 500 helps to set the cheesecake. The cheesecake will be brown on top. If you find it’s too brown for your liking, I would loosely place a piece of foil over the top part way through baking.
So I absolutely LOVE this cheesecake – it’s the only one I use. I am making a layered cake for a friend of mine (2 cake layers with a cheesecake layer in between) and I would love to use this recipe as it’s my favorite, but I am wondering if I would need to split the recipe in half since it usually is pretty tall? I also obviously won’t have the crust layer either. Any advice Michelle?
Hi Melissa, It all depends on how thick you want the cheesecake to be. For the Red Velvet Cheesecake (https://www.browneyedbaker.com/2012/02/08/red-velvet-cheesecake-recipe/) I made last year, I split the cheesecake into two layers, but you could do it either way.
This cheesecake looks amazing! I hope mine turns out as well as yours, I’ve got it in the oven right now! :D Thank you so much for sharing this recipe with us!
I was trying to find a recipe I made at Thanksgiving but the Internet tricked me so I couldn’t find it. I searched and came across this recipe. It sounded so good it’s in the oven as I type this out! I’m looking forward to trying this in the morning!!!
I made this for Mother’s Day and it was the BEST cheesecake I’ve ever made! I’ve always done a water bath because they say you’re supposed to. No matter what I did, it would be soggy. This cooking method was perfect and the taste of the cheesecake, I would say, was far superior than anything at Cheesecake Factory. You never fail for a new go-to recipe!
I’m just making this now (in the oven as I type!) and was thinking of making a coulis for the top rather than just a pour over topping. When would you say is the best time to put on coulis? I was thinking just before it goes into the fridge (i.e. after it’s cooled down for 3 hours).
Hi Nat, A coulis is pretty thin, so I would not pour it over top until you’re ready to serve.
Wow this looks amazing! I’ve been looking for exactly this type of strawberry cheesecake for a while! I have a few questions though. One, can I bake the crust but not the cake? Is it better to cook the cake in the oven or just eave it in the fridge? If I were to put it in the fridge instead of in the oven, how do I proceed? Secondly, do we have to put that many eggs? Six eggs looks a lot to me… Ok I think that is enough questions for one comment. I’d love an answer if you can! This looks amazing!
Hi Catherine, You have to bake the cheesecake; if you leave it in the fridge it will just remain in a liquid batter state. Yes, you have to use that many eggs, as the recipe states.
Did she really just ask if you have to put the cake in the oven?? LOL!
Catherine, there are many recipes for refrigerator cheesecakes…. they usually require gelatin so they set. New York style is ALWAYS baked :)
I’ve been waiting forever for you to post a basic cheesecake recipe! Thank you so much. It is gorgeous.
About how much of a cup are the graham crackers. I already have graham cracker crumbs and do not want to go out and buy another box of regular graham crackers. Thank you.
Hi Tammy, I didn’t measure the crumbs before proceeding, but I would give an educated guess that it was around 1.5 to 2 cups.
Your cheesecake looks absolutely fabulous! You totally have me craving cheesecake now!
What a wonderful recipe! I wonder, do you think if raspberries were used it would be too bitter?
For the topping? I think it would be just fine! You could just use 3 cups of fresh raspberries (no need to cut or slice them).
Yes just for the topping but if i wasn’t sure if it would be too bitter. Thanks for replying Michelle. Top blog!!
can you suggest a cooking time and conversion for a 6″ version?
Hi Michaela, There are some pan conversions on this page: https://www.browneyedbaker.com/conversions/, as well as a link to even more pan sizes. You’ll want to calculate the volume ratio of the 9″ pan vs the 6″ and then scale the ingredients back by that much. I can’t garner a guess at cooking time since I haven’t made this in a 6″ pan, although it will certainly be less.
Thank you!
I love your conversion guide. A lot of help where we in the UK use grams or ounces and have cups but dont measure butter in sticks :)
I will have a play this weekend with a 6″ and post my results. I would cook the larger size but then would have to eat it – big :)
for anyone who hasnt got facebook for Michelles BEB page. I did it!
divided the recipe by 9, multiplied by 6. I then doubled my quantities for the base and after realising I only had 21 oz of cream cheese halved the original recipe for the filling. (120g wouldnt fit in so in the fridge).
baked for 1 hour 5, perfect!!
thank you Michelle for a beautiful recipe x
Hi. Thanks for the recipe. Would like to give this a try today, but we dont have graham crackers in our country and i have to replace with another kind of biscuit. May i know roughly how many grams is one sheet of graham cracker?
Thanks again for the recipe with the mouthwatering pic!
Hi Sally, One sheet of graham cracker is 15.5 grams. Hope that helps! Enjoy!
When you say 1 sheet, is that equal to 2 squares or 1 square and do you know how many cups of crumb it ends up being? Thanks!
Hi Josephine, 1 sheet is equal to 2 squares. I am not sure how many cups of crumbs it ends up being.
This looks like the perfect cheesecake! Wish I had a slice right now!
This looks absolutely delicious, im wondering if i could cut the amount of eggs to half. would it effect the recipe? I’m really looking forward to make cheesecake, but i really hate the smell and taste of eggs. Also, would it effect the recipe if i added a little bit of white vinegar (to get rid of the egg’s smell) ?
and thank you for the amazing recipe :)
Hi Mashael, You cannot eliminate eggs in this recipe without it affecting the recipe. The cheesecake does not smell or taste like eggs, but they are necessary for the texture of the cheesecake. You do not need to add vinegar (I would not do this), as the cheesecake does not smell like eggs.
This is been outstanding strawberry cake….. this is the first time ever i m seeing this kind of cake
Wow, this looks great. I am wondering would you consider making a strawberry shortcake cheesecake, it’s more like a layered white cake with strawberry and cheese filling. Any suggestions on how to get a similar recipe?
Thanks.
Hi Riham, I will add a strawberry shortcake cheesecake recipe to my list, thank you for the suggestion!
Oh my, that is one gorgeous cheesecake! No doubt it tastes as good as it looks.
I have been wanting cheesecake for awhile….I watched a recent episode of Good Eats and Alton Brown made cheesecake and now you….Time to make one myself!
this cheesecake looks absolutely divine and perfect!!!
Your cheesecake looks luscious! I love the look of that strawberry topping – yum!
Yum! I love NY-style cheesecake, and this one looks delicious!!
Oh, how I love cheesecake! Especially with strawberries! Love your photos as well, they’re beautiful :)
So gorgeous! It’s like I can just reach through your beautiful photos and grab a slice!
Cheesecake and I are like this (fingers twisted together) and will always be. Lovely and the fact that it doesn’t have to bake in a water bath makes me 1000x happier.
Yum! Your pictures are so beautiful! I’ve always been a little afraid to try making cheesecake. Maybe with your instructions I can overcome my fear!
I love cheesecake too, but I’ve always been a little intimidated to make one (partly because of the water bath). You make this seem so easy! I’ll have to try this recipe out. It looks absolutely gorgeous!
absolutely, completely perfect. gorgeous!
Cheesecake is one of my greater loves as well. I love that you kept the recipe to just simple cheesecake. Beautiful photography too!
OMG Michele, you are killing me! First it was the Snickers Cake (which I will be making VERY soon), then it was the Cheddar Bay Biscuits (which I made last night) and my biscuits have never been so moist. Now this??!! Now I’m not sure which I will make first – the Snickers cake or the Cheesecake! Keep em coming girl! :-)
Just made your brownie mosaic cheesecake last night for my husband’s and daughter’s birthday dinner. This was the first time one of my aunts tasted this cake, and you should have seen the joy on her face! I’m a NY Cheesecake girl myself, so I might treat myself to this cheesecake as reward for making everyone else so happy with the other.
That’s legit, right?
I so need to get a springform pan! I love that this recipe is without the water bath too. My favorite cheesecake is chocolate. My stepmother usually makes a chocolate cheesecake with pomegranate topping at Christmas.
This looks absolutely delicious! Can’t wait to try it.
I totally love everything the Cheesecake Factory has to offer but I’ll admit that sometimes, they don’t even taste like cheesecake! They’re delicious but there’s something to be said for a really well executed cheesecake. Yours looks amazing!
I used to tell everyone I didn’t like cheesecake, it was something about the texture. Then years went by and I gave it another chance. Now I eat a whole slice SO HAPPILY for dinner. How things change! I’ve never made homemade cheesecake before, only in the box, thanks for the recipe!
I have to admit cheesecake is not my favorite dessert. I am relatively new at coming around to enjoying it. This looks gorgeous and the strawberry sauce would surely win be over!
Oh! On another note….I recently used the Biscoff cookies for a Key Lime Pie recipe, and that crust was so amazing that I decided to use it on my last cheesecake. A little different than graham crackers, and quite yummy.
If you think that’s yummy, try Lorna Doone cookies as the crust…delicious!
Looks yummy, but still waiting for the Cheesecake Factory Carrot Cake Cheesecake recipe…..
Will have to try this recipe! I hate the water bath type too. But I also don’t like the cracks you get often times (which is why I do love the sour cream mixture topping to disguise that a bit :-)). Thanks!
Gorgeous cheesecake!
This turned out absolutely perfect!!
This looks utterly delicious! I love the simple cheesecakes with strawberry or cherry toppings. The fact this one doesn’t need to bake in a water bath is extra appealing!
What a gorgeous cheesecake! Nothing beats a piece of plain, perfectly rich and creamy cheesecake!
I love any and all cheesecake, and this is no exception!
I can’t stop staring at the pictures. It’s one of those days when I wish I could just pluck food off my computer screen and have a go at it. This cheesecake is absolutely gorgeous.
Oh my word I love cheesecake as well. And that peanut butter fudge sounds to die for! But I agree, sometimes that pure creaminess is all you want and this looks like it nailed it. Plus there is no need for a water bath – win win! That strawberry topping and whipped cream almost makes it like strawberry story cake…but oh do much better! ;)
This cheesecake looks absolutely delicious!
Just beautiful, Michelle! Nothing beats a Classic New York-Style Cheesecake. I could eat it for breakfast every single day with fresh strawberries. Best part? Wings colors! (Ha! Can’t help it.) But, guess what? I’ve got bricks of cream cheese coming to room temp on my kitchen island countertop right now. Yep. Going to make a “cockamamy cheesecake creation” today. LOL! ;) Pinned! xo
You had me at 40 ounces of cream cheese.
same here! I was waiting for someone to comment on that!
is it really that much? :o!!
Will definitely make this recipe next weekend!
Yeah, I noticed that too. 40 ounces is around 1.15 kilogram of cheese. And she suggested using a 9-inch springfrom pan. My previous cheesecake only used around 800 grams of cheese.
So did it work for you? I used 40 ounces of cheese, and in the end I had couldn’t fit all the batter into the pan, and I’ve already poured the pan almost to the brim. The cake also remains wobbly after baking for almost 2 hours (she suggested 1 1/2 hours).
Did you bake using Fahrenheit or Celsius
I baked at 90 C, which is converted from the suggested 200 F.
Cheesecakes usually firm up after being chilled for some time.
Yeah, it takes me 4 hours to bake this monster, any less and it still goofy in the middle. Going to try my third oven today and fifth attempt. I guess this is just on of those low and slow baking techniques.
Could someone please clarify? Do we really need 40 ounces of cream cheese???
Yes, you really need 40 ounces of cream cheese.
For me, classic NY cheesecake topped with strawberries is as good as it gets! This one is gorgeous – so tall and perfect!
I like using bacon and caramel for a topping
What a beautiful-looking cheesecake!! The strawberries on top are the perfect touch :)
Drooling here! Your cheesecake looks delicious! My Husband would go bonkers over this recipe!! Just perfect!!!
It looks sooo delicious! I want to eat it for breakfast! Sour cream is very hard to find over here. Is it ok to use crème fraîche instead? I don’t really know the difference between the two.
Hi Teresa, Yes I think you could substitute creme fraiche for the sour cream without a problem.
I haven’t had a fail yet but whenever a recipe calls for sour cream I sub for greek yogurt. We always have some in the fridge here.
Whenever I see the word cheesecake I always want to make it or eat it. It looks great.
This cheesecake looks exactly like every dream of a cheesecake that I’ve ever had. Perfection.
Gorgeous, the strawberry topping is a must!
I love te fact that this cheesecake doesn’t require being baked in a water bath, too! I rarely make cheesecake because I just don’t want to deal with it. Now I don’t have to AND can still get a stunning cake like you did! Wow, your photos are so beautiful and perfectly capture it. Pinned!
That looks and sounds like my perfect version of cheesecake. Love the look of the texture. Like that its not baked in a water bath as I find even if the water doesn’t get in, condensation often does.
Must try
Your pictures are stunning! I want to dive face first into this cheesecake, no lie.
me first!
You wouldn’t even hit the bottom its that deep :)
My personal critic would be that I would have to have the base double that thickness – yum!
This looks perfect. Wow! You did such a beautiful job! Really though, I am not surprised. Your foods always look professional!
I have this in the oven now. It’s almost time to remove it and it looks perfect. I will let yall know because if I can make this, anyone can ;)