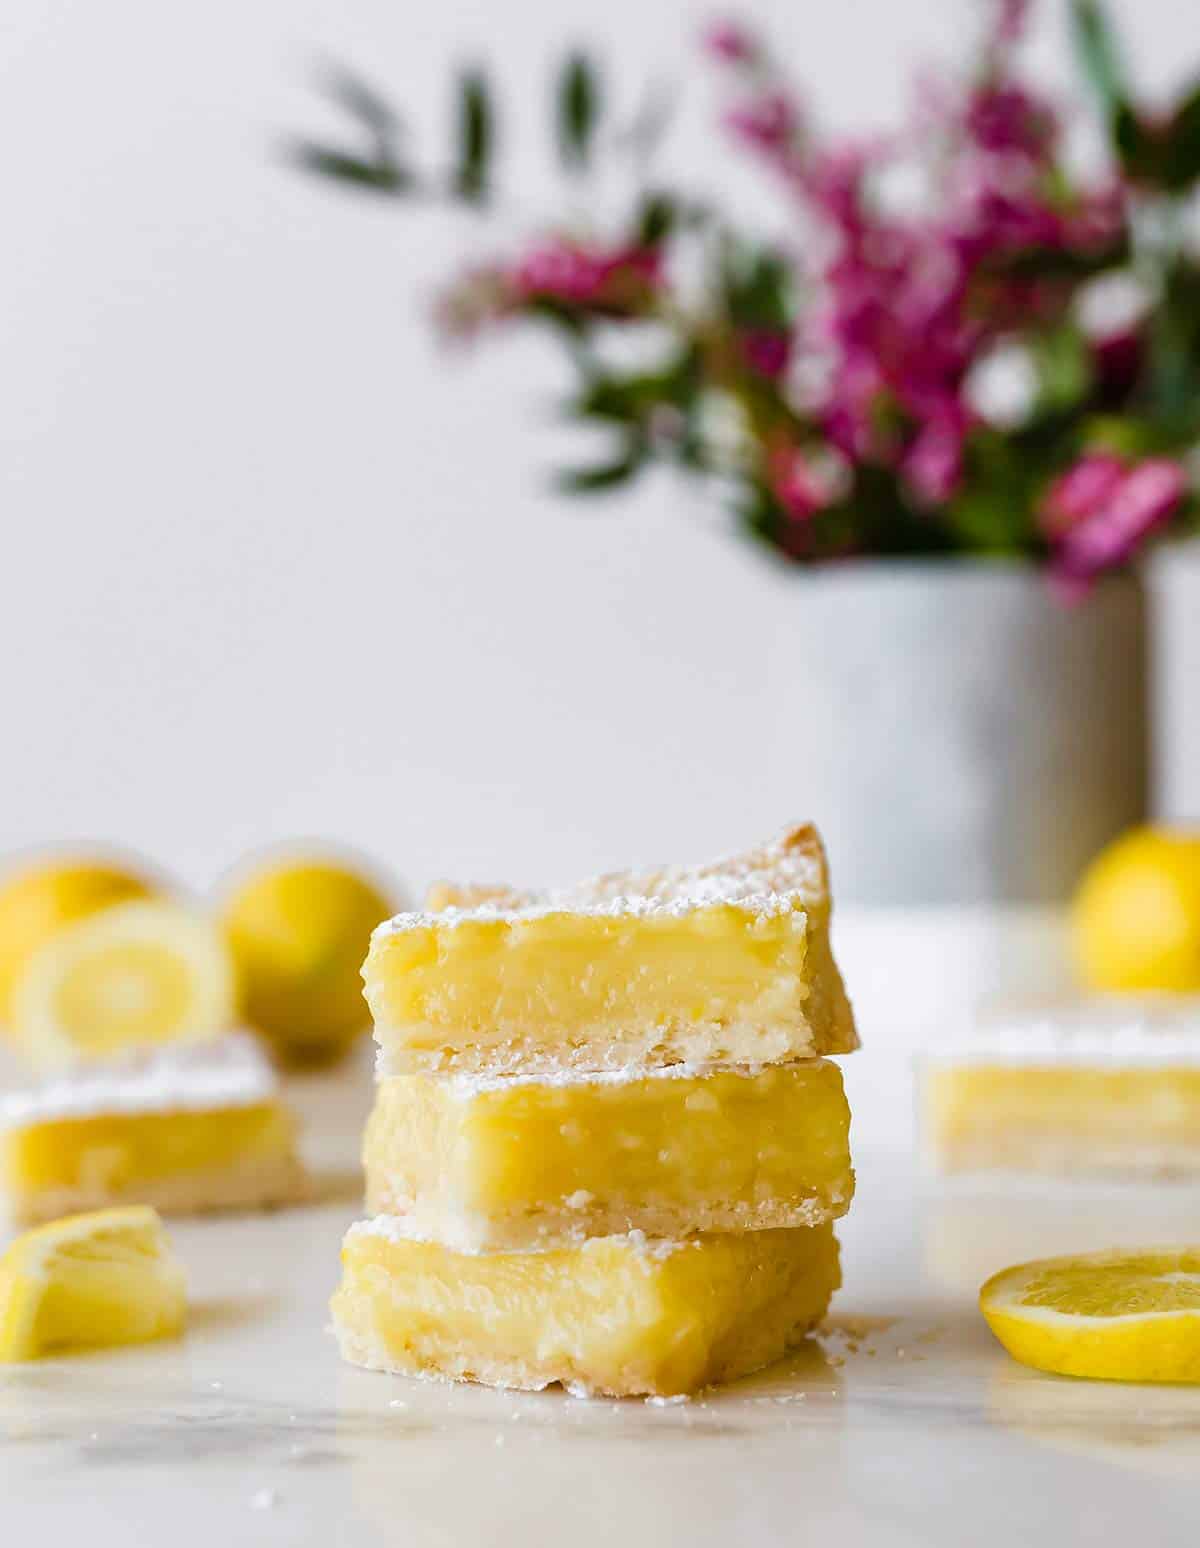
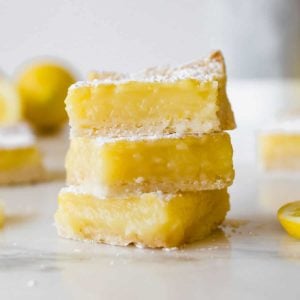
Easy Lemon Bars
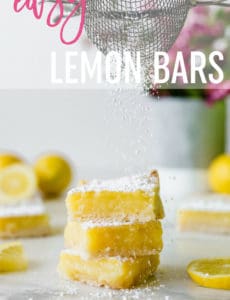
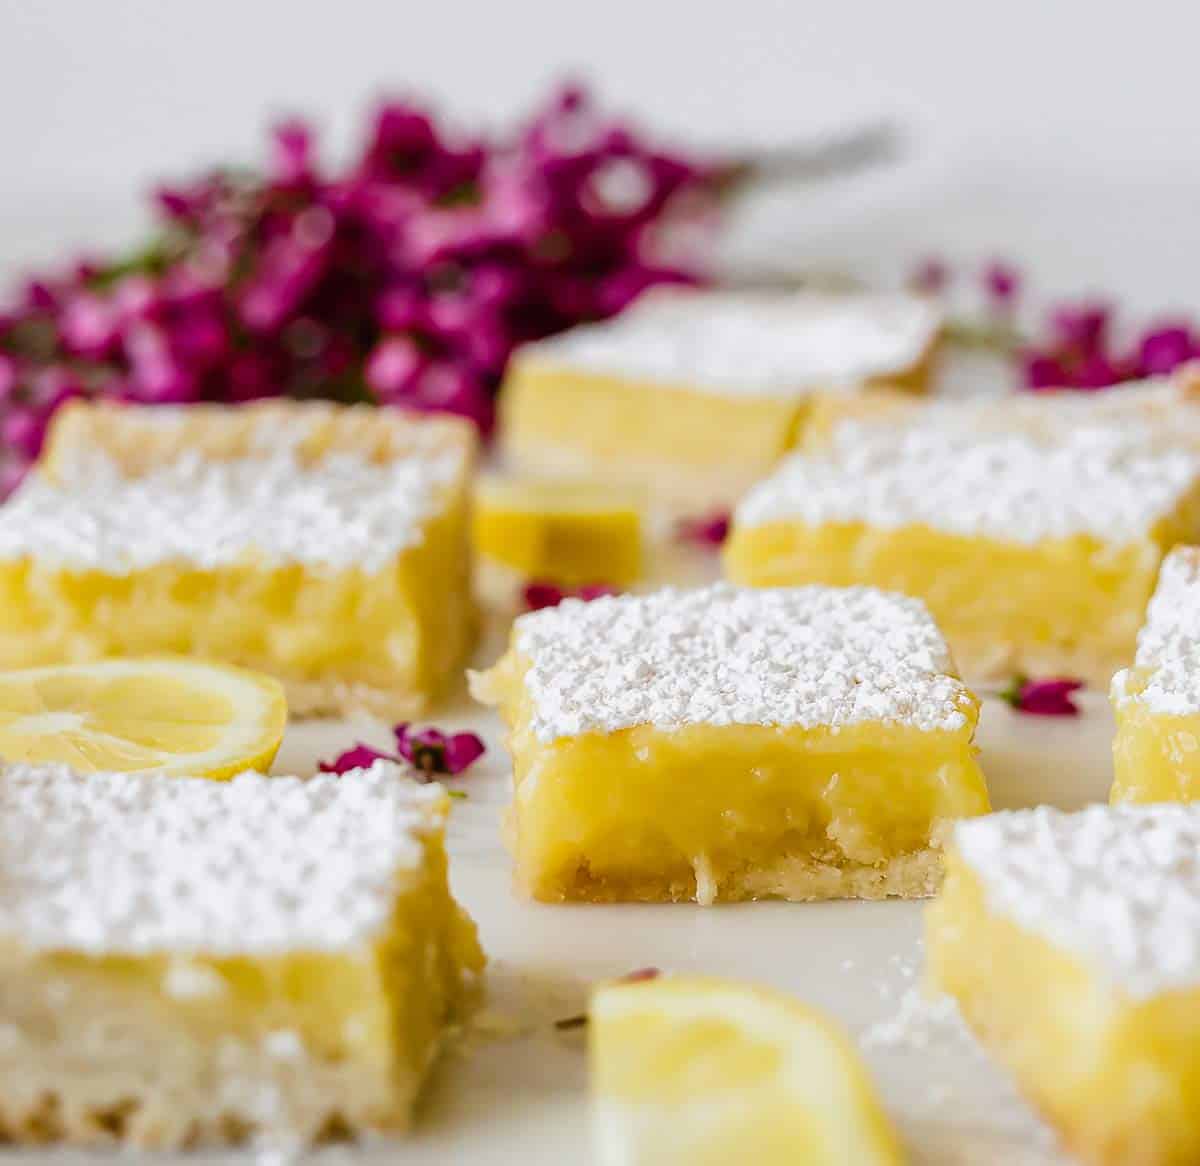
Sweet yet tangy, these classic lemon bars make the ultimate summer dessert. A creamy and zesty lemon filling sits atop a buttery and tender shortbread-style crust in this easy recipe. Perfect dusted with powdered sugar or dolloped with whipped cream, these lemon bars are a refreshing treat!
I am admittedly not a huge lemon dessert type of person.
A wedge of lemon in my water or iced tea? Sure! But lemon for dessert when I could choose something like chocolate or cheesecake? It’s a hard sell for me.
That being said, there are times, especially in the summer, when I’m just craving something super light and refreshing to top off a meal instead of something crazy sweet and heavy.
Enter lemon bars.
Why We LOVE These Bars
Aside from being the ultimate summer treat, these lemon bars are a must make recipe for quite a few reasons.
- They are the perfect balance of sweet yet tart.
- Excellent for a make-ahead dessert since they can be made up to 2 days in advance.
- Unbelievably easy. You can make these bars entirely by hand (but the food processer does help).
The Ingredients
These lemon bars are comprised of a bottom shortbread crust and creamy lemon filling. Let’s walk through some key ingredients for each…
The Crust
- Flour: Use all-purpose flour to provide structure to the crust.
- Powdered Sugar: Helps give the crust a sandy, tender texture.
- Cornstarch: Keeps the shortbread surprisingly soft.
- Butter: Use unsalted butter at room temperature to help bind the shortbread together.
The Lemon Filling
I like to make the filling while the crust chills so it’s ready to pour in after baking. A few notes:
- Lemon zest: For a little boost of lemony flavor, use fresh. lemon zest.
- Lemon juice: Fresh, not bottled, gives maximum lemony flavor to the bars. If you are in a pinch, bottled can be used, but the flavor won’t be quite the same.
- Milk: Whole milk works best to give a creamy finish to the filling.
How to Make the Bars
This sweet yet tangy lemon bar recipe is not only the best recipe for lemon bars but also by far the easiest to make! The shortbread crust is surprisingly soft (thank you, cornstarch!) and the lemon filling is the perfect hybrid of creamy yet firm and tart yet sweet.
Let’s break down how to make these tangy lemon bars into two main parts, the shortbread crust, and the lemon filling.
- Prepare for baking: Preheat to oven to 350°F. Lightly butter 9×13-inch baking pan and line with parchment paper.
- Mix dry ingredients: Pulse the flour, powdered sugar, cornstarch, and salt in a food processor.
- Add the butter and process for 8 to 10 seconds and then pulse until the mixture is pale yellow and resembles a coarse meal, about three 1-second pulses.
- Press into the pan: Sprinkle the mixture into the lined pan and press firmly into an even layer over the entire bottom and 1/2-inch up the sides.
- Chill and bake: Refrigerate for 30 minutes, then bake until golden brown, about 20 minutes.
Make the Filling
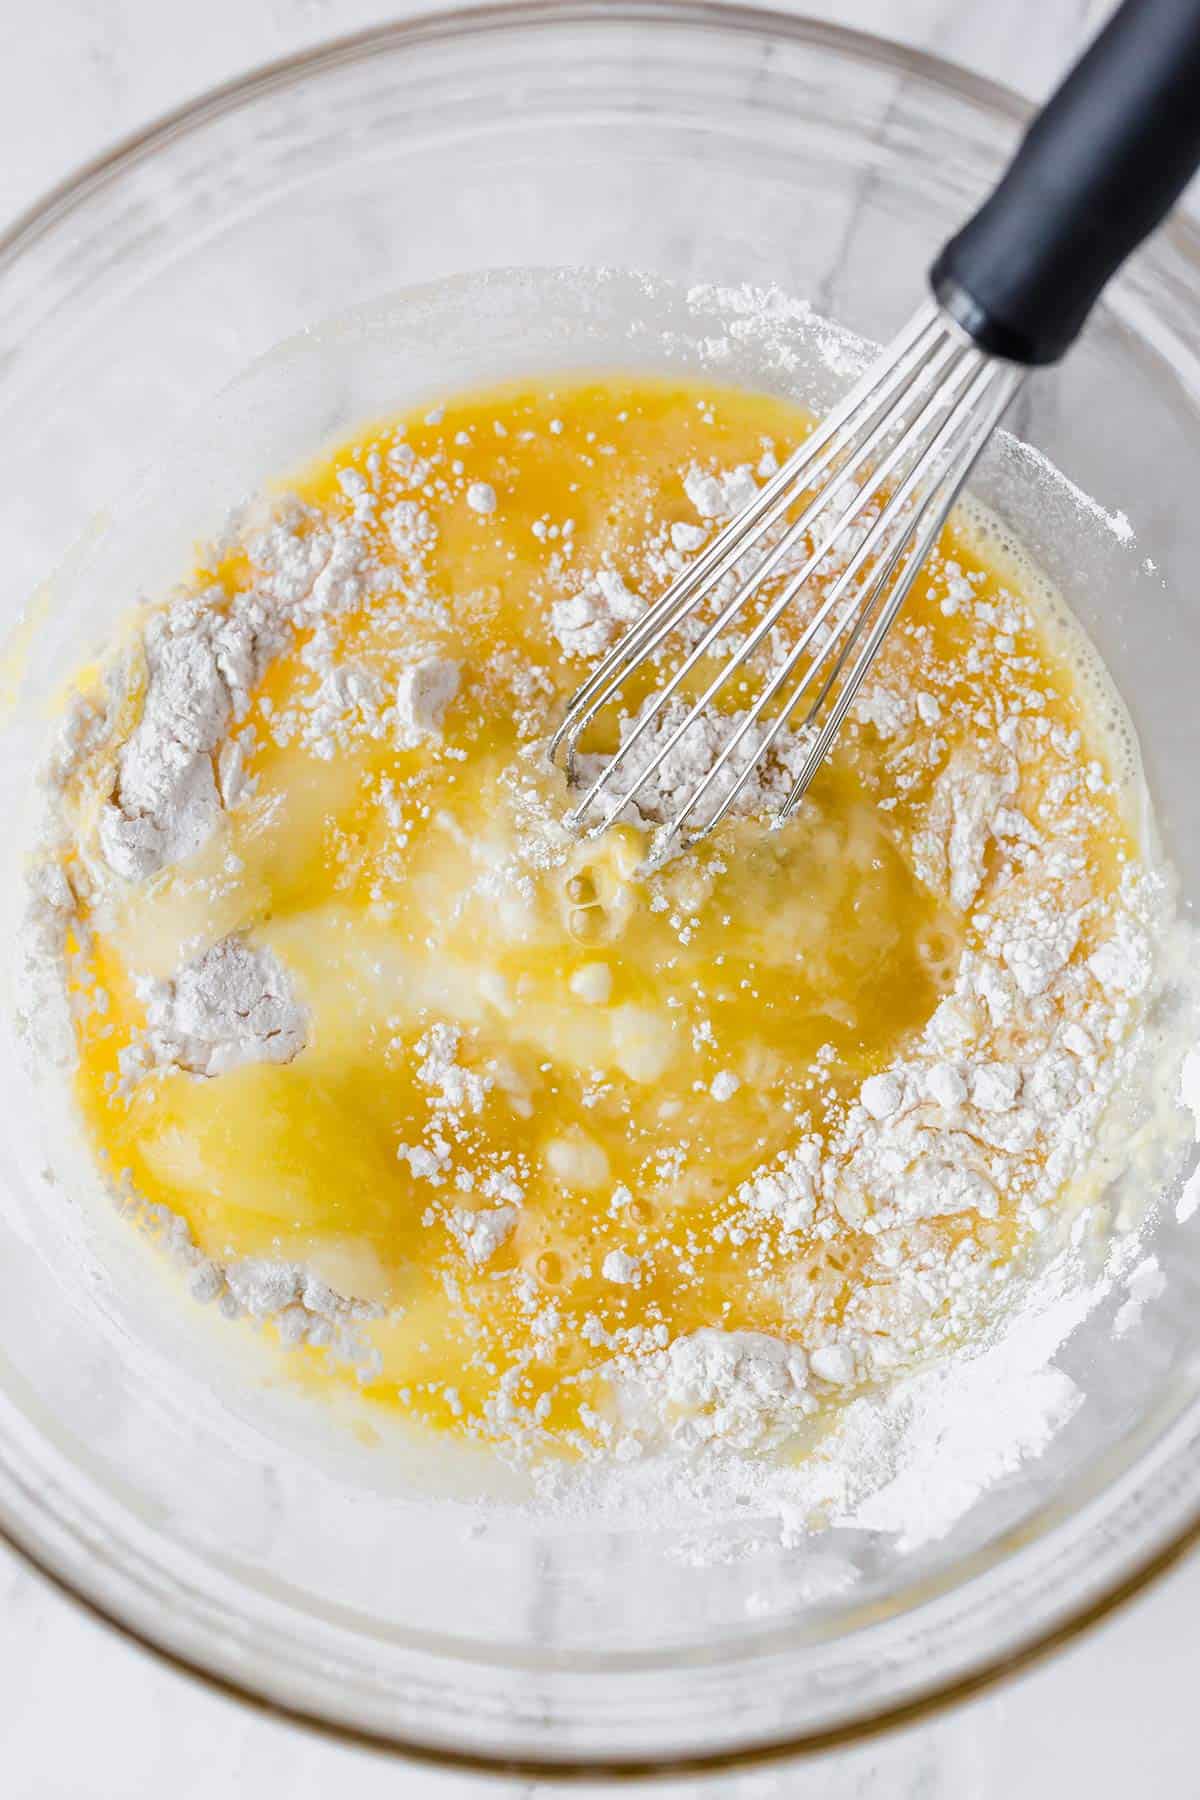
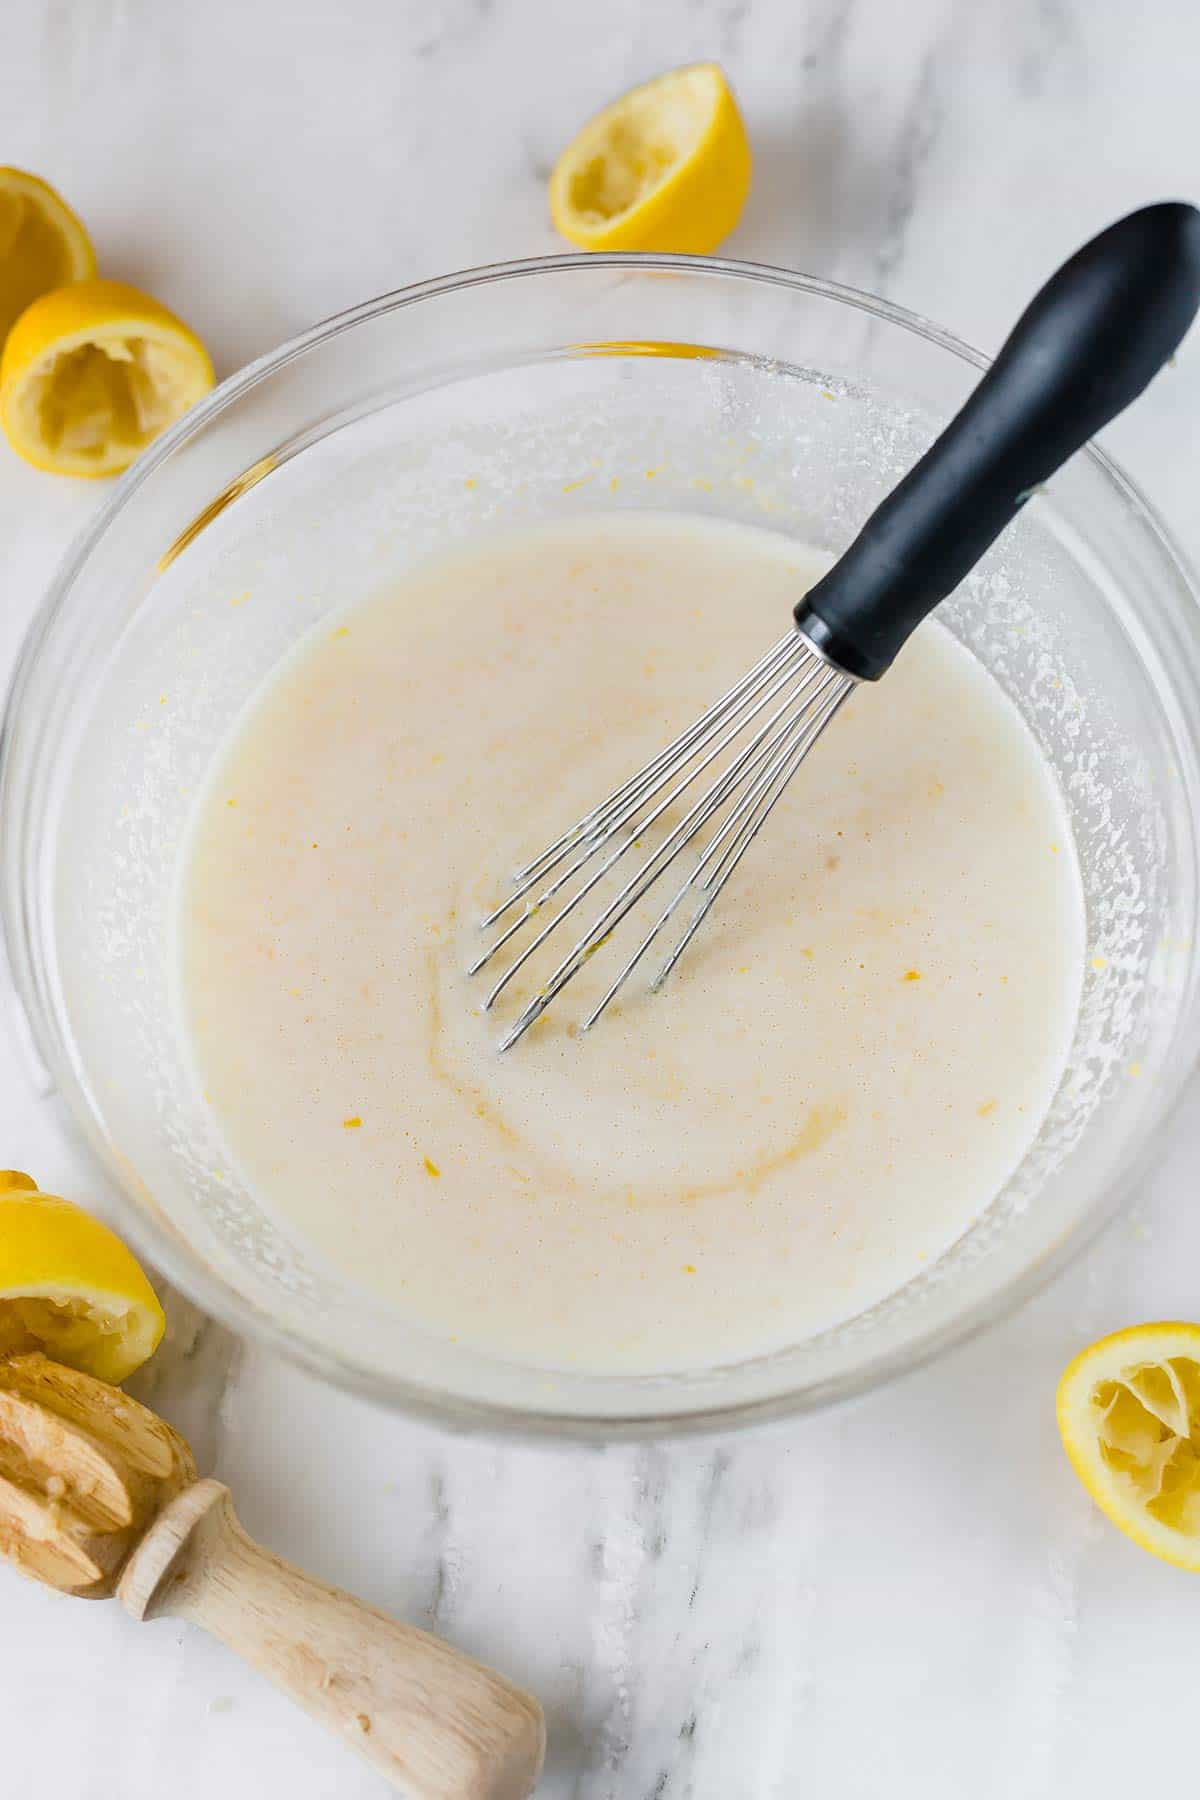
- Mix eggs and dry ingredients: Whisk the eggs, sugar, and flour in a medium bowl.
- Add remaining ingredients: Stir in the lemon zest, lemon juice, milk, and salt to blend well.
- Reduce oven temperature: Once the crust finishes baking, reduce the oven temperature to 325°F.
- Pour filling on the crust: Stir the filling mixture to re-incorporate the ingredients, then pour into the warm crust.
- Bake until the filling feels firm when touched lights, about 20 minutes.
- Cool completely: Transfer the pan to a wire rack; cool to near room temperature, at least 30 minutes.
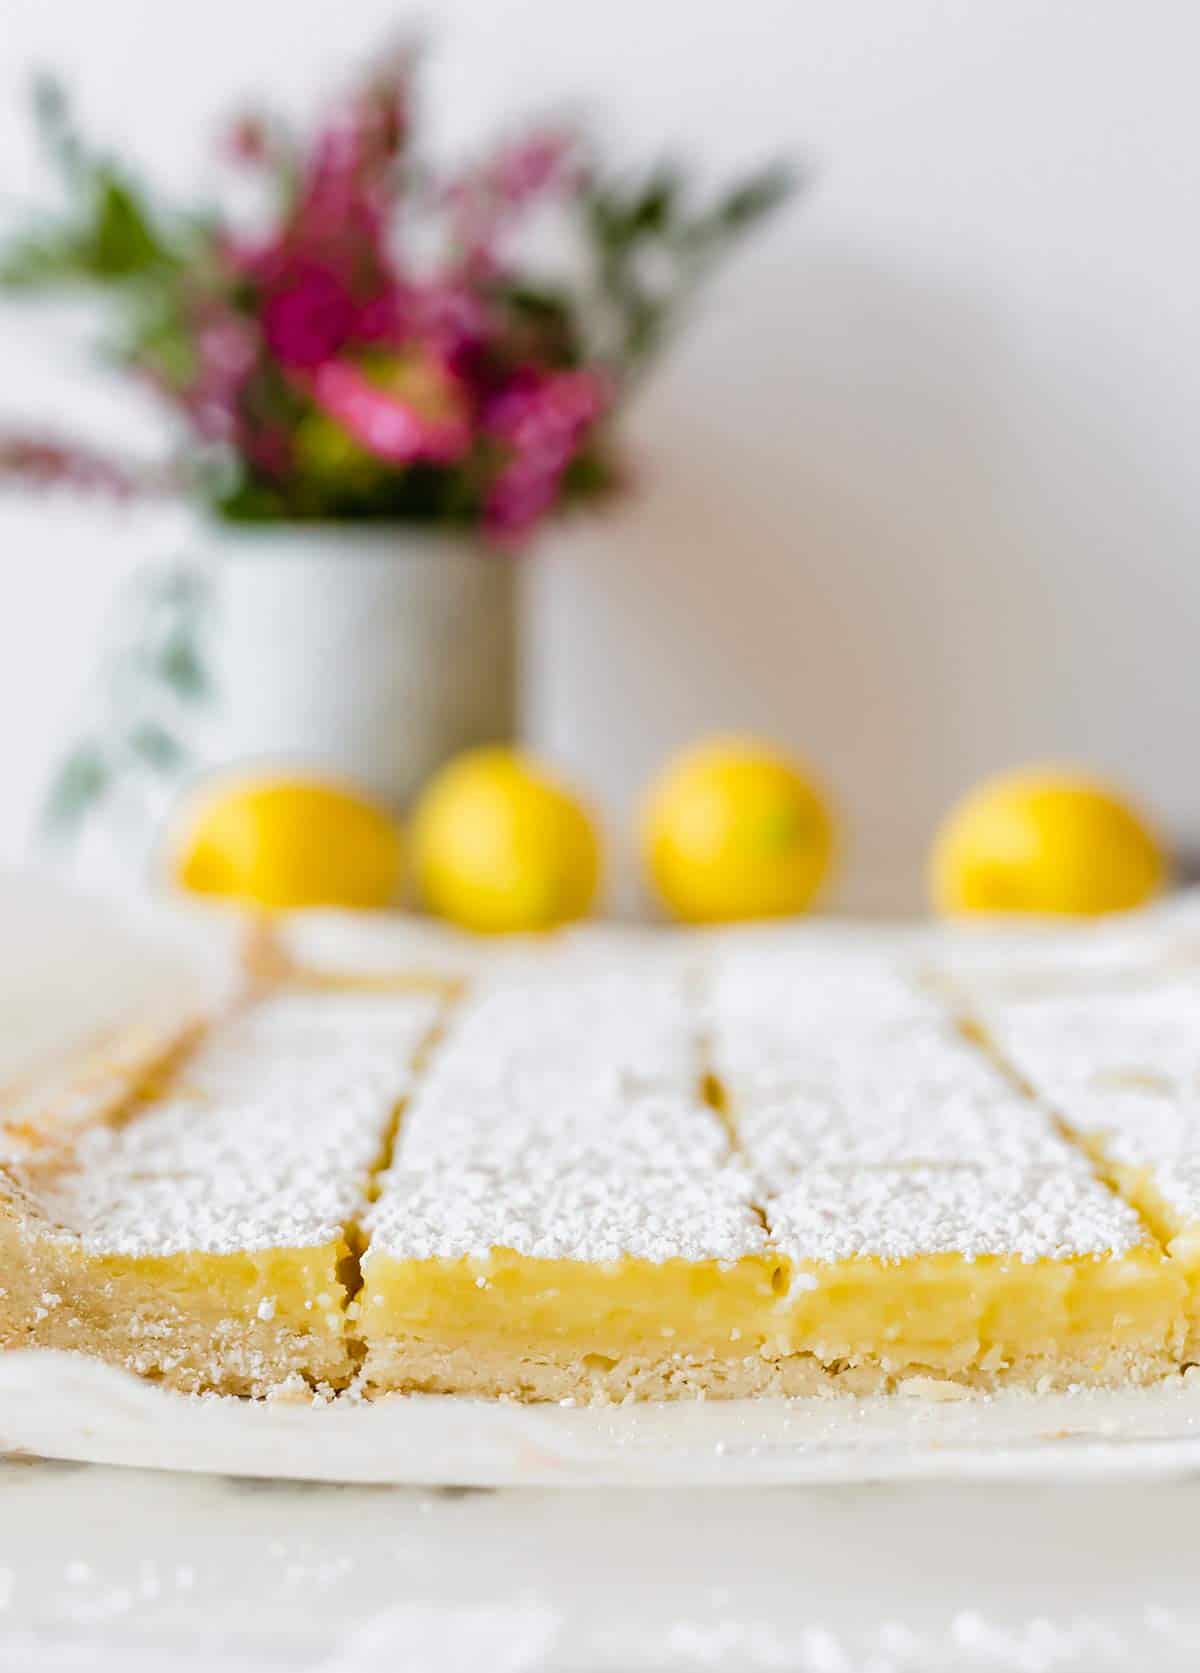
- Transfer and slice: Lift the bars from the pan, using the parchment paper, then place on a cutting board to slice into squares.
Helpful Baking Tips
- Parchment Paper: Make sure the parchment paper comes up the sides to create a sling to lift the bars out when they are done.
- Gooey Lemon Bars: When you remove the lemon bars from the oven, they should be set i.e. not jiggly in the middle and the edges will be golden. They will continue to set during the cooling process, so make sure they have ample time to cool before slicing in.
How to cut smooth lines on Lemon Bars
When you are ready to cut and serve these delicious lemon bars, here are a few helpful tips to get smooth cuts every time.
- Allow the bars to set completely before cutting. It might help to refrigerate them overnight and wait to cut before you plan to serve.
- Run a sharp knife blade under warm water to cut through the lemon bars smoothly.
- Clean off the knife between cuts. Some of the lemon bar filling sticks to the blade and prevents a second smooth cut.
Serving Suggestions
Whether you plan to make these for a picnic in the middle of summer, a cookie table for a wedding in the spring, or a Christmas cookie tray, you’ll be so pleased with how easily these come together and how delicious they are. Some of my favorite ways to dish the bars out include:
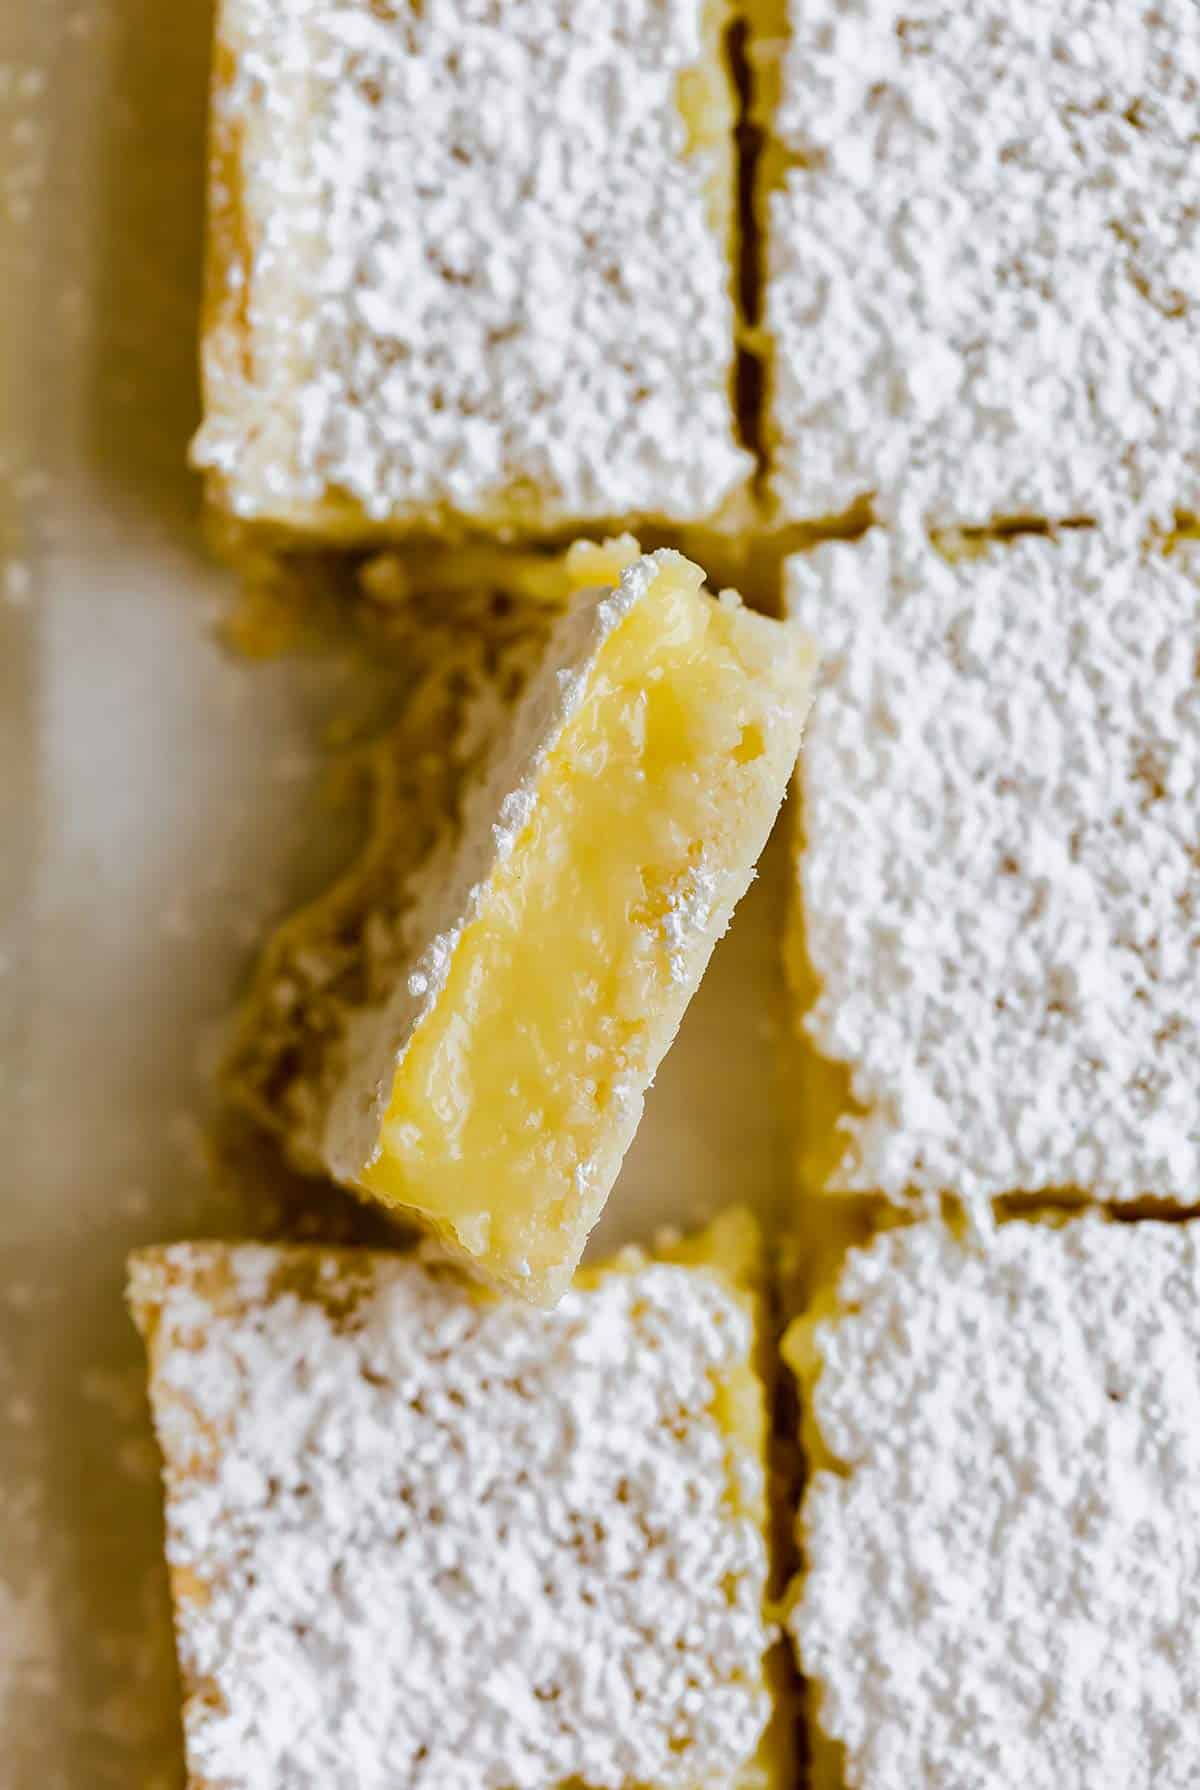
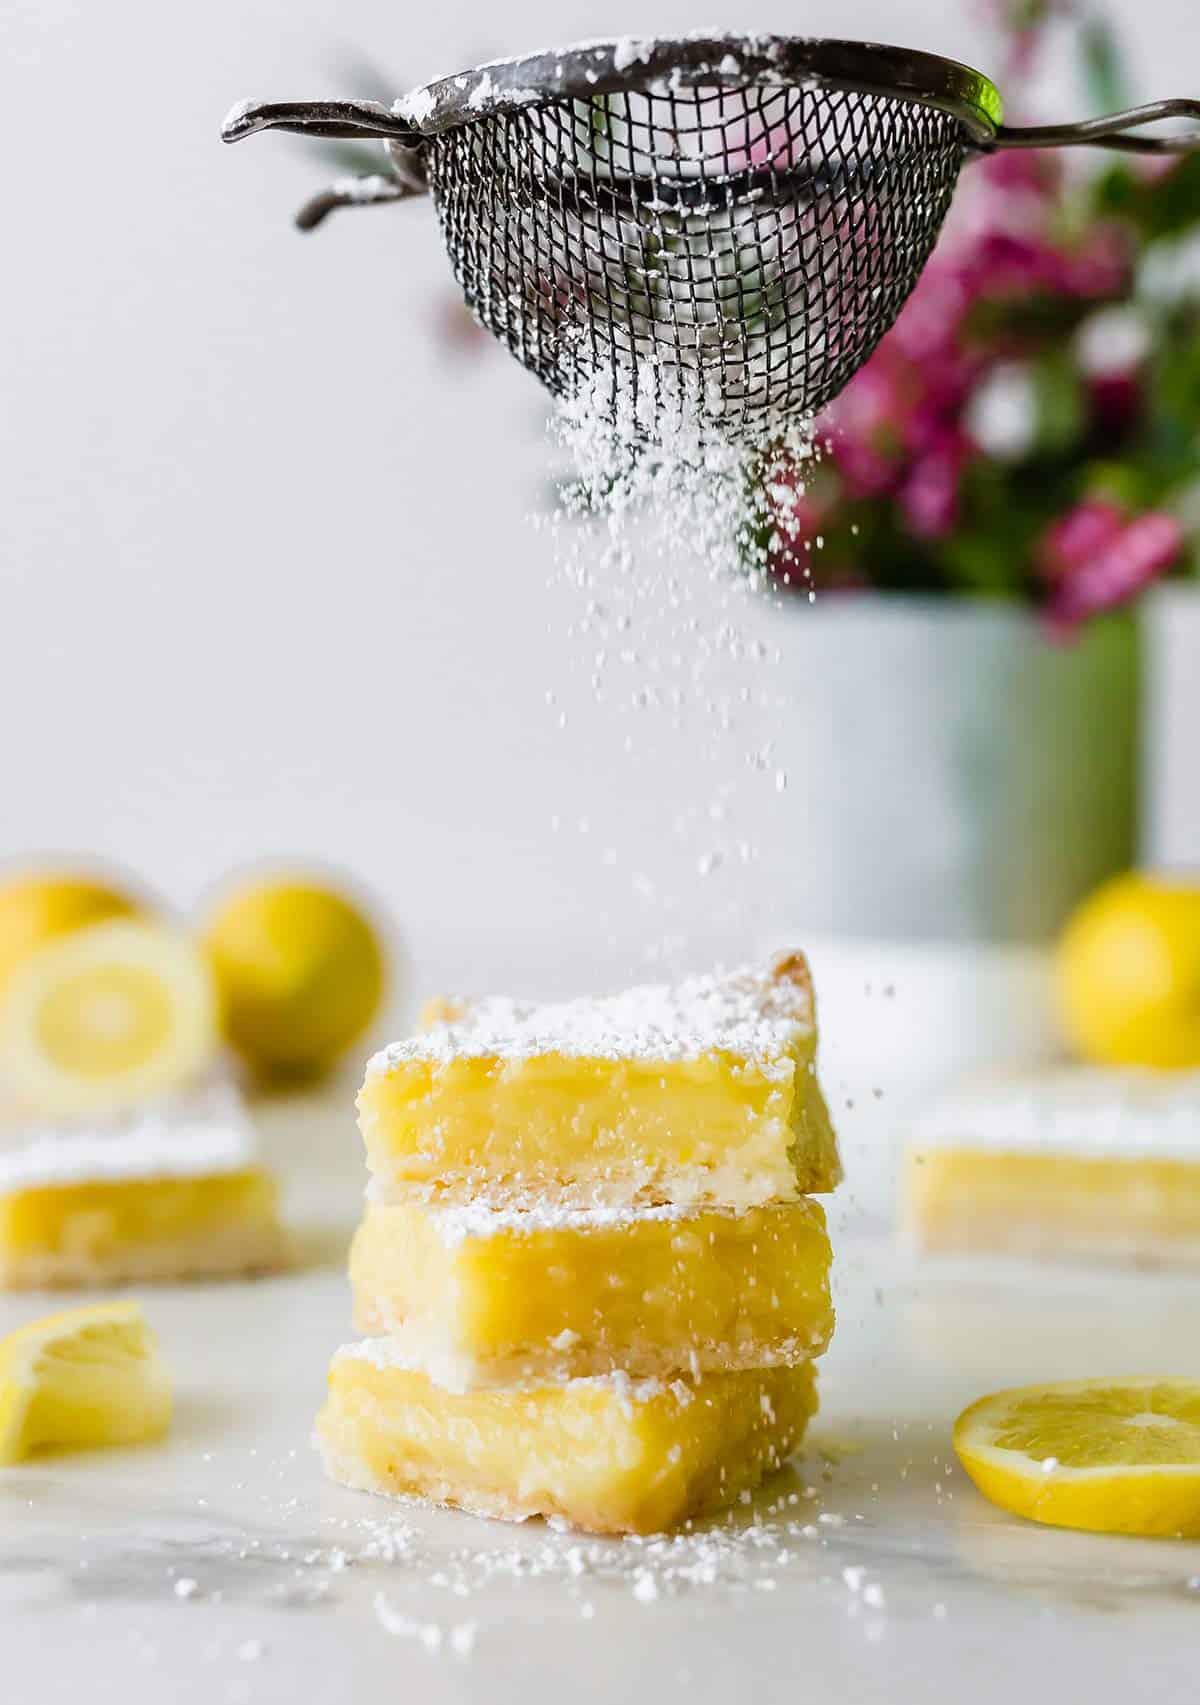
- Powdered sugar: Shower them with a generous dusting of powdered sugar and they’ll be ready to go!
- Whipped Cream: Dollop a fresh scoop of whipped cream on the top for an extra creamy finish.
Serving, Storing, and Freezing
- Serving: Lemon bars are fine to keep out at room temperature for up to 6 hours or so.
- Storing: Store cooked lemon bars or leftovers in the refrigerator. Cover tightly with plastic wrap and store for up to 2 days.
- Make-Ahead: You can make lemon bars up to two days in advance. Simply allow them to cool to room temperature and then cover tightly with plastic wrap and refrigerate. Bring to room temperature and blot the top with paper towels to remove condensation before dusting with powdered sugar (that will help the powdered sugar from dissolving quickly!).
- Freezing the whole batch: Bake the lemon bars as directed and allow them to cool. Before slicing, you can wrap tightly in plastic wrap, then foil and freeze for up to 1 month.
- Freezing individual bars: Once sliced, place lemon bars on a baking sheet and freeze until solid, about 2 hours. Wrap tightly in plastic wrap and place in a freezer-safe bag for up to 2 months.
If You Like These Lemon Bars, Try These:
- Sky-High Lemon Meringue Pie Bars
- Blueberry-Lemon Buttermilk Bundt Cake
- Lemon-Limoncello Cupcakes
- Lemon Blueberry Cheesecake Bars
Sweeten your summer with these tangy yet sweet lemon bars. Made with a creamy lemon filling and a buttery shortbread-style crust, this easy lemon bar recipe is perfect for cookie tables, backyard BBQs, and more!
If you make this recipe and love it, remember to stop back and give it a 5-star rating – it helps others find the recipe! ❤️️
Lemon Bars
Ingredients
For the Crust
- 1¾ cups (218.75 g) all-purpose flour
- ⅔ cup (80 g) powdered sugar, plus extra for decorating finished bars
- ¼ cup (32 g) cornstarch
- ¾ teaspoon (0.75 teaspoon) salt
- ¾ cup (170.25 g) unsalted butter, at cool room temperature, cut into 1-inch pieces
For the Filling
- 4 eggs, beaten lightly
- 1⅓ cups (266.67 g) granulated sugar
- 3 tablespoons all-purpose flour
- 2 teaspoons grated lemon zest, from about 2 large lemons
- ⅔ cup (162.67 ml) lemon juice
- ⅓ cup (81.33 ml) whole milk
- Pinch salt
Instructions
- Preheat oven to 350 degrees F. Lightly butter a 9×13-inch baking pan and line with parchment paper.
- Make the Crust: Pulse flour, powdered sugar, cornstarch, and salt in a food processor. Add the butter and process for 8 to 10 seconds and then pulse until the mixture is pale yellow and resembles coarse meal, about three 1-second pulses. Sprinkle the mixture into the lined pan and press firmly into an even layer over the entire pan bottom and ½-inch up the sides. Refrigerate for 30 minutes, then bake until golden brown, about 20 minutes.
- Make the Filling: Meanwhile, whisk the eggs, sugar and flour in a medium bowl, then stir in the lemon zest, lemon juice, milk and salt to blend well.
- Reduce the oven temperature to 325 degrees F. Stir the filling mixture to reincorporate the ingredients, then pour into the warm crust. Bake until the filling feels firm when touched lightly, about 20 minutes. Transfer the pan to a wire rack; cool to near room temperature, at least 30 minutes. Lift the bars from the pan using the parchment paper, then place on a cutting board to slice into squares. Sift powdered sugar over bars, if desired. Leftover bars can be covered in plastic wrap and refrigerated for up to 2 days.
Notes
- Serving: Since lemon bars are fine to keep out at room temperature for a number of hours if they are on a serving platter at a party, for example.
- Storing: Store cooked lemon bars or leftovers in the refrigerator. Cover tightly with plastic wrap and store for up to 2 days.
- Freezing the whole batch: Bake the lemon bars as directed and allow them to cool. Before slicing, you can wrap tightly in plastic wrap, then foil and freeze for up to 1 month.
- Freezing individual bars: Once sliced, place lemon bars on a baking sheet and freeze until solid, about 2 hours. Wrap tightly in plastic wrap and place in a freezer-safe bag for up to 2 months.
- You can prepare the crust by hand simply by whisking together the flour, powdered sugar, cornstarch, and salt. Then, cut in the butter with a pastry blender (or grate frozen butter into the mixture and rub together quickly with your fingers) until completely incorporated and resembles coarse meal.
- The filling needs to be poured into a warm crust straight from the oven, so once the crust is in the refrigerator chilling, prepare the filling so it’s ready when the crust comes out of the oven.
Did you make this recipe?
Leave a review below, then snap a picture and tag @thebrowneyedbaker on Instagram so I can see it!
Photography by Whitney Wright


Tried these for the first time today. They were easy to put together and they’re DELICIOUS. So glad I made them with the intention of sharing 1/2 the pan…I will have no willpower with these bad boys. Thanks for yet another fantastic recipe.
Quite a unique recipe there. When I think about it, I might end up liking a tangy dessert once in a while. Definitely worth giving a try
These are the best lemon bars I have ever tasted! Love the parchment paper suggestion. I will make these again soon! So easy and delicious 😋
This is an amazing…and it looks soo yummy & sound so delicious…i will trying to make it …Thanks for sharing….
Love it!
How much unsalted butter? It doesn’t say.
I have made these this past summer and they are fantastic! Lately lemons have been hard to find in our local store. However Limes are quite plentiful. I wonder how this would fair if I swapped out limes for lemons. Do you recommend any other adjustments if I give it a try? I know limes can be a good bit more bitter than lemons.
Hi Jen, Yes you can use limes! You could increase the sugar a bit if you’d like. Enjoy!
I just made a batch of these. I’ve been making lemon bars for a long time, and have tried many recipes. I have to say this is the best one ever. Love the cornstarch in the crust which makes it tender. Lemon flavor was perfect. I also like that it makes a 9 x 13” pan of them. Enough to share!!! I made the recipe as written. Thanks for all your recipes.
This recipe is amazing! The crust is so good! I love that it’s thicker. I left mine in for 30 minutes and that seemed just about right. I even tried this recipe a second time, but with lime juice and I made a coconut cream to go with it. Sooo good! Best lemon /lime bars I’ve ever had.
Thank you for sharing this recipe. Although the lemon bars are delicious, I don’t understand why we need to preheat the oven before preparing the crust to go into the fridge for 30 minutes. It seems like a waste of gas (or electricity) when preheating can start toward the last 10 minutes of the crust’s refrigeration.
Made these this morning before church. Cut in to sample while fixing Easter dinner. Prepared exactly as written and they are fantastic! I may have to share them. Thanks.
Nice lemony flavor and great crust, but the filling was watery. Any idea why? Also, I got a thin white film on the top which didn’t matter once I sifted the powdered sugar on top, but was wondering. Thanks!
how much butter?
tasty and delicious
can you tell me if these freeze well? Thank you.
Yes, you can freeze them up to 1 month!
I don’t have a food processor. Could I use a blender?
Hi Christye, Yes that should work just fine!
Made these for a couple of caterings, and got rave reviews. The first time I did them, my sister helped but forgot to add the flour to the filling, so they took a little longer to bake but still tasted wonderful. The second time I made it without help (lol), and the bars were a little more firm. People who said they had never really liked lemon bars gave it a two-thumbs-up review. The little bit of milk in the filling gives it a creamy texture that is similar to lemon curd, but without all the expense and work of making a curd filling! This is now my go-to recipe. Thanks!!!
I have used your refrigerator bread and butter pickle recipe many times (just made another batch) and they are excellent. Going to do the lemon bars too.
I really appreciate the detail you give and all the tips for each of your recipes. Like suggesting blotting the lemon bars after they been refrigerated. Very helpful.
Thank you.
Thank you for the incredibly kind comment, Fredi. It’s wonderful to know you find the recipes helpful!
These are my ‘farewell-to-summer’ treats. This is a fantastic recipe. So good. I absolutely love the lemon and sweet combo. And I love the addition of powder sugar on the top!
I love trying new dessert recipes. I will be making these lemon bars, they look delicious.
I made these yesterday and they are really, really good. They are easy to make and its not like the ones my sister use to make with a boxed mix. The lemon comes thru nicely. These will go with my list of must make again “bar recipes”. Thanks!!
I love anything lemon or lime and these bars sound fantastic. I will definitely try these. Thanks for sharing the recipe with us <3
E || OH LA LATKES
I have a powdered sugar solution! King Arthur Flour has a non melting powered sugar. I used it when I had my bakery (my supplier also had a generic). You will never use anything else!!
I love your blog, and your children are beautiful!
Oh my gosh, thank you for the tip, I had no idea something like that existed!!
Just made these and a thin white film formed over the top. Do you know why that happened???
Hi Darci, Do you mean immediately after baking, or after they sat for awhile? The powdered sugar will eventually dissolve into the top of the bars if left to sit out, so that could be it. If it happened immediately after baking, I’m not sure why that would happen.
Hi does 1-1/3 cups granulated sugar mean 1 and 1/3 cups of sugar?
Hi Nova, Yes, sorry for the formatting issue.
I would like to say…Oh my goodness. This is a fab recipe. I made the recipe twice. Once to try it and the second time for a Super Bowl party. Nothing is left from either pan. I made this for Pintrosity’s Pinstrosiversary and because I had some delicious lemons. Here is a link to my blog posting http://alaskanfamilylife.blogspot.com/2013/02/yum-yum-yummy-lemon-bars.html
I’ve had the same problem twice when making lemon bars. I’m using the parchment paper and somehow the filling is getting underneath the crust?! It makes it a mess. Any help on why this is happening?
Anne- Are you building the crust up along the edge? That would be my first thought. Press the crust down good on the bottom and build up about the length of a fingernail (the bed part, not to include the free edge). The other thing to check is buttering the parchment paper. Using a whole stick I rub it all over the pan, rub it onto the first layer of paper & press it down to seal the edges. I repeat the process on the second layer of paper that goes cross-wise to the first.
Could I use 2% milk without messing up the recipe? That is all I have and want to make these today!
Hi Jody, Whole milk is best when working with custards, as it ensures a thick final product. You can try the 2%, but might find that the custard is a little thin.
I make lemon bars and while they taste great, I have a couple questions. Your recipe calls for milk, doesn’t that cut the tartness of the lemon? Also, a couple of times the filling has had a cratered type look to it after its baked. Do you know what would cause that? Thanks!
Hi Anne, Yes, the milk does cut the tartness a bit, which creates a nice balance of flavor; it also helps to achieve the creamy texture. As for the craters, that could be due to some air pockets.
My most favorite lemon bars recipe so far is from Ina Garten, but I reduce the sugar in the filling to 2 1/2 cups.
http://www.foodnetwork.com/recipes/ina-garten/lemon-bars-recipe/index.html
I am always searching for even better, so I made your recipe today. They were very tasty, had a strong lemon flavor, and were not too sweet. I liked the crust because it was a bit thinner and a little bit more delicate. My crust did not brown as you have pictured above (and maybe that is why it seemed delicate?). I followed your directions exactly. I cooked them in a glass pan. Do you have any suggestions? Perhaps I should try again without the parchment?
Either way, I think that I now have two favorite recipes.
Okay. I now see the problem. After 20 minutes my crust had not browned, so I should have cooked it longer. Duh! I was trying to do too many things at one. Oh well!
Please…..can someone help me with Lemon Bars?? I have made at least five, maybe six different recipes for Lemon Bars and NONE were any good!!!!! The shortbread has always been good but the lemon mixture is gummy,thin and just terrible.
I appreciate any and all replies.
Oh man, these were delicious! My Dad loves lemon so I made these mainly for him…but the entire family ended up loving them as well! Definitely will be making these bars again!
Lemon & custard flavor give a perfect balance of sweet and tasty desert.
These look absolutely heavenly and delightful. Going to give them a go soon, almost certain they’re going to taste as divine as they look! Just looking at the photos are making my mouth water :)
Well, I made them, and I liked them. Grating the butter was such a greasy, messy hassle, and I think you can get the same effect just cutting in the butter. I definetly will not grate butter again! But they did turn out excellent! Everyone enjoyed them, and I really liked them too (first time eating a lemon bar). I might tone down the lemon flavour slightly next time, for my family’s palette, but thats pretty much the only adjustment.
Thanks for the recipe!
I love lemon-y desserts, these bars look perfect. Yumm!
I love lemon bars! They are so light and perfect with a cup of tea in the afternoon :)
I’ve been a lemon fan since day one. The more pucker-power, the better. Same with lime. Your bars look delicious. Lemon bars are a favorite in our house. :)
I know what you mean… I’m a coconut convert. Two years ago I wouldn’t touch it, now I can’t get enough. These bars look great… I had a lemon bar failure a few years back and have never tried again. These might do the trick though!
LOVE LOVE LOVE Lemon bars!!!
My dad has been asking me to make him lemon bars for ages. I will have to try this for him.
I love lemon bars. This is such a great recipe!
I love lemon bars and any lemon dessert really. Yum!
Ahhhh…lemon bars are one of our all time favorites!
Love sourness and tangyness of anything lemon. Never made these myself. Thanks for recipe!
Lemon is one of my favorite flavors, both in sweet and savory foods, and Lemon Bars are always a big hit around here! Great, classic recipe. Thanks for reminding me that I haven’t made these in far too long.
I’ve made lemon bars for a long time, but especially at the holidays. I love lemon and lime for the tart, clean taste they give food, and drinks! I have had to re-powder sugar my lemon bars, too, and they’re fine.
love making these looks delicious
I have a wonderful lemon bar too. However, I have tried many of your suggestions, like your blackberry pie bar, so I will have to just try this recipe too. I’ll let you know how they compare.
I’ve always been a lemon dessert lover. The sweet and tart combination are just like heaven to me. I can’t wait to try these bars!
These lemon bars look so delicious! I love lemon desserts, especially in the summer when they add that bit of much-needed freshness.
These looks great and I’m always looking for a good Lemon Square recipe!
I’ve never seen milk in a lemon bar recipe…maybe that’s why mine always come out so terribly!
I have been seriously craving lemon bars recently, great, now I want them even more!
I’ve eaten two desserts today already (I know!) and yet I think I could devour about four of these bad boys!! I love citrus. These lemon bars look fabulous!
I can literally live by citrus based desserts! Okay may be I can also live by desserts filled with nuts. TRUTH be told I can live by any kind of dessert. This surely goes on my must make list.
I love lemon bars, and lemon anything. These look like the perfect lemon bar!
Love love love love lemon bars. Forgot about them for a while. I think the sourness is great becuase it helps the dessert not be too sweet. Yours look so good!
One of my very favorite treats. I have a cookbook given to me for a Christmas present back when I first started baking called ‘The Artist in the Kitchen’ (copyright 1977!)and that’s when I first discovered lemon bars and have never wavered from that recipe. But I do love to see all the different variations on this theme…and I’ve even made lime bars once when I felt a desperate calling…they were good too!
True confession. I made a pan once for a barbecue. Well, actually made it twice because I could not keep my sticky fingers out of the first pan and while maybe not finishing off the WHOLE thing…came close enough I didn’t want anyone to know. Til now.
Hello and thanks for your quck reply…..I just thought before I try again I better tell you that I use Splenda due to being a diabetic. Could that be the reason My filling is rubbery? But in my 9×13 glass dish I have plenty of room for my delicious shortbread but my filling barley covers the shrotbread. If I sound frustrated…….I AM….sorry! maybe I should double the filling recipe???????
Thanks so much. Barbara
Hi Barbara, I don’t bake with Splenda, but would imagine that using a sugar substitute in a recipe such as this could certainly affect the texture of the final product.
I am a lemon lover! These look incredible! Perfect for summer too!
I have always loved lemon desserts, love them! I have a few great do-often recipes. These bars look so lemony luscious! Oh, I also love lemony savory dishes too. Yum!
Those look divine! I’ve been craving lemon bars lately, but I’m the only lifelong addict (like Joanne!) in my house so I don’t bother making them. Maybe its time I attempt to convert the husband…
Nothing better in the summer than lemon bars!! I just wish it FELT like summer here in Boston! These look delicious :)
I have some lemons on my counter. Methinks they won’t be there long after this… :-)
Seriously – this could not look more amazing. Wish I had a couple of squares in front of me right now.
My boys always preferred lemon bars to brownies, but I am equal opportunity when it comes to sweets. I’ll have one of each, thank you! These look delicious.
I am most definitely a lemon convert! When I was younger I never ate anything lemon. I just didn’t think it would taste good…. I blame lemon jujubes and lemon suckers. I still dont like them! But somehow I started to try lemon desserts and I love them!! Especially the lemon-raspberry combo! Or blueberry, or cranberry…..
These look delicious! I really want to make my own lemon squares. I’ve only ever had one lemon square in my life, and loved it!
I am a convert! If by convert you mean lifelong addict. These look fantastic!
I am a lemon convert too, and it starts to make me wonder what other great things I have been missing out on! I made my first lemon bars recently as well and am now in love. These look excellent!
i love citrusy lemony desserts! there’s nothing better than classic lemon bars. yum!