DIY: Homemade Twinkies

Raise your hand if you’ve eaten a Twinkie at any point in your life. I’m estimated that no less than 98% of you are raising your hands.
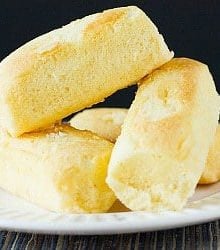
While the iconic snack cake was never a regular fixture in my childhood diet (truth be told, I was always more of a Little Debbie girl when allowed a treat), I’ve certainly had a few in my day. The yellow sponge cake filled with a fluffy white frosting brings back tons of nostalgic memories for a large number of people. In case you haven’t been following the news, Hostess (the company that makes Twinkies) filed for bankruptcy and will be going out of business, meaning that there will be no more Twinkies unless another company buys the brand and continues to make them. I think that’s a very real possibility, but clearly mass hysteria ensued at the news that Twinkies would be discontinued. There were empty store shelves as far as the eye could see! I didn’t buy a single package, figuring I could just as easily make them myself… whenever I wanted. This might not be such a bad thing after all! ;-)

If you can get your hands on this Norpro Cream Canoe Pan, you’ll be all set! I tried to purchase one through Amazon, but it became unavailable before it shipped and appears to be sold out everywhere. Don’t fret, though, you can easily make your own Twinkie molds with a spice bottle and some aluminum foil (see recipe below for instructions)!
This recipe is incredibly easy and the end result is a soft yellow cake that’s a little bit denser than a sponge cake, and a filling that is spot-on when it comes to replicating the actual Twinkie. While nothing can replace the original, I think a homemade Twinkie might be just what the doctor ordered for all those folks mourning the end of their favorite snack cake :) If you’re in the 2% that didn’t raise your hand at the beginning, this is a chance to see what all the fuss is about!

One year ago: Chocolate Chip Cookie & Oreo Fudge Brownie Bars
Homemade Twinkies Recipe
Ingredients
For the Cake:
- 16 ounce (453.59 g) box pound cake mix
- 4 egg whites
- ⅔ cup (166.67 ml) water
For the Filling:
- 2 teaspoons hot water
- ¼ teaspoon (0.25 teaspoon) salt
- 7 ounce (198.45 g) jar marshmallow creme (about 2 cups)
- ½ cup (102.5 g) vegetable shortening
- ⅓ cup (40 g) powdered sugar
- ½ teaspoon (0.5 teaspoon) vanilla extract
Instructions
- 1. Make the Cakes: Preheat oven to 325 degrees F.
2. If you have a Cream Canoe Pan, spray it with non-stick cooking spray. If you do not, make your own molds as follows:
- Tear off a large square of aluminum foil (about 12-inches square), then fold it in half one way, then the other, so you have a smaller square. Wrap the piece of foil around a spice bottle, closing the ends, and leaving the top open. Remove the bottle and place the foil form on a baking sheet or in a large baking pan. Repeat with 9 more pieces of foil to make 10 total molds. Spray the inside of the molds with non-stick cooking spray and set aside.
- 3. In a medium bowl, beat the egg whites on medium-high speed until stiff peaks form; set aside.
- 4. In a large bowl, combine the cake mix and water on low speed for 30 seconds, then on medium speed for an additional 2 minutes, making sure it's thoroughly blended. Using a rubber spatula, fold in ⅓ of the egg whites to lighten the batter. Then, gently fold in the remaining egg whites until completely combined.
- 5. Divide the batter evenly between the molds.
- Bake for 30 minutes, or until the cakes are golden brown on top and a toothpick inserted into the center comes out clean. Using oven mitts and being careful not to get burned, turn the cakes out of the foil molds and place them right-side-up on a cooling rack. Allow to cool completely before filling.
- 6. Make the Filling: In a small bowl, stir together the hot water and salt until the sale has dissolved; set aside. In a large bowl, combine the marshmallow creme, shortening, powdered sugar and vanilla; beat on high speed until light and fluffy, scraping the sides of the bowl as needed. Add the salt solution and beat again on medium speed for 30 seconds to 1 minute, or until thoroughly combined.
- 7. Use a toothpick or skewer to poke three holes in the bottom of each cake, moving it around to create a sizable hole to fill with frosting. Use a piping bag and decorating tip or a plastic ziploc bag with a corner snipped off and pipe frosting into each of the holes, filling as much as you can without allowing the cake to crack.
- Store snack cakes at room temperature in an airtight container, or wrap individually with plastic wrap.
Notes
Did you make this recipe?
Leave a review below, then snap a picture and tag @thebrowneyedbaker on Instagram so I can see it!


I want to make these twinkies for Vacation Bible School snack, can you make these ahead of time and freeze? Do you recommend filling them after I thaw or will the filling freeze okay in the cake?
These are not quite like a twinkie…the cake isn’t spongy like a real twinkie.
I made them for a post I BT to our after school program in honor of National Twinkie Day that was yesterday. They turned out pretty good. The kids liked them and I posted the picture on our Facebook page.
I can’t add a picture for some reason..
I couldn’t find a pound cake mix at my Kroger so I used a yellow cake mix..
The filling seem a little heavy and not sweet enough so I added a little more confectioners sugar and some half and half and it turned out great!! 😋
Wow! So clever. I have been looking for a giant twinkie mold to make a cake for my son in law. Can’t wait to try your idea with a two liter pop bottle as a mold!
I make the cupcakes all the time and there is one recommendation I would make for the filling. Skip the complicated filling, 1 jar of marshmallow creme mixed with one stick of room temperature butter. Viola! Exactly like the original. Nothing I’ve tried beats this combination.
I have a question. Can I use this recipe to make a filled cake (4″) instead of twinkies?
Hi Terrie, I have not tried it, but sounds like a delicious idea! Let me know how it turns out!
I made these and I’m only 14. It took me about an hour or so to do everything. They were delicious and better than the original really! Thanks so much to who ever figured out. And if u are thinking about doing it. Don’t think. Do it!
Could you substitute the vegetable shortening for margarine?
Hi Emilie, I think you could without an issue.
Yay! I made these and can honestly say they taste good. The aluminum boats are a pain to make as is filling them, but well worth it! My one complaint in the amount of shortening. Blegh! Definitely too much. Texture was perfect, but the only taste it had was of shortening and I even decreased it by a tablespoon.
Awesome!! I love twinkles!<3 must try these ASAP!
And for the canoes, why not use small sized rectangular foil tins?
Looks just like the recipe from Top Secret Recipes…is that where you got it?
Yes, if you are ever curious about the source of a recipe, please just see the bottom of the recipe, where recipes sources are cited (when applicable), as it is above.
I shared your website w/one of my coworkers and she sent me the link to these this morning, lol. Your website will make me and my husband fat! lol! I want to try and make everything! These look great, and while not ‘healthy’, these are much better than the original Twinkies w/o all the additives & preservatives! Thanks for this! And the foil idea is pretty clever!
I made these in 2round cake pans,then when cool cut each cake in half then spread the filling on each bottom and put the ” top” back on. Not as pretty but very easy.Tastes just like the real thing !!!
I don’t live in America, and I’m wondering if you have a recipe to use instead of the pound cake mix (I’ve noticed that you have a few other DIY cake mix recipes)
thanks!!
Hi Ariella, I don’t have a homemade pound cake mix unfortunately. If you Google homemade Twinkies, I think you’ll find a few recipes that don’t use a box mix.
Hi thank you for sharing this recipe on here I don’t live in America but we still have them where I live and I have tried making them once before but it failed but this recipe sounds promising thanks :)
I love this. My dad doesn’t even like Twinkies, but yet he said that these where the best that he has had. I also love this recipe too. Love your blog.
I’ve actually never had a twinkie. But, I would definitely love to try these!
This is such a work of genius! I was furious when I found out that Twinkies would no longer be produced, but thanks to you I don’t have to question the purpose of my life without them. Thanks! ~ nerdwithtaste.wordpress.com
Very creative canoes for the twinkles. Love it!
How big was the spice container?
Thanks! :)
Hi Cat, I didn’t measure it; as you can see from the photo, it’s a 1.7 ounce jar from Penzeys. Any large size spice bottle will work (vs those short little plastic jars).
I have a great recipe for Ding Dongs, taste just like them….
Hi Janice, Would you be willing to share your recipe for Ding Dongs? Thank you.
I just make a yellow cake mix. Let cool. Cut length ways. make your filling after the filling and cake mix is cool.spread filling on bottom half. put on top half and no mess trying to make boats!
Thank you so much for this recipe, it’s another bookmarked one. Gee, I wonder why there are no more pans to be found?!!
I have made homemade twinies for a few years – ever since i saw the recipe in a mag at my doctor’s office (and I stole the mag. shh!). I purchased 2 of the canoe pans so you can make a whole batch at one time. The best thing, however, is that you can make your own flavors – and no preservatives so no75 year shelf life like the original. The most popular flavors are vanilla sponge with white filling (like the original – but no artificial flavors so much tastier, chocolate with white filling, chocolate mocha with mocha filling and chocolate with strawberry or raspberry filling. But any flavor sponge cake you can make can be a twinkie (lemon, orange, guava… and then you doctor up a good filling (I DON’T like the recipe that came on the norpro box) to suit your taste. Family and friends will be amazed. This DYI pan idea is brilliant, by the way – I can image the norpro pans are sold out for the forseeable future. Great idea!
I used a nordic wear egg shaped pan I use at Easter, it’s perfect for these…and since I pipe the lemon curd filing into them, the marshmallow fluff was a great addition to the look…my grandbabies love them.
We have a version of these sold in Malaysia, but I don’t quite remember what they’re called. I do like them, they also sell chocolate-flavoured ones. But it would be a thousand times nicer to make them at home :)
Tears appeared in my eyes. I briefly considered saying a marriage proposal, but decided, in the end, that an unofficial marriage to twinkies perhaps isn’t my brightest idea. Thanks very much for the homemade twinkie recipe–but the truth is, I am also amazed at your other ideas. It didn’t occur to me, for example, to use a ziploc bag as a makeshift piping bag or to mold aluminum into small little cake pans… it’s like, you just provided me with three gifts all in one post. Be aware that you have many fans lurking your site, reading your recipes and trying them out, even if they only comment occasionally. Thanks for another great post.
These look heavenly!
I’m a calorie counter, but I don’t care, I can’t WAIT to try your recipe!! It sounds so good and I have always wanted to make twinkies! Thank you for sharing!!!
Cool idea – I love the tutorial on how to make it without a specific pan!
I love the site,teaching grandkids how to cook!!! We been making these for years.I use a very large drink straw,sorta like McDonals,to run the hole,all the way through the twinkies at first ( now,I have a stainless steel tube ).I also use a cake decorating tube,with a straw (used to extend the tip ),far enough to go all the way through the twinkie,then back out,carefully filling it all the way through.Just My Way!! These are great !! Keep it up Ladies !!!
Hi Jim, I love your trick! I misplaced my long piping tip for filling eclairs, as I was planning to fill the whole Twinkie, as you mentioned. I love your use of a straw for aiding the technique; thank you for sharing!!
These look so fun, I’ll definitely have to try making them. And your own Twinkie forms to boot! Talk about being a resourceful girl…were you a Girl Scout as a child?! What I love most, though, is that you used a Penzey’s bottle. Love me some Penzey’s!
Haha, actually I was not a Girl Scout! But, I’ll take that as a compliment :) I also love Penzeys, so many great finds!
Love that you made a homemade version and perfect timing! :)
Yay. I never grew out of my love for Twinkies. Now I don’t have to hoard a supply regardless what happens. Thanks! :D
Michelle, I have tried twice before to make Twinkies but have been unsuccessful in filling them without having them explode! I’ve got the cream canoe pans and I ordered a Bismark pastry tip for my 2nd attempt, but that didn’t allow for enough filling so back to the drawing board. You seem to have solved the issue, so I will try again and hope that the third time is the charm! The back-up plan is Twinkie cupcakes!!
having made hundreds of homemade twinkies with the canoe pans, I agree with Michelles answer to filling (although i don’t find it necessary to ‘pre-drill’ the holes, perhaps because I use actual sponge cake and she says hers are a little more dense. I’ve found the key is to use the 3-punch on the bottom method – as used in the original – and you can feel the pressure in the cake as you’re holding it whilst piping the filling with the other hand. I do prefer pastry bags for this task because I’ve had ‘blow-outs’ with ziplock bags because of the interior pressure. When icing cookies or something else with no resistance, ziplock bags are awesome substitute piping bags – with no clean up because you just throw them away :) Do make sure you snip a corner from the bottom of the bag (not a corner with the ‘zip’ tip) for this, however.
Thanks for sharing.
I can only imagine how much better these are than the original. I wasn’t much of a fan, I was a Little Debbie girl too :)
I can not wait to make these! They look so good. I know my husband will love them.
You are just too smart. I love the homemade canoe “pan” idea.
I have canoe pans and am anxious to try these. Thanks so much for sharing the recipe.
I love your homemade *canoes* for the twinkies.
I had to laugh at this one because you are genius and this might be a twinkie I would actually eat, Michelle.
Crazy! I was just talking about homemade twinkies this past Saturday (Because of the Hostess Situation)! Never made them and was wondering how. . . Well, now I know! Thanks =)
Wow. Yum. These look great!
Look delicious .. I’ve never tasted them .. I think now it’s the time.
Thanks for sharing.
Kisses from Greece
Great recipe! Suzy Q’s could be next :)
we never had them much growing up, but when we did, OH MAN i loved them :) yours look so great!
These are so neat! They sound even better than the original!
I have never had a twinkie before Michelle, but pictures are tempting me to try them. I should defnitely make them for my daughter.
You are such a genius for making this! And to be honest, I actually never had a twinkie before in my life (it never appealed to me) but I’d devour these instantly!
I love Twinkies and did the homemade twinkie thing about a year ago and since the news hit about Twinkies last week, all of a sudden that post got popular again! Yours look *amazing* & so authentic..I’ll take a dozen :)
Too funny! I’m sure these are a million times better than the “real” ones anyway!
I must make these immediately. You could package them up and sell them on eBay for 5 grand each!