Goody Goody Bars

No matter the time of year, no-bake goodies are welcome in just about every kitchen. It’s great to have a few recipes that require very few ingredients (and which are likely to already be in your pantry), and 15 minutes or less to throw together. They’re the perfect go-to for a surprise after-school treat, for guests who are about to arrive on short notice, and the best reason of all… which is, of course, just because. Or no reason at all :) These no-bake bars require just six ingredients, can be mixed together in about 10 minutes, and will be ready to eat in 35 minutes after that. Definitely a back-pocket type of recipe!

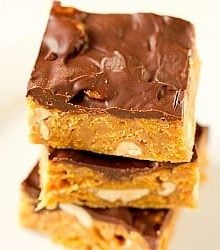
As if having a super easy, super fast, no-oven-required recipe wasn’t good enough, these are chock full of peanut goodness. The filling includes a healthy dose of peanut butter and chopped peanuts are mixed into the bars as well. The bars have a chewy, alllllmost nougat-type consistency, and are very reminiscent of a Baby Ruth candy bar.
Save This Recipe

The recipe as written below is how I followed it, however, when I make it again I think I’ll use 1½ to 2 cups of chocolate chips for the topping. I didn’t feel like the 1 cup was enough to adequately cover the bars. Aside from that, these are perfect – awesome consistency, great flavor, and easy – I can’t wait to whip them up again!

One year ago: Apple Cinnamon Bread
Two years ago: Cannoli
Four years ago: Quintuple Chocolate Brownies
Goody Goody Bars
Ingredients
- 1 cup (220 g) packed light brown sugar
- 1 cup (341 ml) light corn syrup
- 1 cup (258 g) creamy peanut butter
- 1 cup (146 g) salted dry-roasted peanuts, chopped
- 6 cups (168 g) cornflakes
- 1 cup (180 g) semisweet chocolate chips
Instructions
- Line a 9x13-inch baking dish with foil, allowing excess to overhang pan edges. Spray foil with nonstick cooking spray.
- Cook the brown sugar and corn syrup in a large saucepan over medium-low heat until sugar dissolves and the mixture is boiling, stirring constantly, about 5 minutes. Remove from heat.
- Off the heat, add the peanut butter and peanuts, stirring until the peanut butter is incorporated and the mixture is smooth. Add the cornflakes to the pot and stir until coated.
- Working quickly, scrape the mixture into the prepared pan. Using a greased spatula, press the mixture into the bottom and corners of the pan. Let cool completely at room temperature on a wire rack for about 1 hour or in the refrigerator for 30 minutes.
- Microwave the chocolate chips in a bowl at 50% power in 30-second increments, stirring after each, until melted and smooth. Pour the chocolate over the cooled bars and spread into an even layer. Allow the chocolate to cool, about 15 minutes (or pop the pan back in the refrigerator to speed up the process, it'll be set in 5-10 minutes). Using the foil overhang, lift the bars from the pan and transfer to a cutting board. Cut into squares.
Notes
Did you make this recipe?
Leave a review below, then snap a picture and tag @thebrowneyedbaker on Instagram so I can see it!


Wow! I made these as part of a dessert table for a wedding I catered for. These were incredible! I didn’t have corn syrup so I used golden syrup. This is the first time I’m commenting on a recipe, but I just had to. Thanks!
Just made these and they were delicious! I didn’t mix the cornflakes and corn syrup mixture quickly enough, or press the mixture into the pan as firmly as I should have, but it still came out delicious. For the chocolate topping I combined two neglected Easter bunnies, a bar of chocolate, and the remainder of a bag of chocolate chips. I’ve been storing the bars in the fridge (the chocolate would melt if left at room temp) and it’s kind of refreshing when eaten chilled. :) Next time I will consider swapping some of the PB for Nutella. …
Not only does that sound delicious, the pictures look mouthwatering! I think I need to make this now.
These look so good. Similar to the Peanut Butter Cup Bars. These could be the next ones on the list.
Do you think using salted coctail peanuts rather than dry roasted would work as well in these bars?
Yes I think those would work. In fact I was just a little short on the dry roasted peanuts and used salted cocktail peanuts for the remainder of the measurement. It was just fine!
I can’t believe I just found your blog! It’s great I totally love all the desserts you share with us! I dun really have an access to an oven right now so this recipe is great :D
I love your website! Your desserts are over the top amazing. Keep up the great work!
I am just about to make these! I have both regular and honey-roasted peanuts. Do you think I should still stick with the dry-roasted? Thank you for this easy recipe I know my family will love.
I honestly think you could use either. The honey roasted would probably be delicious :)
Thank you for your quick response! I decided to go with regular dry-roasted, only because I was bringing them to work and I didn’t want to mess them up! They were a big hit! Next time I will try honey-roasted and report back.
I’m resisting these…for the moment that is. Bookmarking! I’m such a sucker for peanut butter.
Baby ruth bars are one of my favorite candy bars, can’t wait to try these! I love that you add peanuts to these, I’ve made a couple different peanut butter bars before but have never added nuts, thanks for the recipe!
These were delicious :) I made them last night using rice krispies that I had on hand and instead of peanuts I used chopped mixed nuts and they came out great! I like them even better than rice krispy treats :) Thank you, Michelle!
Made these for my sons daycare and they were a huge hit!!!
Shocking how much these DO taste like a Baby Ruth candy bar! I thought they were yummy!
Ohmygosh, these bars look so good! They’re like a cross between toffee, peanut butter cookies, and a chocolate bar. Yum!
My Great Aunt used to make bars similar to these but with Special K. So yum! My mom made them for us this year and my husband has declared them his favorite. dessert. ever. One tip for melting the chocolate; after you get the peanut butter mixture in the pan and flattened, throw the chocolate chips on and then cover. Let it sit for 5-10 minutes. When you come back all the chips will be melted and you can spread them out in a nice layer. Less dishes is always a plus.
Oh my goodness these look great. I love how these are all ingredients I would have on hand. I’m going to try to hold off for summer when I try not to turn on my oven at all. I don’t have central heat and air so I try to enjoy the added benefit of my oven warming my house in winter :-)
I love the name of these! I can just see my daughter catching a glimpse of them and saying “Oh goody!”