American Sandwich Bread
Please note that I have since shared what I consider to be the best, most foolproof white bread recipe. I encourage you to head over to that recipe and give it a try!
Otherwise known as, white bread. I know, you’re probably wondering to yourself, isn’t this the umpteenth “classic white bread” recipe this chick has posted? Well yes, admittedly, I think this is now the third different loaf that I have blogged (there was the Better Homes & Garden version, then the Peter Reinhart recipe, and now this). It’s not that any of the previous loaves have been bad or have disappointed me in any way. It’s quite simply that I.LOVE.BREAD. I don’t come from the land of low carb, folks. And given the opportunity to try a new recipe when I need to restock the kitchen with a fresh loaf of bread, I run with it! And this loaf, let me tell you, is definitely worth running for!
One of the things I loved about this recipe is how quick it was to execute. Many people are intimidated by homemade bread, not only because of yeast, but also because of the time factor. Some believe that it will take the better part of a day to churn out a loaf of homemade bread. That’s just not true. Now granted there are recipes for complex loaves of bread that include sponges, starters, and three rises that can take a day or more, but for your basic loaf of white bread, just not so. Two hours after you start the process you can be pulling a loaf of fresh bread out of your oven.
Save This Recipe
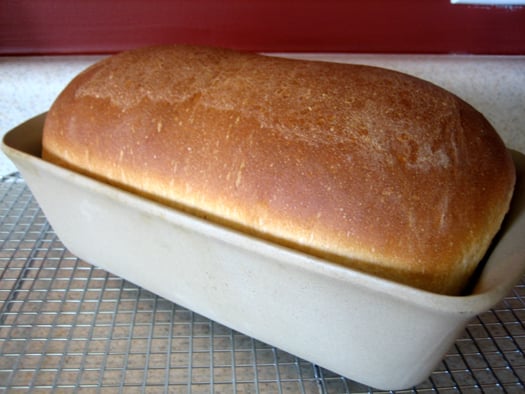
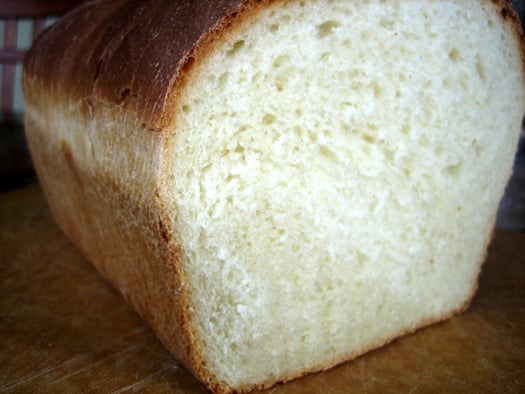
Another thing I love about this particular recipe is that you get a really high loaf of bread, which isn’t always the case when making a regular white bread. I have had my fair share of smallish loaves, and this one definitely turns in a nice change of pace. The key here it to let it go on its second rise until the dough is about an inch higher than the rim of the loaf pan. Then once in the oven, the loaf will gain even more height.
This round of bread making was not without incident, and there was almost a casualty. Now as any KA owner can attest, one of the beautiful things about these wonderful appliances is that you can throw in your ingredients and let it work while you tend to other things, such as cleaning up your mess. I do this often when creaming butter and sugar, and kneading bread dough. Both things take at least a few minutes, so I use the idle time to my advantage. Until today. My dough was kneading away on my island and I was putting my dirty utensils in the dishwasher when I heard the KA start to do a thump, which is not unusual when kneading. But then, 2 seconds later, it did a nose dive onto the floor! Luckily the little KA that could is just fine, the floor is fine, catastrophe averted. I have to wonder if perhaps my KA heard me talking behind its back about how I wish it would die so I could upgrade to a Professional 600 and figured it would help me by leaping to its suicidal death?
Regardless, we all survived the incident to bring you this wonderful bread recipe!
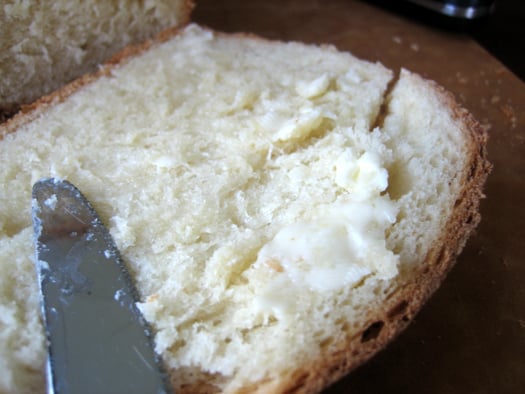
Quite possibly my favorite way to eat bread – slathered with butter. When I was younger, my grandma often quipped that I was the only person she knew who could make a meal from bread and butter. Not much has changed ;-)
American Sandwich Bread
Ingredients
- 3¾ cups (468.75 g) unbleached all-purpose flour, plus more for dusting the work surface, (18¾ ounces)
- 2 teaspoons salt
- 1 cup (244 ml) warm whole milk, about 110 degrees
- ⅓ cup (83.33 ml) warm water, about 110 degrees
- 2 tablespoons unsalted butter, melted
- 3 tablespoons honey
- 1 envelope instant yeast, (about 2¼ teaspoons)
Instructions
- 1. Adjust an oven rack to the lowest position and heat the oven to 200 degrees. Once the oven temperature reaches 200 degrees, maintain the heat for 10 minutes, then turn off the oven.
- 2. Mix 3½ cups of the flour and the salt in the bowl of a standing mixer fitted with the dough hook. Mix the milk, water, butter, honey, and yeast in a 4-cup liquid measuring cup. Turn the machine to low and slowly add the liquid. When the dough comes together, increase the speed to medium and mix until the dough is smooth and satiny, stopping the machine two or three times to scrape dough from hook, if necessary, about 10 minutes. (After 5 minutes of kneading, if the dough is still sticking to the sides of the bowl, add flour, 1 tablespoon at a time and up to ¼ cup total, until the dough is no longer sticky.) Turn the dough onto a lightly floured work surface; knead to form a smooth, round ball, about 15 seconds.
- 3. Place the dough in a very lightly oiled large bowl, rubbing the dough around the bowl to coat lightly. Cover the bowl with plastic wrap and place in the warmed oven until the dough doubles in size, 40 to 50 minutes.
- 4. Gently press the dough into a rectangle 1 inch thick and no longer than 9 inches. WIth a long side facing you, roll the dough firmly into a cylinder, pressing with your fingers to make sure the dough sticks to itself. Turn the dough seam-side up and pinch it closed. Place the dough seam-side down in a greased 9 by 5-inch loaf pan and press it gently so it touches all four sides of the pan. Cover with plastic wrap; set aside in a warm spot until the dough almost doubles in size, 20 to 30 minutes.
- 5. Keep one oven rack at the lowest position and place the other at the middle position and heat the oven to 350 degrees. Place an empty baking pan on the bottom rack. Bring 2 cups of water to a boil in a small saucepan. Pour the boiling water into the empty pan on the bottom rack at set the loaf onto the middle rack. Bake until an instant-read thermometer inserted at an angle from the short end just above the pan rim into the center of the loaf read 195 degrees, 40 to 50 minutes. Remove the bread from the pan, transfer to a wire rack, and cool to room temperature. Slice and serve.
- Note: This recipe uses a standing electric mixer. You can hand-knead the dough, but we found it’s easy to add too much flour during this stage, resulting in a somewhat tougher loaf. To promote a crisp crust,we found it best to place a loaf pan filled with boiling water in the oven as the bread bakes.
Did you make this recipe?
Leave a review below, then snap a picture and tag @thebrowneyedbaker on Instagram so I can see it!


Hi there!
Beautiful loaf! Just a quick question.. Can I partly substitute with whole wheat flour?What changes will I have to make?
THanks a ton for an awesome recipe
urmila
Hi there, If you use some whole wheat, you don’t need to make any other adjustments. Just go ahead and substitute (I would do more than 1/2).
I’m thinking you meant to say you would do “no” more than 1/2.
Correct, sorry about that!
Found your site and have bookmarked it for further use. One of the best ones I’ve found for the type of baking I’m wanting to do! Thanks so much for providing the information! Quick question though; I’m just starting my journey with homemade bread and I don’t really know what I’m doing. :D Normally I buy bread from the store, but I ran out and I’ve got yeast on hand.. but I don’t have whole milk. Can I substitute for 2%? How will that affect the bread? Thanks!
Hi Stephanie, You can use 2% milk, the whole milk just provides a bit more fat which creates more of a “creamy” crumb texture, but it would definitely still be more than okay with the 2%.
This worked perfectly! I never had homemade bread rise so high!! Thanks so much :)
I had never made bread before and I made this omg my family LOVED it my picky 5 year old ate half the loaf! Question tho is it easy to double or triple this recipe? Or should I stick with making 1 loaf at a time?
I have not attempted to double or triple the recipe, but it never hurts to try! If you give it a go I would love to know how it turns out.
I am so glad to have found this recipe as I was just saying to my husband yesterday that i would like to make my own white bread…but have not found a good recipe, that is until now!!
YEAH!!
I’ve got this bread in the oven right now and it smells SO GOOD! I cannot wait to eat it. Thank you, I’ve been looking for a good sandwich bread recipe for a while and trying to make more things at home to save money on groceries. This will go great with my homemade yogurt for breakfast this week!
Been wanting a good, solid one-loaf sandwich bread recipe and went looking the other day and found this site. Made TWO deelish loaves yesterday after not making bread since February. I opted to use all milk + no water, and used Clover honey for one loaf and Blackberry honey for the other, but noticed no flavor difference. I also used the 8″ loaf pans [I just grabbed what was on top] which produced a tall rise in the oven, w/o the steam. I did like your proofing in the oven idea.
Did my taste test afterwards w/ butter and my recently made strawberry jam, deeelish! Thanks for posting this recipe. :-)
I made this bread last night and boy howdy it was delicious! A friend asked me for the recipe so I googled it and found you! Beautiful pictures!
I had bread and butter for breakfast, and bread with butter and jam for lunch, so I know what you mean about living on buttered bread.
Oh.. but you should never speak ill of your KA! I absolutely love mine and tell her so often. She’s helped me make sooo many yummy things!
I just made this bread (my first attempt at homemade bread) and it turned out FABULOUS! The only thing I did differently is put the yeast in with the flour and salt instead of the liquid mixture. I made homemade cinnamon rolls a while back, and when I put the yeast in the “warm” milk, I think it was more like “hot” milk, and I killed it. My rolls never rose, but they still turned out yummy – just dense! This bread is currently baking and the smell is KILLING me! Thank you so much for the recipe – LOVE your blog!
I baked it. Amazing bread.Thanks.
(if you want to see it, http://brindusascheaua.blogspot.com/2011/01/paine-pentru-sandwichuri-sandwich-bread.html )
I made this last night and it was delicious. For the first time in my (short) bread baking career, I actually made a sandwich from homemade bread.
One question though: My bread didn’t get as high as I’d like. I had to make a couple substitutions, I used 2% milk instead of whole and I had to sub sugar for honey. I wonder if either of those had anything to do with it?
High five for homemade bread! The 2% milk and honey sub shouldn’t have caused any differences in the rise. I tend to let my bread do it’s second rise until it’s risen about an inch above the rim of the loaf pan to make sure it’s nice and high.
Thanks Chelle!
Ms. Foodie – I’m so glad that you enjoying this! As far as stoneware vs. metal, I’m not sure of the “technical” differences, but for me I find that the stoneware help to create a nice brown crust. If you decide to go with metal, I’ve heard that Williams Sonoma’s GoldTouch pans have gotten great reviews.
Thanks for the bread idea Chelle! I had a question about your loaf pans…what is the benefit of stoneware vs. metal? Thanks!
P.S. Readers of BEB, I made this bread the other day and it was fantastic!
wow, that is some NICE looking bread! Interesting about the stone bread pans, I need to find some new ones.
That bread looks so delicious! And I’m sure my Francis would love it too…the boy absolutely LOVES bread (well…bread, and cheese)…
I might have to make this for him to use as sandwich bread for next week for lunch!
This loaf looks absolutely beautiful! I love the height of it, and it is so very white. Carbs rock!
I LOVE homemade bread! This looks soooo good!
This looks delicious!!! I can only imagine how wonderful your house smells after this!
Wow, what an amazingly beautiful loaf of bread! I just want to take a bite of my screen. I love my stoneware loaf pans, I have two.
i love making bread to, my family likes potato bread, i’ve never made a white bread before but this looks so good i’m printing! thanks.
We all love when you make bread too!!!! I can almost smell it every time.
Oh also, if you don’t want to do the stoneware, America’s Test Kitchens recently gave the Williams Sonoma Gold Touch loaf pans their highest rating.
Hi Danielle – I do use stone loaf pans. The first loaf pans I received were 10″ pans, and as you can imagine, I had some problems turning out loaves that were “long and lean”. When I went to replace them, I received a lot of recommendations for the Pampered Chef stoneware loaf pans, so that is what I went with. I’ve been very happy with them!
Chelle–did you use a stone loaf pan for baking? i tried this loaf with a metal pan and it didn’t seem to work quite so well–thinking I may upgrade to a stone pan now! Great job as always!
Brooke, I guarantee you will fall in love with homemade bread! Please feel free to email me if you have any questions when you make the bread!
Okay, I am going to jump in the bread baking world. I’ll let you know when I make it…I hope mine looks as good as yours. Ditto on the moldy bread.
Thanks for the recipe! It’s printing right now, and I can’t wait to try it.
I love this bread! I seriously make it two or three times a week these days. It disappears quickly around here!
I will be trying this out in the next few days. It definitely beats buying a loaf at the store for $4 and then watching it get moldy. At least if I’m making my own bread, I’m spending significantly less and I don’t have to feel bad if it gets moldy.