American Sandwich Bread
Please note that I have since shared what I consider to be the best, most foolproof white bread recipe. I encourage you to head over to that recipe and give it a try!
Otherwise known as, white bread. I know, you’re probably wondering to yourself, isn’t this the umpteenth “classic white bread” recipe this chick has posted? Well yes, admittedly, I think this is now the third different loaf that I have blogged (there was the Better Homes & Garden version, then the Peter Reinhart recipe, and now this). It’s not that any of the previous loaves have been bad or have disappointed me in any way. It’s quite simply that I.LOVE.BREAD. I don’t come from the land of low carb, folks. And given the opportunity to try a new recipe when I need to restock the kitchen with a fresh loaf of bread, I run with it! And this loaf, let me tell you, is definitely worth running for!
One of the things I loved about this recipe is how quick it was to execute. Many people are intimidated by homemade bread, not only because of yeast, but also because of the time factor. Some believe that it will take the better part of a day to churn out a loaf of homemade bread. That’s just not true. Now granted there are recipes for complex loaves of bread that include sponges, starters, and three rises that can take a day or more, but for your basic loaf of white bread, just not so. Two hours after you start the process you can be pulling a loaf of fresh bread out of your oven.
Save This Recipe
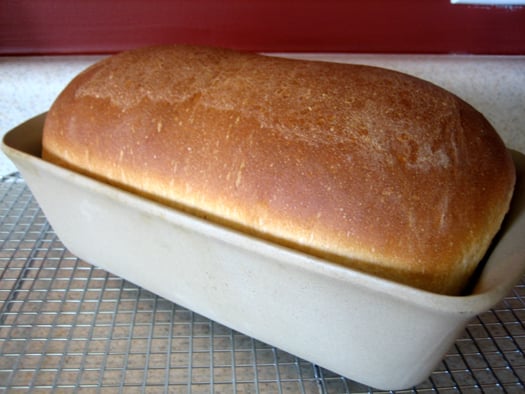
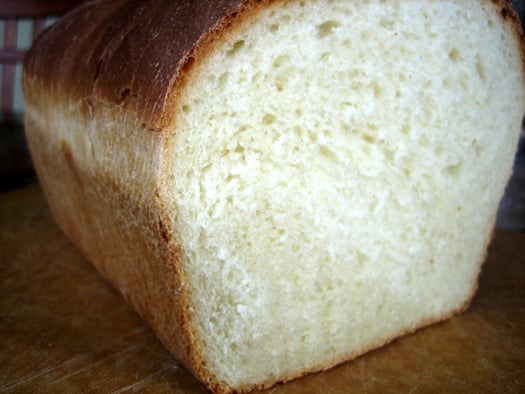
Another thing I love about this particular recipe is that you get a really high loaf of bread, which isn’t always the case when making a regular white bread. I have had my fair share of smallish loaves, and this one definitely turns in a nice change of pace. The key here it to let it go on its second rise until the dough is about an inch higher than the rim of the loaf pan. Then once in the oven, the loaf will gain even more height.
This round of bread making was not without incident, and there was almost a casualty. Now as any KA owner can attest, one of the beautiful things about these wonderful appliances is that you can throw in your ingredients and let it work while you tend to other things, such as cleaning up your mess. I do this often when creaming butter and sugar, and kneading bread dough. Both things take at least a few minutes, so I use the idle time to my advantage. Until today. My dough was kneading away on my island and I was putting my dirty utensils in the dishwasher when I heard the KA start to do a thump, which is not unusual when kneading. But then, 2 seconds later, it did a nose dive onto the floor! Luckily the little KA that could is just fine, the floor is fine, catastrophe averted. I have to wonder if perhaps my KA heard me talking behind its back about how I wish it would die so I could upgrade to a Professional 600 and figured it would help me by leaping to its suicidal death?
Regardless, we all survived the incident to bring you this wonderful bread recipe!
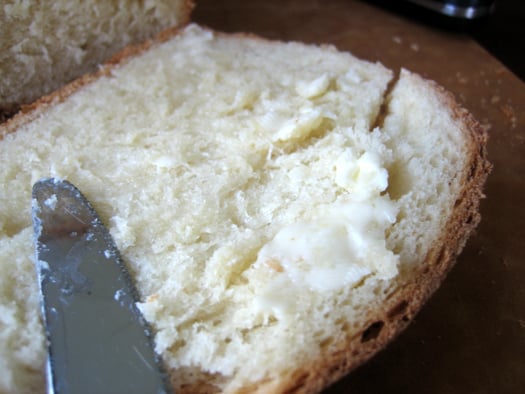
Quite possibly my favorite way to eat bread – slathered with butter. When I was younger, my grandma often quipped that I was the only person she knew who could make a meal from bread and butter. Not much has changed ;-)
American Sandwich Bread
Ingredients
- 3¾ cups (468.75 g) unbleached all-purpose flour, plus more for dusting the work surface, (18¾ ounces)
- 2 teaspoons salt
- 1 cup (244 ml) warm whole milk, about 110 degrees
- ⅓ cup (83.33 ml) warm water, about 110 degrees
- 2 tablespoons unsalted butter, melted
- 3 tablespoons honey
- 1 envelope instant yeast, (about 2¼ teaspoons)
Instructions
- 1. Adjust an oven rack to the lowest position and heat the oven to 200 degrees. Once the oven temperature reaches 200 degrees, maintain the heat for 10 minutes, then turn off the oven.
- 2. Mix 3½ cups of the flour and the salt in the bowl of a standing mixer fitted with the dough hook. Mix the milk, water, butter, honey, and yeast in a 4-cup liquid measuring cup. Turn the machine to low and slowly add the liquid. When the dough comes together, increase the speed to medium and mix until the dough is smooth and satiny, stopping the machine two or three times to scrape dough from hook, if necessary, about 10 minutes. (After 5 minutes of kneading, if the dough is still sticking to the sides of the bowl, add flour, 1 tablespoon at a time and up to ¼ cup total, until the dough is no longer sticky.) Turn the dough onto a lightly floured work surface; knead to form a smooth, round ball, about 15 seconds.
- 3. Place the dough in a very lightly oiled large bowl, rubbing the dough around the bowl to coat lightly. Cover the bowl with plastic wrap and place in the warmed oven until the dough doubles in size, 40 to 50 minutes.
- 4. Gently press the dough into a rectangle 1 inch thick and no longer than 9 inches. WIth a long side facing you, roll the dough firmly into a cylinder, pressing with your fingers to make sure the dough sticks to itself. Turn the dough seam-side up and pinch it closed. Place the dough seam-side down in a greased 9 by 5-inch loaf pan and press it gently so it touches all four sides of the pan. Cover with plastic wrap; set aside in a warm spot until the dough almost doubles in size, 20 to 30 minutes.
- 5. Keep one oven rack at the lowest position and place the other at the middle position and heat the oven to 350 degrees. Place an empty baking pan on the bottom rack. Bring 2 cups of water to a boil in a small saucepan. Pour the boiling water into the empty pan on the bottom rack at set the loaf onto the middle rack. Bake until an instant-read thermometer inserted at an angle from the short end just above the pan rim into the center of the loaf read 195 degrees, 40 to 50 minutes. Remove the bread from the pan, transfer to a wire rack, and cool to room temperature. Slice and serve.
- Note: This recipe uses a standing electric mixer. You can hand-knead the dough, but we found it’s easy to add too much flour during this stage, resulting in a somewhat tougher loaf. To promote a crisp crust,we found it best to place a loaf pan filled with boiling water in the oven as the bread bakes.
Did you make this recipe?
Leave a review below, then snap a picture and tag @thebrowneyedbaker on Instagram so I can see it!


I’ve made this so many times and turns out perfectly every time. Perfect!
Will 2% milk work for this recipe?
Hi Crystal, Yes that should be fine!
I would like to know suggestions for making this bread without a Kitchen Aid. Just my own two hands and the power they hold. Hehe
Thanks 🙂
Yes, you totally can! Just mix together with a wooden spoon and knead with your hands :)
Yes, I have used this recipe before (but through another website/book). Long time favorite in my house. Tender in crumb yet holds up well to PBJ/H or a sandwich slathered with mayo/mustard & meat. Also makes tasty croutons and french toast. Can “air dry” in oven and food process for a recipe needing a bread crumbs. Memorize this one, you will use it a lot!
I have made this bread on 5 different occasions over the last 3 months. Hands down, it is the BEST einkorn bread recipe and I have tried many the last 5 years. I did substitute buttermilk since I was out of regular milk and that loaf was so delicious. I have celiac disease and I do not react to Einkorn flour so I bake exclusively with Einkorn flour. The texture of this bread is comparable to regular bread and is not heavy like most Einkorn recipes. Just the right amount of sweetness from the honey. The most surprising thing was the incredible rise I got from this loaf. If you bake with einkorn for any amount of time, you know the rise is normally 1/2 that of normal wheat bread so I was pretty happy to actually get a full sized loaf of bread. This bread is very versatile and can be used for sandwiches, french toast or even cubed and dried to use for an einkorn stuffing recipe for the holidays. This will definitely be my main bread recipe from now on. HUGE THANKS!
I would like to try this recipe, but I don’t have a Kitchen Aid. Can I still make this bread? If so, tips on how to make it without a KA.
Thanks 🙂
Hi Kristina, Yes you definitely can! You can do it completely by hand!
All I can say is we love this recipe. A couple of months ago we decided to forgo the price of store bought bread and start making our own, Recipes from old cook books and off the internet were tried, but they just didn’t give us what we wanted. This recipe hit it on the head. It was easy to put together and using my old stand mixer to knead it helped with my arthritic hands. Today, we are making our second batch and will be making many more. Thank you, for your recipe.
I’m a baker, and this is one of the best bread recipes I’ve tried. Although bread is fairly easy, this was quick and straight-forward to make. I made it in my food processor instead with perfect results.
Hi can you please tell me what temperature oven you used in baking this bread?
Thanking you in advance Lynn
Step 5, 350* F. Be sure to place a pan of boiling water on the rack below the bread pan. This will keep the loaf moist when baking. To test for done-ness, use a digital thermometer it should read 190-195* F.
Best bread I’ve ever had in my life! I added Alton Brown’s recommendation to use a bit of the flour & water to make a roue, adding it to the rest of the wet ingredients. Outstanding.
I love making this bread recipe and it turns out perfect every time, and freezes very well after slicing. I run a microbiology blog and have a series on how microbes are involved in food. I have modified your recipe on my latest blog post if you are interested in taking a look. Happy baking :)
I would love to try this recipe! I grind my own grains to make flour. I have hard white wheat, soft white wheat, kamut and spelt grains. Do you have a recommendation on which or how much to use with this recipe?
Thanks!
Hi Sally, I am not familiar with grinding my own wheat, so I would recommend whatever you have that is the closest to an all-purpose flour.
I have made this recipe 3 times now. My recipe calls for 3 1/3 cup flour and is supposed to be the CI recipe. The rest is the same. Anyway, I have been making in it my Zojirushi Bread machine. So far, Perfect every time.
SOOOO impressed and finally found the recipe I have been searching for.
You mention “instant” yeast in your recipe. My jar says Quick Rise – is that the same. Also, do you let it proof when you put it in the warm liquids? Hoping your recipe will solve my “low” loaf problems.
Hi Jean, Yes, it is the same! And no, you do not need to wait for instant yeast to proof in this recipe.
I love your blog : all the more so since I too am a Brown Eyed Baker!!! Going to try the chubby hubby no bake bars this week!
We love this bread, we are eating strictly organic and I make this bread every week for our family!!! Thanks so much, everything you post is fantastic!
Really surprised how well this bread performed at altitude 8,200ft. I usually make the wonderfully easy No-Knead Bread recipe (my standby for flour/water/salt/yeast daily bread), but I needed something softer for good cucumber sandwiches. This rose beautifully, and the soft crumb was ideal. Only problem is that my husband wants me to make a lot more of this, but the other is better for us! Anyway, thanks so much for this recipe, which will stay in my files.
So you recommend all-purpose over bread flour for this recipe?
I used KAF unbleached bread flour – worked great. Then tried one version substituting 1 cup of wholewheat flour for white – that was great, too – just a little less rise.
Yes.
I found this post a year ago and since I was unable to make it then forgot about it and I’m so excited about your yeast bread list! My family loves fresh bread as well and all 7 of us devour a warm loaf with every meal it is served. Anyway! Since I got a bread machine in August I have been using that to make bread or at least making the dough. It recommends using bread flour for all breads, do you know what the difference would be for this recipe if I used bread flour instead of all purpose? Thanks!
Hi Sara, Bread flour has more protein, so if you substitute it your bread will likely turn out heavier and denser.
I am just starting out with learning how to make bread. This recipe was easy to follow and it turned out awesome! Thanks for sharing this!!
Oh, my goodness! I just finished baking my first loaf. This bread is incredible. Seriously so amazing. This was my first successful attempt at making homemade bread and everything worked out so well.
Here are two things I encountered during the baking process. I don’t have a stand-alone mixer but have a food processor. Since the flour level was high, I opted for old-fashioned plug in the wall beaters. Those were not sturdy enough, so I just handed kneaded the bread for 10 minutes. The other thing is that I also forgot to put butter in the recipe but the bread turned out just fine.
This will be my go-to bread recipe from now on. Thank so much for making an easy to read, easy to perform recipe. This turned out SO well.
Making this now and wondering why you suggested cling wrap on second rise. I did and it won’t come up over the edge of the pan this way. Now in the oven but has not risen any more. A bit disappointing. I hope it tastes okay. I will try again without the cling wrap on the second rise. Any alternative?
Hi Linda, I always use plastic wrap to cover my dough while rising (with any bread recipe), and I’ve never had an issue. If you feel like it stuck and it prevented the dough from rising, try spray it lightly with a non-stick cooking spray before covering.
I wonder if Linda is putting the plastic wrap tightly over the tin instead of loosely laying over the oiled dough only…?
I bake bread frequently always looking for the perfect Sammie bread……well, this is it. Slices beautifully, crust is perfect. This bread recipe Is pretty forgiving too as I have had to substitute sugar for honey at times….and today ran out of butter…go figure. I used cream cheese in its place with no problems. Awesome and thank you.
Just made this loaf at home. Wonderful! Best loaf i have ever made! Thank you so much.
I’m confused by all the different yeasts. This recipe calls for instant yeast and on the package it says instant rapid rise yeast only requiring one rise so I’m a bit confused why we are rising it twice for this recipe just the added benefit to get a bigger loaf maybe??? Thank you.
Ok I just followed the recipe and it came wonderful. Made no chaned at all. I use an oven thermometer. I think most used ovens are off a bit. That made a difference too. I mad 2 loaves the first was perfect the second I just shaped and did not roll. Mistake!!! Did not raise as well and was full of air. That what I get lol.
Hi Robin, I’m glad you enjoyed the bread! And yes, two rises will get you a bigger loaf of bread.
Just made this bread for the first time. I have been baking home made bread for over 40 years (off & on a bit). For the last 10 years or so I have been lazy & using a breadmaker, until it recently went to god. Was looking for a nice high-top recipe online & stumbled on this one. As I also recent managed to blow up my Kenwood Chef, I did complete hand kneading. The loaf came out a treat. It didn’t quite rise as high as I would have liked, but I think I may have made the dough a bit too dry, so will make it a bit wetter next time. But the crumb was beautiful, white & soft with very fine bubbles – not too different in texture to store bought sandwich bread. Came out of the oven about 30min ago & the family have just about knocked it all off – guess I won’t be having it on my sandwiches until I bake some more.
Heating the oven up to rise really helped. Mine came out almost identical to the pic
Oh my word! I have never baked bread in my life until today and let me just tell you this bread is AMAZING! It is super tasty and super easy to make. I didn’t have any whole milk so I used buttermilk and naturally, not being a baker, I didn’t have a stone bread pan so I used glass and shaved a little time off. I say, again… this recipe is PERFECT. If I could give it stars it would get 5 from me!
This bread is AMAZING. I have been searching – and I do mean SEARCHING – for an everyday bread recipe that I could make my go-to. This is it. Period. I used coconut milk and agave nectar because that’s what I had in the house and it was just delicious. Now to keep myself from downing the entire loaf before I can share it….. ha! Thank you, thank you!
Hi Michelle – your recent post on whole wheat bread got me thinking about trying to make homemade bread for the first time. I decided to start with a white sandwich bread for my first attempt and found this on your site. A couple of quick questions: You used stone loaf pans for this recipe but metal ones for the WW recipe – does it matter? (I only have metal.) Also, you used a baking stone beneath the pans in the WW recipe but did not use it here, again, does it matter? And, how do you heat your milk and water (stovetop, micro, steamer)? Last, do you still love this recipe or are you preferring the WW one now? Thanks in advance!
Hi Kristin, The type of loaf pan does not matter, however, if yours are a dark non-stick, you will need reduce the oven temperature by 25 degrees. You should use the baking stone for the whole wheat bread recipe, as it help to set the bottom crust. It’s not needed for this recipe. The water I just get hot from the tap, and if it’s too hot, I let it cool to the correct temperature. Milk I warm in the microwave, stirring every 20 seconds or so. I honestly can’t really compare a wheat bread recipe and a white bread recipe – to me, they’re like apples and oranges. This is by far my favorite white bread recipe, and the whole wheat bread recipe I just made is my favorite among the wheat breads I’ve made.
Thanks Michelle! I pulled the trigger and made it today….followed the recipe to a “T” and everything turned out perfectly! I had to hold back my 3 teens from opening the oven as the smell was calling to them all morning :) We just returned from a couple weeks in Austria/Germany and our copious daily fresh bread consumption is what inspired this entry into “real” bread making. Just had a warm slice with Nutella – DIVINE. Thanks again!
Question, I have recently been into making bread-always loved carbs and I really would like to replace store bread with something I can make. I decided I wanted a bread machine to assist my goal, I haven’t tried this recipe yet but am super excited to, before I get hooked on it though, any advice on how to use this recipe in a bread machine? I won’t actually have it for about a week and a half (hubby is going to buy it for my birthday :)) thanks in advance!
Hi Sara, I’ve actually never used a bread machine, so unfortunately I don’t have any good advice. I would just go according to the manufacturer’s instructions.
Well it’s now July 20, 2014 and I just came across this bread recipe on your site. I just LOVE the smell of making and baking bread. I’ve never been a big bread eater (I think some degree of this wheat allergy has always been in me, it’s just that it wasn’t to the severe level yet and I didn’t recognize the allergy) although there is very little better in life than a slice of warm, homemade white bread with some nice butter (also homemade at times) and spread with a generous layer of Apple Butter. WOW, is THAT good. That’s also one of my dad’s very favorite things but since he developed Type II Diabetes he can’t enjoy these types of treats very often. We’ve discovered that regular white flour will really elevate his blood sugar levels while whole wheat flour only does a fraction of the amount. This is why my mom usually cooks with whole wheat pasta. And finally, worst of all, I can’t enjoy normal bread AT ALL since I was diagnosed with Celiac Disease and I just haven’t made myself start making gluten free bread yet. I hate to think of buying all those odd, weird flours. I recently bought the bread and pizza crust blend of the new gluten free flour substitute called Cup4Cup. I guess making bread is going to be just like my cake baking, I can bake it for others, I just can’t eat it myself. So…..six years have passed since the original posting and your KitchenAid mixer tried to commit suicide. Were you ever able to upgrade and get the larger mixer? I’ve been lucky, when my parents bought me my KitchenAid stand mixer they must have been in a fog and not thinking as they bought me the smallest one they make, the 4-1/2 size bowl. Me, who does more baking in a couple of weeks than anyone else in my family does in a year. But yet, when my dad bought one for my mom, he got her the largest one they make, and she doesn’t do very much baking, not enough to need that anyway. Well, about a year ago when I was talking about buying myself a new larger mixer my mom decided to give me her LARGE stand mixer. It is SO nice when I make my frosting to decorate cakes. I use a recipe given to me by a friend and I often double or even triple it. It filled my small one almost to the rim, so did my cheesecake recipe I make from Martha Stewart and I get a fair number of orders for those. I now have two mixers going every so often. THIS is SO nice when having to make these large 14, 16, or even 18 inch cake layers. THEN, about a month ago I was at an auction where I believe they were selling the estate of a woman who must have passed away or gone into a home. This person apparently was a collector and everything they had was in pristine condition. I was able to get another KA stand mixer for FORTY DOLLARS! It’s just a 5 quart but that’s fine. It even included all the accessories that come with it in the different beaters, the bowl, EVEN the cover. It probably has 10 years or more on it but with KA, that doesn’t matter, it’s perfect. So now I have THREE.. My mom has a good many of the attachments which I haven’t brought home yet, I need to get those. I need to discover if she has the pasta maker as I want to get that to roll fondant. (and also make my own gluten free pasta and whole wheat for my dad). So now, with your latest good news, if you haven’t upgraded, now is the time to ask for one since you will be baking and cooking for even more in your life. And of course, you’ll want to make your own homemade baby food, right? Have a great day, so far it’s rather dreary, cloudy and gloomy here in my area near Camp David. For the first time since Thanksgiving Obama and his family were there, we had fighter yets and helicopters flying over us most of the weekend. At least they don’t fly as low as they did right after 9/11 and shake the house. They once flew so low over my brother while driving his truck on a road it nearly shook him off the road.
I did get a larger mixer! My husband bought me a 6-quart model for Christmas five years ago (we were just dating then) – it’s amazing!