Egg Bagels

A few weeks ago I realized that I hadn’t made bagels in a few months and that I was long overdue for whipping up a batch. I asked my Chief Culinary Consultant if he wanted Cinnamon Raisin Bagels (his favorite), plain bagels or something different. He mentioned that he’s always been a fan of egg bagels and wouldn’t mind if I were to tackle a batch of those. I love getting ideas for new things, and jumped at the chance to make them. I ran into a problem, however, after poring over every cookbook I own and realizing that none of them had a recipe for egg bagels. I turned to the web and found multiple recipes that were all very, very similar, so I gave it a shot and they were okay, but certainly didn’t live up to the standard I was used to, which were all variations on Peter Reinhart‘s basic bagel recipe. A light bulb finally went off and I emailed Peter to see if he had a recipe for egg bagels that perhaps hadn’t been published, and he was wonderfully generous with his time and explained to me how I could adapt his basic recipe for bagels to make egg bagels.

To sum things up, Peter basically stated that I should add 1 egg (or just 1 yolk for a richer egg bagel, which is what I chose to do) per 1 cup of flour. Since eggs have water content, there needs to be an adjustment of the water that goes into the recipe. As a general rule of thumb, each whole egg contains 1.5 ounces of water, while yolks contain about 0.5 ounce of water. Given those guidelines, I made the adaptation to his original recipe and have shared it below.
Save This Recipe
The bagels turned out absolutely fabulous! My Chief Culinary Consultant said that while the cinnamon raisin bagels are still his favorite because he loves the flavor, that these egg bagels were, without question, the best bagels I have ever made in terms of texture and traditional bagel flavor. High praise, indeed! A great big thank you to Peter for taking the time to help me create this recipe!!
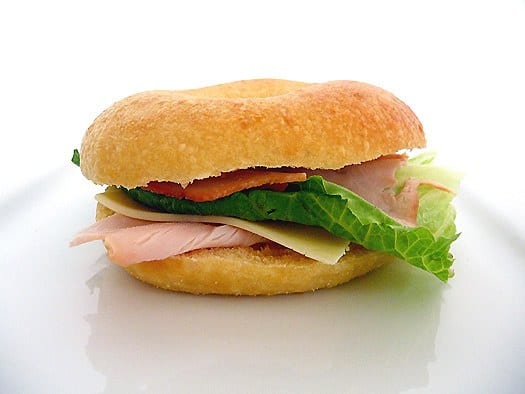
While I was looking around the cyber world for egg bagel recipes, I read that egg bagels topped with poppy seeds are traditional Jewish fare, which is something I didn’t know. In an attempt to be authentic, I made half of the bagels “regular” plain egg bagels and topped the other half with popppy seeds. Both were phenomenal – the poppy seed egg bagels were great with cream cheese, and the egg bagels were fantastic as typical bagels and also made awesome sandwiches!
1 year ago: Apple Hand Pies
2 years ago: Brown Sugar Raisin Bread

Egg Bagels
Ingredients
Sponge:
- 1 teaspoon instant yeast, (.11 ounce )
- 4 cups (500 g) unbleached high-gluten flour or bread flour, (18 ounces )
- 2 cups (500 ml) water, at room temperature, (16 ounces )
Dough:
- ½ teaspoon (0.5 teaspoon) instant yeast, (.055 ounce)
- 3¾ cups (468.75 g) unbleached high-gluten or bread flour, (17 ounces )
- 8 egg yolks
- 2¾ teaspoons (2.75 teaspoons) salt, (.7 ounce )
- 2 teaspoons malt powder OR 1 Tablespoon dark or light malt syrup, honey or brown sugar, (.33 ounce )
To Finish:
- 1 Tablespoon baking soda
- Cornmeal or semolina flour for dusting
- Poppy seeds, optional
Instructions
- 1. To make the sponge, stir the yeast into the flour in a 4-quart mixing bowl. Add the water, whisking or stirring only until all of the flour is hydrated. Cover the bowl with plastic wrap and leave at room temperature for approximately 2 hours, or until the mixture becomes very foamy and bubby. It should swell to nearly double in size and collapse when the bowl is tapped on the countertop.
- 2. To make the dough, in the same mixing bowl (or in the bowl of an electric mixer), add the additional yeast to the sponge and stir. Then add 3 cups of the flour, the egg yolks and all of the salt and malt. Stir (or mix on low speed with the dough hook) until the ingredients form a ball, slowly working in the remaining ¾ cup flour to stiffen the dough.
- 3. Transfer the dough to the counter and knead for at least 10 minutes (or for 6 minutes by machine). The dough should be firm, stiffer than French bread dough, but still pliable and smooth. There should be no raw flour - all the ingredients should be hydrated. The dough should pass the windowpane test and register 77° to 81°F. If the dough seems too dry and rips, add a few drops of water and continue kneading. If the dough seems tacky or sticky, add more flour to achieve the stiffness required. The kneaded dough should feel satiny and pliable but not be tacky.
- 4. Immediately divide the dough into 4½-ounce pieces for standard bagels, or smaller if desired. Form the pieces into rolls.
- 5. Cover the rolls with a damp towel and allow them to rest for approximately 20 minutes.
- 6. Line 2 sheet pans with baking parchment and mist lightly with spray oil. Proceed with one of the following shaping methods:
- 6a. Poke a hole in a ball of bagel dough and gently rotate your thumb around the inside of the hole to widen it to approximately 2½ inches in diameter. The dough should be as evenly stretched as possible (try to avoid thick and thin spots).
- 6b. Roll out the dough into an 8-inch-long rope. Wrap the dough around the palm and back of your hand, between the thumb and forefinger, overlapping the ends by several inches. Press the overlapping ends on the counter with the palm of your hand, rocking back and forth to seal.
- 7. Place each of the shaped pieces 2 inches apart on the pans. Mist the bagels very lightly with the spray oil and slip each pan into a food-grade plastic bag, or cover loosely with plastic wrap. Let the pans sit at room temperature for about 20 minutes.
- 8. Check to see if the bagels are ready to be retarded in the refrigerator by using the "float test". Fill a small bowl with cool or room-temperature water. The bagels are ready to be retarded when they float within 10 seconds of being dropped into the water. Take one bagel and test it. If it floats, immediately return the tester bagel to the pan, pat it dry, cover the pan, and place it in the refrigerator overnight (it can stay in the refrigerator for up to 2 days). If the bagel does not float, return it to the pan and continue to proof the dough at room temperature, checking back every 10 to 20 minutes or so until a tester floats. The time needed to accomplish the float will vary, depending on the ambient temperature and the stiffness of the dough.
- 9. The following day (or when you are ready to bake the bagels), preheat the oven to 500°F with the two racks set in the middle of the oven. Bring a large pot of water to a boil (the wider the pot the better), and add the baking soda. Have a slotted spoon or skimmer nearby.
- 10. Remove the bagels from the refrigerator and gently drop them into the water, boiling only as many as comfortably fit (they should float within 10 seconds). After 1 minute flip them over and boil for another minute. If you like very chewy bagels, you can extend the boiling to 2 minutes per side. While the bagels are boiling, sprinkle the same parchment-lined sheet pans with cornmeal or semolina flour. (If you decide to replace the paper, be sure to spray the new paper lightly with spray oil to prevent the bagels from sticking to the surface.) If you want to top the bagels, do so as soon as the come out of the water.
- 11. When all the bagels have been boiled, place the pans on the 2 middle shelves in the oven. Bake for approximately 5 minutes, then rotate the pans, switching shelves and giving the pans a 180-degree rotation. (If you are only baking 1 pan, keep it on the center shelf but still rotate 180 degrees.) After the rotation, lower the oven setting to 450°F and continue baking for about 5 minutes, or until the bagels turn light golden brown. You may bake them darker if you prefer.
- 12. Remove the pans from the oven and let the bagels cool on a rack for 15 minutes or longer before serving.
Did you make this recipe?
Leave a review below, then snap a picture and tag @thebrowneyedbaker on Instagram so I can see it!


I haven’t ever tried to make bagels but I have been wanting to. Thanks for this recipe.
I made them…your directions were awesome, although I did have issues with the sponge (as anna commented above) and thought I was doing it wrong. They were good enough that I’ll be trying them again…I wasn’t satisfied with the inside texture – they seemed, for lack of a better word, grainy. Anyway, I blogged about it and linked back to you ’cause I was so stoked that they turned out. Thanks again.
http://nagle5.blogspot.com/2009/11/egg-bagels.html
This will be my first time to make bagels. Wish me luck! Thanks for sharing.
I just made Peter’s bagels for the first time a couple of weeks ago. Now I want to try out this version! They look perfect.
delicious! much much better than the ones you buy, they really look amazing, well done, cheers from london,
I haven’t made bagels in a few years, but looking at this may inspire me to make them again soon. I’ll probably be sticking with cinnamon-raisin ones, however, as they’re a flavour not available here. A few years ago, however, there were no bagels at all, so it’s slowly improving. Now I just need strawberry cream cheese…
Anna – You really do add 2 cups of water to 4 cups of flour. Since this is an adaptation off the original recipe and some water is withheld to account for the egg yolks, you are right – it will be thicker than pancake batter. I will adjust the recipe so that it reads correctly. Thank you for your comment!
I LOVE bagels. I suppose that’s because I grew up in a house that was never without bagels. (When I go home, there’s always about 2 dozen bagels in freezer NO MATTER WHAT!)
I’ve been meaning to try making bagels for years now, but I’ve never got around to it. Maybe home made bagels (or perhaps a trip to NY, NY) will convince my goy boy that they really are one of the best foods in the world.
Woooow I always wanted to make my own bagels! it looks so yummy :)
Wow – these look awesome! I haven’t tackled bagels yet – I’m nervous about it! I keep readig blog posts that look wonderful though, so I’m building up my courage.:)
I’m so glad to have another recipe for bagels! I don’t like the one I’ve made, despite repeated attempts, too chewy throughout. I’ll try making these instead. So smart of you to ask Peter directly!
one of these days I shall attempt making bagels…if for no other reason than to make a great sandwich like the one you have
For the sponge, you really add only two cups of water to four cups of flour?? It doesn’t come out like pancake batter at all.
Do you only had some of the flour?
OK so I have never heard of an egg bagel. Or at least don’t think I have. But I have to say that your bagels came out great. It is something that I will have to try. There is nothing like a fresh bagel!
Those bagels look totally fantastic!
great looking bagels! you can tell their richness from the yellowing due to the yolks. i’ll definitely add this to my future recipe attempts – thank you!
Oh, how perfect and wonderful looking! Could I please have one of those sandwiches…yum!
Enjoy!
This is lovely. I love bagels and I hope to give these a try soon. (And convince my hubby to buy me this book.)
wow they look good.
Check out my food blog and tell me what you think:
http://thegodscake.wordpress.com
Michael
Hi Steph – I have never made a baked apple bagel, but that sounds delicious!!
easily my most favorite bagel in the whole world. its best lightly toasted with american cheese melted on each half under the broiler-yum! thanks for inducing such delicious memories with your egg bagel accomplishment!
mmmm delicious!! have you ever made a baked apple bagel?? They make them at a store here and I love them!!
i love bagels! one thing i really hate those grocery store ones is some of them can be very tough! i love how soft yours look!
Very very beautiful bagels. Awesome job!
I’ve always wondered how to make egg bagels using his recipe, since that is what I always use to make my bagels. Thanks so much for posting this!! :-)
I have never made my own bagels- never even given it a thought…now you have me wanting to give it a try.
I’ve never made egg bagels. These ones look great.
yumm! i still haven’t felt brave enough to try making bagels myself. yours turn out so pretty! i guess i’m worried that mine are going to look funny. i’ll definitely give this recipe a try!
Looks Awesome!!
Wow these bagels look great! I like the idea of making bagels at home. I will have to try it. :)