How to Decorate Cookies with Royal Icing
Welcome to the first in what I plan to be a recurring “How-To” series here on Brown Eyed Baker. While recipes are all well and good, there are some techniques that are best explained in a step-by-step method, with pictures included (at least this is how I learn best). As I was decorating my Stanley Cup Playoffs cookies last week I thought that doing a tutorial on how to decorate cookies with royal icing would be a great first How-To post.

I was always very good at baking snowmen, Christmas trees, angels and the like in December, slapping on some buttercream, a few sprinkles and calling it a day. Not that it isn’t good. It is definitely good. But then royal icing came onto my radar. The possibilities seemed endless – a completely smooth finish to the cookies and intricate designs? Now THAT looked fun! I’m here to guide you on a step-by-step tutorial on how to achieve any design you want on any shape cookie. Ready? Let’s begin!
Step 1: Find a Good Sugar Cookie Recipe
This might seem obvious, but not all sugar cookie recipes stand up well to heavy-duty decorating. If you don’t already have a favorite, let me point you to mine: Dorie Greenspan’s All-Occasion Sugar Cookies. They’re incredible.
Step 2: Cool Cookies Completely
Again, maybe elementary, but we’re going step-by-step here. You can’t decorate cookies that have just come out of the oven. Or even cookies that are slightly warm. They need to be completely cool before you can move on to decorating.
Step 3: The Equipment
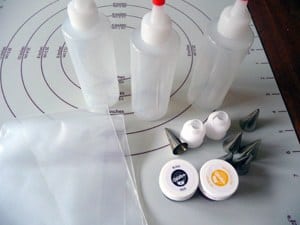
Now, you don’t necessarily need fancy equipment for decorating with royal icing, but investing in just a few decorating tips and couplers, some disposable pastry bags and squeeze bottles will make your cookie decorating experience exponentially more pleasant. Here is a run-down of what I typically use:
♦ 12″ disposable pastry bags. So easy to just throw away when you’re done instead of washing them!
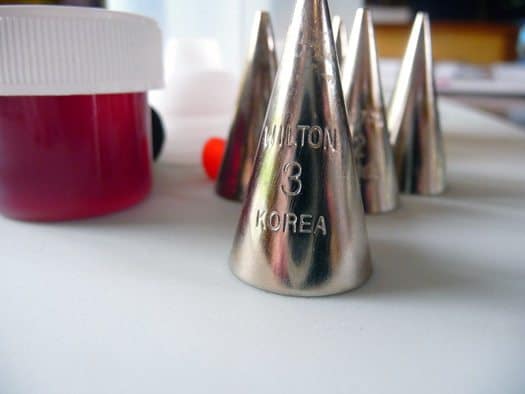
♦ Decorating tips. For outlining the cookie I use a #3 tip and anything from a #1 to #3 for intricate designs on the cookie. It’s not a bad idea to have a few of each number, as I find myself using them a lot.
♦ Couplers. These make it easy to switch the size tip you are using in the same color.
♦ Squeeze Bottles. I use these for flooding my cookies. Since the royal icing is very thin at this point, it’s a much neater alternative to a cut-open pastry bag. Plus you can put the cap on and save any extra icing for next time.
♦ Small bowls or Tupperware (to color your icing)
♦ Toothpicks.
Step 4: Prep, Prep, Prep!
This got me the first time I decorated with royal icing, and is especially important if you are going to be using multiple colors and different tips. I flew by the seat of my pants and ended up making a huge mess, it took twice as long as it should have, and I was trying to fish used tips out of pastry bags to re-use them somewhere else. Your plan of action:
♦ Write down how many different colors you will be using and take out that many pastry bags and couplers and prepare them. Also figure out what size decorating tips you will be using and fit them to the pastry bags.
♦ If you don’t have squeeze bottles for flooding, add additional pastry bags for however many colors you will use for flooding, in additional to the bags of that color you will use for detail work (if any).
♦ Have your icing colors ready and as many small mixing bowls (Tupperware works great for this) as you have colors planned.
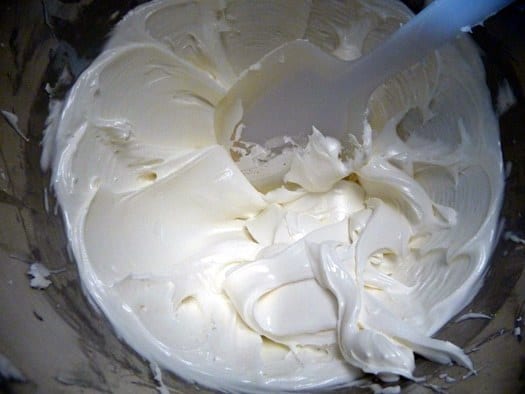
Step 5: Make the Royal Icing
The recipe for royal icing is very simple:
Save This Recipe
4 cups powdered sugar
2 tablespoons meringue powder
6 tablespoons water
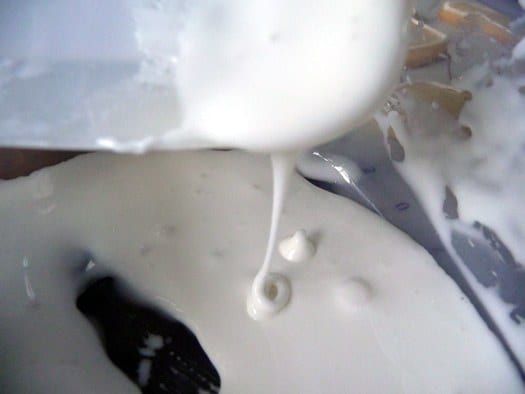
Mix all ingredients on low speed for 7-10 minutes or until the icing loses its shine. Add more water by the teaspoon if it appears too stiff. At this stage you want to be able to pipe it easily:
Step 6: Color the Icing
Divide the icing into your containers based on how much you will need of each one. Proceed to color the icing and then cover each container with a damp paper towel. It is key when working with royal icing not to allow it to dry out.
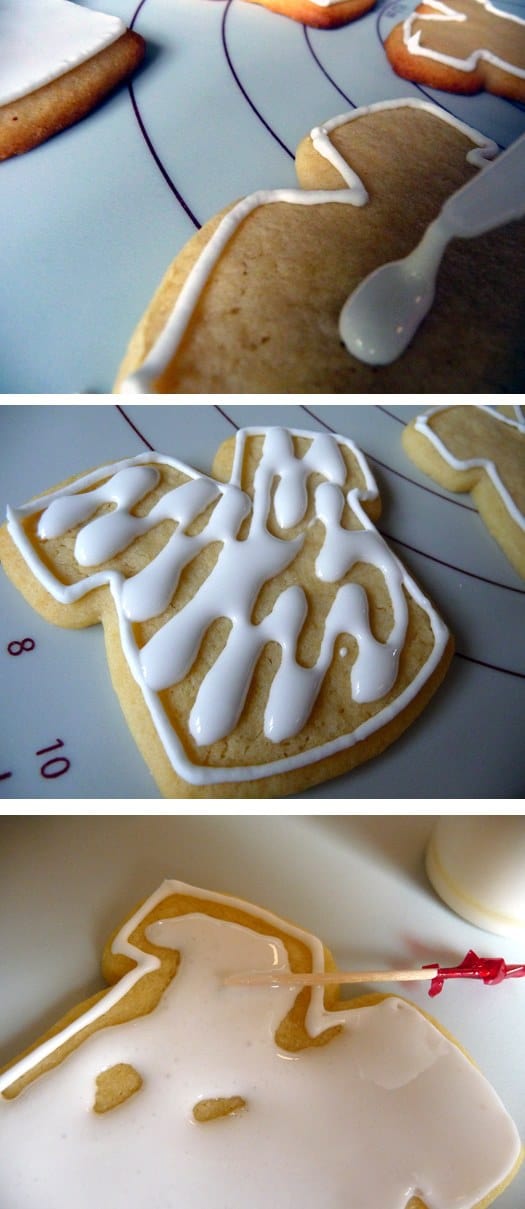
Step 7: Outline the Cookies
You will want to outline the cookies with whatever color you will be using to fill them in with. Place some of the icing into a disposable pastry bag fitted with a #3 tip and outline the outside of the cookie. I find that keeping the tip about ½-inch above the cookie while moving it allows the icing to lay on the cookie more easily.
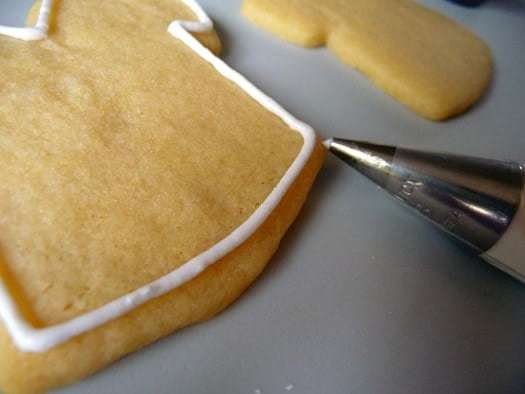
You’ll want to make sure that the outline is pretty well set before moving on to flooding the cookies, but I generally find that by the time I am done outlining the first ones are already dry.
Step 8: Flood the Cookies
Take whatever color you are using to fill in the cookies and slowly start adding a few drops of water at a time, until the icing reaches an almost liquid consistency. The test here is to pick some icing up with a spoon and let it drizzle back into the bowl – the drizzle should disappear into the bowl within 10 seconds. Once you have achieved this, you are ready.
Either fill a squeeze bottle with the thinned icing or transfer it to a disposable pastry bag with a ¼-inch hole cut off the end.
Now squeeze in the icing to almost completely fill the inside the cookie.
Then take a toothpick and gently use it to distribute the icing to any empty spots.
Once you are done the cookies need to dry completely before moving on to any intricate piped designs. Some bakers will let them sit overnight but I generally find that a 2-3 hour rest will do the trick.
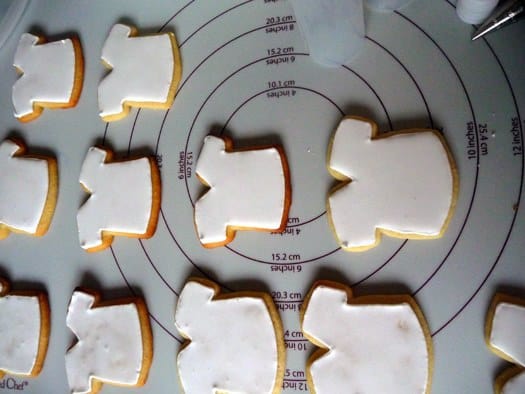
Now use whatever colors and tips you’d like to achieve the design you want!

♦ ♦ ♦
Was this helpful? I’d love your feedback on this post since it’s the first of its kind on Brown Eyed Baker! Any questions or additional tips to share?
What do you want to learn? I’d love to hear what you would like to see featured in the How-To series. A reader has already mentioned that she’d like to see a tutorial on baking bread with yeast. What’s on your list?
![]() Don’t forget to subscribe to the Brown Eyed Baker RSS feed to ensure you don’t miss any upcoming posts!
Don’t forget to subscribe to the Brown Eyed Baker RSS feed to ensure you don’t miss any upcoming posts!


Hi Elizabeth,
You can definitely use the schedule that you outlined – your cookies will be perfectly fine by Saturday. Once they are decorated and dry you can store them in an airtight container. Mine have stayed for up to a week.
have you ever frozen them before? i am doing them for a first communion party and i am trying to get some food done ahead so i can spend more time cleaning closer to the party…
never mind, i just looked at the other post where this is linked to. it says 2 months. thanks for such a great tutorial! i am excited to try this way -i too have cookies that look like a 2 year old decorated them…
Hi Missy, Just wanted to clarify that you should not freeze them after you have frosted and decorated them – the icing will bleed when it thaws. You can freeze the plain, undecorated cookies, but they should only be decorated within a few days of serving. Enjoy!
thanks so much! i did catch that in the other post! about to get started baking now!
Hi Susan,
I use Wilton food coloring gel for my icing coloring. The red and black can definitely be tricky – you need to use quite a bit of it to get the full color. Also keep in mind, though, that the colors of the icing will typically darken a bit over the course of a day or so. I hope this helps!
Thank you for posting such great instructions! The photos are perfect!!
How long do the cookies stay good for? I was planning on making some cookies for an open house that I am going to on Saturday and was just wondering when I should start to make them in order for them to be dry/ready by Saturday evening. I was thinking of baking on Wednesday evening, flooding them on Thursday evening and then finishing the decorations on Friday evening. Will the cookies be stale by Saturday?
Great tips! Thanks! :D
Your tutorial was great….and the royal icing recipe has worked great. What type of food/icing coloring do you use? I just purchased the wilton icing coloring and I can’t seem to get certain colors to brighten up (ie. my red looks like fushia). Thanks again!!
Thank you, thank you, thank you for sharing this information!! I am so happy to know how to do this now!!!
WHOA. That’s too weird! I just happened across this from a link on your onesie cookies. I JUST made 20 football jersey cookies and colored them tonight! I was planning on adding the kid’s numbers to the jerseys tomorrow really early so that they are dry for their football party tomorrow :0) Great tutorial!!
Good morning, Happy late Halowen(: !!
Thanks so much Michelle. You were right on sugar.. I was not using the fine powdered sugar. I did another batch with icing sugar and it came out perfect.
Hi Tania – The type of sugar that should be used for the royal icing is powdered sugar, which is softer and finer than granular sugar. What type of sugar did you use? Not using powdered sugar would be a reason why it looked a little “crusty”. I hope this helps!
Hi Emily – You hit the nail on the head – thinning the icing too much to flood the cookies will definitely cause a lot of little bubbles. It has definitely happened to me before. That would also be why they took a long time to dry, breached the dam and weren’t a deep enough color. I hope you’re not discouraged and I’ll give the cookies another shot!
Hi, I made the cookies and followed the above recipe and instructions for icing them. They looked good, but not the way in picture. I mean, my icing after drying, was not very shiny and smooth. It looked smooth while wet, but was little crusty after drying. What do you think I must be doing wrong? Do you use some very fine sugar for it?
Also, my cookies took forever to dry. My last night batch is still drying.
can you please advice where I could be doing wrong. Thanks!
Thank you so much for such GREAT instructions! I do have a question though–I followed your directions, but I think I thinned my “flooding” icing a little too much. The cookies took forever to dry, some icing breached my “dam” and most importantly, tiny bubbles were in all of them, and did not go away upon drying. Will thinning the icing cause these bubbles? I didn’t even shake the icing in my squeeze bottle so I can’t imagine where so many bubbles came from! Also, I was using very light colors and I added more “flooded” icing when they started drying a little and I felt I could still see cookie showing through the icing. I know now that was overkill–well let’s just say I learned A LOT just trying this out on my own! But the bubbles are my major concern. Any ideas?
thank you So much! i have always wanted to decorate cookies but have never known how. i’ve even asked others but never gotten a response. i can’t wait to try with you step by step instructions.
Late to the party here but honestly this post just rocks!!!! I have been baking for y e a r s and have not had great luck with Royal Icing and cookies. Should have been obvious to thin the icing you flood with but nooooo never read it anywhere nor saw it demonstrated! Thank you, Thank you!!!! Keep up the great work! Meesh :D
Beautiful job! My husband is also impressed with the jerseys and wishes there were some Chiefs ones lying on the countertop right now. (I told him they should win first, which didn’t go over well.) Anyway, thanks for the tutorial. It’s very helpful!
Great step by step instructions. Now I can achieve the professional look I have searching for. I make cookies for the local highschool football team every week and have been looking for this sort of instruction so I can make personalized cookies for each team member. Thanks for sharing your experience.
Hi Linda,
So glad you found this helpful! These cookies are absolutely edible! The royal icing dries smooth and hard. I have never used this recipe to make cookies on a stick, so I can’t attest to that, but if you try it definitely stop back and let us know how it turns out!
Does this sugar recipe that you use, can be used for making cookies on a stick? This is something I am excited to try, but need a good cookie recipe.
I have used a sugar cookie recipe out of the old Better Homes and Gardens cookbook for 35 years. Don’t leave out the orange zest. Everyone loves the subtle flavor. If you can’t find it, send me an email and I’ll get it to you.
Thank you for having step by step, found this very helpful compared to other sights.
Do the cookies with royal icing get really hard to eat & are they edible?
Suzanne – I’m glad this tutorial was timely and useful for you! I recommend the gel coloring, as the liquid can tend to affect the consistency and taste too much. I use Wilton brand, and have also heard good things about Ateco.
Thanks for the wonderful tutorial! I want to make sugarskull cookies for a Halloween party and this tutorial is just what I have been looking for since I had no idea on how to go about decorating them. You make it sound very easy! Do you recommend a certain type of coloring such as liquid or gel?
Thank you X 100! This is a fantastic tutorial.
Hi Debbie – I’m thrilled that this post has given you the courage to do decorated cookies for a baby shower! I can’t wait to hear how they turn out!
Loved your detailed instructions and photo illustrations. I want to make sugar cookies for an upcoming baby shower. You’ve given me the courage. thanks!!
I just spent 2 hours delicately painting my biscuits. Once i was done, they still looked like a 2year old had done them :-) so i decided to see how to do this properly (on the net) and came across your website! what a relief!! you have made my next attempt so much more promising. Thank you this was exceptionally helpful.
Wow! This is such a great post of Royal Icing, thanks for sharing the tips.
I will this great step by step with my boys this year
Hi Rachel,
I’m so glad you found this helpful and were able to use the instructions to decorate your cookies! Thanks so much for coming back and letting me know!
-Michelle :)