Red Velvet Cheesecake

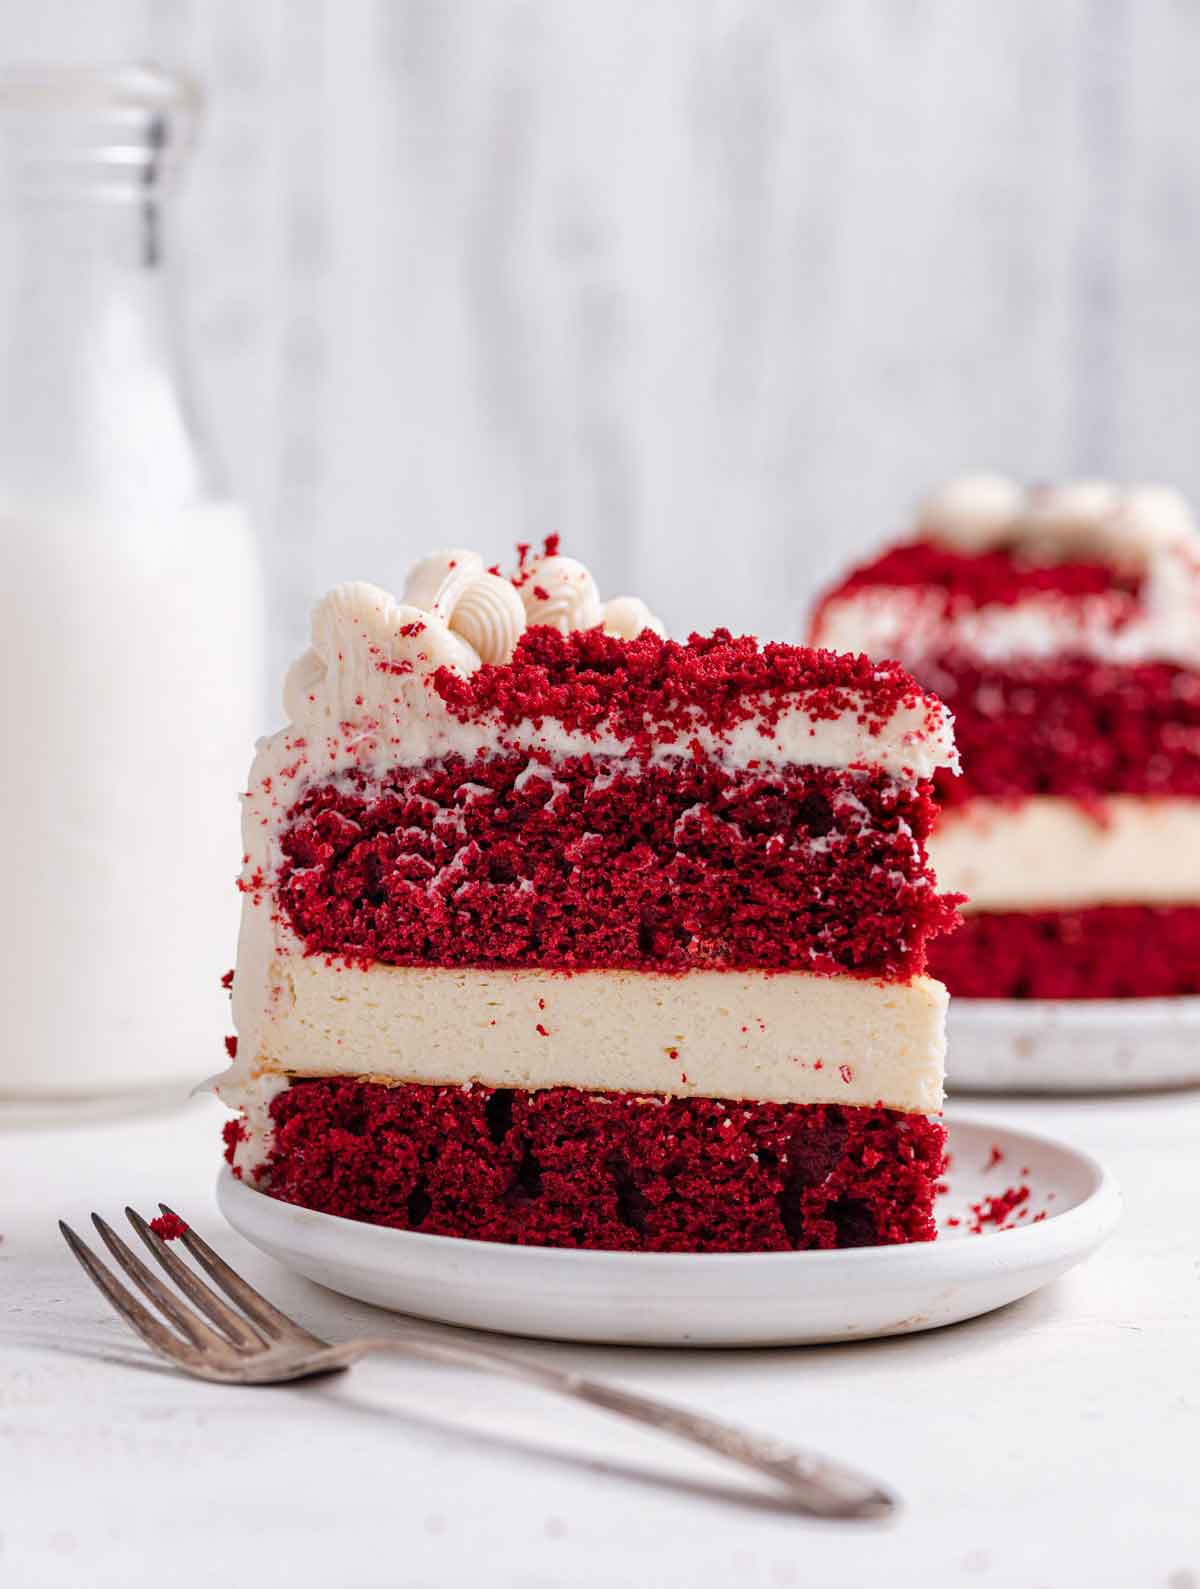
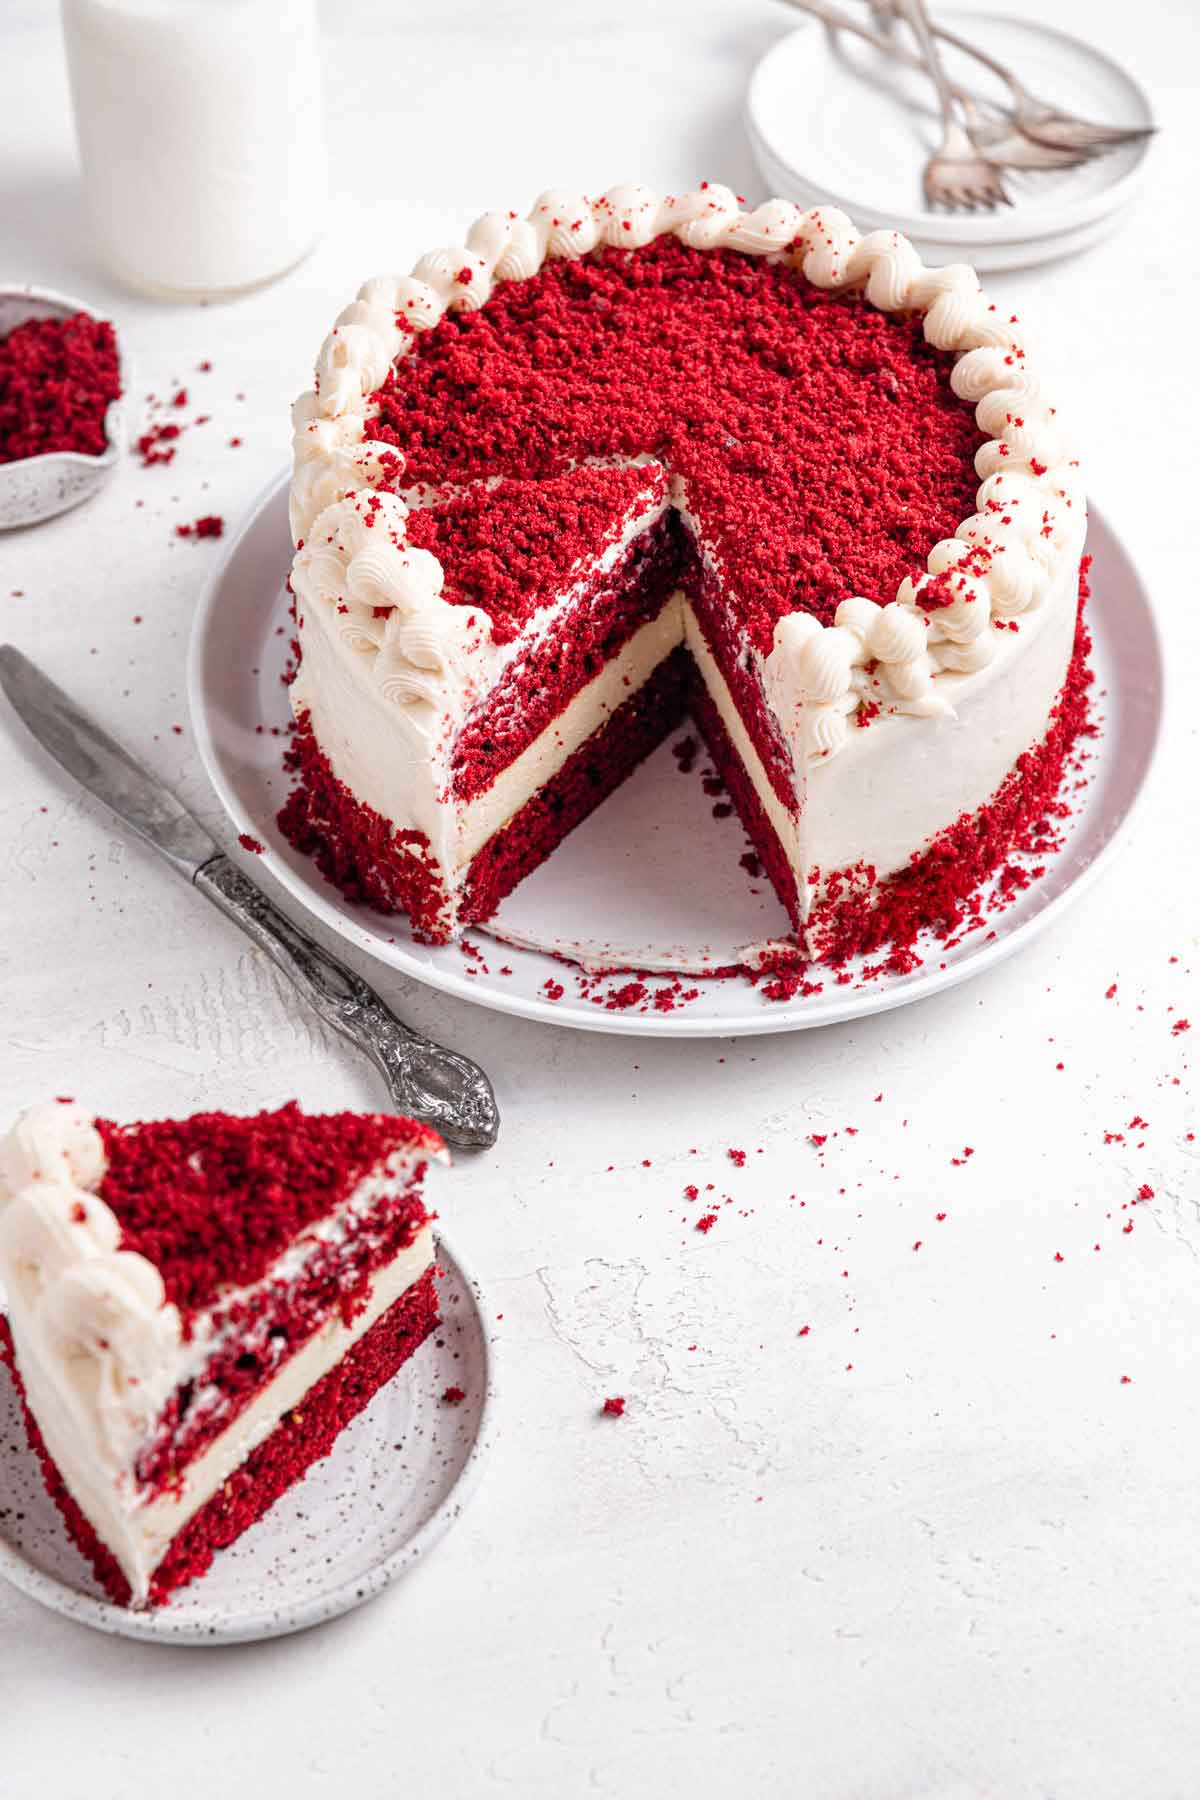
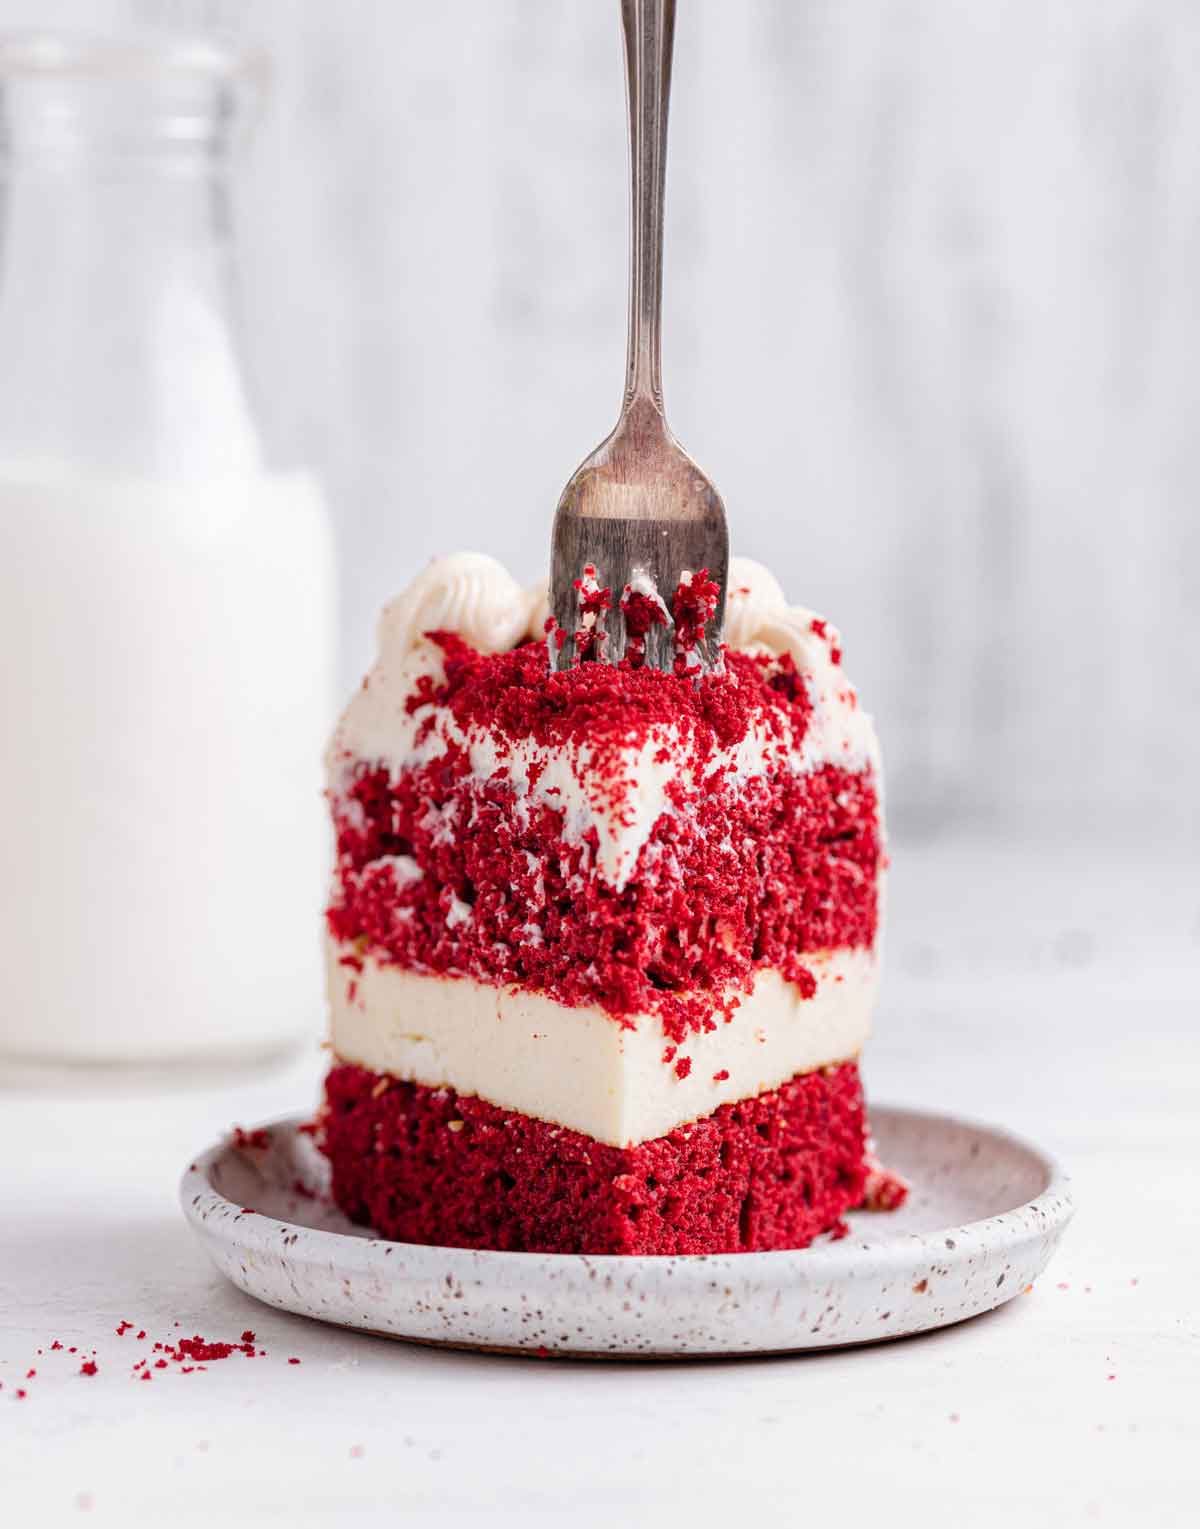
Treat yourself with a slice (or two) of this divine Red Velvet Cheesecake. Tender red velvet cake sandwiches creamy cheesecake for the ultimate dessert pairing. Based on the Cheesecake Factory's decadent version, this unforgettable cheesecake recipe is perfect for Valentine's Day, date night in, or just because.
I have made my share of red velvet desserts over the years, but this red velvet cheesecake truly stands above the rest. Moist red velvet cake layered with creamy cheesecake all wrapped up in a velvety cream cheese frosting… What more could you want?!?
Cheesecake Factory Copycat Recipe
This beauty originated at the Cheesecake Factory, where all incredibly decadent cheesecakes are born into existence.
For a long time, Oreo cheesecake reigned supreme for me, then I tried some different varieties and crowned the Snickers cheesecake as my favorite. It's been many years since we've had a slice from there, but my husband has an old standby favorite - the red velvet cheesecake. It is a four-layered dessert, with two layers each of red velvet cake and creamy cheesecake, all covered in cream cheese icing. I was so excited to make my own homemade version finally!
A previous version of this cheesecake recipe featured all four layers, but slicing a cheesecake in half horizontally isn't the easiest, so I've streamlined and simplified the recipe. If you want to go the full four-layer route, double the cheesecake layer, and once it has been chilled, slice it in half horizontally and alternate layers with the red velvet cake.
Important Ingredients
While many of the ingredients for the cake and cheesecake are pantry and refrigerator staples (flour, sugar, eggs, etc.), there are a few important ones to make note of:
For the Cheesecake
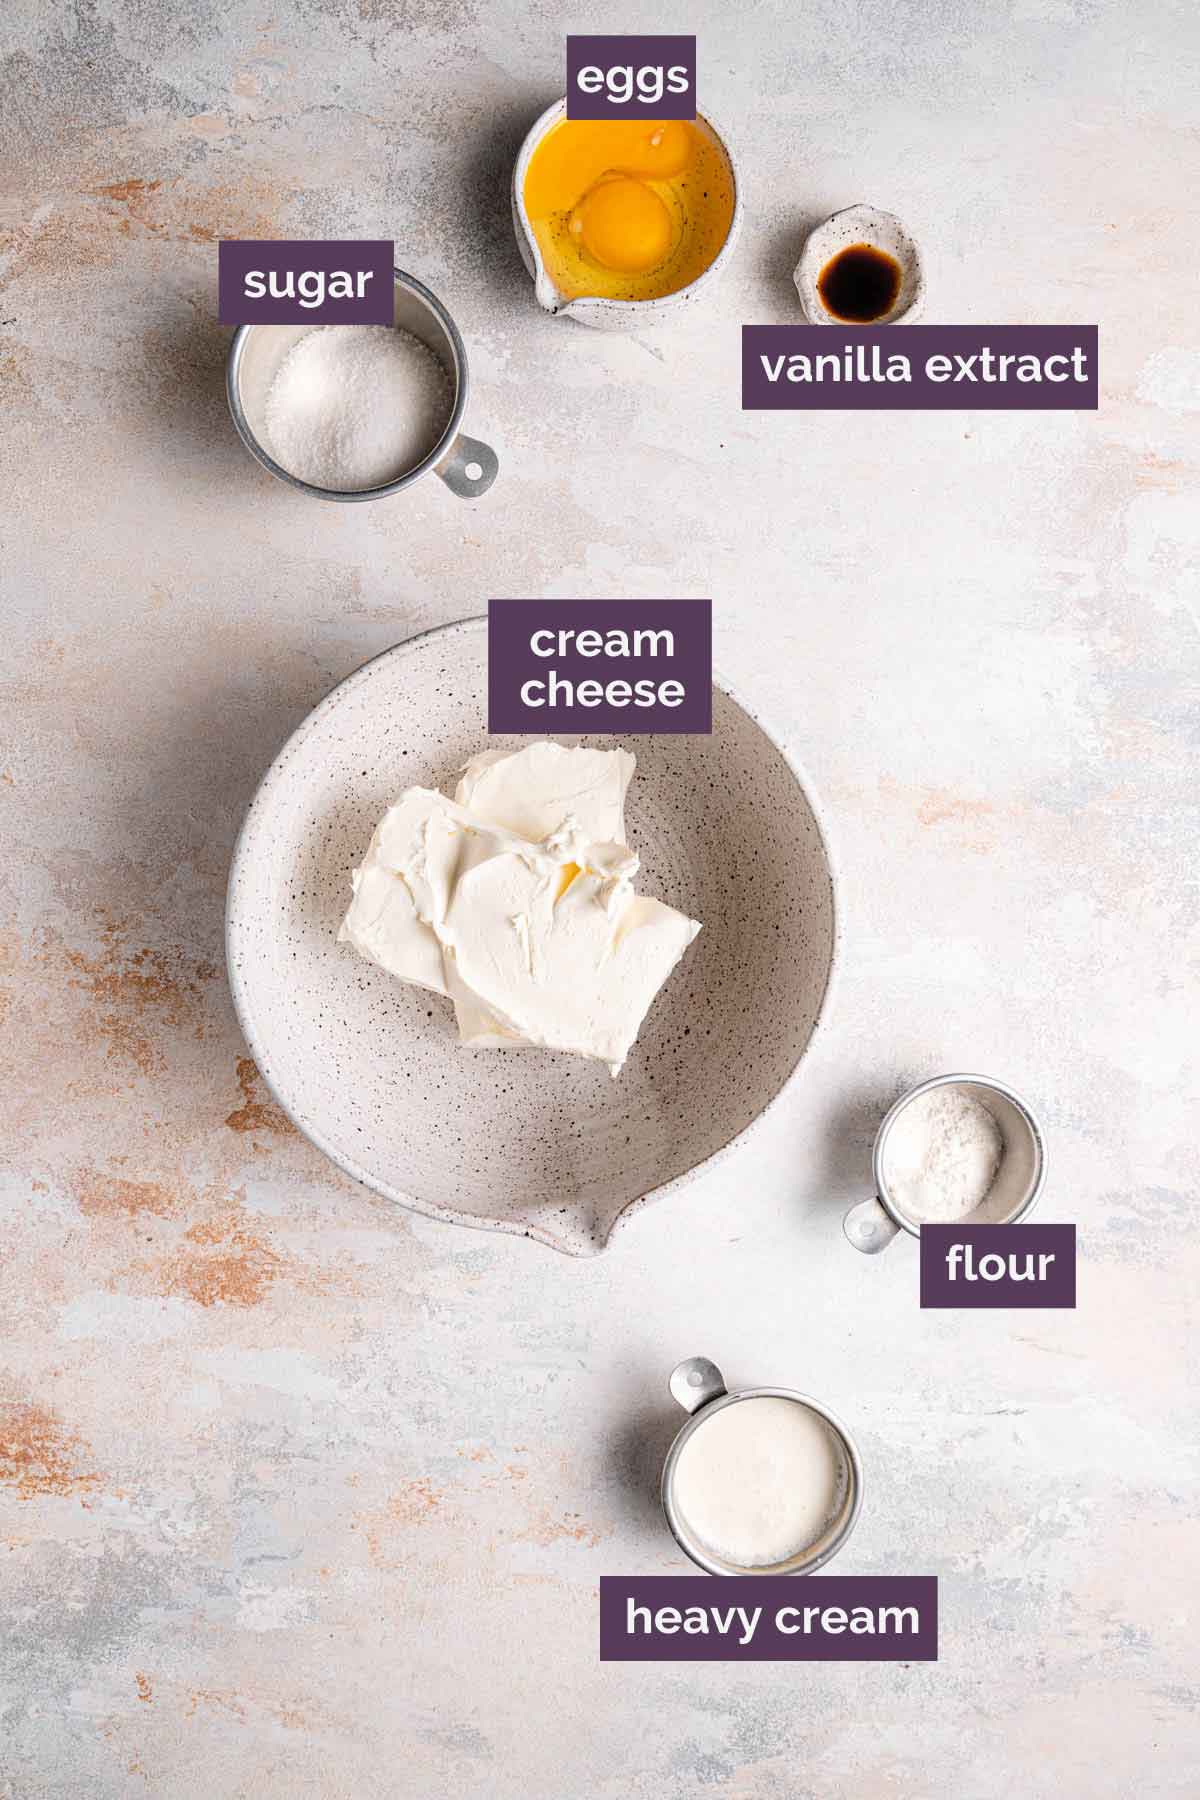
- Cream Cheese – For the cheesecake layer. Use full fat cream cheese to ensure the cheesecake is rich and creamy.
- Heavy Cream – This softens the texture of the cream and cheese and adds a little moisture. It is sometimes also called heavy whipping cream. You can substitute half and half or whole milk if necessary.
For the Cake Layers
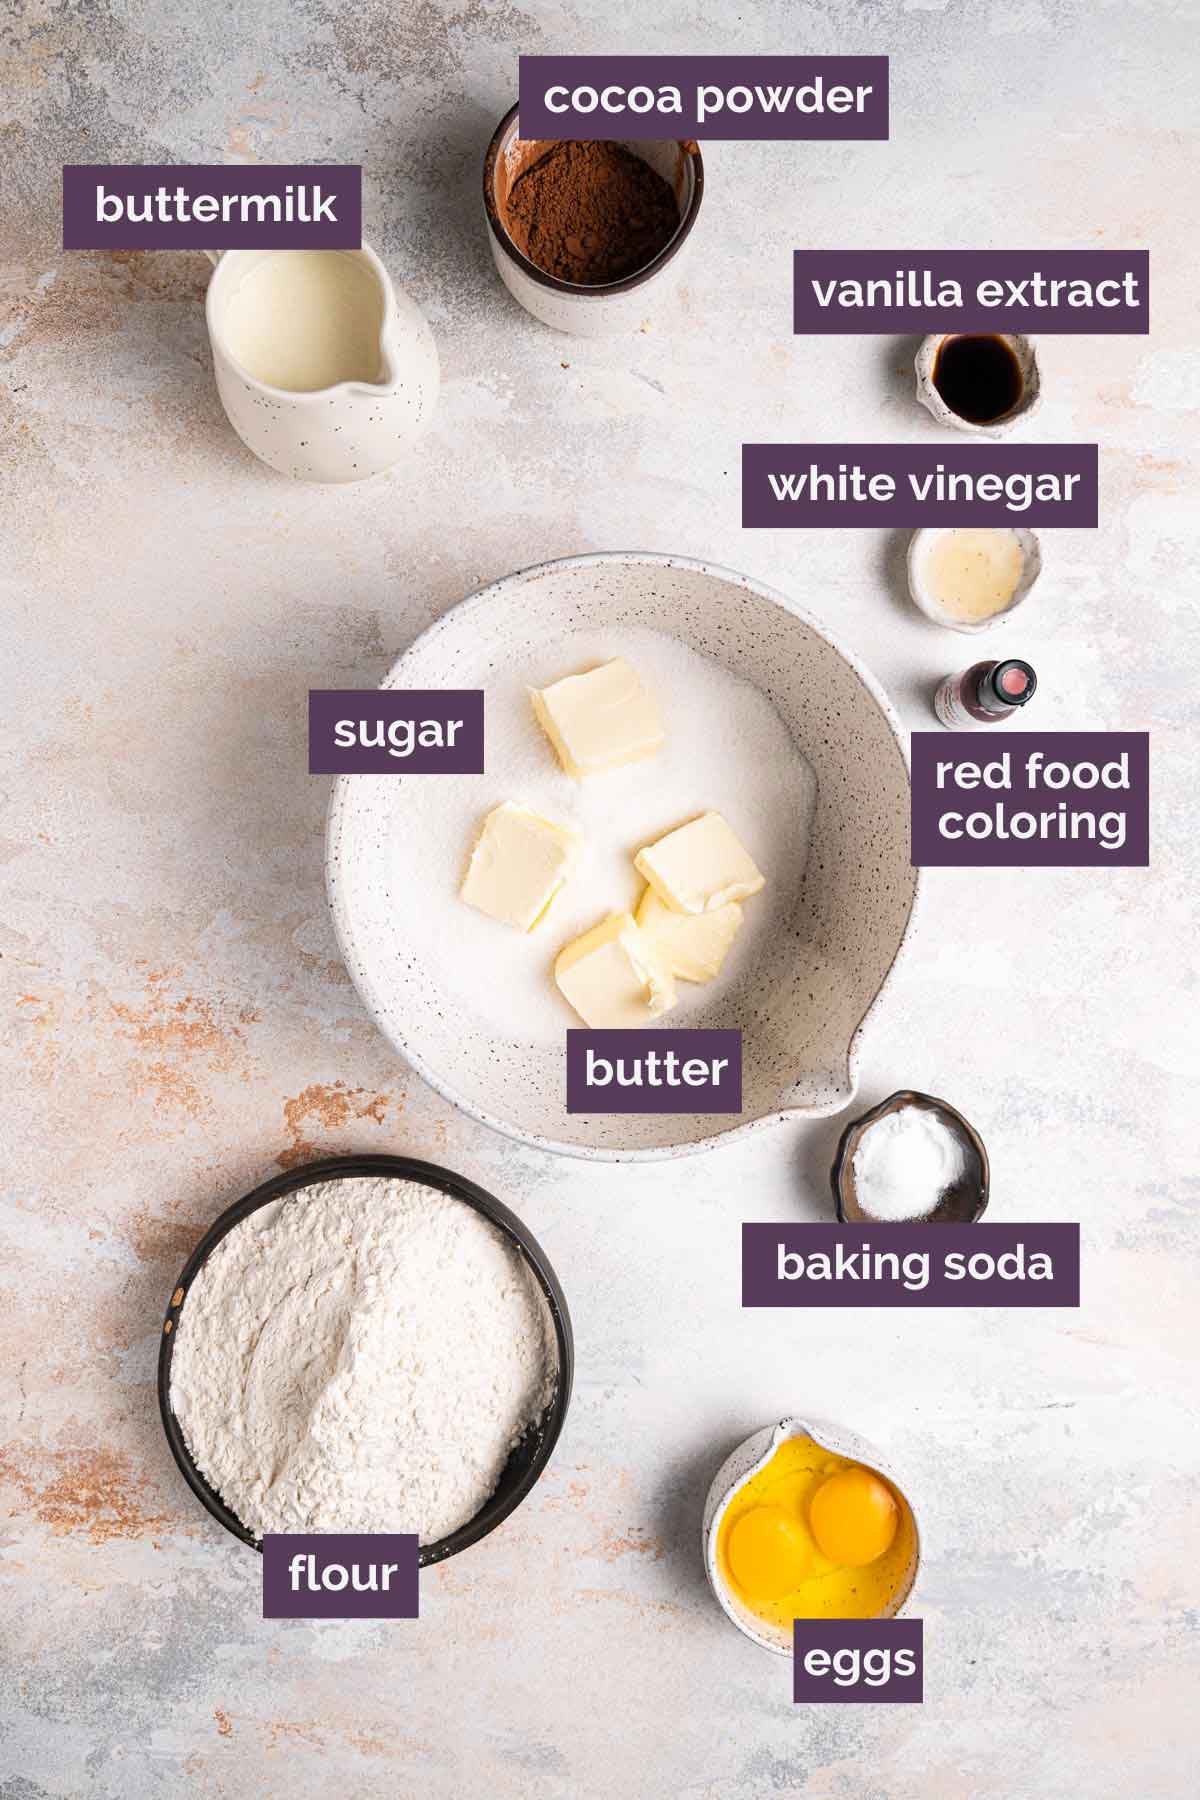
- Cocoa Powder – Use unsweetened, natural cocoa powder here. We want to avoid Dutched since it has already been alkalized.
- Vinegar - The reaction of the vinegar with the buttermilk helps to pull out the red hue in the cocoa powder. For this recipe, we use white vinegar, but you could also substitute apple cider vinegar.
- Buttermilk - Using soured milk is a key component of red velvet cake batter, as the acidic liquid is needed to combine with the baking soda and cocoa powder to get the rise and texture right. You can substitute sour cream or plain Greek yogurt.
- Baking Soda - This works magic with cocoa powder and buttermilk to get a beautiful rise and tender crumb.
- Red Food Coloring - We want to boost that beautiful red color! If you prefer to use gel food coloring, substitute 1 teaspoon gel food coloring and add about 1 tablespoon of water.
How to Make Red Velvet Cheesecake
Now on to the cheesecake… this really isn't terribly difficult, just a little time-consuming. It helps to spread the work out over a couple of days, and then it's easy breezy.
The Cheesecake Layer
To start, you will want to make the cheesecake first to ensure it sets and cools in time. I would plan to make the cheesecake layer at least one day in advance. Here is the cheesecake-making process:
Step #1: Spray a 9-inch springform pan with non-stick cooking spray and line the bottom with parchment paper (pre-cut parchment rounds are so handy for things like this!).
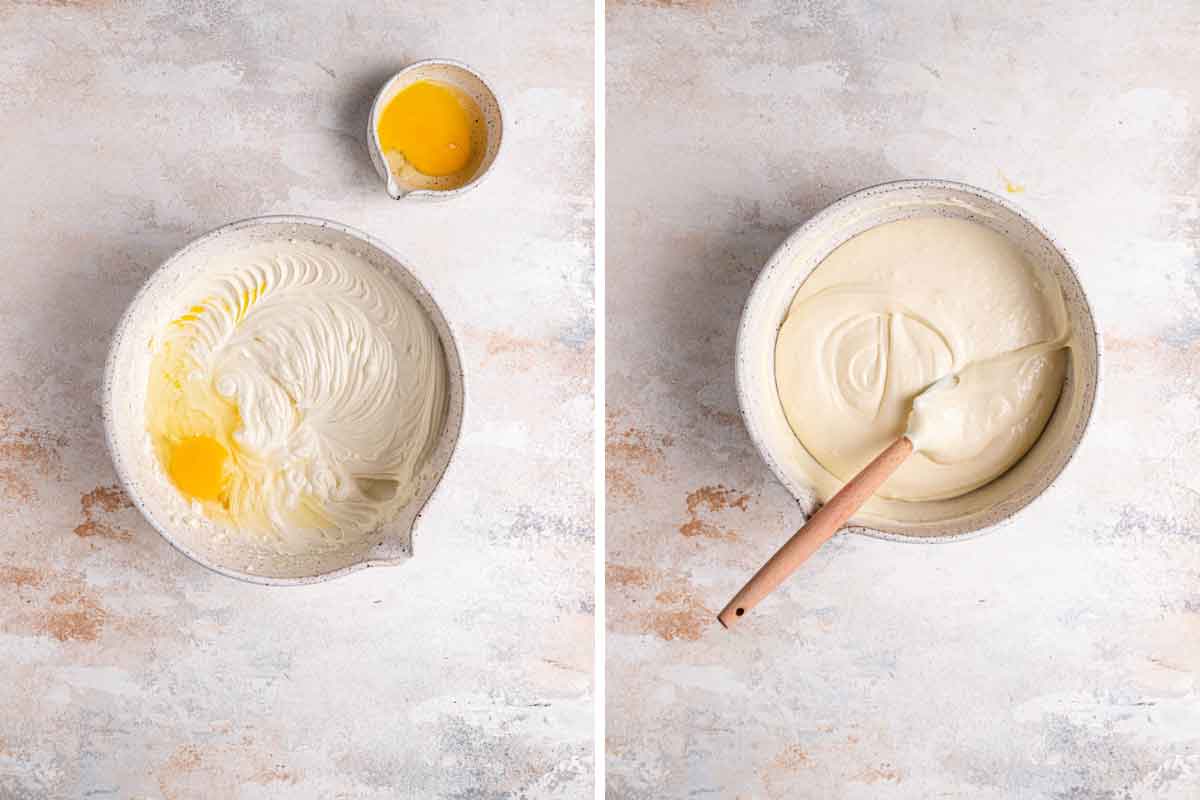
Step #2: Beat the cream cheese, sugar, flour, and salt until the mixture is creamy with no lumps. Add the heavy cream and vanilla, then the eggs, one at a time.
Step #3: Pour the filling into the pan and bake until the cheesecake is set and does not jiggle (40 to 55 minutes). Remove from the oven and cool for an hour on a wire rack. Once at room temperature, place in the freezer for 3 hours, or overnight.
The Red Velvet Cake Layers
Red velvet cake often gets written off as just a red chocolate cake, but it is SO much more than that. With a slightly acidic taste coming from the buttermilk and the white vinegar, this unique cake truly stands alone. The cocoa powder is actually subdued a bit by the acidity of the buttermilk and vinegar, leaving a very mild chocolate flavor.
For this recipe, I doubled the recipe for my Red Velvet Cupcakes and used the batter to make two 9-inch cake rounds. A quick overview:
Step #1: Preheat the oven to 350 degrees, then grease two 9-inch cake pans, line the bottoms with parchment paper, grease the parchment paper, and then coat the pan in flour, tapping out any excess.
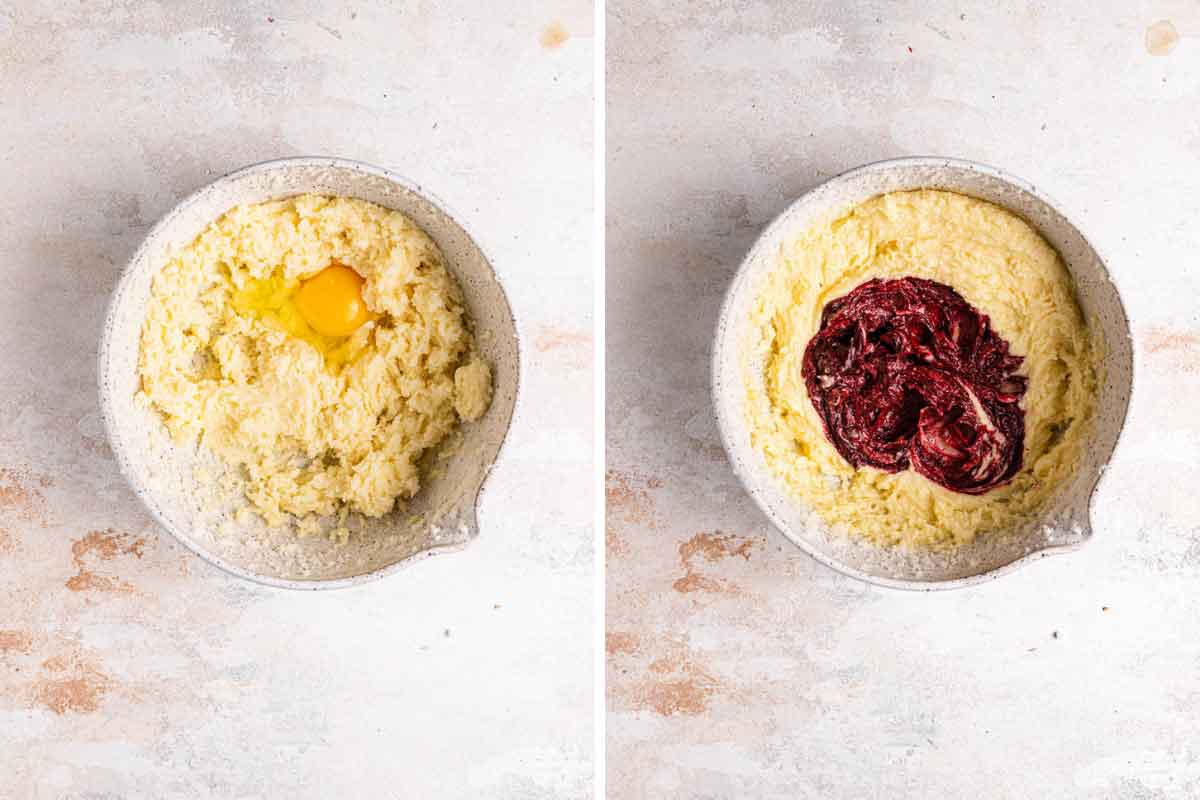
Step #2: Using a stand mixer or a large bowl with a hand mixer, cream the butter and sugar together, then add the egg and beat until well incorporated.
Step #3: In a separate bowl, combine the cocoa powder, vanilla extract, and red food coloring, which will make a thick paste. Add it to the batter and mix until combined.
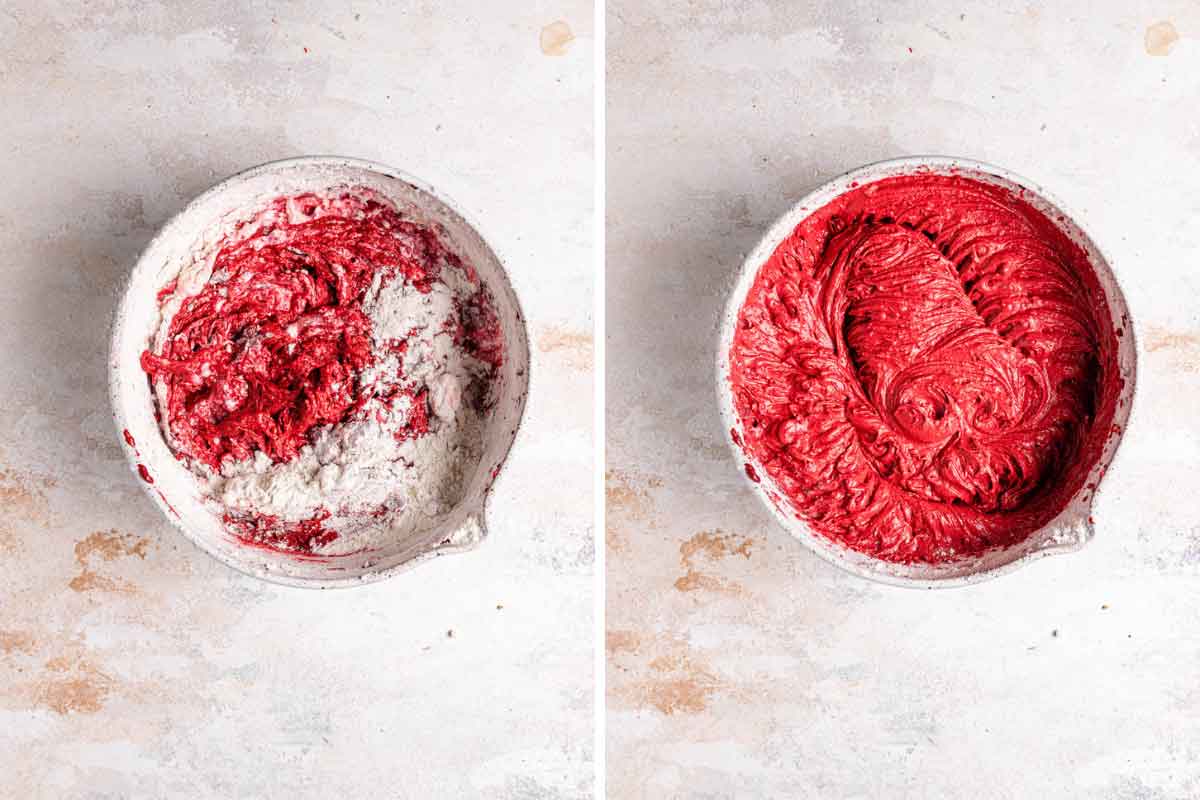
Step #4: On low speed, alternate adding the buttermilk and flour, then beat on high until smooth.
Step #5: On low speed again, add the salt, baking soda, and vinegar. Beat on high until the mixture is completely combined and smooth.
Save This Recipe
Step #6: Divide the batter evenly between the two cake pans and bake for about 30 minutes or until a thin knife inserted in the center comes out clean. Cool in the pan for 10 minutes then remove the cakes from the pans and place on a cooling rack to cool completely.
Note: You can also use a red velvet cake mix and prepare according to the package directions for two 9-inch cake layers.
Cream Cheese Frosting
I use my favorite cream cheese frosting to cover this beautiful dessert:
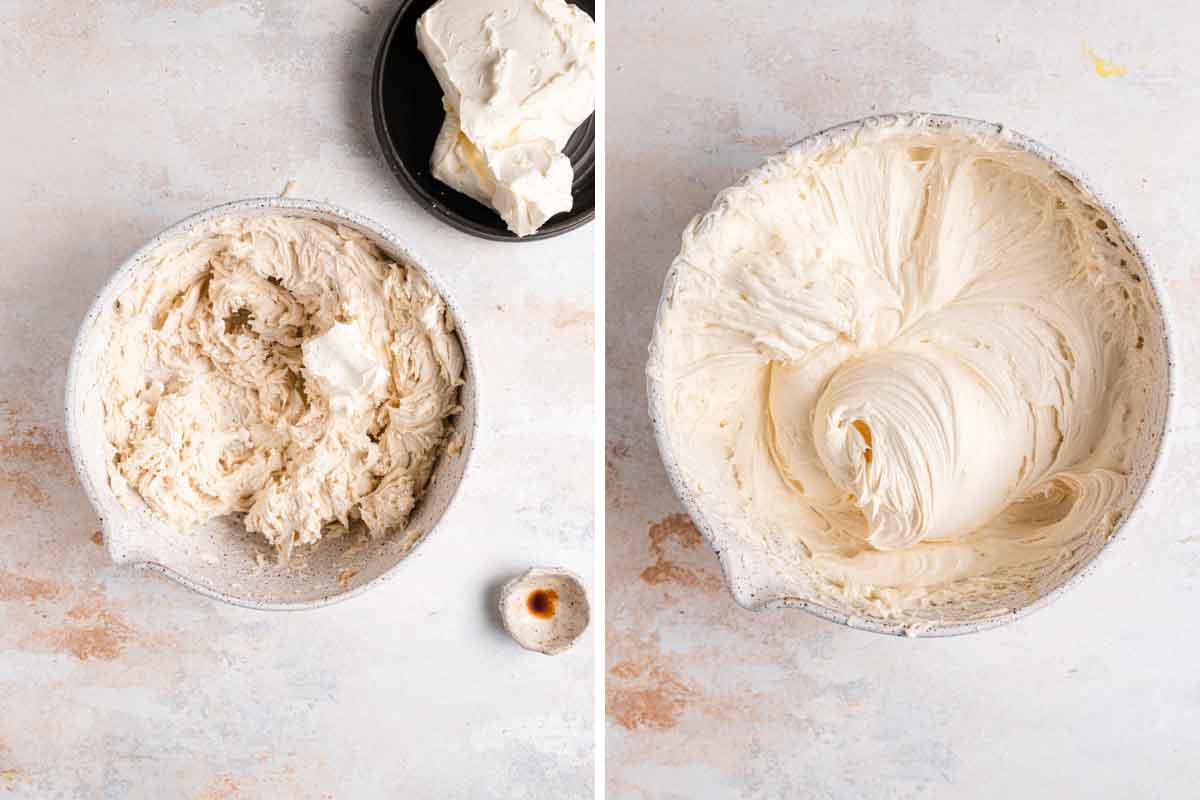
Step #1: Beat the butter, powdered sugar, vanilla, and salt with an electric mixer on low until smooth. Then mix for an additional 2 minutes, scraping down the bowl as needed.
Step #2: Increase the speed to medium-low and add the cream cheese, one piece at a time, and mix until smooth. Then mix for an additional 2 minutes.
Assembling the Cheesecake
Now that you have all of the components made for this decadent cheesecake, let's get it put together:
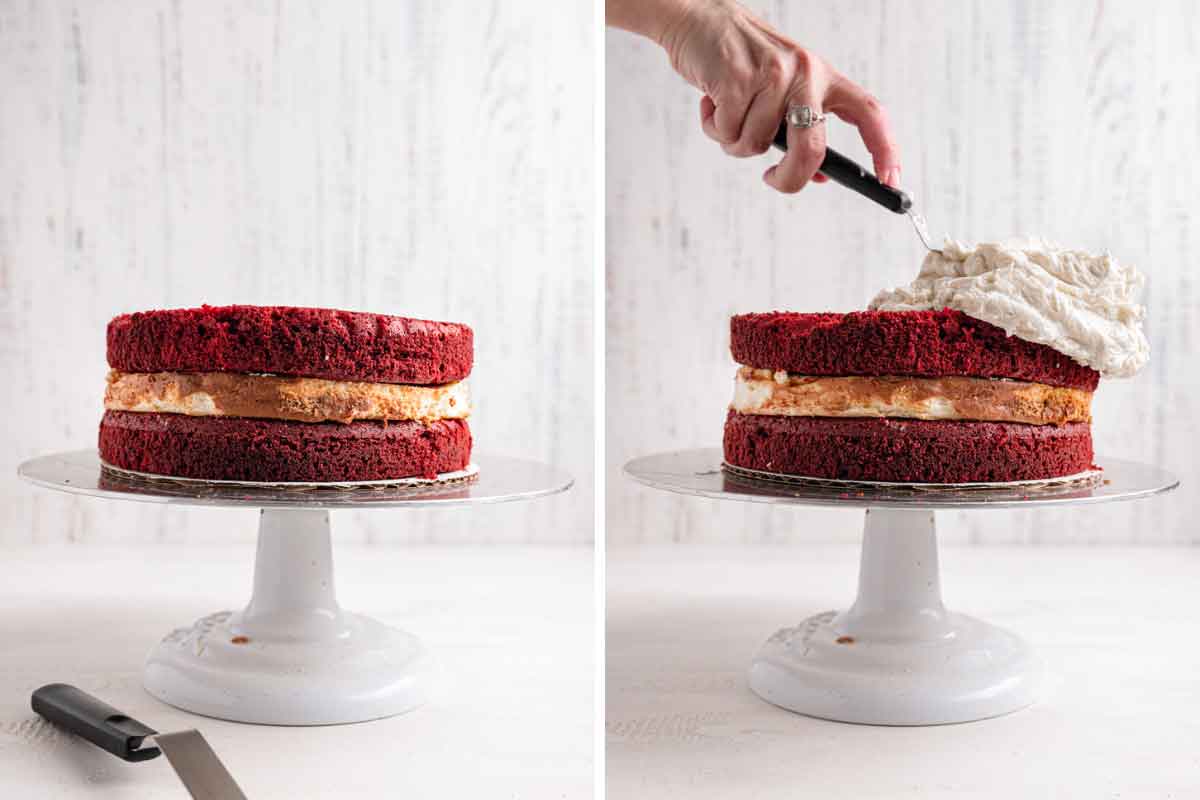
- Level the tops of the cakes if necessary, then place one cake layer on a serving platter.
- Remove the cheesecake from the freezer and remove the sides of the springform pan. If the cheesecake is wider than the cake layers, use a sharp knife to gently shave off some of the sides of the cheesecake so it is the same width as the cake layers.
- Place the cheesecake layer on top of the first cake layer, then place the second cake layer on top of the cheesecake layer, upside-down., and then frost the whole thing with the cream cheese frosting.
Decorate and Serve
After frosting the cake, you have a blank canvas for decorating. Some ways you can spice up the look of this cake are to:
- Pipe the edge with a shell border and fill the center with red velvet cake crumbs. For a tutorial on shell borders, check out this example from Wilton.
- You can use red velvet cake crumbs to press on the side of the cake.
- Top the finished cake with shaved white or dark chocolate!
- Press red or pink sprinkles into the sides of the cake, or garnish the top with them.
When you are ready to serve, dish out your slices as is or with a side of whipped cream.
Make-Ahead Instructions
This is a perfect dessert to make ahead of time! Each of the components can be made in advance, and the whole red velvet cheesecake is best when chilled for at least 4 hours or overnight before serving.
- Cheesecake Layer: This can be wrapped tightly in plastic wrap, then in foil, and frozen for up to 3 months.
- Cakes: Once the cakes have cooled, wrap them tightly in plastic wrap and refrigerate for up to 3 days.
- Frosting: This can be made up to 2 days in advance and stored in the refrigerator in an airtight container.
How to Store the Finished Red Velvet Cheesecake
Keep this cheesecake in an airtight container (or wrapped in plastic wrap) in the refrigerator for up to 5 days. Let sit at room temperature for 20 to 30 minutes before serving.
Freezing Instructions
This freezes very well! You can freeze any or all of the components, or freeze the entire assembled cheesecake:
- To Freeze the Cake Layers: Allow the cakes to cool completely and then wrap them tightly in plastic wrap and store them in the freezer for up to 3 months. Move the wrapped cakes to the refrigerator the night before you plan to use them.
- To Freeze the Cream Cheese Frosting: The cream cheese frosting can be kept in an airtight container in the freezer for up to 3 months. Thaw in the refrigerator overnight; allow to come to cool to room temperature, and then stir vigorously with a rubber spatula before spreading or piping.
- To Freeze the Whole Cheesecake: Wrap it tightly with plastic wrap and then cover it with foil. Freeze for up to 1 month. Thaw in the refrigerator overnight. You can also wrap individual slices in plastic wrap, then place in a ziploc freezer bag and thaw in the refrigerator overnight or at room temperature for about 30 minutes.
More Red Velvet Recipes You Must Try
- Red Velvet Cupcakes with Cream Cheese Frosting
- Easy Red Velvet Poke Cake
- Red Velvet Whoopie Pies
- Creamy Red Velvet Ice Cream
- Red Velvet Roll Cake
If you make this red velvet cheesecake recipe and love it, remember to stop back and give it a 5-star rating - it helps others find the recipe! ❤️️

Red Velvet Cheesecake
Ingredients
For the Cheesecake:
- 16 ounces cream cheese, at room temperature
- ½ cup (99 g) granulated sugar
- 1 tablespoon all-purpose flour
- Pinch salt
- ¼ cup (60 ml) heavy cream
- ½ teaspoon vanilla extract
- 2 eggs, at room temperature
For the Red Velvet Cake:
- ½ cup (113 g) unsalted butter, at room temperature
- 1½ cups (298 g) granulated sugar
- 2 eggs
- ¼ cup (26 g) + 1 tablespoon unsweetened cocoa powder
- 6 tablespoons red food coloring, liquid
- 1 teaspoon vanilla extract
- 1 cup (240 ml) buttermilk
- 2¼ cups (270 g) all-purpose flour
- 1 teaspoon baking soda
- 1 teaspoon salt
- 1 tablespoon distilled white vinegar
For the Cream Cheese Frosting:
- 1 cup (227 g) unsalted butter, at room temperature
- 4 cups (454 g) powdered sugar
- 2 teaspoons vanilla extract
- Pinch salt
- 16 ounces cream cheese, chilled and cut into 16 pieces
Instructions
- Make the Cheesecake: Preheat oven to 350 degrees F. Spray a 9-inch springform pan with non-stick cooking spray and line the bottom with a round of parchment paper.
- Using an electric mixer on medium-low speed, beat the cream cheese, sugar, flour, and salt until the mixture is creamy and no lumps of cream cheese remain, about 3 minutes. Scrape down the sides of the bowl, add the heavy cream and vanilla, and beat to combine. Beat in the eggs one at a time, beating for about 15 seconds before adding the next. Using a rubber spatula, mix a few times by hand to ensure that all of the ingredients are evenly incorporated.
- Pour the filling into the prepared pan and spread into an even layer. Bake until the cheesecake is set and does not jiggle, about 40 to 55 minutes. Remove from the oven and cool on a wire rack for at least 1 hour. Once the cheesecake has cooled to room temperature, place it in the freezer for at least 3 hours or overnight.
- Make the Red Velvet Cake: Preheat oven to 350 degrees F. Grease two 9-inch cake pans. Line the bottoms of the pans with a parchment round, butter the parchment paper, and then flour the pans.
- On medium-high speed, cream the butter and sugar until light and fluffy, about 3 minutes. Turn the mixer to high and add the eggs one at a time, mixing for about a minute after each addition. Scrape down the bowl and beat until well incorporated.
- In a separate small bowl, mix together the cocoa powder, vanilla extract and red food coloring to make a thick paste. Add to the batter and mix on medium speed until completely combined. You may need to stop the mixer to scrape the bottom of the bowl, making sure that all the batter gets color.
- Reduce the mixer speed to low and slowly add half of the buttermilk. Add half of the flour and mix until combined. Scrape the bowl and repeat the process with the remaining buttermilk and flour. Beat on high until smooth.
- Again, reduce the mixer speed to low and add the salt, baking soda and vinegar. Turn to high and beat for another couple of minutes until completely combined and smooth.
- Divide the batter evenly between the two cake pans and bake for about 30 minutes, or until a thin knife or skewer inserted into the center comes out clean. Cool for 10 minutes and then remove cakes from the pans and place them on a cooling rack to cool completely.
- Make the Frosting: Using an electric mixer, beat the butter, powdered sugar, vanilla, and salt on low speed until smooth, then mix for an additional 2 minutes, scraping down the bowl as needed. Increase the speed to medium-low and add the cream cheese one piece at a time and mix until smooth, then mix for an additional 2 minutes.
- Assemble the Red Velvet Cheesecake: Level the tops of the cakes if necessary, then place one cake layer on a serving platter. Remove the cheesecake from the freezer and remove the sides of the springform pan. Slide a knife between the bottom of the cheesecake and the parchment paper to remove the cheesecake from the pan bottom and parchment round. If the cheesecake is wider than the cake layers, use a sharp knife to gently shave off some of the sides of the cheesecake so it is the same width as the cake layers.
- Place the cheesecake layer on top of the first cake layer, then place the second cake layer on top of the cheesecake layer, upside-down.
- Spread a very thin layer of cream cheese frosting (the "crumb coat") over the top and sides of the cake, then refrigerate for 30 minutes to set the frosting. Then apply another liberal coat of frosting and decorate as desired. Keep refrigerated, then let sit at room temperature for 20 minutes before serving. Cover leftovers and store in the refrigerator for up to 5 days.
Notes
- Equipment: Two 9-inch round cake pans / 9-inch springform pan
- Buttermilk: You can substitute sour cream or plain Greek yogurt.
- Cocoa Powder - Use unsweetened, natural cocoa powder. We want to avoid Dutched since it has already been alkalized.
- Cream Cheese - For both the cheesecake layer and the frosting, use full fat cream cheese, otherwise you can have a watery consistency.
- Food Coloring: If you prefer to use gel food coloring, substitute 1 teaspoon gel food coloring and add about 1 tablespoon water.
- Make-Ahead Tips: I highly suggest making the cheesecake at least one day in advance of serving but it can also be made up to 3 days in advance. You can make the cake layers up to 2 days in advance without freezing. Bake, cool, and wrap tightly with plastic wrap. The frosting can be made up to 2 days in advance and stored in the refrigerator in an airtight container.
- Storing: Keep this cheesecake in an airtight container (or wrapped in plastic wrap) in the refrigerator for up to 5 days. Let sit at room temperature for 20 to 30 minutes before serving.
- To Freeze the Cake Layers: Allow the cakes to cool completely and then wrap them tightly in plastic wrap and store them in the freezer for up to 3 months. Move the wrapped cakes to the refrigerator the night before you plan to use them.
- To Freeze the Cream Cheese Frosting: The cream cheese frosting can be kept in an airtight container in the freezer for up to 3 months. Thaw in the refrigerator overnight; allow to come to cool to room temperature, and then stir vigorously with a rubber spatula before spreading or piping.
- To Freeze the Whole Cheesecake: Wrap it tightly with plastic wrap and then cover it with foil. Freeze for up to 1 month. Thaw in the refrigerator overnight. You can also wrap individual slices in plastic wrap, then place in a ziploc freezer bag and thaw in the refrigerator overnight or at room temperature for about 30 minutes.
Did you make this recipe?
Leave a review below, then snap a picture and tag @thebrowneyedbaker on Instagram so I can see it!
Photography by Dee Frances
The original recipe was published in February 2012.


I made this for my husband’s bday and Wow! This is the best cake I’ve ever made and I’ve made a lot of homemade cakes. Everyone at the party loved it. Thank you for the great recipe!
I’m just making this. Got to the cake part and to my astonishment it starts by mixing/beating “the” butter and sugar. There’s no mention of butter in the ingredient list for the cake. Here I am, trying to figure out just how much butter to use.
Sorry, my mistake. I missed it, there indeed is butter listed.
yo recipe author! have you read the reviews – how does the star rating get a 4+ when a the reviews are between 1-3?? from the reviews i wouldn’t waste my time or money making this dessert
6 TABLESPOONS red food coloring?? the little bottle (expensive!) i have might come out to 1 TEASPOON!
6 TABLESPOONS red food coloring?? the little bottle (expensive!) i habe might come out to 1 TEASPOON!
Wish I could put 0star tried to make for my partners birthday and the amount of food colouring you need to put in it is not correct the cheesecake did not cook do not use this recipe if you want to actually have a nice cheese cake
Wish I had read the reviews first. Made this as my son love red velvet cake not the best recipe The cooked cheesecake wasn’t nice way to much frosting I only put half of it on and that was too much very sickly don’t think I would make it again I prefere the no bake cheesecakes
This recipe was far from the Cheesecake Factory cheesecake it is supposedly based on. Both the cheesecake and the red velvet cake layers were too dense. The cake layer was not only dense it was chewy and lacked any great flavor. The only redeeming quality of this recipe was the cream cheese frosting. I would pass on this recipe and try something else.
I want to make this for my daughter because these are her two favorite desserts. I just want to make one layer of each. Can I bake in a pie pan and add cheesecake after it’s cooled?
The cheesecake and frosting recipes are great, but the cake recipe is pretty awful. There’s way too much mixing after the flour is added, which makes for a dry and dusty crumb. Wish I’d read through the cake steps first before trying this.
Made this recipe!
Subbed GF flour
Cane sugar
And it was perfect 😍
I tried the Wayback website but couldn’t access the old recipe. I would be grateful if anyone could share a link or send the recipe.
Made this for my boyfriend’s birthday with some homemade vanilla extract. Absolutely fantastic thank you.
Honestly, I have not yet tried the recipe, but I have questions. Since both buttermilk and vinegar are acidic, how does the vinegar react with the buttermilk and the food coloring to make the color more intense? Also, you mention using natural cocoa powder which has a lower pH than alkalized, but you also mention the reaction of the acidic buttermilk with the cocoa powder to help the cake rise. Wouldn’t a the high pH of the alkalized cocoa powder react more strongly with the acid and produce a lighter crumb? Thanks in advance!!
Hi, Mich! Thanks for posting such wonderful cake recipe. I wonder if I can cut all the ingredients in half in the recipe to make a smaller cake ?
Hi Beth, Yes I think that would be fine!
Love this recipe; it is delicious! Took the easy route with the red velvet, opting to use a cake mix with some adjustments. Cheesecake made in a water bath. It turned out perfectly. Made in advance, I froze everything and refrigerated overnight before assembling for dinner party. It was delicious and everyone loved it!
I would so much like the original recipe for this … I have tried to find it with the info given …. But no success. Thank you
Where do the cake crumbs for the top and sides come from?
When you level the tops of the cakes, use the scraps to crumble for the decoration.
The frosting was AMAZING! But the cake layers came out a little dense for me. I don’t think I’d make this recipe again.
For everyone looking for the old recipe, you can use the Wayback Machine (https://archive.org/web/) to access the old recipe using this same link (https://www.browneyedbaker.com/red-velvet-cheesecake-recipe) as the input. Select one of the dates from 2014, and boom–there it is! (You can do this for any defunct page, such as dead links you’ve saved on Pinterest.)
Hi Michelle, Would you please send me the old recipe? It’s amazing and I’d like to make it for a graduation! Thanks!
This recipe is very good, however the original recipe is amazing. Is there anyway you can send me the original recipe?
It amazes me one would rate a recipe anything having never made it. I’ve enjoyed brown eyed baker recipes over the years, because they reliably delicious and yield consistent results when you follow them. I followed what was written and it was delicious. Just enough of everything.
Please please can you also post the original recipe , its my fav dessert of all time please ..
I have made your original recipe and this new one both are delicious, however I prefer the original recipe. Can you please email the original recipe?
Can you please send me the original recipe ❣️Thank you and Merry Christmas
I accidentally made the frosting into cupcakes cuz I accidentally added baking powder,they were great but the actual cake was terrible
Mission failed successfully