Crispy Sweet and Sour Chicken

Skip the takeout and make this sweet and sour chicken at home! Pan-fried chicken pieces are coated in a homemade sweet and sour sauce and baked to perfection in this easy recipe. Pair it with steamed rice, stir fry vegetables, or a homemade fried rice for a filling dinner you will want to make again and again.
Confession: I was a serious late bloomer when it came to eating Chinese food.
I went to college, lived in a dorm, lived in an apartment, and yet never did a morsel of Chinese food touch my lips. I’m not exactly sure how this happened – we did our fair share of take-out, but it seemed to always be pizza or the leftovers from a friend’s shift at Kentucky Fried Chicken. We were partial to the potato wedges and chocolate cake, naturally.
It wasn’t until I started dating my husband that I gave it a try – he suggested ordering it one night when I was visiting him, and he was (of course) stunned when I told him I had never had it, so I’d just get whatever he was having. That day, we had General Tso’s and egg rolls, and I was in love. Since then, I’ve eaten Chinese takeout countless times, have tried tons of different dishes, and have made many of them in my own kitchen.
This oven-baked recipe is my favorite riff on sweet and sour chicken!
Sweet and Sour Chicken
The hallmark of a good sweet and sour chicken comes down to two things. Crispy, well-fried chicken, and a sticky sweet and sour sauce. Oh, the sauce… It’s the absolute perfect balance between sweet and tangy and the way it clings to the chicken is just glorious!
How to make Sweet and Sour Chicken
Do not let the longer-than-usual bake time worry you, this sweet and sour chicken recipe is really easy to make and worth the extra time it takes to cook in the oven.
Sweet and Sour Chicken Ingredients
- Chicken – I use boneless, skinless chicken breasts in this recipe. You can also use a combination of chicken breasts and thighs, or all thighs if you’d prefer.
- Salt + Pepper – Seasons the chicken to taste before pan-frying.
- Cornstarch – Helps to keep the outside of the chicken slightly crisp, while the egg will give the exterior a bit of a puffy texture.
- Eggs – Slightly beaten for dipping the cornstarch coated chicken.
- Oil – Vegetable or canola oil is used for pan-frying the chicken.
- Sweet and Sour Sauce- This homemade sauce is made from a mixture of sugar, ketchup, rice vinegar, soy sauce, and garlic powder.
Now that you have your ingredients let’s break it down into pan-frying the chicken and baking the sweet and sour chicken to perfection.
Batter + Fry the Chicken
- Preheat the oven: Set the oven to 325°F.
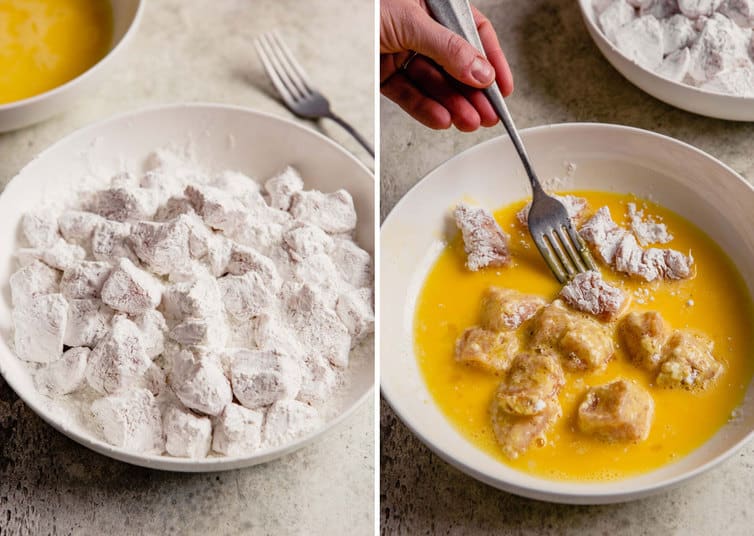
- Season the chicken: Cut the chicken into 1-inch chunks and season with salt and pepper.
- Prep the batter: In a shallow bowl or pie plate, place the cornstarch. Beat the eggs slightly in a separate shallow bowl.
Save This Recipe
- Batter the chicken: Working in two batches, toss the chicken pieces in the cornstarch and then coat with the egg.
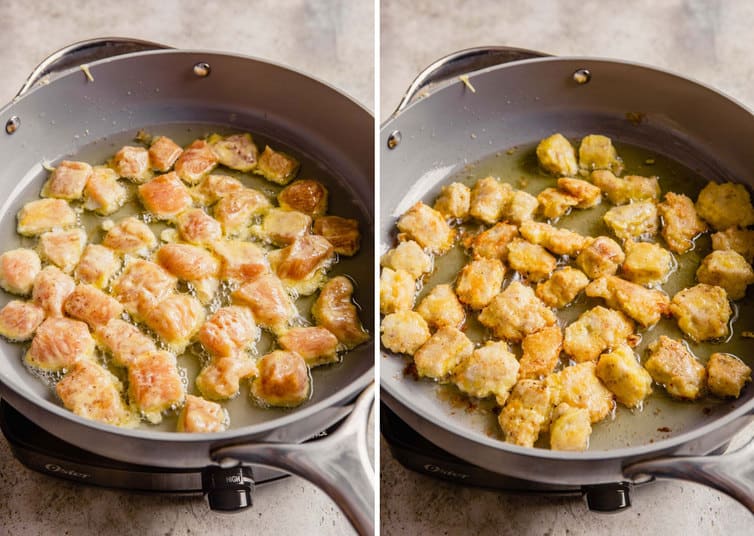
- Pan-fry the chicken: In a large skillet over medium-high heat, heat the oil. Again working in two batches, brown the chicken, turning it so that all sides are browned.
Sauce + Bake
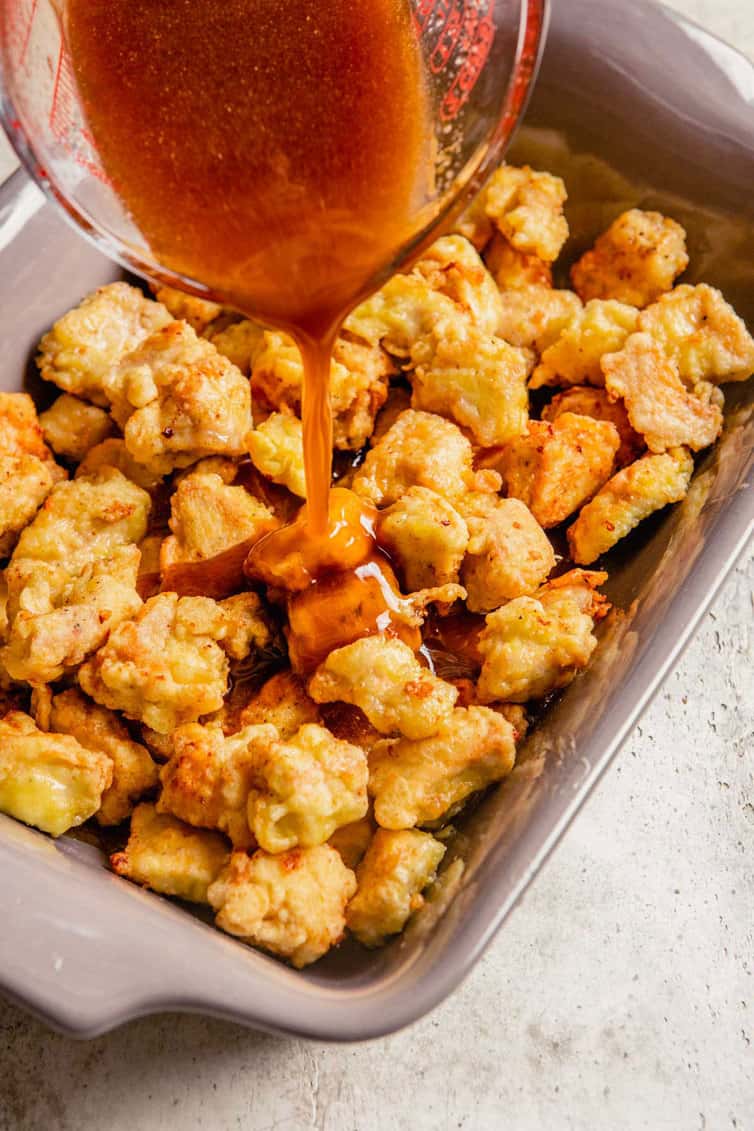
- Transfer chicken: Place the chicken in a single layer in a 9×13-inch baking dish.
- Make the sweet and sour sauce: In a small bowl, whisk together the sauce ingredients and pour evenly over the chicken. Turn the chicken to ensure each piece is coated in sauce.
- Bake the chicken: Bake for 1 hour, turning the chicken every 15 minutes.
Serving Suggestions
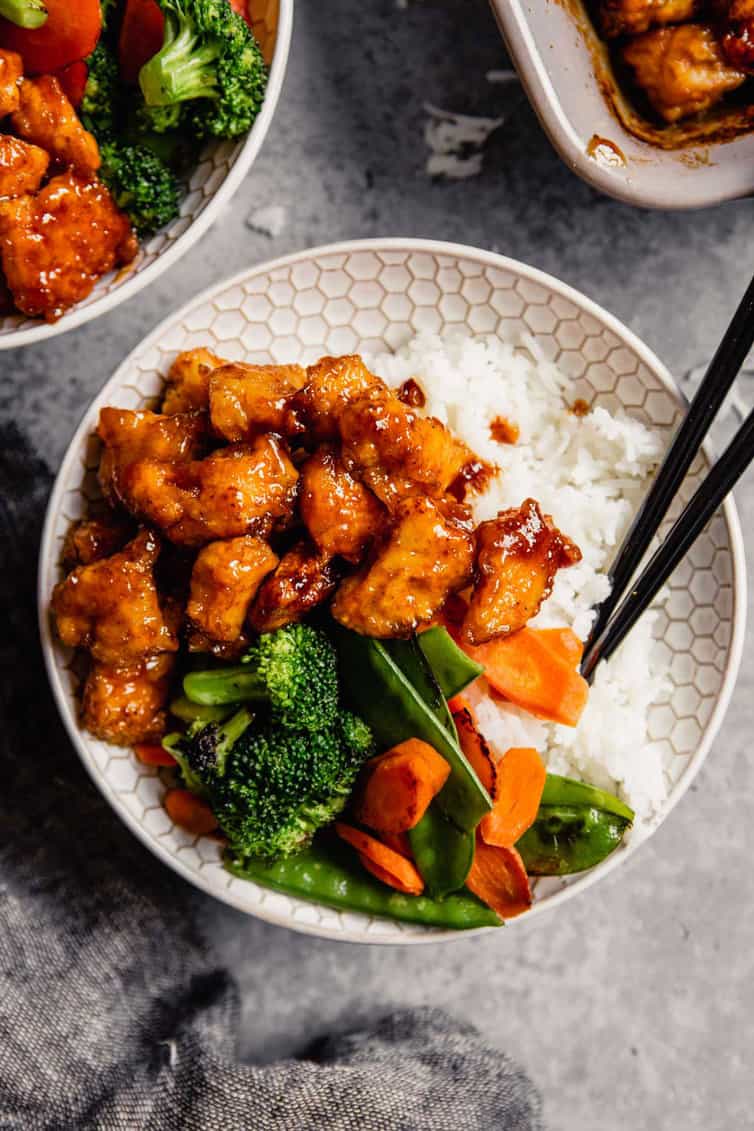
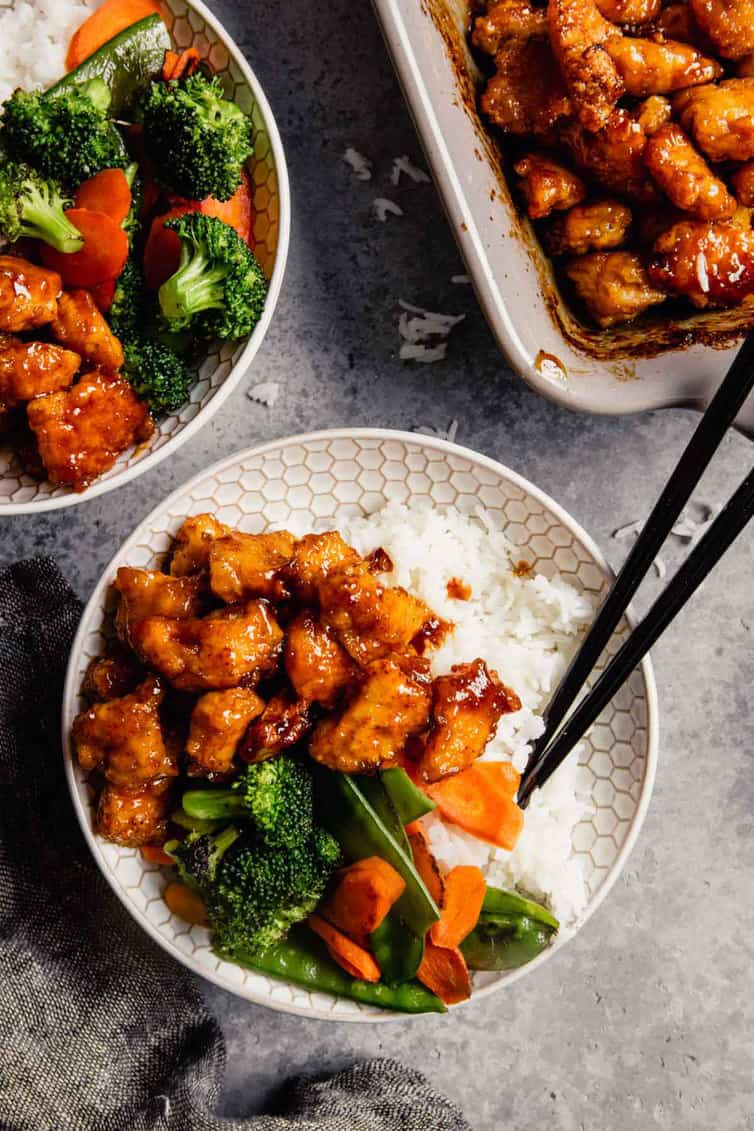
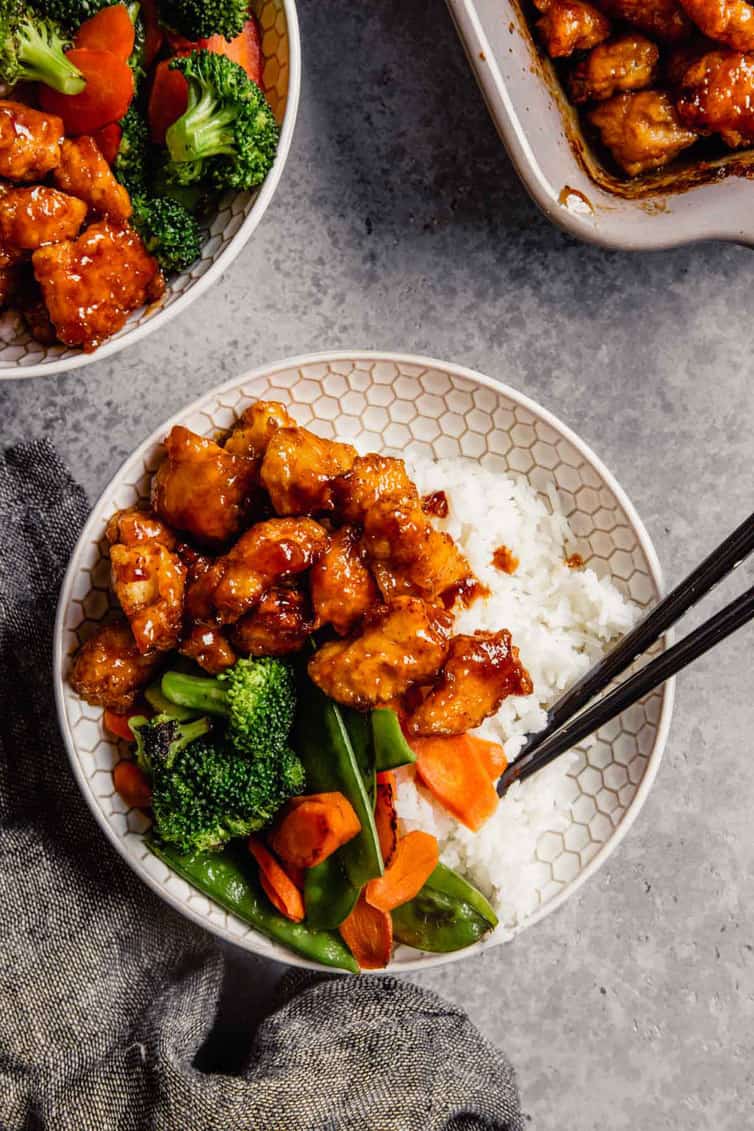
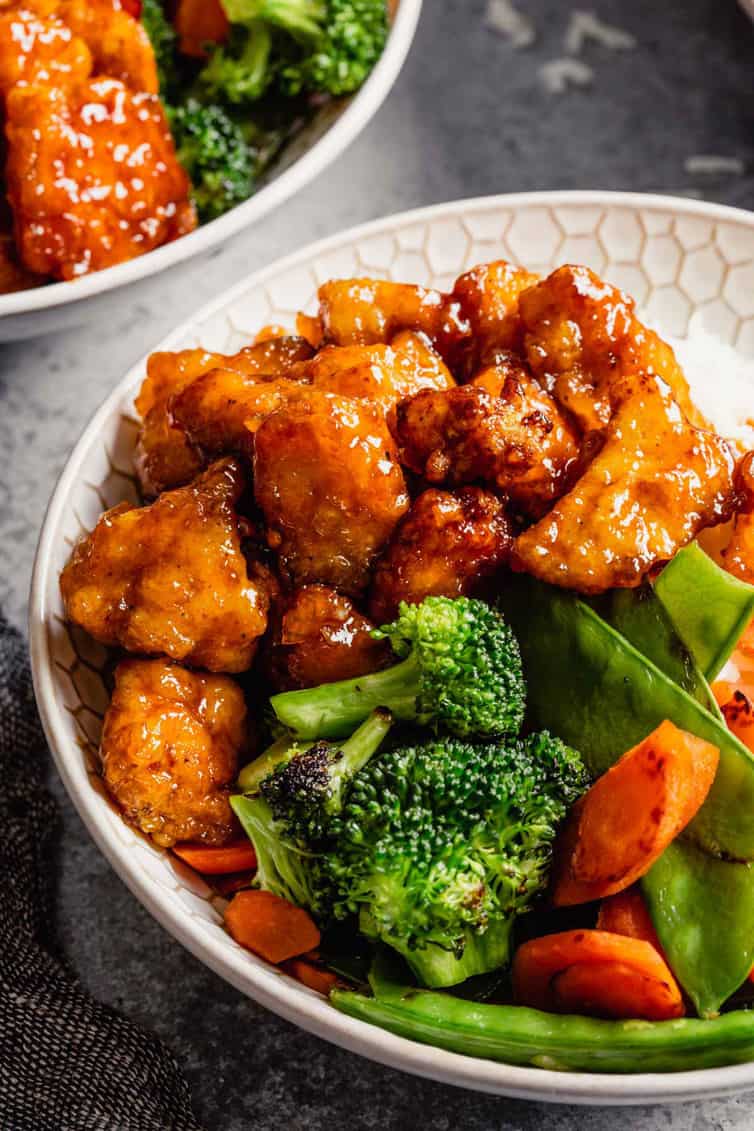
I usually serve this baked sweet and sour chicken with steamed rice and broccoli. Some other ways you can serve this dish include:
- Brown rice, cauliflower rice, or fried rice.
- Stir-fried vegetables such as carrots, snow peas, bell peppers, onion, etc.
- Switch it up with pineapple chunks and diced red and green peppers mixed in with the chicken.
Recipe Notes
- The recipe calls for rice vinegar (an Asian pantry staple), but you can substitute white vinegar or apple cider vinegar if necessary.
- For a slightly different flavor, use pineapple juice instead of vinegar in the sauce.
Tips for Doubling the Sauce
The amount of sauce is enough to coat the chicken, so if you prefer a much saucier dish (enough to coat the rice, too) then you will want to double the sauce for sure. To double the sauce:
- Double the ingredients for the sweet and sour sauce.
- Pour half of the sauce over the chicken, and stir to coat.
- Reserve the other half of the sauce and cook on the stove-top for 8-10 minutes until reduced.
- Drizzle over the baked sweet and sour chicken and rice.
Alternate Cooking Methods
Air fryer
- Instead of pan-frying the chicken, air fry the chicken pieces in batches for 7-9 minutes, flipping halfway.
- Then place air-fried chicken in the baking dish and coat with the sauce.
- Cook 1 hr tossing every 15 minutes.
Slow cooker
- For this method, begin by pan-frying the chicken.
- Line a slow cooker with a slow cooker liner and place chicken in.
- Pour the sauce over the chicken and stir to coat.
- Cook on low for 6 hours or high for 3 hours.
It’s important to note the sauce won’t reduce and thicken as much as it would in the oven, so take that into consideration.
Storing, Reheating, Meal Prepping
- Storing – The sweet and sour chicken can be stored in an air-tight container in the refrigerator for up to 4 days.
- Reheating – I suggest baking the sweet and sour chicken to reheat. Bake in an oven-safe dish for 10-20 minutes at 325°F. It can also be microwaved to warm up, as well.
- Meal Prepping – I love this sweet and sour chicken for an easy lunch meal prep recipe. Divide the cooked sweet and sour chicken into 4 meal-prep containers with rice and stir-fried vegetables and you are ready for better than takeout lunches!
If You Like This Sweet and Sour Chicken, Try These Next:
- Sesame Chicken
- Chinese Beef and Broccoli
- Scallion Pancakes with Ginger Dipping Sauce
- Crab Rangoon Recipe
Sweet and Sour Chicken
Get take-out quality sweet and sour chicken from the comfort of your own home! Crispy, pan-fried chicken beautifully coated in a homemade sweet and sour sauce are so good you’d think you ordered this dish from the neighborhood Chinese restaurant.
If you make this recipe and love it, remember to stop back and give it a 5-star rating - it helps others find the recipe! ❤️️

Sweet and Sour Chicken
Ingredients
For the Chicken
- 1½ pounds (680.39 g) boneless skinless chicken breasts, cut into 1-inch chunks
- Salt and pepper, to taste
- 1 cup (128 g) cornstarch
- 2 eggs, slightly beaten
- ¼ cup (54.5 ml) canola or vegetable oil
For the Sauce
- ¾ cup (150 g) granulated sugar
- ¼ cup (60 g) ketchup
- ½ cup (127.5 ml) rice vinegar
- 1 tablespoon soy sauce
- 1 teaspoon garlic powder
Instructions
- Preheat oven to 325 degrees.
- Season chicken with salt and pepper.
- Place the cornstarch in a shallow bowl or pie plate. Place the eggs in a separate shallow bowl. Working in two batches, toss the chicken pieces in cornstarch and then coat with the egg.
- In a large skillet, heat the oil over medium-high heat. Again working in two batches, brown the chicken, turning it so that all sides are browned.
- Place the chicken in a single layer in a 9x13-inch baking dish.
- In a small bowl, whisk together the sauce ingredients and pour evenly over the chicken. Turn the chicken to ensure each piece is coated.
- Bake for 1 hour, turning the chicken every 15 minutes. Serve with rice and steamed broccoli, if desired.
Notes
- Chicken: You can substitute boneless, skinless chicken thighs for the breasts.
- Vinegar: You can substitute white vinegar or apple cider vinegar. You can also use pineapple juice for a different flavor!
- Pineapple and Bell Pepper: Add chunks of pineapple and red/green bell pepper to the chicken mixture in the pan before baking for even more flavor.
- Extra Sauce: If you like a super saucy dish, I recommend doubling the sauce, using half as directed, and simmer the other half in a small saucepan while the dish is baking, then toss with the baked chicken when it comes out of the oven.
- Serving Suggestions: Steamed rice, cauliflower rice, or fried rice, along with steamed or stir-fried vegetables (broccoli, carrots, snow peas, etc.).
- Storage: Store leftovers in an airtight container in the refrigerator for up to 4 days.
- Air Fryer: Air fry the chicken pieces in batches for 7-9 minutes, flipping halfway. Then place air-fried chicken in the baking dish, coat with the sauce, and proceed with baking as directed.
- Slow Cooker: Pan-fry the chicken, then line a slow cooker with a slow cooker liner and place chicken in. Pour the sauce over the chicken and stir to coat. Cook on low for 6 hours or high for 3 hours. Important Note: The sauce won't reduce and thicken in the slow cooker the way it will in the oven, so you may want to transfer it to a saucepan and reduce on the stovetop before serving if you prefer a thicker sauce.
Did you make this recipe?
Leave a review below, then snap a picture and tag @thebrowneyedbaker on Instagram so I can see it!
Photography by Lauren Grant.


This was AAAAAAAmazing. My husband was so impressed! Definitely a keeper in our family. I will make extra sauce for rice. Thanks!
I’m sure America has its own special Chinese food, but COME TO CHINA!!!!!! I’m Chinese and I’ve never had General Tso’s chicken. Egg rolls aren’t that common here but I promise, if — no, WHEN — you come to China and/or Hong Kong, I will give you real Chinese food that’s amaaaazzzziiiiiiiinggggggggg. :)
Can the sweet and sour chicken be made earlier in the day and then reheated? If so, what temperature and time to reheat. Having an appetizer party and need to have food ready to reheat.
Thanks!
Hi Anne, I’d say you could fry the chicken before hand and make the sauce, and then combine the two and bake as directed.
i dont know whats wrong with me, but every time i fry with oil it splatters everywhere and i am so scared. the chicken browned decently but when i took it out of the oven, it was dry and overcooked. the sauce was nice though.
Looks wonderful! My Star wanted a sweet and sour chicken meal for tomorrow’s dinner and I do not have one, as I have never attempted to make this dish. This is what’s for dinner tomorrow night :)
I am so happy that I tried this recipe last night! My boyfriend absoulty loved it and so did I! Tonight Im going to try the beer and brown sugar kielbasa and sauerkraut. I think you should try making those eggrolls next!
Made this for dinner tonight with fried rice… It was a huge hit!!! Absolutely delicious!!!
this turned out great and i didnt have to go to the store to get anything i had all the ingredients already!
Would love to try this………wonder if it can be cooked totally on a stove in a skillet? My oven is broke… :-(
i just made this and its AWESOME. i never want to order chinese with the crappy red glaze on the side ever again!
just one thing… i made a half batch of this, and it came out very well except there are some hard blackened bits of the sauce on the chicken that are burned/caramelized and kinda chewy? i put it in the oven for an hour but i have a gas stove which might be hotter, do you think i should take it out sooner next time?
The oven could definitely be running hot. If you don’t have one, I highly recommend an oven thermometer!
The reward at the end of this recipe was dead silence as my dad and brother ate. This was really delicious and easy to make. I used a frozen vegetable mix similar to yours but used brown basmati rice which is my new fav. My brother hates brown rice but he liked this. It only took 30 mins. in the oven and next time I’ll double the sauce for sure. Definitely will make again! Thanks a bunch!
Made this last night, it turned out great! I used two smallish chicken breasts (about 3/4 of a pound), a red bell pepper, two carrots, and some fresh pineapple chunks I had in the fridge (maybe 1 – 1.5 cups?) Also doubled the sauce, but I only used 1 cup of sugar total, which was plenty. We liked how the “sour” in “sweet and sour” really came out, unlike a lot of take-out Chinese sweet and sour which is just overbearingly sweet. Will definitely make this again. Only thing I’d do different is to add the veggies half way through instead of at the beginning so they don’t cook down quite so much. :)
Absolutely deliscious!!!! Will definately make again though I think I will double the sauce next time!!!
We are making this dish tonight! Excited to see how it turns out! Will let you know!
Brittney
Peoria, AZ
Oh, wow! This was AMAZING! I’ve made zillions of recipes from blogs, but this is the first time I’ve ever jumped online right after dinner to post a comment about how good the food was! To make it easier for frying and flipping, I cut the chicken into large strips instead of small pieces, which I will definitely do again. I also doubled the sauce and am very glad I did. We had ours with brown rice and broccoli. We’ll be having this again! Thanks!
Just made this tonight along with my homemade fried rice…very good! Thanks for this recipe. I used 1/4 cup of brown sugar and 1/2 cup white sugar as I was low on granulated sugar…yum!
Hi!
We love this recipe! It is exactly what we were looking for. Thanks so much for posting it. The only slight changes we made were: adding a tbspn of toasted sesame oil into the oil for frying them off to add a little more asian flavor and we use egg beaters rather than whole eggs for the dip (which doesn’t change the chicken in anyway, we just prefer egg beaters). Thanks again!
Found this recipe and love it! Making it again right now :) I have been using egg white’s only because I felt with whole eggs it was coming out like scrambled egg coated chicken, at least for me. Next time I am going to add orange juice, orange zest and chili pepper flakes to make a spicy orange chickenversion. Thank you for the recipe.
I loove Chinese food!! We’re definitely trying this recipe for dinner tonite, I like that it’s simple and not a ton of oil to fry it in..thanks so much for sharing!
I came across this recipe as few days ago and made it for dinner last night. Can I just say…OH. MY. GOODNESS. Thank you so much…it was awesome!
This was fantastic! We had it tonight and it’s already made it’s way onto my blog. Thank you, thank you, thank you!
I just made this last night after you posted it in your top 10 dinners- and it was PHENOM! Thank you!
I just discovered this recipe and I made it last night. I am definitely making it again. It’s so simple and delicious!! Thanks so much!!
Okay so I was a little skeptical about this recipe. I thought,’Can it really taste like take-out?’. Was I ever WRONG – this tastes exactly like take out but better because it’s homemade! It is a definite make again – plus it’s super easy to make! Since I am on a gluten free diet, I converted it to gluten free ingredients and it was delicious! Thank you, thank you!
I just made this! Delicious!
I served it with homemade crab rangoons and broccoli. This one is going into the weekly rotation! Absolutely amazing!
This was delicious! Taste was spot on and it disappeared VERY quickly.
My sauce didn’t seem to completely thicken up though, any suggestions?
Hi Rachel, Hmm the only thing I could think is that the oven wasn’t hot enough, but any oven should be hot enough to cook down that sauce. Perhaps accidentally too much vinegar or soy sauce thinned it?
Hmm… I made multiple batches at once, so there was plenty of room for a math error there. Thickened sauce or no, I’ll be making this again. I’ll make sure to pay a little extra attention to how much liquid I put in next time. Thanks!
I had the same problem. I added about a cup of cornstarch with water to the sauce and heated it before adding to the dish and it ended up thickening up nicely. I also only cooked it for half an hour
Ok, THIS is amazing!! My husband said it was the BEST Chinese he has ever had. Definitely a keeper.
Thank you so much for such a great recipe. I just made it tonight and my husband said it was the best meal I have ever made! I cooked snowpeas and water chestnuts to go with it, and served it with short grain brown rice. It tasted better than any Chinese takeout I have had. Can’t wait to try more of your recipes! Thanks again.
I bookmarked this recipe to try someday. Today was the day! I LOVE it! Yummy! I made it for tonights dinner, but I think I’ll be having it for today’s lunch first LOL. Thanks for posting this recipe, I will be making it again and again!