September Daring Bakers: The Cinnamon Roll

This was my first challenge as a member of the Daring Bakers group and I was excited to tackle it! To be completely honest, I was overwhelmingly relieved that my first challenge appeared to be something I could handle without a lot of complicated steps that might intimidate me.

We were provided with the recipes for both cinnamon rolls and sticky buns and had the option to make either one or both. I stuck with the classic cinnamon rolls because I didn’t have a doubt that they would definitely go.

I didn’t run into any problems and in fact the dough was perfectly soft and silky – maybe the best dough I have ever worked with! There was nothing very difficult about this recipe and I will be saving it as my default cinnamon roll recipe.

Thanks to the Daring Bakers for inducting me and making my first challenge a success, and thank you to Marce for hosting this month!

Keep reading »

Cornbread


Nothing goes better with a big bowl of chili than cornbread! This was my first attempt at making cornbread from scratch, and the result was incredible. I wouldn’t change a thing from this recipe – it developed a perfect crust and was warm and crumbly inside.


All-Purpose Cornbread
(Source: Cook’s Illustrated, Fall 2007)

1 1/2 cups unbleached all-purpose flour
1 cup yellow cornmeal
2 teaspoons baking powder
3/4 teaspoon table salt
1/4 teaspoon baking soda
1/4 cup packed light brown sugar
3/4 cup frozen corn kernels, thawed
1 cup buttermilk
2 large eggs
8 tablespoons (1 stick) unsalted butter, melted and cooled slightly

1. Adjust oven rack to middle position; heat oven to 400 degrees. Spray 8-inch square baking dish (glass is recommended) with nonstick cooking spray. Whisk flour, cornmeal, baking powder, salt, and baking soda in medium bowl until combined; set aside.

2. In food processor or blender, process sugar, thawed corn kernels, and buttermilk until combined, about 5 seconds. Add eggs and process until well combined (corn lumps will remain), about 5 seconds longer.

3. Using rubber spatula, make well in center of dry ingredients; pour wet ingredients into well. Begin folding dry ingredients into wet, giving mixture only a few turns to barely combine; add melted butter and continue folding until dry ingredients are just moistened. Pour batter into prepared baking dish; smooth surface with rubber spatula. Bake until deep golden brown and toothpick inserted in center comes out clean, 25 to 35 minutes. Cool on wire rack 10 minutes; invert cornbread onto wire rack, then turn right side up and continue to cool until warm, about 10 minutes longer. Cut into pieces and serve.

An Non-Traditional Take on Chili


There are a million different versions of chili and most people have their tried and true favorite. I typically don’t like very spicy dishes, so this chili recipe that my mom passed along to me from another family member fits the bill for me. It’s warm, hearty and not too spicy (not spicy at all if you leave out the chili powder!). The addition of rice and omission of beans certainly make this nontraditional! This chili can be thrown together in less than 30 minutes so it’s also perfect for a quick meal!


Chili-Rice Dinner
(Source: My Mom)

3/4 lb. ground beef
1/3 cup chopped onion
1 tablespoon chili powder
1/2 teaspoon dry mustard
1 pkg (10-oz) frozen sweet whole kernel corn
1 cup diced green pepper
1 can (15-oz) tomato sauce
1/2 cup water
1 cup instant rice
1/2 cup shredded cheddar cheese

1. Brown beef and onion in a skillet over medium-high heat.

2. Add spices, corn, green pepper, tomato sauce and water. Cover and bring to a full boil, stirring occasionally.

3. Stir in rice, reduce heat, cover and simmer for 5 minutes.

Sprinkle with cheese.

Oatmeal Raisin Chocolate Chip Cookies
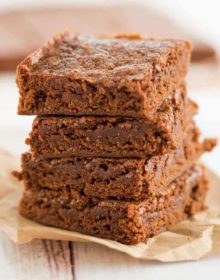
I have been eating a lot of oatmeal with apples and raisins for breakfast in the mornings and as a result, I’ve been craving oatmeal raisin cookies. I haven’t made these in years, and to be quite honest, the last couple of times that I made them they didn’t turn out all that great. I was looking forward to trying a new recipe and these definitely lived up to my expectations! They were crisp on the outside and soft and chewy on the inside – the perfect oatmeal cookie.


Oatmeal Raisin Cookies
(Source: Deborah’s Culinary Confections, courtesy of Annie’s Eats)

1 cup (2 sticks) unsalted butter, softened
1 1/2 cups light brown sugar, packed
1/2 cup granulated sugar
2 eggs
1 teaspoon vanilla extract
1 3/4 cups flour
1 teaspoon baking soda
1/2 teaspoon salt
1 1/2 teaspoons cinnamon (omitted)
1/4 teaspoon nutmeg (omitted)
3 cups old-fashioned oats
1 cup raisins
1 cup walnuts (I substituted dark chocolate chips)

Directions:
1. Preheat oven to 375.

2. In a large bowl, beat butter, sugars, eggs and vanilla extract until well blended. In a medium bowl combine flour, baking soda, salt, cinnamon and nutmeg. Add dry ingredients to butter mixture, stirring just until combined.

3. Fold in rolled oats, raisins, and walnuts (in this case, chocolate chips). Drop dough by rounded teaspoons (I used a cookie scoop) about 2 inches apart onto a cookie sheet.

4. Bake for 8 – 10 minutes (mine took 12 minutes) or until edges are lightly browned. Cool 2 minutes and remove to wire rack to cool completely.

Yield: A little over 4 dozen cookies.

The BEST Brownies?

You bet they are! Hershey’s struck a home run with their Perfectly Chocolate Cake, and I am again impressed with their famed brownie recipe. This was actually the second time I have made this recipe, but they disappeared so fast the first time that I didn’t get a chance to take a picture!

I admittedly don’t have a lot of experience with homemade brownies, but these were dense and fudge-like – the perfect brownie by my standards!


Best Brownies
(Source: Hershey’s)

1/2 cup (1 stick) butter or margarine, melted
1 cup sugar
1 teaspoon vanilla extract
2 eggs
1/2 cup all-purpose flour
1/3 cup Hershey’s cocoa
1/4 teaspoon baking powder
1/4 teaspoon salt
1/2 cup chopped nuts (optional)

Directions:
1. Heat oven to 350. Grease 9-inch square baking pan.

2. Stir together butter, sugar and vanilla in bowl. Add eggs; beat well with spoon. Stir together flour, cocoa, baking powder and salt; gradually add to egg mixture, beating until well blended. Stir in nuts, if desired. Spread batter evenly into prepared pan.

3. Bake 20 to 25 minutes or until brownies begin to pull away from sides of the pan. Cool completely in pan on wire rack. Cut into squares. Approximately 16 brownies.

Beef Mushroom Barley Soup


The weekly soup continues with a recipe for Beef Mushroom Barley soup, adapted from Elly. I couldn’t believe how fabulous this soup turned out. The flavor was amazing, the meat perfectly tender and it was amazingly easy to put together. This rivals homemade wedding soup as my current favorite – it was THAT good! It does take about 2.5 hours from start to finish, but trust me when I tell you that the waiting is well worth it!

The substitution you find below for the red wine was found in Cook’s Illustrated Fall 2007 issue. To replace wine in a dish, use the following ratio:

1/2 cup wine = 1/2 cup broth + 1 teaspoon wine vinegar (red or white, based on recipe)


Beef Mushroom Barley Soup
(Source: Elly Says Opa!)

Ingredients:
1 lb. beef (I used stew meat)
1 tablespoon olive oil
Salt & pepper
1 cup water
1 cup red wine (I substituted 1 cup beef broth + 2 teaspoons red wine vinegar)

2 tablespoons butter
1 medium onion, finely chopped
1 cup carrots, sliced (about 3 carrots)
1 cup celery, sliced (about 3 ribs)
2 cloves garlic, minced
8 cups beef broth
1 teaspoon dried thyme
1 teaspoon dried basil
1 bay leaf
Salt & pepper

1/2 cup barley
8 oz. mushrooms, sliced

Preparation:
1. Season beef with salt and pepper. Heat olive oil in a large stockpot. Add meat and brown. Pour in water and red wine (or broth/vinegar mixture) and simmer for approximately 1 hour.

2. Remove beef and cut into bite-size pieces. Skim fat and reserve 1/2 cup of cooking liquid; discard remaining liquid.

3. Melt butter in the stockpot. Add onion, carrots and celery and saute until tender. Stir in garlic and saute until fragrant, about 30 seconds. Pour in beef broth and add thyme, basil, bay leaf, beef and reserved cooking liquid. Simmer for 20-30 minutes; season with salt and pepper to taste.

4. Add barley and mushrooms and simmer for approximately 40 minutes.

Chocolate Rum Cheesecake


My first inclination when thinking about the type of dessert to make for our classic Italian dinner was a cheesecake. I couldn’t decide between a plain cheesecake with a fruit topping, a filling of some sort, etc. My friend Amber was nice enough to remind me of a recipe she showed me a couple of weeks ago that I was enamored with – Chocolate Rum Cheesecake.

This was my second time making a cheesecake (the first was an Oreo Cheesecake) and I found it once again to be rather simple. This cheesecake required a few extra steps but none that were complicated or advanced in any way.

This recipe called for superfine sugar, which I could not find at my grocery store. After researching for a bit I found that you can easily make your own by merely processing regular granulated sugar in the food processor or blender until it is fine and powdery, which is what I did.

I was proud in that I only managed one small crack in the top of the cheesecake! This recipe produced an insanely creamy cheesecake. The bittersweet chocolate was perfect because it wasn’t too sweet, and consider yourself warned — you can most definitely taste the rum in this!


Chocolate Rum Cheesecake
(Source: Williams Sonoma)

For the crust:
1 1/4 cups graham cracker crumbs
1 tablespoon granulated sugar
4 tablespoons (1/2 stick) unsalted butter, melted

For the filling:
6 oz bittersweet baking chocolate
1/4 cup rum (I used dark rum)
1 lb cream cheese
3/4 cup superfine sugar
1/2 cup sour cream
1 tablespoon vanilla extract
4 extra-large eggs

Directions:
Position a rack in the center of an oven and preheat to 325 degrees. Butter a 9-inch springform pan and cover the outside with aluminum foil, shiny side out.

In a mixing bowl, combine the graham cracker crumbs and granulated sugar and stir to mix. Add the melted butter and stir until blended. Press the mixture evenly into the bottom and halfway up the sides of the pan. Refrigerate until ready to use.

In a small saucepan over low heat, combine the chocolate and rum and melt, stirring often, about 1 minute; set aside.

In the bowl of an electric mixer, beat the cream cheese until smooth and fluffy. Gradually add the superfine sugar and continue beating until blended. Then beat in the sour cream and vanilla extract. Add the eggs one at a time, beating well after each addition.

Remove the bowl from the mixer and set it over a pan of simmering water but not touching the water. Warm the mixture, stirring constantly, until completely smooth and very creamy, 2 to 3 minutes.

Pour 1 1/3 cups of the batter into another bowl and set aside. Add the chocolate mixture to the remaining batter and whisk until blended. Set the bowl back over the simmering water and stir until creamy and smooth.

Pour the chocolate batter into the prepared pan. Gently pour the plain batter over the top and make swirls in the batter with a fork.

Bake until the cake is set around the edges and the center is still a little loose, 45 to 50 minutes. Cool to room temperature, remove the rim from the pan and refrigerate overnight. Serves 10 to 12.

Fresh Baked Italian Bread

What better to go with a hearty Italian dish like risotto, than a big crusty loaf of homemade Italian bread!


I have made simple white breads in the past and had also tried my hand at a honey wheat bread, but this was my first attempt at a rustic-style bread. Many thanks to my friend Amber for finding this recipe for me.

Be forewarned that this recipe takes literally all day to make, but the waiting and effort is well worth it! This bread produced an amazingly thick and crunchy crust with a warm, soft and chewy interior – the perfect Italian bread. Served with warmed butter, I could eat an entire loaf myself!


Italian Bread

(Source: The Fresh Loaf)

Makes 2 large 2-pound loaves.

Preferment:
1 cup water
1 cup bread or all-purpose unbleached flour
1/2 teaspoon instant yeast

Dough:
All of the preferment
5 cups bread or all-purpose unbleached flour
1/2 cup nonfat dry milk
1 tablespoon malt syrup, malt powder, brown sugar, or sugar
1 tablespoon salt
2 teaspoons instant yeast
1 tablespoon olive oil
2 cups water

Preparation:
To start the preferment, mix together the flour, water, and yeast in a small bowl and cover with plastic wrap. Leave out at room temperature for at least 4 hours and as long as 16 hours.

To make the dough, mix together the preferment, water, olive oil, yeast, salt, malt powder, and dry milk in a bowl with 2 more cups of flour. Mix thoroughly. Mix or knead in in the rest of the flour a half a cup at a time until you have a slack dough but one that is no longer sticky. Total mixing time should be in the ballpark of 10 to 15 minutes.

Place the dough in a well-greased bowl and cover with plastic wrap. Allow to rise at room temperature until at least 2 times in size, approximately 2 hours. Punch the dough down and let it rise again for half an hour.

Remove the dough from the bowl and divide it in half. Shape the dough into a ball or log, cover with a damp towel, and allow it to relax for another 20 minutes.

Shape the dough into its final shape. Cover again and allow to rise for another hour until doubled in bulk.

Meanwhile, preheat the oven and baking stone, if you are using one, to 425 degrees.

Right before placing the loaves in the oven brush or spray them lightly with water. Place them into the oven and bake for 20 minutes before rotating them. Bake them another 20 to 30 minutes or until the internal temperature of the loaf reads 200 degrees. Remove from the oven and allow to cool for at least a half an hour before serving.

The Chocolate Chip Cookie


For the better part of my baking life (at least 10 years now) I have been haunted by the chocolate chip cookie. It’s the most simple of all baking recipes, yet I have struggled to find the perfect recipe and successfully make a cookie that didn’t turn into a rock within 5 minutes of coming out of the oven.

The classic Nestle recipe? Forget it.
The much-loved BBFCCC? Totally screwed them up.

Earlier this year I came upon the recipe that adds vanilla pudding mix to the cookie dough. While this resulted in a chewy cookie, it was a little cakey and missing the ooey gooey goodness that I have always dreamed of achieving.

Last night I kept eating chocolate chips out of a large bag that I had sitting in the pantry, and in an attempt to get them out of my reach I decided to give the elusive chocolate chip cookie another shot. The recipe below has elements from a lot of different recipes and tips that I have read online, so I am honestly not sure who to credit for it. I would like to think that I finally created something on my own :) The result of this recipe is what I have always longed for from my chocolate chip cookie – thin, not cakey, soft, chewy and gooey. I am in love :)

Mission Accomplished!!


Chelle’s Soft & Gooey Chocolate Chip Cookies

2 1/4 cups all-purpose flour
1 teaspoon baking soda
1 teaspoon salt
1 cup (2 sticks) unsalted butter
3/4 cup granulated sugar
3/4 cup packed light brown sugar
1 tablespoon vanilla extract
2 large eggs
1 tablespoon milk
2 cups semisweet chocolate chips

1. Preheat oven to 375 degrees.

2. Microwave butter for 30 seconds, stir and set aside. Do not worry if it is not completely melted.

3. Combine flour, baking soda, and salt in a small bowl and set aside.

4. Beat butter, granulated sugar, brown sugar and vanilla on medium-high speed until creamy. Add eggs, one at a time, beating well after each addition. Add milk and beat until combined. Gradually beat in flour mixture, beating just until combined (do NOT overmix!). Stir in chocolate chips.

5. Refrigerate dough for 15-30 minutes.

6. Drop by rounded spoonful (I used a Pampered Chef cookie scoop that holds approximately 2 tablespoons) onto ungreased cookie sheets. Bake for 12 minutes or until edges are just brown and middle is not quite set yet. Cool on pan for 2 minutes and then transfer to a cooling rack.

7. Before adding more dough to warm cookie sheets, place sheet in freezer for 5-7 minutes to cool.

Store in an airtight container. Recipe yielded 3 1/2 dozen cookies.


Foodbuzz 2009 Blog Awards Nominee


Stay Connected!


Subscribe via RSSSubscribe via RSS

Subscribe via Email

Become a Fan on Facebook

Follow on Twitter

Top 10 Recipes This Month

Categories

Monthly Archives


CookEatShare Featured Author
view my recipes
CookEatShare Featured Author