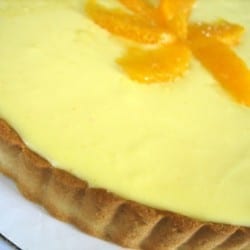
Fresh Orange Cream Tart
My first tart, hooray! I am in awe of the beauty of the fluted buttery crust!
This week’s Tuesday With Dorie recipe was chosen by Mary of Starting From Scratch. Her choice was The Most Extraordinary French Lemon Cream Tart; however, with so many people not necessarily having a taste for lemons, we were given an alternate choice – the Fresh Orange Cream Tart. Since I am not a huge fan of lemon, I went for the Fresh Orange Cream Tart.
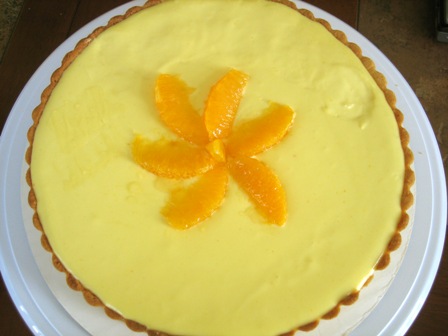
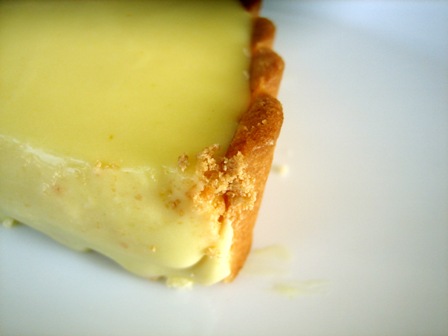
This tart can easily be described as a creamsicle wrapped up in a buttery shortbread crust. The first part of this tart involved making the cream. A number of people had noted problems with getting the cream up to 180 degrees, but I used a metal bowl and hit 180 degrees in just about 10 minutes, as the recipe indicated. After heating the cream, the butter is whirred in, in more of an emulsion type of procedure. A quick taste confirmed that this was a silky smooth and perfectly orange mixture.
The dough for this tart was nothing short of amazing. Using a food processor to combine it the key was to have patience. Some said that their dough turned out crumbly and dry. After adding the egg it did appear to be dry and course, but after about five of the 10 second pulses, the sound changed (as Dorie indicated it would) and the dough clumped up. It didn’t form a cohesive ball, but clumped together enough to be able to be rolled out very nicely.
Save This Recipe
The tart had a nice, light flavor to it, was nice and creamy, and I just can’t say enough about that crust! I typically prefer richer desserts over citrus ones, but this was a nice change of pace and I’d love to fill that tart crust with some luscious chocolate! :)
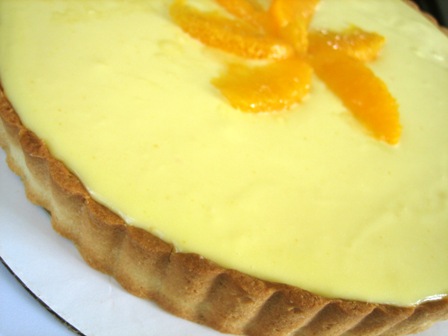
I did try to brush the tart with the boiled down apple jelly, but it was just too much for my delicate cream. You can see some imperfections on the surface, and that’s where I tried to lightly brush it on, but I chose to just skip it as it seemed to be too much for the surface.
The Tuesdays With Dorie group is nearing 125 members, so be sure to head on over to the blog and check out everyone’s lemon and orange tarts!
Next week: Marshmallows
Last week: Gooey Chocolate Cakes
Fresh Orange Cream Tart
Ingredients
For the Dough:
- 1 ½ cups (187.5 g) all-purpose flour
- ½ cup (60 g) confectioner's sugar
- ¼ teaspoon (0.25 teaspoon) salt
- 1 stick plus 1 tablespoon very cold (or frozen) unsalted butter, cut into small pieces, (9 tablespoons)
- 1 large egg yolk
For the Orange Filling:
- 1 cup (200 g) sugar
- Grated zest of 3 oranges
- Grated zest of 1 lemon
- 4 large eggs
- ¾ cup (186 ml) Scant fresh blood-orange or Valencia orange juice
- 3 tablespoons fresh lemon juice
- 1 ¼ teaspoons (1.25 teaspoons) unflavored gelatin
- 1 tablespoon cold water
- 2 ¾ sticks (2.75 sticks) unsalted butter, cut into tablespoon-size pieces, at cool room temperature, (11 ounces)
- 3 orange segments, for decoration
- ⅓ cup (113.33 g) quince or apple jelly mixed with 1/2 teaspoon of water, for glazing
Instructions
- 1. To make the Dough: Put the flour, confectioner's sugar and salt in a food processor and pulse a couple of times to combine. Scatter the pieces of butter over the dry ingredients and pulse until the butter is coarsely cut in - you should have some pieces the size of oatmeal flakes and some the size of peas. Stir the yolk, just to break it up, and add it a little at a time, pulsing after each addition. When the egg is in, process in long pulses - about 10 seconds each - until the dough, which will look granular soon after the egg is added, forms clumps and curds. Just before you reach this stage, the sound of the machine working the dough will change - heads up. Turn the dough out onto a work surface and, very lightly and sparingly, knead the dough just to incorporate any dry ingredients that might have escaped mixing.
- 2. To Press the Dough into the Pan: Butter a 9-inch fluted tart pan with a removable bottom. Press the dough evenly over the bottom and up the sides of the pan, using all but one little piece of dough, which you should save in the refrigerator to patch any cracks after the crust is baked. Don't be too heavy-handed - press the crust in so that the edges of the pieces cling to one another, but not so hard that the crust loses its crumbly texture. Freeze the crust for at least 30 minutes, preferably longer, before baking.
- 3. To Partially or Fully Bake the Crust: Center a rack in the oven and preheat the oven to 375 degrees F.
- 4. Butter the shiny side of a piece of aluminum foil and fit the foil, butter side down, tightly against the crust. (Since you froze the crust, you can bake it without weights.) Put the tart pan on a baking sheet and bake the crust for 25 minutes. Carefully remove the foil. If the crust has puffed, press it down gently with the back of a spoon. For a partially baked crust, patch the crust if necessary, then transfer the crust to a cooling rack (keep it in its pan).
- 5. To Fully Bake the Crust: Bake for another 8 minutes or so, or until it is firm and golden brown. (I dislike lightly baked crusts, so I often keep the crust in the oven just a little longer. If you do that, just make sure to keep a close eye on the crust's progress - it can go from golden to way too dark in a flash.) Transfer the tart pan to a rack and cool the crust to room temperature before filling.
- 6. To Patch a Partially or Fully Baked Crust, if Necessary: If there are any cracks in the baked crust, patch them with some of the reserved raw dough as soon as you remove the foil. Slice of a thin piece of the dough, place it over the crack, moisten the edges and very gently smooth the edges into the baked crust. If the tart will not be baked again with its filling, baking for another 2 minutes or so, just to take the rawness off the patch.
- 7. To make the Orange Filling:Have an instant-read thermometer, a strainer and a blender (first choice) or food processor at hand. Bring a few inches of water to a simmer in a saucepan.
- 8. Put the sugar and orange and lemon zest in a large heatproof bowl that can b e set over the pan of simmering water. Off the heat, rub the sugar and zests together between your fingertips until the sugar is moist, grainy and very aromatic. Whisk in the eggs, followed by the orange and lemon juice.
- 9. Set the bowl over the pan and start stirring with the whisk as soon as the mixture feels tepid to the touch. You want to cook the cream until it reaches 180 degrees F. As you whisk - you must whisk constantly to keep the eggs from scrambling - you'll see that the cream will start out light and foamy, then the bubbles will get bigger and then, as it gets closer to 180 degrees F, it will start to thicken and the whisk will leave tracks. Heads up at this point - the tracks mean the cream is almost ready. Don't stop whisking or checking the temperature, and have patience - depending on how much heat you're giving the cream, getting to temp can take as long as 10 minutes.
- 10. As soon as it reaches 180 degrees F, remove the cream from the heat and strain it into the container of the blender (or food processor); discard the zest.
- 11. Soften the gelatin in the cold water, then dissolve it by heating it for 15 seconds in a microwave oven (or do this in a saucepan over extremely low heat). Add the gelatin to the filling and pulse once just to blend, then let the filling cool to 140 degrees F, about 10 minutes.
- 12. Turn the blender to high (or turn on the processor) and, with the machine going, add the butter about 5 pieces at a time. Scrape down the sides of the container as needed as you incorporate the butter. Once the butter is in, keep the machine going - to get the perfect light, airy texture, you must continue to blend the cream for another 3 minutes. If your machine protests and gets a bit too hot, work in 1-minute intervals, giving the machine a little rest between beats.
- 13. Pour the cream into a container, press a piece of plastic wrap against the surface and refrigerate for at least 4 hours. (The cream can be refrigerated, tightly covered, for up to 5 days or frozen for up to 2 months; thaw overnight in the fridge.)
- 14. When you are ready to construct the tart, whisk the cream vigorously to loosen it. Spread the cream evenly in the crust. Arrange the orange segments in the center of the tart and prepare the glaze: bring the jelly and water to a boil. Use a pastry brush or pastry feather to lightly spread the jelly over the orange segments and cream. Serve now or refrigerate the tart until needed.
Did you make this recipe?
Leave a review below, then snap a picture and tag @thebrowneyedbaker on Instagram so I can see it!


Thank you for every other great article. Where else may anybody get that kind of information in such a perfect means of writing? I have a presentation subsequent week, and I’m on the look for such information.
It’s actually a great and helpful piece of info. I’m happy that you simply shared this helpful info with us. Please stay us informed like this. Thank you for sharing.
I don’t even understand how I stopped up right here, however I believed this post was once good. I do not recognize who you are however certainly you’re going to a well-known blogger should you aren’t already ;) Cheers!
Very nice article and straight to the point. I don’t know if this is really the best place to ask but do you folks have any thoughts on where to hire some professional writers? Thx :)
I’ve recently started a blog, the info you provide on this web site has helped me greatly. Thanks for all of your time & work.
I like the valuable information you provide in your articles. I’ll bookmark your blog and test again right here frequently. I am fairly sure I’ll be told plenty of new stuff proper here! Good luck for the next!
OMGosh! This is heaven!!! I am not a lemon fan so this was an awesome alternative and came out so so delicious! I was just thinking last night…I wonder if this would work for pineapple? I love fresh pineapple and thought that too would be out of this world! I wanted to get your take on it before trying it though-what do you think?
Hi Juli, Definitely, pineapple sounds delicious!
Do you think cornstarch would work instead?
Cornstarch would definitely work as a thickening agent, but I don’t know if it would allow the tart to set firm the way gelatin does. That being said, it never hurts to try! If you give it a go I’d love to hear how it turned out.
Could you substitute something for the gelatin? I prefer not to use it.
Hi Ameya, I have not tried to do any substituting for the gelatin; that’s what helps the tart stay firm.
Hi, I was wondering if I needed to prick the dough before baking it. I am making a mango tart with this tart dough recipe :)
Hi Jasmine, Yes, I always prick the dough before blind baking, sorry if I forgot that in the steps! And a mango tart sounds delicious!
Yum! I love oranges and this looks awesome. I’ll have to make it soon.