Cinnamon Raisin Bagels
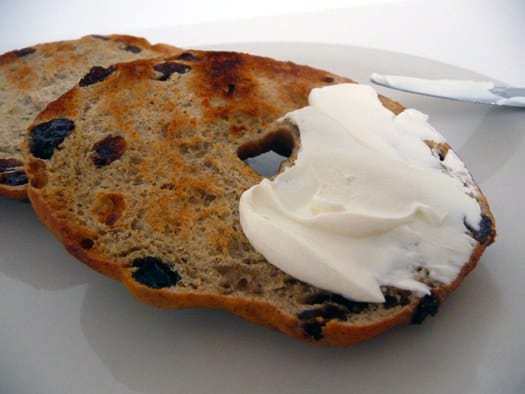
I love bagels and I was in the mood to do some baking. Since I had already made the original bagel recipe in The Bread Baker’s Apprentice, I decided to use this opportunity to make the cinnamon raisin variation provided by Peter Reinhart. The only differences are an increase in yeast and the addition of sugar, cinnamon, and raisins to the dough. I loved the original bagels and quite possibly loved this version even more. They were absolutely incredible – the texture was perfectly chewy and just the right amount of sweet to complement the cinnamon and raisins. Everyone who tried them loved them and begged for more. So far they have been eaten with cream cheese, with butter, and with peanut butter, all generating rave reviews.

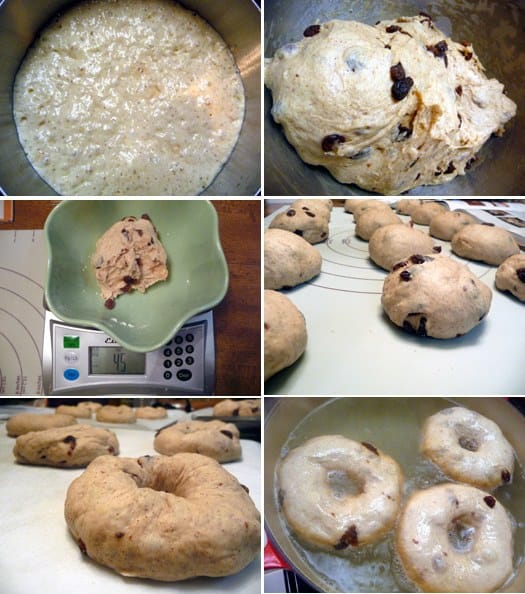
A beginner baker who has never tackled bagels need not be intimidated. As you’ll see, there are a number of steps and involved, and it is a bit time-consuming, but certainly not difficult. The one thing you will want to take note of is the overnight rest in the refrigerator – this step should not be skipped or any short cuts taken, as this retardation, as Peter Reinhart refers to it, is a vital step in allowing the bagels to develop their characteristic flavor.
Notes on recipe:
♦ This bagel recipe makes a very stiff dough, so keep an eye (and nose) out for your KA – the last time I made these I could actually smell the motor burning. Definitely not good. If you feel like it’s too much for your mixer, do the kneading by hand.
Save This Recipe
♦ I measured out the dough into 4½-ounce pieces as the recipe instructs, and I got 15 bagels instead of 12. I’m not sure why, but I was happy to have some extra bagels.
♦ Some of my bagels plumped up nicely but many others were rather flat. I’m not sure why this was – does anyone have any insight to share? The only thing I could think of is maybe I had the trays covered too tightly in the refrigerator overnight, and perhaps that kept them from plumping up to their full potential?
More Bagels:
Plain bagel recipe from Peter Reinhart
Want some different breakfast options? Check these out:
Bacon, Cheddar, and Green Onion Scones
Omelet for Two
Buttermilk Pancakes
French Toast
Baked Oatmeal
Cinnamon-Raisin Bagels
Ingredients
Sponge:
- 1 teaspoon instant yeast, (0.11 ounces )
- 4 cups (500 g) unbleached high-gluten or bread flour, (18 ounces )
- 2½ cups (625 ml) water, at room temperature, (20 ounces )
Dough:
- 1 teaspoon instant yeast, (0.11 ounces )
- 3¾ cups (468.75 g) unbleached high-gluten or bread flour, (17 ounces )
- 2¾ teaspoons (2.75 teaspoons) salt
- 1 tablespoon ground cinnamon
- 5 tablespoons granulated sugar
- 2 cups (290 g) loosely packed raisins, rinsed in warm water
- 2 teaspoons malt powder, (or 1 tbsp dark or light malt syrup, honey, or brown sugar)
To Finish:
- 1 tablespoon baking soda
- Cornmeal or semolina flour for dusting
Instructions
- 1. To make the sponge, stir the yeast into the flour in a 4-quart mixing bowl. Add the water, whisking or stirring only until it forms a smooth, sticky batter (like pancake batter). Cover the bowl with plastic wrap and leave at room temperature for approximately 2 hours, or until the mixture becomes very foamy and bubbly. It should swell to nearly double in size and collapse when the bowl is tapped on the countertop.
- 2. To make the dough, in the same mixing bowl, add the additional yeast to the sponge and stir. Then add 3 cups of the flour and all of the salt, malt, sugar and cinnamon. Stir (or mix on low speed with the dough hook) until the ingredients form a ball, slowly working in the remaining ¾ cup flour to stiffen the dough.
- 3. Transfer the dough to the counter and knead for at least 10 minutes (or for 6 minutes by machine), adding the raisins during the final 2 minutes. The dough should be firm, stiffer than French bread dough, but still pliable and smooth. There should be no raw flour - all the ingredients should be hydrated. The dough should pass the windowpane test and register 77° to 81°F. If the dough seems too dry and rips, add a few drops of water and continue kneading. If the dough seems tacky or sticky, add more flour to achiever the stiffness required. The kneaded dough should feel satiny and pliable but not be tacky.
- 4. Immediately divide the dough into 4½-ounce pieces for standard bagels. Form the pieces into rolls. Cover the rolls with a damp towel and allow them to rest for approximately 20 minutes.
- 5. Line 2 sheet pans with parchment paper and mist lightly with spray oil. Shape the bagels in one of the following two ways:
- 5a. Poke a hole in a ball of bagel dough and gently rotate your thumb around the inside of the hole to widen it to approximately 2½ inches in diameter. The dough should be as evenly stretched as possible (try to avoid thick and thin spots).
- 5b. Roll out the dough into an 8-inch-long rope. Wrap the dough around the palm and back of your hand, between the thumb and forefinger, ovrlapping the ends by several inches. Press the overlapping ends on the counter with the palm of your hand, rocking back and forth to seal.
- 6. Place each of the shaped pieces 2 inches apart on the pans. Mist the bagels very lightly with the spray oil and slip each pan into a food-grade plastic bag, or cover loosely with plastic wrap. Let the pans sit at room temperature for about 20 minutes.
- 7. Check to see if the bagels are ready to be retarded in thee refrigerator by using the "float test". Fill a small bowl with cool or room-temperature water. The bagels are ready to be retarded when they float within 10 seconds of being droppd into the water. Take one bagel and test it. If it floats, immediately return the tester bagel to the pan, pat it dry, covr the pan, and place it in the refrigerator overnight (it can stay in the refrigerator for up to 2 days). If the bagel does not float, return it to the pan and continue to proof the dough at room temperature, checking back every 10 to 20 minutes or so until a tester floats. The time needed to accomplish the float will vary, depending on the ambient temperature and the stiffness of the dough.
- 8. The following day (or when you are ready to bake the bagels), preheat the oven to 500°F with the two racks set in the middle of the oven. Bring a large pot of water to a boil (the wider the pot the better), and add the baking soda. Have a slotted spoon or skimmer nearby.
- 9. Remove the bagels from the refrigerator and gently drop them into the water, boiling only as many as comfortably fit (they should float within 10 seconds). After 1 minute flip them over and boil for another minute. If you like very chewy bagels, you can extend the boiling to 2 minutes per side. While the bagels are boiling, sprinkle the same parchment-lined sheet pans with cornmeal or semolina flour.
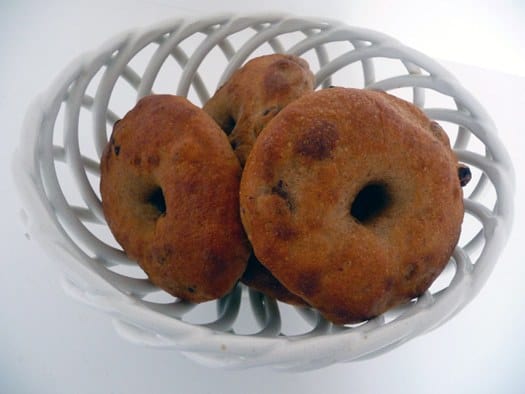
- 10. When all the bagels have ben boiled, place the pans on the 2 middle shelves in the oven. Bake for approximately 5 minutes, then rotate the pans, switching shelves and giving the pans a 180-degree rotation. (If you are baking only 1 pan, keep it on the center shelf but still rotate 180 degrees.) After the rotation, lower the oven setting to 450F and continue baking for about 5 minutes, or until the bagels turn light golden brown. You may bake them darker if you prefer.
- 11. Remove the pans from the oven and let the bagels cool on a rack for 15 minutes or longer before serving.
Did you make this recipe?
Leave a review below, then snap a picture and tag @thebrowneyedbaker on Instagram so I can see it!


I read that cinnamon reacts differently with yeast and best to knead it in after dough has risen before you shape it. 🤷🏼♀️
I just recently came across Peter’s book and bagels were the first thing I wanted to try – this website has been a great accompaniment to the recipe. I try to cook by measurement and many of the measurements don’t line up – for example, 1 tbsp of ground cinnamon is < 14 grams, unless it's packed. And, even then it's not a perfect match. Which measurement should I use – the tablespoon or the grams? The same problem exists with granulated sugar and salt. Thanks – love the website!
Thank you so much for the very detailed description of your thoughts and process! I must note, I tried to decrease the recipe by hitting the reduction arrow for serving size and it really messed things up! I was going by masses. So I didn’t notice that the site did not update any of the oz requirements in the text. This is the first time it has been really obvious that the sites don’t let you adjust serving size without hiccups. So, I thought I’d pass it along to prevent perhaps another heartache! Thank you again!
Are you really supposed to add a whole teaspoon of yeast to the dough (after making the sponge)? I noticed that the plain bagel recipe only calls for 1/2 teaspoon in the dough, and thought maybe the extra yeast and extra sugar in this recipe could cause the bagels to rise too much.
Hi Katie, That is correct, the raisins add a bit more moisture to this version so the extra yeast is needed.
Thanks! After two not super successful batches of these, I decided to buy the instant yeast (instead of active dry) and bread flour, and lo and behold they worked much better :) Thanks for the recipe!
Hi there, thank you so much for your recipe. I’m from, and live, in Brazil. I lived in Boston 20 yrs ago, and 6 yrs in the Uk till about 2 yrs ago, in both places I could get bagels which I can’t here. Just put them in the fridge and can’t wait till tomorrow to see how these are gonna turn out like, and eat them with my family (they have never tried, so I’m hoping they turn out as great as I know they are). ?
Making these now… your photo for the sponge looks like the yeast is “brewing”. However as I made my sponge it looks very, very think. No way could I use a whisk to blend that. You directions say the consistency should be like pancake batter. Not getting that at all.
As I read your directions again for the sponge part it says to use “4 cups (18 ounces) unbleached high-gluten or bread flour”. So is my math WAY wrong? One cup = 8 ounces. So 18 ounces would be just over 2 cups…. not 4 cups. Am I wrong? Is the recipe wrong? This just does not seem right and I so hate to waste all the ingredients to end up with a rock.
Thanks!
Hi Anita, 1 cup is 8 ounces ONLY for liquid measurements and a very few solid ingredient exceptions (butter, sour cream). Dry ingredients have varying weights per cup. I did a post on weighing ingredients here: https://www.browneyedbaker.com/the-basics-of-weighing-ingredients/
I may have figured out the answer to my own (dumb) question–the 18 ounce measure is by weight rather than volume, right? Now I see!
This looks like a great recipe–but I have one question: the sponge calls for 4 cups of flour OR 18 ounces. But four cups is 32 ounces, so which one is correct?
Thanks!
Lily
Hi Lily, 4 cups is 32 ounces when measuring liquids and a select few other ingredients (like butter), however 8 ounces does not equal 1 cup when measuring the volume of most ingredients. Flour, for example, weighs in at a little over 4 ounces per cup (more protein-heavy flours will weigh more). Hope that helps!
Its been a long time since this recipe was posted, but I still want to say thank you for the great, detailed instructions! Made my first batch of Bagels on the weekend and it worked out perfectly! They are super yummy and it was really easy! I actually like the overnight-resting because then you can start cooking/ baking them right away in the morning.
Finally got around to making these bagels and I just want to thank you for sharing Peter Reinhart’s bagel recipe. It turned out great and really nice. Definitely worth all the effort. And, I’m thinking of other ingredients I can use instead of raisins. I can’t thank you enough. And, I really enjoy reading the recipes on your blog. Unfortunately, I can’t make most of them because I’m from Australia and don’t have US measuring cups/spoons.
Your Bagels look amazing. I would like to invite you to bring a dish to my Full Plate Thursday, the linky is open all week end. Thank you for sharing and have a nice day!
These were fantastic. Mine also were a little flat and insanely huge. I didnt measure them though so that could attribute to the flatness. Also I got like 17 bagels (a couple of smallish ones) but some of them were really big like 5-6 inches across.
But so good. Your recipes are fantastic. Gonna be making these bagels (and your english muffins) from now on!
I am in the process of making these right now, I did not realize they needed to stay in the refrigerator over night. Could you tell me what the purpose is in putting them in the refrigerator, also could I leave them in for an hour or does it need to be longer? Thanks for you help.
Hi Tiffany, Peter Reinhart explains in the book: “…the premise is that longer, slower fermentation improves both the flavor and shelf life of the product…It is impossible, in my opinion, to make a decent bagel without the overnight method…you will never achiever a legendary bagel without the benefits of a long, slow, cold fermentation, which allows the naturally occurring enzymes to release flavors.”
Given that reasoning, I assume you could potentially leave them in for a shorter amount of time, but am unsure of how the flavor or texture might be affected, therefore I can’t guarantee the type of result you’ll get. I’ve made variations of this bagel recipe countless times and I’ve always done the overnight refrigeration. Let me know how they turn out!
Thank you so much, I did cook them last night but as you said I think it would have been better to leave them in the fridge. My problem was that they were very wet on the bottoms after I took them out of the water and put them on the cornmeal. Also do you cook them on the wax paper?
My family really liked them. We live in Africa and can’t buy bagels so this was a treat. I made mini ones and my son who is 8 ate 4 of them for breakfast.
Thank you so much for sharing.
You’re welcome! I use a skimmer to take the bagels out of the water bath and shake off as much water as possible. I do bake them on the parchment paper – not wax paper though.
I put my bagels on a clean flour sack towel to rest as I take them out of the water to absorb excess moisture – works like a charm.
These look amazingly delicious!
I have never made bagels, but I love eating them. These look great!
Kayte and Wonk – I hope you’ll give homemade bagels a try and let me know how it goes! Good luck! :)
I’ve never made bagels before but I’ve been threatening to for ages (ages being the last 3 years or so since I got my bread machine). I love Cinnamon n Raisin ones so I think this recipe might just be the one to get me motivated!
Thanks for sharing :)
these look wonderful! now i’m craving a cinnamon raisin bagel slathered with cream cheese :-) i’ve never made bagels but i might give these a try when i have some extra time on my hands.
I definitely have to try these. I made plain ones for the challenge, since I had never made them before, but cinnamon raisin are my very favorite kind.
Your photos and bagels look awesome. Great job.
Susie