Hamburger Buns

I am definitely a “meat and potatoes” kind of girl. Given the choice of chicken, beef or fish, I’ll choose beef every day of the week and twice on Sundays. As far as chicken and fish go, if you batter and fry them, I’ll enjoy them. Otherwise, I’m totally “meh” about both of them. Oh, but beef. Steak, cheeseburgers, tacos, stew… so much goodness no matter how you prepare it, and when you throw a baked potato, French fries or home fries into the mix? I can’t resist. I realize it’s not very girly of me, but then again, I’m not terribly girly most of the time (example: I currently have an ugly skinned knee from a street-hockey-on-rollerblades mishap last week). One of my favorite meals is a juicy bacon cheeseburger with all of the trimmings. The best thing about eating a burger at a really great restaurant is usually the bun. They’re a little over-sized, sturdy enough to handle the burger, and typically buttered and toasted. For a long, long time, I’ve been wanting to make hamburger buns at home, and I’m happy to finally able to cross them off my list. I thought that summer would be the perfect time to tackle them since the grill is usually in full swing, and we eat a lot of hamburgers at home. These hamburger buns could not have turned out more perfectly, and I’m excited to keep them stocked for summer grilling!

These hamburger buns are light yet sturdy, very tender and moist. The dough is enriched with milk and butter, which gives the buns all of their amazing flavor. I love that these can be made in an afternoon and with very little hands-on time. Between the mixing, shaping and baking, you’re only looking at maybe one hour total, if that. The rest of the time is inactive, letting the dough rise and do its thing, while you do your thing. Like laundry. Or browsing Pinterest. Or watching reruns of your favorite TV show.

You’ll see in the directions to press down lightly on the top of the buns before their second rise to give them their final shape. If you don’t do this, you’ll end up with really round buns, which will look more like dinner rolls. How much you press down is really up to you and how flat or round you prefer your hamburger buns. I pressed down lightly twice, and you can see the general shape that my buns took. For me, they were perfect; I like my buns with a little height and substance, but wouldn’t want them any larger. Hopefully, you can use that as a starting point for getting yours to the perfect height and width for your preferences.
Save This Recipe

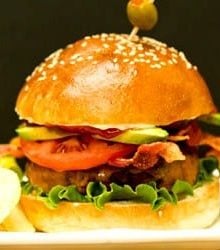
Once you have the buns finished, it’s party time! Time to build your favorite burger. Mine has cheese melted onto the burger while it’s still on the grill, lots of bacon, lettuce, tomato, avocado, mayonnaise and ketchup. With a side of chips and a pickle, of course. Maybe you like blue cheese and bacon? Or a classic with American cheese, lettuce, tomato and pickles? Perhaps a BBQ-style burger? Whatever your favorite burger is, one thing is for certain – this will definitely become your favorite hamburger bun.
I’m already excited for my next burger on one!

One year ago: Sweet and Salty Brownies
Hamburger Buns
Ingredients
- 4¼ cups (531.25 g) bread flour
- 1½ teaspoons (1.5 teaspoons) salt
- 3 tablespoons granulated sugar
- 2 teaspoons instant yeast
- 1 egg, slightly beaten, at room temperature
- ¼ cup (56.75 g) butter, at room temperature
- 1½ cups (360 ml) buttermilk or whole milk, at room temperature
- 1 egg, whisked with 1 teaspoon water until frothy, for egg wash (optional)
- Sesame or poppy seeds for garnish, optional
Instructions
- Mix together the flour, salt, sugar and yeast in a large mixing bowl (or in the bowl of an electric mixer). Pour in the egg, butter and milk, and mix on low speed until all the flour is absorbed and the dough forms a ball. If the dough seems very stiff and dry, trickle in more milk until the dough is soft and supple.
- Sprinkle flour on the counter, transfer the dough to the counter, and begin kneading (or mix on medium speed with the dough hook), adding more flour, if necessary, to create a dough that is soft, supple and tacky, but not sticky. Continue kneading (or mixing) for 6 to 8 minutes. (In the electric mixer, the dough should clear the sides of the bowl, but stick every so slightly to the bottom.) Lightly oil a large bowl and transfer the dough to the bowl, rolling it to coat it with oil. Cover the bowl with plastic wrap.
- Ferment at room temperature for 1½ to 2 hours, or until the dough doubles in size.
- Remove the fermented dough from the bowl and divide it into twelve 3-oune pieces. Shape the pieces into tight rounds. Mist the dough lightly with spray oil and cover with a towel or plastic wrap. Allow to rest for about 20 minutes.
- Line 2 sheet pans with parchment paper. Gently press down on the tops of the rolls with your fingers to flatten slightly. Transfer the buns to the sheet pans.
- Mist the tops of the dough with spray oil and loosely cover with plastic wrap or a towel. Proof the dough at room temperature for 60 to 90 minutes, or until the buns have nearly doubled in size.
- Preheat the oven to 400 degrees F. Brush the buns with the egg wash and garnish with poppy or sesame seeds, if desired.
- Bake the buns for approximately 15 minutes, or until they are golden brown and register just about 180 degrees F in the center. The buns should cool for at least 15 minutes on a rack before serving. Store leftovers in an airtight zip-top bag. If you want to freeze them, I would wrap individually in plastic wrap and then store in a zip-top bag. Thaw at room temperature.
Notes
Did you make this recipe?
Leave a review below, then snap a picture and tag @thebrowneyedbaker on Instagram so I can see it!


I’ve had trouble in the past with burger buns that are too dry and bland. These were absolutely amazing! They were pillowy soft and flavorful. I’ll be saving this to make again and again.
The best buns yet!
My dear Michelle,
After quiet some years I finally found your web side again! This is my first time making these delicious looking burger buns… They came out perfectly, they have an amazing taste, and they are so simple to make!
I will never go back to other web sites to find recipes. Your recipes are the best, easiest to understand and make. They are exceptional delicious and simple!
I assembled all of the ingredients for this recipe and then realized I only have active dry yeast, not instant. Can the recipe still be made with active dry yeast? thanks!
Hi Anne, Yes definitely! I would warm the milk to 100-110 degrees, add the yeast and stir, let sit for 5 minutes then proceed with the recipe.
These buns are crazy good!! And so easy. I love making these. I will never buy from the store anymore. I follow the recipe. I didn’t use any mixer. Mix all with a spatula and by hand, and also knead the dough myself. It’s a good arm workout :) I let the dough rise for 2 hours during the first and the second rise. I used kitchen scale to weigh each dough before shaping them. Did the egg wash and sprinkle sesame seeds. Perfect consistency and sooooo yummy! We’re in buns heaven!
Just made your white bread it was the best and tastiest loaf I’ve ever made.
Made your favorite White bread yesterday. The best loaf I’ve ever made. Love your instructions. Looking forward to making your hamburger buns and bagels.
I think these are the best buns ive ever made!! Super soft & great flavor! Since eggs are scarce, i brushed them with cream before baking & still has a nice brown top!
Far too much liquid
These buns were amazing, they had the perfect amount of fluffiness! I loved it
Would give it 10 stars if I could! I bake most of our bread and these buns are FABULOUS!!! My Hubby had a fit! Told me to forget every other roll/bun recipe and stick with these….and they were so EASY! I used my stand mixer…very little effort, BEAUTIFUL dough texture and the smell was heavenly.
I agree with the others. Best buns ever!
These are THE BEST BUNS EVER!! Soft, perfect density, & just delish! I bake a lot & have tried dozens of bun recipes, nothing comes close to these!! My kids even prefer to toast these buns for breakfast to eat with cream cheese over normal beagles! Thanks for the recipe!!
I made these with 2 cups of whole wheat and 2 1/4 regular white flour to make them more healthy. However, since I didn’t have whole milk, I used 2% milk and added some evaporated milk. I used instant yeast to shorten the rising time and covered the dough with a damp cloth.
My first batch got a little over baked on the bottom so I turned the oven to 350F and increased the baking time with 4 minutes. Second batch came out perfect and the family enjoyed a really good homemade bun. It was my first time baking burgers buns but definitely not the last. Thanks for the recipe.
Liz, these buns are incredible! Thank you so much for sharing. Since there are only 2 in my family, I halved the recipe. After toasting the buns, we ate pulled pork sandwiches on them last night and they held up to the weight and sauce of the BBQ perfectly. Tonight we will be eating hamburgers. Not only are these buns delicious, they are beautiful!
I have tried several of your recipes and you never fail to deliver. Thanks, again.
Absalotly amazing recipe it’s SO tasty! A must try
Made these today for the second time.
They freeze great and hold up to everything I put on them without falling apart. Burgers, brisket and BBQ pork that I smoked today.
Fantastic recipe and I will look no further for another.
These truely are the best, although it took 4 cups flour….
This is the first time I have baked my own burger buns and they came out amazing they are soft fluffy and golden. ?
Hello from Denmark, Best buns ever, i swopped the granulated sugar and used 3 spoonfull og Brown sugar, they were super with Applesmoked pulles pork.
Newer buying buns again
Thanks for the recipe.
Regards from Denmark
#weber #kopperen #bbq ;)
Hey Michelle! I made these a couple weeks ago and they were completely perfect!! I was wondering if the recipe could be halved? I think one large egg is 1 1/2 tablespoons.
Hi Heather, I’ve never tried to halve the recipe; I would probably recommend making the whole recipe and freezing whatever buns you don’t need right away, and then defrosting them when you’re ready to use them.
I made these for dinner tonight. The whole family loved them. My picky son said “they were the best ever!” Thank you.
Hi,
These buns look amazing. Just wondering, are these the same as brioche buns?
Thanks1
Lori
Hi Lori, They are similar, but I think true brioche is a little bit richer than these buns.
OT about these wonderful buns – general comment. THANK YOU for making the “print” so good. This is the first website where I can just hit the print and not have to create the recipe myself in Word. It is perfectly formatted.
These buns are fantastic, especially when you are ready to use them you cut them in half and toast the cut side in a hot pan with a small bit of butter pre-melted in the pan. Been making these for my hubby and I, and my parents, for about 6 months now – virtually foolproof recipe. I just finished mixing up a triple batch of dough for an upcoming birthday party. They are that good that I will be proud to serve them to my guests. I really want to try these with whole wheat flour. I may try a half recipe to see if they come out okay.