Rainbow Ribbon Jello
This rainbow ribbon Jello is one of my grandma’s signature desserts – she always makes it for Easter and other spring and summer parties. She layers the colors of the rainbow, but you could certainly adapt it to whatever colors you’d like!

My grandma on my dad’s side has a number of signature recipes that we can count on showing up at most family gatherings. At Christmas, it’s her famous Decker Cake. During the spring and summer you’ll see her broccoli salad, strawberry pretzel salad and ribbon Jello all at least once. I’m a total sucker for old-school Jello desserts. As a kid, both my mom and grandma would routinely have a bowl of Jello stashed in the fridge for a quick weeknight dessert with some whipped cream on top. It’s a comfort food, for sure, and I love all of the different types of fun desserts that can be made from it. My grandma’s ribbon Jello recipe has four layers of colors with white layers in between. Since I’m a stereotypical first-born that likes things just so, I needed my ribbon to be transformed into a rainbow. Such a picky girl I can be! I took my grandma’s recipe, added more colors, increased the white layer mixture, and voilà! I have a rainbow!

Aren’t old recipes just the best? I love the handwritten ones more than anything!
This is my mom’s written copy of my grandma’s recipe…

When I went to the store to buy my boxes of Jello, I was suddenly aware that I hadn’t shopped for Jello in quite some time. They have some pretty cool flavors now! When I was a kid, orange was, well… Orange. Yellow was always Lemon. This was life, right? Sort of like how the sky is blue. Now they have mango and “island pineapple”! My rainbow Jello got a little tropical kick, love these new flavors!
Save This Recipe
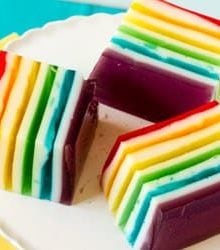
Doesn’t it look like I’m about to color Easter eggs?

This is the point where I am completely, totally, 100% honest with you. This recipe takes a long time. Halfway through I realized why my grandma’s recipe only contains four colors. You’ll need to devote the better part of a day to assembling this, but the result is absolutely awesome. The good news is also that once you mix everything together in the beginning, it takes less than 5 minutes to pour on each new layer; the time is just spent waiting for the layers to set up. As long as you don’t have anywhere to run off to, this is an incredibly simple recipe that you can work on while doing other things at home.
I love all of these bright colors and the accompanying bright flavors! This is such a fun dessert for any summer get-together and would be a blast for a child’s birthday party as well. I love the look of the rainbow, but you could use any combination of colors you’d like.

A few notes on the recipe:
- My grandma recommends putting the 9×13-inch pan in the freezer while you mix together your layers so that the first layer will set up quickly in the refrigerator and get you moving on to the next layer faster.
- You can absolutely choose to cut down on the number of colors/layers. If you do so, you just need to scale down the white filling the appropriate amount.
- The Jello colors should not gel sitting out at room temperature, however my very last color (red) started to set before I got it on the white layer. I popped it in the microwave for about 20 seconds to bring it back to a liquid state, let it cool for a few minutes, and then poured it on. It worked just fine!

One year ago: Easy Homemade French Fries
Rainbow Ribbon Jello
Ingredients
For the Jello Layers:
- 6 3-ounce boxes (85g) Jello, 1 each red, orange, yellow, green, blue & purple (or colors of your choice)
- 6 cups (1.5 l) boiling water
- 3 cups (750 ml) cold water
For the White Layers:
- 4 cups (976 ml) milk
- 1 cup (250 ml) boiling water
- 4 envelopes Knox gelatin
- 24 ounces (680.39 ml) vanilla yogurt
- 1 cup (200 g) granulated sugar
- 4 teaspoons vanilla extract
Instructions
- Get 6 small bowls out to start. Mix 1 box of Jello with 1 cup boiling water and ½ cup cold water. Do this with all of the colors at the same time.
- Heat the milk in a saucepan over low heat just until it reaches a lukewarm temperature. Meanwhile, in a large bowl, mix together 1 cup boiling water with the envelopes of Knox gelatin. Whisk together until the gelatin is completely dissolved. Add the warm milk, yogurt, sugar and vanilla extract and whisk until thoroughly combined and completely smooth with no lumps.
- Pour the first color into a 9x13-inch pan and refrigerate until set (about 45 minutes, but can vary depending on the temperature of your fridge and how full it is). Once it's set, very gently pour 1½ cups of the yogurt mixture on top. Return to the refrigerator for 45 minutes, or until set. Repeat with the colors and yogurt mixture until the last color is used (you will have some yogurt mixture leftover). When finished, refrigerate for at least another hour. Store in refrigerator until ready to serve; refrigerate leftovers.
Notes
Did you make this recipe?
Leave a review below, then snap a picture and tag @thebrowneyedbaker on Instagram so I can see it!


Well, so far, so good.. I’m in the process of making this recipe right now.. I’m surprised at the fact that you are to mix ALL the jellos at once instead of 1 at a time, so they don’t start to set prematurely (mine definitely are). But I’m trusting the publisher that this is the best way to do it.. (fingers crossed!)
So, my favorite jello recipe is probably the whipped cream gently mixed but not combined into the jello then letting it set the rest of the way.. I can add fruit or not, either way..
And that marshmallowed fluff stuff that uses green jello, I think? LOVE that stuff!!
Using these measurements in my Pyrex 9×13” I was able to fit exactly 7 layers into it, however, that meant 4 layers of jello and 3 layers of the cream. This may have been why someone else questioned how it is possible to fit 11 layers which would not work in this size pan. It looks awesome and I can’t wait to try it at our Super Bowl party tomorrow.
Do you leave the milk out of the fridge the entire time or do you use the fridge?
I lost my 7 layer Ribbon Jello Recipe and yours was the closest I could find to mine so I’m making it this weekend and I’ll let you know how it is Thank you
Question: The 9×13 casserole, how high does it have to be? There are 9×13 2 inch high & i believe 9×13 3 inch high? Which one do i need to fit everything in!!!!!! ???? Thank you for sharing your recipe!
I made 2 pans of this and my grandkids had to cancel. Can I freeze this or how long will it keep in tupperware
How do I prevent the layers fromseperating from the white layer?I’ve made this 4 times and each time the jello layers slip off the white layer. It’s actually cool to watch, but not good at the presentation.
The key is not too wait too long before you add the next layer. I only wait 20 to 25 minutes. If it’s set really hard then they won’t stick.
I had to make a few adjustments due to things I forgot to buy.
One question…24 ounces of yogurt. That’s like 3 cups. Is that correct?
That’s correct!
Thanks for sharing! Does it keep long?