Peanut Butter Brownies
If you love the chocolate and peanut butter combo, you will go bananas for these peanut butter brownies. They're made using my favorite homemade fudgy brownies recipe, are stuffed with a peanut butter filling, and taste like the most amazing peanut butter cups!
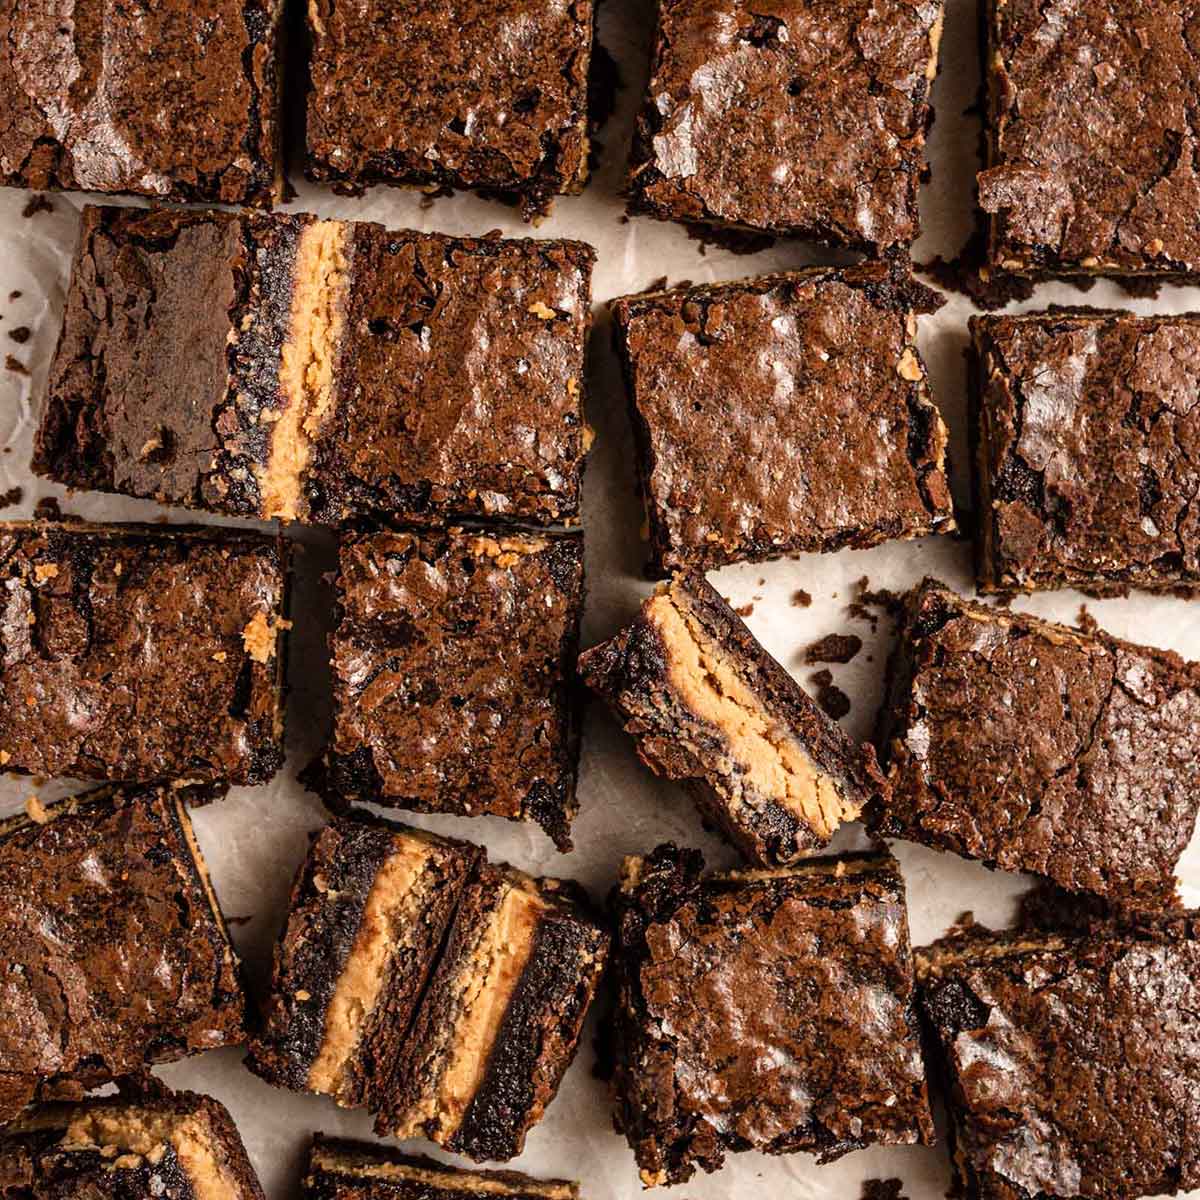
You’re Going to LOVE These Brownies!
Is there a flavor combination more revered than peanut butter and chocolate? There's a reason that the majority of people rank a peanut butter cup as their favorite Halloween candy, right?!
These brownies take that combination to the next level!
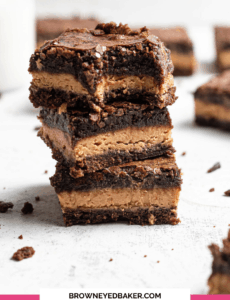
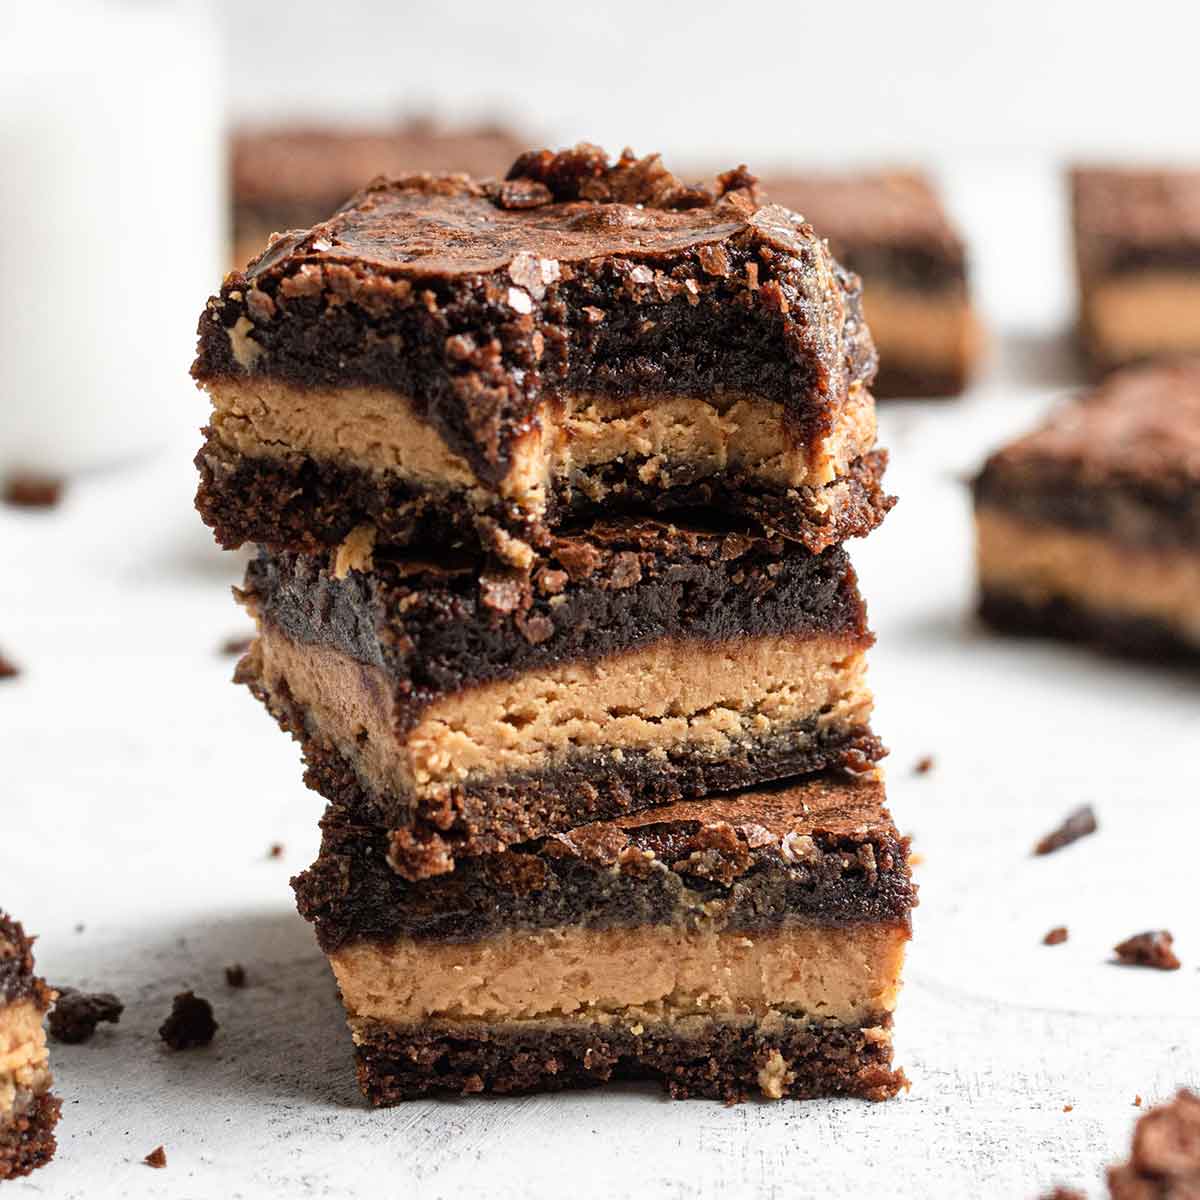
A peanut butter filling that tastes just like the inside of a peanut butter cup is sandwiched between two layers of the best chewy, fudgy homemade brownies for an incredibly rich and decadent dessert.
What You’ll Need to Make Them
These are made primarily of pantry staples, but let’s highlight some of the most important ingredients and my recommendations:
- Cocoa Powder: The brownies call for Dutch-process cocoa powder, which imparts a wonderfully rich flavor and I highly recommend it, but the recipe will still work if you substitute regular unsweetened cocoa powder.
- Chocolate: For unsweetened chocolate, I typically turn to Ghiradelli, Baker’s, or Guittard.
- Vegetable Oil: The butter and vegetable oil ratio in this recipe gives these brownies their wonderful chewy texture; the oil should not be substituted.
- Peanut Butter: For best results, use a "processed" style peanut butter such as Jif or Skippy and avoid natural-style peanut butter that separates and needs to be stirred.
- Substitute Nut Butters: You can replace the peanut butter with other similarly processed nut butter, such as Barney Butter almond butter, Sunbutter, or processed cashew butter.
- Mix-In Ideas: The brownie recipe calls for optional chocolate chips in the batter, but you could swap in things like chopped peanuts, peanut butter chips, Reese's Pieces, or chopped peanut butter cups.
How to Make Peanut Butter Brownies
These brownies come together quite easily, starting with my homemade fudgy brownies, affectionately called "better-than-box-brownies," and are layered with the absolute best peanut butter filling!
I made a couple of slight alterations to the filling I use in my homemade peanut butter cups for the peanut butter layer in these brownies. It sets up soft enough to meld into the texture of the brownie, yet firm enough so it doesn't ooze out or cause baking issues.
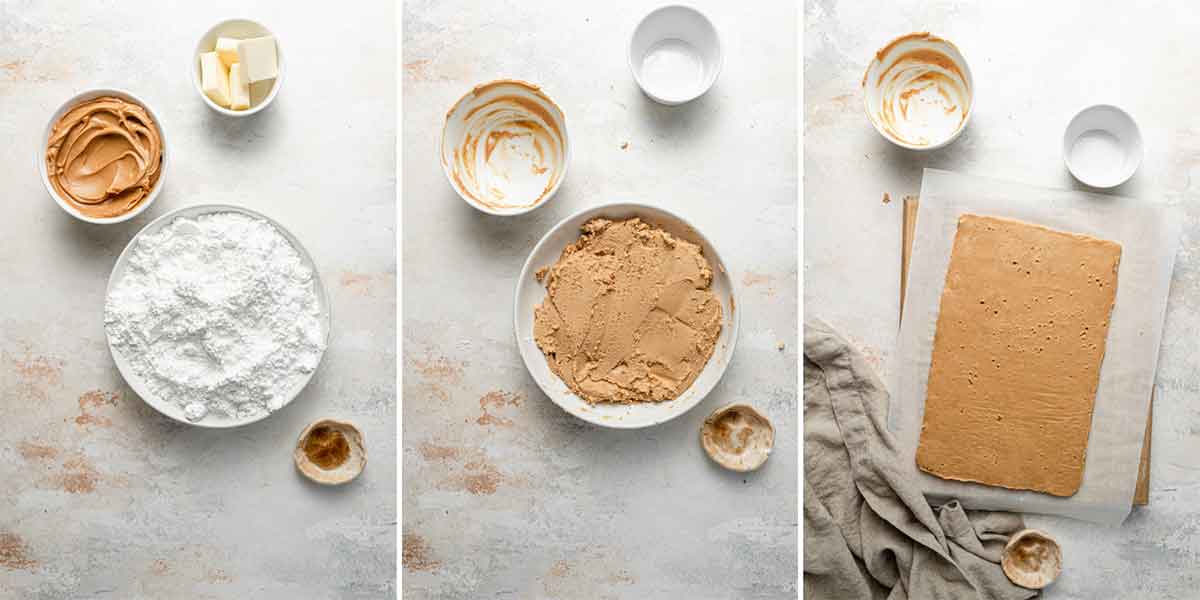
First, prepare the peanut butter filling and set it aside to cool a bit while you prepare the brownie batter.
Save This Recipe
Prepare the brownies, then pour half of the batter into the prepared pan.
Turn the peanut butter mixture out onto a work surface and press it into a rough 9×13-inch rectangle.
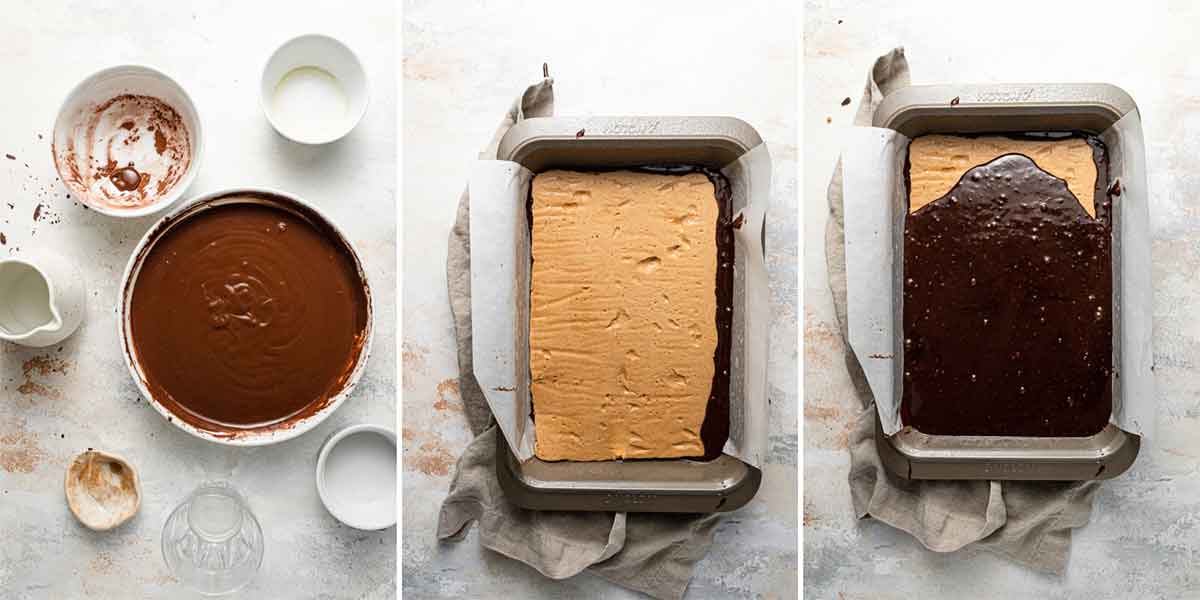
Gently lay it on top of the brownie batter, then pour the rest of the brownie batter over the top and spread it gently over the top of the peanut butter filling.
Bake, cool, cut, and devour!
Recipe Tips and Notes
- Baking Pan: A traditional 9×13-inch metal baking pan is recommended for these brownies. If you use a glass pan, only allow them to cool for 10 minutes in the pan, then remove them to a wire rack to cool completely. Glass retains more heat and will essentially overcook the brownies if you leave them in the pan.
- Serving Suggestions: These brownies stand on their own, but you could always top them with homemade whipped cream or vanilla ice cream.
- Make-Ahead: You could prepare the peanut butter filling, press it out and place it in the refrigerator up to a day before assembling and baking the brownies.
- How to Store the Brownies: The brownies can be kept in an airtight container at room temperature for up to 4 days.
- Freezing Instructions: You can freeze the brownies by wrapping them individually in plastic wrap, then placing in an airtight container for up to 3 months. Thaw at room temperature for about 45 minutes before enjoying.
If You Like These Chocolate Peanut Butter Brownies, Try These Recipes:
- Peanut Butter Cup Crunch Brownie Bars
- Buckeye Brownies
- Peanut Butter Cup Overload Cake
- Peanut Butter Cup Bars
Watch How to Make This Peanut Butter Brownie Recipe:
If you make this recipe and love it, remember to stop back and give it a 5-star rating - it helps others find the recipe! ❤️️

Peanut Butter Brownies
Ingredients
For the Peanut Butter Filling:
- 1½ cups (405 g) creamy peanut butter
- 6 tablespoons (85 g) unsalted butter
- 1 tablespoon vanilla extract
- 2 cups (227 g) powdered sugar
For the Brownies:
- ⅓ cup (28 g) Dutch-processed cocoa powder
- ½ cup (120 ml) + 2 tablespoons boiling water
- 2 ounces unsweetened chocolate, finely chopped
- 4 tablespoons (57 g) unsalted butter, melted
- ½ cup (99 g) + 2 tablespoons vegetable oil
- 2 eggs
- 2 egg yolks
- 2 teaspoons vanilla extract
- 2½ cups (495 g) granulated sugar
- 1¾ cups (210 g) all-purpose flour
- ¾ teaspoon salt
- 1 cup (170 g) semisweet chocolate chips, optional
Instructions
- Adjust oven rack to lowest position and preheat oven to 350 degrees F. Spray a 9×13-inch pan with non-stick cooking spray, then line with parchment paper, leaving about a one-inch overhang on the sides.
- Prepare the Peanut Butter Filling: Melt the peanut butter and unsalted butter together in a medium bowl in the microwave until completely melted and smooth, 1 to 2 minutes, stirring occasionally. Whisk in the vanilla extract, then gradually whisk in the powdered sugar until completely smooth. Set aside while you prepare the brownie batter.
- Prepare the Brownies: Whisk the cocoa powder and boiling water together in a large bowl until smooth. Add the unsweetened chocolate and whisk until the chocolate is melted. Whisk in the melted butter and oil (the mixture may look curdled at this point, that's okay!). Add the eggs, yolks, and vanilla extract, and whisk until smooth and homogeneous. Whisk in the sugar until fully incorporated. Add the flour and salt and mix with a rubber spatula until combined. Fold in the chocolate chips, if using.
- Pour half of the batter into the prepared pan, spreading into an even layer.
- Turn the peanut butter filling out onto a clean work surface and press into a rough 9×13-inch rectangle. Transfer that filling using your fingers or a thin metal spatula onto the brownie batter in the pan. You can do this in sections and it doesn't have to be perfect. Pour the remaining batter over the peanut butter filling and gently spread into an even layer.
- Bake until a toothpick inserted halfway between the edge and center comes out with just a few moist crumbs attached, 28 to 35 minutes. Transfer the pan to a wire rack and cool for 1½ hours.
- Using the parchment overhang, lift the brownies from the pan. Place the brownies on the wire rack and cool completely, about 1 additional hour. Cut into squares and serve. The brownies can be stored in an airtight container at room temperature for about 4 days.
Notes
- Pan: A traditional 9×13-inch metal baking pan is recommended for these brownies. If you use a glass pan, only allow them to cool for 10 minutes in the pan, then remove them to a wire rack to cool completely. Glass retains more heat and will essentially overcook the brownies if you leave them in the pan.
- Cocoa Powder: The brownies call for Dutch-process cocoa powder, which imparts a wonderfully rich flavor and I highly recommend, but the recipe will still work if you substitute regular unsweetened cocoa powder.
- Chocolate: For unsweetened chocolate, I typically turn to Ghiradelli, Baker’s, or Guittard.
- Peanut Butter: For best results, use a “processed” style peanut butter such as Jif or Skippy and avoid natural-style peanut butter that separates and needs to be stirred.
- Substitute Nut Butters: You can replace the peanut butter with other similarly processed nut butters, such as Barney Butter almond butter, Sunbutter, or processed cashew butter.
- Mix-In Ideas: The brownie recipe calls for optional chocolate chips in the batter, but you could swap in things like chopped nuts, peanut butter chips, Reese’s Pieces, or chopped peanut butter cups.
- Serving Suggestions: These brownies stand on their own, but you could always top them with homemade whipped cream or vanilla ice cream.
- Make-Ahead: You could prepare the peanut butter filling, press it out and place it in the refrigerator up to a day before assembling and baking the brownies.
- How to Store the Brownies: The brownies can be kept in an airtight container at room temperature for up to 4 days.
- Freezing Instructions: You can freeze the brownies by wrapping them individually in plastic wrap, then placing in an airtight container for up to 3 months. Thaw at room temperature for about 45 minutes before enjoying.
Did you make this recipe?
Leave a review below, then snap a picture and tag @thebrowneyedbaker on Instagram so I can see it!
[Photography by Dee of One Sarcastic Baker]


Peanut butter part was easy rolling between 2 pieces of Saran wrap and then cutting into manageable pieces
However took an hour to cook on my new gas stove. Times so inaccurate
I trusted the process in baking on the bottom rack. It was burnt before the middle was even close to being done. Horrible instructions, also the peanut butter makes a huge mess. I have no idea how you could make a thin layer out of this and removing it from the surface it was rolled out onto.
Awesome! I cut back on the powdered sugar and regular sugar by 1/2 each. They are very tasty!