Ultimate Baked Mac and Cheese

This easy baked mac and cheese recipe is totally homemade, super creamy, and topped with a mixture of bacon and crushed Ritz crackers. It’s quick enough for a weeknight dinner, but totally worthy of serving to company, as well.
I have been making some variation of the same baked macaroni and cheese recipe since waaaaaay back in 2010, and this is the base recipe that every single one of them begins with. In the past, you may have seen it as the mushroom-herb macaroni and cheese, the butternut squash and bacon mac and cheese, Cajun shrimp macaroni and cheese, or Hatch chile macaroni and cheese.
They are all derived from the same formula for a béchamel sauce, the same amount of cheese and are baked with a crunchy topping. I originally made them all with a Panko bread crumb topping, but a few years ago I saw this bacon and Ritz cracker combo in Lori’s homestyle macaroni and cheese recipe, and I FELL IN LOVE.
The combination of my original base recipe with this topping now officially my absolute favorite baked macaroni and cheese recipe.
How to Make Baked Mac and Cheese
If you’ve never made a homemade macaroni and cheese before, the process is super simple and only requires a few steps:
- Boil the Pasta – Cooking the pasta while you make the cheese sauce helps everything come together at the same time. Bonus points for efficient use of time!
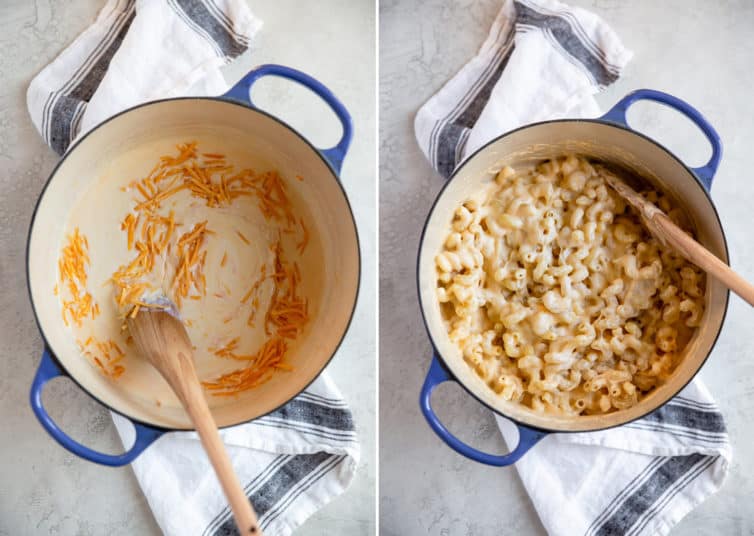
- Make a Béchamel Sauce – Start by melting the butter, then whisking in the flour until completely combined and it omits a nutty aroma (this ensures that the raw flour taste has been cooked out), about 1 to 2 minutes. Then slowly pour in the milk, whisking constantly. The first few splashes will cause the flour mixture to clump up, but it all smoothes out as you add more milk and keep whisking!
- Add the Cheese! – The best part, right?! Once all of the milk has been added and the sauce comes to a light simmer, start adding the cheese a handful at a time (this helps it melt evenly and not clump up). Add some salt and pepper to taste, then turn off the heat.
- Add the Pasta – Once the pasta is drained, add it to the cheese sauce and stir really well to ensure all of the pasta is broken up and incorporated into the sauce.
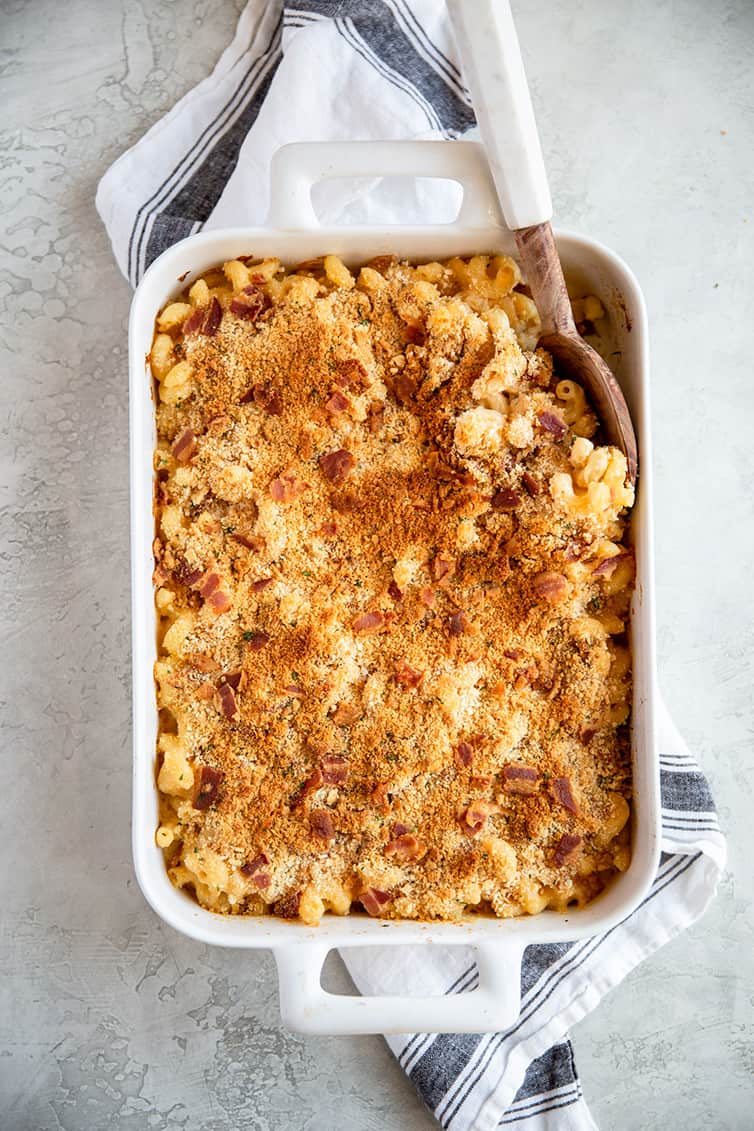
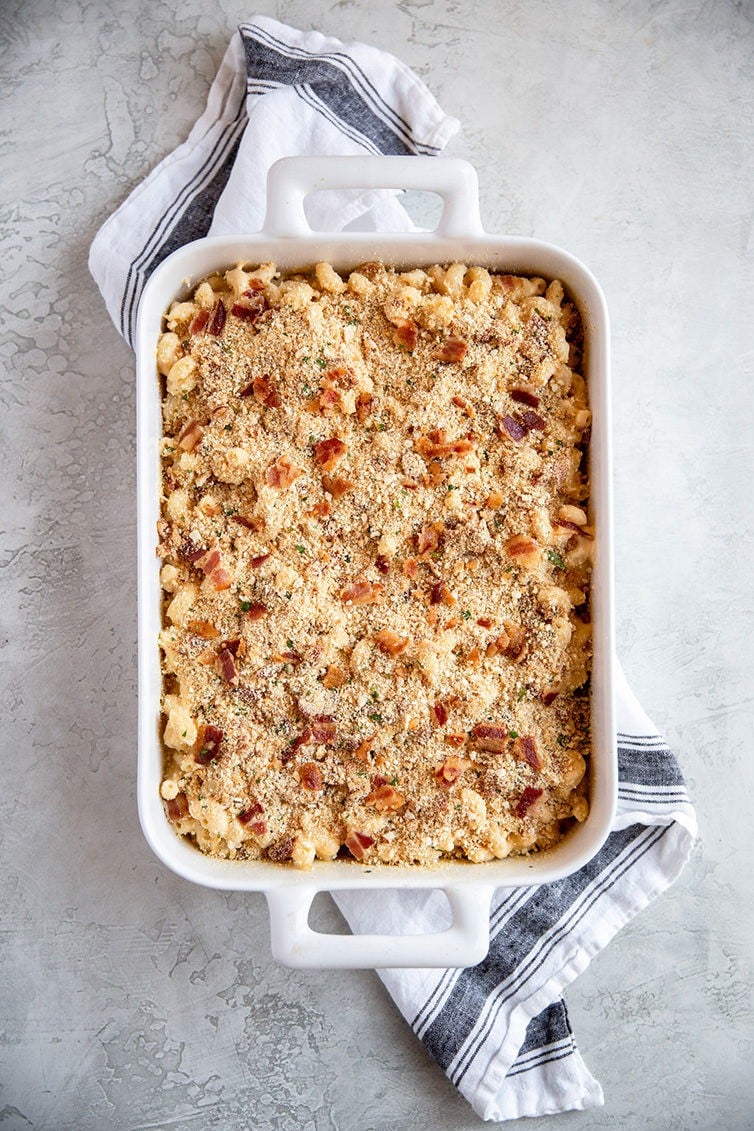
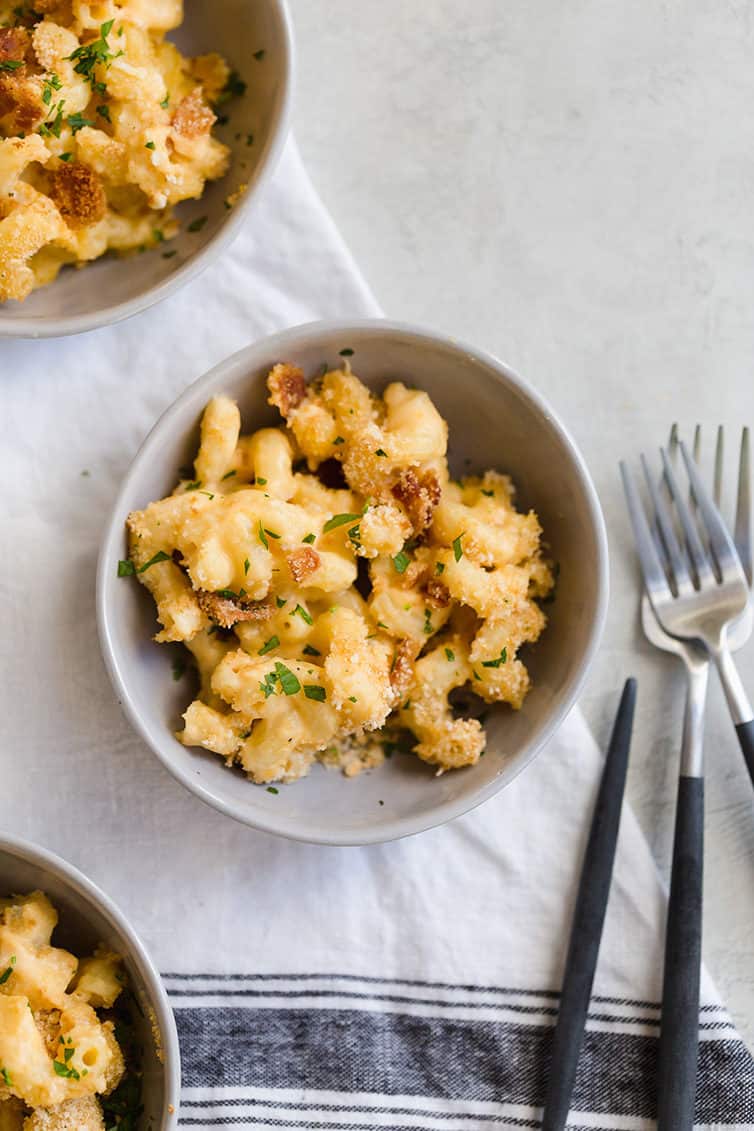
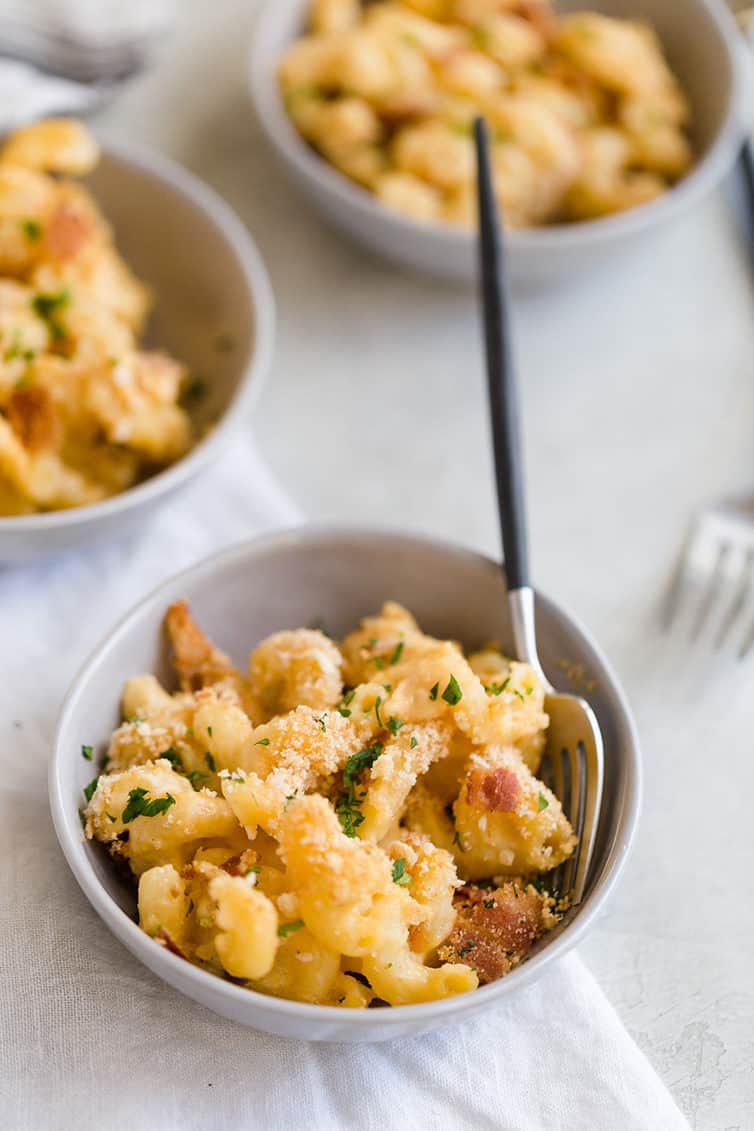
- Assemble! – Pour the pasta and cheese sauce mixture into a casserole dish and spread into an even layer. In a bowl, combine the crushed Ritz crackers, cooked and chopped bacon, and some fresh parsley. Sprinkle over the top and bake until browned and bubbly!
Recipe Notes
- Cavatappi is my absolute favorite pasta shape for baked mac and cheese, but feel free to use whatever you like. Shells, elbows, and gemelli are all great choices, too.
- I like using whole milk because it makes the mac and cheese super rich and creamy, but you could also use 2% or 1% milk.
- Different cheeses can be substituted for the cheddar cheese. Play around with different flavors or combinations – smoked gouda, pepper jack, American, Gruyere… so many options!
- But whatever you do, don’t use pre-shredded cheese! Pre-shredded cheese is coated with a thin layer of an anti-caking agent to keep it from clumping up in packages; unfortunately, this also can create a gritty texture when it is melted in a sauce. I recommend buying a block of cheese and shredding by hand (or using a food processor!).
- I’ve also used bread crumbs as a topping, so you can definitely do that in place of the crushed Ritz crackers.
- You can omit the bacon if you want to make it a vegetarian dish.
- If you don’t want to bake this, you can definitely serve from stovetop. You can still toss together the topping ingredients and sprinkle on each serving, if desired.
- Make Ahead Tip: To prepare ahead, assemble the recipe as written, then cover with plastic wrap and refrigerate up to 1 day. Bake for 15 minutes with foil on, then uncover and bake as directed.
- Freezer-Friendly: To freeze an entire pan, you can do so unbaked or baked. Either way, I recommend cooking the pasta only to al dente and adding an extra 1/2 cup milk to the sauce, then cool completely, then cover with plastic wrap, then foil and freeze for up to 3 months. Thaw in the refrigerator overnight, then bake as directed above in the make ahead note. You can also freeze individual portions by chilling the assembled (or baked and cooled) mac and cheese, then cutting into individual portions. Wrap each portion in plastic wrap, then in foil, and place in a resealable plastic freezer bag for up to 3 months. You can thaw and reheat in the oven (remove the plastic wrap!), or in the microwave if you’re in a hurry.
Save This Recipe
While stovetop mac and cheese is great, I just absolutely adore the texture and cheesiness that you get from baking it in the oven for a mere 20 minutes. The cheesy sauce starts to bubble and the topping gets a little toasted and extra crunchy – it’s just macaroni and cheese perfection.
I used to top my baked macaroni and cheese with panko bread crumbs, but crushed Ritz crackers are just infinitely better. Throw in bacon and you’ll be fighting people for the topping!
Stash this recipe away somewhere safe and use it as-is, or as a jumping off point for all kinds of mac and cheese variations!
If You Like This Baked Macaroni and Cheese, Try These Recipes:
- Chrissy Teigen’s Mac and Cheese
- Crock Pot Mac and Cheese
- Three-Cheese Baked Macaroni and Cheese
- Creamy Stovetop Macaroni and Cheese
- Butternut Squash & Bacon Mac and Cheese
Watch the Recipe Video:
One year ago: Traditional Devil’s Food Cake
Seven years ago: Nutella-Hazelnut Cookies

Ultimate Baked Macaroni and Cheese
Ingredients
For the Macaroni and Cheese:
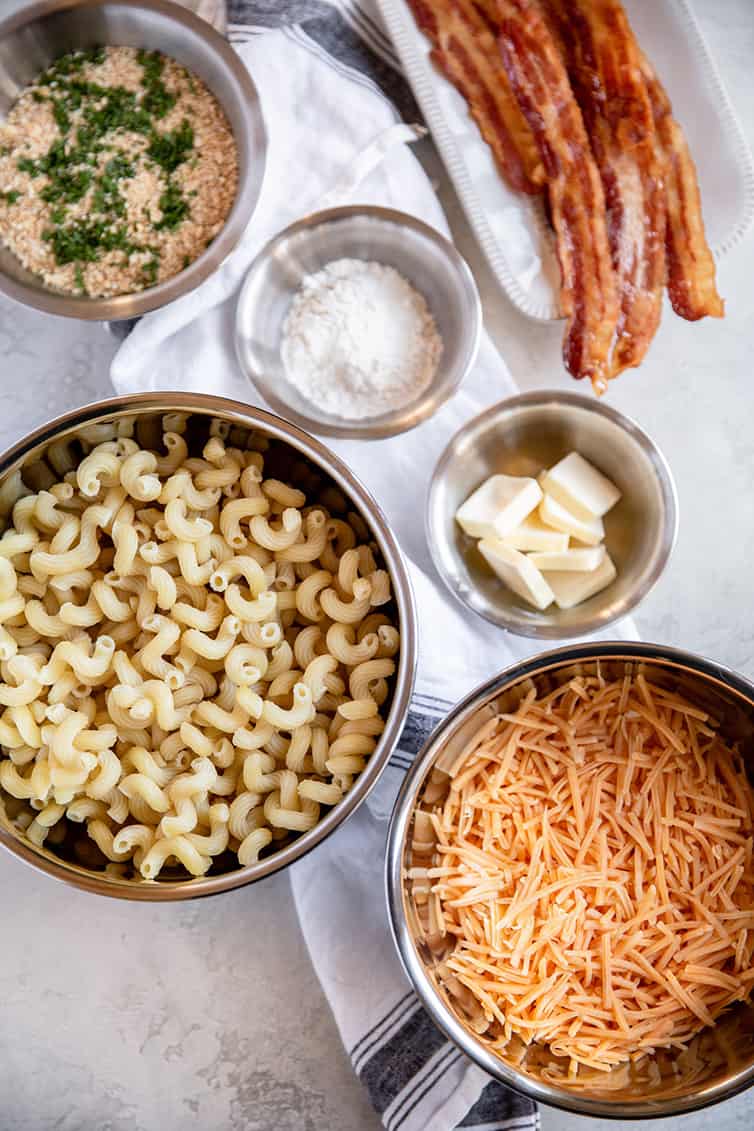
- 16 ounces (453.59 g) elbow pasta, or shaped pasta of your choice
- 4 tablespoons unsalted butter
- 4 tablespoons all-purpose flour
- 3 cups (732 ml) whole milk
- 12 ounces (340.2 g) sharp cheddar cheese, shredded (about 3 cups)
- Salt and pepper, to taste
For the Topping:
- 40 Ritz crackers, about 1.5 sleeves, crushed
- 8 slices bacon, cooked and crumbled
- 1 tablespoon finely chopped fresh parsley
Instructions
- Preheat oven to 400 degrees F. Butter a 9×13-inch casserole dish. Heat a large pot of water over high heat for the pasta; cover.
- Add the pasta to the boiling water and cook the pasta according to the box directions for al dente pasta (if your box doesn’t specify al dente, cook it for 1 to 2 minutes shorter than the time called for – it shouldn’t be cooked the whole way through). When the pasta is finished cooking, drain it in a colander.
- While the pasta is cooking, make the sauce. In a large saucepan, melt the 4 tablespoons of the butter over medium heat. Once the butter has melted, whisk in the flour and cook for about 1 minute, until the flour starts to brown a bit and smells nutty, whisking constantly. In a slow, steady stream, whisk in the milk. Allow the sauce to come to a simmer.
- Once the sauce comes to a simmer, stir in the cheddar cheese, adding a handful at a time and stirring with a wooden spoon until completely melted before adding the next handful. Season with salt and pepper and turn off the heat.
- Add the cooked, drained pasta to the sauce. Stir with a wooden spoon until everything is completely combined and evenly distributed. Pour the mixture into the prepared casserole dish.
- In a small bowl, mix together the crushed Ritz crackers, crumbled bacon and parsley.
- Sprinkle the macaroni and cheese with the topping mixture.
- Bake until browned and bubbly, about 15 to 20 minutes. Allow to sit for 10 to 15 minutes before serving.
Notes
- Cavatappi is my absolute favorite pasta shape for baked mac and cheese, but feel free to use whatever you like. Shells, elbows, and gemelli are all great choices, too.
- I like using whole milk because it makes the mac and cheese super rich and creamy, but you could also use 2% or 1% milk.
- Different cheeses can be substituted for the cheddar cheese. Play around with different flavors or combinations – smoked gouda, pepper jack, American, Gruyere… so many options!
- But whatever you do, don’t use pre-shredded cheese! Pre-shredded cheese is coated with a thin layer of an anti-caking agent to keep it from clumping up in packages; unfortunately, this also can create a gritty texture when it is melted in a sauce. I recommend buying a block of cheese and shredding by hand (or using a food processor!).
- I’ve also used bread crumbs as a topping, so you can definitely do that in place of the crushed Ritz crackers.
- You can omit the bacon if you want to make it a vegetarian dish.
- If you don’t want to bake this, you can definitely serve from stovetop. You can still toss together the topping ingredients and sprinkle on each serving, if desired.
- Make Ahead Tip: To prepare ahead, assemble the recipe as written, then cover with plastic wrap and refrigerate up to 1 day. Bake for 15 minutes with foil on, then uncover and bake as directed.
- Freezer-Friendly: To freeze an entire pan, you can do so unbaked or baked. Either way, I recommend cooking the pasta only to al dente and adding an extra 1/2 cup milk to the sauce, then cool completely, then cover with plastic wrap, then foil and freeze for up to 3 months. Thaw in the refrigerator overnight, then bake as directed above in the make ahead note. You can also freeze individual portions by chilling the assembled (or baked and cooled) mac and cheese, then cutting into individual portions. Wrap each portion in plastic wrap, then in foil, and place in a resealable plastic freezer bag for up to 3 months. You can thaw and reheat in the oven (remove the plastic wrap!), or in the microwave if you’re in a hurry.
Did you make this recipe?
Leave a review below, then snap a picture and tag @thebrowneyedbaker on Instagram so I can see it!
Update Notes: This recipe was originally published in February 2016; updated in February 2019 with new photos, a video, and more recipe tips.
[photos by Ari of Well Seasoned]


This recipe makes a wonderfully flavored, classic baked mac & cheese. I added 1 tsp paprika and 1/2 tsp onion powder to the flour. I did not have ritz or bacon for the topping, so I just topped with a little bit extra shredded cheese and some bread crumbs.
Loved the mac and cheese! I took the liberty of using homemade bread crumbs from a different recipe that was suggested to try and it was great.
Delicious ? https://dusuncekatalogu.com/sevgiliye-uzun-mesajlar-2022/
A great recipe indeed. If you are curious about Turkish delicacies, you can also take a look at this resource. https://www.ow.com.tr/konu/yemek/
Can I add sugar
Delicious.
This is the same way I make my mac and cheese. I like to make enough to have leftovers or lunch on another day; however, it tends to get rather dried out. Any suggestions as to how to keep that from happening?