Blueberry Bagels

There are few things in the kitchen that bring me a greater sense of satisfaction than baking with yeast. Whether it’s bread, rolls, English muffins, pastries or bagels, I just adore it. I made my first batch of homemade bagels almost three years ago and still can’t get enough of them. I began with the plain variety and have tried a few variations since – Cinnamon Raisin (my favorite!), Asiago, and Egg. I got the urge for homemade bagels a few weeks ago and was thinking about a new flavor to try. One of my favorites has always been blueberry – lightly toasted and slathered in cream cheese. Delicious! So off I went on my blueberry bagel quest…
All of the bagels that I have made so far are variations off that first plain version, which is from Peter Reinhart’s book The Bread Baker’s Apprentice. All of his recipes are excellent, and he has always been so very helpful and generous with his time, responding to my emails when I ask how I would go about adapting the bagel recipe for things like Asiago bagels and egg bagels. This time was no exception, and Peter gave me some tips on creating the perfect blueberry bagel.
Save This Recipe
He recommended using dried blueberries since fresh blueberries will bleed into the dough and break down when you attempt to knead them into such a stiff dough. He said to use about the same amount of dried blueberries as raisins that is in the cinnamon raisin version (I actually reduced it by ½ a cup since the blueberries were larger than raisins), and again like the cinnamon raisin bagels, to increase the yeast in the final dough from ½ teaspoon to 1 teaspoon to compensate for the dead weight of the dried fruit. Since the dried blueberries are pretty sweet, he didn’t feel that any additional sugar needed to be added to the dough.
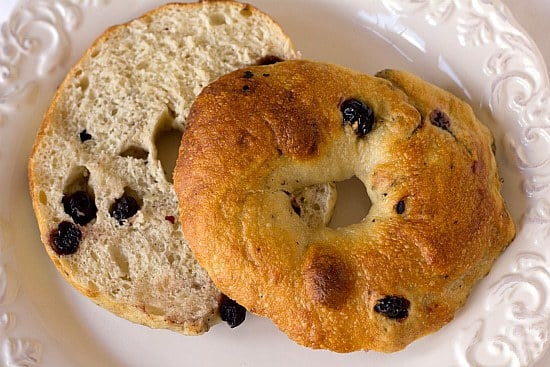
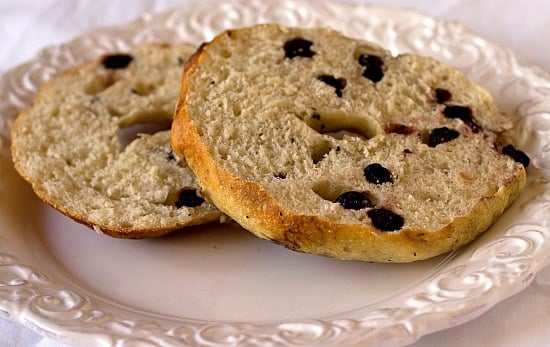
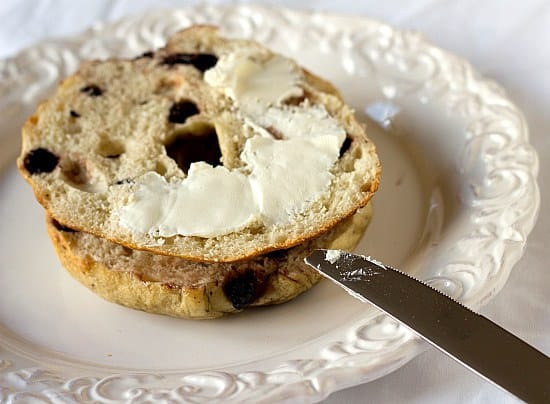
The result was everything I had hoped my blueberry bagels to be: chewy on the outside, soft on the inside and packed with an enormous amount of blueberry flavor. Perfect lightly toasted with cream cheese. Mission accomplished!
Two years ago: For the Love of Peanut Butter and Cinnamon
Four years ago: Homemade Soft Pretzels

Blueberry Bagels
Ingredients
For the Sponge:
- 1 teaspoon instant yeast
- 4 cups (500 g) high-gluten or bread flour, (18 ounces)
- 2½ cups (625 ml) water, at room temperature
For the Dough:
- 1 teaspoon instant yeast
- 3¾ cups (468.75 g) high-gluten or bread flour, (17 ounces)
- 2¾ teaspoons (2.75 teaspoons) salt
- 2 teaspoons malt powder or 1 tablespoon dark or light malt syrup, honey or brown sugar
- 1½ cups (240 g) dried blueberries, rinsed
To Finish:
- 1 tablespoon baking soda
- Cornmeal or semolina flour for dusting
Instructions
- 1. To make the sponge, stir the yeast into the flour in a 4-quart mixing bowl. Add the water, whisking or stirring only until it forms a smooth, sticky batter (like pancake batter). Cover the bowl with plastic wrap and leave at room temperature for approximately 2 hours, or until the mixture becomes very foamy and bubbly. It should swell to nearly double in size and collapse when the bowl is tapped on the countertop.
- 2. To make the dough, in the same mixing bowl (or in the bowl of an electric mixer), add the additional yeast to the sponge and stir. Then add 3 cups of the flour and all of the salt and malt. Stir (or mix on low speed with the dough hook) until the ingredients form a ball, slowly working in the remaining ¾ cup flour to stiffen the dough.
- 3. Transfer the dough tot he counter and knead for at least 10 minutes (or for 6 minutes by machine). Add the dried blueberries during the final 2 minutes of kneading. The dough should be firm, but still pliable and smooth. There should be no raw flour - all the ingredients should be hydrated. If the dough seems too dry and rips, add a few drops of water and continue kneading. If the dough seems tacky or sticky, add more flour to achieve the stiffness required. The kneaded dough should feel satiny and pliable but not be tacky.
- 4. Immediately divide the dough into 12 pieces. Form the pieces into rolls.
- 5. Cover the rolls with a damp towel and allow them to rest for approximately 20 minutes.
- 6. Line 2 sheet pans with parchment paper and mist lightly with spray oil. To shape the bagels, poke a hole in a ball of bagel dough and gently rotate your thumb around the inside of the hole to widen it to approximately 2½ inches in diameter. The dough should be as evenly stretched as possible (try to avoid thick and thin spots).
- 7. Place each of the shaped pieces 2 inches apart on the pans. Mist the bagels very lightly with the spray oil and cover loosely with plastic wrap. Let the pans sit at room temperature for about 20 minutes.
- 8. Check to see if the bagels are ready to be retarded in the refrigerator by using the "float test". Fill a small bowl with cool or room-temperature water. The bagels are ready to be retarded when they float within 10 seconds of being dropped into the water. Take one bagel and test it. If it floats, immediately return the tester bagel to the pan, pat it dry, cover the pan, and place it in the refrigerator overnight (it can stay in the refrigerator for up to 2 days). If the bagel does not float, return it to the pan and continue to proof the dough at room temperature, checking back every 10 to 20 minutes or so until a tester floats. The time needed to accomplish the float will vary, depending on the ambient temperature and the stiffness of the dough.
- 9. The following day (or when you are ready to bake the bagels), preheat the oven to 500 degrees F. Bring a large pot of water to a boil (the wider the pot the better), and add the baking soda. Have a slotted spoon or skimmer nearby.
- 10. Remove the bagels from the refrigerator and gently drop them into the water, boiling only as many as comfortably fit (they should float within 10 seconds). After 1 minute flip them over and boil for another minute. If you like very chewy bagels, you can extend the boiling to 2 minutes per side. While the bagels are boiling, sprinkle the same parchment-lined sheet pans with cornmeal or semolina flour. (If you decide to replace the paper, be sure to spray the new paper lightly with spray oil to prevent the bagels from sticking to the surface.)
- 11. When all the bagels have been boiled, place the pans on the 2 middle shelves in the oven. Bake for approximately 5 minutes, then rotate the pans, switching shelves and giving the pans a 180-degree rotation. (If you are baking only 1 pan, keep it on the center shelf but still rotate 180 degrees.) After the rotation, lower the oven setting to 450F and continue baking for about 5 minutes, or until the bagels turn light golden brown. You may bake them darker if you prefer.
- 12. Remove the pans from the oven and let the bagels cool on a rack for 15 minutes or longer before serving.
Did you make this recipe?
Leave a review below, then snap a picture and tag @thebrowneyedbaker on Instagram so I can see it!


Love this adaptation to Peter’s recipe! Blueberry bagels are my absolute favorite!
I think dried fruit bagels are my favorite sweet bagel. I’m going to make these!
I have always wanted to try my hand at making homemade bagels. You definitely make it sound doable!
I made my own bagles once and they surely didn’t look so good, maybe I have to try again. These really make you feel like it’s worth trying! Thanks, Sabrina.
Yeast scares me. It’s so hit or miss for me. But these blueberry bagels (my favorite) look too wonderful not to try out!
You’ve made some wonderful looking bagels. I have yet to try to make my own and to be honest, don’t know if I have the nerve to attempt.
I really need to try my hand at bagels. Yours look delish!
These look wonderful!
Blueberry bagels are in my top 5 favorite foods of all time! I love them so much. Yours look fantastic!
Wow, these look just perfect! Bagels are my once in a while breakfast treat, but if I could make them myself they’d be 100X more delicious than storebought… I bet the aroma from the oven is something else, too. Thanks for sharing! I’ll have to roll up my sleeves and give these a try sometime.
I’ve been wanting to make bagels for so long!
I can’t believe you made bagels. My family would love me more if I made these on a Sunday morning. They look fabulous!
They look perfect! I am craving one now!
I have been dying to make bagels, but still haven’t plucked up the courage. Perhaps after seeing this…
Drool-worthy. Like everything else on your site! :)~~~~~
These look absolutely amazing. I am going to have to try my hand at making bagels. You have convinced me to take the leap. Just want to let you know…I made your lemon burst cookies again….I used an icecream scoop for a nice size cookie. Was met with rave reviews. My friend’s husband brings us freshly caught fish and I make sure I hold up my bargain with one of his favorites.
Yum! Bagels are on my must bake list. Maybe I’ll try blueberry….
I just had blueberry waffles for breakfast and now I’m wishing I had bagels! I’ve got to make these!
Wow these bagels look delicious! Blueberry bagels are my ultime favorite type of bagel, but you can’t always find them everywhere. I love the idea of using the dried blueberries too. Definitely have to try this recipe!
Delish! :) I love how you added blueberries to this! :D
These look delicious – I’ve never made bagels – though I did work in a bagel bakery for a while!
Blueberry bagels were my favorite kind growing up. My husband keeps asking me to make bagels so I might have to try one of your recipes!
I have not tried to make bagels…but I think I should after seeing these. I love blueberry bagels…
These look incredible. I have been wanting to try to make homemade bagels. Can you use all-purpose flour instead of bread flour?
Hi Lori, Eh I don’t know that I would use all-purpose flour for these; you really won’t get the same texture. Bread flour, in fact, is the second choice here, with high-gluten flour being the best. I order high-gluten from King Arthur Flour and when I’ve run out I’ve subbed bread flour in a pinch, and even with that I can tell a definite difference in texture. Bagels really need that extra protein/gluten.
I used all-purpose flour (by accident) and they turned out just fine. Not as smooth as bread flour, but the texture wasn’t obnoxiously grainy or anything.
Delicious! I’d love to give homemade bagels a whirl once I have a big kitchen, aka more than one feet of counter space. :)
Blueberries are already on my current breakfast list so this would be an easy – not to mention delicious – transition from my normal breakfast routine!
this looks so delicious,..
LOVE the idea of making your own bagels- genius!
These look like they would make for a perfect breakfast. Wish I had one of these to enjoy on my day off from work tomorrow. They look awesome.
These look delicious! I’ve never made my own bagels before, but they are definitely on my list and blueberry is one of the best flavors to start with :)