Chocolate Gobs (aka Whoopie Pies)
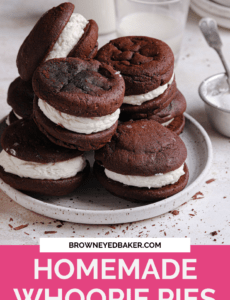
Homemade gobs are a nostalgic dessert made with two soft, cake-like cookies sandwiching a fluffy white filling. You can easily switch up the flavors for different seasons, but there really isn't much that can beat the classic- chocolate and white icing! These easy-to-make gobs are sometimes also called whoopie pies based on the filling, and are perfect for afternoon snacks or birthday treats.

Growing up, my mom would sometimes get gobs as a treat from the grocery store, and at most birthday parties, someone's mom inevitably showed up with a plate of them. They were just one of those things that were always around as a kid, and now as an adult, I realized that I totally took them for granted. Lucky for us, my mom had given me a copy of her recipe, which she received from her friend Karen umpteen years ago, and here it is!
I love how incredibly easy these are to make, not to mention how fast they bake! You can certainly make them larger or smaller if you'd like; I experimented with a few different sizes and found these to be perfect in terms of my personal preference. They're large enough that you don't feel like you need to eat more than one to get your fill, and not so big that you feel as though you totally gorged when you're done eating one.
The History
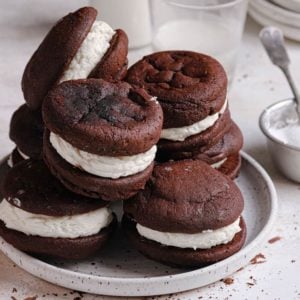
Whoopie pies are quite simply two chocolate cake-like cookies that sandwich a fluffy white creamy filling. Sometimes considered cookies, pies, sandwiches, or even cakes these delightful treats are truly one-of-a-kind.
While many New England states try to stake their claim on creating the original whoopie pie, Maine has gone out of its way to honor this baked good. Not only is it the state treat but Maine also holds the record for the largest whoopie pie, weighing in at a whopping 1,062 lb!
Gobs vs. Whoopie Pies
As someone who hails from western Pennsylvania, I grew up calling these "gobs". I've since learned that there is one big difference between traditional whoopie pies and gobs - the filling!
Most people contend that whoopie pies include a marshmallow fluff-based filling, while gobs traditionally have a less-sweet filling made from a cooked flour/milk mixture. The recipe included here does have marshmallow fluff in the filling, but we grew up eating these and calling them gobs.
If you would like to use a cooked filling, make the white filling/frosting from my Ho Ho Cake - it is the same as the more traditional gob filling!

Key Ingredients
While most of the ingredients needed for gobs are pantry staples, I wanted to highlight a few important ingredients for you. As always, be sure to check the recipe card for a full list of ingredients and quantities.
- Cocoa Powder: Use unsweetened natural cocoa powder (i.e. Hershey’s).
- Vegetable Shortening: This helps the gobs rise during the baking process, as well as keep their shape.
- Buttermilk: Acid from the buttermilk reacts with the cocoa powder and bakingsoda to create rise and tenderness in the cookie. If you don’t have any (or can’t get any), you can use this substitution method, or use plain full-fat Greek yogurt or full-fat sour cream in its place.
- Marshmallow Fluff: The base for the filling; as mentioned above, you can substitute a cooked icing if you prefer.
How to Make Gobs
Once you have your ingredients, you are ready to begin!
Step #1: Make the Cookies – Mix together the dry ingredients and set aside. Cream the shortening and sugar until fluffy, then add the egg, yolks, and vanilla extract. Alternate adding the dry ingredients, buttermilk, and hot water.

Step #2: Scoop the Cookie Dough and Bake – Using a medium-sized cookie scoop, drop the dough onto an ungreased cookie sheet (or lined with parchment paper). Bake for 5 to 6 minutes. They should look puffy and completely set.

Save This Recipe
Step #3: Make the Filling – Cream together the marshmallow fluff and shortening until light and fluffy. Add the powdered sugar, salt, and vanilla and mix to incorporate.

Step #4: Assemble the Gobs – Using a piping tip or spoon, pipe or spread filling on the bottom side of cookie, repeating with half of the cookies. Top with the remaining cookies.
Different Flavor Combinations
Over the years, I have tried my hand at a number of different gob (or whoopie pie) recipes, all with fun and delicious cookie and filling combos. Some of my favorites included:
- Red Velvet + Cream Cheese: These gobs have fluffy red velvet cookies sandwiching a tangy-sweet cream cheese filling.
- Pumpkin Spice + Maple: With fluffy pumpkin spice cookies and a sweet maple cream cheese filling, these pumpkin spice gobs are the perfect fall treat.
- S'mores: With a graham cracker cookie, chocolate ganache, and a marshmallow fluff filling, what s'more could you want??

Recipe Notes
- Mini Gobs: Use a small cookie scoop - about 2 teaspoons of dough - and bake for 4 to 5 minutes.
- Storage: These should be stored in an airtight container at room temperature for up to 4 days.
- Freezing Instructions: Gobs can be frozen… wrap individually in plastic wrap, then place in a freezer-safe ziploc bag and store in the freezer for up to 3 months. Thaw in the refrigerator overnight or on the counter for about 1 hour.
More Delicious Sandwich Cookies
If you make this gobs recipe and love it, remember to stop back and give it a 5-star rating - it helps others find the recipe! ❤️️
Gobs (aka Whoopie Pies)
Ingredients
For the Gobs:
- 2 cups (260 g) all-purpose flour
- ½ cup (42 g) unsweetened cocoa powder
- 1 teaspoon baking soda
- ¼ teaspoon salt
- ½ cup (92 g) vegetable shortening
- 1 cup (198 g) granulated sugar
- 1 whole egg
- 1 egg yolk
- 1 teaspoon vanilla extract
- ½ cup (120 ml) buttermilk
- ½ cup (120 ml) hot water
For the Filling:
- 1½ cups (192 g) marshmallow fluff
- 1¼ cups (283 g) vegetable shortening
- 1 cup (113 g) powdered sugar
- Pinch of salt
- 1 tablespoon vanilla extract
Instructions
- Preheat oven to 450 degrees F. Line two baking sheets with parchment paper; set aside.
- In a medium bowl, whisk together the flour, cocoa powder, baking soda and salt; set aside.
- Using an electric mixer, cream together the shortening and sugar on medium speed until light and fluffy, about 3 minutes. Add the egg, egg yolk and vanilla extract and beat for another 1 to 2 minutes, or until completely smooth and combined. Reduce the mixer speed to low, add one-third of the flour mixture and beat until just combined. Add the buttermilk and mix again, followed by another third of the flour mixture, the hot water, and then the remaining flour mixture. Give the batter a few quick folds with a rubber spatula to ensure all of the ingredients are incorporated.
- Drop the dough onto the parchment-lined baking sheets using a medium cookie scoop (about 1½ tablespoons of dough). Bake in the preheated oven for 5 to 6 minutes. The cookies should look puffed and completely set. Let cool on the baking sheets for about 5 minutes, then transfer to a wire rack to cool completely.
- Make the Filling: Cream together the marshmallow fluff and shortening on medium speed until light and fluffy, about 3 minutes. Reduce the speed to low and add the powdered sugar, salt, and vanilla extract; mix until all of the sugar has been incorporated, then increase the speed to medium and beat for another 3 to 5 minutes, until the mixture is light and fluffy.
- Assemble the Gobs: Using a pastry bag with round decorating tip, or a spoon, spread some of the filling onto the bottom side of half of the cookies. Top with the remaining cookies. The gobs can be stored at room temperature in an airtight container for up to 4 days.
Notes
- Cocoa Powder: Be sure to use unsweetened natural cocoa powder.
- Buttermilk: If you do not have buttermilk and need a substitute, follow the instructions here.
- Shortening: I do not recommend making a substitution in the cookie, as the shortening helps the cookie hold its shape. However, if you want to replace half or all of the shortening with butter in the filling recipe, I think that would totally work!
- Filling Substitute: For an even more traditional filling, replace this filling with the cooked white icing recipe from my Ho Ho Cake.
- Doubling: This recipe can easily be doubled.
- Mini: Use a small cookie scoop (or about 2 teaspoons of dough). Reduce the baking time by 1 to 2 minutes.
- Storage: The whoopie pies will keep in an airtight container at room temperature for up to 4 days, or in the refrigerator for up to 1 week.
- Freezing Instructions: Wrapped individually in plastic wrap, the assembled whoopie pies can be stored in an airtight container or ziploc bag for up to 3 months. Thaw overnight in the refrigerator or for a brief time at room temperature.
Did you make this recipe?
Leave a review below, then snap a picture and tag @thebrowneyedbaker on Instagram so I can see it!
This recipe was originally published in February 2013.
Photography by Dee Frances


These look absolutely amazing I cannot wait to try them out!!
Also visit:- https://reelsdownload.cc/how-to-create-a-strong-instagram-reels-brand-identity/
Made these for the first time today. Didn’t have marashmellow cream so used 1 tbsp butter and melted 12 marshmellows. To that I added 1/2 brick of cream cheese….Yum! Sprinkled with powdered sugar. Best results!
What do you mean by marshmallow fluff could I use ordinary mallows and heat them up to soften , from the uk, wales. Xx
Just made a batch of these gobs I should have made more thank you for the recipe Conrad
I have some ideas on the origins of Whoopie pies. I grew up in Michigan my husband in Texas. Neither of us had ever heard of this delicious treat until we went to stay with a Mennonite family in Lancaster, Pa for a vacation back over 3 decades ago. The owner of the home introduced us to them and when I questioned her she said the Amish had been making them there forever (and this woman was older then) and developed them as a treat to be easily taken into the field for a treat or with lunch. She even gave me her own handwritten recipe card that was stained and used then. It’s one of my most treasured cards not only for the recipe but because it reminds me of her and the wonderful, enchanting, adventure my family shared at her home.
Looks delicious and easy to make. Thanks for sharing the recipe.