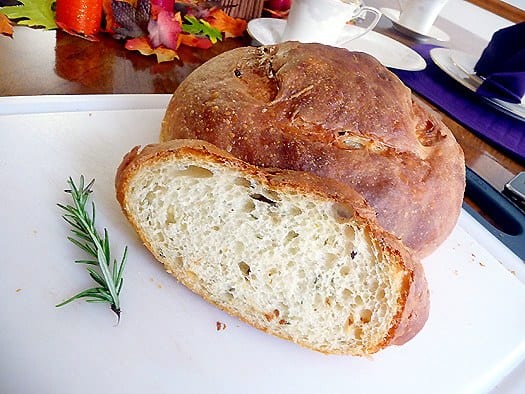
Potato Rosemary Bread

Happy Belated Bread Day! World Bread Day was last Friday, October 16th, and while I fully intended to participate my baking schedule was a little behind, so I bring you a delicious bread to start this week. Each year when World Bread Day rolls around I try to choose a recipe that is different than anything I have made before, as well as something that represents a bit of a challenge to me. Two years ago (my first time participating) I made a Brown Sugar Raisin Bread, which was my first attempt at a swirled bread. Last year I tackled Challah, which introduced me to braided breads. This year I started flipping through my bread cookbooks and, as it had countless times before, this recipe caught my eye. Potato Rosemary Bread sounds so good, and when you throw in coarse black pepper and roasted garlic, it’s nearly impossible to resist. Plus it met my requirement in trying something new: potato bread.
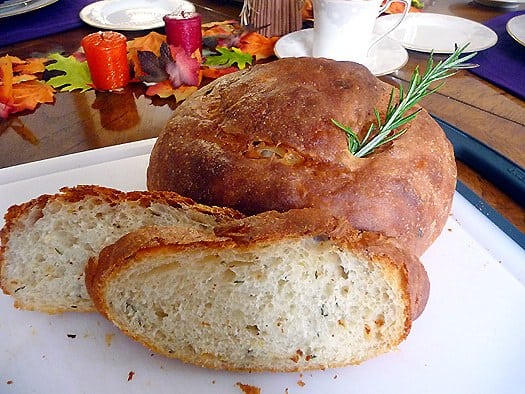
In a word, this bread is spectacular. Utterly spectacular. Probably in the Top 5, maybe even the Top 3, of breads I have ever made. The potatoes give it a soft and tender texture, and all of the ingredients combine for a sensational flavor. Roasted garlic is optional in the recipe, but I highly recommend including it – it adds even more depth and flavor to the bread. If you’ve never roasted your own garlic, it’s super easy and I’ll be posting a tutorial tomorrow with pictures so stay tuned! Now back to the bread – it may sound weird, but I couldn’t stop smelling the bread. It made the house smell fantastic while it was baking, and once baked and cut into, it may have been even better.
Save This Recipe
If you have some leftover mashed potatoes to use up, you should definitely use them to make this bread. And if you don’t have leftovers… well, everyone loves mashed potatoes! Whip up a batch and use some for this bread. Bottom line: this bread is a MUST to add to your to-bake list. You and everyone you share it with will be glad you made it.
1 year ago: Brownie Mosaic Cheesecake
2 years ago: Sweet Dinner Rolls

Potato Rosemary Bread
Ingredients
For the Bread:
- 1¼ cups (295.74 g) biga (recipe follows), (7 ounces)
- 3 cups (375 g) plus 2 Tablespoons unbleached high-gluten or bread flour, (14 ounces)
- 1½ teaspoons (1.5 teaspoons) salt, (.38 ounce)
- ¼ teaspoon (0.25 teaspoon) black pepper, coarsely ground (optional), (.03 ounce )
- 1¼ teaspoons (1.25 teaspoons) instant yeast, (.14 ounce)
- 1 cup (210 g) mashed potatoes, (6 ounces )
- 1 Tablespoon olive oil, (.5 ounce )
- 2 Tablespoons coarsely chopped fresh rosemary, (.25 ounce )
- ¾ cup (0.75 cup) plus 2 Tablespoons to 1 cup water, at room temperature (or warm if the potatoes are cold), (7 to 8 ounces)
- 4 Tablespoons coarsely chopped roasted garlic (optional), (1 ounce )
- Semolina flour or cornmeal for dusting
- Olive oil for brushing on top
For the Biga:
- 2½ cups (312.5 g) unbleached bread flour, (11.25 ounces )
- ½ teaspoon (0.5 teaspoon) instant yeast, (.055 ounce)
- ¾ cup (0.75 cup) plus 2 Tablespoons to 1 cup water, at room temperature, (7 to 8 ounces)
Instructions
- 1. Make the biga: Stir together the flour and yeast in a 4-quart bowl (or in the bowl of an electric mixer). Add ¾ cup plus 2 Tablespoons of water, stirring until everything comes together and makes a coarse ball (or mix on low speed for 1 minute with the paddle attachment). Adjust the flour or water, according to need, so that the dough is neither too sticky nor too stiff. (It is better to err on the sticky side, as you can adjust easier during kneading. It is harder to add water once the dough firms up.)
- Sprinkle some flour on the counter and transfer the dough to the counter. Knead for 4 to 6 minutes (or mix on medium speed with the dough hook for 4 minutes), or until the dough is soft and pliable, tacky but not sticky. The internal temperature should be 77° to 81°F.
- Lightly oil a bowl and transfer the dough to the bowl, rolling it around to coat it with oil. Cover the bowl with plastic wrap and ferment at room temperature for 2 to 4 hours, or until it nearly doubles in size.
- Remove the dough from the bowl, knead it lightly to degas, and return it to the bowl, covering the bowl with plastic wrap. Place the bowl in the refrigerator overnight. You can keep this in the refrigerator for up to 3 days, or freeze it in an airtight plastic bag for up to 3 months.
- 2. Remove the biga from the refrigerator 1 hour before you plan to make the bread. Cut it into about 10 small pieces with a pastry scraper or serrated knife. Cover with a towel or plastic wrap and let sit for 1 hour to take off the chill.
- 3. Stir together the flour, salt, black pepper, and yeast into a 4-quart mixing bowl (or in the bowl of an electric mixer). Add the biga pieces, mashed potatoes, oil, rosemary, and ¾ cup plus 2 Tablespoons water. Stir with a large spoon (or mix on low speed with the paddle attachment) for 1 minute, or until the ingredients form a ball. Add more water, if necessary, or more flour, if the dough is too sticky.
- 4. Sprinkle flour on the counter, transfer the dough to the counter, and begin to knead (or mix on medium speed with the dough hook). Knead for approximately 10 minutes (or 6 minutes by machine), adding more flour if needed, until the dough is soft and supple, tacky but not sticky. It should pass the windowpane test and register 77° to 81°F. Flatten the dough and spread the roasted garlic over the top. Gather the dough into a ball and knead it by hand for 1 minute (you will probably have to dust it with flour first to absorb the moisture from the garlic). Lightly oil a large bowl and transfer the dough to the bowl, rolling it around to coat it with oil. Cover the bowl with plastic wrap.
- 5. Ferment at room temperature for approximately 2 hours, or until the dough doubles in size.
- 6. Remove the dough from the bowl and divide it into 2 equal pieces for loaves, or 18 equal pieces (about 2 ounces each) for dinner rolls. Shape each of the larger pieces into a boule, or shape the smaller pieces into rolls. Line a sheet pan with baking parchment (use 2 pans for rolls) and dust lightly with semolina flour or cornmeal. Place the dough on the parchment, separating the pieces so that they will not touch, even after they rise. Mist the dough with spray oil and cover loosely with plastic wrap.
- 7. Proof at room temperature for 1 to 2 hours (depending on the size of the pieces), or until the dough doubles in size.
- 8. Preheat the oven to 400°F with the oven rack on the middle shelf. Remove the plastic from the dough and lightly brush the breads or rolls with olive oil. You do not need to score these breads, but you can if you prefer.
- 9. Place the pan(s) in the oven. Bake the loaves for 20 minutes, then rotate the pan 180 degrees for even baking. The loaves will take 35 to 45 minutes total to bake. Bake the rolls for 10 minutes, rotate the pans, and then bake for 10 minutes longer. The loaves and rolls will be a rich golden brown all around, and the internal temperature should register at least 195°F. The loaves should make a hollow sound when thumped on the bottom. If the loaves or rolls are fully colored but seem too soft, turn off the oven and let them bake for an additional 5 to 10 minutes to firm up.
- 10. Remove the finished loaves or rolls from the oven and cool on a rack for at least 1 hour for loaves and 20 minutes for rolls before serving.
Did you make this recipe?
Leave a review below, then snap a picture and tag @thebrowneyedbaker on Instagram so I can see it!


I really love this recipe and it’s definitely one of the top 3 go to breads I would always make, especially when the smell of the buns waft thru the house 😋
You used to have a roasted garlic recipe that accompanies this recipe which I have bookmarked but it looks like it has been removed? Any possibility of putting that up again? Thanks!
Nice recipe, but reading through the steps, the total time for this is significantly longer than the “total time” estimate would imply :)
Hmm these look delicious, thanks for posting up this recipe, looks quite simple to make.
Simon
I was wondering if I can use aluminum foil instead of parchment paper?
Do you have to dust with semolina flour or cornmeal? I dont have either
I am waiting for the bread to ferment now step #5, can I wait until tmw evening to finish the rest of the steps so I can go get the other ingredients?
Thank you!!
Hi,
I would like to use baking soda instead of yeast from this recipe. Is that possible? If so,what is the correct amount to use and what else needs to be added,changed?
I’d love to read your feedback.
Hi Heidi, You absolutely cannot substitute baking soda for the yeast; this is a yeast bread.
I’m wondering what type of potatoes you used? Or if it even matters?
I always make mashed potatoes with Yukon gold potatoes, but I’m not sure that it matters.
I made this tonight and it was fantastic! My husband and I had it for dinner with some French onion soup and it couldn’t have been better. Thanks for sharing!
Is it necessary to refrigerate it over night or at all? I would like to skip that step since I plan to serve it tonight for dinner. Thank you. Barb
Hi Barb, Yes, it does need to rest in the refrigerator in order for the bread to properly develop.
Made this tonight . Lovely I adore a dough that requires 10 min of my attention. Fun to make and fabulous to eat
How much do you use? Can you freeze the rest?
As the recipe states, 1¼ cups of the biga. The recipe also gives directions for refrigerating/freezing the leftover biga.
Did I miss something. You don’t use the whole biga?
No, the entire biga is not used.
I too had a deflating and browning problem with my bread. Next time I may leave them in a tad longer and try the spray bottle idea for the olive oil.
But the flavor! The wonderfully garlicky herbalicious flavor! The bread tastes fantastic and since mine didn’t deflate too badly there were plenty of holes inside. I ate some with a cup of tomato bisque and it was divine! Ill make this again and play around with cooking times to get a dark top. The bottom however of my bread was oh so wonderfully crusty.
I usually give bread as gifts for the holidays. I love baking bread, it’s like therapy! In my search for my bread for this season I happen upon your site which is just wonderful all around! I plan to try this particular bread this weekend but thinking ahead to the holiday season…have you tried freezing the dough and then baking at a later date? I usually try to make all my dough in the weeks leading up and then the night before I want to give the bread as a gift, I defrost it and bake the next day just before giving it away. Thanks!
Hi Jenn, I have never frozen the actual bread dough before (just frozen the baked bread), but if you have had success doing it, I’d give it a go! Let me know how it turns out!
Hi Michelle! It worked really well! It baked and tasted just as wonderful as the one I baked the day I made the dough. Couldn’t do a side by side taste test but I thought it was dynamite both times :) I froze the dough after the first rise and shaping, wrapped in “freeze tight” plastic wrap (it was in the freezer a good 3 weeks). I let it defrost in the fridge last night. This morning, I took it out and it sat for probably about 4 hours to come to room temp and then rise. Sprayed with olive oil and baked at same temp and same amount of time. Great time saver when giving bread as a gift!
Sounds yummy and I love rosemary and have bought potato bread in the store. You stress high-gluten flour. would the recipe turn out OK if one used non-gluten flour?
Hi Nancy, Are you talking about something like rice flour? I don’t believe that this would work at all; the gluten and proteins in the flour are what help to develop the dough.
I just made this bread yesterday/today. A couple things…I used regular all-purpose flour because it’s what I had, accidentally used all the biga instead of measuring it out and used active yeast without even realizing it. The result. AMAZING. Seriously, this is the best bread I’ve ever made. Such a great texture and flavor – just a hint of garlic (I roasted a whole head, next time I might go for more).
I’m sure someone has said this already, but how funny is it that the bread itself looks like a giant potato? At least I got a kick out of it. Thanks for sharing this wonderful loaf… I can’t wait to give it a try!
Made this bread- half as a loaf and half as rolls – used all the biga……..ooops, bu they turned out great anyway- will try again this time following the recipe : )
I’m glad they still turned out and you enjoyed the recipe! I keep meaning to make it into rolls; I love the bread!
I am in the process of making the bread now. I made the full biga recipe yesterday, but it looks like you only need a small portion of it (1.25 cups). Do I need to measure that amount out or did you use all of the biga?
Hi Aly, You need to measure out the biga. You can discard the rest. Enjoy the bread, it’s one of my favorites!
thanks for sharing i am going to make this on the week end
did you try making them as rolls?? if yes which one was more moist ? the loaf or the rolls ??
thanks again for all your fantastic recopies