How To Make Rye Sour Starter (for Jewish Rye Bread)
As they say, the third time’s the charm. Or, is it the fourth? Fifth?
I have been at odds with rye bread for years now. Years. After enjoying a fresh loaf of rye bread from a Jewish deli in Florida more than three years ago, I got the itch to make my own. Having made tons of yeast bread in the past, I thought there would be nothing to it. I was in for a rude awakening… an awakening that took the form of multiple failed attempts at a rye starter. Frustration mounted, and I put the project on the back burner for quite some time. A few months ago, I decided to try again. This time, I did what I should have done in the first place – I went straight to the source. Since I wanted to make Jewish rye bread, I figured the place to find the best recipe would be in a Jewish cookbook. Since I happened to have one that had been sitting on my shelf for quite some time unused, I busted it open. Sure enough, there was a recipe for Jewish rye bread. I followed the instructions to a “T” and didn’t run into any problems. I feel like the rye bread fairy godmother waved a magic wand. Finally, success!
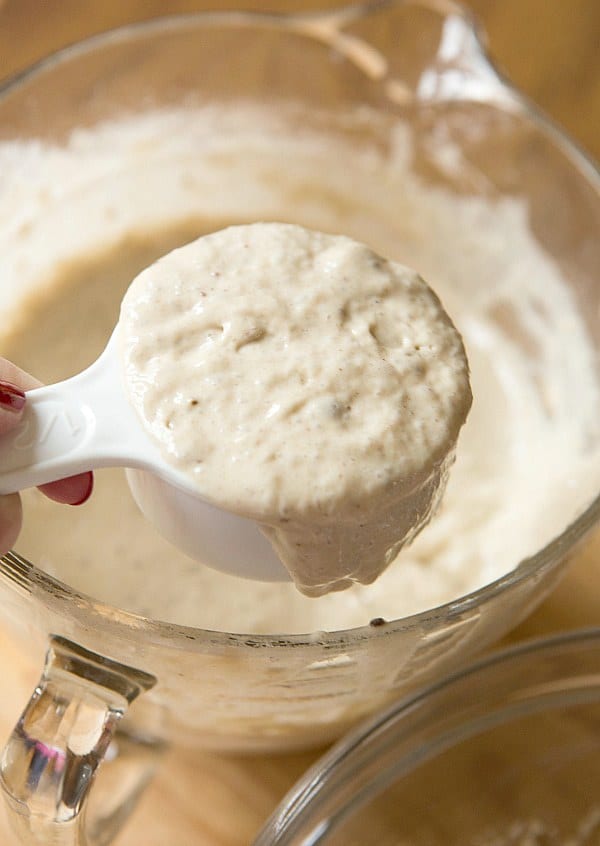
Since the process to mix together the starter for this rye bread is somewhat involved and takes multiple days, I thought it would be easier to break the recipe down into the starter process, and then the actual mixing of the dough and baking the bread. Below you will find step-by-step instructions (with photos) on how to create a rye sour starter, which provides the bread with its soft texture and immense flavor.
Save This Recipe
Tomorrow I will share the bread recipe with you, so stay tuned!
[Update: Recipe for Jewish Rye Bread using this starter.]
One year ago: Bourbon Bread Pudding
Two years ago: Peanut Butter Cup Crunch Brownie Bars and Chocolate Malted Whopper Cookies
Three years ago: Pumpkin Scones with Spiced Glaze
Four years ago: Ham and Split Pea Soup
Five years ago: Almost Fudge Gateau
Rye Sour Starter
Ingredients
Rye Sour Starter:
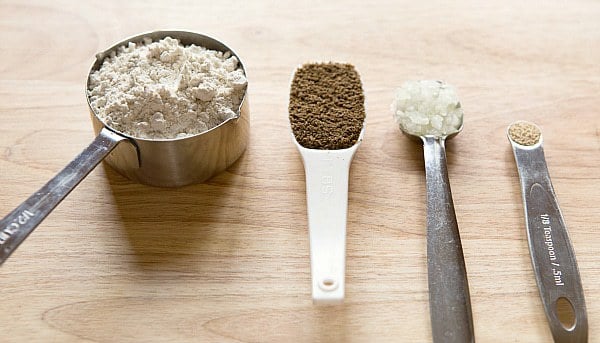
- ½ cup (51 g) rye flour
- ⅛ teaspoon (0.13 teaspoon) active dry yeast
- 1 cup (250 ml) warm water, 110 degrees F
- 1 tablespoon crushed caraway seeds
- 1 teaspoon minced onion
Stage One:
- ½ cup (125 ml) water
- 1½ cups (153 g) rye flour
- 1 recipe Sour Starter
Stage Two:
- ½ cup (125 ml) warm water, 110 degrees F
- 1 cup (102 g) rye flour
Stage Three:
- ½ cup (125 ml) water, use warm water if sour has been refrigerated
- 1 cup (102 g) rye flour, or more
Instructions
- 1. Begin the Rye Sour Starter: Combine the rye flour, yeast, warm water, crushed caraway seeds and minced onion in a large bowl and stir with a wooden spoon until smooth. The mixture should have a thin, soupy consistency. Cover with plastic wrap and allow to stand in a warm spot until bubbly and fermented. It can be left for up to 24 hours.
- 2. Prepare Stage One: In a large bowl, combine the water, 1¼ cups of the flour, and the starter; stir with a wooden spoon until smooth. The dough should pull slightly and may start to come away from the sides of the bowl. Wipe down the sides of the bowl and sprinkle the remaining ¼ cup flour over the entire surface of the sour. Cover with plastic wrap and let stand until doubled in size and the floured top appears cracked with openings spread widely apart. This could take 4 to 8 hours (avoid letting the mixture collapse).
- 3. Prepare Stage Two: To the Stage One sour, add the water and ¾ cup of the flour; mix until smooth. Wipe down the sides of the bowl and sprinkle the remaining ¼ cup flour over the entire surface of the sour. Allow to rise in a warm area for 4 to 8 hours, or until doubled in size.
- 4. Prepare Stage Three: To the Stage Two sour, add the water and the 1 cup flour. Mix until smooth. Add more flour, ¼ cup at at time, until a dough-like consistency is reached. Cover with plastic wrap and leave in a warm spot until doubled in size, 4 to 8 hours. At this point, the starter is ready to be used in the bread.
Notes:
- The caraway seeds can be ground in a coffee or spice grinder or with a mortar and pestle.
- The book recommends using white rye flour, which I purchased from King Arthur Flour.
- When preparing Stages One and Two, the object is to make a thick consistency as close as possible to that of a soft dough. If the mixture is too soupy, add more flour ¼ cup at a time and mix until smooth.
- It is recommended that Stage One and Two be made on the same day, the second stage refrigerated overnight, and the third stage prepared the morning of baking. If you intend on baking the bread first thing in the morning, then prepare the third stage the evening before, so it can rise slowly all night and be ready in the morning.
- The sour starter can be refrigerated; it is recommended that it be stirred down every 3 to 4 days if it hasn't been used. Every 10 to 12 days, dispose of half of the starter and refresh it by mixing in equal amounts of rye flour and water. If there is some discoloration on top, it can be skimmed off.
Notes
Did you make this recipe?
Leave a review below, then snap a picture and tag @thebrowneyedbaker on Instagram so I can see it!


This is George Greenstein’s recipe out of the Secrets of a Jewish Baker cookbook. It is a shame you did not give him credit for his recipe.
I’ve come late to the conversation but notice that this is the exact recipe for rye sour starter found in “Secrets of a Jewish Baker” by George Greenstein. This book is now out of print but I managed to get a copy. Amazing book with lots of history. Is that where you found your recipe?
How much of this starter should be used in a conventional two loaf rye bread recipe that does not call for a starter?
Should the amount of sour starter used to replace the rye flour called for in the recipe be equal to the rye flour in the recipe (starter flour equal to recipe rye flour))?
I’d like to know how to keep this starter going rather than start a new one each time. I tried the first generation and although it didn’t rise as much as I would have liked but I loved the flavor. Second time I used refreshed sour starter I had leftover the first time that I refrigerated. I used the first clear flour and “white”rye flour (as the first time I used whole rye flour). The flavor again was good but the rise was not great.
Now I’m in the weeds as I just decided to take out the starter from frig and begin as if I had refrigerated phase 2 overnight in hopes 8 hours from now I’ll have enough again to bake with some starter to refrigerate.
The 3 day process is elaborate but I loved this breads flavor. Could I use an egg wash with caraway seeds or cornmeal like a zissel rye? How do the Jewish rye bread bakers get theirs to rise so high?
Hi Simone, I’ve actually never tried to keep the starter going. Let me know how it goes! You definitely could do an egg wash with topping!
My husband had told me for years that he couldn’t find real Jewish corn rye around where we live. So I decided to try making some. This was complicated, but it came out beautifully. He loves it!
I have a question: my sour starter is very thick, like a thick cake batter. I have it in the refrigerator. How can I keep it going so that I always have some ready to bake with? I saw below that you said to keep feeding it. Would that be like going through Stages 1, 2, and 3 again?
Thanks!
I made the starter and fed it twice on day 2. I used a cup of it to bake and put the rest in the fridge. Do I take out some and feed to use with a recipe and also feed what is left then return it to the fridge? I’m confused as to what to do with the portion to be used in a bread recipe and what to do with the starter that is being returned to the fridge.
Thanks
Jeanette
Hi Jeanette, Yes you would take out what you need for the recipe, then feed what’s left to keep it going until you want to use it again.
I’ve made the starter (for the first time) and it did all the things it was supposed to do and I used it in my grandfather/father’s pumpernickel recipe. The starter smelled “metallic” when it was done. I used it anyway thinking it would vent out or something but it didn’t seem to. My loaves smell metallic. It has been in the fridge for 24 hours and it’s fallen a little but a great starter but while it may be less, it still smells. What did I do wrong?
Hi Marcy, Hmmm the only thing that I can think of is did you stir it with a stainless steel spoon? I’ve read some things that they can transfer odors/taste or affect the starter.
What is “dough like consistency?” I screwed up and kept adding 1/4 cup of flour until it was a thicker dough like consistency and have messed the entire process. And to top it off, I accidentally skipped Stage Two. What exactly is Stage Three supposed to look like? I suppose I will have to order more rye flour and start over. Sigh. Frustrated.
Hi Terri, I look for a consistency that is thicker than soupy but might still be a little sticky, but holds together on its own.
This is a complicated recipe. I use Artisan Bread In 5 Minutes A Day with 1/4 cup dry minced onion and 2 tbsp caraway seed. I allow the dough rest for 3 days in the refrigerator and it sours. I use this to make my classic NYC Jewish style rye.
I have that book. Which recipe do you use? Would love to try.
Hi, where is the bread recipe? It says it will come the next day but is has been awhile
Hi Sue, There is a link to it in the post above, but here it is: https://www.browneyedbaker.com/2013/02/20/jewish-rye-bread-recipe/
Thank you so much for the detailed instructions and pictures. My first attempt at making a starter (different recipe) was a fail, so the wind was out of my sails a little. I just finished stage 3 and am feeling pretty good about it. I have a question though, maybe you can help. When I put stage 2 in the fridge over night and pulled it out this morning, it looked to have fallen in there. Is that normal? Please say yes. Thanks!
Anyway, I appreciate the details, and can’t wait to try it. Feel like a kid at Christmas!
Hi Jamie, Stage 2 should rise first, THEN be refrigerated. Did you do that?
This is from “Secrets of a Jewish Baker” by George Greenstein. Please give credit–it’s a great book.
Janis, I did give credit above – this method comes from the book “Arthur Schwartz’ Jewish Home Cooking”. Perhaps it’s the same common method used in the book you’ve referenced, but I’ve not read that book.
by the end of stage 3 how much rye starter does the recipe yield?