American Sandwich Bread
Please note that I have since shared what I consider to be the best, most foolproof white bread recipe. I encourage you to head over to that recipe and give it a try!
Otherwise known as, white bread. I know, you’re probably wondering to yourself, isn’t this the umpteenth “classic white bread” recipe this chick has posted? Well yes, admittedly, I think this is now the third different loaf that I have blogged (there was the Better Homes & Garden version, then the Peter Reinhart recipe, and now this). It’s not that any of the previous loaves have been bad or have disappointed me in any way. It’s quite simply that I.LOVE.BREAD. I don’t come from the land of low carb, folks. And given the opportunity to try a new recipe when I need to restock the kitchen with a fresh loaf of bread, I run with it! And this loaf, let me tell you, is definitely worth running for!
One of the things I loved about this recipe is how quick it was to execute. Many people are intimidated by homemade bread, not only because of yeast, but also because of the time factor. Some believe that it will take the better part of a day to churn out a loaf of homemade bread. That’s just not true. Now granted there are recipes for complex loaves of bread that include sponges, starters, and three rises that can take a day or more, but for your basic loaf of white bread, just not so. Two hours after you start the process you can be pulling a loaf of fresh bread out of your oven.
Save This Recipe
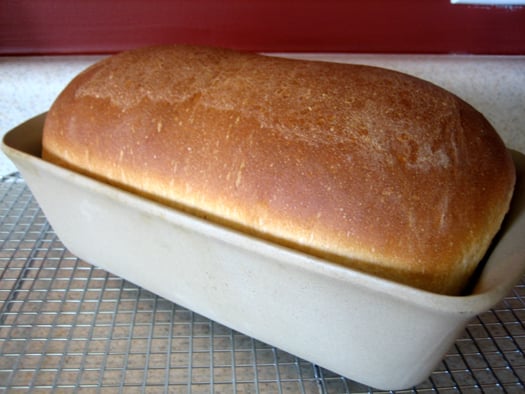
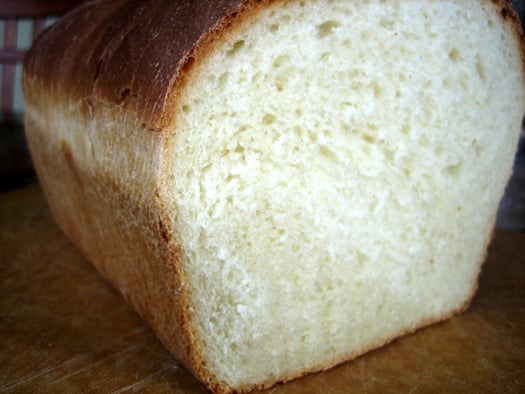
Another thing I love about this particular recipe is that you get a really high loaf of bread, which isn’t always the case when making a regular white bread. I have had my fair share of smallish loaves, and this one definitely turns in a nice change of pace. The key here it to let it go on its second rise until the dough is about an inch higher than the rim of the loaf pan. Then once in the oven, the loaf will gain even more height.
This round of bread making was not without incident, and there was almost a casualty. Now as any KA owner can attest, one of the beautiful things about these wonderful appliances is that you can throw in your ingredients and let it work while you tend to other things, such as cleaning up your mess. I do this often when creaming butter and sugar, and kneading bread dough. Both things take at least a few minutes, so I use the idle time to my advantage. Until today. My dough was kneading away on my island and I was putting my dirty utensils in the dishwasher when I heard the KA start to do a thump, which is not unusual when kneading. But then, 2 seconds later, it did a nose dive onto the floor! Luckily the little KA that could is just fine, the floor is fine, catastrophe averted. I have to wonder if perhaps my KA heard me talking behind its back about how I wish it would die so I could upgrade to a Professional 600 and figured it would help me by leaping to its suicidal death?
Regardless, we all survived the incident to bring you this wonderful bread recipe!
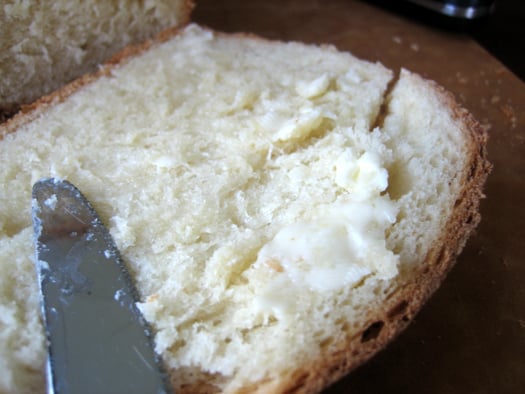
Quite possibly my favorite way to eat bread – slathered with butter. When I was younger, my grandma often quipped that I was the only person she knew who could make a meal from bread and butter. Not much has changed ;-)
American Sandwich Bread
Ingredients
- 3¾ cups (468.75 g) unbleached all-purpose flour, plus more for dusting the work surface, (18¾ ounces)
- 2 teaspoons salt
- 1 cup (244 ml) warm whole milk, about 110 degrees
- ⅓ cup (83.33 ml) warm water, about 110 degrees
- 2 tablespoons unsalted butter, melted
- 3 tablespoons honey
- 1 envelope instant yeast, (about 2¼ teaspoons)
Instructions
- 1. Adjust an oven rack to the lowest position and heat the oven to 200 degrees. Once the oven temperature reaches 200 degrees, maintain the heat for 10 minutes, then turn off the oven.
- 2. Mix 3½ cups of the flour and the salt in the bowl of a standing mixer fitted with the dough hook. Mix the milk, water, butter, honey, and yeast in a 4-cup liquid measuring cup. Turn the machine to low and slowly add the liquid. When the dough comes together, increase the speed to medium and mix until the dough is smooth and satiny, stopping the machine two or three times to scrape dough from hook, if necessary, about 10 minutes. (After 5 minutes of kneading, if the dough is still sticking to the sides of the bowl, add flour, 1 tablespoon at a time and up to ¼ cup total, until the dough is no longer sticky.) Turn the dough onto a lightly floured work surface; knead to form a smooth, round ball, about 15 seconds.
- 3. Place the dough in a very lightly oiled large bowl, rubbing the dough around the bowl to coat lightly. Cover the bowl with plastic wrap and place in the warmed oven until the dough doubles in size, 40 to 50 minutes.
- 4. Gently press the dough into a rectangle 1 inch thick and no longer than 9 inches. WIth a long side facing you, roll the dough firmly into a cylinder, pressing with your fingers to make sure the dough sticks to itself. Turn the dough seam-side up and pinch it closed. Place the dough seam-side down in a greased 9 by 5-inch loaf pan and press it gently so it touches all four sides of the pan. Cover with plastic wrap; set aside in a warm spot until the dough almost doubles in size, 20 to 30 minutes.
- 5. Keep one oven rack at the lowest position and place the other at the middle position and heat the oven to 350 degrees. Place an empty baking pan on the bottom rack. Bring 2 cups of water to a boil in a small saucepan. Pour the boiling water into the empty pan on the bottom rack at set the loaf onto the middle rack. Bake until an instant-read thermometer inserted at an angle from the short end just above the pan rim into the center of the loaf read 195 degrees, 40 to 50 minutes. Remove the bread from the pan, transfer to a wire rack, and cool to room temperature. Slice and serve.
- Note: This recipe uses a standing electric mixer. You can hand-knead the dough, but we found it’s easy to add too much flour during this stage, resulting in a somewhat tougher loaf. To promote a crisp crust,we found it best to place a loaf pan filled with boiling water in the oven as the bread bakes.
Did you make this recipe?
Leave a review below, then snap a picture and tag @thebrowneyedbaker on Instagram so I can see it!


I love bread
I have been cooking for over 3o years, and I have always purchased sliced sandwich bread.
I no longer have a need to look for or purchase sliced bread, because the very beat I have ever enjoyed has come out of my oven, in my kitchen thanks to your recipe!
Thank you so much for posting this perfect recipe!
Rob
Robert Jannicelli
This is now my favorite go to bread for my weekly eating. I love the crunchy crust and enjoy a slice made into cinnamon toast quite frequently, it is every bit as good as dessert! I have also enjoyed all sorts of hot and cold sandwiches using it, including barbeque open faced sandwiches, open faced toasted tuna salad (toast with butter, remove, add tuna salad and cheese on top, back into oven on broil and YUM) and both skillet ham and cheese, and toads in a hole! And it really is quite FAST! The honey helps preserve it – mine lasts all week on my counter in a zip lock bag (for one).
Thank you Brown eyed baker!
This is a very good recipe and I have found that the honey seems to preserve it much longer on the counter than most homemade breads! I put mine into a sealed gallon sized bag once it cools. It is fairly quick to make, so a go-to recipe; delicious as oven toast with jams, a hot skillet sandwich (great for barbequed meats) or with cold meats, tuna or PB&J! Thank you Brown-eyed Baker!
Love Love this bread. Its one of the few bread recipes that I make. Thanks!
This (yet another) recipe is from America’s Test Kitchen – I am curious why it is not acknowledged this is NOT an original recipe with a nod to the creator?
Do not care but this was my first true loaf of bread that I can say hit all the marks. Thanks Michelle. Go ‘Guins.
If I use bead flour instead of AP, would I need to make any changes to the recipe? I made this with AP and measured the flour by weight and found it a little light in texture. Wondering if using a blend or all bread bread flour would create a better crumb.
How do you do the recipe without a stand mixer?
I don’t know about Michelle, but here is what I do.
1) Prep it the same way. Water, milk, honey, and butter mixture 110 degrees Fahrenheit. Set aside 1/4 cup of the liquide for the salting phase.
2) Dissolve the yeast in the mixture and let it bloom as stated in the recipe.
3) I have a large bowl I sift the flour into (you can stir in the salt at this time but I elect to hold off on the salt until after the autolyse), take out about 1/4 to 1/2 cup of flour and create a small well in the middle.
4) Pour the yeasted mix into the well. Using clean hands, stir the yeasted mix and gently mix the flour into the liquid until all the flour is incorporated into the mix and there is little to no dry flour and the dough is a cohesive semi shaggy ball.
5) Now the autolyse which is a fancy term for rest. I cover the bowl with a moist towel and let it rest for 25 to 30 minutes but no more than 60 minutes. This makes kneading much easier.
6) Combine the unyeasted mix and the salt mixing til all the salt disolves.
7) Pour the in with the dough ball mixing them with your hands until the liquid is absorbed into the dough.
8) Knead the dough until it smooth and supple with vidible strands of gluten and it passes the window pane test.
9) Form into a ball and place into a large bowl to proof for 40 to 50 minutes. It is done proofing when it has doubled in size and when gently poked, the dough bounces back to cover the place it was poked.
10) Form the dough into a loaf as described in the recipe
11) Cover and let proof for 20 to 30 minutes as described in the recipe.
12) Apply an egg wash and score if desired (as I do) or use a cake tester and poke 6 holes in it to let some of the moisture to escape.
13) Bake at 350 degrees as described for 40 to 50 minutes or until it reaches an internal temperature of 195 degrees or slightly higher.
14) Remove from the pan and let cool completely before slicing into.
I Love this recipe. It’s my go to recipe for bread. I sometimes add a bit of flax seed to it, and it turns out nicely still. I usually make three loafs at once. (that’s about as much as my mixer and oven can handle.)
Love this bread turns out so good, crispy outer crust & soft inside..thank you for sharing d rcpe
I don’t have instant yeast. Can I use regular active dry yeast and if so, do I need to change anything in the recipe, rise times, etc?
Hi Kathy, First bloom the yeast in the warm milk and water, then add the rest of the wet ingredients and proceed with the recipe as written. Rise times might be slightly longer. Enjoy!
If I omit the pan of boiling water, will it turn out fine except for no “crisp crust”? I like my sandwich bread to be soft – without a crisp crust.
Yes, it will be just fine :)
I substituted 1 1/2 c. whole wheat flour, 1/2 c. Evaporated milk , 1/2 c. 1% milk and Agave syrup for the honey. The bread was delicious!