Homemade Croissants Recipe

Learn how to make croissants! If you’ve always wanted to try your hand at those delicious, buttery, flaky French pastries, this step-by-step tutorial loaded with tons of pictures and a video, will walk you through exactly how to do it. These classic pastries aren’t difficult, they just take a little advance planning; once you make them at home you’ll never want to get store-bought again!

I first made croissants at home nearly 12 years ago and it felt like such a massive accomplishment! I couldn’t believe that I was able to produce amazingly flaky pastries just like those I had enjoyed at the best bakeries.
The original recipe that I made came from the Tartine cookbook; while it was delicious, it also required a preferment and since learning and experimenting with more croissant recipes, I found that it was an unnecessary step. This current iteration takes ratios, steps, and techniques from a combination of that original recipe, a slightly different Tartine recipe published in Saveur, and Weekend Bakery.
It’s a kitchen project that will make you feel like an absolute superhero at the end! You will be rewarded with the most amazing, ultra-flaky French croissants that you won’t be able to stop eating (I know from experience).

How croissants are made from scratch
You’ll hear croissants referred to as a labor of love not necessarily because they are difficult, but because you have to do some advance planning and complete it over a few days.
Let’s talk through the steps!
Make the Dough
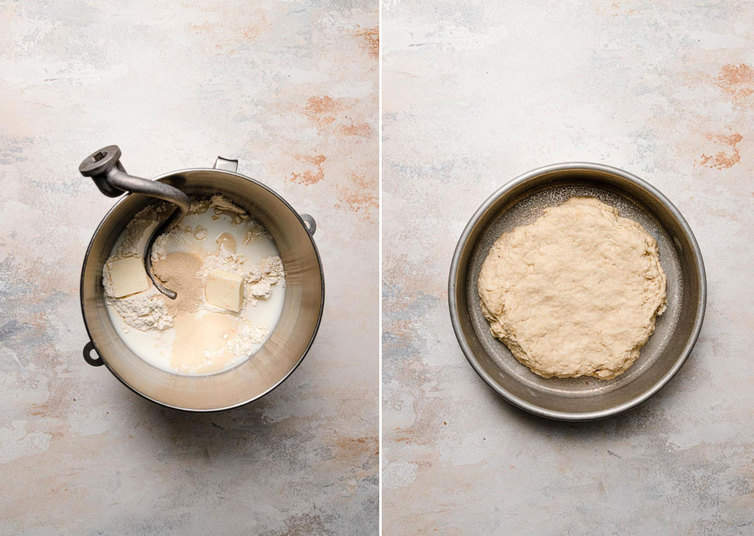
This is super quick and takes only 10 or 15 minutes from start to finish. You’ll add all of the ingredients to a mixer and knead for a few minutes to get everything worked together so the gluten can start working.
Make the Butter Block
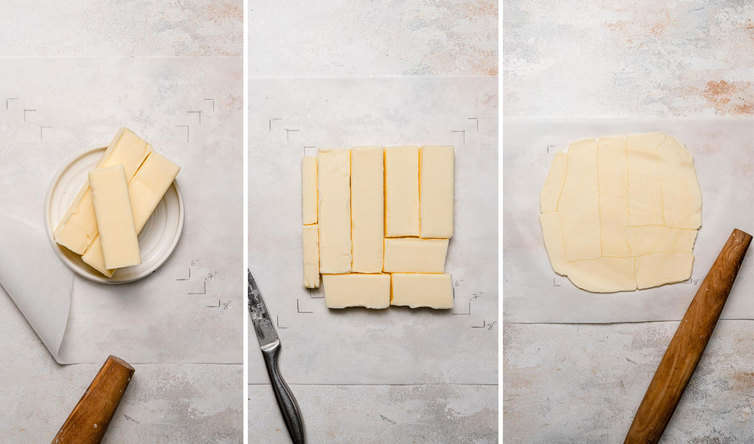
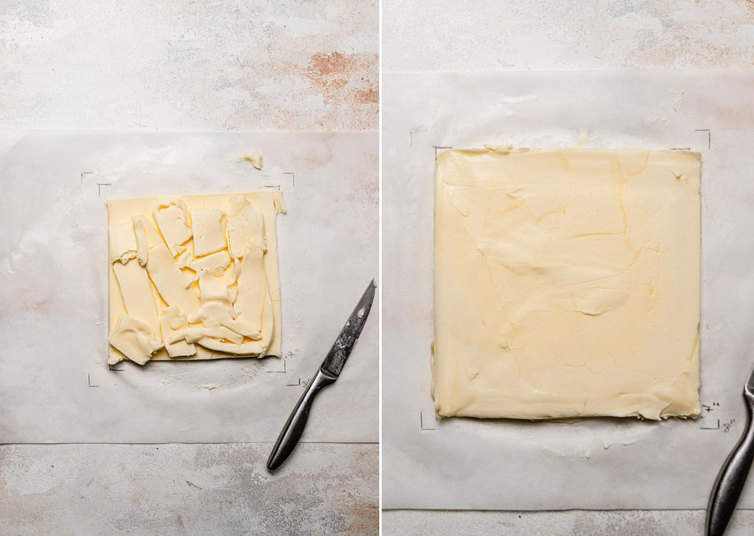
To make our butter block, we gently pound out sticks of butter into a square and then refrigerate it to firm up a bit while we roll out the dough.
I’ve tried doing this step by beating butter and spreading it into a square, but I’ve found using cold sticks of butter and pounding them out a bit to result in a butter block that is more cohesive, easier to chill, and doesn’t melt into the dough.
Laminate the Dough
This is the process by which the butter block gets incorporated into the dough and creates all of those magical flaky layers! You will sometimes see these steps referred to as “turns”.
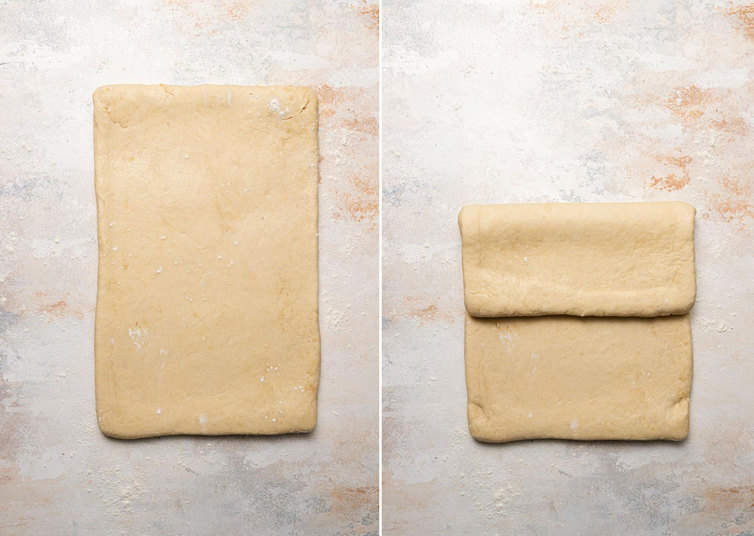
First, the butter block is placed on top of the dough and covered so that it is completely encased in the dough.
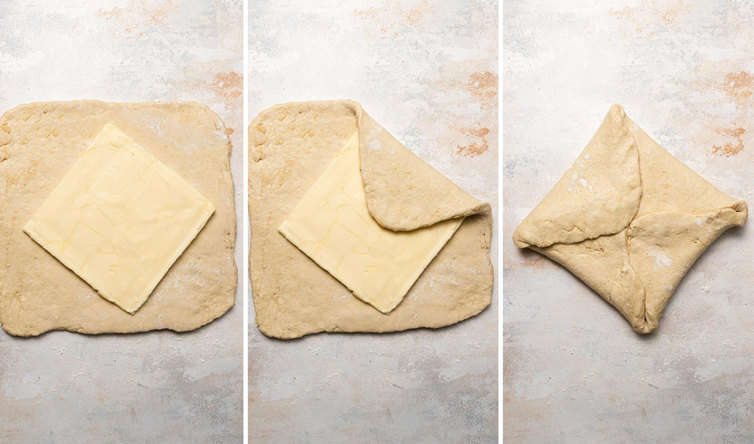
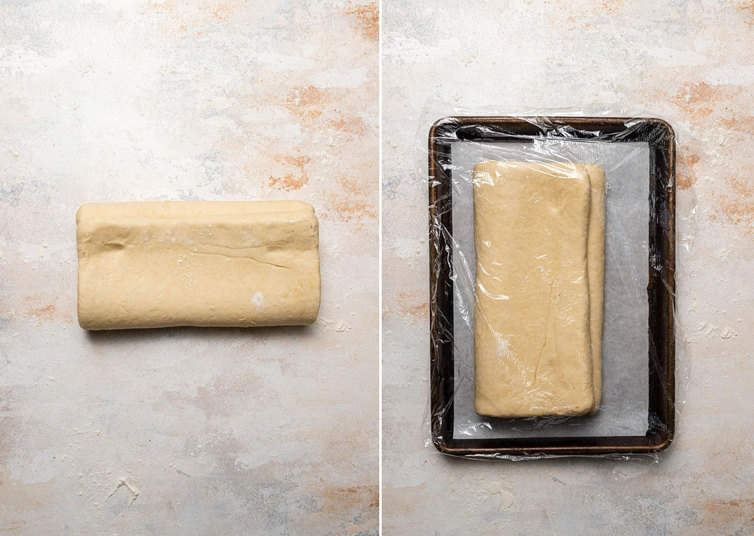
Then it is rolled out into a rectangle and folded in thirds letter-style. That is considered a turn.
This is repeated twice more after resting the dough in the refrigerator after each turn, and after the third, it is finally left to rest in the refrigerator overnight.
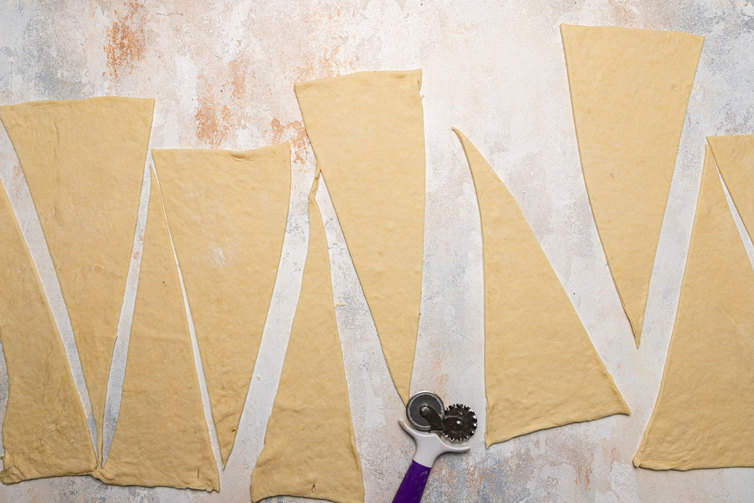
Cut and Shape the Croissants
The day has come! The dough gets rolled out into a long rectangle and cut into triangles.
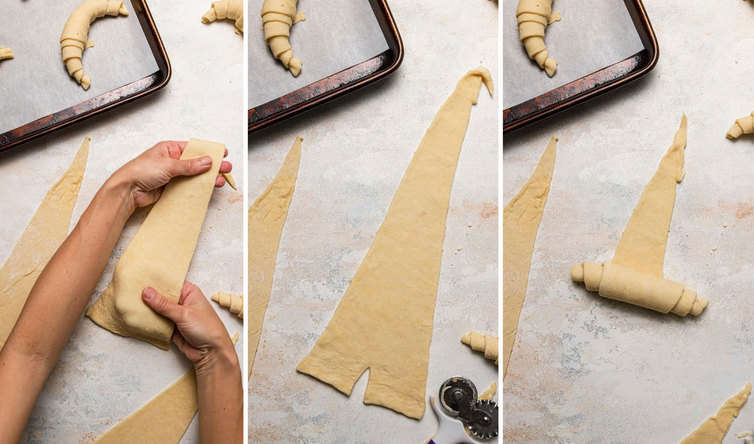
Then, they are rolled up and you can do this one of two ways:
Save This Recipe
- You can cut a slit in the base of the triangle and roll it up with the edges curved to create a crescent or moon-shaped croissant.
- Do a straight roll, which is the more traditional, French-style croissant.
Proof the Croissants
Once the croissants are all rolled up, they are left to rise on baking sheets until wonderfully puffy, which can take a good couple of hours depending on the air temperature and humidity level in your kitchen.
It’s important to not rush this step; if they are baked before fully proofed, they will be denser and not as flaky.
Bake the Croissants
Hallelujah, the time has come!
It only takes about 20 minutes to get beautifully browned croissants; be sure that they feel light when you pick them up – that is the key indicator that they are baked through on the inside and will be airy and light when you bite into them.
The best butter to use
Using high-quality, high-fat, European-style butter will result in the absolute flakiest, best-tasting croissants you can make at home.
I recommend using one of these brands, which should be easy to find in most grocery stores:
- Kerrygold (my favorite!)
- Plugra
- Presidente

Croissant-making schedule
Croissants actually require very little hands-on time to complete, but there is a lot of chilling and resting steps to ensure the dough is properly laminating with the butter for all of those beautiful flaky layers!
This is the ideal schedule for getting your croissant baking on:
Day 1: Mix together the dough (15 minutes hands-on time).
Day 2: Prepare the butter block and laminate the dough.
Day 3: Shape, proof, and bake the croissants!
I actually love how it’s easily broken up into these nuggets of time because it allows you to be able to have fresh croissants ready for a brunch or lunch if you shape first thing in the morning on Day 3.
Recipe tips
- Cold, Cold, Cold! – The key to working with laminated dough is keeping it as cold as possible. If you have a marble slab and/or rolling pin, use those for working with the dough. If the dough seems to get too warm or you have butter squeezing through while you are rolling/folding, transfer the dough to the refrigerator and allow it to chill, then continue.
- Make-Ahead Instructions – Croissants are perfect for assembling ahead of time, per the schedule listed out above. However, there are a couple of spots where you can stop and freeze the dough. After Day 2, you can wrap the dough tightly with plastic wrap, place in a freezer-safe bag and freeze for up to 3 months. Thaw in the refrigerator overnight, then proceed with the recipe.
- Freezing Instructions – To freeze the croissants unbaked, place the shaped croissants on baking sheets and place in the freezer until solid, at least 2 hours. Transfer to an airtight container or freezer-safe bag and freeze for up to 3 months. Thaw in the refrigerator overnight, then remove to proofing and baking (step #10). To freeze the croissants baked, allow them to cool completely, then freeze for up to 3 months. Thaw on the countertop at room temperature or in the refrigerator overnight. Reheat to your liking.
- Shelf Life – Croissants are absolutely, positively best eaten the day they are freshly baked. Nothing can come close to the shatteringly crisp, flaky layers. However, they can be stored at room temperature for up to 3 days or in the refrigerator for up to 1 week.
- Reheating Leftovers – While you can warm up leftover croissants in the microwave, to best recapture that fresh croissant flavor and texture, I recommend reheating in a 350-degree oven or toaster oven for 5 to 10 minutes.
Bake more pastries!

Watch How to Make Croissants:
If you make this recipe and love it, remember to stop back and give it a 5-star rating - it helps others find the recipe! ❤️️

Homemade Croissants Recipe
Ingredients
Dough
- 4¾ cups (570 g) all-purpose flour
- ⅔ cup (160 ml) water
- ⅔ cup (160 ml) whole milk
- ⅓ cup (66 g) sugar
- 3 tablespoons (43 g) unsalted butter, at room temperature
- 4 teaspoons instant yeast
- 2½ teaspoons (2.5 teaspoons) salt,
Butter Block
- 11 ounces (312 g) unsalted butter, cold
Egg wash:
- 1 egg
- 2 teaspoons heavy cream
Instructions
- Make the Dough: Place all of the ingredients for the dough in the bowl of a stand mixer fitted with the dough hook. Mix and knead on low for 3 minutes, until the dough has just come together. Shape the dough into a disc and plate on a plate or small baking dish and cover with plastic wrap. Refrigerate overnight.
- Make the Butter Block: Cut the butter lengthwise and arrange in a rough 6-inch square on a piece of parchment paper. Cover with an additional piece of parchment paper and use a rolling pin to pound the butter into an 8-inch square. Trim and straighten the edges, and put the trimmings on the top of the square. Pound lightly into a 7-inch square. Wrap in the parchment paper and place in the refrigerator for at least 30 minutes before using.
- Laminate the Dough: Roll the dough into a 10-inch square. Arrange the square so that a straight side is facing you. Place the butter block on top of the dough at a 45-degree angle so it looks like a diamond, with a point of the butter block facing you. Fold a flap of dough over the butter so the point of the dough reaches the center. Repeat with the other three flaps to fully enclose the butter. You may need to stretch the dough a bit to cover all of the butter; lightly press the edges to seal the seams together.
- On a lightly floured surface with a lightly floured rolling pin, gently roll the dough out into an 8×14-inch rectangle. Fold the dough into thirds letter-style, place on a baking sheet and cover with plastic wrap. Refrigerate for 30 minutes.
- Repeat gently rolling the dough out into an 8×14-inch rectangle. Fold the dough into thirds letter-style, place on a baking sheet and cover with plastic wrap. Refrigerate for 30 minutes.
- Again, roll the dough out into an 8×14-inch rectangle. Fold the dough into thirds letter-style, place on a baking sheet and cover with plastic wrap. Refrigerate overnight.
- Shape the Croissants: Line two baking sheets with parchment paper and set aside.
- Remove the dough from the refrigerator and, on a lightly floured surface, roll it out into a 12×40-inch rectangle. Using a pizza wheel or chef's knife, cut the dough into long triangles that measures 10 to 12 inches along the side and 4 inches along the base.
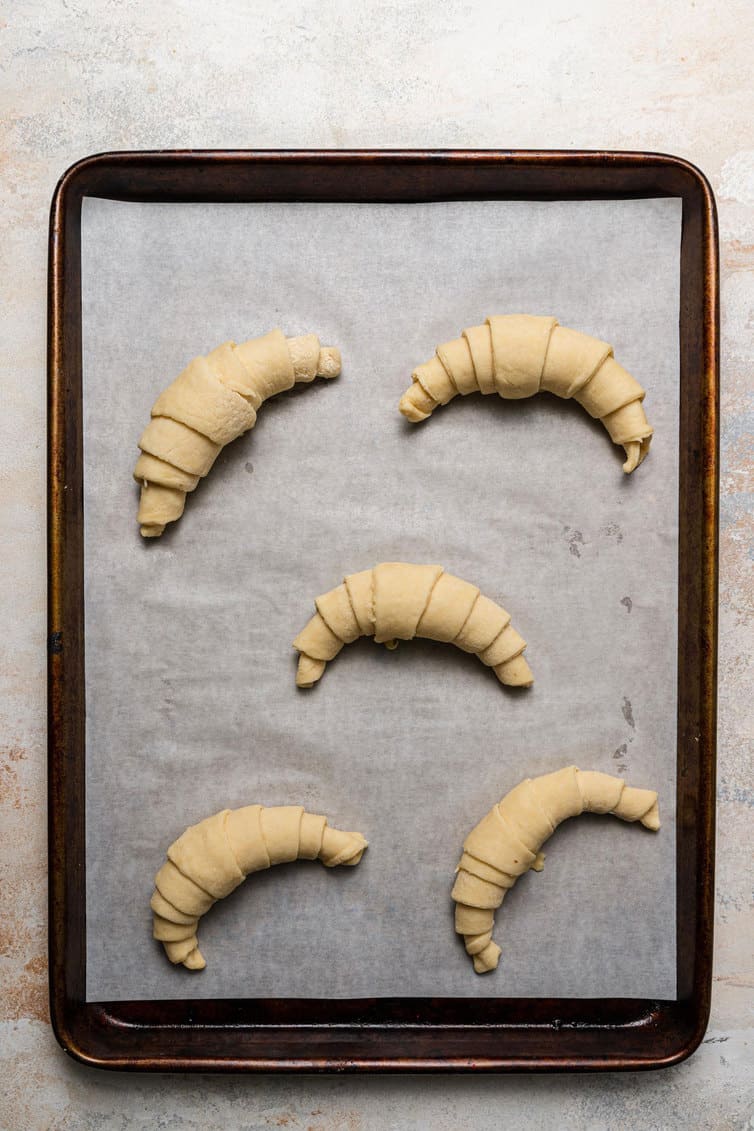
- Working with one at a time, gently stretch the triangles to elongate them by about an inch. Cut a small slit at the wide end of the triangle then, starting at the base, roll each tightly, yet gently, all the way up, making sure to tuck the tip underneath the bottom of the croissant.
- Proof the Croissants: Transfer the croissants, evenly spaced, on the prepared baking sheets (5 to a sheet) and cover loosely with plastic wrap. Place in a warm and humid spot until they have doubled in size, look puffy, and jiggle slightly if you carefully shake the baking sheet, about 2 hours.
- Preheat oven to 400 degrees F.
- Make the Egg Wash: In a small bowl, whisk together the egg and heavy cream.
- Once the oven is preheated, gently brush the croissants with the egg wash and let sit for 10 minutes.
- Bake the Croissants: Bake the croissants, one pan at a time, for 10 minutes, then reduce oven temperature to 350 degrees and bake for an additional 5 to 10 minutes, or until evenly deep golden brown.
- Remove from the oven and allow to cool slightly before serving.
Notes
- Butter – I recommend a high-fat, European-style butter such as Kerrygold, Plugra, or Presidente.
- Cold, Cold, Cold! – The key to working with laminated dough is keeping it as cold as possible. If you have a marble slab and/or rolling pin, use those for working with the dough. If the dough seems to get too warm or you have butter squeezing through while you are rolling/folding, transfer the dough to the refrigerator and allow it to chill, then continue.
- Make-Ahead Instructions – Croissants are perfect for assembling ahead of time, per the schedule listed out above. However, there are a couple of spots where you can stop and freeze the dough. After Day 2, you can wrap the dough tightly with plastic wrap, place in a freezer-safe bag and freeze for up to 3 months. Thaw in the refrigerator overnight, then proceed with the recipe.
- Freezing Instructions – To freeze the croissants unbaked, place the shaped croissants on baking sheets and place in the freezer until solid, at least 2 hours. Transfer to an airtight container or freezer-safe bag and freeze for up to 3 months. Thaw in the refrigerator overnight, then remove to proofing and baking (step #10). To freeze the croissants baked, allow them to cool completely, then freeze for up to 3 months. Thaw on the countertop at room temperature or in the refrigerator overnight. Reheat to your liking.
- Shelf Life – Croissants are absolutely, positively best eaten the day they are freshly baked. Nothing can come close to the shatteringly crisp, flaky layers. However, they can be stored at room temperature for up to 3 days or in the refrigerator for up to 1 week.
- Reheating Leftovers – While you can warm up leftover croissants in the microwave, to best recapture that fresh croissant flavor and texture, I recommend reheating in a 350-degree oven or toaster oven for 5 to 10 minutes.
Did you make this recipe?
Leave a review below, then snap a picture and tag @thebrowneyedbaker on Instagram so I can see it!
[Photography by Dee of One Sarcastic Baker]


What an amazing croissant tutorial! The step-by-step guide, accompanied by pictures and a video, makes it seem so doable. Excited to try this and savor homemade, flaky perfection!
I am a huge fan of croissants, and this looks so delicious! I can’t wait to try your dish with my mother. word hurdle
Hi Michelle! LONG time follower of you. Love everything you post! I have a question when using the pizza cutter to cut the dough…how many “cuts” do you do along the 12×40 rectangle?? The video you posted had 11 cuts but it looks like that recipe made 12 croissants. Your recipe says it will yield 10 croissants! I want to be as accurate as possible! Thank you so much!
look so tasty , will try Word Games soon !!
A question, I want to try this recipe but I need specifics: when you put the butter and fold and freeze (and so on- steps 3 to 6), do you have to put butter once more for each time you’re going to extend and fold and then refrigerate? or it’s just the one time and the other times are to laminate the dough?
I just made these as a pandemic project and they came out great! I used salted Kerrygold throughout and didn’t find them overly salty, so I’d probably use salted butter next time too.
This recipe is not good at all. The dough is way too dry. Had to add almost 3/4 c of liquids. Rolling it out is also much more labor intensive than it should be.
This recipe is amazing. I used it to make croissants for the first time ever and they turned out perfect.
Excellent instructions! If you plan on making these PLEASE watch the video. It is very informative. My son and I made these croissants over the past two days. They weren’t difficult to make, but it does take planning. My only tip is that I didn’t have the fast acting yeast that it calls for, so instead I used my regular yeast and proofed it with the amount of water called for in the recipe before adding it to the flour mixture. It turned out great! We also added some chocolate (some with dark and some with milk chocolate) and some were just plain. So tasty and flaky! Brown Eyed Baker is my go to when I want to try some kind of baked treat and these didn’t disappoint! Enjoy!
Hi. I do not know why this is not working for me. The actual inside of the croissant is wonderful, but the outside is rock hard. I’ve read another blog where it said it might be losing moisture while proofing so to put it in the oven with some water baths. I’ve tried that and it doesn’t work. This is my third or fourth attempt and I’m about to give up. On the other hand, my cronuts came out perfectly LOL. Thank you for any advice.
I’m a huge croissant lover and this looks soo good! Really want to try your recipe with my mum soon!
Hi! Is it possible to get to the point of shaping the croissants, then refrigerating them overnight and proofing and baking on the 3rd morning? I really want to take some to work but not sure I would have time for shaping, proofing and baking all before work!
Hi Marla, Yes that will work!
Omg croissants are so intimidating. I decided to go with your recipe because it was so clear and of course had a video. My 6 year old has a fascination with French food and has been wanting to make these. We prepared well and made them. Mind you this was our first attempt ever. I love that it was over 3 days and the taste was so worth every minute. They were fluffy, soft, flaky and the crunch from the outside was just magnificent. These are now a favorite and I would make them again without question. I ate mine with raspberry jam and I felt a queen eating them.
It may be beginner’s luck, but I made these and they turned out perfectly! Thank you for the great instructions and the video. My timing was off so they were ready at around 10 pm the night before but they reheated beautifully for breakfast. They were a big hit in my family. I’m wondering if I could add chocolate in the middle like a pain au chocolat? Or is that an entirely different recipe?
I’m so thrilled to hear you enjoyed these! You can use the same exact dough recipe for pain au chocolate – once you get to the step where you cut the dough into triangles, cut it into rectangles instead (it helps to contain the chocolate). Chop up a 4 ounce chocolate bar (I love the Ghiradelli bars) and divide it between the rectangles. Place the chopped chocolate at one end and then tightly roll it up. Proceed with the rest of the recipe. Enjoy!
Hi, I just made the dough and it was very dry. I know my measurements were correct because I checked everything. I ended up adding another half cup of liquid to bring the dough together. It’s rest in the fridge now. Hopefully it will be ok!!
i honestly don’t know what went wrong. i might have melted the butter but idk if that was my mistake. te dough was weird looking and the butter kept finding its way out. I’ve just put them in the over although they turned out thick since it was too hard to roll the dough.. i really tried my best as a first timer :((
I just made these as a pandemic project and they came out great! I used salted Kerrygold throughout and didn’t find them overly salty, so I’d probably use salted butter next time too. None of the steps of the recipe are particularly hard, it just requires advance planning. The toughest part was doing the final roll of the dough into a 12×40 rectangle. I found I needed to let my dough rest for 20-30 mins after getting it out of the fridge or it was too ‘nervous’ to roll out. I also cut it in half to make it easier to roll out the thin pieces on my limited counter space. I made mostly plain ones, but I put about an ounce of cheese in a couple and about an ounce of dark chocolate chips in a couple others before rolling – delish. Would definitely make this recipe again.
I’m so glad I found the BrownEyedBaker! My regular go-to baking site let me down with sloppy directions, so I went looking for a better Kouign Amann and found it here. Based on that unqualified success, I decided to go for Michelle’s take on croissants. Her mention in the recipe of Tartine, my all-time favorite bakery, convinced me she was the one to guide me in further exploring laminated pastry. So today, the day after my 67th birthday, I pulled my first half-batch of croissants out of the oven (the rest are in the freezer). I need to work on consistency of size, but the lamination is great and the taste is over-the-top. I’m chuffed beyond words that my first attempt came out so well.
– PS – Michelle, you also mentioned Tartine’s cookbook in this recipe – only to say you don’t use it anymore. Then I had to look up what a “preferment” was. I had no idea such a book existed, but I ordered it. It’s *very* particular. But maybe that’s why their stuff is so good.
*Photo on Instagram. http://www.instagram.com/browneyedbaker
Hi Michelle!! I took a nose dive into this recipe and I was so happy with how they turned out. I definitely need some more practice (I don’t think I let them rise long enough and I definitely crowded them so they weren’t as golden as your), but for a first try it made me feel super confident! That being said – they got rave reviews and I think I can definitely get better! Thank you for helping me find confidence in this one!
So my daughter and I made croissants this weekend using your recipe and instructions. She recently moved to SanDiego and I live in Pittsburgh. We connected via FaceTime for each of the step and talked one another through the process. We had an absolute blast! And the croissants….. Divine! Seriously. Incredibly good! And not that difficult – totally worth the effort. Thank you so much for the encouragement (via your bake-along) to tackle this!
I do wonder if you have tried cutting this recipe in half – very dangerous to have extra croissants just laying around when they are this delicious. Have you tried it and/or do you have any concerns? Thank so much!
Oh my goodness, I love this SO MUCH! What an amazing idea!!! I’m so thrilled that you both enjoyed making these. I’ve not cut this recipe in half, but I don’t think there would be an issue in doing so.
Curious, would you change anything on the dough recipe if making chocolate croissants?
Chocolate croissants you would just add a piece of really good, dark chocolate at the large end of the triangle and rolling it in.
Nope, I would keep the dough exactly the same!
Now that you know how and where to play absurdle, try it out for yourself to see if you can figure out the secret word or not.
Making croissants has been on my baking bucket list for a long time. Thanks for all the pictures and directions. Hope to make them soon (maybe when weather cools down.)
Oh yum. So love a perfectly made croissant…
Superb photography. Will try soon