Anadama Bread
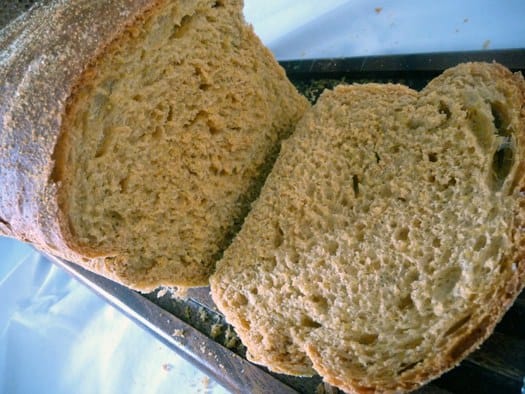
This bread is a wonderful loaf bread full of complex flavors and a hearty texture. Although it appears as though it may be a wheat bread, don’t be fooled! The dark coloring is a result of mild molasses in the dough, which provides a slightly sweet flavor to the bread. In addition to the molasses, cornmeal is also added, which gives the crust a nice crunch and the bread a full and hearty texture. The resulting loaf is a soft sandwich-style bread that pairs well with just as well with lunch meat as it does with your classic peanut butter and jelly. For breakfast, layer on butter and your favorite jelly.
Did I mention that it also makes a fabulous prosciutto, mozzarella, and roasted red pepper sandwich?

Prosciutto, Mozzarella, & Roasted Red Peppers on Anadama Bread
The majority of the recipes in The Bread Baker’s Apprentice require an overnight fermentation of a portion of the dough, which Peter Reinhart states improves the flavor of the bread. While an overnight soaking of the cornmeal in water is required, a “bulk fermentation” is completed the same day that the bread is baked, which relieves the heavy night-before work that is needed. All that is needed the night before is to mix together cornmeal and water with a spoon, and set it aside. Easy enough.
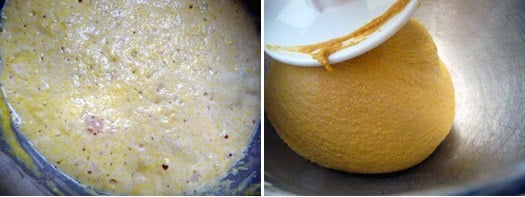
Below is my bulk fermentation once it has bubbled, and then the dough just as it is finished kneading in my Kitchen Aid mixer. From start to finish, this bread took about five hours to complete, which includes all rising and baking time.
Save This Recipe
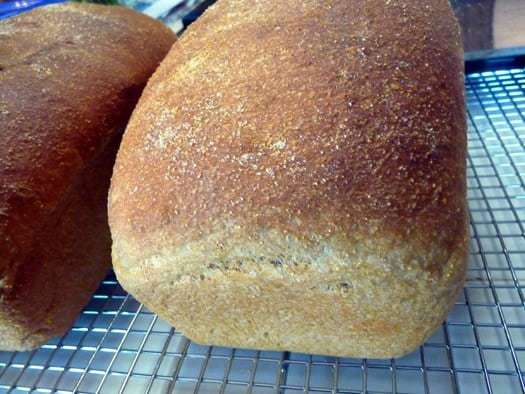
One of the cardinal rules of bread baking is that you must give it ample time (usually around 1 hour) to cool after coming out of the oven before it is sliced into. I detest this rule. It just seems contrary to the common sense that screams from most people’s taste buds. After all, isn’t warm bread fresh from the oven one of the most satisfying and comforting tastes? As much as I hate this rule, it’s one that I usually try to follow. Unless of course I’m making Italian bread and there’s pasta on the table, then all bets are off. The truth is that the bread needs the cooling time to allow the inside of the bread to set up. If you cut into a warm loaf of bread, more than likely you will find that it will result in a softer, more “mushy” type texture. So, call upon all the self-discipline you have and try to leave the bread to cool for about an hour.
Anadama Bread
Ingredients
Soaker
- 1 cup (159 g) cornmeal, (6 ounces )
- 1 cup (250 ml) water, at room temperature, (8 ounces )
Dough
- 4½ cups (562.5 g) unbleached bread flour, (20.25 ounces )
- 2 teaspoons instant yeast
- 1 cup water, lukewarm (90° to 100° F), (8 ounces )
- 1½ teaspoons (1.5 teaspoons) salt
- 6 tablespoons molasses, (4 ounces)
- 2 tablespoons unsalted butter, at room temperature
- Cornmeal for dusting, optional
Instructions
- 1. The day before making the bread, make the soaker by mixing the cornmeal and water in a small bowl. Cover with plastic wrap and let sit overnight at room temperature.
- 2. The next day, to make the dough, stir together 2 cups of the flour, the yeast, soaker, and water in a mixing bowl (or in the bowl of an electric mixer). Cover the bowl with a towel or plastic wrap and ferment for 1 hour, or until the sponge begins to bubble.
- 3. Add the remaining 2½ cups of flour, the salt, molasses, and butter and stir (or mix on low speed with the paddle attachment) until the ingredients form a ball. Add water if necessary to make a soft, slightly sticky mass.
- 4. Sprinkle flour on the counter, transfer the dough to the counter, and begin kneading (or mix on medium speed with the dough hook), sprinkling in more flour as needed to make a tacky, but not sticky, dough. The dough should be firm but supple and pliable and definitely not sticky. It will take about 10 minutes of kneading to accomplish this (or 6 to 8 minutes in the electric mixer). The dough should pass the windowpane test and register 77° to 81° F.
- 5. Lightly oil a bowl and transfer the dough to the bowl, rolling it around to coat it with the oil. Cover the bowl with plastic wrap and ferment the dough at room temperature for about 90 minutes, or until it doubles in size.
- 6. Remove the dough from the bowl and divide it into 2 equal pieces of 24 ounces, or 3 pieces of about 16 ounces. Shape the dough into loaves, and place them into bread pans that have been lightly oiled or misted with spray oil. Mist the tops of the loaves with spray oil and loosely cover the tops with plastic wrap.
- 7. Proof at room temperature for 60 to 90 minutes, or until the loaves crest fully above the tops of the pans.
- 8. Preheat the oven to 350°F with the oven rack on the middle shelf. Place the pans on a sheet pan and remove the plastic wrap. Mist the tops with a spray of water and dust with cornmeal.
- 9. Place the sheet pan in the oven and bake for 20 minutes. Rotate the sheet pan for even baking and continue to bake for 20 to 30 minutes, or until the loaves are golden brown, including along the sides and bottom, and register at least 185° to 190°F in the center. They should make a hollow sound when thumped on the bottom.
- 10. When the loaves are done, remove them immediately from the pans and cool on a rack for at least 1 hour before slicing or serving.
Did you make this recipe?
Leave a review below, then snap a picture and tag @thebrowneyedbaker on Instagram so I can see it!


This is a great recipe hand been making it for years. Maritimers Love It and have no complaints
Made this for Christmas day for my grandson who has a dairy and egg allergy. Substituted butter flavored Crisco for the butter. Came out wonderful. Grandson loved it. Leftovers make great morning toast. Recipe made 8 small loaves – a hit with a 2 year old. Worth the work. Making again soon. Thank you.
Made this the other day, it’s great. Thanks so much for posting.
Thank you for this recipe!
Whoa, that sandwich? It sounds absolutely awesome. Can’t wait to bake through BBA with you!
Looks fantastic, I have the book and hope to bake along for as many as I can.
Great job Chelle! I used my bread to make a BLT – yum!
Your bread looks great! I’m also a member of the BBA Challenge & am enjoying trying bread recipes that I otherwise would skip over. My family & I are sourdough fans so the Anadama Bread tasted ok to us but I wasn’t blown away by it. However, it did taste yummy with smoked turkey, provolone & red bell pepper/ancho chili jam!
Shauna – I believe that the group is officially closed to new members, but I’m encouraging my readers to get the book and bake along with me here. I will always post the next month’s worth of recipes each week and you are more than welcome to add your results and link to your post here in my comments section!
That looks delicious! After seeing yours and Joelen’s posts it really makes me want to join this group as well.
Yes, I made mine this past weekend and posted my results late last night. All went well.
Yours looks wonderful and I love your sandwich idea.
~Donna
Thank you so much for these marvellous instructions and the wonderful inspiration to get baking! Your bread looks delicious, and I just love the colour of it in the mixer. I’m looking forward to trying this one.
Your loaves look great. I don’t like to wait to cut into breads either but ‘now’ after starting this challenge I wait and the bread “IS” much better that way.
Great job.
I’m baking along with you,
Susie
Wow, that sandwich looks seriously good! Your bread turned out fabulous. The idea of baking through BBA is just awesome. I can’t wait to see all of the breads you bake up!
Your bread looks fantastic – especially in that great sandwich.