Homemade Dairy Queen Ice Cream Cake
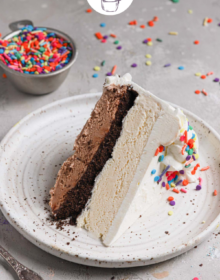
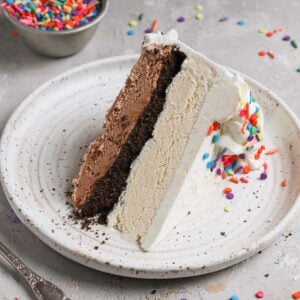
This ice cream cake recipe will be the star of every birthday celebration! A homemade riff on the popular Dairy Queen ice cream cake, it has layers of ice cream, hot fudge, and Oreo cookie crumbs and is covered in whipped cream and sprinkles.
I have long loved having ice cream cake for my birthday instead of a traditional birthday cake; I just adored the layers of chocolate and vanilla ice cream, along with fudge and those chocolate crunchies.
And for the last two years, Dominic has requested an ice cream cake for his birthday; he is a boy after my own heart!
When it comes to ice cream cake, I am firmly in the camp of all ice cream and no actual cake layer, a la the iconic Dairy Queen ice cream cake. It’s a fabulous no-bake dessert that everyone gets excited about!
Ingredients Overview
You don’t need many ingredients to create your own ice cream cake, and you can make this completely homemade or use all store-bought ingredients; the choice is yours! Here is what you’ll need:
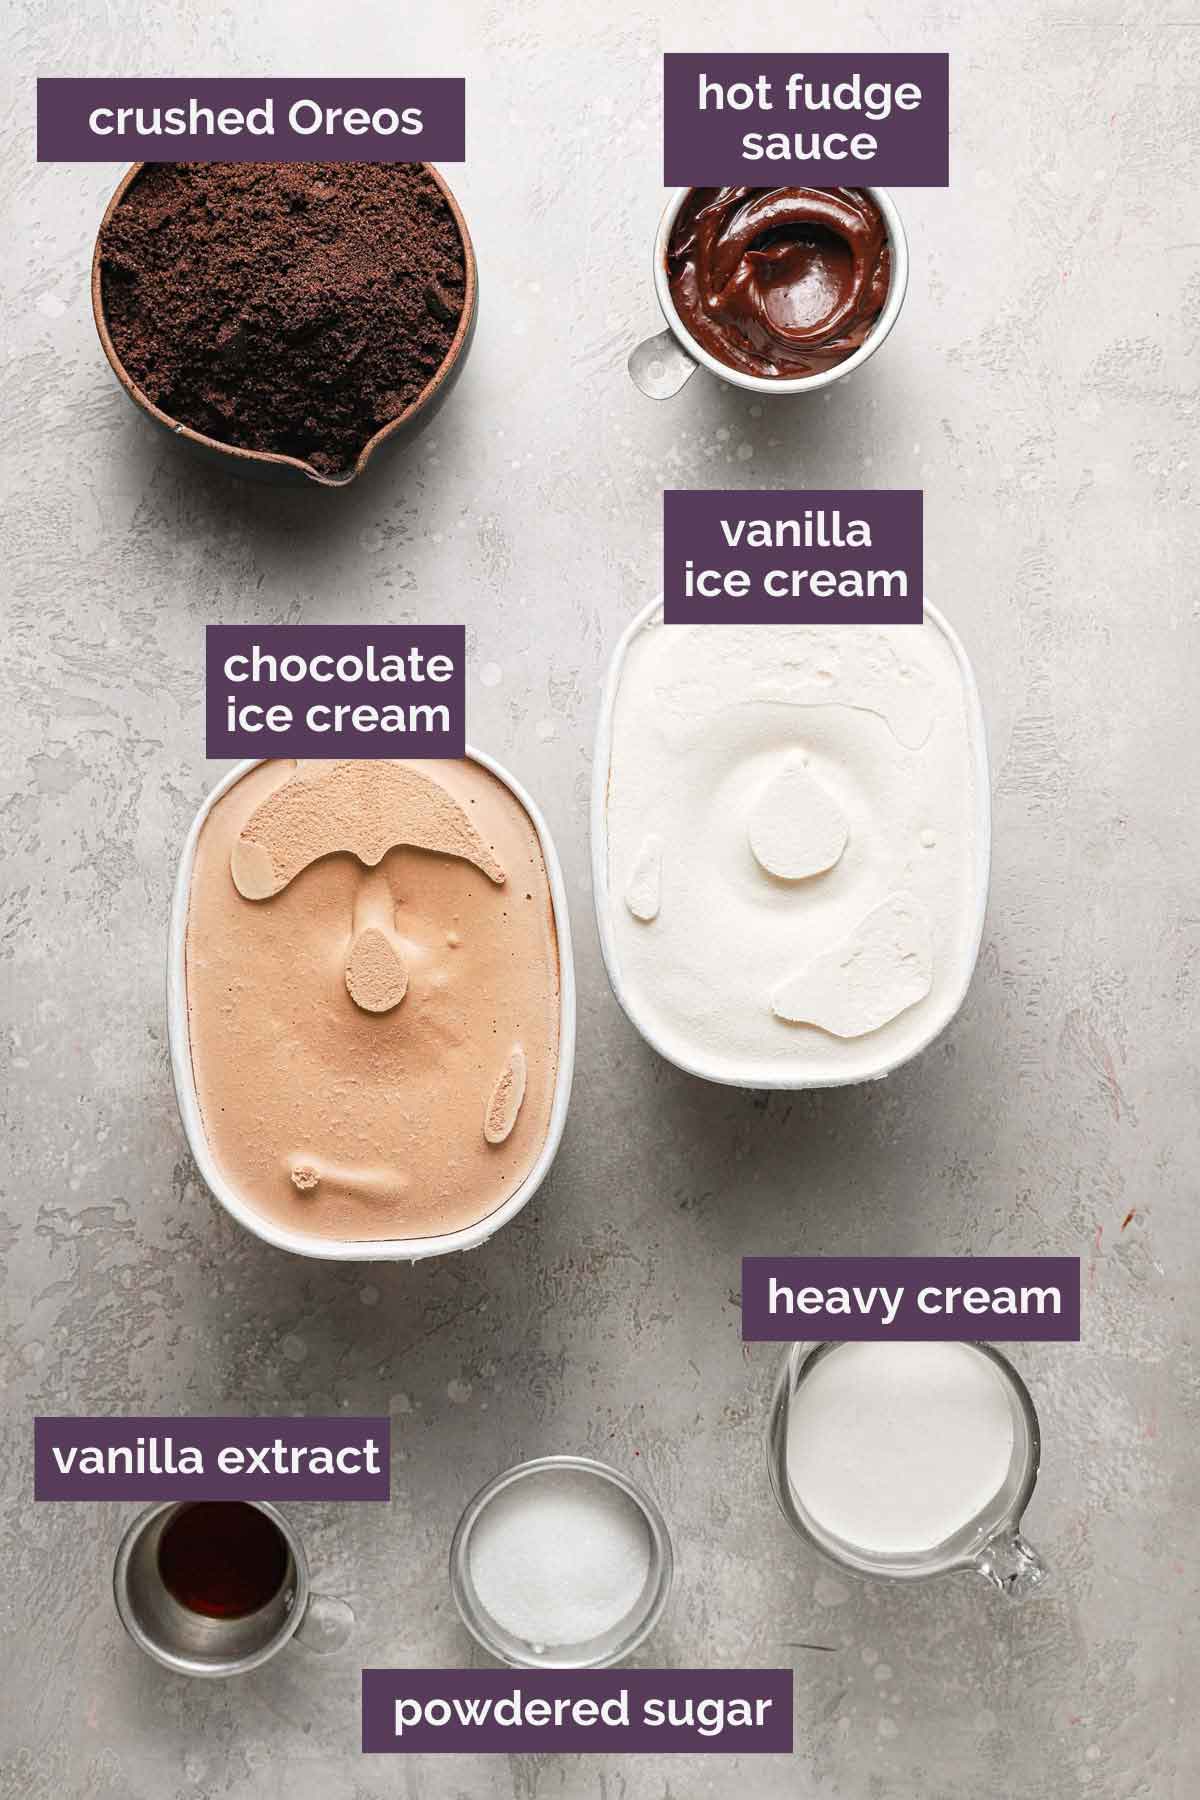
- Ice Cream – I go the classic route and use chocolate and vanilla, but you can use absolutely any of your favorite ice cream flavors! Dominic asked for mint chocolate chip ice cream and chocolate for his last birthday :) If you want to use homemade, I recommend these recipes: homemade vanilla ice cream and homemade chocolate ice cream.
- Hot Fudge Sauce – Again, you can absolutely buy this from the store, or you can make a homemade hot fudge sauce.
- Oreo Cookies – I crush up Oreo cookies, including the cream center, which keeps the cookie layer a bit softer once frozen, which I prefer.
- Whipped Cream Frosting – I cover the whole cake with my favorite homemade whipped cream, which whips up thick and luscious and pipes like a dream.
How to Make an Ice Cream Cake
While it might sound intimidating, making an ice cream cake at home is quite easy; the biggest thing to remember is that you want the ice cream soft and spreadable, and you will need to pop the cake in the freezer often to keep everything nice and frozen.
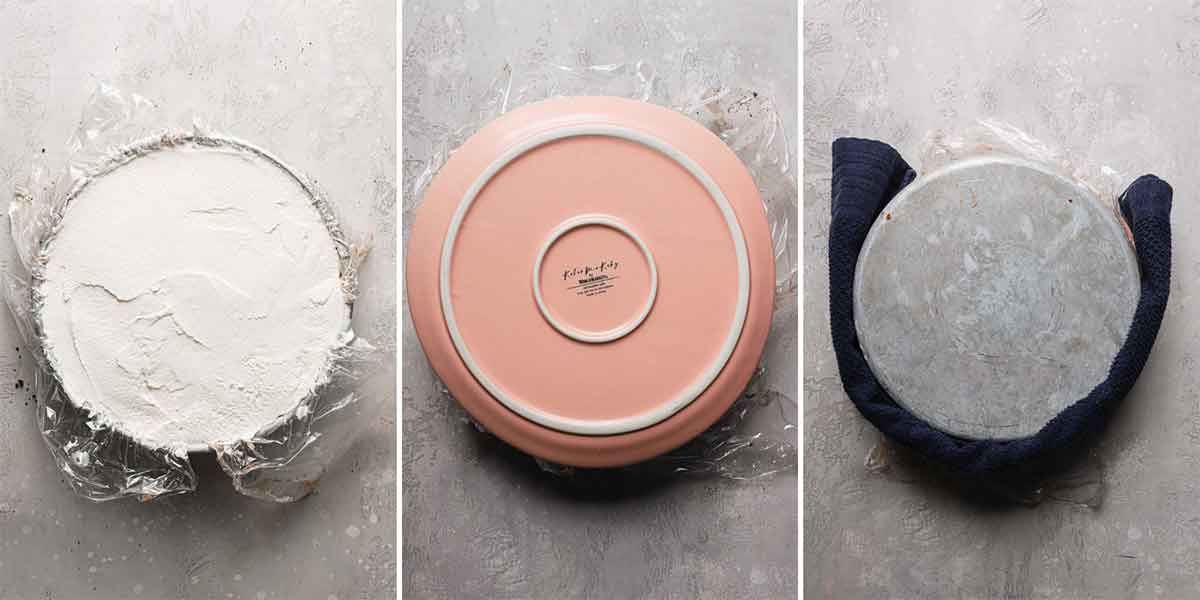
Step #1: Prepare Your Pan – Line a 9-inch cake pan with plastic wrap, ensuring that it completely covers the inside of the pan, and that it hangs over on all sides.
Step #2: Chocolate Ice Cream Layer – Working with softened ice cream, use an offset spatula to spread it into an even layer over the bottom of the pan. Place the pan in the freezer for at least 30 minutes.
Step #3: Hot Fudge and Cookie Layer – Spread the hot fudge sauce over the chocolate ice cream, then sprinkle the crushed Oreos over the hot fudge, pressing lightly so they adhere to the hot fudge. Return to the freezer for at least 30 minutes.
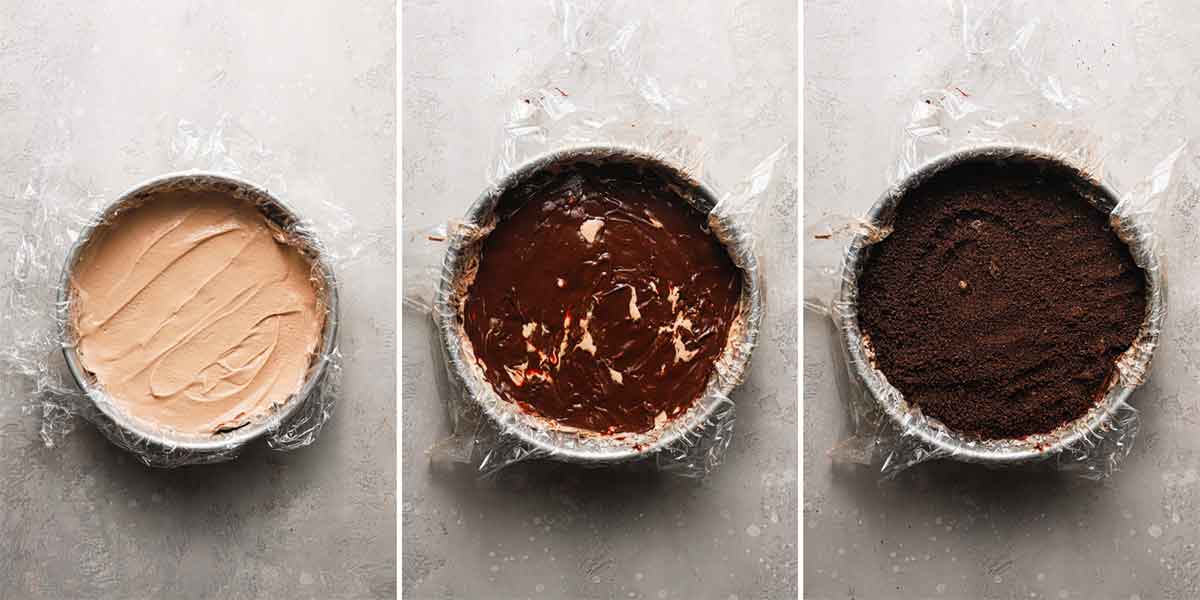
Step #4: Vanilla Ice Cream – Spread the softened vanilla ice cream over the cookie layer and return the cake to the freezer for at least 8 hours or overnight.
Step #5: Unmold the Cake – To release the cake, invert it over a plate and wrap a hot towel around the sides of the pan, holding it until the cake loosens. Top with a serving platter and turn the cake right side up. Return to the freezer for at least 10 minutes.
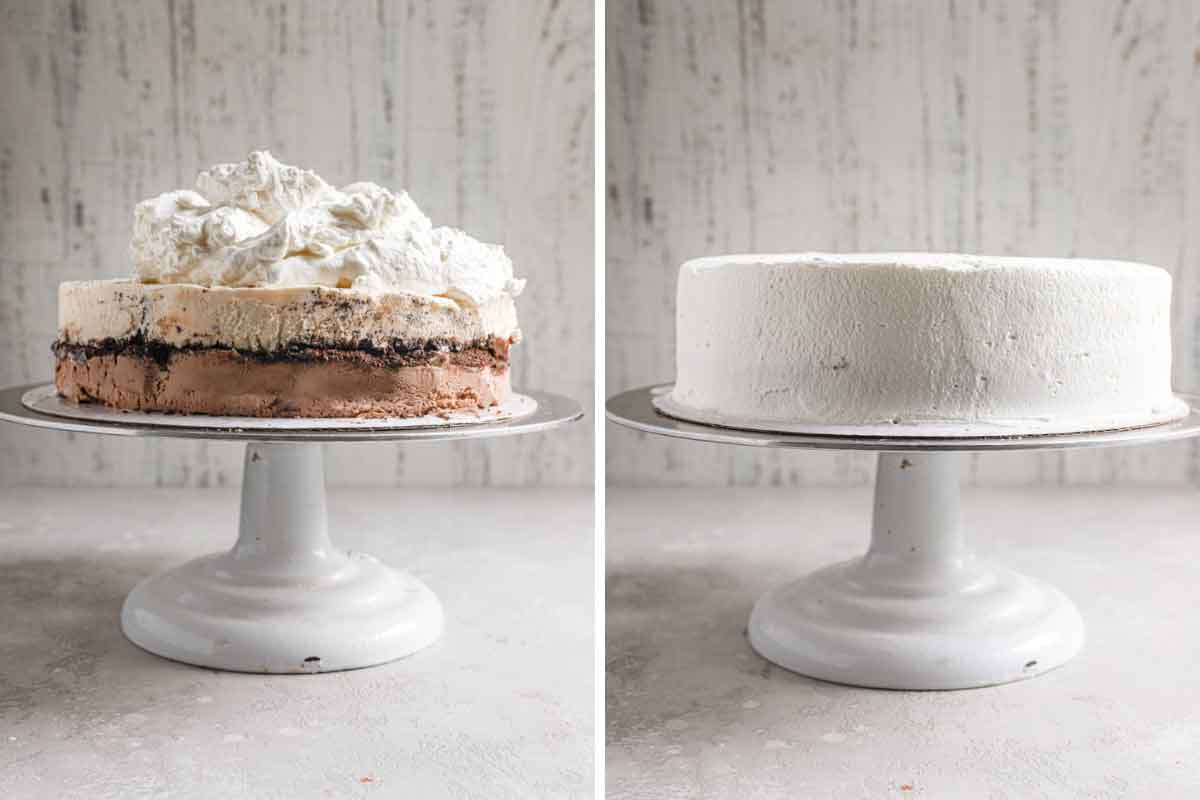
Step #6: Frost the Cake – While the cake is back in the freezer, make the whipped cream frosting, being sure to whip it to stiff peaks, then take the cake out of the freezer, frost the cake, and decorate as desired. You’re done!
Recipe Tips
- Prep the Freezer – Before you get started, make sure you have space in your freezer for storing the cake pan and finished cake.
- Cake Alternative – If you DO like an actual cake layer in your ice cream cake, you can absolutely do that. Place a 9-inch layer of chocolate cake or vanilla cake (or any other variation you prefer!) as the bottom layer, then top with the hot fudge and crushed Oreos, freeze, then add your preferred ice cream flavor to the top.
- Filling Options – If you want to do something different than hot fudge and crushed Oreos, some other options could include salted caramel sauce, peanut butter, butterscotch sauce, crumbled chocolate chip cookies, peanut butter cookies, shortbread cookies, chopped Reese’s cups, chopped brownies, or Thin Mint cookies.
- Serving – Remove the cake from the freezer about 30 minutes before serving so that it is easier to slice through. You can also run a sharp knife under hot water before slicing.
- Storage – This cake should be kept covered tightly in plastic wrap in the freezer for up to 3 months.

More Ice Cream Cakes!
- Ice Cream Sandwich Cake
- Banana Split Ice Cream Cake
- Pretzel Strawberry Ice Cream Pie
- Cookies and Cream Ice Cream Cake
Watch How to Make a Homemade Ice Cream Cake:
If you make this ice cream cake recipe and love it, remember to stop back and give it a 5-star rating – it helps others find the recipe! ❤️️
Homemade Dairy Queen Ice Cream Cake
Ingredients
For the Cake:
- 2 quarts (1892.71 ml) chocolate ice cream, freshly churned or softened
- 1 recipe Hot Fudge Sauce, prepared and cooled
- 24 Oreo cookies, finely chopped
- 2 quarts (1892.71 ml) vanilla ice cream, freshly churned or softened
For the Whipped Cream Frosting:
- 2 cups (476 ml) heavy cream
- 4 tablespoons granulated sugar
- 2 teaspoons vanilla extract
Instructions
- Lightly butter a 9-inch springform pan.
- Spread the chocolate ice cream into an even layer in the bottom of the springform pan. Place in the freezer for 30 minutes. Spread the hot fudge sauce over the chocolate ice cream (if it had been chilled, you’ll need to rewarm briefly), then sprinkle the chopped Oreo cookies, pressing lightly so that they adhere to the hot fudge. Return to the freezer for at least 30 minutes. Lastly, dollop the vanilla ice cream over the chopped Oreos and gently spread into an even layer. Freeze for at least 8 hours, or overnight.
- At least 1 hour (and no more than 12 hours) before serving, unmold the cake. To release the cake from the pan, invert the cake onto a plate or cardboard round the same size and wrap a hot kitchen towel around the cake pan, keeping it there for 30 seconds, or until the cake loosens, and slide the pan off. Remove the bottom of pan. Top with a serving plate and turn the cake right side up. Return to the freezer for at least 10 minutes.
- While the cake is in the freezer, make the whipped cream. Combine the heavy cream, sugar and vanilla extract in the bowl of a stand mixer. Using the whisk attachment, whip on medium-high speed until the cream is light and fluffy and holds a medium to firm peak, 2 to 3 minutes.
- Spread the whipped cream on the cake, working quickly so that the ice cream doesn’t melt. (If it gets soft, just pop it back into the freezer for 5 minutes.) I used a Wilton #21 decorating tip to pipe a shell border around the top and bottom of the cake. Decorate with sprinkles on top, if desired.
- Remove the cake from the freezer 5 minutes before serving to soften it slightly. A hot, dry knife will yield the cleanest cuts. Dip your knife in a glass of hot water, wipe it clean with a towel, and cut a slice. Repeat between every slice.
Notes
- You can substitute 2 cups of store-bought hot fudge for the homemade.
Did you make this recipe?
Leave a review below, then snap a picture and tag @thebrowneyedbaker on Instagram so I can see it!
The recipe was originally published in June 2015.
Photography by Dee Frances.


Powdered sugar or granulated sugar? Says it powdered at the top in the picture and granulated in the list at the bottom
Hi. Love the recipe site.
I have been entering my own recipe electronically for the use of family. Can you tell me what site you use to calculate the nutrition facts. I am curious on where my recipes stand for nutrition are the good or not!
This is my favourite go to ice cream cake. The chocolate sauce is the best! It’s so easy to customize to each persons liking. Today I did mocha bottom, sauce, homemade edible cookie dough and then vanilla mixed with more cookie dough. I actually made a giant cookie base to put it in as well. This cake is perfect to mix up!! Have fun with it.
I’ve been making this cake for my stepsons’ birthdays for years!!! Everyone loves it, and it’s easy to make since you only have to do a little bit at a time. I’ve found that I usually have enough left over ingredients to make two smaller cakes in 4″ spring pans. So we have the big cake for their birthday parties and then we have the two small “baby cakes” leftover for later on.
Fabulous recipe as always from Brown-eyed Baker! I’m never disappointed. Thank you! Crumbled cookie crumbs are nice for decorating the cake.
I would love to make this in a 9×13 pan for a group! How would you adapt recipe for a 9×13? I appreciate your help!!
Easy and yet delicious, will be sure to make for my grandson!
I’ve been a fan for years, stopped for a few (illness) and have been back for awhile now. Thank you for all the recipes, your stories and the obvious love you have for your family.
Hi M – Making this for my kiddo’s birthday and just curious about the whipped cream frosting. We are doing a theme cake and need to do a bit of decorating – can I color the frosting or will it fall?
I know it will be a lot of decorate – freeze – decorate – freeze. But that is okay for me!
pretty good i actually like it.
frosting didn’t work at all
Amazing!!! I used mint chip ice cream with the fudge middle and it was a huge hit! I will 100% be making this every summer birthday!
Great Ice Cream Cake recipe! The middle fudge sauce is top notch, really levels it up! The real whipped cream icing is simply amazing! I’ve got a hunch this will be the start of a family tradition for us, too!
I just used the two packages of ice cream (so essentially, half!) and it still came out wonderful, but next time I will use 3 cartons of ice cream to make it perfect (one will be a half chocolate, half vanilla). 4 cartons won’t fit into my springform pan, for sure.
I used parchment paper on the bottom, and substituted coconut oil (instead of the butter) on the sides. The hot towel trick worked great, and I kept a hair dryer on the ready, just in case. The hair dryer actually worked the best to help peel the parchment paper off.
Thank you so much for this!!!!!
This recipe is great! Did it all as stated, even the fudge sauce, and it turned out good, looked good and tasted good. (Well, true to recipe comment form, I did sub in cookies and cream ice cream for the chocolate ice cream per my kid’s request, but I don’t think that affected anything.)
What I did slightly different in the assembly which made it super easy to handle was to line the whole pan in plastic wrap and use acetate wrap around the sides so that I could feel comfortable going a little higher up the edge of the pan. When the top layer was frozen I put plastic wrap over that too. Popping it out of the springform and flipping was a cinch.
I have never been to a Dairy Queen, so have never known about this classic cake. I was just looking for tips on making and frosting an ice cream cake. I will absolutely make this again! It was quickly deemed a must-have-again. Thanks!
Been working on this 2 days just to get it right. And make each layer good and solid. Get excited
What’s the 12 hour rule on icing this cake? Was going to prep today and serve tomorrow? You should not do?
You can definitely make it the day before!
is there any way i could make the frosting chocolate instead of vanilla? btw love the cake! it tasted amazing!
For chocolate whipped cream, I use 2 cups heavy cream, 1/2 cup sugar (I like to use icing sugar but fine granulated is good too) and 1/4 cup cocoa powder. Whip as usual.
This ice cream cake recipe was fabulous. It is pretty easy to make and yet looks so impressive. My guests remarked that it was the best ice cream cake they ever had. Thanks for this gem.
I can hardly wait to try this recipe. Has anyone tried using cool whip versus whipped cream??
Mine did not freeze enough even though I followed instructions and made my freezer colder. It was still a yummy mess. Could only fit 2.5 quarts ice cream in my pan.
Do you use flour besides sugar of the nella and chocolate sir
I have made this before and it is delicious. This time, however, the cake split in two where the crumb mixture was. Ideas?
After reading comments I’m afraid of not doing it right with the granulated sugar. Am I able to use icing sugar?
For sure you can use icing sugar.
This was a HUGE hit, and relatively easy to make! Just make sure you allot enough time for proper freezing. The whipped cream with granulated sugar was fine – not grainy at all…maybe the mixer matters? I used a stand-up mixer. Anyway, everyone loved it! THANKS
Can you freeze the cake after applying the icing as well?
Yes!
I put parchment paper in my 8 inch pan make sure it hangs over the sides of the pan. I use chocolate ice cream for the bottom and then I used moose track ice cream in my other round 8 inch pan with parchment paper I put wax paper on top then I double wrapped Each pan in Saran Wrap. Then I put in freezer. Once it was completely frozen I left it in the freezer for about 6 hours. Then I lifted up the parchment paper. Easy to peal off then I put the ice cream put on my 10” cardboard I put Hersheys hot fudge in the middle with heath milk chocolate English toffee bites on top of Hershey’s fudged Than I added more Hershey’s fudge on top of the heath toffee bits Then I put the moose track ice cream on top. I got a box from Walmart fit perfect put it in the box back in the freezer while I make the whipped topping.
I made this recipe and had rave reviews. Everyone said it was better or as good as DQ or store bought. The frosting i made and put on my devils food cake and red velvet cupcakes, and they went fast. I am now getting requests for me to make these with the frosting, as well as requests to make the ice cream cake.
Thank you so much for such a great recipe. I love your videos and appreciate you making them for people to follow, you are so talented!
This sounds so good! Do you think you could make up the cream frosting and refrigerate ahead of time? I’m up against it time wise and trying to make it work 😂
I have been making this cake for many years. I have always received numerous compliments at many events I have made it for. The whipped topping was not grainy at all and it was easy to make. I have even substituted the hot fudge with Smucker’s sundae syrup and it was just as good. I highly recommend this recipe and I have also passed it on to others who have asked for it. They also received compliments .
Works really well – not sure about the complaints on here. Granulated sugar in whipped cream works perfectly well and isn’t grainy. Just make sure to add it in the beginning and it will dissolve with the whipping process. Use plenty of hot fudge and your cookies will stick. Works really well, comes out great, and tastes great. Was a hit at our house. I simply don’t understand the complaints here, clearly they weren’t capable of following the extremely simple directions.
Made this for my friend’s birthday a couple months ago. Really good. Only thing is granulated sugar does not work for making whipped cream, you need confectioner’s sugar.
using granulated sugar was a big mistake and now my icing is grainy. Now what do I do to remedy this situation , without having to start all over?
My son doesn’t really like cake – or chocolate. He told me this year he wants an ice cream cake ( he has never had one, just heard rumours about them…). Has anyone made this with an alternative to hot fudge sauce? I would probably use vanilla ice cream and mango sorbet, so thinking maybe a strawberry or raspberry sauce for the layer with the crumbled cookies, but I wondered if there is something crucial in the thickness of hot fudge sauce, that makes it freeze differently and bind the cooky layer more effectively?
I used 1 quart of each flavor of ice cream. 2 quarts total. I dont think 4 quarts couod possibly fit in a 9 inch springform pan. It makes a delicious cake tho!!
I did the same. It still barely fit in the 9” springform.
Having the same trouble here- I made a double batch (2 quarts) of chocolate – that and the fudge and cookies have filled my pan to the brim before the vanilla is added. Will attempt to do that later in a separate pan and join the two after freezing.
I love anything relates to ice cream cake :) Can’t wait to try this recipe. Thank you for sharing!!
I am now 2/3 done with this recipe and it’s clear that 3 quarts of ice cream won’t fit in it. I should have used my old school cake pans, with chocolate and cookies in one, and vanilla and fudge in the other one.
I am making this with a 9 or 10 inch springform pan. I tried to put all of a 1.5 quart thing of chocolate ice cream. It took up the majority of the pan so I took some ice cream out. I hope it doesn’t make this cake 99 percent vanilla. It’s for my dad’s 82nd birthday because he doesn’t like regular ice cream.
YES to making your own. I have been making ice cream cakes for years (daughters fave!). Great alternative to the WAY OVERPRICED DQ cakes – it is utterly absurd what they charge for not even real ice cream!!
I made this for my son’s birthday. His words were.”Mom , this is the best!” Everyone loved it! I was nervous about messing it up, but the directions were easy to follow. I even used the recipe here for the fudge sauce, which is amazing! This is a keeper! Thank you for sharing and for explaining each step so well!
I made this for my sons birthday. He requested an ice cream cake made by me. This was perfect and everyone loved it.
Made this 2 days ago for my fiances birthday and it was one of the best ice cream cakes I’ve ever had! I swapped mint Oreo bits for the regular ones and we’re already planning what other combinations we want to try :)
Looks delicious! Thanks for the great recipe, you never fail to come up with something wonderful to eat.
Can I make this cake, frosting and all and the re-freeze it for a party in a few days?
Yes, absolutely! Enjoy!
Hi Michelle, THANKS for the great post! Adorable photos, love your house, and may try to make the ice cream cake in individual servings?? :-)
Hi, I made this past Sunday. It was great except the cookie layer the crumbs were too flaky and powdery. It did not stick on the ice cream. I am not sure what I did wrong but could it be because I crushed the Oreos in a food processor vs chopping them with a knife? How should the cookie consistency be? Also can I frost and keep it in the freezer for two days? Thank you in advance for your response.
Hi Rima, They should still be a bit chunky, so the food processor may have made them too fine. And yes, it will keep just fine in the freezer for two days.
Has anyone tried this as a 9×13 cake? I don’t need it to springform. I was just going to try and cut and scoop out of a regular cake pan or even pyrex.
I make a similar ice cream cake but find that 24 OREO cookies is way too much. I take the cream out of mine and fill up a Fiesta Gusta Bowl with the Cookies. Then I crush coarsely in a plastic bag with a rolling pin. I am able to use 2 containers of Breyer’s ice cream in my cake and I use whipped cream but I stabilize it so the piping turns out a lot better. Ice cream cake is very requested in our house and it is so easy to make.
BEST RECIPE! I’ve made it two times for gatherings and just got a message from my dad: “do you think you could make that ice cream cake for Fathers Day dessert?” YES!! It’s a bit of a labor of love but worth every second. Way better than store bought! And sooo fun to create!! Thank you for this recipe!!!
I am making this now (almost done) but I did want to ask about the recipe. The recipe calls for 2qt of each kind of ice cream so in total 4qt in a 9″ springform pan but once I got 1qt in the pan the pan was half full. I went ahead and put 1qt of each flavour and it filled the pan to the top exactly. Did you mean 2qt ice cream total? Also when I flipped the cake out of the pan I was unable to lift off the bottom part of the springform pan as using 24 cookies there was just a layer of loose cookie crumbs so the cake was seperating where the cookies are. It’s like there was not enough fudge and too much cookies. I used the 2 cups of fudge. Anyway it all seems to be working out with a bit tweaking. Thanks for the recipe.
I have been making a recipe similar to this for years….If you whip your ice creams with a half container (8 oz.) of Cool Whip it tastes more like DQ and also mix your oreo cookies with about a 1/4 c. melted butter or margarine they are more like DQ crumbs.
So I just did the 2 quarts chocolate and now the Oreos layer and I’m only left with a half of an inch to place the vanilla ice cream on top 😑 I used the 9” spring form pan so I’m not sure. Next time I’ll definitely try using 1 quart of each ice cream that way it’s even layers…..
I made this for my daughters second birthday yesterday and everyone loved it!! I only used a pint and half of each ice cream. I also used Carmel instead of fudge and cookie dough ice cream instead of vanilla. My spring form pan was filled to the brim so I’m glad I didn’t used two pints of each. I think on pint of each ice cream would be plenty.
This was super easy to make and just like the Dairy Queen cakes I remember having for my birthdays as a kid. Thanks for the recipe!
We have to watch for gluten free and low sugar recipes. I took this one – substituted the ice cream with Blue Bunny no added sugar and used the Gluten free sandwich cookies. Diabetic and Gluten Free were satisfied. I thought it was great and couldn’t tell the difference. EVERYONE ate it!
I am giving this a 5 star rating because it is sooooo delicious but…..the recipe called for way too much ice cream! I didn’t have enough room in the pan for the vanilla ice cream layer. Next time, I will reduce the amount of ice cream. Otherwise, it was perfect! Everyone said it was better than any ice cream cake they ever had! I used jarred hot fudge but I will definitely try the homemade sauce sometime.
This cake turned out great & everyone loved it!, thank you! But I wanted to add that I used a 3″ springform pan and one regular (1.5quart) container of each flavored ice cream was plenty. You don’t need 2 of each. Also the amount of crushed cookies seemed off to me as well and I ended up using half. Next time I might just use the extra crushed cookies on the bottom. I agree the whip isn’t as tasty after the 1st day. : ) Also I used Nestle syrup instead of the homemade fudge and it worked just fine. It was a tad drippy on an edge or 2 so maybe keep it a centimeter inside the ring when you’re filling it in, but the whip will cover it well so it’s shouldn’t be a deal breaker. I think I’ll try using wax paper next time. I was afraid to remove the bottom of the springform pan, and it got a few scratches in it when we cut the cake.
How long will it keep in the freezer? I made my son one for his bday and now he’s sick so we have to postpone the party :(
Hi Sarah, I’m so sorry to hear your son is sick! This will keep for up to 1 month in the freezer.
Woww. Looks easy but should often go into the freezer yes. I am interested to make this Dairy Queen Ice Cream Cake display in my showcase. Thank you very much!!
Will the fudge stay soft after it’s been frozen? (Does it ooze somewhat still?)
Hi Rebekah, Yes, it will be soft but not frozen!
Hi everyone, has anyone added a layer of actual cake to this recipe rather than it being all ice cream (and crunch mix, etc)? I love ice cream and cake together and just thought I would throw this question out there. THANKS SO MUCH!!!!
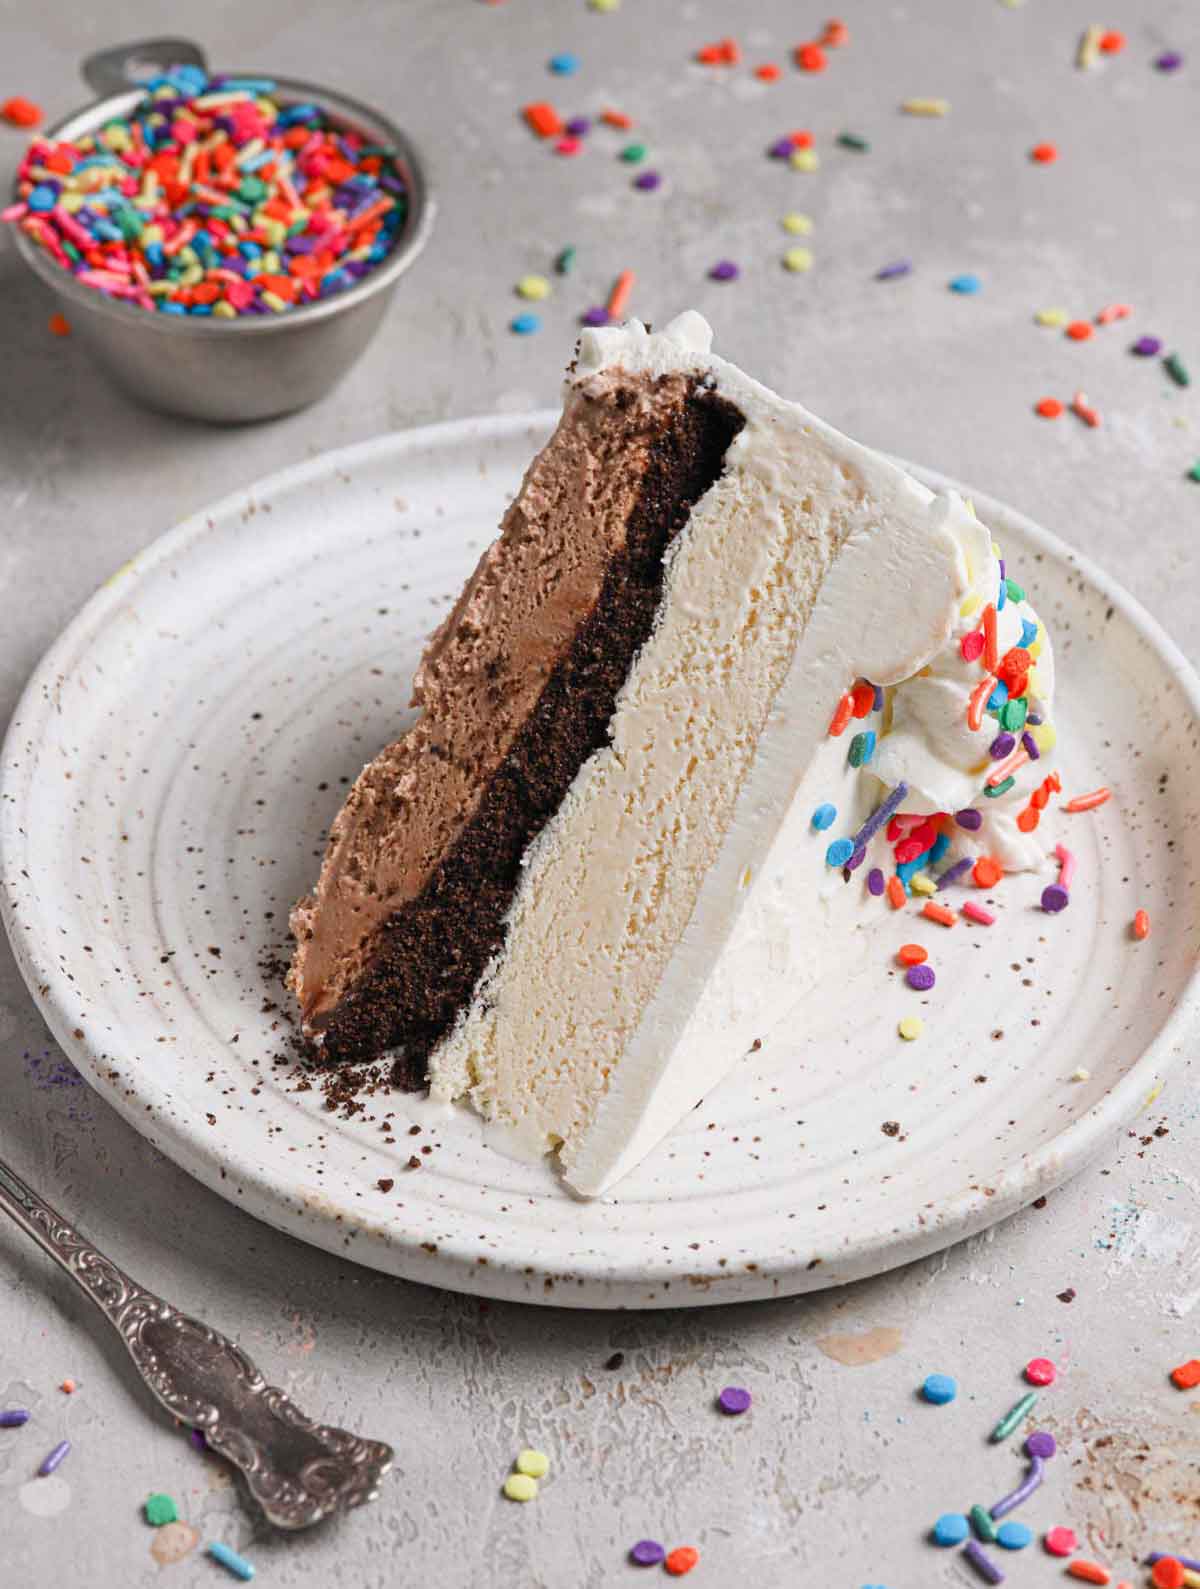
I noticed in your pictures that the chocolate layer is much thinner than the vanilla layer, yet the recipe calls for 2 quarts of each flavor. Is this correct? I’m in the middle of making this and after adding the fudge and cookies, my springform pan is almost full. I know 2 quarts of vanilla will not fit in the pan.
Hi Jackie, They look uneven just because of the way they got pushed down; I used the same amount of both.
Please can you tell me the height of the pan you used and the approximate end height of the cake. I need to ensure there is adequate height in the freezer for it.
Hi Alicia, This is the springform pan I have – http://rstyle.me/n/csg9recaugx – it’s 3.5″ high. The end height of the cake doesn’t quite come up to the top.
I’m so excited to make this for my husband’s birthday! Can you freeze overnight after putting on the whipped cream topping? Or is it better when the whipped cream is fresh?
Hi Jessica, Yes, for sure! I’ve done that many times.
I just made this for my sons b-day tomorrow can’t wait to try it looks delicious…… THANK you for sharing the recipe
I used chocolate and cookies & cream ice cream his favorite
Wow!! Thanks for the great idea! How long will it keep in the freezer? My daughters bday is in a week.
Hi Cassy, A week for sure! I think it would be fine up to a few weeks. Happy birthday to your daughter!
My kids have summer birthdays. DQ has always been their favourite cake. In the last two years they have both been diagnosed with Celiac Disease so no more do cake. So, I’ve picked up some gluten free Oreos and just made this!! I can’t wait to see their faces. Thanks!!!!
Can you make this as a sheet pan size, to feed more?
Hi Chelsey, I don’t think there’s any way you could make this in a sheet pan, as the sides are way too low, the ice cream would melt over before it could freeze.
What a fun cake!
How long can you keep this cake in the freezer before serving it? I’m wanting to make it for a friend’s birthday next Thursday, but my plan was to make it this weekend (and I wouldn’t ice it until the day of) – can the cake last 5 days and be okay still? =\
Thanks!
Hi Ann, I think up to a few weeks would be okay, so making it a handful of days ahead would be just fine!
Can the first batch of ice cream sit in the springform pan overnight in the freezer? My kitchen aid icecream attachment has to refreeze after the first batch before I can make the second batch of ice cream.
Hi Marissa, Yes you could definitely do that!
I just made this for my step-daughter’s 12th birthday, with some minor adjustments. I used oreo ice cream instead of just vanilla and used chocolate oreos for the crumb layer and topped with crushed oreos. Mine didn’t turn out quite as neat but it sure is delicious! Just like DQ and you could customize it anyway you like with different ice cream flavors and cookies! Thanks for the recipe!
Are all springform pans the same height? I’ve just put 2 quarts of the chocolate and it looks so full already. I can’t imagine the layers of cookie and fudge and another 2 quarts of vanilla fitting in there? Also, your picture doesn’t look like equal amounts of each??? Help!!
Hi Amber, Almost all springform pans fall between 2-3 inches high. There are actually equal amounts of each, but when I put the vanilla in, trying to spread it caused the filling and chocolate below to move around a bit, so it looks uneven in places.
Although your items look great,what does this have to do with Fixer Upper?
I’m not sure what you’re referring to with Fixer Upper??
Looks Amaaaazing. Going to make it when the grands come this summer. Except I may add another chocolate ice cream layer. My daughter and grandson are serious chocoholics. :-)
This has become my kids’ favorite cake for birthdays! I love it my family didn’t believe that it wasn’t purchased the first time I served it! ❤️
DQ cakes are the best! Our local one used to use buttercream frosting which is 100x better than whipped and it recently stopped. Highly recommend.
If you put Oreo crumbs on the bottom of the pan, the ice cream won’t stick and it’s easier to remove the pan. Also, as a time saver….use cool whip to ice with. It can be defrosted and refrozen.
You can also use waxed paper and press the ice cream into the pan.
I’m trying it with nutella instead of hot fudge since that’s what I had on hand. Taste test tomorrow! I can’t wait to try this!
I love it! My only suggestion? Dark chocolate fudge stripe Keebler cookies…. Most amazing fudge crunch layer ever!!!!!! Thank you so much!!!!!’
Can’t wait to make this!
Could I make it in a 9 X 13 pan?
Hi Beth, Yes, I don’t see why not! Good idea!
Hi, in my computer class I am working on a blog. Would it be okay to feature this recipe on it thanks.
could I put parchment paper in the pan first instead of buttering the pan?
Hi Abbie, I’ve tried that on ice cream cakes, but it gets really soggy and rips, so I don’t recommend it.
Should this be made with a 9×3 inch springform like you use for your other ice cream cakes, or is the size the regular 9×2 inch? You don’t specify the height of the pan. Also you don’t use the parchment paper liners for the inside sides of the ice cream like you do in the other ice cream recipes. Is there a reason why they aren’t needed for this cake? Thanks! I’m new to making ice cream cakes and am still learning!
Hi Kim, Sorry about not being more specific with the height – if you have a 3-inch height, I always prefer those, but you can make it with a 2-inch. You can still use the parchment, but there isn’t anything sticky in this recipe, so you should be fine without it.
This cake is awesome! Your directions were awesome and easy to follow. I can’t wait to cut into this in a few hours. It looks perfect!
Thank you for this recipe! Can you specify if you can/should or should not freeze the cake again after adding the cream topping? Ideally, I would like to have the cake all set and decorated before company arrives. Any suggestions from anyone on this site would be appreciated!
In the interest of being a team player, I felt that after reading your question that it was my moral duty to pull a piece of my leftover from Saturday cake…there was a bit left that I am savouring. ;) I iced the cake Saturday at noon, and put it back into the freezer until I served it closer to 6pm. Even today it is holding together nicely, and I don’t really see any downside to it having been in the freezer since then.
Michelle does say in the recipe to ice it prior, but try not to freeze it for any longer than 12 hours prior to serving…maybe the whipped cream just loses a bit of texture if frozen longer? It’s still yummy today tho.
Thank you, Liz! I appreciate your reply and love that you conducted the taste test. ;) I just made the cake, will ice it in the morning, and serve at night! Can’t wait for everyone to try it!
Hi Patty, You can definitely freeze it again once the whipped cream is on… I just find that the whipped cream tends to get a little bit of an off taste once it’s frozen for awhile.
This was so yummy! I made it for a July 4th party and it all got eaten…so did the leftover Oreos. Thanks for a great recipe!
Hi Michelle,
The cake looks great, and I’m going to make it for an upcoming bday party on Juky 10th that we are hosting. If I make the cake portion a week prior in the springform pan, is it reasonable for me to believe that the Oreo mix will still be fairly crunchy when I serve it 6 days later? I read the part about holding off on the whipped cream icing until the day I serve it, but I’d like to get the bulk of the work done this weekend. Thoughts?
L.
PS…I love this blog!
Hi Liz, They aren’t super crunchy because I use the whole cookie including the cream filling (my preference). If you want them super crunchy then I wouldn’t use the cream filling… I’m not sure even if you do that how crisp they will still be in a week’s time.
Thanks! I actually held off until last night to start it…the vanilla custard is chilling in the fridge and will be churned in the morning for a Saturday presentation, so all should be good. So far I do have to agree that the chocolate ice cream is to die for, lol….hopefully my vanilla ice cream efforts work out as well!
Thank you!
And…the crowd LOVED it. I’ve made plenty of yummy desserts before, but this one was quite the show stopper! It was delicious! I messed up the first batch of chocolate, as I didn’t cook it until it was thick enough, and also I don’t think that I let it chill enough before I put it into the ice cream maker, however the 2nd batch and then the vanilla turned out awesome! Thank you for the great recipe!
L.
You’re very welcome! I’m so glad it was a hit!
Ok, I am not a fan of ice cream cakes without a layer of cake, but I am a huge BEB fan and had a son with a birthday who loves ice cream cakes, so I made this recipe. Delicious! I loved the fudge and Oreo layer. I used Schwan’s Vanilla Bean and Chocolate ice creams and a pre-made fudge sauce(only because of a time issue and because if I made it from scratch, I would be eating more than my son!). The only issue I had was that the 9″ Springform pan was too small for the amount of ice cream the recipe called for.
Thank you, for another outstanding recipe!
Your post inspired me to make a peanut butter version for my dad for Father’s Day (let’s just say I know where my peanut butter addiction came from… Thanks dad) I had been trying to figure out what to make for him and it hit me! Ice cream cake!! I used the mousse filling from Jif’s peanut butter pie recipe and folded in Reese’s PB cups and used that in place of vanilla ice cream. I am excited to taste the outcome!
I used to make these cakes in high school. The crunchies are chocolate graham type crumbs mixed with chocolate cone coating :)
I love the crunchies … when you said Chocolate cone coating… what is that? and how would I come about that or make it?? thanks!
Add Magic Shell to the crushed up cookies. (and I would recommend using just the cookies, not the cream center, if you want it to taste more like DQ).
This made me laugh. I know exactly what you mean about the crunchies being too crunchy! My family always got DQ cakes, but there was never enough fudge and I hated the crunchiness. It made me shiver and bothered my teeth. I’ll try this!
DQ Ice Cream cakes were always a birthday tradition in my family growing up. We kept it going by serving it at our wedding instead of classic cake! It was such a hit, I think everyone has some happy memory associated with them.
Just an FYI – if you order an ice cream cake at DQ, you can ask them to add extra layers of the chocolate goo. I saw them making them once and the chocolate crunch/fudge layer is a premade disc that they drop in between the layers. They will put 2 or even 3 in, rather than just 1, if you ask!
I make one very similar to this except I make it in a 13x 9pan . I buy the ice cream in the square box. So I peel off the outer peel and then cut box shape icecream into slices. So much easier to assemble and perfect for this hot weather.
oh wow! This looks too good not to try! Everyone loves ice cream in our house (who doesn’t!) but I think they’d love it even more if I were to make it into a cake.
Ice cream cakes are hard to put together but this one looks so good! And I completely agree, there was never enough fudge filling! This is giving me such great memories! And such terrible cravings. ;)
A DQ cake was always something super special that I would get to have at other kids’ birthdays. When I met my husband, he told me his parents always got him a DQ cake and he still missed those days. For his 30th I got him a DQ cake and you’d swear I got him a Rolex, the way he lit up! Can’t wait to make our own at home :)
Since I am the birthday cake baker in my family, I don’t get a baked cake unless I bake it. So my family buys me an ice cream cake every year. This looks exactly like the cakes we used to get from Carvel as a kid, and they were the best. I guess now that I found a recipe that I like I’ll end up making my own birthday cake next year.
I LOVED Carvel as a kid! With a summer b-day it was my cake of choice.
Not sure the Texas DQ”s make the cake. Have never heard of one.
Love this re-creation, Michelle! I haven’t had a DQ cake in years, but my favorite part was the fudgy, chocolate crunch filling, too! So good! Your cake is mouthwatering! Thanks for the recipe!
Oh no- the fudge is my least favorite part… I keep one of these DQ cakes in my freezer at all times. I cut them into slices and wrap them in tin foil- a perfect one slice snack at any time! However, I hate the fudge part- recently I asked them to make me one without the fudge but they won’t do it. Sad… They will however add another crunchy/fudgey layer- which I loved! .
Depending on the DQ, at least the one I worked at, the cake crunchies and fugde come prepackaged, together. So there would be no way for them to make one without the fudge. :/
Do you think they could make one with only fudge center?
I am a decorator at DQ and we make cakes without fudge or cookie crunch or chocolate ice cream for those that don’t like it or are allergic. Our fudge and cookie crunch is separate so we can do that. If there are a few DQ’s close by, ask around. They may just do it for you. Give at least 48 hours notice but 4 or 5 days is helpful!
THERE.JUST.AREN’T.WORDS… I LOVE DQ cakes! I must make this (although I’m going to have to think about the cookies – I love the crunchies – maybe Oreos without the cream?). I took my son to DQ for the first time a few months back. He was enthralled with the cakes in their freezer. He might crown me mother of the year if I make this! I know what I’m doing this weekend.
I’ve never been a die hard cake fan! So, growing up, I always requested ice cream sundaes or donuts! But this is the type of cake I would eat.
I love this idea! Making it for Father’s Day for sure!
Oh my! This looks like one amazing birthday cake! We never got ice cream cakes as kids. Maybe it’s time to have one as an adult!!!
Only once in a blue moon do I open my email and see something I need to make RIGHT NOW. This is it! So excited.
O M G this is unbelieveable! That cake is one of my favorite treats!
I am SO excited…my birthday is coming up and I just might make this for myself! :-)
I’m not that keen on DQ or any kind of ice cream cakes but you had me at your Hot Fudge Sauce…I have made it a few times and I definitely eat it with a spoon. It is amazing!!! My mom used to make us package cake mixes with a very thin layer of icing but my wish was for a store bought cake with a thick layer of that very unhealthy icing made with shortening…yuk! A moist chocolate cake with homemade buttercream would be my wish now…or German Chocolate Cake or a Passionfruit Mist cake which is white cake with passionfruit flavours icing and white chocolate shards…yum!
A DQ cake was like the best bday cake ever when I was growing up (that or one of those giant Mrs. Field’s cookie cakes!) This looks wayyyy better than DQ’s! Pinned!