Homemade Peanut Butter Cups
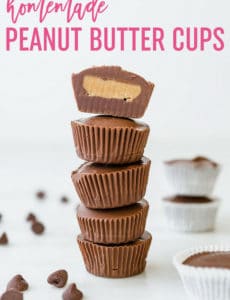
A homemade version of Reese’s peanut butter cups. This easy recipe comes together quickly and is great for gifting or stashing in your freezer!
There is absolutely no question about where my heart lies when it comes to candy. Reese’s Peanut Butter Cups and Reese’s Pieces are it for me. Reese’s cups were my favorite Halloween candy as a kid, so it’s only natural that I immediately cozy up to recipes that merge together two of my favorite ingredients – chocolate and peanut butter.
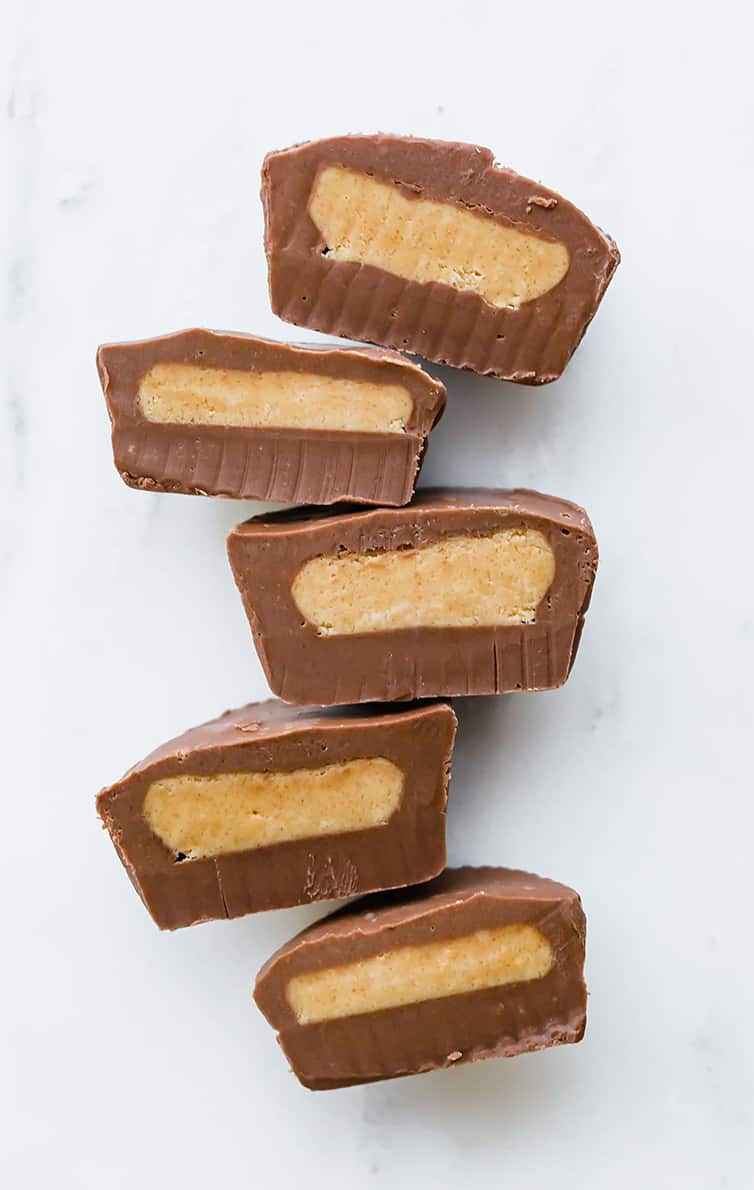
Over seven years ago, a reader of mine, Lissa, shared this peanut butter filling recipe with me, citing that she used it as a base for peanut butter bars. At the time, I already had a go-to recipe for peanut butter bars, but what she sent me sounded like a perfect filling for homemade peanut butter cups. After doing some testing, I discovered that it really WAS a perfect recreation of Reese’s peanut butter cup filling.
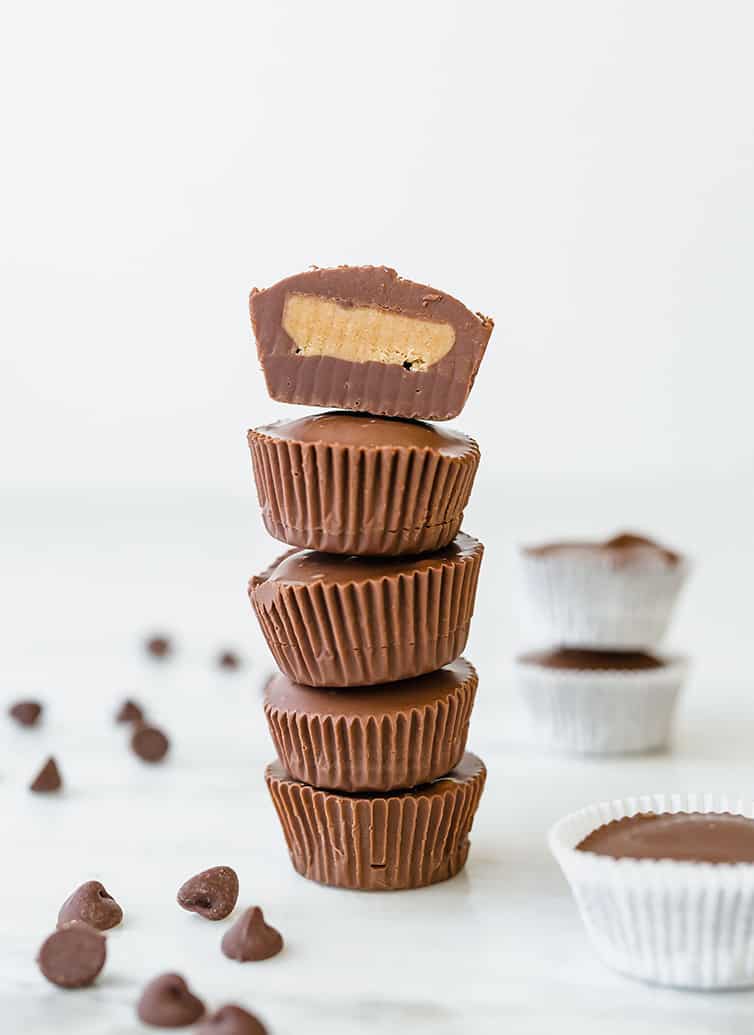
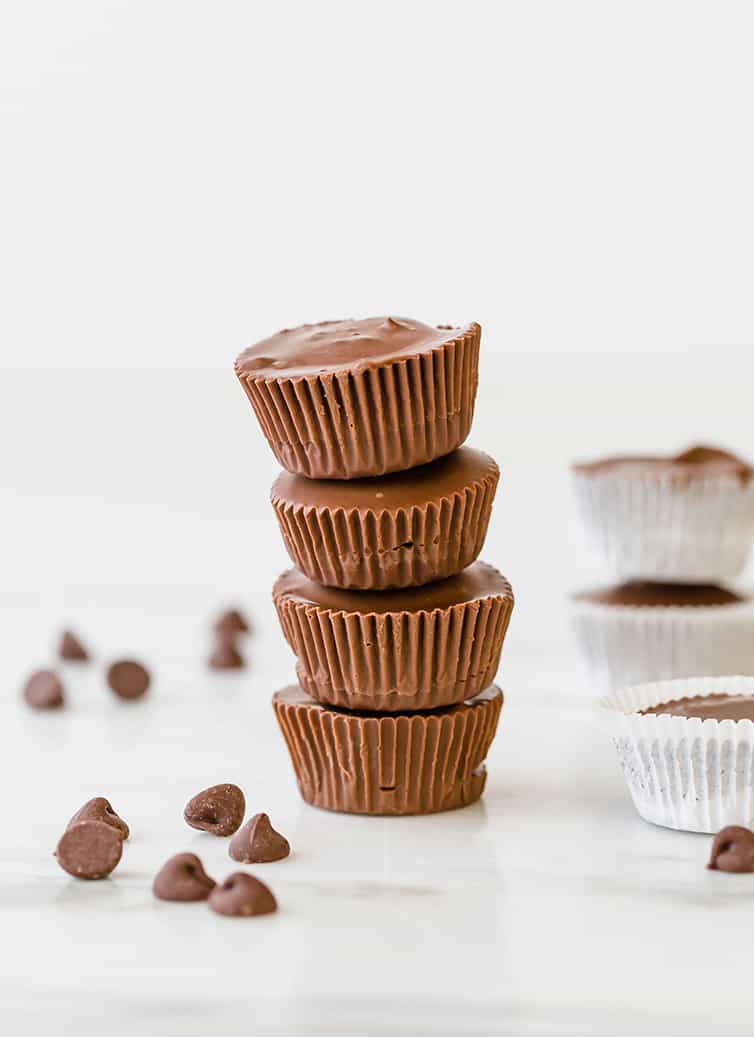
Behold! The most amazing homemade peanut butter cups – super easy and a great project to do with kids!
How Do You Make Homemade Peanut Butter Cups?
They’re super easy and just require a few steps!
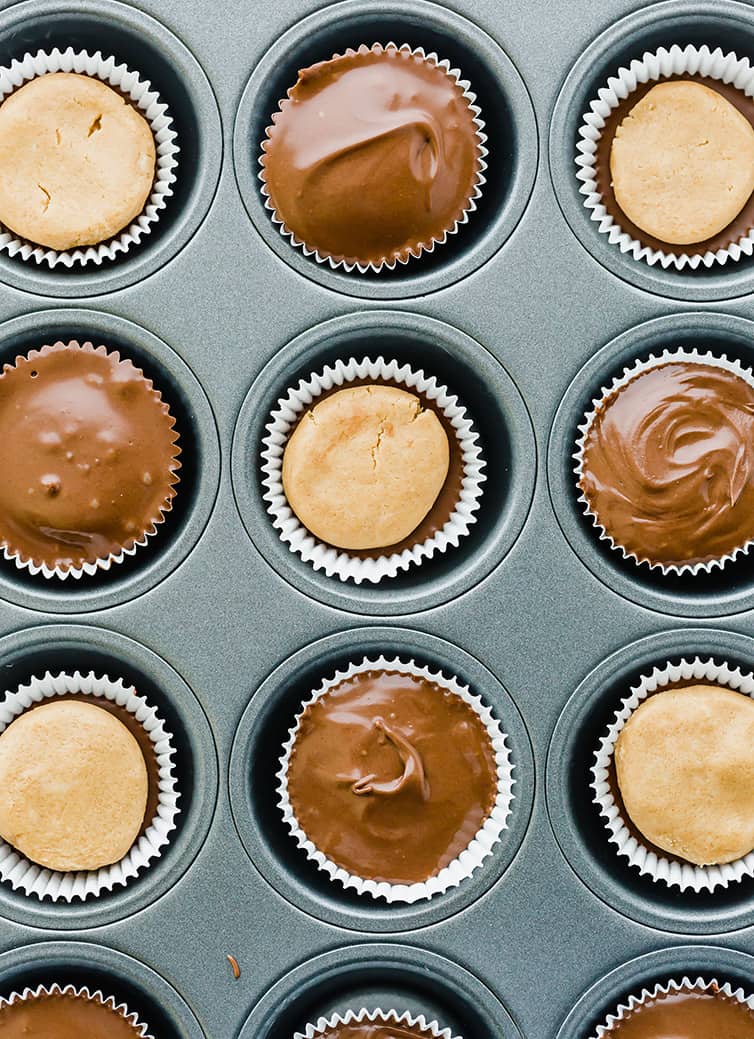
First up, you mix melt together peanut butter, butter and brown sugar in a saucepan until bubbling, then take it off the heat and add the powdered sugar a little at a time until it’s completely absorbed, then set it aside to room temperature.
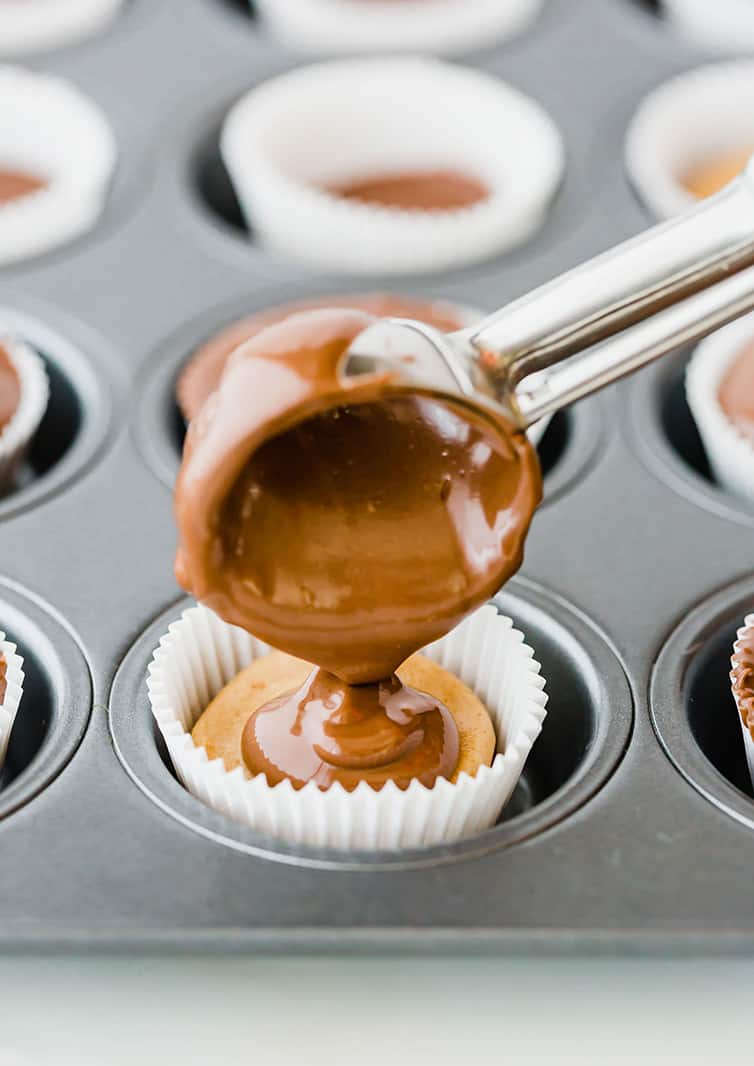
Meanwhile, melt milk chocolate together with vegetable shortening and line the muffin cups with some of the chocolate. Scoop balls of the peanut butter filling and press into a patty, then place on top of the chocolate in the muffin cups. Top with more of the melted chocolate and chill until set.
That’s it!
I’ve seen some people use a pastry brush to brush the sides of the cups with the melted chocolate so you don’t have any little naked spots on the sides, but I’ve never had an issue with glaring open spots, so I’ve never done this.
Save This Recipe
But consider it an option!
Substitutions for Homemade Peanut Butter Cups
This is my all-time favorite version of peanut butter cups (peanut butter + milk chocolate), but there are tons of variations you can try. Some ideas:
- Substitute semisweet or dark chocolate for the milk chocolate.
- Substitute almond, cashew or another nut butter for the peanut butter.
- You can use chocolate chips instead of the the chopped chocolate.
- You can substitute refined coconut oil for the vegetable shortening.

If you are a fellow chocolate and peanut butter lover, then homemade peanut butter cups are a must in your kitchen!
They make a fantastic gift for Halloween or Christmas, a great addition to cookie trays, and are also perfect for stashing in your freezer for peanut butter cup emergencies (because I’m fairly certain that’s an actual thing, right?).
If You Like Peanut Butter Cups, Try These:
- Homemade Peanut Butter Eggs
- Peanut Butter Buckeyes
- Salted Peanut Butter Cup Chocolate Chip Cookies
- Peanut Butter Cup Overload Cake
- Buckeye Brownies
- Peanut Butter Cup Cookies
- The Best Soft Peanut Butter Cookies
Four years ago: Bacon Jam
Five years ago: Ricotta Cake with Fresh Berries
Six years ago: Tamale Pie
Homemade Peanut Butter Cups
Ingredients
- 1 cup (258 g) creamy peanut butter
- ¼ cup (56.75 g) unsalted butter
- ¼ cup (55 g) light brown sugar
- 1¼ cups (150 g) powdered sugar
- 24 ounces (680.39 g) milk chocolate, finely chopped (or substitute milk chocolate chips)
- ¼ cup (51.25 g) vegetable shortening
Instructions
- Line a mini-muffin tin with paper liners; set aside. Line a baking with parchment paper; set aside.
- In a medium saucepan, combine the peanut butter, butter and brown sugar over medium heat. Heat until completely melted and starting to bubble a little, stirring constantly. Remove from the heat. Add the powdered sugar a ¼ cup at a time, stirring until completely combined with the peanut butter mixture after each addition. Set aside and let cool.
- Meanwhile, melt the chocolate chips and shortening together in the microwave on 50% power in 30-second increments, until completely melted, stirring after each burst.
- Using a small cookie scoop or a couple of teaspoons, spoon melted chocolate into the bottom of each lined muffin cup.
- Use a heaping teaspoon to scoop out the peanut butter mixture. Roll it into a ball, and then flatten it slightly into a disk. Place on the prepared baking sheet lined with parchment paper. Once finished with all of the peanut butter mixture, refrigerate both the muffin tins and the peanut butter patties for about 30 minutes.
- Place a peanut butter patty on top of each chocolate-lined muffin tin. Then use a scoop or spoon to add more melted chocolate on top and around each peanut butter patty. (If the melted chocolate firmed up, just pop it back into the microwave at 50% power for 30 seconds or so to re-melt.)
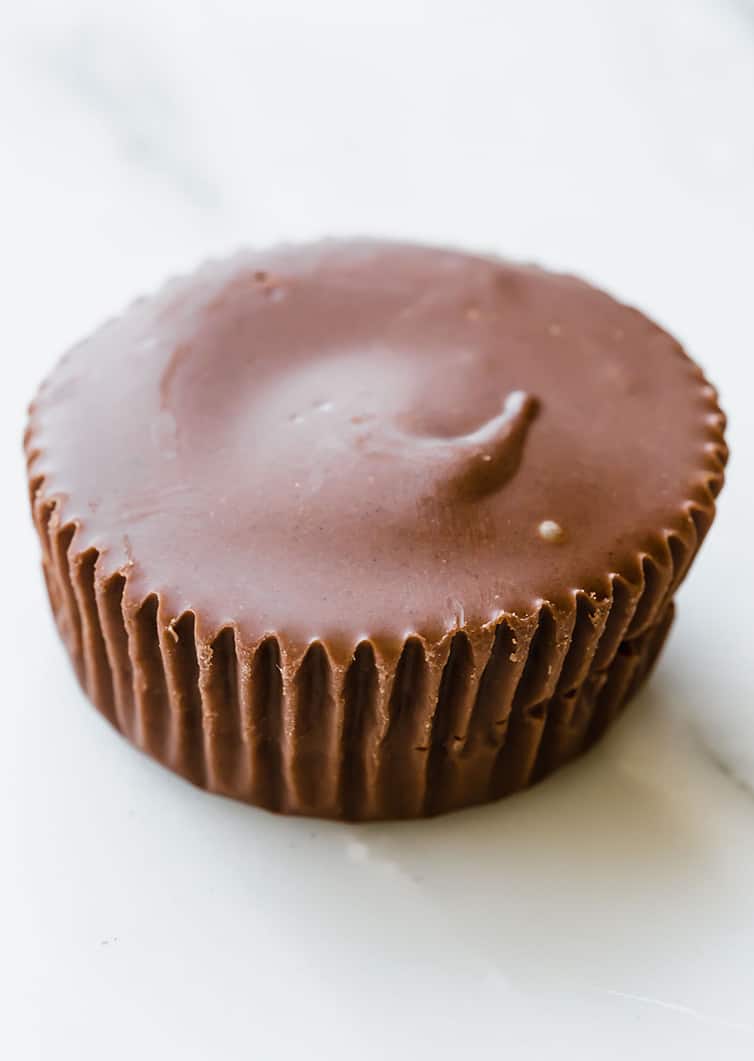
- Refrigerate again for 30 minutes, then they're ready to serve! Store in the refrigerator for up to 1 month or in the freezer for up to 3 months. You can keep at room temperature in an airtight container if you're going to serve them the same day, but they'll start to get soft if not at cool room temperature.
Notes
- You can substitute milk chocolate chips for the chopped milk chocolate.
- You can substitute refined coconut oil for the vegetable shortening.
- You use different nut butters, I recommend using "processed" versions; the "natural" version of nut butters will be too oily for the filling.
Did you make this recipe?
Leave a review below, then snap a picture and tag @thebrowneyedbaker on Instagram so I can see it!
This recipe was originally published on August 2, 2011.
[photos by Whitney Wright]


Thanks for the recipe – I’ll be making these for Easter shaped like eggs! Have a great day.
Hi Michelle,
Could I make this recipe using white chocolate? My husband prefers white!
Yes, that will work!
I like to keep recipes ( blogs) that my family dearly loves handy on my desktop so I can refer to them easily when shopping for ingredients & cooking, after all time is of the essence. It would be nice if all bloggers put their recipes in the same place (beginning, end/top or bottom) so that we can access them faster. It never fails, I waste valuable minutes scrolling up & down the blog trying to find it. If any other moms have an solutions, I am all Micky Mouse EARS! Thankksss !!!
Hi Diana, At the very top of every single one of my posts, right underneath the big title, is a button that says “skip to recipe” – click it and you will be magically transported right to the recipe. Works every time! :)
I love peanut butter cups! The perfect treat!
Hi Michelle! What do you think of using this peanut butter filling for a homemade pop tart?
That sounds seriously AMAZZZZZZZZING.
Wow this is looking so super delicious, thank you for sharing your blog
I too am a peanut butter and chocolate FREAK…but I have to have dark chocolate! I have made this recipe with dark chocolate and absolutely adore it! So easy and delish! It makes it into my Christmas Cookie rotation regularly :)
Yum! I’m putting this on the To-Make list for my girls and me. Along with the homemade crunch bars, coconut cups, and chocolate-covered potato chips suggested at the bottom of the post. I’ve really got to get stay this site when I’m hungry, lol.
How long might these store in the fridge?
Hi Lauren, They would keep for awhile, I’d say a month.
Could I use butter with the chocolate chips in place of shortening.
I tried to email this recipe and was sent to the comments.
Hmm I just tried it, and the email button worked just fine for me. Try refreshing the page and doing it again?
Hello,
Can I substitute butter for the shortening. I have none :(
Hi Michelle:
I know that this question was probably asked already, but I am still unsure.
–>Could you replace the shortening with vegetable oil or butter?
–>What is the difference between butter, vegetable oil, shortening in melted chocolate?
–>Also, I have read about tempering to give the chocolate that nice “snap” when you bite into it. Would the shortening give it that “snap” or can you only get that from the tempering process?
–> Does the shortening help prevent melting in the finished product and give it a nice texture?
–> Also what is the purpose of the butter in the peanut butter filling?
These look wonderful! I am wondering whether anyone has tried it with natural peanut butter (without stirring in the oil)? Also, has anyone tried them with coconut oil instead of shortening? I have some I need to use up. It has a hint of coconut flavor, but it isn’t strong.
Oops! I now see you mentioned the coconut oil in an earlier comment/question. Sorry about that part! Any thoughts on the natural PB would be greatly appreciated.
Hi JC, I haven’t tried these with natural PB, although I generally find it to be too oily for general baking.
If you store your natural peanut butter upside down the oil on the top doesn’t happen. The peanut butter is ‘loose’ compared to ‘Jiffy’ but I may give it a whirl because that is what we use.
The peanut butter is ‘encapsulated’ in the chocolate so if it runs when you eat it, well… eat it quickly!:-) which will likely happen anyway:-))
Reese is a fav of mine and husband has major love for. Question: Do you use regular milk choco chips (like Chip Its) or do you use couverture milk chocolate to melt? Thanks for the help :)
Hi Jackie, I have used both; either will work just fine.
You answers are always so quick. Thank you for that. I went ‘economy’ and used ChipIts… worked fine. I used the filling from your Peanut Butter Cup Bars for that true Reese ‘grit’ feel. Mouthwatering, I had to put them all right in the freezer to be smashed the next day for your Chocolate Peanut Butter Cup Ice Cream. Devine!
FYI: When writing a recipe, the ingredients are written IN ORDER OF USE to make the recipe easier to read and follow. If ingredients are jumbled, it is too easy to omit that item from the recipe. Does sound wonderful, though.
Judy, If you read the recipe, you’ll see that the ingredients ARE listed in the order that they are used. They are not jumbled.
WOW! These are Wonderful !!!!!! I live in Australia and miss peanut butter cups so much. Have tried may recipes to make them but they were always too much effort and the results were average. We don’t have Crisco so I use ‘Copha” instead and the results were amazing! Thank you!
I’ve been making peanut butter cups for 20 years and my trick is to use a Turkey baster to distribute the melted chocolate into the muffin papers first then put the filling in and do it again for the tops.
Was wondering if you think using the coconut oil would make them more stable at room temperature since you mentioned they soften unless it’s cool. I have a jar of coconut oil I’ve been wanting to use for homemade magic shell although I am a bit worried about the taste. Do you find the coconut flavor to overwhelming? My husband is decidedly anti-coconut. Thanks!
I used coconut oil for the shell for my homemade klondike bars. You can definitely taste a bit of the coconut. I wouldn’t call it overwhelming, but unless you have serious issues with vegetable shortening, I wouldn’t use coconut oil for these peanut butter cups.
Michelle. I do a lot of Christmas baking for others, also some for Craft shows. I love making specialty items. I am wondering what you might charge, if you were going to sell these?
Hi Zoe, I actually don’t sell any of my baked goods, so I don’t have a price to give you.
I make these every christmas and gift them in mason jars wrapped with ribbons!! Everyone always loves them and raves about the recipe. They are a little time consuming with all the refrigeration, but it makes so many and they are so rich that it doesnt even matter!!! Ive also made them using Adams peanut butter, an oily refrigeration PB, and i just found i had to keep them stored in the fridge or freezer or else they would melt and get really soft, but for the most part, no one minded!!!! =))
Thanks!!!!!!
I LOVE THIS!!! It’s so sinfully simple not to mention the fact that its 10 times cheaper than buying peanut butter cups!
THANK YOU THANK YOU THANK YOU
I would love to make this for a Christmas cookie exchange. Are they freezable? I was thinking they would freeze well, but provide instructions to thaw in the fridge. Is this possible? – Thanks
Hi Karen, Yes, they are freezable. And yes, I would thaw in the fridge. Enjoy!
Thanks, Michelle, I did use shortening and they came out fantastic! Much better than store bought…they’re almost gone, time for another batch. Thanks again.