Ciabatta Bread
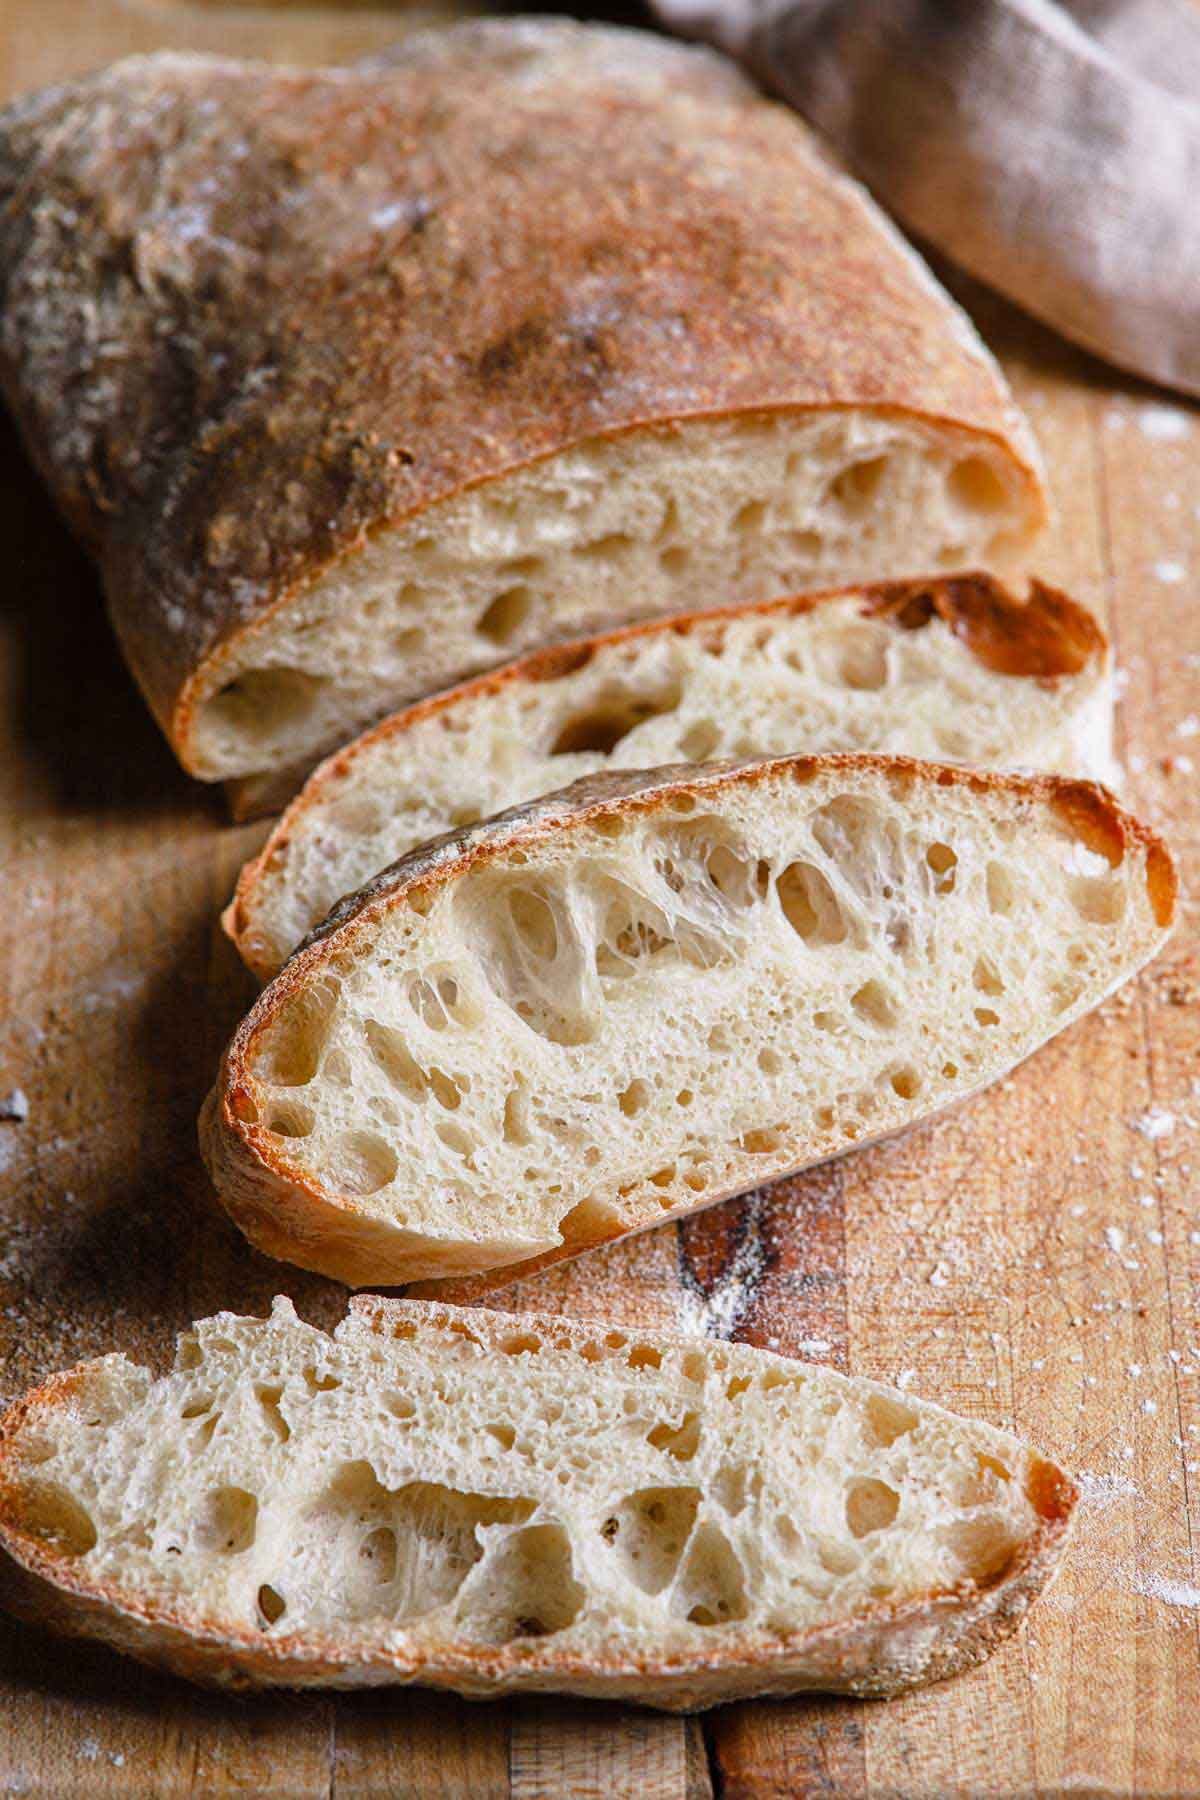
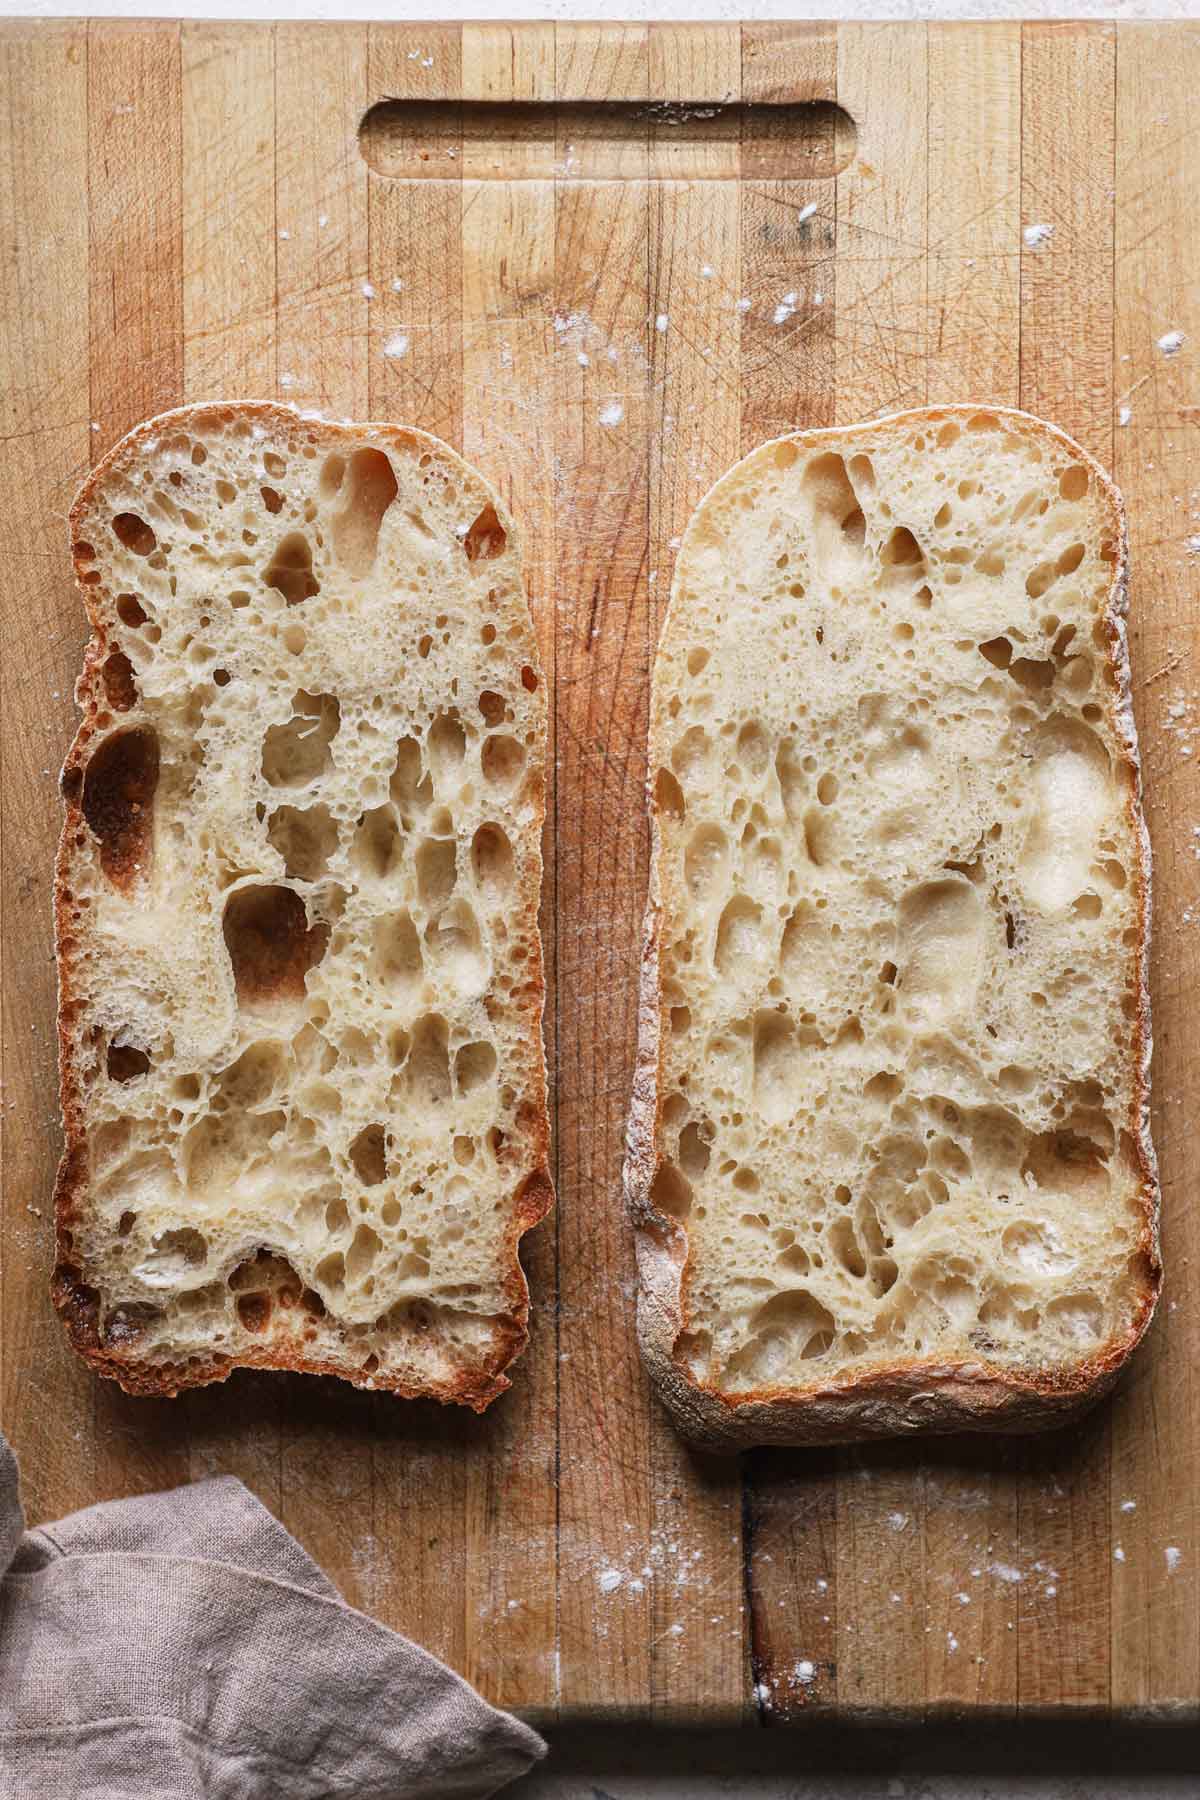
This easy ciabatta bread recipe results in beautiful rustic loaves of classic Italian bread, with its perfectly chewy interior texture studded with those wonderfully large air bubbles. It’s practically begging to be dipped into your favorite soup or stew.
I have such a love affair with baking homemade bread; the smell of yeast and fresh, rising dough has such a calming effect.
It makes me want to curl up on a covered wrap-around porch and read during a rainstorm.
Why You’re Going to Love It
I've long loved ciabatta bread for its chewy exterior and soft crumb speckled with air holes. It's the perfect bread for dunking into soup, slicing horizontally and making a sandwich, converting to garlic bread, or for simply slathering with butter and eating until your heart's content.
This recipe is not complicated, although it does take a little bit of planning ahead. Actual hands-on time is less than an hour in total, and the dough is very forgiving. Let’s dive into the details of the recipe!
Ingredients Overview
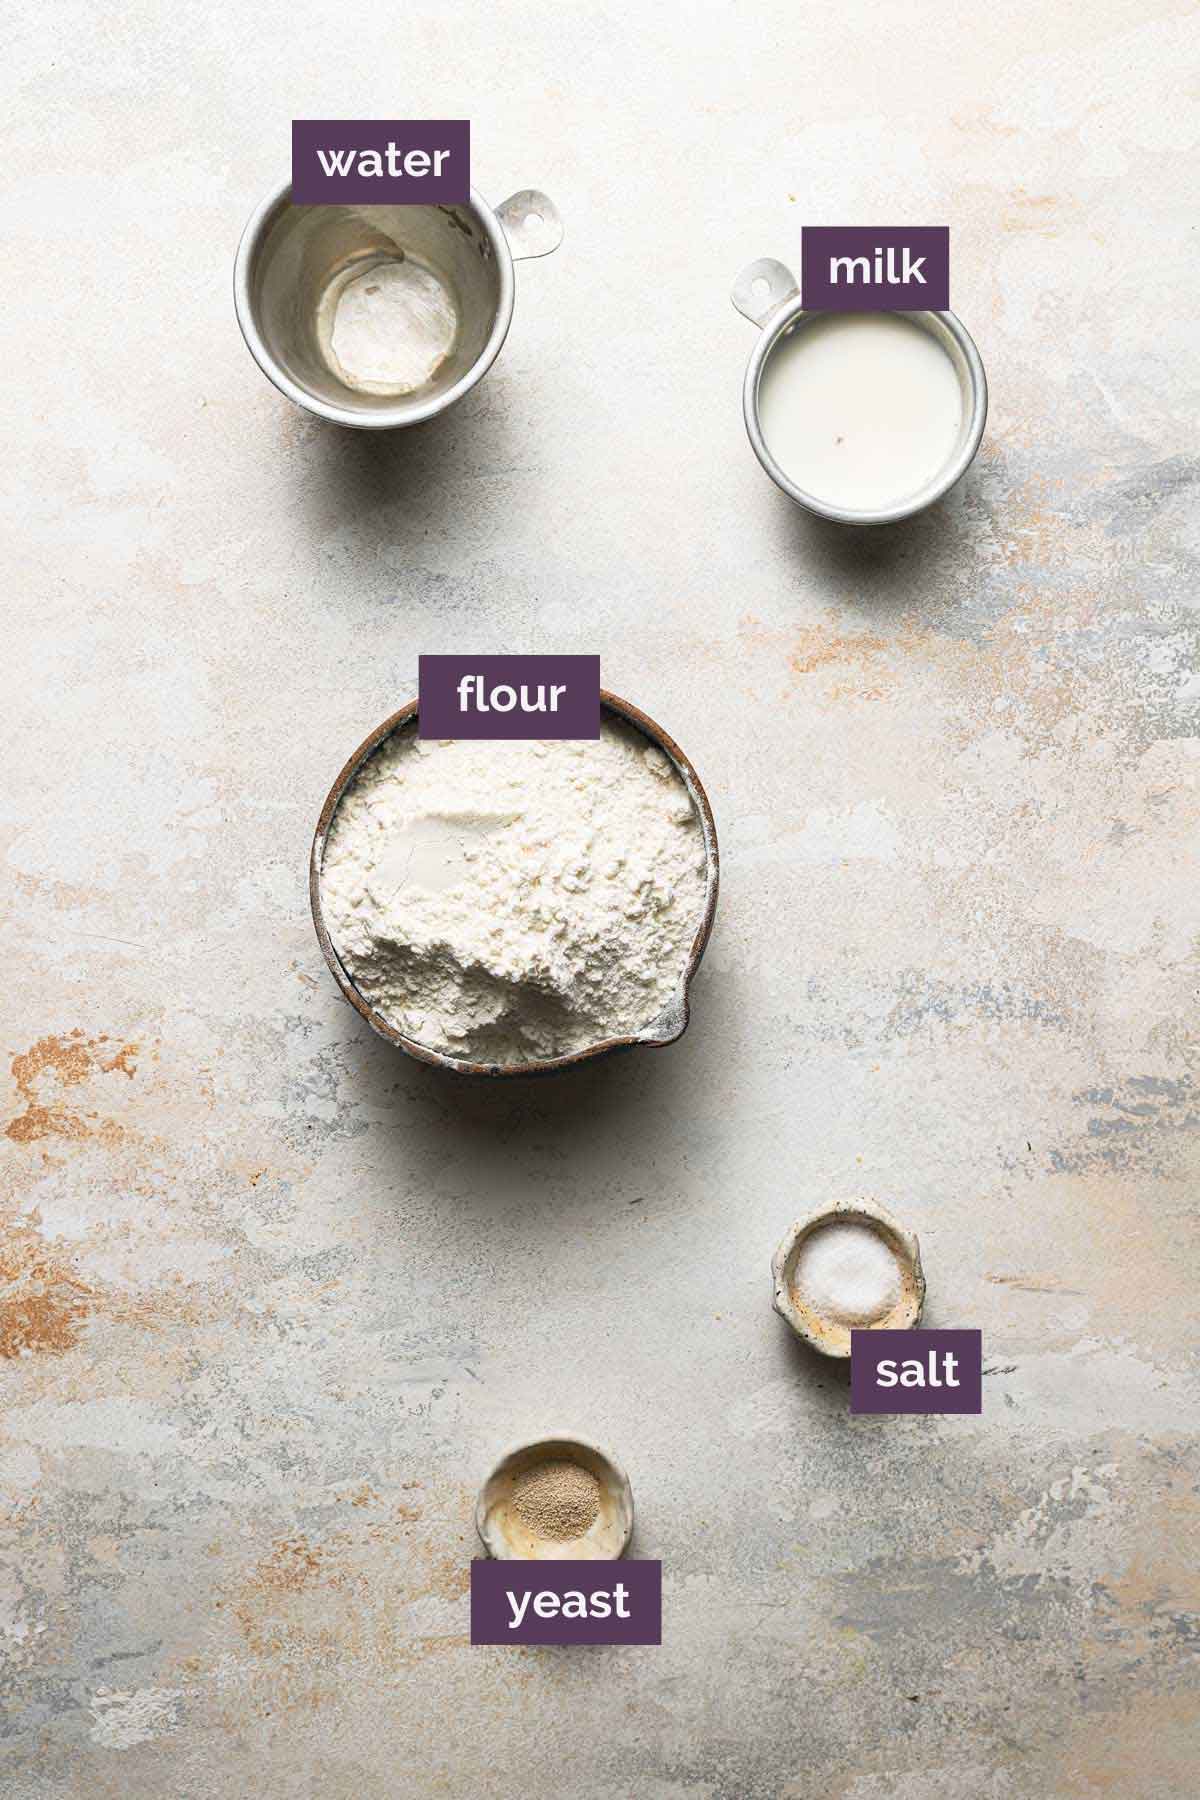
The beauty of this bread is its incredibly simplistic and rustic nature. Below is a quick overview of the ingredients we use with some notes on them and substitutions you may be wondering about:
- Flour – For this recipe, we use all-purpose flour. It has the perfect amount of protein to produce a ciabatta with a perfect rise and airy texture. Substituting bread flour will result in a denser, chewier, and less airy loaf of bread.
- Yeast – We use instant yeast, which is easily mixed into dry ingredients. If you need to substitute active dry yeast, be aware that you will need to activate it in both the sponge and the dough by first ensuring that the water is warm (100 to 110 degrees F), sprinkling the yeast over the water, giving it a quick stir, and then waiting 10 or 15 minutes, until it becomes foamy. At that point, proceed with the rest of the recipe.
- Water – A vital component! Ciabatta dough is considered a high-hydration dough because of the ratio of water to flour. For this reason, you will notice that it is rather sticky and a very wet dough. We’ll talk below about how best to handle the dough.
- Salt – Not only does this help to balance flavors in bread, but it also aids in coloring the crust, controlling the rise, and developing gluten. Don’t leave it out!
- Milk – A protein in milk helps to control the size of the air bubbles in the bread. Without it, the holes are larger, which doesn’t leave as much bread structure. The best milk is whole or 2%, but 1% can also be used in a pinch. You can also substitute 2 tablespoons of nonfat milk powder (increase the water in the dough step to 1 cup).
Ciabatta Dough: Two Parts
The dough for ciabatta bread is made in two stages:
- Sponge (or Biga) – This first mixture is prepared the day before you plan to bake the bread. It is comprised of just flour, yeast, and water. This fermented sponge is what gives the ciabatta its amazing, slightly tangy flavor.
- Dough – The next day, you will mix together the dough, which will include the sponge that has been sitting overnight.
How to Make the Dough
Let’s walk through how the dough comes together:
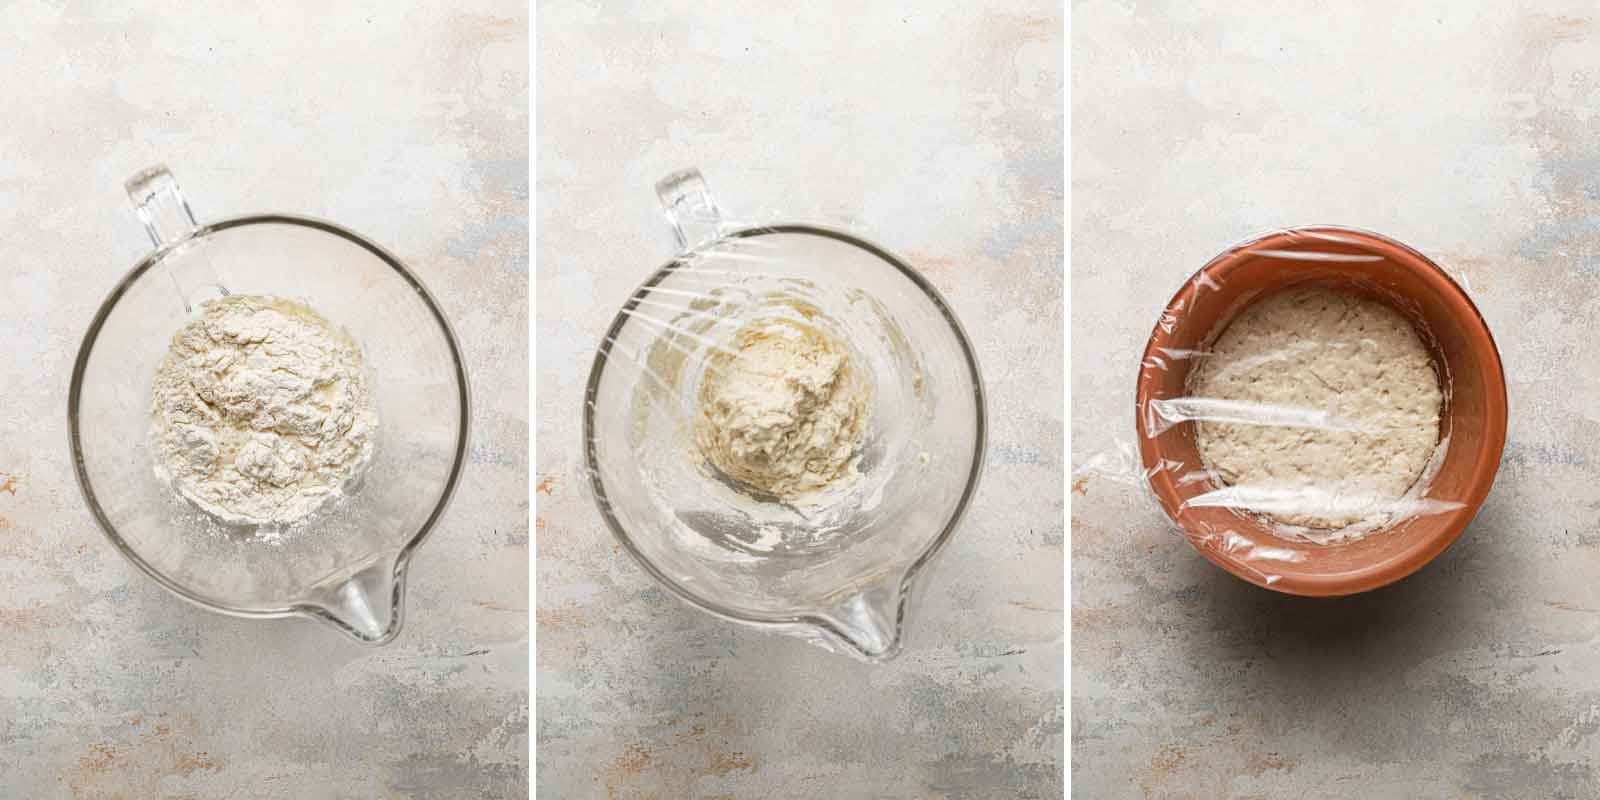
Step #1: Make the Sponge – You’ll mix together the flour, yeast, and water with a wooden spoon, cover the bowl with plastic wrap, and let sit overnight or for up to 24 hours.
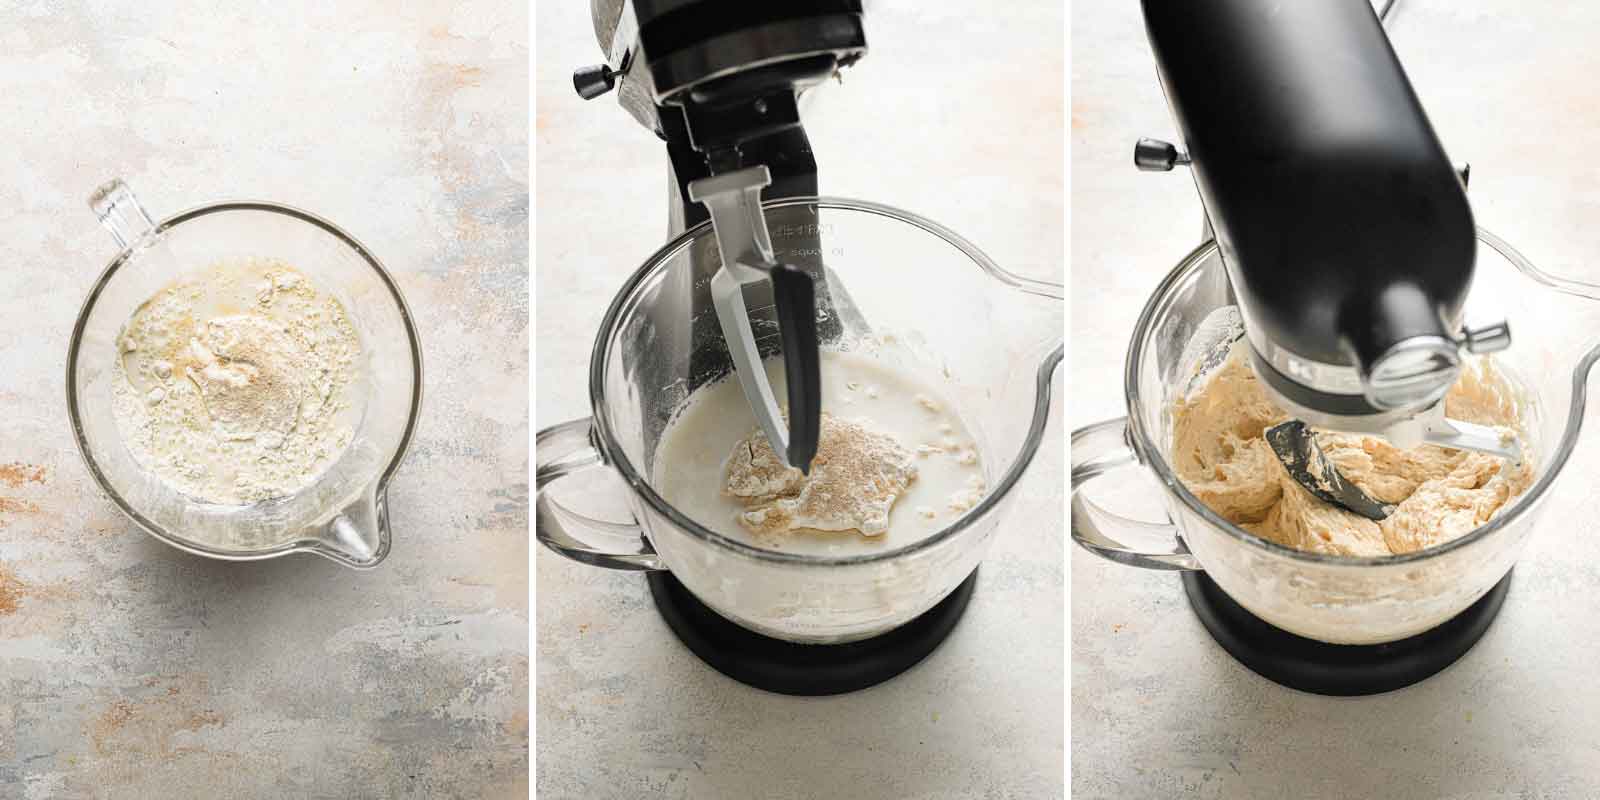
Step #2: Mix the Dough – Add the sponge and all of the dough ingredients to a stand mixer and mix with the paddle attachment until it becomes a uniform mass and pulls away from the sides of the bowl. Switch to the dough hook and knead until the dough is shiny and smooth (about 10 minutes).
Step #3: Rise – Transfer the dough to a bowl, cover with plastic wrap, and set at room temperature until doubled in size (about 1 hour).
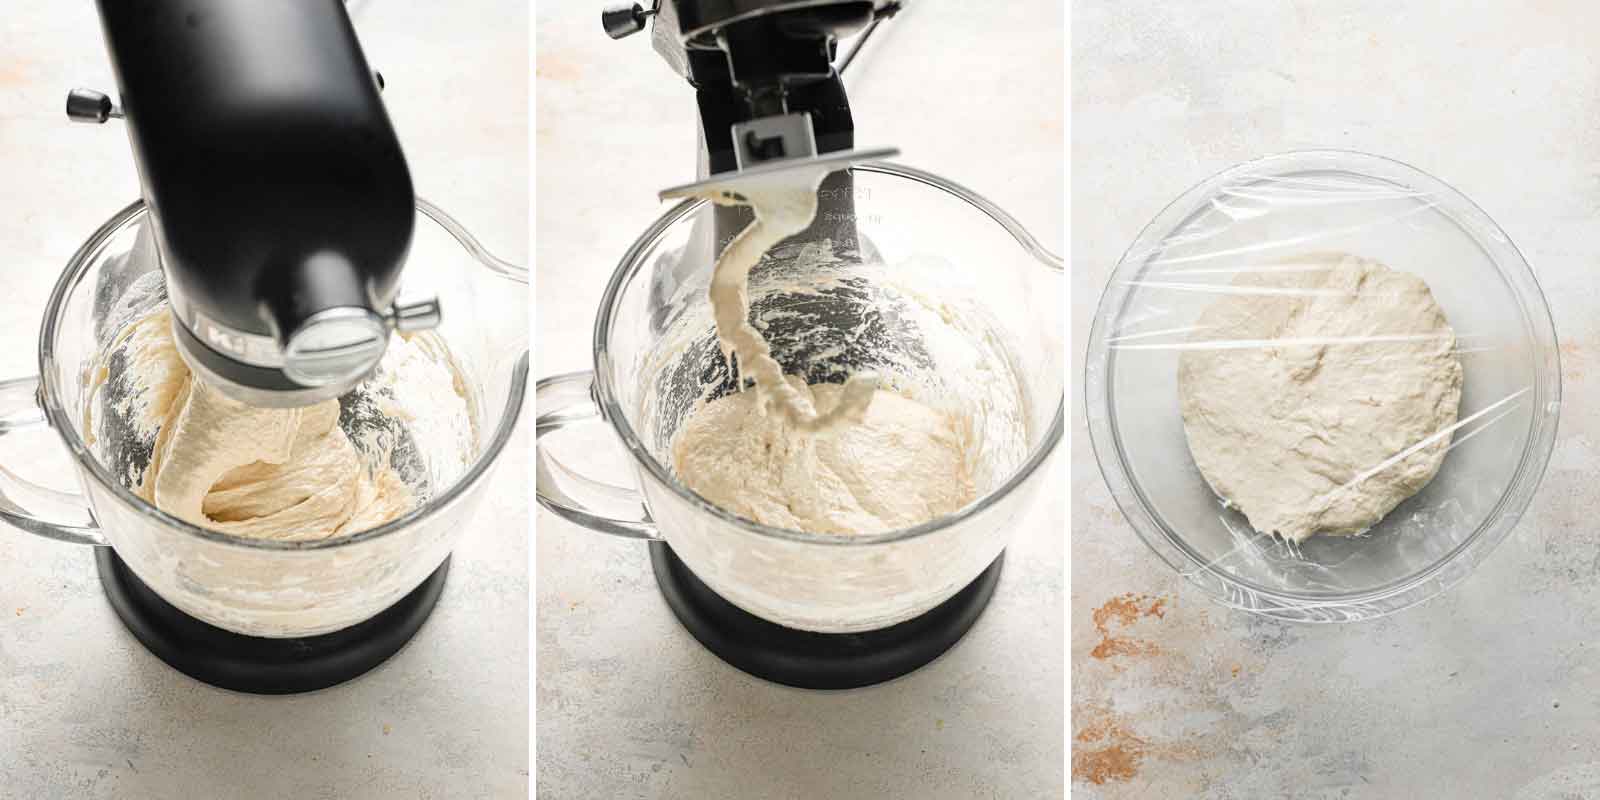
Folding the Dough
This folding process may seem tedious, but it is an integral part of achieving those picture-perfect air bubbles! Here is how you do it:
Make sure your spatula or bowl scraper is sprayed with cooking spray (or rub it with olive oil).
Then lift the end of the dough over itself toward the middle, rotate the bowl 90 degrees, repeat, and then six more times, for a total of 8 times.
Save This Recipe
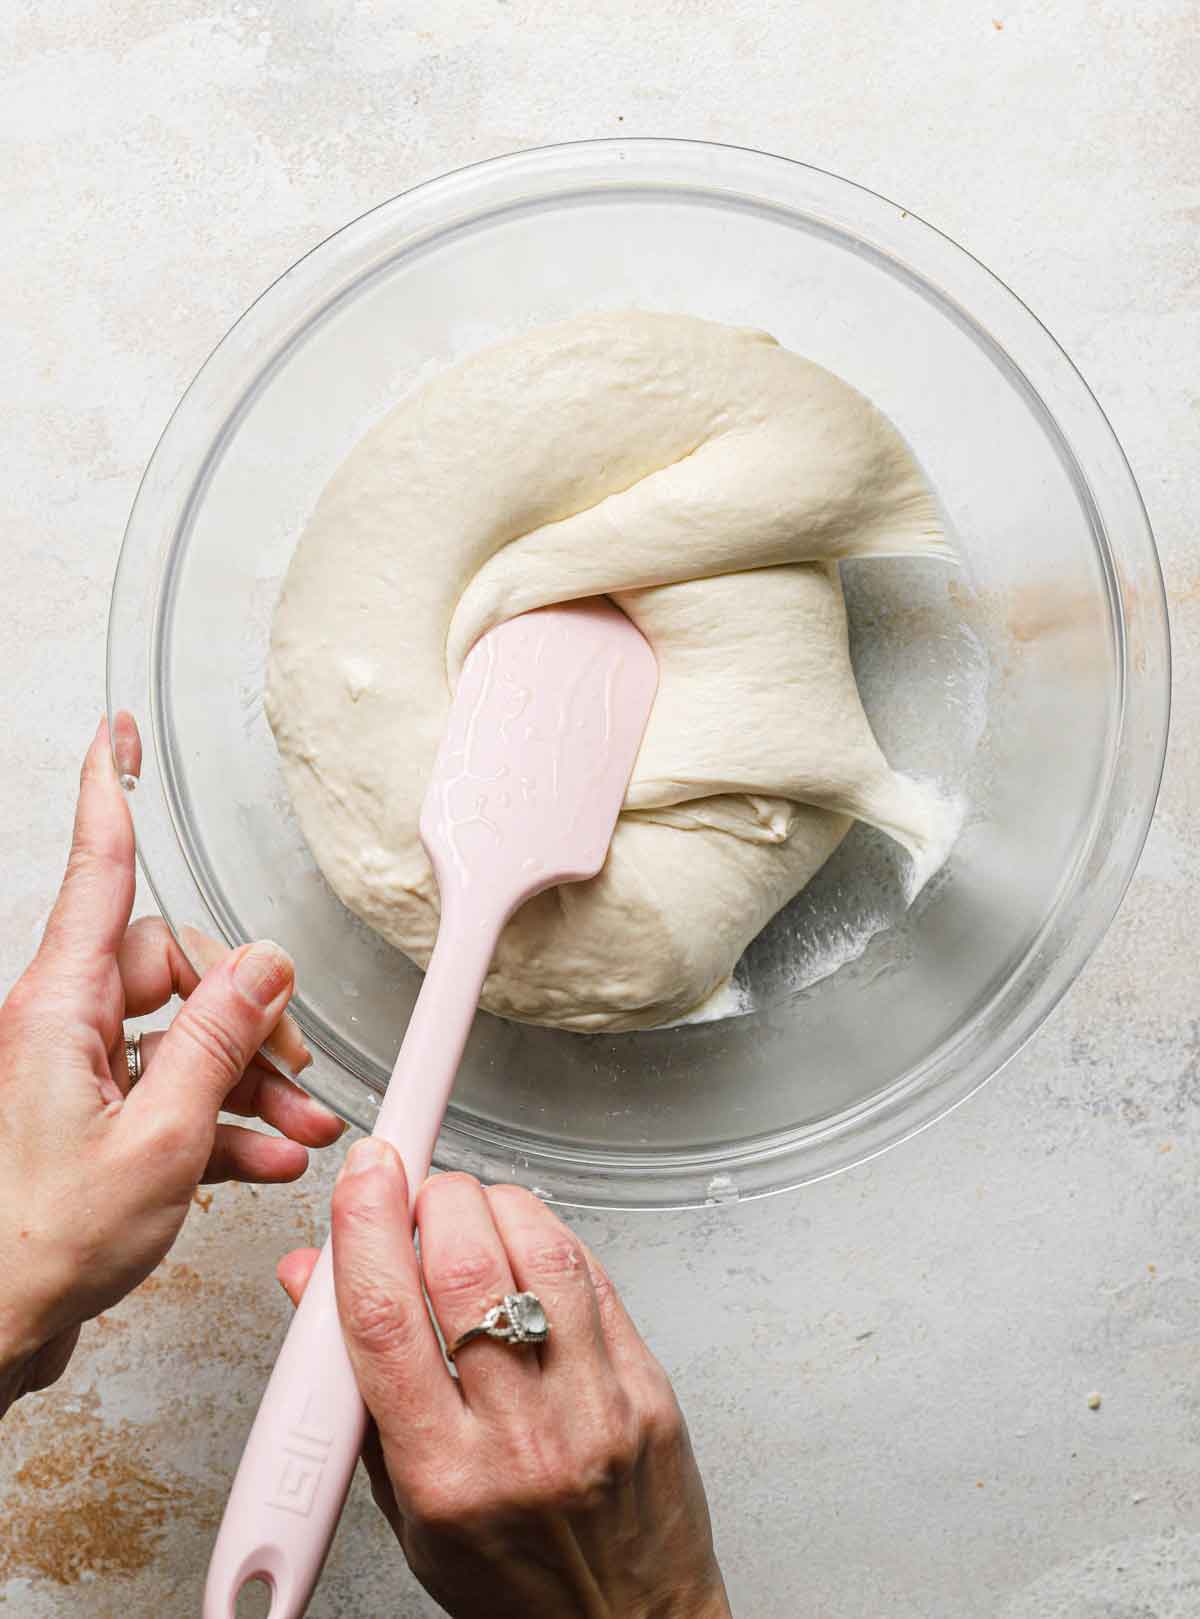
Cover the bowl with plastic wrap, let rest/rise for 30 minutes, then repeat the exact same folding process again.
Once done, cover the dough once more and allow to double in size before proceeding with shaping.
Shaping the Ciabatta
The final shaping of the ciabatta before baking is what gives the bread its characteristic “slipper” shape, from which its name originates (“ciabatta” means slipper in Italian; the bread was given this name because its shape resembles a well-worn slipper).
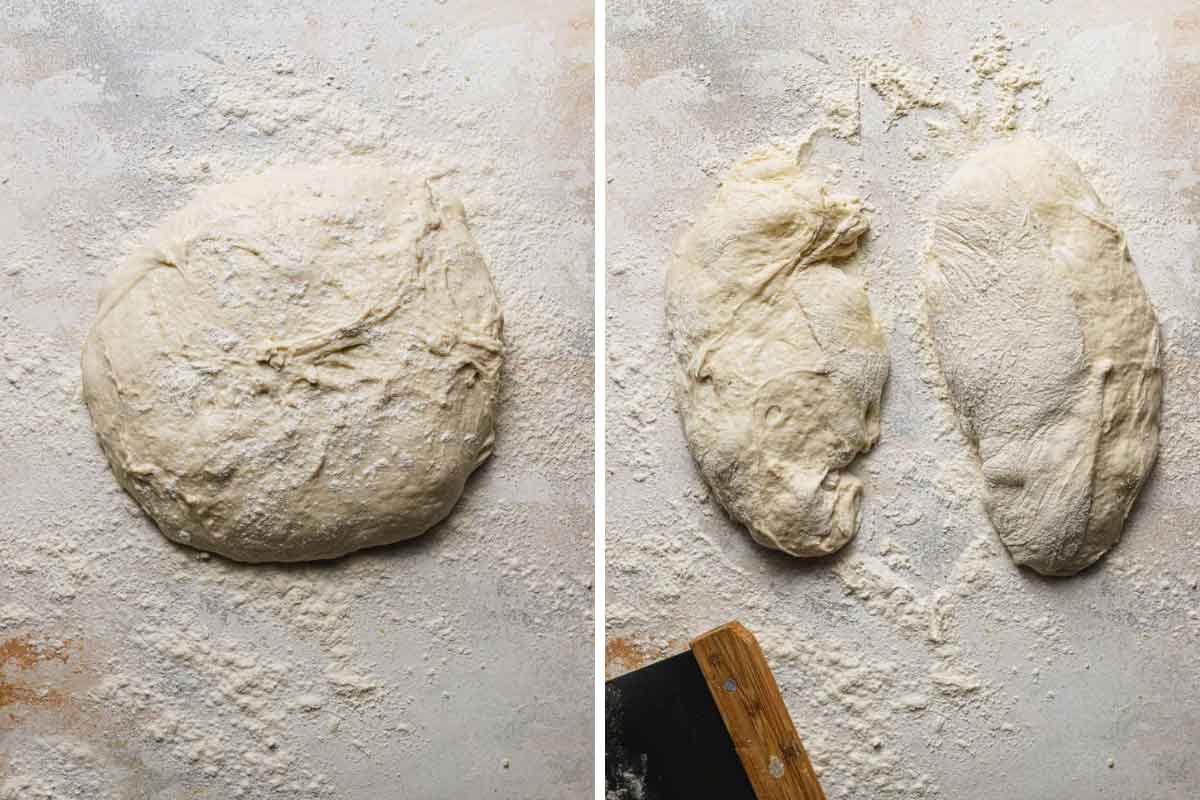
Shaping Step #1: Turn the dough out onto a floured surface gently (so it does not completely deflate), dust it with flour, and divide in half with a bench scraper.
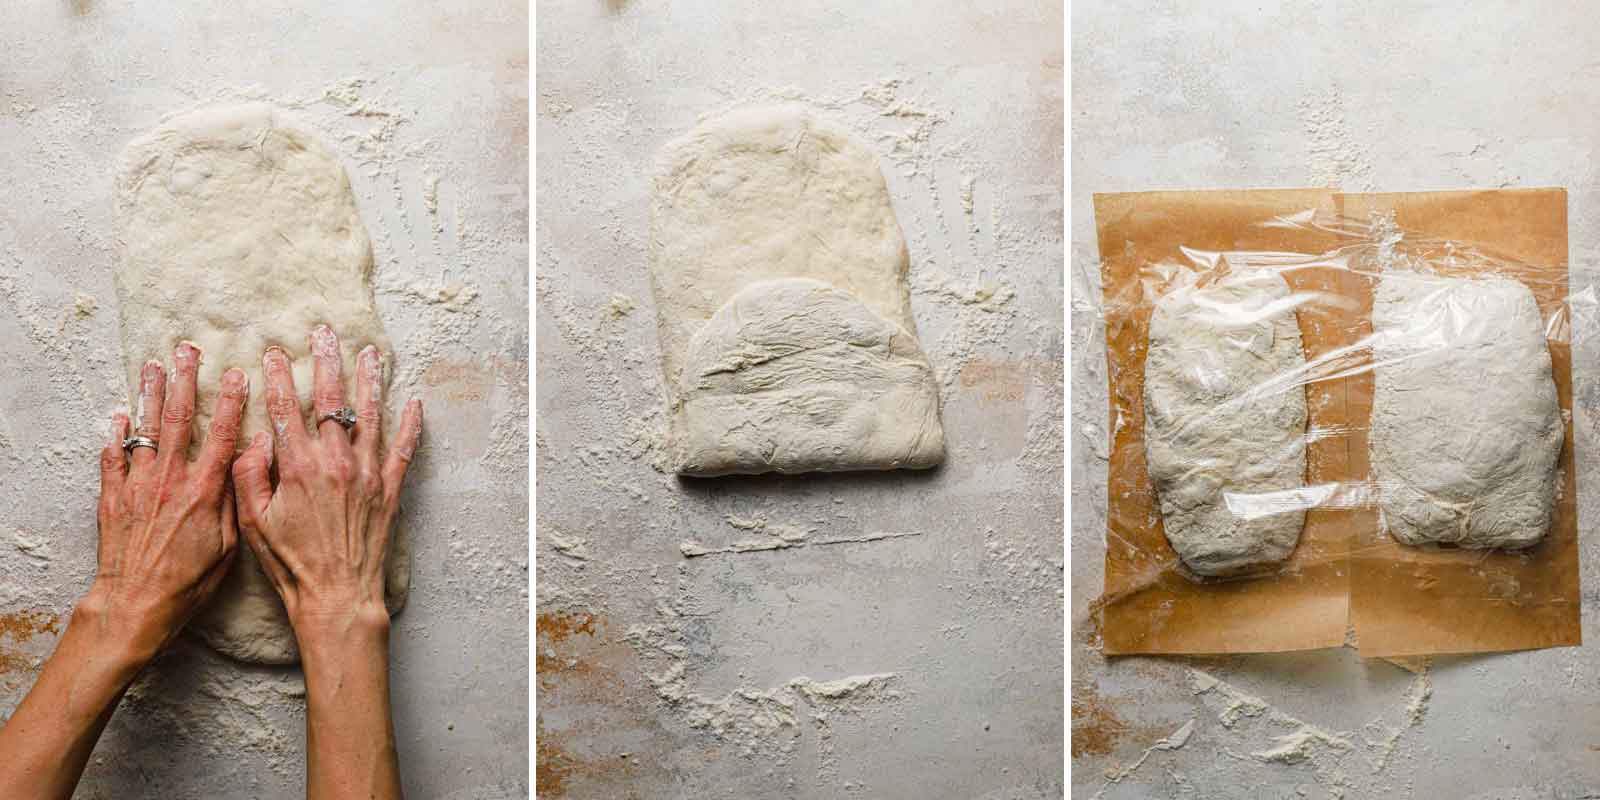
Shaping Step #2: Place one piece of dough cut-side-up and dust with flour, then using fingertips, gently press the dough into a 12×6-inch rectangle. Fold one end of the dough towards the middle, and fold the other end over the top of the first fold (as you would fold a letter in thirds). Repeat with the second loaf of dough.
Shaping Step #3: Transfer each loaf to a rectangular piece of parchment that has been dusted with flour. Dust the tops of the loaves with flour, cover with plastic wrap, and allow to sit for 30 minutes.
Baking the Bread
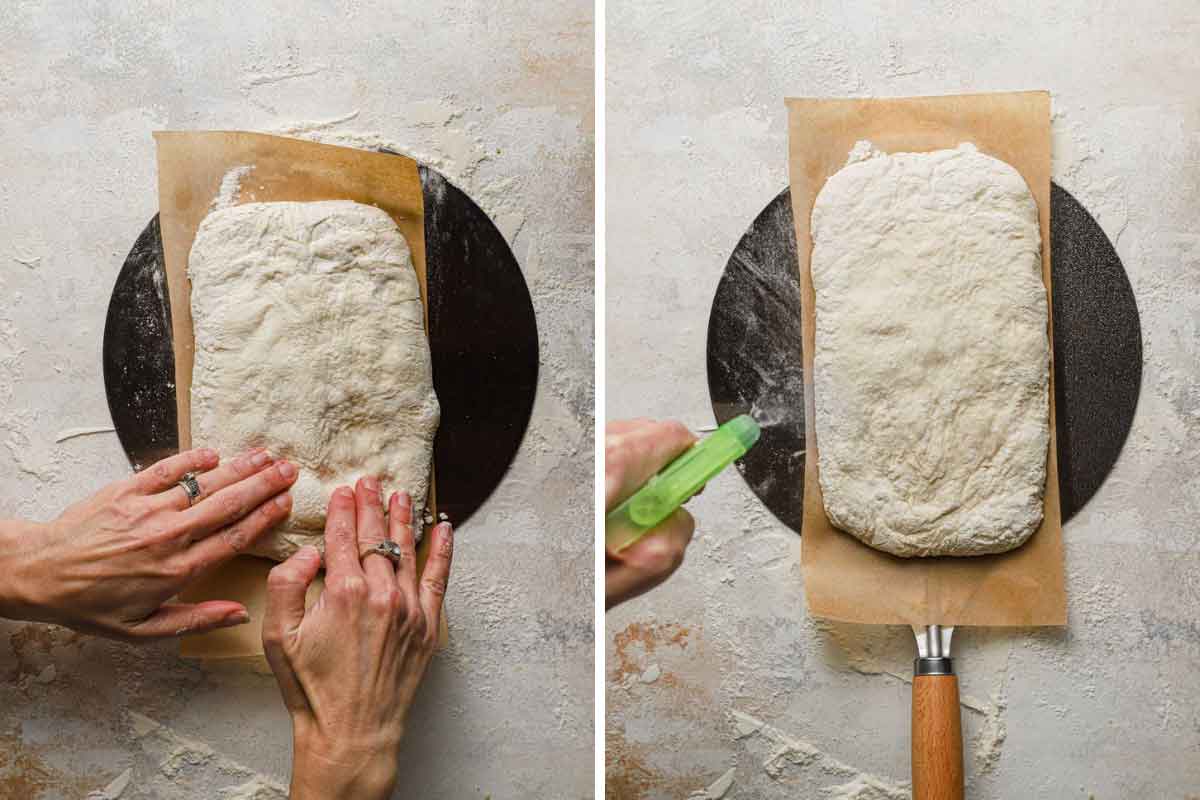
When the 30 minutes is up, you will slide the parchment pieces with the loaves onto a pizza peel. Use floured fingertips to poke the surface all over to create a 10×6-inch rectangle. Lightly spritz the loaves with water and slide the loaves onto a preheated pizza stone in the oven (you can also use an inverted baking pan, see notes below).
Spray with water twice more during the first 5 minutes of baking, then continue baking until the internal temperature registers 210 degrees F.
Recipe Notes and FAQ
A few notes and the answers the some commonly asked questions:
- Equipment – To make the most of this recipe, I recommend using the following pieces of equipment: stand mixer / bowl scraper / bench scraper / baking stone / parchment paper / pizza peel / spray bottle / digital instant-read thermometer / wire cooling rack
- Yeast – If you substitute active yeast instead of instant yeast, you will need to be sure to activate it in warm water first, instead of simply mixing it with the flour and room temperature water.
- Milk – Whole milk is preferred, but 2% or 1% can also be used. You can also substitute 2 tablespoons of nonfat milk powder (increase water in dough to 1 cup).
- Stand Mixer – Due to the high hydration of this dough and how sticky it is, a stand mixer is important for being able to manage the dough properly.
- Handling the Dough – Keep in mind that this dough is very wet and sticky; the key to working it well is to do so quickly and gently. Too much heavy-handling of the dough will result in flat, tough loaves. Use a bowl scraper when possible and if you need to use your hands, make sure they are well-floured.
- Baking Stone – If you do not have a baking stone, you can use a baking sheet that is turned upside on the lowest oven rack and preheated as directed.
- Making Ciabatta Rolls – To make rolls, use a bench scrape to divide each loaf into 6 or 8 even-sized portions. Separate them a bit on the parchment sheet so they aren’t touching.
- Storage – The bread can be kept at room temperature, wrapped in foil, for up to 2 days.
- To Reheat the Bread – Keep it wrapped in foil and place in a 450-degree oven for 6 to 8 minutes.
- Freezing the Bread – Wrap tightly in foil, then place in a ziploc freezer bag and freeze for up to 3 months. Thaw at room temperature, then warm and re-crisp the crust using the reheating method above.
More Popular Homemade Bread Recipes
- The Best White Bread Recipe
- Grandma’s Banana Nut Bread
- Copycat Pizza Hut Breadsticks
- Classic Italian Bread Recipe
- Spicy Cheese Bread
Watch How to Make Homemade Ciabatta Bread:
If you make this ciabatta bread recipe and love it, remember to stop back and give it a 5-star rating - it helps others find the recipe! ❤️️

Ciabatta Bread
Ingredients
For the Sponge:
- 1 cup (130 g) all-purpose flour
- ⅛ teaspoon instant yeast
- ½ cup (120 ml) water, at room temperature
For the Dough:
- 2 cups (260 g) all-purpose flour
- 1½ teaspoons salt
- ½ teaspoon instant yeast
- ¾ cup (180 ml) water, at room temperature
- ¼ cup (60 ml) whole or 2% milk, at room temperature
Instructions
- Make the Sponge: Combine the 1 cup flour, ⅛ teaspoon yeast, and ½ cup water in a medium bowl and stir with a wooden spoon until a uniform mass forms. Cover the bowl tightly with plastic wrap and let stand at room temperature for at least 8 hours or up to 24 hours.
- Make the Dough: Place the sponge and the dough ingredients (flour, salt, yeast, water and milk) in the bowl of a stand mixer fitted with the paddle attachment. Mix on low speed until combined and a shaggy dough forms, about 1 minute, scraping down the bowl and paddle as needed. Increase the speed to medium-low and continue mixing until the dough becomes a uniform mass that collects on the paddle and pulls away from the sides of the bowl, 4 to 6 minutes.
- Change to the dough hook and knead the bread on medium speed until smooth and shiny (the dough will be very sticky), about 10 minutes.
- Transfer the dough to a large bowl, cover tightly with plastic wrap, and let rise at room temperature until doubled in size, about 1 hour.
- Spray a rubber spatula or bowl scraper with non-stick cooking spray. Fold the dough over itself by gently lifting and folding the edge of the dough toward the middle. Turn the bowl 90 degrees, and fold again. Turn the bowl and fold the dough 6 more times (for a total of 8 times).
- Cover with plastic wrap and let rise for 30 minutes.
- Repeat the folding as in step #7, replace the plastic wrap, and let rise until doubled in size, about 30 minutes.
- One hour before baking, adjust an oven rack to the lower-middle position, place a baking stone on the rack and preheat the oven to 450 degrees F.
- Cut two 12×6-inch pieces of parchment paper and dust liberally with flour. Transfer the dough to a floured work surface, being careful not to deflate it completely. Liberally flour the top of the dough and divide it in half with a bench scraper. Turn 1 piece of dough cut-side-up and dust with flour. With well-floured hands, press the dough into a rough 12×6-inch rectangle. Fold the shorter sides of the dough toward center, overlapping them like you would fold a letter in thirds, to form a 7×4-inch rectangle. Repeat with the second piece of dough.
- Gently transfer each loaf, seam-side-down, to the parchment sheets, dust with flour, and cover with plastic wrap. Let the loaves sit at room temperature for 30 minutes (the surface of the loaves will develop small bubbles).
- Slide the parchment pieces with the loaves onto a pizza peel. Using floured fingertips, evenly poke the entire surface of each loaf to form a 10×6-inch rectangle; spray the loaves lightly with water. Slides the loaves and parchment onto the baking stone. Bake, spraying the loaves with water twice more during the first 5 minutes of baking time, until the crust is deep golden brown and the loaves register 210 degrees F, 22 to 27 minutes.
- Transfer the loaves to a wire rack, discard the parchment, and let cool to room temperature for at least 1 hour before slicing and serving. The bread can be wrapped in a double layer of plastic wrap and stored at room temperature for up to 3 days. Wrapped with an additional layer of foil, the bread can be frozen for up to 1 month. To recrisp the crust, thaw the bread at room temperature (if frozen), and place unwrapped bread in 450-degree oven for 6 to 8 minutes.
Notes
- Equipment - To make the most of this recipe, I recommend using the following pieces of equipment: stand mixer / bowl scraper / bench scraper / baking stone / parchment paper / pizza peel / spray bottle / digital instant-read thermometer / wire cooling rack
- Yeast - If you substitute active yeast instead of instant yeast, you will need to be sure to activate it in warm water first, instead of simply mixing it with the flour and room temperature water.
- Milk - Whole milk is preferred, but 2% or 1% can also be used. You can also substitute 2 tablespoons of nonfat milk powder (increase water in dough to 1 cup).
- Stand Mixer - Due to the high hydration of this dough and how sticky it is, a stand mixer is important for being able to manage the dough properly.
- Handling the Dough - Keep in mind that this dough is very wet and sticky; the key to working it well is to do so quickly and gently. Too much heavy-handling of the dough will result in flat, tough loaves. Use a bowl scraper when possible and if you need to use your hands, make sure they are well-floured.
- Baking Stone - If you do not have a baking stone, you can use a baking sheet that is turned upside on the lowest oven rack and preheated as directed.
- Making Ciabatta Rolls - To make rolls, use a bench scrape to divide each loaf into 6 or 8 even-sized portions. Separate them a bit on the parchment sheet so they aren't touching.
- Storage - The bread can be kept at room temperature, wrapped in foil, for up to 2 days.
- To Reheat the Bread - Keep it wrapped in foil and place in a 450-degree oven for 6 to 8 minutes.
- Freezing the Bread - Wrap tightly in foil, then place in a ziploc freezer bag and freeze for up to 3 months. Thaw at room temperature, then warm and re-crisp the crust using the reheating method above.
- Recipe from Baking Illustrated
Did you make this recipe?
Leave a review below, then snap a picture and tag @thebrowneyedbaker on Instagram so I can see it!
This recipe was originally published in March 2014.
Photography by Dee Frances.




I followed your recipe exactly and both times my batter was way too runny – even though I managed to bake them both. One turned out good, other one was eh….is it better to wait over 8 hours for the sponge?
Bread recipes shouldn’t be followed exactly – you sometimes need more or less flour or water, depending on the environment in your kitchen. If it’s too runny, add more flour. It takes time to know for sure how much additional you may need. It may also have needed more mixing.
Hi Nancy, Sam described it perfectly. With my basic white bread recipe, I always need more flour in the summer (warmer, more humid) than in the winter (drier, colder). It just takes some practice to troubleshoot on the fly but the more you bake bread, the better feel for it you will get! Keep on baking! :)
This was really tasty and chewy – it came out great! I used active dry yeast so made a couple tweaks: I dissolved the yeast it in the water and added 10-15 min to each rise. Definitely will make again.
Active dry yeast doesn’t have to be dissolved. It’s added directly to the flour. It’s regular dry yeast (so non-active) and fresh yeast that have to be activated in water/milk for 10-15min before adding it.
Can’t wait to try your Italian Bread and Ciabatta Bread
recipes tomorrow. Thank you
My dough is so pretty and perfect. As soon as I got ready to turn the oven on, my oven decides to not cooperate. Is it possible to refrigerate the dough until my oven gets fixed (hopefully tomorrow)? Crossing my fingers that it won’t lose the fluffiness in the fridge.
I placed the dough in the fridge and miraculously, my oven decided to work today! I let the dough come to room temperature and proceeding with your recipe! OMG! My first loaf of bread ever and it’s delicious! Thank you!
Ahhhh I’m so thrilled that it turned out!! :)
I felt like a hero! I want to double the recipe. Can I make the same amount of sponge (1 cup flour…) but double the dough amount (4 cups flour…) to make 4 loaves or do I also have to double the sponge?
I too doubled the recipe but I doubled the sponge part as well and it came out fine. I would advise to double the entire recipe to include the sponge part.
I would double the entire recipe (including the sponge).
Would this work with dairy free milk? Like almond milk?
I made this last night and my bread was tasty but I wish the inside had been a little more airy. I didn’t have milk so I used half and half instead could that have been why? What would you suggest I do to make the inside fluffier? Thank you for the recipe!
Thank you, great recipe! Is there a way to hold back a little dough to use as the following days polish? Add a little water maybe?
This was my first time making ciabatta bread and it was a hit! The process is lengthy and not hard but totally worth it.
I just have a question, the loaves were pretty crispy the first day but after storing them in a double layer plastic wrap, they they were not crispy and more soft exterior the next day.. is that suppose to happen or did I do something wrong?!
Thanks
hello,
In honesty I rated it high because im not done yet but k have a question and didn’t wanna take anything away for my i guess inexperience …
I don’t have bench cutters or those metal to things to cut it … I almost bailed while the sponge was in the fridge because of this
I am also lacking proper kitchen towel to put the dough on..
Is there another household item i can use to replace this , there is no turning back now…
I didn’t realize i needed these things
While making the dough with the sponge… It was a bit confusing, i am pretty sure more was soupy so i added flour until it pulled away from the bowl and looked considerably more shiny however i don’t know if its smooth enough., i already had mixed it for a while and was worried about over mixing
I also added all the yeast to the sponge and im hoping it rises
Thanks
Any chance I can use regular yeast
Recipe is great, but the texture turned out dense. I used fresh yeast instead of active dry yeast (which I usually do) and perhaps mucked up the measurements there :(
The crust was great and it was also quickly finished too!
I have instant dry yeast. Is that ok to use
I’ve baked this recipe twice in the past week. And I am about to make a third batch tomorrow! It’s that good! My friends and family scarf these down like their lives depend on it. I have been baking bread for a year now and have tried a variety of recipes. However, when I baked this recipe my friend told me, “forget every other bread you’ve made. This is your best one yet.”
This is a great way to make our own bread. I find that minimum handling after the rising works best. Don’t have a baking stone but my heavy-duty sheet pan works just fine. I use a little more water in the sponge and then put extra flour tablespoon by tablespoon until I get the perfect shaggy texture in the mixer. The video is great to see what it’s supposed to look like at each stage.
Im confused . Do i fold it 6 times and leave to rise and repeat that for 8 times ?
I believe it is…. fold it 8 times and let it rise then fold 8 times then let it rise.
I followed this recipe exactly and straight from the start it was different than how you say it is meant to be.
‘uniform mass’ – mine was a solid ball. I think you need to add more description to this recipe because it is not clear how wet the dough is meant to be or if you are meant to add water to the yeast to ‘activate’ it or not.
The numbers are also confusing as you have numbered bullets which are different to the steps you have numbered.
confusing,
Hi. Thanks for the recipe. Even though I must have only partially read, and partially followed it correctly, it still turned out. It has a nice crust and a good chew and flavor. We easily ate the first loaf and will have the second tomorrow.
I’m betting that next time I make it, it’ll turn out even better. And now I have a better idea of how much more active yeast (I didn’t have instant) to use too.
Also, at a time like this – it’s a super thrifty recipe. Thanks again.
Hi
Is all purpose flour the same as UK Plain Flour?
Hi Angela, Yes, it is!
Can you please tell me what the “uniform mass” (starter) is supposed to look like? My interpretation of that term is like a ball, but mine was more like thick pancake batter. Can you please elaborate on that term as there are no pictures on your site to refer to? Thank you in advance!
Hi Tina, It should be a wet, sticky, loose ball. So if your “pancake batter” was pretty thick, you were good!
Hi, thanks for sharing your recipe! What would be your recommendation to make this if you do not have a stand mixer? I have a hand mixer, but no dough hook. Any advice?
This is a really loose, sticky dough, so I would mix with a wooden spoon and then knead as best you can without having to add too much extra flour.
So, we are locked down in NY. as in many places. I have been cooking all my life as a profession. I have always loved ciabatta, but have never made it because it looks like kind of a pain. So, sitting here with a glass of wine I looked for a ciabatta recipe, just because now I have lots of time. This recipe looks great. I always have yeast in the fridge, but I do not have fast rising. I will go to two stores tomorrow, hopefully being able to find some, I have to get my daughter some toilet paper any way, as they have none in Binghamton. I will have a ( hopefully positive ) review on Thursday. I am very excited to try this. Michelle, I am so happy to have found your blog and this recipe. Now, I’m off to watch something on Tv. I just started streaming Chermobyl, the series last night. No hand sanitizer available anywhere around here, I have ordered 12 gallons from a chemical company to hopefully arrive by the weekend. Lots of people around here could use it. These are weird times, again, thank you Michaelle
Hi, I can’t seem to understand at what temp do you bake the dough? It states it should reach 210 degrees but not sure at what temp do you make it?
Hi Susan, Step #8 – 450 degrees F.
Hi! I really want to try to make this bread, but I don’t have whole or 2% milk. Will 1% milk work?
Hi Elise, While it’s not the best choice for flavor/texture, 1% will still definitely make you a good loaf of bread. Enjoy!
Hi, I was wondering if anyone has tried using Bob Red Mill 1 to 1 gluten free bread? My son is allergic to wheat and would like to try this recipe for him. Thanks
why don’t you tell people the easy way. everything is mixed together in 1 bowl covered in plastic wrap and left overnight. in the morning dump it all on parchment paper and bake in a covered enamel pot. NO KNEAD BREAD recipe with the details is all over pinterest. takes 2 minutes to add ingredients and stir by hand. been making it for years and
it is a ciabatta bread
This bread was fabulous!!!! I only lasted about 45 minutes rather than the 60 minutes recommended before I cut into the loaf – I just couldn’t wait!
********I have the starter ready to go this afternoon, but something came up and I won’t be able to make it today. Can I put it in the fridge for a few days or perhaps the freezer?? I hate to waste the starter!
Thanks for your recipe and your recommendation.
Hi Kittie, You can leave it at room temperature for up to 24 hours and then proceed. I think perhaps up to 2 days in the refrigerator might work, but I have not tried it, so I can’t guarantee.
I doubled the sponge recipe, and saved half the sponge in the fridge, in a Ziploc – once for 7 days and just now for 10 days; both times later-loaves turned out perfect!
Worked perfectly.
To the people who say it didn’t work: you added more flour, that’s why it didn’t work.
It’s supposed to be a batter-like dough – it oozes out. The folds give it strength and by the time you bake it, it holds it shape perfectly.
Do it again, but follow the instructions. DO NOT ADD MORE FLOUR. It will work.
This was so easy to do. Literally all the hard stuff the mixer did and I did the fun things – folding and shaping dough, which was enjoyable. The recipe steps intimidated me but it was much easier than it looks.
I see you have a ‘WATCH HOW TO MAKE CIABATTA BREAD’ but there’s no video? I feel if you took pictures of the batter (1. after mixed and pulled away from the paddle, 2. after being put in a container 3. on the work surface 4. after shaped) people could see the consistency and NOT put extra flour in.
My only criticism is: yes liberally (!) flour the work area but you don’t need to liberally flour the parchment or the top of the dough. A gentle sprinkle would do otherwise too much flour sticks and you get excess flour on the baked loaf.
My loaves came out beautifully and huge(r) than I expected. Gave one to my mother and she loved it. Finished it in one day. Would definitely make again.
Regarding the video not showing up, if you have an ad blocker running, the video will not appear. This was an issue for me as well. Turn off adblocker for this site only, and the video should pop up.
Hey. I love your recipes! Just wondering what temperature should the water be? I know it’s supposed to be room temperature, but do you have the exact degrees? I tried the sponge and it didn’t rise. Should I follow the water temperature on the yeast package? It says water should be 120-130 degrees. Is that too high for room temperature water?
Your sponge shouldn’t rise – just be gently bubbly. Perfect yeast temp should be fingertip temp – stick your finger in it and it should feel gently warm. You actually don’t need it to be warm for this, especially since it’s set overnight for fermentation and with instant yeast. I used coldish water (didn’t bother measuring or feeling as it ferments overnight with instant yeast) from the tap for both steps and it worked perfectly.
Hello! Yes, too high for room temperature! Water that is room temperature should be between 68 and 72 degrees.
I adore this recipe. I made it the first time for a fondue party, but now I make it weekly for sandwiches! Since I live at high altitude, none of my breads ever turn out quite right, but this one is so soft and fluffy, and in a stand most of the work is done for you. Thanks for sharing!
Super delicious, super easy! Looks amazing. Eat with avocado or butter and jam. Can’t go wrong with this.
What temperature should I set my oven and about how long to bake? I look fwd to making this today!
It wasn’t as hard to make as I thought, my first came out so good! Didn’t use a stone