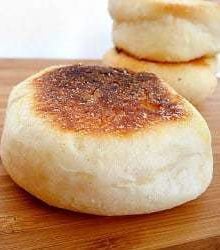
English Muffins

English muffins are one those foods that never really occurred to me to make from scratch. I had a similar revelation with pita bread, actually. Sure, I bake loaves of bread quite often and have even made things like brioche, challah and bagels. Yet, for some reason it seems that there are foods that somehow magically appear in their packaging and surely must not have been made by human hands. For me, English muffins always fell into this category. They are perfectly split, have those nooks and crannies that so expertly collect pools of butter and jam, and are covered with a dusting of cornmeal that may have been sprinkled by the bread fairy. Imagine my shock when I finally hunkered down to make English muffins and discovered that they are actually EASY! No harder, in fact, than a simple loaf of white bread. They are delicious, their aroma will make your mouth water, and they have nooks and crannies that provide little swimming pools just waiting to be filled with sweet, creamy butter. Move over store-bought English muffins, you’re no longer needed!

The process for making English muffins is very simple – you mix up the dough, which is strikingly similar to that of a basic bread dough, and you let it rise. Then you divide the dough into six pieces, shape into balls, and let them rise. Once they have doubled in size, the fun begins. English muffins actually start baking on the stoveop – a skillet or griddle (I used a cast iron skillet) is used to brown the muffins on both sides, and then they are moved to the oven to finish baking. Total baking time is less than 25 minutes – not too shabby! Since they are fairly small, the muffins cool pretty quickly – you’ll be gobbling up butter-and-jam slathered English muffins before you know it!
Save This Recipe
Is there a food that you never thought about making from scratch?

More favorites from Peter Reinhart:
Soft Cheese and Pepperoni Bread
Egg Bagels, Cinnamon-Raisin Bagels and Original Bagels
Potato Rosemary Bread
Greek Celebration Bread
Anadama Bread
English Muffins
Ingredients
- 2¼ cups (281.25 g) unbleached bread flour, (10 ounces)
- ½ tablespoon (0.5 tablespoon) granulated sugar, (.25 ounce )
- ¾ teaspoon (0.75 teaspoon) salt, (.19 ounce )
- 1¼ teaspoons (1.25 teaspoons) instant yeast, (.14 ounce )
- 1 tablespoon shortening or unsalted butter, at room temperature, (.5 ounce )
- ¾ to 1 cup (177 to 236 ml) milk or buttermilk, at room temperature, (6 to 8 ounces )
- Cornmeal for dusting
Instructions
- 1. Stir together the flour, sugar, salt, and yeast in a mixing bowl (or in the bowl of an electric mixer). Stir in (or mix in on low speed with the paddle attachment) the shortening and ¾ cup milk until the ingredients form a ball. If there is still loose flour in the bowl, dribble in some of the remaining ¼ cup milk. The dough should be soft and pliable, not stiff.
- 2. Sprinkle flour on the counter, transfer the dough to the counter, and begin kneading (or mixing on medium speed with the dough hook). Knead the dough for about 10 minutes (or mix for about 8 minutes), sprinkling in more flour if needed to make a tacky, but not sticky, dough. It should pass the windowpane test and register 77° to 81° degrees F. Lightly oil a large bowl and transfer the dough to the bowl, rolling it to coat it with oil. Cover the bowl with plastic wrap.
- 3. Ferment at room temperature for 60 to 90 minutes, or until the dough doubles in size.
- 4. Wipe the counter with a damp cloth and transfer the dough to the counter. Divide the dough into 6 equal pieces of 3 ounces each. Shape the pieces into boules (or round rolls). Line a sheet pan with baking parchment, mist the parchment lightly with spray oil, and dust with cornmeal. Transfer the balls of dough to the sheet pan, spacing them about 3 inches apart. Mist them lightly with spray oil, sprinkle them loosely with cornmeal, and cover the pan loosely with plastic wrap or a towel.
- 5. Proof at room temperature for 60 to 90 minutes, or until the pieces nearly double in size and swell both up and out.
- 6. Heat a skillet or flat griddle to medium (350°F if you have a thermometer setting). Also, preheat the oven to 350°F with the oven rack on the middle shelf.
- 7. Brush the pan or griddle with vegetable oil or mist with spray oil. Uncover the muffin rounds and gently transfer them to the pan, sliding a metal spatula under them and lifting them to the pan. Fill the pan so that the pieces are at least 1 inch apart, not touching. Cover the pieces still on the sheet pan with the plastic wrap or a towel to prevent them from developing a skin. The dough that is being cooked will flatten in the pan and spread slightly, then the pieces will puff somewhat. Cook them for 5 to 8 minutes, or until the bottom of the dough cannot cook any longer without burning. The bottoms should be a rich golden brown; they will brown quickly but will not burn for awhile, so resist the temptation to turn them prematurely or they will fall when you flip them over. Carefully flip the pieces over with the metal spatula and cook on the other side for 5 to 8 minutes in the same manner. Both sides will now be flat. When the dough seems as if it cannot endure any further cooking without burning, transfer the pieces to a sheet pan and place the pan in the oven (don't wait for the still uncooked pieces, or the ones just out of the pan will cool down and will not respond to the oven stage). Bake for 5 to 8 minutes on the middle shelf in the oven to ensure that the center is baked. Meanwhile, return to the uncooked pieces and cook them, then bake them, as you did the first round.
- 8. Transfer the baked muffins to a cooling rack and cool for at least 30 minutes before slicing or serving.
Did you make this recipe?
Leave a review below, then snap a picture and tag @thebrowneyedbaker on Instagram so I can see it!


These look amazing! I can’t wait to try them. Until recently graham crackers were something I thought it wasn’t worth making at, but the homemade ones were one of the best things I have ever eaten so that clearly is no longer true. Why put a homemade marshmallow on a store bought graham cracker?
This is one thing that Ive yet to make at home yet, Ive made everything “bread” but!!! Thanks so much for the inspiration, as I LOVE english muffins!!!
Ooh, I’m going to have to try making English muffins now. I love them, especially for the reasons you state — the holes for pools of butter — yum!
I never thought of making marshmallows until this past summer. I don’t like store bought marshmallows and when I made some at home, I was suprised how tasty they are. Contrasting that, a friend of mine told me that she likes the staleness of store-bought marshmallows and when she made some at home, she had to leave them out for awhile before she liked them. :)
I’ve wanted to make English muffins for a while now, but never got around to it because I figured they’d be tough. Who knew?
Bagels were a food that I didn’t think about making from scratch until I stumbled across a recipe, because my mom always told me “There are some things you just buy.” Well, not I live in Guatemala and English muffins and bagels aren’t available at the local shops, so I need to make them if I want them. :)
Every time I see a recipe for these, I want to try. For whatever reason, I haven’t, but your wonderful results have given me the desire. Maybe this will be the time I finally dive in.
English muffins for me are one of those never-make-at-home things. Although, I used to feel the same way about bread and now I’ve made a resolution to make all my own bread in 2010! Pasta is also that way for me. Probably because I don’t have a pasta roller. And ice cream.
Love the muffin thing. The only thing missing is some home made preserves
They look delicious, but they’re not English Muffins if you make them with cornmeal – real English muffins are dusted with tapioca!
These muffins look so soft and scrumptious. I want some!!! You did an excellent job.
I never thought to make english muffins, but I love buying them. Yours look perfectly toasted. yum!
You know I’d never even thought about making English muffins. I remember this horrible little hard ones we’d pick up at the store as a child and how much jam I spread on them to make them edible. I’d sworn them off entirely. But after reading your post, I just might have to try again.
Wow, these seem surprisingly easy to make! I’ll definitely need to add these to my list.
Crikey, these look so good and more substantial somehow than bought ones. I’ve never made muffins either -hummm!
These look great! I never thought to make a lot of sauces from scratch – particularly hoisin – until I went gluten-free, and started to really read labels. I have to make so many things now, or else hunt for an expensive gluten-free version!
I love that this can all be done in a kitchen aid. THey look so delicious and not that difficult. Great post!
I’ll definitely be trying these! I love english muffins, and I love homemade bread! Like you I’ve tried lots of types – naan, ciabatta, pita, etc). Have you tried english muffin bread? It’s like an english muffin in bread borm – it is so so easy and absolutely delicious! Check it out if you’re interested :)
http://whatmegansmaking.blogspot.com/2009/02/english-muffin-toasting-bread.html
i just read your recipe – fairly straightforward! U make it sound so simple :) Love the pictures. Now I know homemade English muffins are possible. x
They look perfect. I must try to make them. I always thought they were pain to make. It doesn’t sound so bad.
I have english muffins on my 100 items to make in 2010. I will have to try out this recipe. I’ve never made fresh english muffins before and my daughter loves them! Any good tips on how to store these or how long they will last? I know that store bought ones are bagged, but me and bread whenever I put them in a bag its never the same.
Ever since I started my love affair with Peter Reinhart (thanks to you for introducing us :-) ) I have wanted to try these! I eat a store-bought english muffin covered in almond butter every morning and it does NOT look like this. Maybe a flattened version of this. Can’t wait to try these!
I love this post. Never dawned on me to make these from scratch either but I bet they are superb. And who would have thought they start their cooking life on top of the stove. Well I suppose English crumpets do as well. Thanks!
i used to really hate english muffins. i would only eat them were if they were joined by sausage egg and cheese. i still don’t eat them often, but i think if i baked them myself, i would feel differently about them. i will have to try it out, for sure. although, i know i will always be a bagel girl.
Love it! I’m emailing the recipe to myself as I am writing this!!! Love making these kinds of things from scratch!!! Thanks so much for sharing :o)
This is how I felt about bagels until I saw them on your blog and others. It’s always so funny that I don’t think things are possible to make at home – of course they are but one must decide if it’s worth the effort. I’m glad to hear these are easy to make! :)
Your english muffins look perfect. Absolutely perfect! Well done.
Renee of kudoskookies
English muffins have been on my recipe wish list for ages. One day I’m actually going to do something about it.
They look wonderful! I want one now!
These muffins look perfect. I have to try making them. Thanks for sharing.
Homemade English muffins are delicious! I make them from scratch, but out of necessity because we can’t buy them where I’m living. My recipe is a bit different – they only cook on the stovetop, not in the oven at all. Even easier! (They cook on very low heat on the stovetop, so that there is enough time for them to cook without them over-browning.)
These look wonderful!I have crumpets on my list of things to make at the moment. I’ve made them once before, but normally I would buy them and not make them. It only occurred to me because I saw a picture of some in a recipe book I was browsing in a store.