Flourless Chocolate Cake Recipe
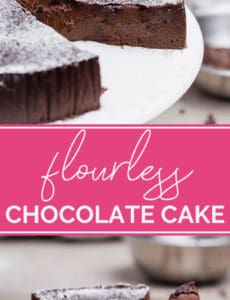
Rich, fudgy, and perfectly sweet, this flourless chocolate cake will satisfy all of your chocolate cravings! Made with just 5 pantry staple ingredients, this naturally gluten-free cake is as easy to make as it is to enjoy. With decadent slices that taste just like a chocolate truffle, there is so much to enjoy about this cake!
If there is one sweet I think we can all pretty much agree on its chocolate. Chocolate ice cream, chocolate cupcakes, chocolate pudding, chocolate cream pie, oh my! I don’t ever need an excuse to eat chocolate, but if there’s one readily available, then I’m more than happy to take advantage of it.
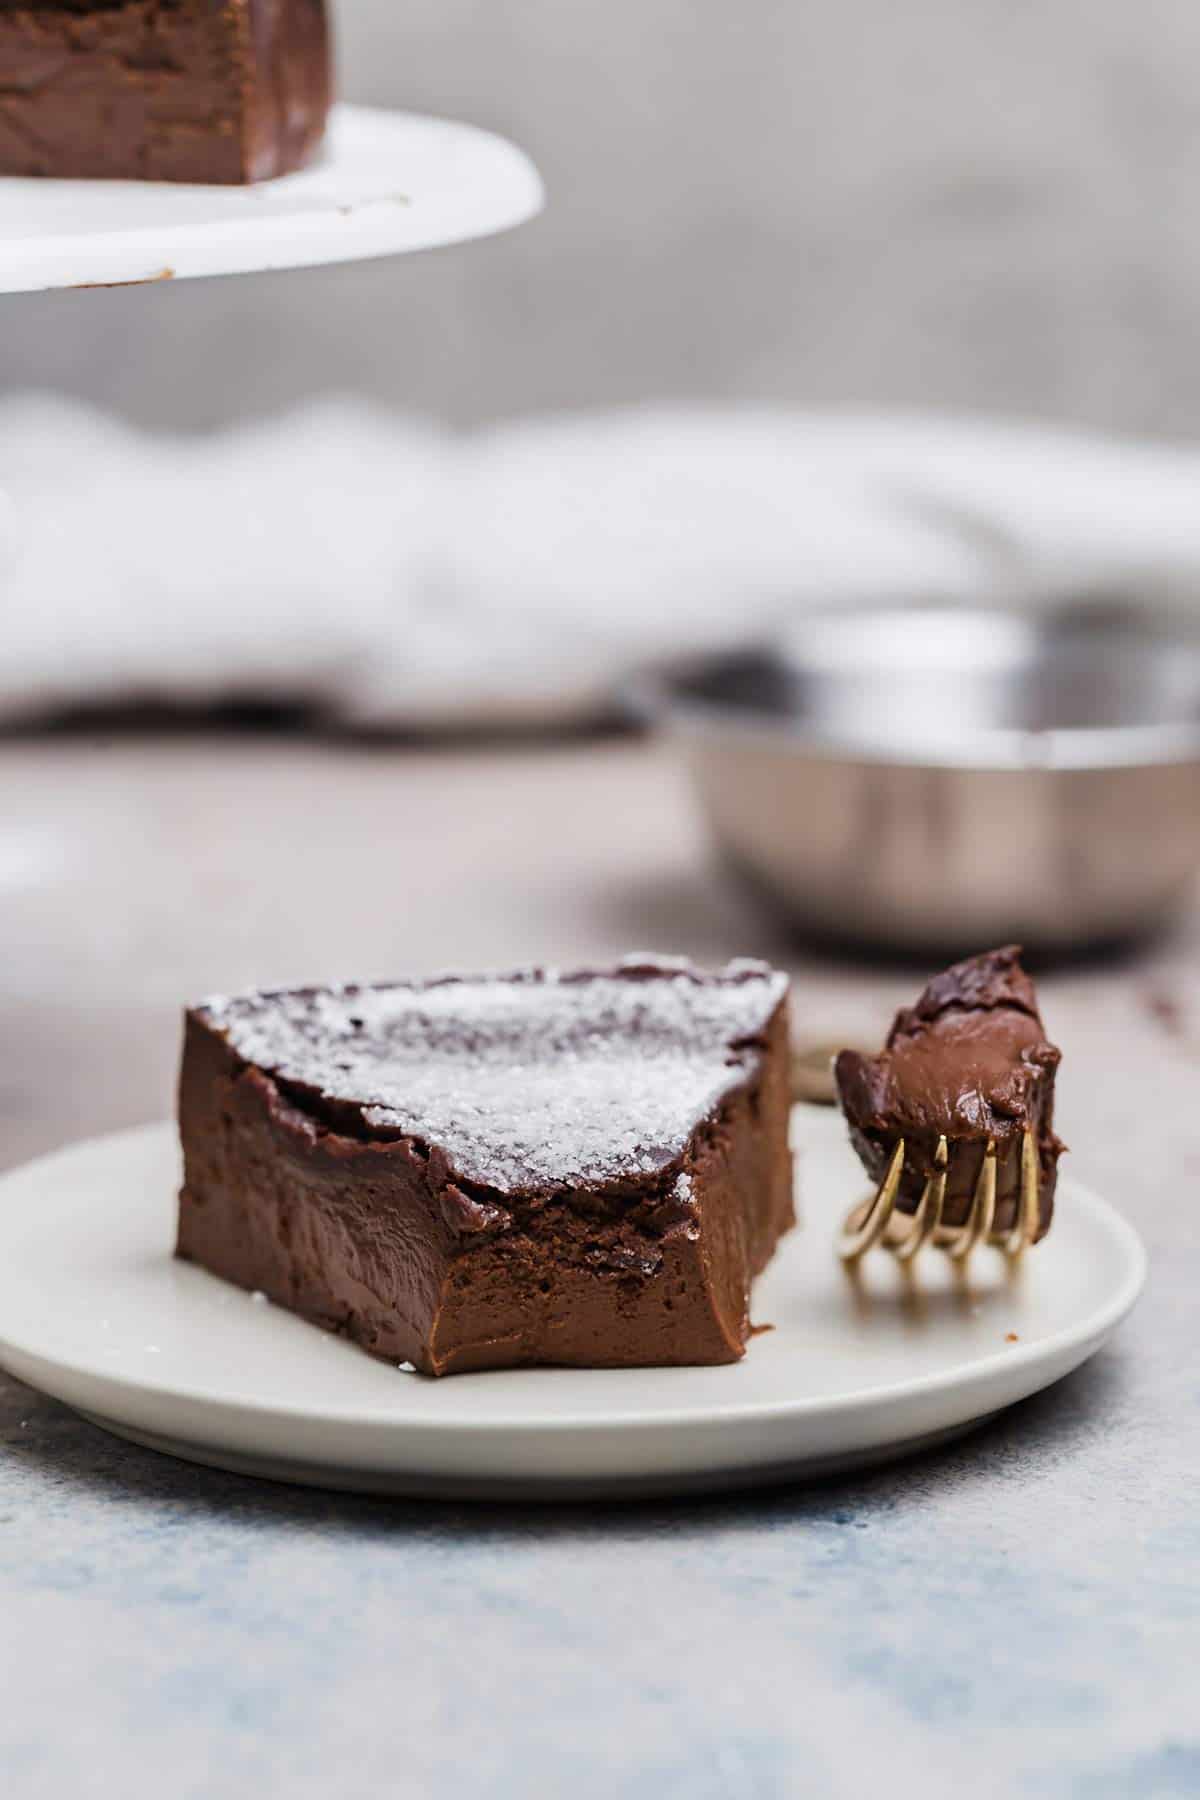
Flourless chocolate cake is made without – you guessed it! – flour, so it relies on whipped eggs to provide stability and structure to the cake. This is, without a doubt, one of the richest, most indulgent desserts I’ve ever made. Which is to say, it’s absolutely phenomenal.
Why You’ll Love This Recipe
It just doesn’t get better than an ultra-rich slice of chocolate cake. I love that this is a naturally gluten-free recipe, making it the perfect dessert to make for friends and family who follow a gluten-free diet.
The cake also bakes and stores exceptionally well making it a great make-ahead cake. Also, it is much healthier than your traditional slice of chocolate cake since it does not contain added sugar. If these reasons weren’t enough to get you up and in the kitchen to make it right now, then I should also mention that it takes less than 15 minutes to prep and get in the oven!
What are you waiting for?? Let’s get baking!
Grab Your Ingredients
A very short ingredient list – only five items! – means that you may very well have everything you need for this in your pantry already.
This is all you need:
- Eggs: Beating the eggs gives the cake rise, as well as structure.
- Chocolate: Chopped bittersweet chocolate is recommended, but semisweet can work, too.
- Butter: We’re using unsalted butter; it is melted with the chocolate for a fudgy chocolaty finish.
- Coffee: Totally enhances the chocolate flavor.
- Vanilla + Salt: Flavor!
A Note on the Coffee
I realize that coffee in baked goods is a very polarizing topic, so let’s lay everything out here.
If you need to avoid coffee for religious or dietary reasons, then you can replace it with water.
However, if you simply do not like coffee (I hear you, I’m not a coffee drinker, either!), I implore you to please give it a try with the coffee. Your cake will NOT taste like coffee, but the coffee makes the chocolate flavor absolutely explode.
Step-by-Step Directions
Preparing the cake is incredibly easy; there isn’t much in the way of prep time and it needs to chill overnight, which makes it a perfect make-ahead dessert.
- Prep the oven: Adjust oven rack to lower-middle position and preheat oven to 325°F.
- Get the springform pan ready: Grease an 8-inch springform pan, line the bottom and sides with parchment paper, and then grease the parchment paper. Wrap the outside of the pan with a double layer of aluminum foil and place in a 9×13-inch pan. Put a small pot of water to boil.

- Beat the eggs: Using a stand mixer with a whisk attachment, beat the eggs on medium speed until doubled in volume, about 5 minutes.
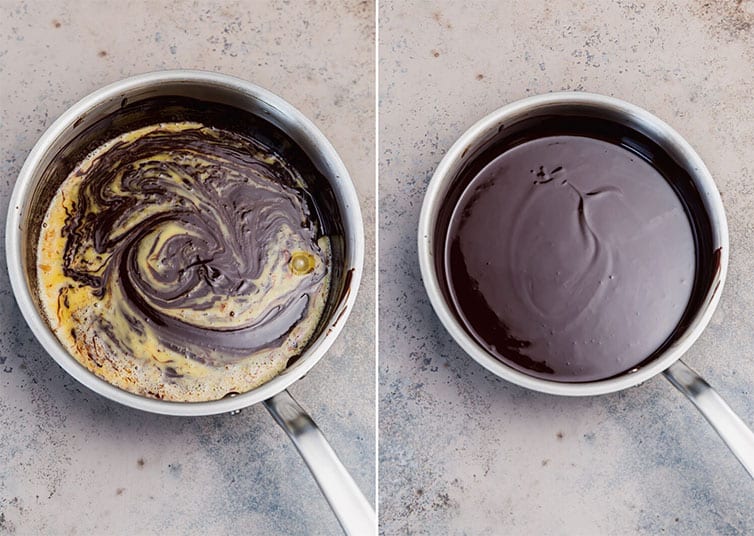
- Melt chocolate: Meanwhile place the chocolate, butter, and coffee in a large, heat-proof bowl set over a saucepan of barely simmering water.
- Check temperature: Stir occasionally until completely melted, smooth, and very warm (the mixture should register 115°F on an instant-read thermometer).
- Add salt+ vanilla: Remove from heat and stir in the salt and vanilla extract.
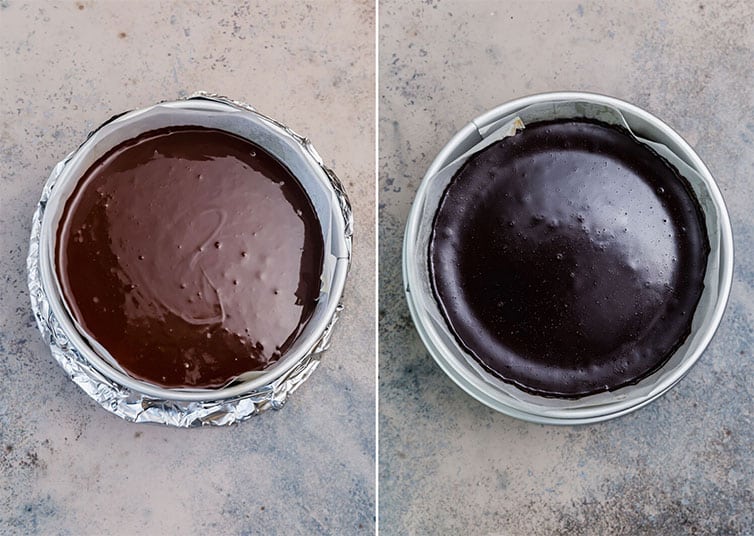
- Move to pan: Transfer the batter to the prepared springform pan and smooth the top.
- Create a water bath: Pour enough boiling water into the 9×13-inch pan to come about halfway up the sides of the springform pan.
- Bake until the cake has risen slightly, the edges are just beginning to set and a thin glaze (like a brownie crust) has formed on the surface, about 22 to 25 minutes. The cake should register 140°F in a digital thermometer.
- Cool: Remove the cake from the water bath and set on a wire rack to cool completely to room temperature.
Save This Recipe
- Chill: Once cool, cover with plastic wrap and refrigerate at least 6 hours, or overnight.
- Remove from pan: About 30 minutes before serving, run a thin knife between the cake and sides of the pan; remove the sides of the pan.
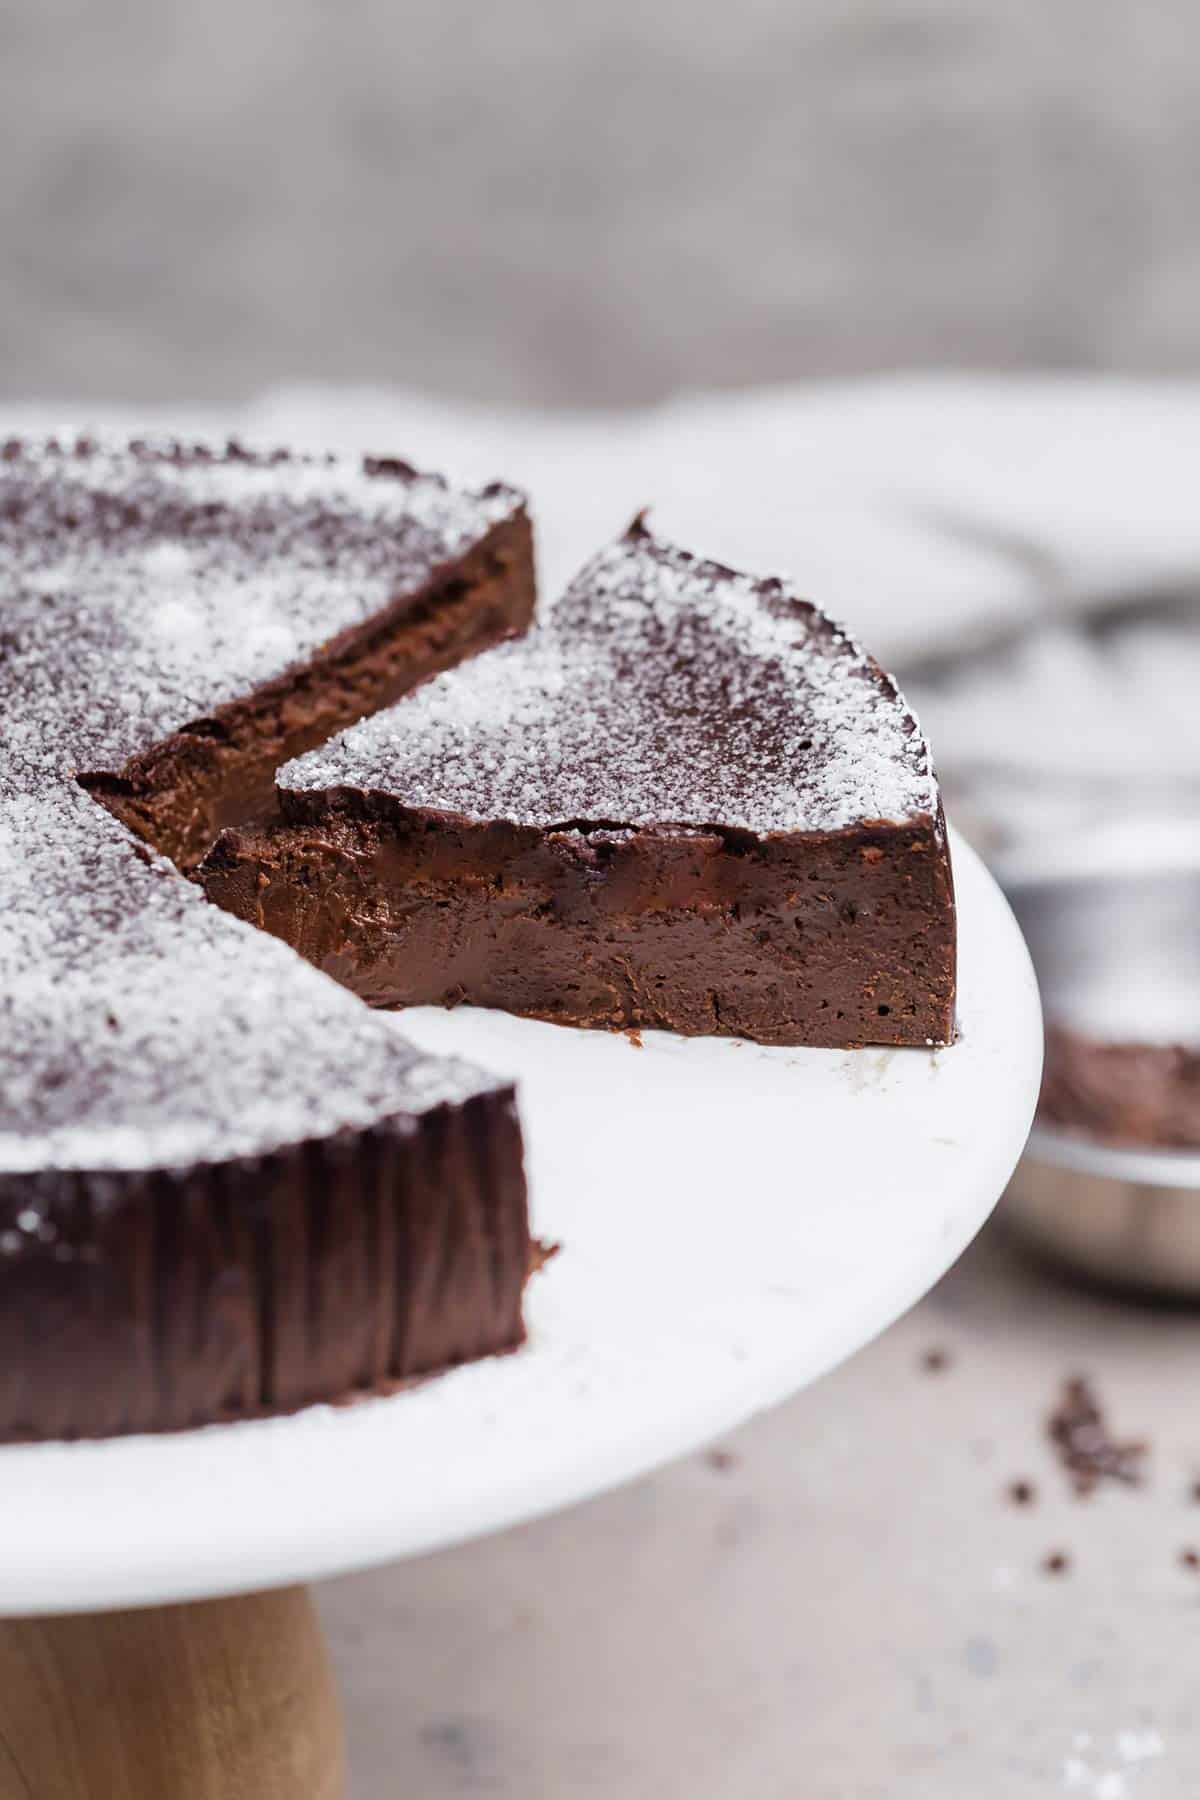
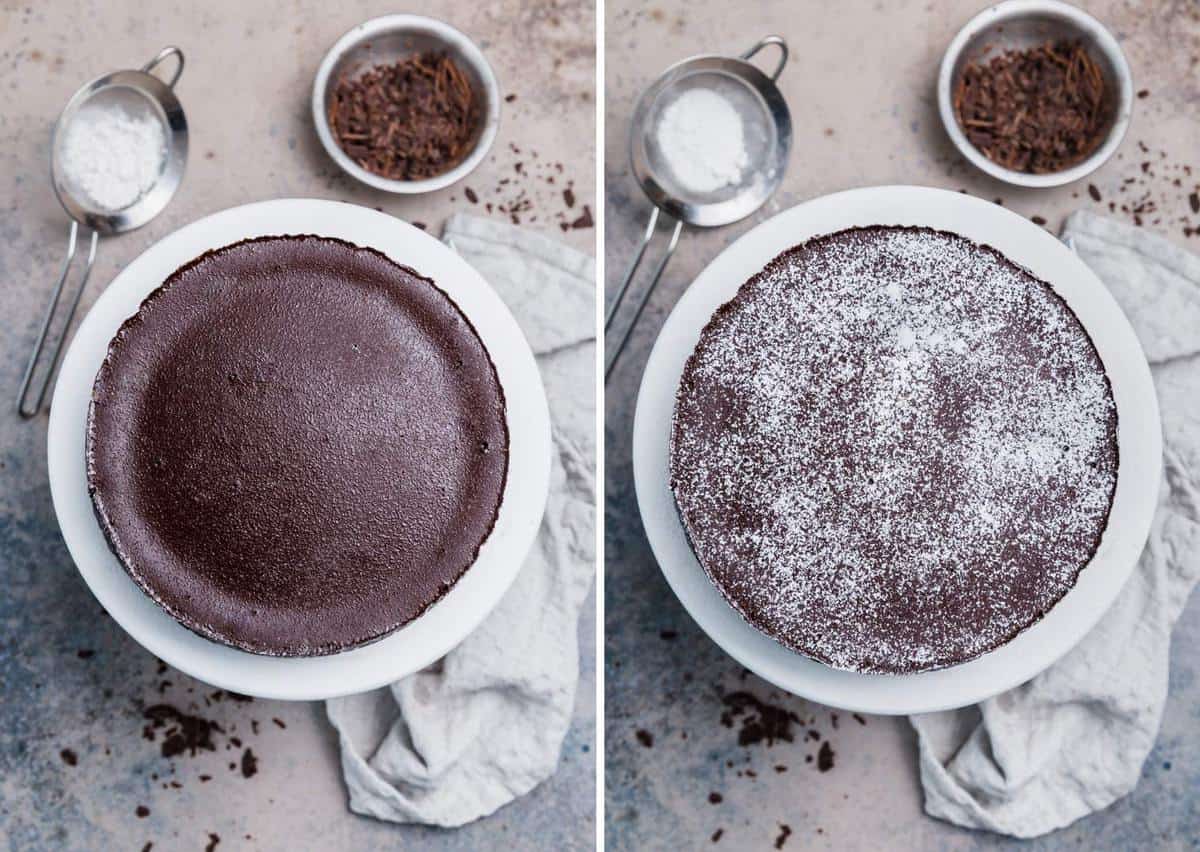
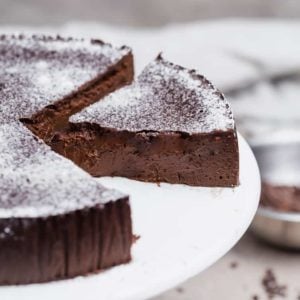
- Serve: Place the cake on a serving platter, dust with powdered sugar and serve with a dollop of fresh whipped cream if desired.
Serving Suggestions
You truly cannot go wrong with a plain slice of this heavenly flourless chocolate cake. But if you are looking for some different ways to dress it up and dish it out, try some of these serving suggestions:
- Dust with powdered sugar
- Top with a layer of chocolate ganache
- Dollop with homemade whipped cream
- Drizzle with salted caramel
- Serve with a scoop of peanut butter ice cream
- With a side of fresh fruit such as sliced strawberries or fresh raspberries

Additional Success Tips
For the best flourless chocolate cake, consider these notes:
- Do NOT add sugar! You might be tempted to add sugar to the recipe to sweeten it up, but it will alter the texture of the cake; instead adjust the chocolate you use, as noted above.
- The Water Bath: If you’re thinking that a water bath is a bit fussy and annoying, I 100% agree with you! However, using a water bath in certain situations goes a really long way in ensuring that the mixture is heated evenly, which creates that ultra-creamy texture. And that’s exactly what we need for this cake, so let’s plow forward with the water bath!
- Springform Pan: This recipe calls for an 8-inch springform pan, which is less common than its 9-inch cousin. If you don't have one, I recommend this one.
- Converting to 9-inch: If you do not have an 8-inch pan and prefer not to purchase one, you can still make this recipe in a 9-inch springform pan. Be aware that it will NOT fit inside of a 9×13-inch baking pan for the water bath and you will need to use something larger, like a roasting pan. The cake takes about the same amount of time to bake, but I would start checking at the 18-minute mark just to be safe.

Storing and Making Ahead
I love how easy this cake is to make ahead. Since it needs a long chill time I always recommend making it the day before you plan on serving.
- Storage: This cake can be stored, covered, at room temperature for up to 2 days, or in the refrigerator for up to 5 days. If you store it in the refrigerator, let it sit at room temperature for at least 30 minutes before serving.
- Make-Ahead Instructions: This cake can be made up to one day in advance and kept in the refrigerator.
- Freezing Instructions: The baked and cooled cake freezes exceptionally well. Wrap it tightly in a double layer of plastic wrap, then place in a freezer-safe zipper bag. Freeze for up to 3 months; thaw in the refrigerator overnight. (You can also freeze individual slices using the same instructions.)
Flourless Cake FAQs
While both cake and flourless chocolate cake are both sweets and should be consumed in moderation, a flourless chocolate cake is, on the whole, healthier than a regular cake.
For starters flourless cake is naturally gluten-free making it less dense and carb heavy compared to a traditional chocolate cake.
The second reason this flourless chocolate cake is healthier than a regular cake is the lack of added sugar. Instead of whipping cups of butter and sugar together, the sweetness comes from the bittersweet chocolate.
The typical ingredients for a flourless chocolate cake include eggs, butter, and chocolate. From there many recipes differ and will include additional ingredients such as coffee, vanilla, and sugar.
To get a thick and fudgy chocolate cake, I recommend using bittersweet chocolate, also known as dark chocolate. For this particular cake, I recommend using chocolate with around a 60% cacao percentage.
If you prefer your cake a little more bitter, go higher; if you prefer it a little more sweet, then you can go lower. I do not recommend using milk chocolate in this particular recipe, as it would be much too sweet.
More Decadent Chocolate Cakes
If rich is what you’re looking for, these recipes are sure to satisfy…
- Coca Cola Chocolate Cake
- Peanut Butter Cup Overload Cake
- Best-Ever Chocolate Cake Recipe
- Guinness Chocolate Cake with Irish Cream Frosting
This flourless chocolate cake, once chilled, tastes like a giant, fudgy chocolate truffle. It’s dense, rich, creamy, and bursting with chocolate flavor. This cake is definitely one that will make the chocolate purists rejoice.
Watch the Recipe Video:
If you make this recipe and love it, remember to stop back and give it a 5-star rating - it helps others find the recipe! ❤️️
Flourless Chocolate Cake
Ingredients
- 8 eggs, chilled
- 16 ounces (453.59 g) bittersweet chocolate, chopped
- 1 cup (227 g) unsalted butter, cut into small cubes
- ¼ cup (59.25 ml) brewed coffee, at room temperature
- ¼ teaspoon salt
- 1 teaspoon vanilla extract
To Garnish
- Powdered sugar
Instructions
- Adjust oven rack to lower-middle position and preheat oven to 325 degrees F. Grease 8-inch springform pan, line the bottom and sides with parchment, then grease the parchment. Wrap the outside of the pan with a double layer of aluminum foil and place in a 9×13-inch pan. Put a small pot of water on to boil.
- Using a stand mixer with a whisk attachment, beat the eggs on medium speed until doubled in volume, about 5 minutes.
- Meanwhile, place the chocolate, butter and coffee in a large, heat-proof bowl set over a saucepan of barely simmering water. Stir occasionally until completely melted and smooth and very warm (the mixture should register 115 degrees F on an instant-read thermometer). Remove from the heat and stir in the salt and vanilla extract.
- Using a large rubber spatula, fold one-third of the eggs into the chocolate mixture until just a few streaks of egg are visible. Add the remaining eggs in two more additions, folding until the mixture is totally combined.
- Transfer the batter to the prepared springform pan and smooth the top. Pour enough boiling water into the 9×13-inch pan to come about halfway up the sides of the springform pan. Bake until the cake has risen slightly, the edges are just beginning to set and a thin glaze (like a brownie crust) has formed on the surface, about 22 to 25 minutes. The cake should register 140 degrees on a digital thermometer.
- Remove the cake from the water bath and set on a wire rack to cool completely to room temperature. Once cool, cover with plastic wrap and refrigerate at least 6 hours, or overnight (the cake can be refrigerated for up to 4 days).
- About 30 minutes before serving, run a thin knife between the cake and sides of the pan; remove the sides of the pan. Place the cake on a serving platter, dust with powdered sugar and serve with a dollop of fresh whipped cream, if desired.
Notes
- Chocolate: Bittersweet chocolate is also known as dark chocolate. For this particular cake, I recommend using chocolate with around a 60% cacao percentage. If you prefer your cake a little more bitter, go higher; if you prefer it a little more sweet, then you can go lower. I do not recommend using milk chocolate in this particular recipe, as it would be much too sweet.
- Do NOT add sugar! You might be tempted to add sugar to the recipe to sweeten it up, but it will alter the texture of the cake; instead adjust the chocolate you use, as noted above.
- Coffee: Coffee does a phenomenal job of enhancing the flavor of chocolate. You cannot taste the coffee in the finished product, so even if you dislike drinking coffee, I recommend you use it here. If you cannot drink coffee for medical, religious, or other reasons, you can substitute water.
- Springform Pan: This recipe calls for an 8-inch springform pan, which is less common than its 9-inch cousin. If you don't have one, I recommend this one.
- Converting to 9-inch: If you do not have an 8-inch pan and prefer not to purchase one, you can still make this recipe in a 9-inch springform pan. Be aware that it will NOT fit inside of a 9×13-inch baking pan for the water bath and you will need to use something larger, like a roasting pan. The cake takes about the same amount of time to bake, but I would start checking at the 18-minute mark just to be safe.
- Storage: This cake can be stored, covered, at room temperature for up to 2 days, or in the refrigerator for up to 5 days. If you store it in the refrigerator, let it sit at room temperature for at least 30 minutes before serving.
- Make-Ahead Instructions: This cake can be made up to one day in advance and kept in the refrigerator. The baked and cooled cake freezes exceptionally well. Wrap it tightly in a double layer of plastic wrap, then place in a freezer-safe zipper bag. Freeze for up to 3 months; thaw in the refrigerator overnight. (You can also freeze individual slices using the same instructions.)
Did you make this recipe?
Leave a review below, then snap a picture and tag @thebrowneyedbaker on Instagram so I can see it!
Photography by Ari Laing


Tried this for the first time and it was perfect! And I don’t cook. Made the Martha Stewart recipe last week and it was horrible. I am a rookie and I recommend everyone try this for yourself
I love this chocolate cake without flour and sugar. I have made this several times. Thank you.
Can I use Kahlua instead of coffee?
I made this cake last year for a dinner party with some neighbors. It’s so delicious! Everyone loved it. I made it ahead and froze it because I knew I’d be pressed for time the day of the dinner party. It freezes beautifully. I will be making it next week and freezing it for a Super Bowl get together dinner with friends.
I made this today as a “dry run” for a dinner I’m hosting next month with some neighbors. It came out perfect! Only thing is it took 32 min. to get to 140 degrees. Well, all ovens are different, aren’t they? The texture and taste were divine! I’ll definitely be making this for dessert next month!
Thanks for another delicious recipe!
Would ghirardelli bittersweet chocolate chips work with this recipe?
Made it for a birthday. Everyone loved it and asked for the recipe. So yummy!
Forgot to rate the recipe. Currently baking the Fig and Pig Quiche, so distracted and didn’t see the rating system. You are always 5 stars with us!
I have made this cake many times. Always a crowd pleaser. SO much easier than the NY Times recipe of whipping the egg whites separately. Anyway, today, I tipped my pan as I was placing it in the water bath. First, I forgot to put the aluminum foil around the outside of the pan before I placed it in the water, so I was moving quickly! Could it be that we have a Covid+ person in our household so life hasn’t been our norm? Anyway, the finished product, minus about a third of the batter is cooling on my wire rack. Dear Ms. Brown Eyed Baker, you are my first stop when looking for recipes. First one my 29 y/o daughter found was the lemon cupcake with the curd. Best cupcake ever. Thank you for all you do and may you and your family have a blessed Memorial Day weekend.
This was a terribly unspecific dish and the final product could barely be called a cake.
Michelle,
I wanted to feed 15 for a holiday party, I don’t want to make the slices too small( I know its rich, but, aesthetically, I want to serve a standard sized slice of cake. Could I do 1 1/2 times the recipe and make it in a 10” springform? Have you done a larger size of this cake? Any idea of baking time? Or, have you done 3” individual cakes? I have the rounds with removable bottoms…
I have many of your recipes pinned and many are tried and true in my kitchen!
Thanks for any input.
Easy to make and delicious!
Things went smoothly until adding the eggs to the chocolate. At the first addition, the chocolate got a little grainy, and after the second addition, the butter completely separated, and I couldn’t get it to come back together no matter how long I folded. Was the difference in temperature between egg and chocolate too great perhaps? After baking, a lot of butter was floating on top and had to be spooned and dabbed off with paper towels. I’m going to chill it and see how it tastes, but something definitely went wrong.
Unfortunately, I can’t add a picture, because what wasn’t eaten was taken home by happy guests in go-boxes!
Make sure everything is laid out, pan and parchment is greased and wrapped in foil before starting the process. Once you begin you need to blaze through without stopping to measure or find the vanilla.
I had to cook it longer than the instructions by 10 minutes to get the center set. I used a mix of dark and semi sweet chocolate.
Otherwise, I followed recipe to the letter. It was absolutely delicious! I had the last sliver for breakfast and made happy noises while I ate.It’s like eating a slice of a giant truffle.
It’s worth the time and effort!
Made the italian bread and the buttermilk biscuits yesterday. They came out perfect, will be using those recipes again!
I made this for a gathering of relatives, and actually they were hesitant to try as they have previously had flourless chocolate cake that was awful. Everyone absolutely died and went to heaven! They loved it! It was just like eating a chocolate truffle, it melted in your mouth. Thank you for a great recipe!
I made this the night of 2/13 for Valentine’s Day. I am a fairly experienced baker but the prep time took far longer than 15 minutes??? Anyhow, I used 4 oz. 100% cacao and 12 oz. 60% cacao. Also, I only added 1/2 of the butter (1 stick vs. 2). I baked as directed for 22 minutes. It came out absolutely perfect. I was worried that it might be dry with less butter (some of us have trouble digesting fat which is why I cut the butter) but it really wasn’t. It had a perfect torte texture. I paired it with a touch of whipped cream and fresh strawberries to add some sweetness. My husband said it was one of the best desserts I’ve ever made and I have to agree! Thank you for the recipe.
I made this cake today. It is actually very simple to make and a chocolate lover’s dream! It is so good! It has the texture of truffle. I highly recommend this! I didn’t have an 8 inch springform pan so I just used a 9 in cake pan and baked it in a larger roasting pan and it came out perfect. Definitely do not skip the parchment on the bottom or sides because it will stick, even when greased.
Hi Michelle,
I am so making this for my hubby for Valentine’s Day. I love your website and especially your Friday Things blog!
Do you think subbing almond extract for vanilla will overpower the chocolate flavor?
Thank you!
Hi Kat, I’m not a good person to ask because I can’t stand the taste of almond extract 😬 For me, it overpowers everything lol!
Looks amazing. My niece and I still remember ordering flourless chocolate cake at the Disneyland hotel to this day. When you say chocolate..is it found in the baking section or just a regular chocolate candy bar? Obviously I haven’t baked with it before besides chocolate chips lol. This will be fancy for me.
Hi Macy, In the baking section! I’m partial to the Ghiradelli or Guittard baking bars. Enjoy!
OMg this looks amazing, cant wait to try it!!! Your chocolate cream pie is a family favorite so I have faith that this will be just as wonderful.
For anyone who doesnt like coffee and is asking if they can leave it out: if you have ever eaten a chocolate dessert at a nice restaurant or dessert shoppe, you have had coffee in your dessert and you didnt notice it. LOL. ;)
I have espresso powder any idea how much to use?
Hi Cheryl, I would follow the instructions on the container to see how much you need to dissolve in water for ¼ cup total.
How would you downsize the recipe to fit in a 6 inch springform was pan? Do you think that reducing the recipe by 25% would work?
Hi Kathy, I would cut the recipe in half! Enjoy!
Michelle – I cannot drink coffee, is there some replacement that can be used instead? Love your recipes.
She said to use water.
Have made this before and it was ‘The Best’ just wanted to know it it’s possible to freeze it as would like to make it for 4 people but again while I’m at it not cut the recipe down?
Hi Sherrie, So thrilled you enjoyed it! Yes, it freezes very well.
Since you don’t use any sugar or sweetener, can semi-sweet chocolate be substituted for the bittersweet chocolate in this recipe to lessen the bitterness for those who don’t enjoy dark, bitter chocolate, but love a rich chocolate taste?
The lack of sugars data in your nutritional information is no doubt turning away many diabetics and pre-diabetics. Do you realize how many potential followers that’s costing you?
I tried to turn this recipe into a peppermint chocolate cake for Christmas (added peppermint extract and topped with crushed candy canes right when it came out of the oven). I was really worried about adding too much extract and didn’t add enough (you couldn’t really taste it). How much would your recommend adding?
Hi Julie, It truly depends on personal preference. I’ve never tried to flavor this entire cake so I couldn’t say how much I think it would need, although I’d guess maybe around 2 teaspoons. Peppermint extract can be strong and some people find it overpowering, but go off of whatever you used and up it from there until you find the right amount for your taste.