Hamburger Buns

I am definitely a “meat and potatoes” kind of girl. Given the choice of chicken, beef or fish, I’ll choose beef every day of the week and twice on Sundays. As far as chicken and fish go, if you batter and fry them, I’ll enjoy them. Otherwise, I’m totally “meh” about both of them. Oh, but beef. Steak, cheeseburgers, tacos, stew… so much goodness no matter how you prepare it, and when you throw a baked potato, French fries or home fries into the mix? I can’t resist. I realize it’s not very girly of me, but then again, I’m not terribly girly most of the time (example: I currently have an ugly skinned knee from a street-hockey-on-rollerblades mishap last week). One of my favorite meals is a juicy bacon cheeseburger with all of the trimmings. The best thing about eating a burger at a really great restaurant is usually the bun. They’re a little over-sized, sturdy enough to handle the burger, and typically buttered and toasted. For a long, long time, I’ve been wanting to make hamburger buns at home, and I’m happy to finally able to cross them off my list. I thought that summer would be the perfect time to tackle them since the grill is usually in full swing, and we eat a lot of hamburgers at home. These hamburger buns could not have turned out more perfectly, and I’m excited to keep them stocked for summer grilling!

These hamburger buns are light yet sturdy, very tender and moist. The dough is enriched with milk and butter, which gives the buns all of their amazing flavor. I love that these can be made in an afternoon and with very little hands-on time. Between the mixing, shaping and baking, you’re only looking at maybe one hour total, if that. The rest of the time is inactive, letting the dough rise and do its thing, while you do your thing. Like laundry. Or browsing Pinterest. Or watching reruns of your favorite TV show.

You’ll see in the directions to press down lightly on the top of the buns before their second rise to give them their final shape. If you don’t do this, you’ll end up with really round buns, which will look more like dinner rolls. How much you press down is really up to you and how flat or round you prefer your hamburger buns. I pressed down lightly twice, and you can see the general shape that my buns took. For me, they were perfect; I like my buns with a little height and substance, but wouldn’t want them any larger. Hopefully, you can use that as a starting point for getting yours to the perfect height and width for your preferences.
Save This Recipe

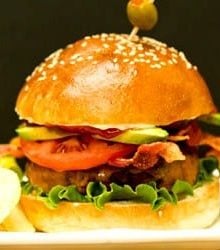
Once you have the buns finished, it’s party time! Time to build your favorite burger. Mine has cheese melted onto the burger while it’s still on the grill, lots of bacon, lettuce, tomato, avocado, mayonnaise and ketchup. With a side of chips and a pickle, of course. Maybe you like blue cheese and bacon? Or a classic with American cheese, lettuce, tomato and pickles? Perhaps a BBQ-style burger? Whatever your favorite burger is, one thing is for certain – this will definitely become your favorite hamburger bun.
I’m already excited for my next burger on one!

One year ago: Sweet and Salty Brownies
Hamburger Buns
Ingredients
- 4¼ cups (531.25 g) bread flour
- 1½ teaspoons (1.5 teaspoons) salt
- 3 tablespoons granulated sugar
- 2 teaspoons instant yeast
- 1 egg, slightly beaten, at room temperature
- ¼ cup (56.75 g) butter, at room temperature
- 1½ cups (360 ml) buttermilk or whole milk, at room temperature
- 1 egg, whisked with 1 teaspoon water until frothy, for egg wash (optional)
- Sesame or poppy seeds for garnish, optional
Instructions
- Mix together the flour, salt, sugar and yeast in a large mixing bowl (or in the bowl of an electric mixer). Pour in the egg, butter and milk, and mix on low speed until all the flour is absorbed and the dough forms a ball. If the dough seems very stiff and dry, trickle in more milk until the dough is soft and supple.
- Sprinkle flour on the counter, transfer the dough to the counter, and begin kneading (or mix on medium speed with the dough hook), adding more flour, if necessary, to create a dough that is soft, supple and tacky, but not sticky. Continue kneading (or mixing) for 6 to 8 minutes. (In the electric mixer, the dough should clear the sides of the bowl, but stick every so slightly to the bottom.) Lightly oil a large bowl and transfer the dough to the bowl, rolling it to coat it with oil. Cover the bowl with plastic wrap.
- Ferment at room temperature for 1½ to 2 hours, or until the dough doubles in size.
- Remove the fermented dough from the bowl and divide it into twelve 3-oune pieces. Shape the pieces into tight rounds. Mist the dough lightly with spray oil and cover with a towel or plastic wrap. Allow to rest for about 20 minutes.
- Line 2 sheet pans with parchment paper. Gently press down on the tops of the rolls with your fingers to flatten slightly. Transfer the buns to the sheet pans.
- Mist the tops of the dough with spray oil and loosely cover with plastic wrap or a towel. Proof the dough at room temperature for 60 to 90 minutes, or until the buns have nearly doubled in size.
- Preheat the oven to 400 degrees F. Brush the buns with the egg wash and garnish with poppy or sesame seeds, if desired.
- Bake the buns for approximately 15 minutes, or until they are golden brown and register just about 180 degrees F in the center. The buns should cool for at least 15 minutes on a rack before serving. Store leftovers in an airtight zip-top bag. If you want to freeze them, I would wrap individually in plastic wrap and then store in a zip-top bag. Thaw at room temperature.
Notes
Did you make this recipe?
Leave a review below, then snap a picture and tag @thebrowneyedbaker on Instagram so I can see it!


This is such a GREAT hamburger bun recipe! :) I made them for supper tonight to go along with sloppy joes and it was dynamite! My husband’s first comment was that they smelled just like the store bought hamburger buns :) I will definitely be making these in the future – look out BBQs here we come! Thanks so much for sharing this recipe, Michelle!
I am an excellent cook, but not much of a baker. This week I made home made buttermilk biscuits and they were to die for, so I wanted to try my hand at these lovely buns. After 2 hours they still haven’t risen at all. I am wondering because I put the yeast in dry? It doesn’t say anything about using warm water first. This may be a given, but I’m a newbie baker, so idk! Also, I bought regular yeast (quick rise) and maybe this isn’t the same as the instant from the recipe? Otherwise, the whole process seemed a bit daunting, die to the length of directions, but I thought it was pretty simple and no machine necessary.
Hi Sarah, With the use of instant yeast, you do not need to “activate” it with warm liquid the way that you would active dry yeast. That being said, you said you bought “regular” yeast – usually this would refer to active dry yeast. Rapid or quick rise is the same as instant, so just wanted to check that you do have the correct yeast. Also, be sure that you placed the dough in a warm, draft-free place to rise.
Ah, okay! It was quick yeast. It may have been that it just wasn’t warm enough in the kitchen. Gotta love the balmy 40 degree Michigan days where the heat doesn’t run as much lol:) I will definitely try these again, when it’s a bit warmer. Maybe by July;) Thanks for your help, Michelle!
I tried to make these buns and I don’t know why, but once I followed the instructions and put the dough in the bowl to ferment for 2 hours, it did absolutely nothing! No rise. Therefore when I baked them, they were like scones. I’m a very unhappy bunny but will still keep trying to find the perfect buns for my USA burgers. :(
Hi Leza, If the dough didn’t rise at all, it would definitely seem that your yeast was either old or the area where the dough was left to rise was too cold. Otherwise, you would have seen at least SOME rise in the dough.
Nice buns! I made 24 sliders and used finely diced onion for the top. Good recipe. Thanks!
I’ve made these several times now, and they’re amazing. But I can’t ever seem to them to brown like you have them in the photo. Even in a convection oven. I’ve tried different cooking temps and times, and washes but they never brown like this! Any tips?
Hi Dale, Have you tried just giving them a little extra time? I can’t imagine why the tops wouldn’t brown if you used a wash and let them in the oven long enough. Maybe try moving them up a rack closer to the top of the oven?
I figured it out! I was adding too much flour during the kneading process and wasn’t kneading it as long as i should have. I found when you initially mix the dough it’s very sticky, and the trick is to not add more flour, but to just keep kneading and it eventually turns out fine.
Doing this allowed the dough to rise much better and they turned out perfect, just like the picture. Thanks so much for your response!
I’m making these on the fly today – love the use of buttermilk (no one seems to pay any attention to this wonderful ingredient these days). I’ll see how it goes – putting everything in the hands of my new KitchenAid commercial mixer. Further comments to follow.
Very tasty buns and great consistency. The 400 deg temp was a bit too hot for my oven, so they got a bit dark on the bottom so will reduce the temp next time. I will definitely make them again.
These were amazing. We had portobello mushroom cheddar bacon burgers with these buns. Mine didn’t fair as well after the second rise. They deflated when I uncovered them. Baked them anyway. They held up wonderfully. Thank you for the recipe.
Thanks for this amazing recipe!
I’ve been making these every week for hamburgers, sandwiches, or really anything that could be enhanced by these epic rolls. Its possible these buns are solely responsible for the few extra pounds I’ve gained this summer – and I mean that in the nicest way possible ;-)
If anyone is wondering, you can use traditional dry yeast instead of instant or “quick” yeast. Simply replace ¹/⁴ cup of milk with warm water and stir in the yeast to activate it. Wait 5 minutes then add it to the dry ingredients along with the milk, butter and eggs.
Can you make these the night before a bbq? They won’t get stale overnight will they? They look amazing by the way!!
Hi Jeff, I don’t imagine these will get stale in one night. Just be sure to keep them in an airtight container or bag.
How much did you roll out the dough before baking the rolls? They tasted good, but after they rose for an hour they flattened out a ton and ended up being way bigger than the burgers…..may try to work the dough more next time and experiment with wheat flour.
Hi Ben, I didn’t roll out the dough at all. I shaped them into rolls and then just gently pressed down before baking.
Hi! These look incredible. Is there a point in the recipe when I can put the dough in the fridge overnight? Or would you suggest doing it all in one day?
Thanks!
Hi Kim, Although I haven’t tried it, you could try refrigerating when it tells you to let the dough rise for 1.5 to 2 hours. Let me know how it goes!
I seriously have made these almost weekly for the past month or so since I found the recipe. So good! My favorite is now to make them as hot dog buns and eat them with grilled Trader Joe’s jalapeño cheddar chicken sausages, with just a little mustard. Thanks for a new standard recipe!
Tried these in the bread machine then baked in the oven and they turned out nice. Wet to dry on the dough cycle, thanks for the recipe!
I just made these! They are wonderful and so tasty. I used All Purpose Flour because I did not have bread flour and while it took a little longer for the risings, but it still worked. Thanks for the recipe!
Have you tried freezing the dough and baking as needed? Any suggestions on how to do this?
Hi Liz, I haven’t tried freezing the dough. Hopefully someone else has and can lend some insight!
i tried freezing the dough and it worked great! I froze them right after shaping, then pulled out what I needed, let thaw and proof, then baked as usual. Also baked some the regular way for comparison. I couldn’t tell any difference. There is nothing like a warm fresh baked bun!
Made these today..they were perfect.
Oopps sorry.. I didn’t read that lower bit about freezing tip:))
My bad. Apologies for the incovenience.
Hi! I have always baked my own bread, but for some silly reason I am quite lazy to make burger buns:) Are these okay when frozen?
I do not own mixer and I knead with hands so I tend to make a large batch then freeze the bread. I tried your honey oat loaf. Love it, freeze it, n it’s just awesome.
I made these burgers for dinner tonight. They were really good. The only thing I would do different is drop the oven temperature to 350-375. My cooking time wasn’t even complete and the buns were VERY brown on the verge of burnt. But the dough was nice texture and tasted graet
Just made these! They are absolutely fabulous! Great Recipe!
Made these half wheat half white (was bread flour though) and these are our new favorite buns. In fact I probably wont look for any other recipe except to see if I can pull off an all wheat version. Perfect for a nice thick burger that the juices just run out off. Thanks so much for sharing :)
Am trying this as I write since I have all the time in the world. Wish I would have read this better before I printed it out because I certainly wouldn’t have started a recipe that takes 4 hours in rest and rise time. Not a recipe I will try again.
These are definitely worth the wait when you have the time to spare.. :)
I have made so so many of your recipes over the last two years. You are without a doubt my go-to blog for baked goods. But these were the most joyful baking experience I have had in so long… I make veggie burgers from scratch that I felt deserved buns of their caliber… They came out so amazingly good, my husband ate one plain! Thank you for this, I will never but store bought buns again!
Fried chicken and fried fish are all about my childhood, YUM! Now if asked give me the beef too, lol!
Ooooohhh!! Thank you for sharing this. Thinking of making some sliders and finding the right size perfect buns are always difficult or expensive. Loooks sooo great. Do you know how long these are good for? Can I freeze them and reheat if needed? Love my bacon cheeseburgers! Add a little bleu cheese and it is over.
These will stay for about 3 days stored in an airtight ziploc bag. You can definitely freeze them as well and reheat as needed.
Also, can I replace the bread flour at all with all-purpose? Or would you not recommend it?
Mei-l,
I would not recommend it personally. I have seen recipes with 1/3c APF added, but quite frankly, I can’t imagine why. The texture of these is quite perfect in every way. I am a fan of modifying every recipe, but adding APF may affect the rise on these, and trust me, you won’t want that – they are spectacular as is!
Just my humble opinion ( =
What if I need to use grainless flour, do you think this recipe will still work? I’ve been reading about almond flour so wondered if I could just substitute for that.
Hi Megan, I have never tried to use a nut flour for bread baking, so I could not say how it might turn out. Sorry I can’t help, but you can always experiment and come back to let us know how it goes!
Hi Mei-l, I would not substitute the all-purpose flour. Bread flour has a higher protein content; substitute AP flour would affect the texture of the buns, as well as how much they rise.
How would you adapt these to a bread machine? I want to try almost every bread you post, but sadly don’t have a stand mixer. My office mates and I absolutely love your site!
I have never used a bread machine, so unfortunately I can’t give you any guidance. I would recommend checking out the user manual to see how you would adapt recipes for the machine. That being said, you can totally make any bread recipe without a mixer. Just mix the ingredients with a large wooden spoon and then when it’s time to knead, just dump out the dough and use your hands!
hey Baquist, this might be too late! but I just had a bread machine and I am going through my best recipe to try them with it.
I tried this recipe today with one today and it turned amazing, what I did, I mixed the egg, butter and the buttermilk together in a bowl, then I poured it into the machine, and I added the sugar, then flour, then salt, then I made a whole with a little spoor and put the yeast in it.
When the dough raised and ready to be backed, I took it out from the machine and I followed the steps starting from point 4 in this recipe. It turned beautiful and very tasty.
thank YOU very much Michelle!! I am a big fun, I love your blog and tried most of the your recipe.!!
These are beyond gorgeous, they’re pretty much the most perfect hamburger buns ever! I have a favorite homemade recipe, but I am definitely thinking these need to happen in my kitchen – and soon :)
I’m totally a beef girl too! :)
These look perfect! Now that I usually do homemade hamburgers, store-bought buns just don’t cut it anymore!
Wow. I have so got to try these. Hamburgers are for sure my favorite food. Unless ice cream counts as food, and then that’s more favorite. :D