Pavlova Recipe
This classic pavlova recipe hails straight from Australia. It's a simple meringue dessert with minimal prep time and can easily be made in advance. Pile on a heap of slightly sweetened fresh whipped cream, top it with your favorite fresh fruit, and you have the perfect light and airy dessert!
What is Pavlova?
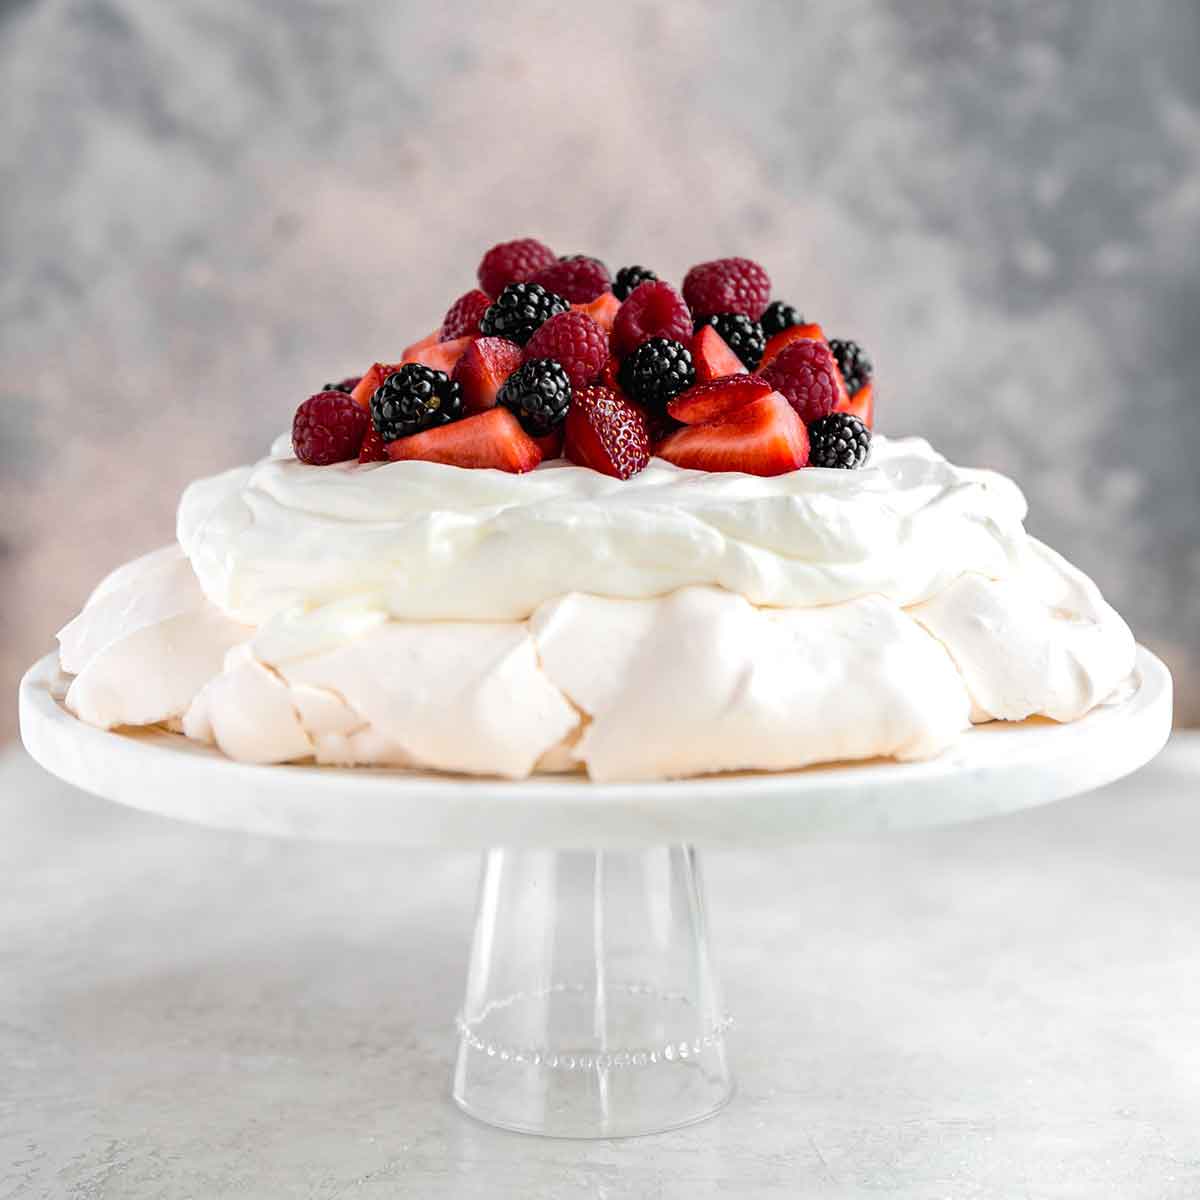
Pavlova is a big pile of meringue spread in a circle and baked; once cooled, it is topped with whipped cream and fresh fruit. It has a crisp exterior, while the inside is soft and pillowy, with the taste and consistency of a homemade marshmallow.
The dessert was supposedly created to honor the Russian ballerina Anna Pavlova while she was touring Australia and New Zealand in the 1920s. The actual place of origin has been a source of contention between the two countries for years, with each laying claim to the creation.
When the summer weather has you craving something sweet and delicious but light, pavlova is a go-to dessert. It surprises people, leaves them intrigued, and will leave them begging for the recipe! It is traditionally topped with fresh whipped cream and fresh berries.
Ingredients Overview
Pavlova only requires three ingredients, and you likely already have them in your refrigerator and pantry:
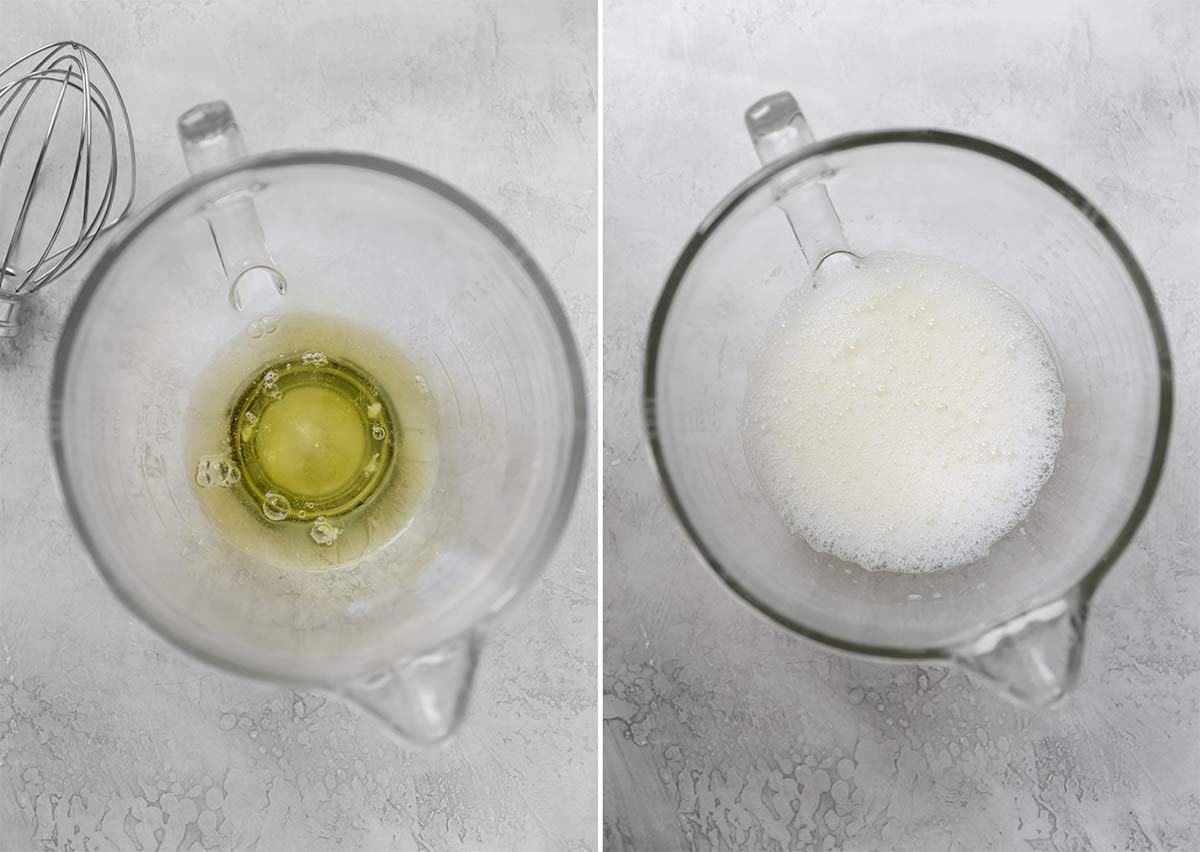
- Egg Whites – These need to be at room temperature. I recommend separating the eggs first, then allowing the whites to come to room temperature (eggs are easier to separate when cold).
- Cream of Tartar – This helps stabilize the egg whitemixture, keeps it firm, and keeps it from weeping. If you don’t have the cream of tartar, you can substitute 1½ teaspoons of either lemon juice or white vinegar.
- Granulated Sugar – Regular white sugar sweetens the pavlova, but it does so much more! The sugar binds and stabilizes the egg whites so they don’t collapse and keeps the exterior nice and crisp!
- Vanilla Extract – For mega flavor!
A Note on Corn Starch
Some pavlova recipes call for mixing cornstarch into the sugar before adding it to the egg whites. While this old family recipe is made without cornstarch, some say it helps to absorb any extra moisture, keeping the meringue completely dry, which could be especially helpful in humid environments.
If you’d like to add it, I recommend stirring 2 teaspoons into the sugar before adding it to the egg whites.
Recipe Tips for Pavlova
Fear not if you've ever felt intimidated when looking at a beautiful pavlova! The process is super simple, but there are a couple of key tips to ensure you get the best pavlova possible right out of the gate. Here we go!
- Meringue Basics: If you are unsure about making meringue, read through my ultimate guide on how to make meringue for a boost of confidence. It's full of troubleshooting tips and pointers!
- Electric Mixer: I recommend using a stand mixer due to all the whipping involved, but this can also be made with a hand mixer. I do not recommend whisking by hand; achieving the correct consistency will be near impossible.
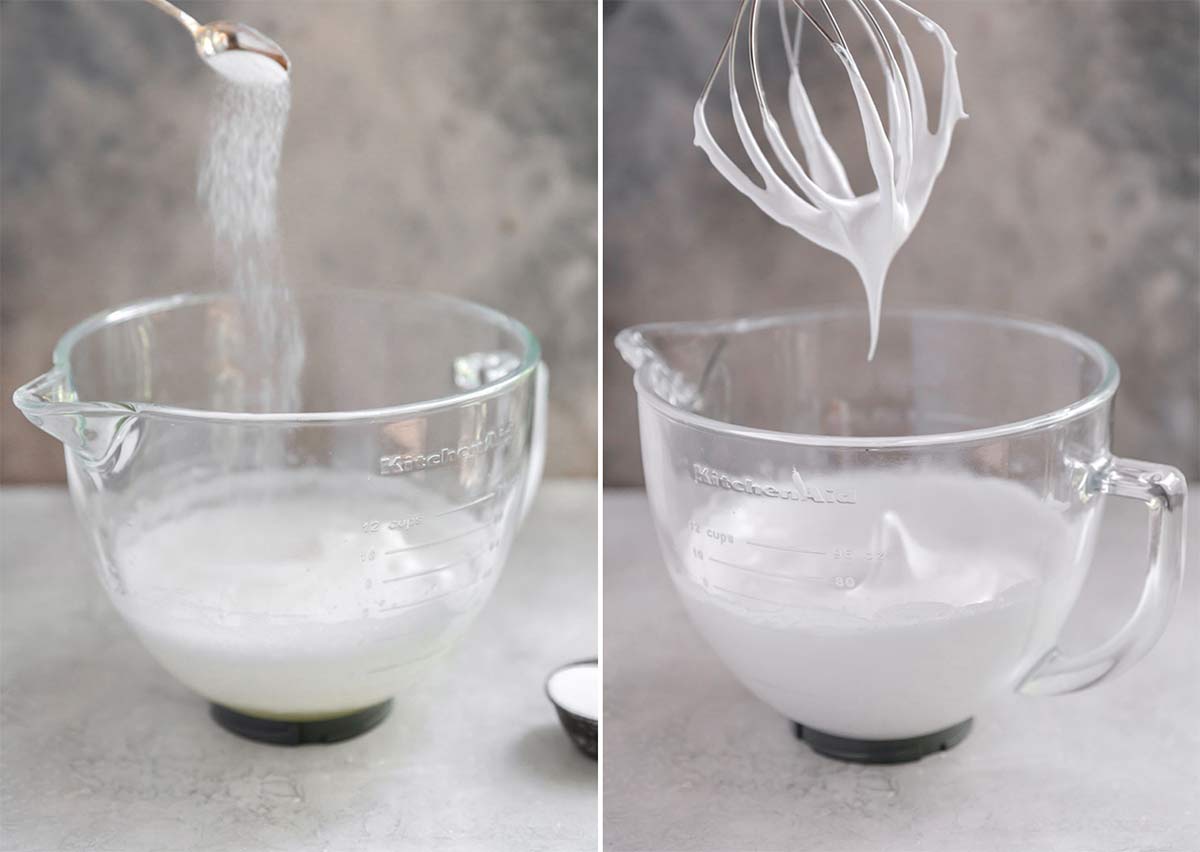
- Add the sugar slowly! This keeps the egg whites from collapsing; if you add the sugar all at once the eggs whites will deflate and it will be difficult to get them to whip up to stiff peaks at that point.
- Mini Pavlovas: You can make individual pavlovas by piping (or dolloping) small meringue circles on the parchment instead of one large circle (I recommend the Wilton 1M piping tip). The mini pavlova meringues will only need to bake for 25 to 30 minutes; check for doneness – they should feel firm and dry.
- Cooling the Pavlovas: A low and slow cool down creates the best texture, so prop open the oven door (use a wooden spoon if needed) and let it cool completely in there. (I usually leave it overnight.)
- Cracks on the Outside: As the pavlova dries, it’s possible that you will see some cracks… that’s okay! The slow cooling method helps to ensure that the pavlova does not crack too much and collapse, so be sure to give it all the time it needs.
- Storage: Store cooled pavlova in a large, airtight container in a cool, dark place for up to 2 days maximum. Do not refrigerate this pavlova! It will condensate and fall apart as it chills. You can store the whipped cream and garnishes separately if not serving immediately.
Save This Recipe
Make Ahead Instructions
The pavlova layer can be made up to 2 days in advance and kept in an airtight container once completely cool. However, once it has been topped with whipped cream, it needs to be served within a few hours, as the meringue will start to soften.
The Best Pavlova Toppings
Fresh whipped cream is a must! Then layer on your favorite fruits or other toppings; the possibilities are truly endless. Here are some of our favorites:
- Fresh berries (strawberries, blueberries, raspberries, blackberries)
- Kiwi
- Mango
- Sliced peaches, nectarines or plums
- Raspberry sauce
- Lemon curd (use up those leftover egg yolks!)
- Wine-poached pears
- Chocolate shavings
- Toasted nuts or coconut
- Mint leaves, to garnish
More Meringue Desserts
- Pavlova Layer Cake with Whipped Cream and Berries
- Chocolate Pavlova with Mascarpone and Raspberries
- Classic Meringue Cookies
- Chocolate Chip Meringue Cookies
Watch the Pavlova Recipe Video Tutorial:
This traditional pavlova recipe produces a delicious meringue dessert that melts in your mouth. A perfect dessert for summertime when everyone is looking for lighter dessert recipes yet special and striking enough to cap off a holiday meal!
If you make this pavlova recipe and love it, remember to stop back and give it a 5-star rating - it helps others find the recipe! ❤️️
Pavlova Recipe
Ingredients
For the Pavlova
- 6 egg whites, at room temperature
- ¾ teaspoon cream of tartar
- 1½ cups (298 g) granulated sugar
- 1 teaspoon vanilla extract
For the Whipped Cream
- 1½ cups (360 ml) heavy cream
- 2 tablespoons powdered sugar
To Garnish
- Fresh fruit, shaved chocolate
Instructions
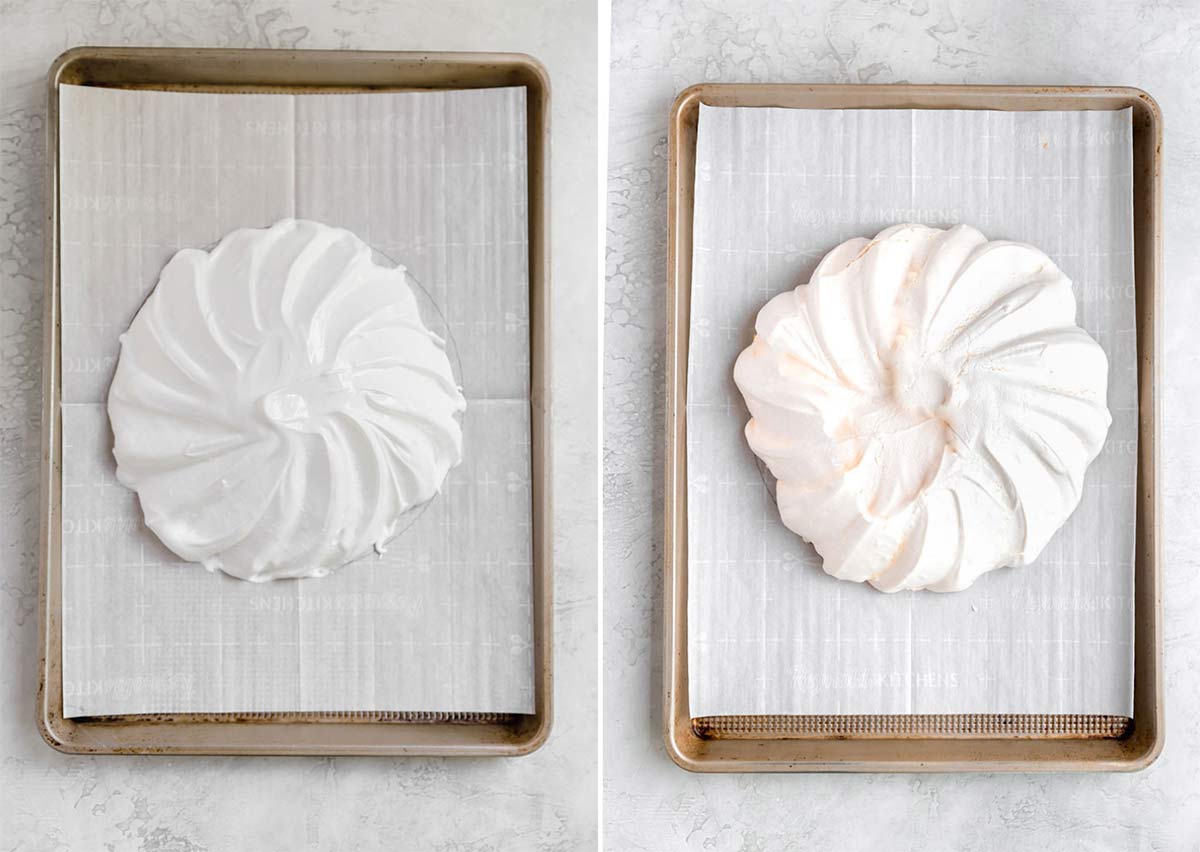
- Make the Pavlova: Preheat the oven to 250 degrees F. Line a baking sheet with parchment paper and draw a 9-inch circle in the middle (I traced 8-inch parchment rounds, but you could cake pans or anything else about the same diameter). Spray lightly with non-stick cooking spray.
- Using an electric mixer with the whisk attachment, beat the egg whites on medium speed until frothy, then add the cream of tartar. Increase the mixer speed to medium-high and beat to soft peaks. While continuing to beat the egg whites, gradually add the granulated sugar (I estimate that I added about 3 tablespoons at a time), then the vanilla, and beat until glossy and stiff peaks form. Spoon the mixture onto the circle, and use a spatula to shape the egg white mixture into a circle with decorative sides, if desired.
- Bake for 1 hour, or until firm to the touch. Turn off the oven and prop the oven door open with a wooden spoon. Allow the pavlova to cool completely in the oven.
- Make the Whipped Cream: Place the heavy cream, sugar, and vanilla extract in a large bowl and beat on medium-high speed until it holds stiff peaks.
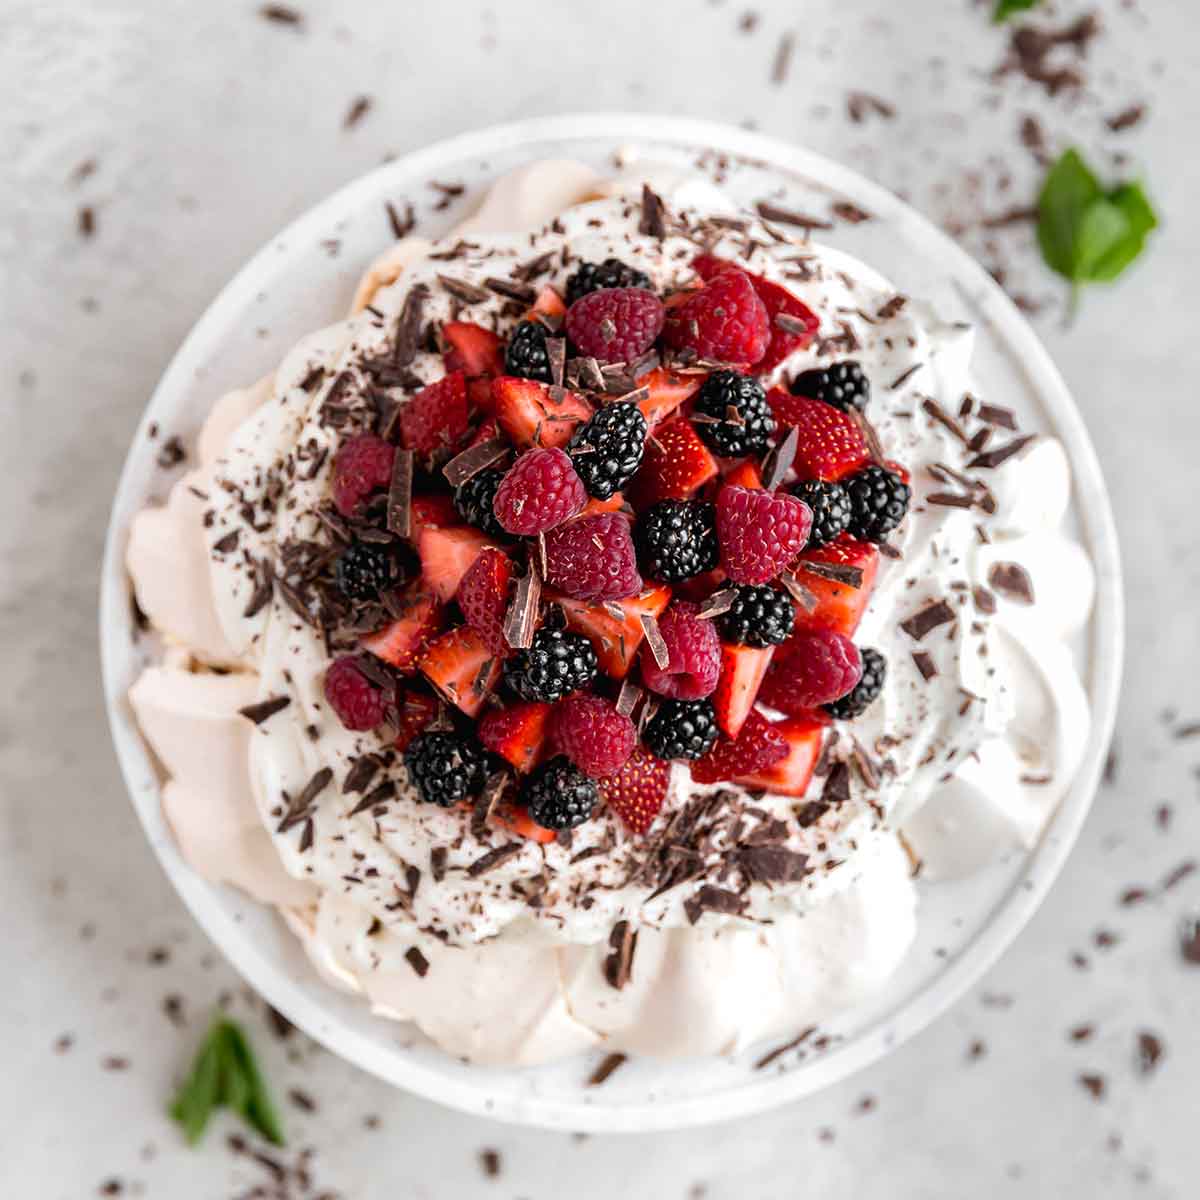
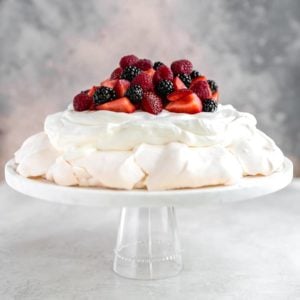
- Transfer the pavlova to a serving platter, then top with the whipped cream and fresh fruit. Serve immediately.
Notes
- Meringue Help: Read through how to make meringue for troubleshooting tips if you need some extra confidence!
- Cream of Tartar Substitute: If you don’t have the cream of tartar, you can substitute 1½ teaspoons of either lemon juice or white vinegar.
- Cornstarch: While this pavlova recipe does not use cornstarch, some swear by adding it (see the ingredient notes above). If you wish to add it, I recommend stirring 2 teaspoons into the sugar before adding to the egg whites.
- Mini Pavlovas: You can make individual pavlovas by piping (or dolloping) small meringue circles on the parchment instead of one large circle (I recommend the Wilton 1M piping tip). They will only need to bake for about 25 to 30 minutes; check for doneness – they should feel firm and dry.
- Garnishes: Fresh fruit, including mixed berries, kiwi, and blood oranges. Other topping options are a raspberry sauce, lemon curd (use up those leftover egg yolks!), or wine-poached pairs, to name a few! Use your favorites or whatever is in season.
- Storage: Store cooled pavlova in a large, airtight container in a cool, dark place for up to 2 days maximum. Do not refrigerate this pavlova! It will condensate and fall apart as it chills. You can store the whipped cream and garnishes separately if not serving immediately.
- Make-Ahead: The pavlova layer can be made up to 2 days in advance and kept in an airtight container once completely cool. However, pavlova is best enjoyed shortly after being topped and garnished. It does not store or freeze well.
Did you make this recipe?
Leave a review below, then snap a picture and tag @thebrowneyedbaker on Instagram so I can see it!
Photography by Ari Laing.


Beautiful and delicious dessert!
Hi what should the weight of the egg whites be as the size of eggs differ which can make it too sweet etc in general what is the weight of one egg white ?
Hi Michelle
I love your Pavlova decorating ideas, photography and tips: thanks. Lynn
For all readers;
Please respect the following as copyright material which may not be copied or sold in any form. The recipe may be baked and used for your personal 😋 pleasure. If you receive requests for this recipe please have them mail a request to L.Bowman at;
390 Matterhorn Drive, Park City, Utah 84098-5230. Thank you.
My mother had many requests for Pavlovas to be baked for weddings and other events. Her recipe follows;
July 3 of 2022;
Some lively debate
Though I’m reading it all rather late.
From my Mother, I learned to make
The perfect Pavlova, which is not a cake,
Please don’t call it cake, that’s a mistake.
The best oven temperature is low & slow, Pre-set it to 250°F then when ready bake
for one hour, then turn the oven off
But leave the pav in the oven one more hour then remove your pan to a counter.
Here’s the PAVLOVA recipe:
Ingredients:
6 egg whites
2 cups white granular sugar
1 & 1/2 Tbsp white (or Malt) vinegar
1 tspn vanilla
Method:
1. Line your meat pan* with parchment paper to cover (in excess of) the inside
2. Fill the pan with cold water, preferably not getting the parchment paper wet on the side next to the pan.
3. Carefully separate the egg whites from the yolks. Do NOT get any yolk in the egg whites. To be safe separate the egg whites one at a time into a small dish or bowl. Then, if there’s no yolk or problem transfer each egg white into your electric mixer bowl. Put the egg yolk in another container with a lid to refrigerate. Repeat with all 6 eggs.
4. Turn the mixer on and whip the egg whites for quite awhile until STIFF peaks form.
5. Gradually add the sugar beating constantly then continue beating until there are no sugar granuals remaining and the mix looks more glossy still has peaks. The lack of any sugar granuals is important to a successful Pav.
6. Add the vanilla and the vinegar to the whipped egg white / sugar mixture. Whip to mix in the vanilla and vinegar into the egg white mixture.
7. Pour the water out of the meat pan. Dry
any excess water that may be in the pan. Shake any excess water off the parchment paper. Then put the parchment paper back in the pan with the wet side facing up.
8. Poor the eggwhite / sugar meringue like mixture into the pan. Spread it as needed, then place it in the middle of the oven to bake.
9. See above for oven temperature and baking instructions.
Notes;
1. This recipe does not call for any cream of tarter, nor any cornstarch. Some people like the impact of the cornstarch which increases the softer layer.
2. After the baking the pav should have a firm (slightly crunchy) layer on the bottom and a lighter softer thicker layer above.
4. Now carefully take the paper off. It may be sticky or not so much.
5. Now the tricky part to get it to the serving / storing container without it landing on the floor. If you have a lid for your pan place the lid on top and invert. 6.Then you decorate before serving with whipped heavy cream (optional sweeten with powdered sugar). There are many good options for decorating the pav. E.g.
Use fruit of choice. I like to decorate according to the holiday. Like today 4th of July i would want to get fruit to create a USA flag using blue berries, seeds of pomegranates, stars, something red white and blue. At Christmas I use 🥝 kiwi fruit to design a Christmas tree and pomegranates for tree lights, and a slice of Star Fruit for the star at the top. I use just a little of the kiwi fruit skin cut in strips for the tree trunk. Canned Mandarin segments, Strawberries, blueberries, raspberries,
7. If I’m making this for a larger group I double the recipe and use a larger pan more the size of a sheet cake.
8. The meat pan of my Mother’s is similar to the size of a cake baking pan
9. I was born and raised in New Zealand, where celebrations call for Pavlova.
Good luck
Great recipe with nice guidance on the stages of the egg white mixture, which was extremely helpful for a newbie. The only thing I did differently, based on what I found in other recipes, was I used powdered sugar so it would integrate easier, and I folded in about 1 tsp of vanilla extract and 1 Tbl of cornstarch after the stiff peaks. Again, these additions were based on a plethora of other recipes I had found, but I liked your instructions the best. Also, per my previous comment, I started at a higher temp (300 deg) for the first 25 min so the outer shell would firm up, then dropped it to 250 deg for the remainder of the time. All in all, it came out great! Thanks again!
I tried this twice. Both i stances made to the T of the i structuons and both i stances the paclova never firmed up. Instead, the exteriors were tacky and marshmallow-like. The interiors were still light and foamy like the merinque atop a lemon pie.
I baked at 250 for an hour in a convection. I even did the upside down bowl test to make aure the whites were whipped enough.
What could possibly explain why it didnt turn out properly?
Hi Miro, Is it particularly warm or humid when you’ve made it? That type of weather can definitely cause meringues and pavlovas to keep from drying out properly.
Hi Miro: From other recipes, I started at a higher heat and it came out perfect, and I live in a humid place (Alabama). My process: 350 deg for pre-heat, turn down to 300 deg right before you put it in the oven and keep at that temp for 25 min, then turn down to 250 degrees for last 30 min or until exterior is firm. I also added the small amount of vanilla and cornstarch (1 Tbl) at the end per Aussie recipes I found. I am pleased with the result, so give it another try!
This recipe was my first time making pavlova and they came out absolutely perfect. I halved the recipe but changed nothing and am so in love!
Ya’ll this recipe is fantastic! I never post anything on any social media platform for recipe I try, but this one is a must! The guests and hubby were impressed. The only tweak I did was I used 1 c of sugar instead of 1 1/2. To speed up the cooling process, I let the oven door ajar about a coupe inches for the 10 min and by a foot for another 10 before removing it from the oven.
Hi, Great recipe, but it does need a tablespoon of cornstarch and a teaspoon of vanilla, also coming straight from Australia with my aussie wife of twenty years, I felt it important to point out that no good pavlova ever gets served in Australia without a good squeeze of a few passion fruits over the top, just before serving. Fresh fruits piled high on the pav with some freshly whipped cream in a bowl on the side, self-serve style. One of the lightest, easiest and tasty desserts of an aussie summer bar-b.
you didn’t add lemon or vinegar or cornstarch. i am wondering why.
maureen
This is how I top my Pavlova. The raspberry sauce over the fruit is amazing!
1/2 pint fresh strawberries, hulled and sliced
1/2 pint fresh blueberries
1/2 pint fresh raspberries
1/2 pint blackberries
Small bunch of red grapes
Triple Raspberry Sauce (recipe follows)
Mint leaves, for garnish
Triple Raspberry Sauce:
1/2 pint fresh raspberries
Scant 1/8 cup castor sugar
1 cup seedless raspberry jam (10-12-ounce jar)
1 tablespoon framboise liqueur( you cans also use Chambore, a French liqueur)
I adore pavlova. I like how you made the sides higher than the middle. I ironically made this recipe in May and don’t have a photo. Mine was much flatter. Will try to create higher sides next time. Thanks.