Triple Chocolate Mousse Cake
I have been tempted by Triple Chocolate Mousse Cake for well over three years now. I’ve seen a variety of recipes in a number of different places and have bookmarked it and doggy-eared it countless times. One day last week, my Chief Culinary Consultant mentioned that it had been awhile since I had made a big ol’ fancy cake. A show-stopper, as it were. Challenge accepted. I sifted through my notes, spreadsheets and cookbooks to see what I might want to bake up, when a page from a long-gone Cook’s Illustrated magazine fell out of a binder. The Triple Chocolate Mousse Cake. It was destiny.
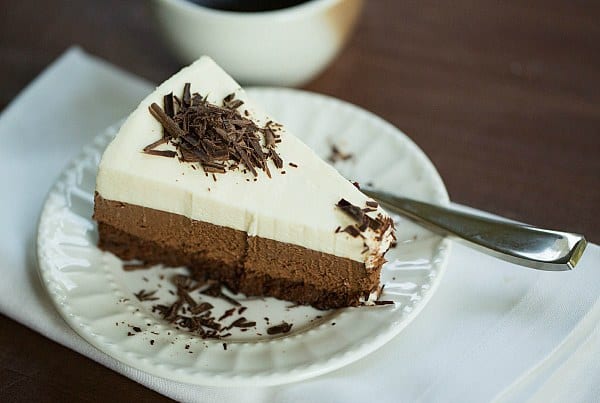
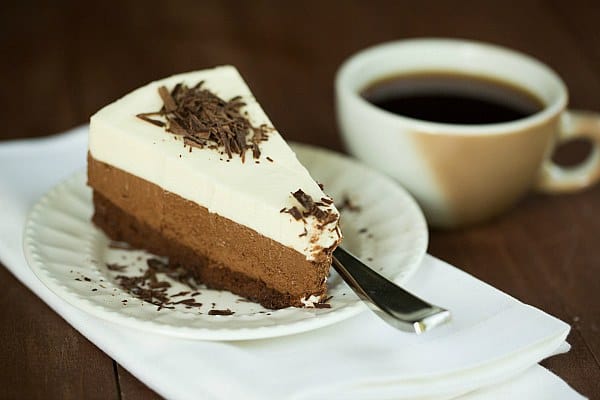
This triple layer cake is the trifecta of chocolate deliciousness. The bottom layer is a flourless chocolate cake… the middle layer is a light dark chocolate mousse… and the top layer is an even lighter white chocolate mousse. The combination of the three is rich, intensely flavorful and silky smooth. It’s a fabulous dessert to pair with coffee and enjoy slowly, lingering over each bite.
Save This Recipe
This cake is the holy grail for any chocolate lover. It takes a bit of time, but the assembly is relatively easy and absolutely, 100% worth it. You owe yourself this treat!

One year ago: Oatmeal-Raisin Ice Cream
Two years ago: How To Make a Rainbow Cake
Four years ago: Polenta Pizza

Triple Chocolate Mousse Cake
Ingredients
For the Bottom Layer
- 6 tablespoons unsalted butter, cut into 6 pieces, plus extra for greasing pan, (3 ounces )
- 7 ounces (198.45 g) bittersweet chocolate, finely chopped
- ¾ teaspoon (0.75 teaspoon) instant espresso powder
- 1½ teaspoons (1.5 teaspoons) vanilla extract
- 4 eggs, separated
- Pinch salt
- ⅓ cup (73.33 g) light brown sugar
For the Middle Layer:
- 2 tablespoons cocoa powder, preferably Dutch-processed
- 5 tablespoons hot water
- 7 ounces (198.45 g) bittersweet chocolate, finely chopped
- 1½ cups (357 ml) cold heavy cream
- 1 tablespoon granulated sugar
- ⅛ teaspoon (0.13 teaspoon) table salt
For the Top Layer
- ¾ teaspoon (0.75 teaspoon) powdered gelatin
- 1 tablespoon water
- 6 ounces (170.1 g) white chocolate chips, (1 cup )
- 1½ cups (357 ml) cold heavy cream
Instructions
- Make the Bottom Layer: Preheat oven to 325 degrees F. Butter the bottom and sides of a 9-inch springform pan that is at least 3 inches high.
- Melt the butter, chocolate and espresso powder in a large heatproof bowl set over a saucepan filled with 1 inch of barely simmering water, stirring occasionally until smooth. Remove from heat and cool for 5 minutes. Whisk in the vanilla and egg yolks; set aside.
- In a stand mixer fitted with the whisk attachment, beat the egg whites and salt at medium speed until frothy, about 30 seconds. Add half of the brown sugar and beat until combined, about 15 seconds. Add the remaining brown sugar and beat at high speed until soft peaks form when the whisk is lifted, about 1 minute longer, scraping down the sides halfway through. Whisk one-third of the beaten egg whites into the chocolate mixture. Using a rubber spatula, fold in the remaining egg whites until no white streaks remain. Carefully transfer the batter to the prepared springform pan, gently smoothing the top with an offset spatula.
- Bake until the cake has risen, is firm around the edges, and the center has just set but is still soft (the center of cake will spring back after pressing gently with your finger), 13 to 18 minutes. Transfer the pan to a wire rack to cool completely, about 1 hour. (The cake will collapse as it cools.) Do not remove the cake from the pan.
- Make the Middle Layer: Whisk together the cocoa powder and hot water in a small bowl and set aside. Melt the chocolate in a large heatproof bowl set over a saucepan filled with 1 inch of barely simmering water, stirring occasionally until smooth. Remove from heat and cool for 5 minutes.
- In the bowl of a stand mixer fitted with the whisk attachment, whip the cream, granulated sugar and salt on medium speed until the mixture begins to thicken, about 30 seconds. Increase the speed to high and whip until soft peaks form when the whisk is lifted, 15 to 60 seconds.
- Whisk the cocoa powder mixture into the melted chocolate until smooth. Whisk one-third of the whipped cream into the chocolate mixture to lighten. Using a rubber spatula, fold in the remaining whipped cream until no white streaks remain. Spoon the mousse into the springform pan over the cooled cake and gently tap the pan on counter 3 times to remove any large air bubbles; smooth the top with an offset spatula. Refrigerate for at least 15 minutes while preparing the top layer.
- Make the Top Layer: In a small bowl, sprinkle the gelatin over the water; let stand for at least 5 minutes. Place the white chocolate in a medium bowl. Bring ½ cup of the heavy cream to a simmer in a small saucepan over medium-high heat. Remove from heat and add the gelatin mixture, whisking until fully dissolved. Pour the cream mixture over the white chocolate chips and whisk until the chocolate is melted and the mixture is completely smooth. Cool to room temperature, stirring occasionally, 5 to 8 minutes (the mixture will thicken slightly).
- In the bowl of a stand mixer fitted with the whisk attachment, whip the remaining 1 cup heavy cream at medium speed until it begins to thicken, about 30 seconds. Increase the speed to high and whip until soft peaks form when the whisk is lifted, 15 to 60 seconds. Whisk one-third of the whipped cream into the white chocolate mixture to lighten. Using a rubber spatula, fold the remaining whipped cream into the white chocolate mixture until no white streaks remain. Spoon the white chocolate mousse into the pan over the middle layer. Smooth the top with an offset spatula. Return the cake to the refrigerator and chill until set, at least 2½ hours.
- The cake can be made up to 1 day in advance and refrigerated. Remove the cake from the refrigerator and let sit at room temperature for 45 minutes before releasing it from the pan. Garnish the top of cake with chocolate curls or dust with cocoa, if desired. Run a thin knife between the cake and side of the springform pan, then remove the side of pan. Cut into slices and serve. (For clean slices, dip a sharp knife into hot water and wipe dry between cuts.)
Notes
Did you make this recipe?
Leave a review below, then snap a picture and tag @thebrowneyedbaker on Instagram so I can see it!


Beautiful cake!! It looks so amazing. Ahhhh! Love this!
Oh, isn’t it the best when a recipe you’ve ripped out and kept for a long time finally happens? It looks great!
I have seen and admired this cake from the magazine – and you did a perfect job! It’s a chocolate lover’s (me) dream come true!
That’s a show stopper for sure!!! Now I just need an excuse to make it ;)
I made this about 3 years ago for my mom’s birthday cake. It was absolutely amazing. One of the best things I have ever eaten. Your layers look great!
Looks yummy and amazing!
Oh my goodness. This is one of my favorite things ever and I have not even tried it yet. I just know, because, well, triple chocolate. Going on my list for the next time I need to make a showstopper!
Oh I’m so making this! Love mousse cakes! Question though; I’ve used heavy cream and it doesn’t whip at all. Are you sure the recipe doesn’t call for heavy whipping cream?
Hi Yana, Yes, I am positive the recipe does not call for heavy whipping cream. I whip heavy cream all the time and have never experienced an issue. If it doesn’t work for you, for whatever reason, I’m sure you could use heavy whipped cream as a substitution if you need to.
Always a great one and sure to make everyone happy! But it is so pretty it would be hard to cut into. But I would!
I LOVE that there is no Cool Whip in this, because I was looking for it. Cool Whip makes me sick and there are so many yummy looking recipes that have it. I can’t wait to have an occasion to try this. It looks really Thanksgiving-y!
I made this a couple of years ago for my birthday. It was amazing!!!! I think I will have to make again soon!
Oh goodness, it looks simply irresistible! Thank you for another gorgeous recipe!
I my husband is always asking for some kind of mousse but I never venture on making it! This makes me want to give it a try!
This is simply gorgeous! Every layer looks delicious and perfect!
I’ve made this recipe a few times, and it is The Bomb. If you really want to wow someone, this is the way to go. It not only looks beautiful, it tastes just as good as it looks. Your photos are fantastic, Michelle!
Do you have any idea if substituting agar-agar for the gelatin in the top layer would work? I know it does for some recipes but in others it tends to just make a mess (ex: every time I try to make agar-agar marshmallows).
Thanks!
Hi Erin, Unfortunately, I’m not sure about a gelatin substitute, as I’ve never heard of agar-agar.
I tried using agar agar for the top layer and it did not work out well – the texture was kind of gritty. It was probably user-error, since I hadn’t tried it before, but I ended-up scraping off the top layer and going back to the original recipe. Seems perfect now. Otherwise, this was a really easy recipe to make, from start to finish. Can’t wait to try it later today for Thanksgiving!
I made a cake like this once and it totally rocked my world! This is lovely!
Destiny! This is beautiful! Love the contrasting layers!
Very happy to see this recipe. It looks perfect for my gluten-free daughter. I think I will make it and bring it to her when I visit her at college! I’m sure her suitemates will be happy to share.
Thanks!
Would it be wrong to have a chocolate shake with this? I am on a mission to overdose on all things cacao.
I love that you posted this! This is one of my favorite desserts to get at restaurants, and I attempted it once (making up my own recipe) and it wasn’t a success. Definitely going to try this recipe…soon!
What a great dessert for a dinner party – such a show stopper!
Challenged accepted, I loved that. This recipe might be a bit over my capabilities but as you mentioned some things are worth the extra effort, so I will give it a try.
that is sooooo temting… and it looks sooo beautiful too… the colours of teh cake and the colours on teh cup.. wow!!looks awesome..:)
Oh, girl! Just beautiful! I love making this dessert from Cook’s Illustrated! It always receives rave reviews. I even ran out of white chocolate chips once and decided to double-up on the chocolate middle layer once and then just used my cream whipper to put fresh whipped cream on top with a dusting of cocoa. Everyone loved it! The one thing new bakers need to keep in mind is that the bottom layer will shrink a little from the pan sides once cooled. This is totally normal with this recipe. Thanks for sharing, Michelle!
This really is a show stopper with all of those creamy, luscious layers! Beautiful dessert!
Any of the layers unto themselves sound amazing! The three together – wow, over the top and knowing that it’s a CI recipe, you just KNOW you’re in for a real showstopper! Also very impressed by how super neat the layers are and the total clean cuts on the slice. Nice!
When the recipe starts with Triple Chocolate I start to get a creepy smile on my face! Beautiful cake, great job on it!
I have the Cooks Illustrated cookbook (I call it my red cooking bible) and every time I open it, I find myself looking at this exact recipe! It’s totally on my cooking bucket list. Your’s look even more beautiful than I imagined!
Flawless layers, what a gorgeous cake!