DIY: How To Make Fresh Pasta
While my grandma never, ever used store-bought spaghetti sauce (seriously, those brand names were like swear words to her), it wasn’t unusual to see boxes of pasta at her house. However, those Sundays when we strolled in after church and caught a glimpse of her countertops completely covered in towel-lined baking sheets, nests of fresh pasta sitting on top, were certainly extra-special.
I made fresh pasta once before for fettuccine alfredo, and can’t believe that’s it’s been almost SIX years since I did it! I was definitely way overdue for busting out the pasta rollers. Truth be told, homemade pasta is not difficult at all, and it only involves two ingredients! You can use an old school hand-crank pasta machine (I’ve used one in the past, both at my grandma’s, and the first time I made pasta on my own), or if you have a KitchenAid, you can use their pasta roller attachment, which is what I used here.
I have seen people use mixers for making the dough, but I do it the way I remember seeing my grandma make it on her big dough board – a big mound of flour, then creating a well in the middle, cracking the eggs into there, and mixing it all up. That method served her well her entire life, so I went with the whole “if it’s not broke, don’t fix it” mantra.
Yesterday, we made a phenomenal meat sauce, and today we’re tackling fresh pasta. I promise that tomorrow is going to be fan-freaking-tastic!
Save This Recipe
Now, let’s get this homemade pasta party started!
One year ago: How to Make Rye Sour Starter
Two years ago: New Orleans Beignets
Three years ago: Chocolate Malted Whopper Cookies
DIY: How to Make Fresh Pasta
Ingredients
- 2 cups (250 g) all-purpose flour
- 3 eggs
Instructions
- 1. Place the flour on a clean work surface, gathering it into a mound. Make a well in the center.
2. Crack the eggs into the center of the mound:
- Using a fork, lightly beat the eggs until they are completely broken up.
- Working from the inside of the mound, start to incorporate flour into the eggs, taking a little at a time, maintaining the "walls" of the mound for as long as possible.
- 3. Once all of the flour has been incorporated into the eggs, the mixture will be very rough and shaggy.
- Begin working the mixture with your hands and knead the dough, just as you would bread dough, until the dough is smooth and elastic, which can take up to 10 minutes.
- 4. Cover the dough with a piece of plastic wrap and allow to rest for at least 15 minutes, or up to 2 hours.
- 5. If you are making the dough for filled pasta (like ravioli or tortellini) or lasagna, cut the dough into four equal pieces (shown here). If you are making the dough for noodles, cut the dough into eight equal pieces.
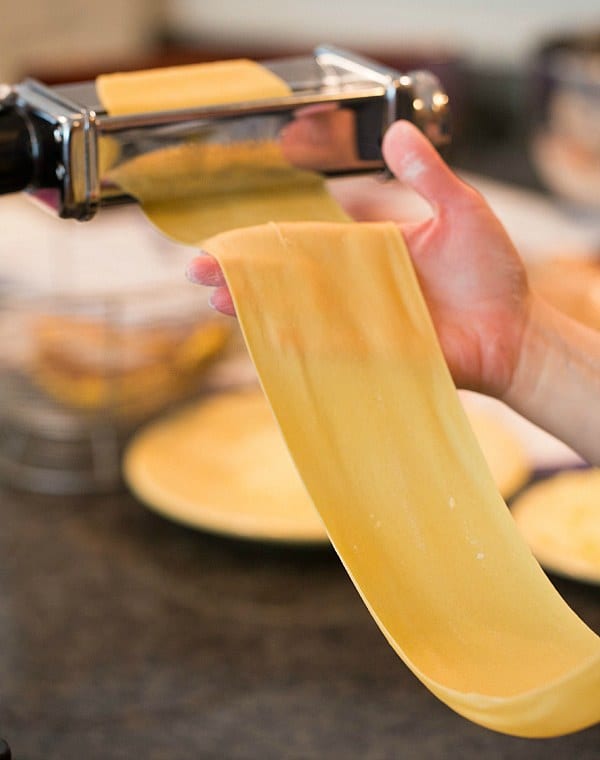
- 6. Work with one piece of dough at a time (keep the others covered with plastic wrap so they do not dry out). Flatten the dough into an oblong shape and pass through the pasta machine on the widest setting (usually 1).
- 7. Dust the dough lightly with flour, then fold the dough into thirds.
- Pass through the pasta machine's widest setting again, feeding the open side of the dough through first. Pass the dough through again once more, for a total of three times.
- 8. Lightly flour the dough if it is sticky, and adjust the setting to the next level (number 2), and pass the dough through two times.
- 9. Continue to roll the pasta thinner by passing it through the machine repeatedly, using a narrower setting for each pass going forward. If you are making filled pasta (ravioli or tortellini), you should end on the thinnest setting. For lasagna or noodles, end on the next-to-thinnest setting.
- 10. Lay the sheets of pasta on a clean dish towel dusted lightly with flour. If you will be using the sheets for lasagna or filled pasta immediately, cover the pasta with another damp dish towel to keep from drying out. If you will be cutting the pasta into noodles, do not cover and allow to sit until only slightly tacky, 10 to 15 minutes. At this point, you can use a fettuccine or spaghetti attachment on the pasta machine and run each sheet through, creating noodles. If you prefer wide noodles, you can cut pappardelle (¾ to 1 inch wide) and tagliatelle (¼ to ⅜ inch wide).
- 11. Immediately transfer the noodles to a baking sheet lined with a clean dish towel, separating individual strands as best you can. If planning to cook immediately, cover the noodles with a damp dish towel so that they do not dry out. If you would like to store the pasta for future use, gather several strands as you cut the pasta and curl them into nests. Allow them to dry on the clean, flour-dusted kitchen towel for 24 hours. After they are completely dry, they can be stacked in an airtight container for up to 2 weeks. Filled pasta, such as ravioli and tortellini, can be placed in a single layer on a baking sheet to freeze. Once completely frozen, they should be transferred to a resealable freezer bag and can be kept in the freezer for up to 1 month.
Notes
Did you make this recipe?
Leave a review below, then snap a picture and tag @thebrowneyedbaker on Instagram so I can see it!


Hi, I will be making a lasagna on Saturday, but was wondering if I could make the noodles in advance on Friday. If so, how do I store the lasagna noodles?