Ciabatta Bread
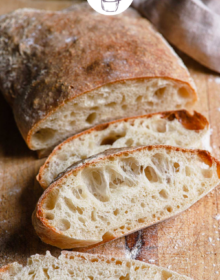
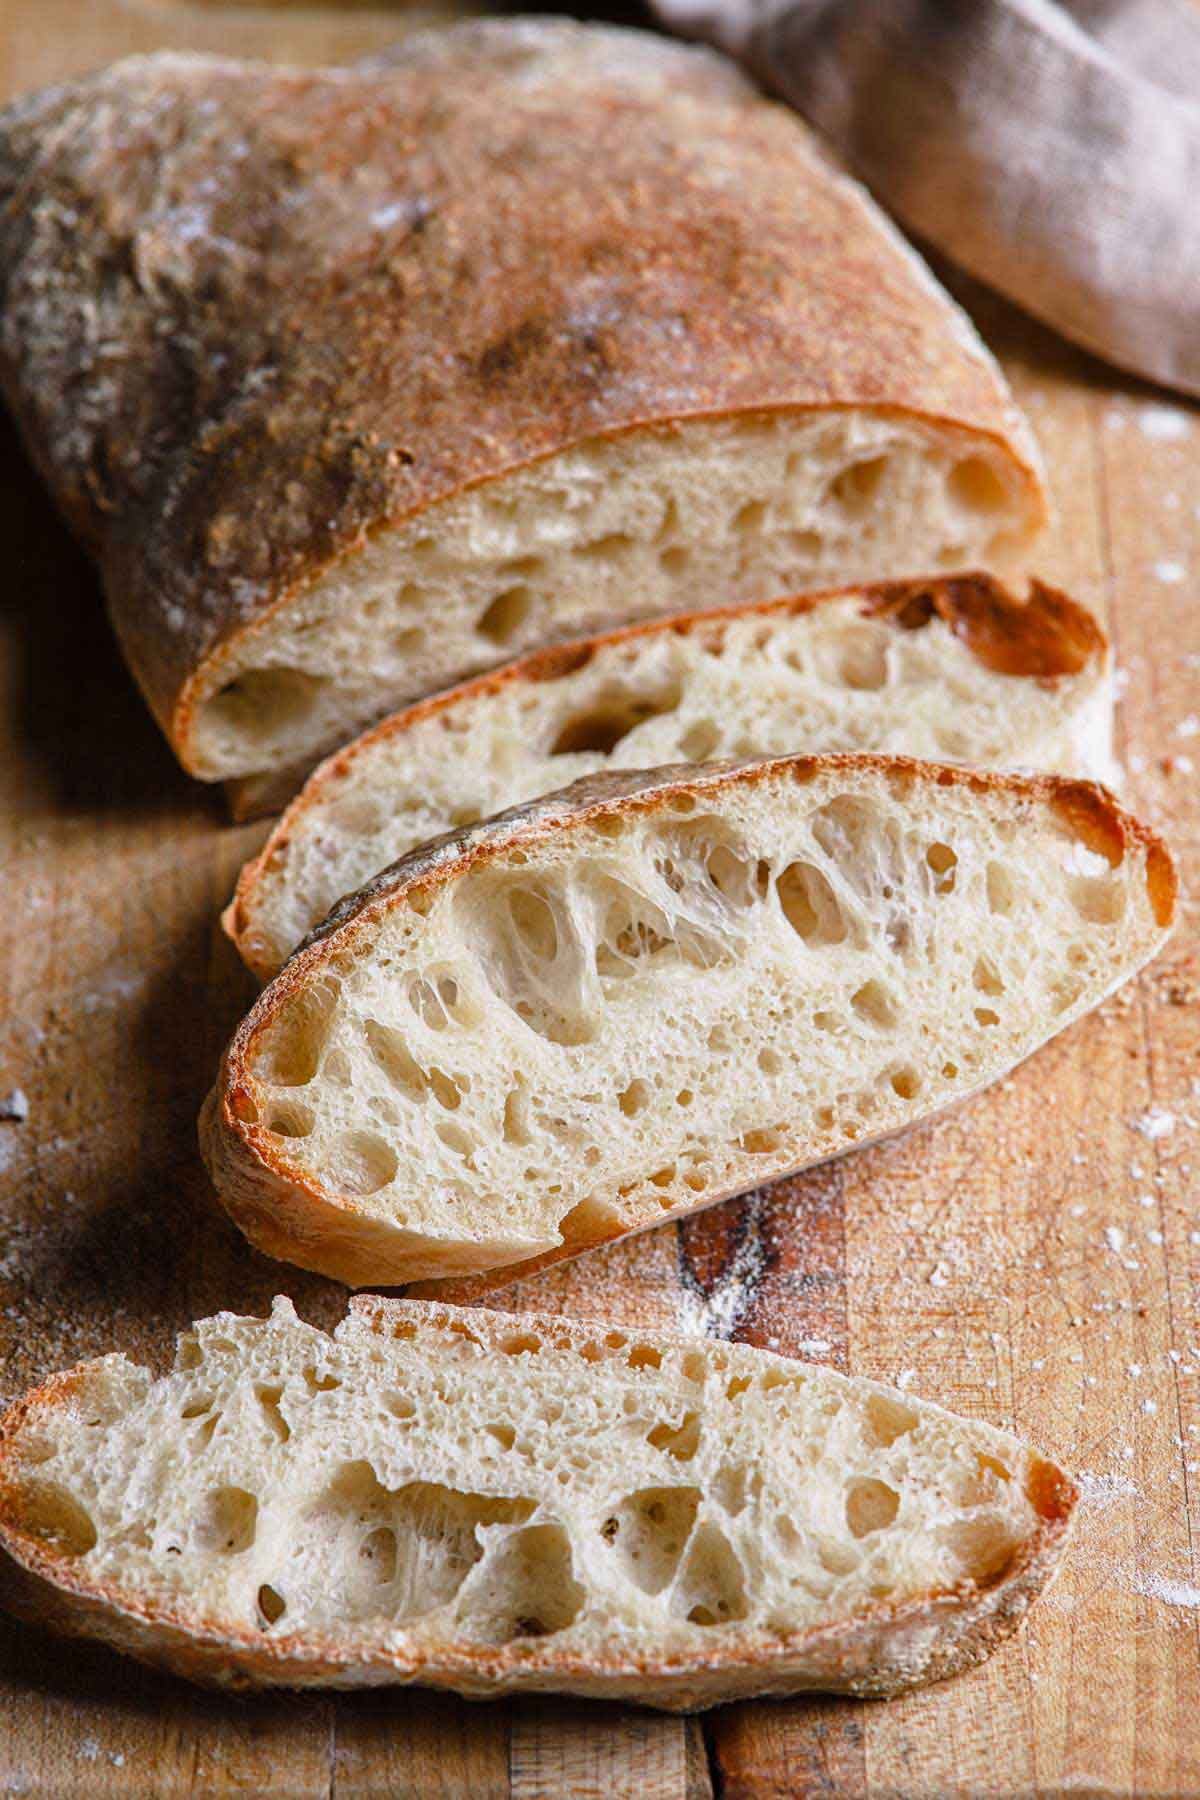
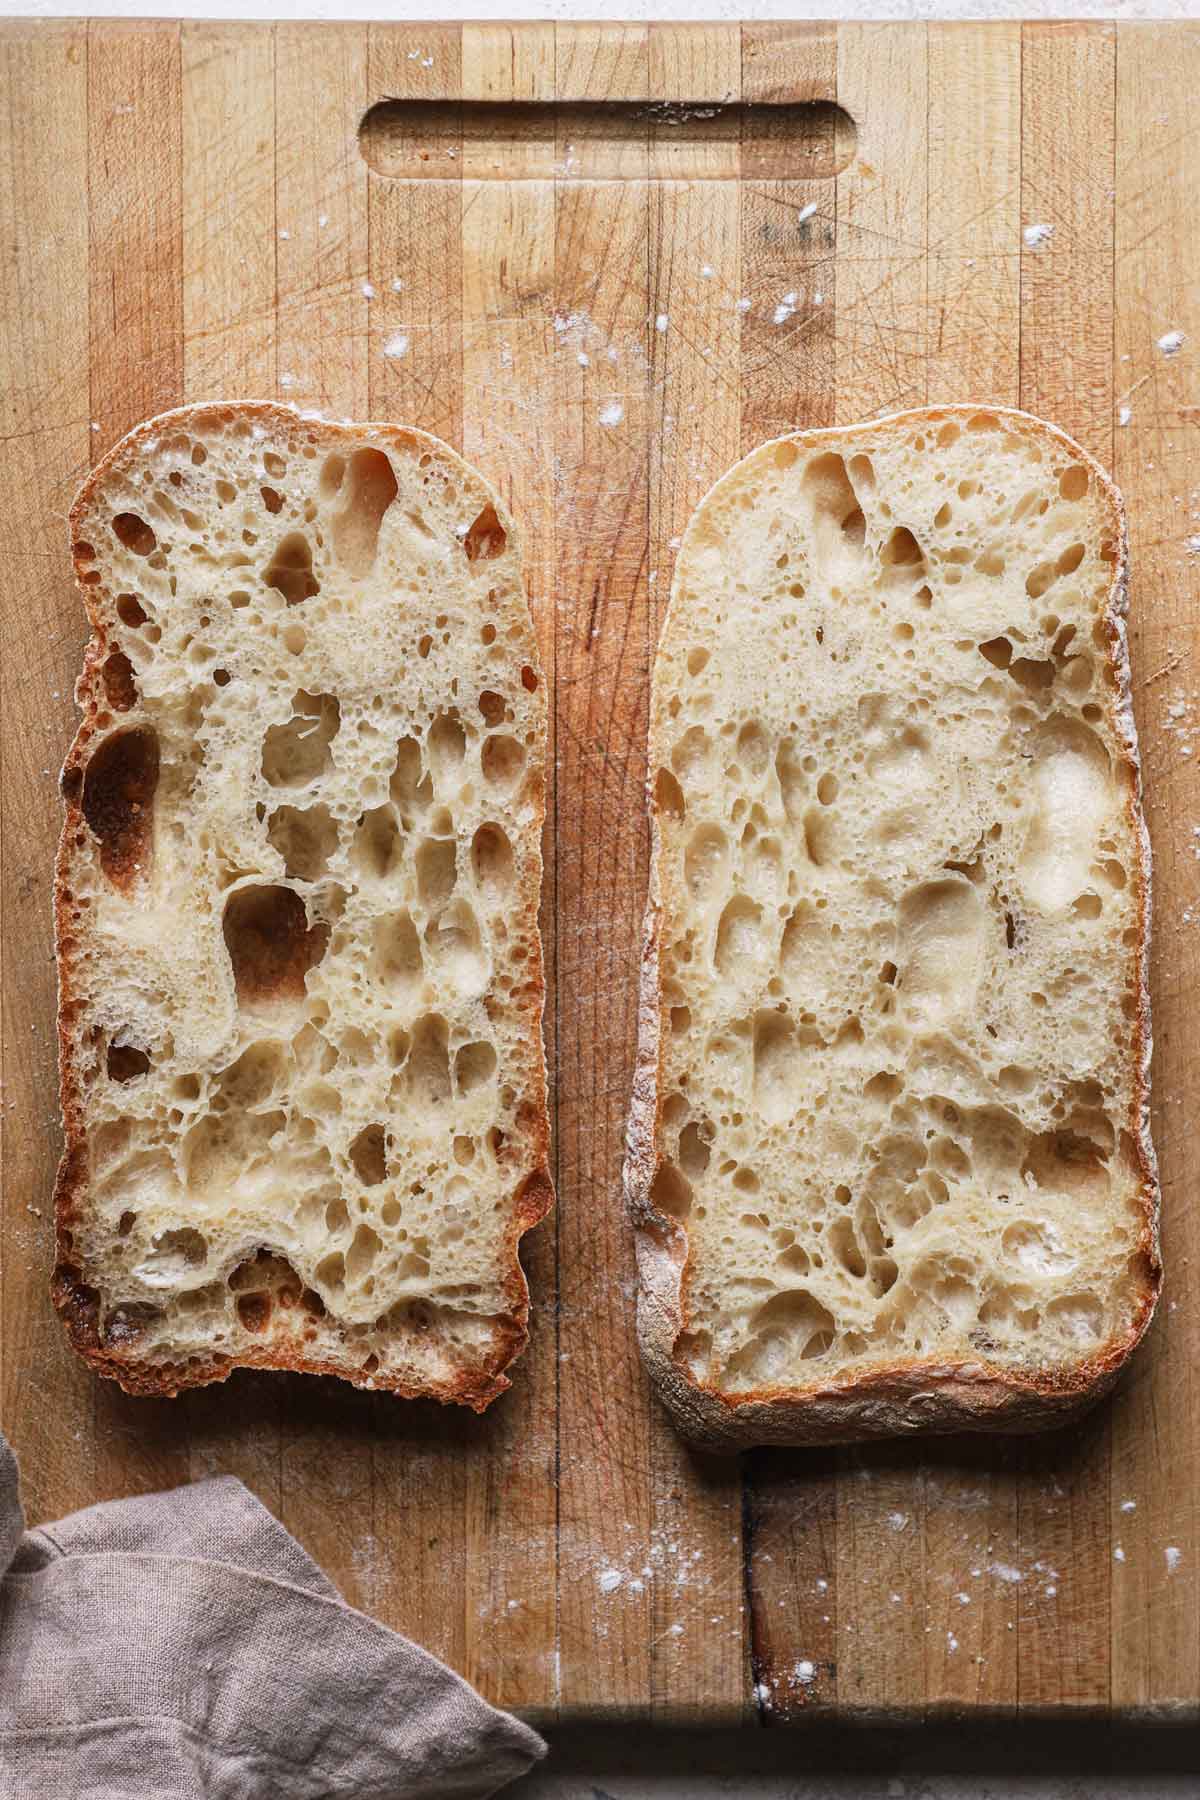
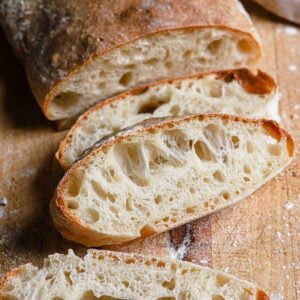
This easy ciabatta bread recipe results in beautiful rustic loaves of classic Italian bread, with its perfectly chewy interior texture studded with those wonderfully large air bubbles. It’s practically begging to be dipped into your favorite soup or stew.
I have such a love affair with baking homemade bread; the smell of yeast and fresh, rising dough has such a calming effect.
It makes me want to curl up on a covered wrap-around porch and read during a rainstorm.
Why You’re Going to Love It
I've long loved ciabatta bread for its chewy exterior and soft crumb speckled with air holes. It's the perfect bread for dunking into soup, slicing horizontally and making a sandwich, converting to garlic bread, or for simply slathering with butter and eating until your heart's content.
This recipe is not complicated, although it does take a little bit of planning ahead. Actual hands-on time is less than an hour in total, and the dough is very forgiving. Let’s dive into the details of the recipe!
Ingredients Overview
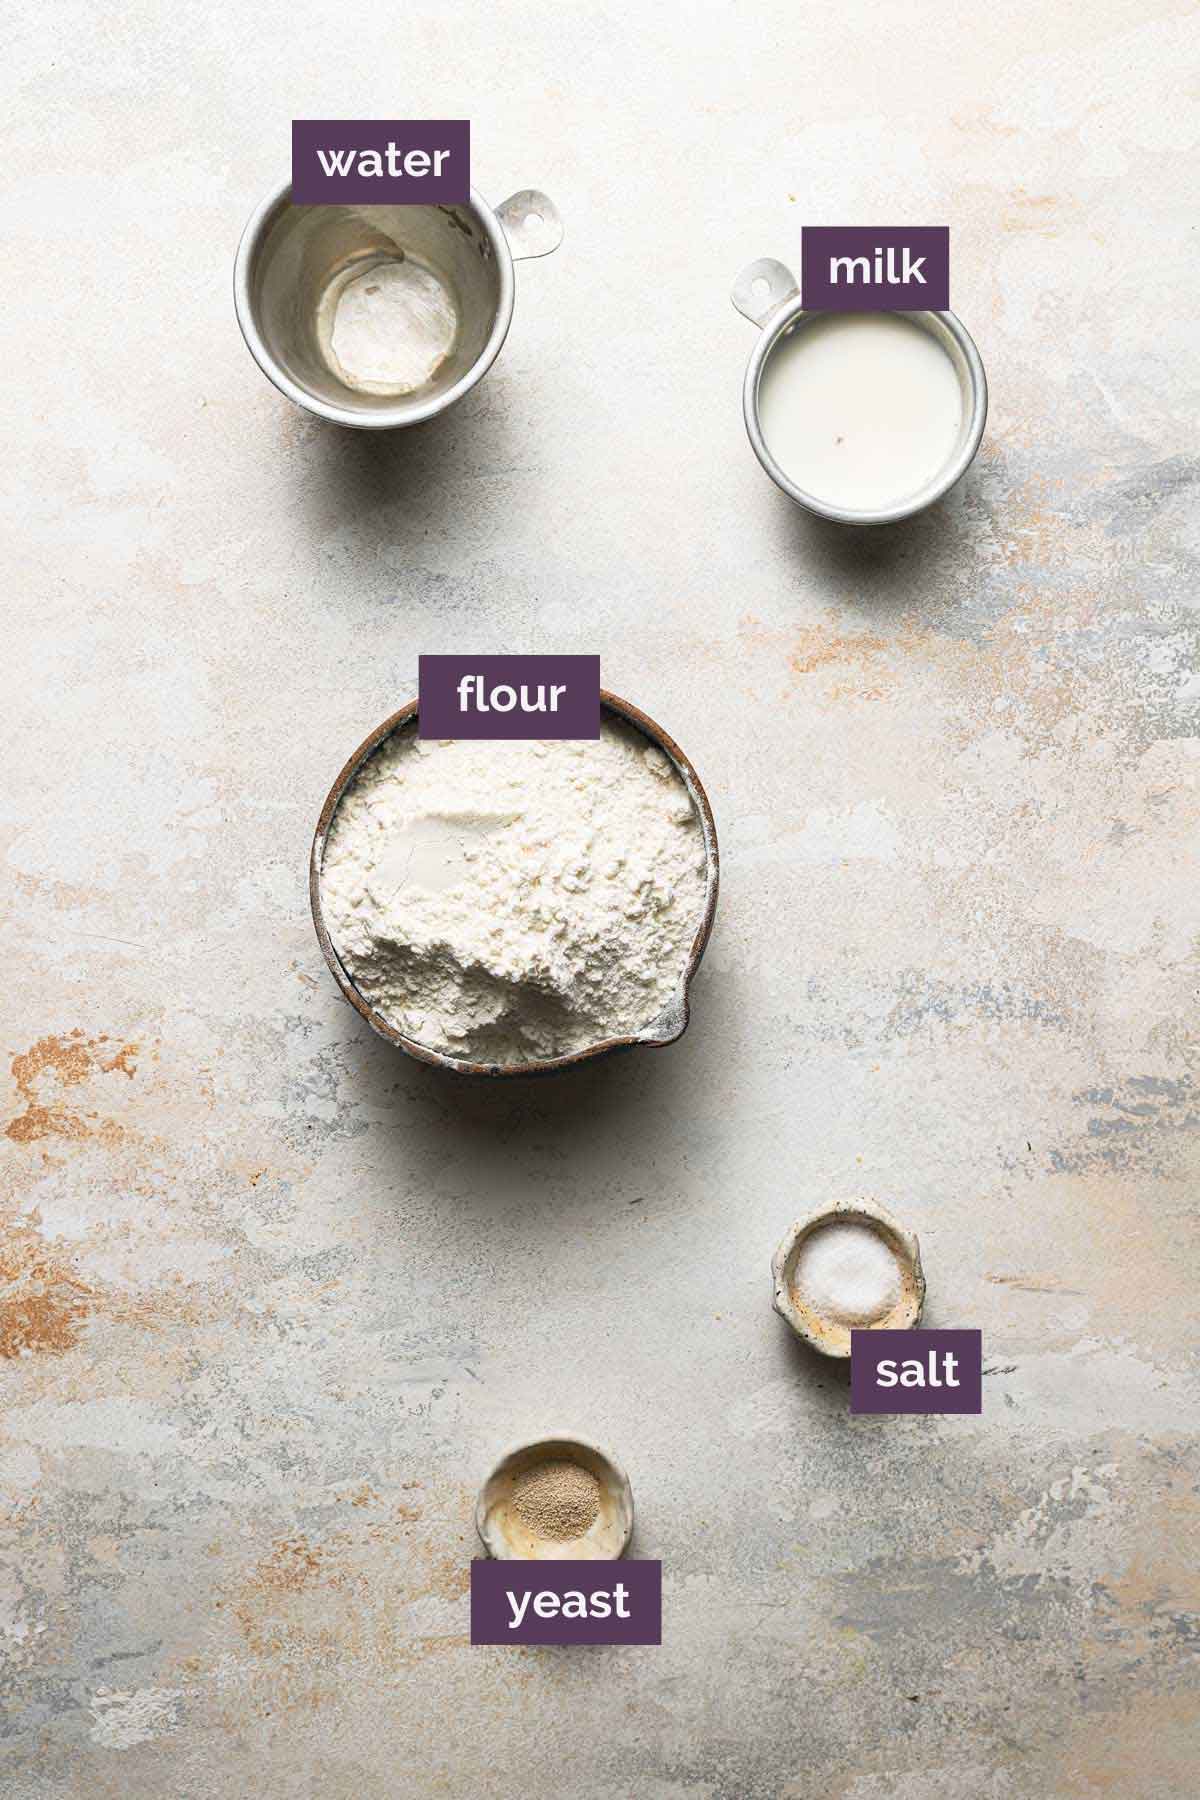
The beauty of this bread is its incredibly simplistic and rustic nature. Below is a quick overview of the ingredients we use with some notes on them and substitutions you may be wondering about:
- Flour – For this recipe, we use all-purpose flour. It has the perfect amount of protein to produce a ciabatta with a perfect rise and airy texture. Substituting bread flour will result in a denser, chewier, and less airy loaf of bread.
- Yeast – We use instant yeast, which is easily mixed into dry ingredients. If you need to substitute active dry yeast, be aware that you will need to activate it in both the sponge and the dough by first ensuring that the water is warm (100 to 110 degrees F), sprinkling the yeast over the water, giving it a quick stir, and then waiting 10 or 15 minutes, until it becomes foamy. At that point, proceed with the rest of the recipe.
- Water – A vital component! Ciabatta dough is considered a high-hydration dough because of the ratio of water to flour. For this reason, you will notice that it is rather sticky and a very wet dough. We’ll talk below about how best to handle the dough.
- Salt – Not only does this help to balance flavors in bread, but it also aids in coloring the crust, controlling the rise, and developing gluten. Don’t leave it out!
- Milk – A protein in milk helps to control the size of the air bubbles in the bread. Without it, the holes are larger, which doesn’t leave as much bread structure. The best milk is whole or 2%, but 1% can also be used in a pinch. You can also substitute 2 tablespoons of nonfat milk powder (increase the water in the dough step to 1 cup).
Ciabatta Dough: Two Parts
The dough for ciabatta bread is made in two stages:
- Sponge (or Biga) – This first mixture is prepared the day before you plan to bake the bread. It is comprised of just flour, yeast, and water. This fermented sponge is what gives the ciabatta its amazing, slightly tangy flavor.
- Dough – The next day, you will mix together the dough, which will include the sponge that has been sitting overnight.
How to Make the Dough
Let’s walk through how the dough comes together:
Step #1: Make the Sponge – You’ll mix together the flour, yeast, and water with a wooden spoon, cover the bowl with plastic wrap, and let sit overnight or for up to 24 hours.
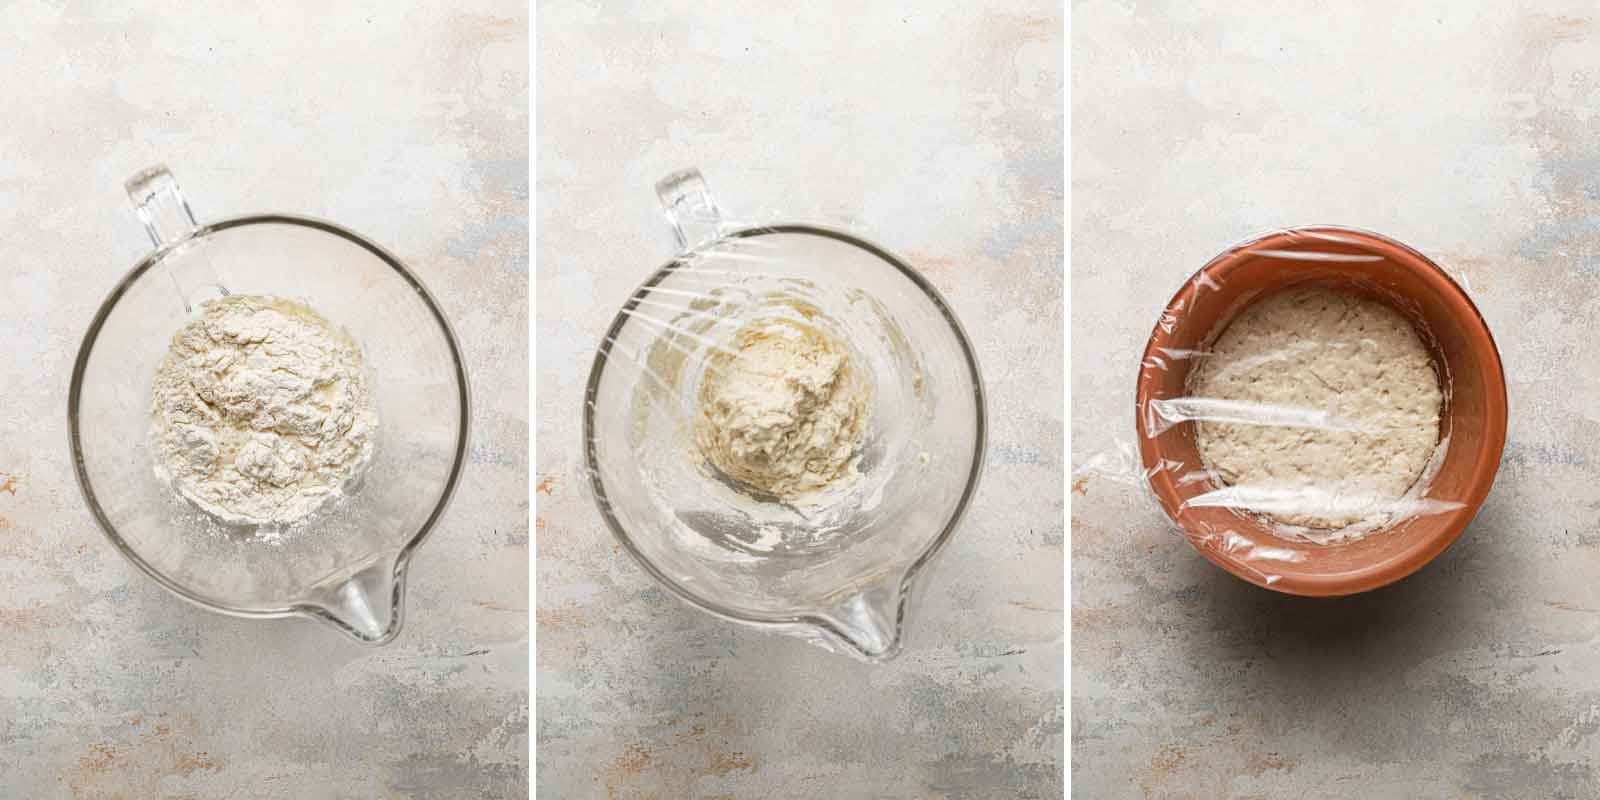
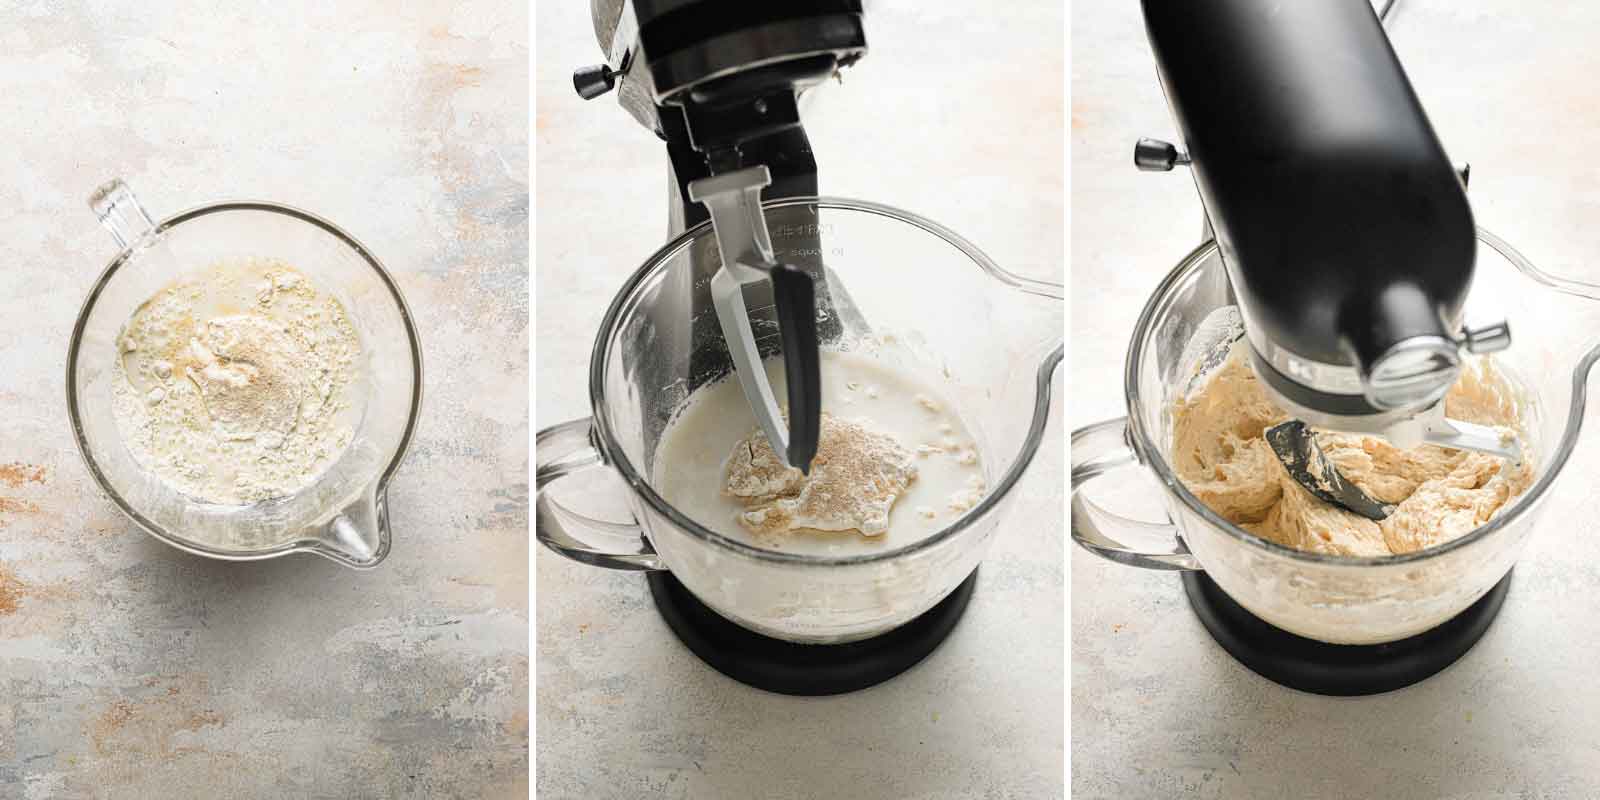
Step #2: Mix the Dough – Add the sponge and all of the dough ingredients to a stand mixer and mix with the paddle attachment until it becomes a uniform mass and pulls away from the sides of the bowl. Switch to the dough hook and knead until the dough is shiny and smooth (about 10 minutes).
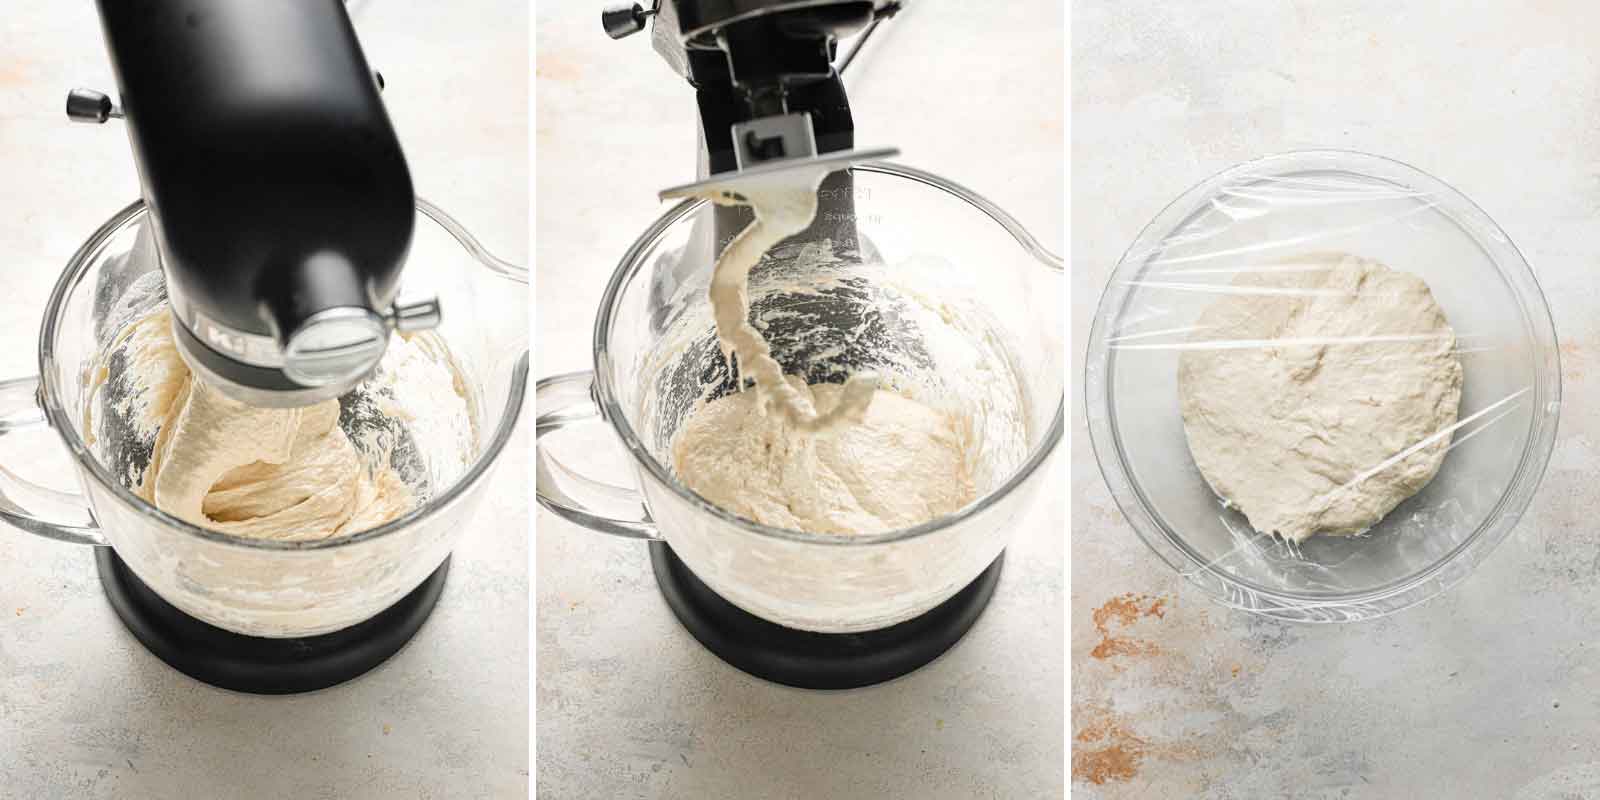
Step #3: Rise – Transfer the dough to a bowl, cover with plastic wrap, and set at room temperature until doubled in size (about 1 hour).
Folding the Dough
This folding process may seem tedious, but it is an integral part of achieving those picture-perfect air bubbles! Here is how you do it:
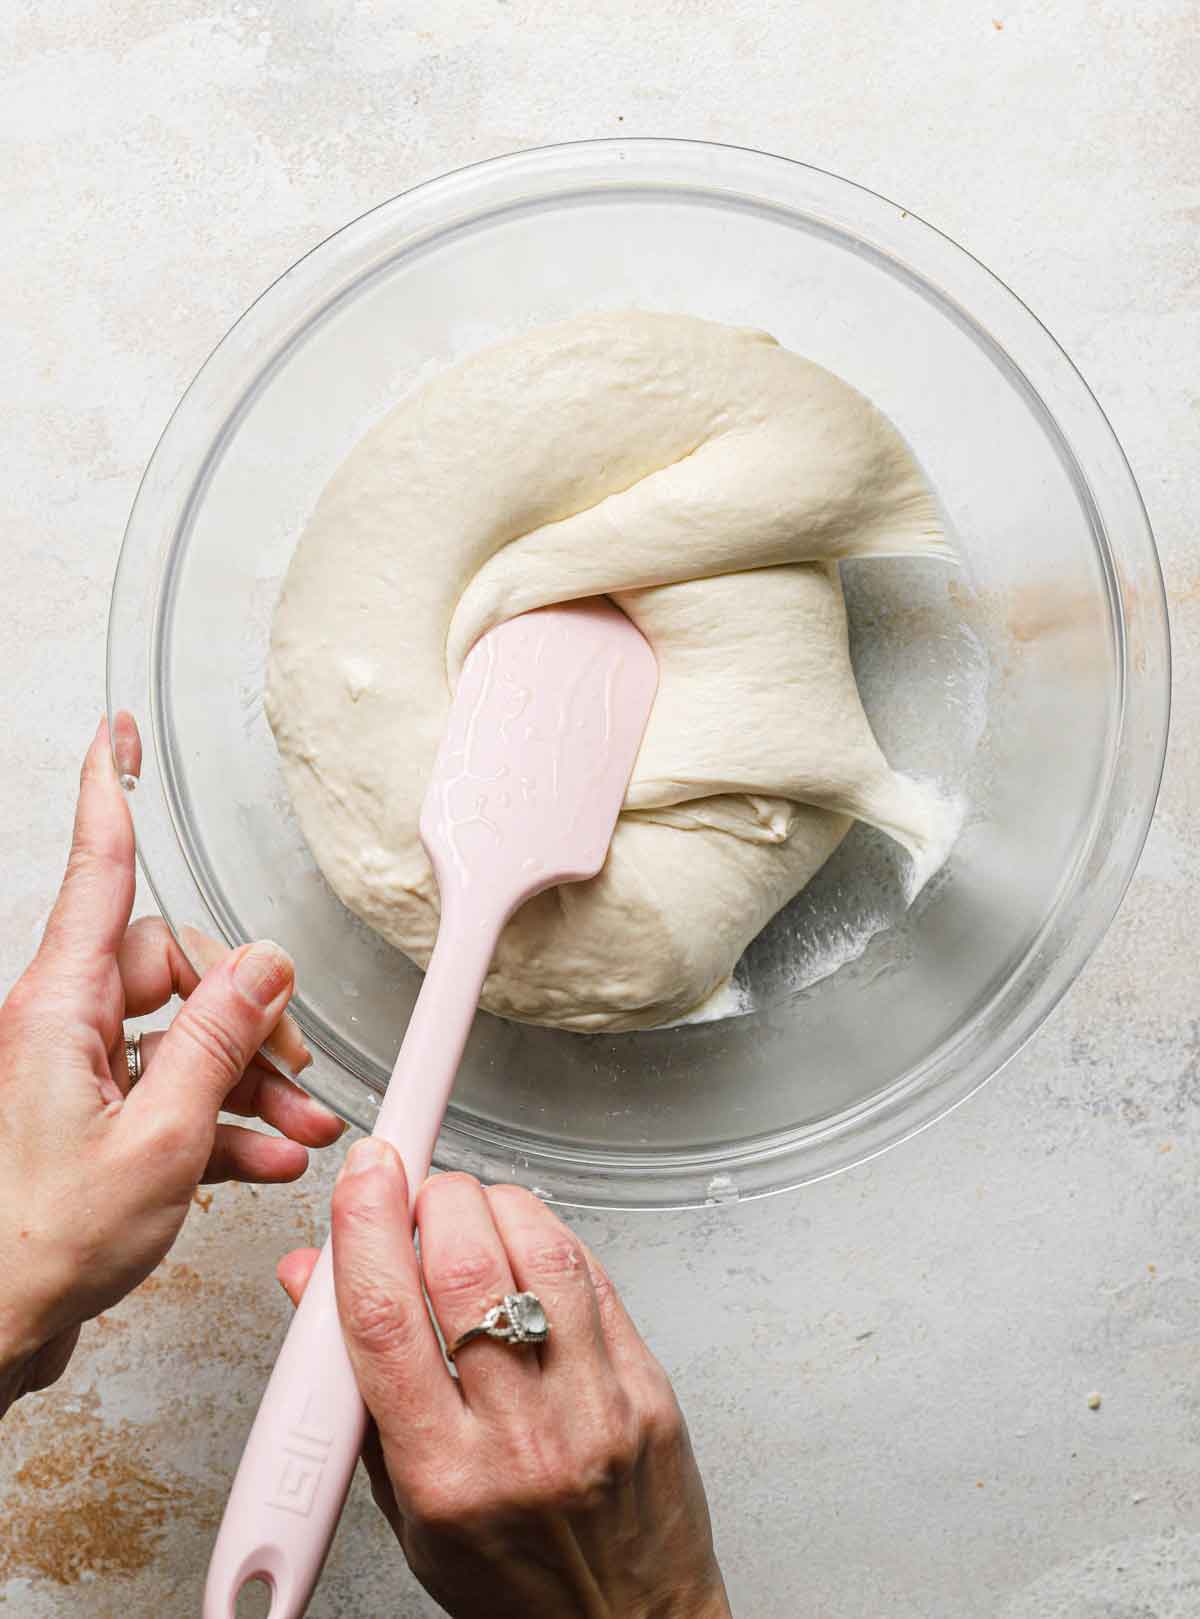
Make sure your spatula or bowl scraper is sprayed with cooking spray (or rub it with olive oil).
Then lift the end of the dough over itself toward the middle, rotate the bowl 90 degrees, repeat, and then six more times, for a total of 8 times.
Save This Recipe
Cover the bowl with plastic wrap, let rest/rise for 30 minutes, then repeat the exact same folding process again.
Once done, cover the dough once more and allow to double in size before proceeding with shaping.
Shaping the Ciabatta
The final shaping of the ciabatta before baking is what gives the bread its characteristic “slipper” shape, from which its name originates (“ciabatta” means slipper in Italian; the bread was given this name because its shape resembles a well-worn slipper).
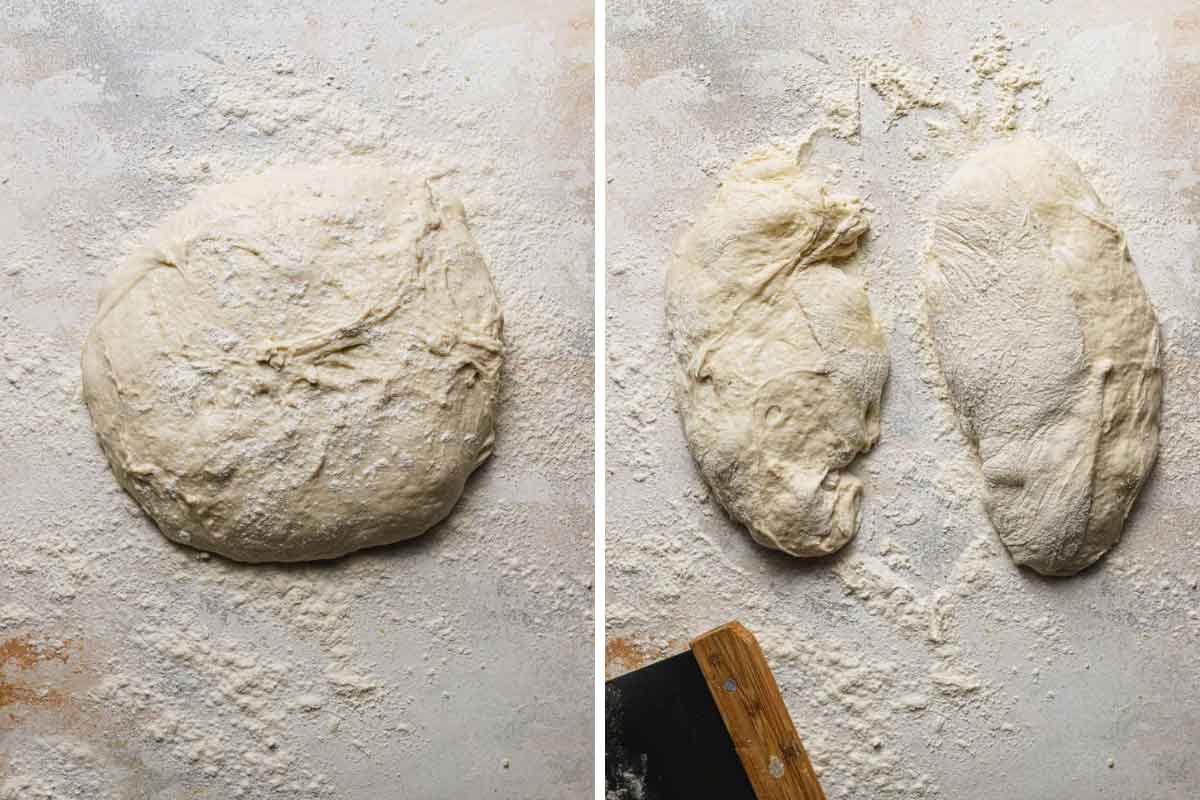
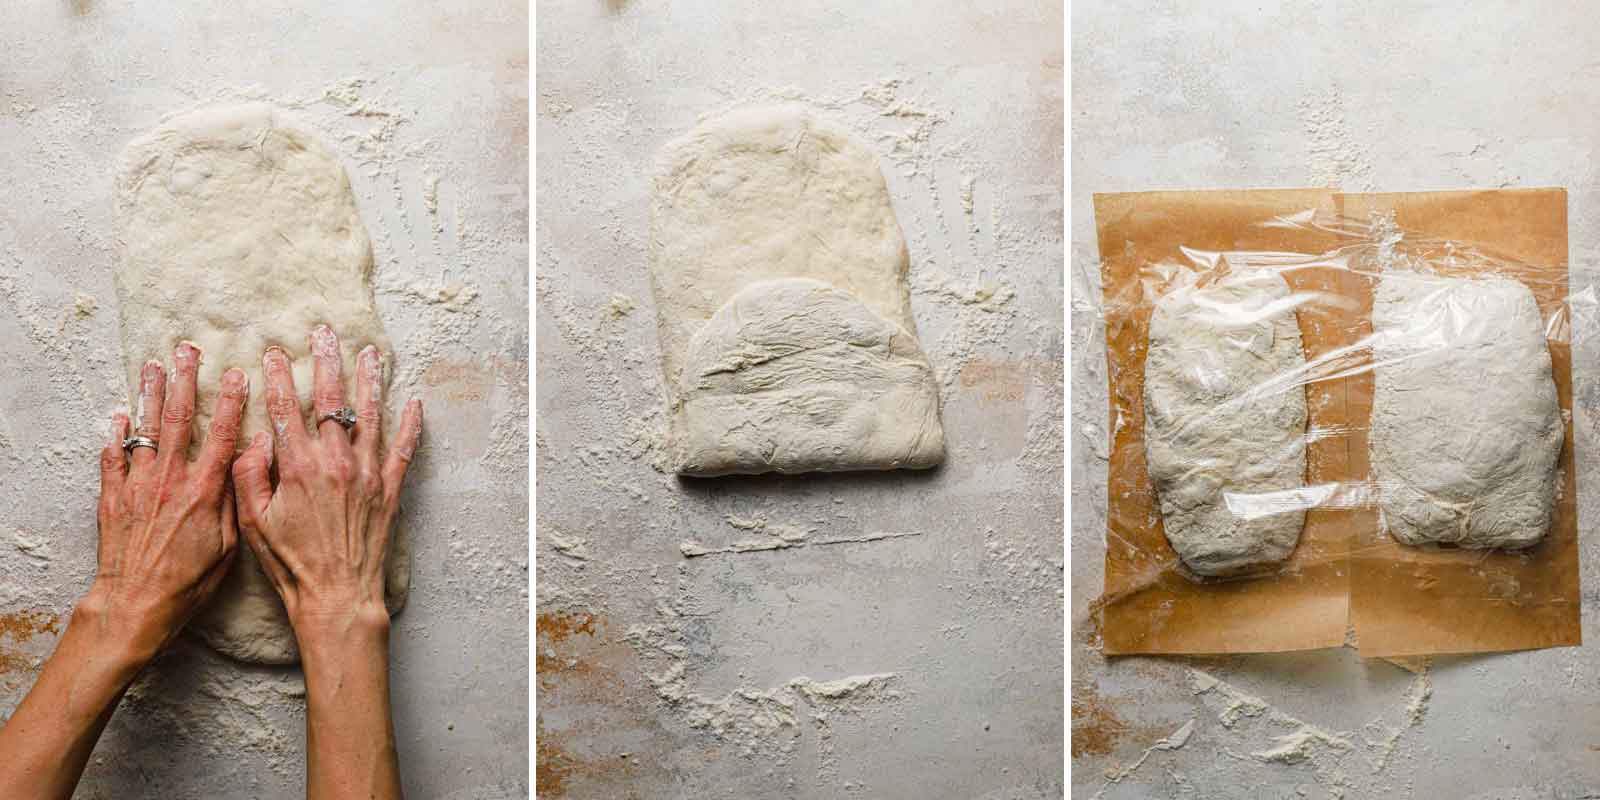
Shaping Step #1: Turn the dough out onto a floured surface gently (so it does not completely deflate), dust it with flour, and divide in half with a bench scraper.
Shaping Step #2: Place one piece of dough cut-side-up and dust with flour, then using fingertips, gently press the dough into a 12×6-inch rectangle. Fold one end of the dough towards the middle, and fold the other end over the top of the first fold (as you would fold a letter in thirds). Repeat with the second loaf of dough.
Shaping Step #3: Transfer each loaf to a rectangular piece of parchment that has been dusted with flour. Dust the tops of the loaves with flour, cover with plastic wrap, and allow to sit for 30 minutes.
Baking the Bread
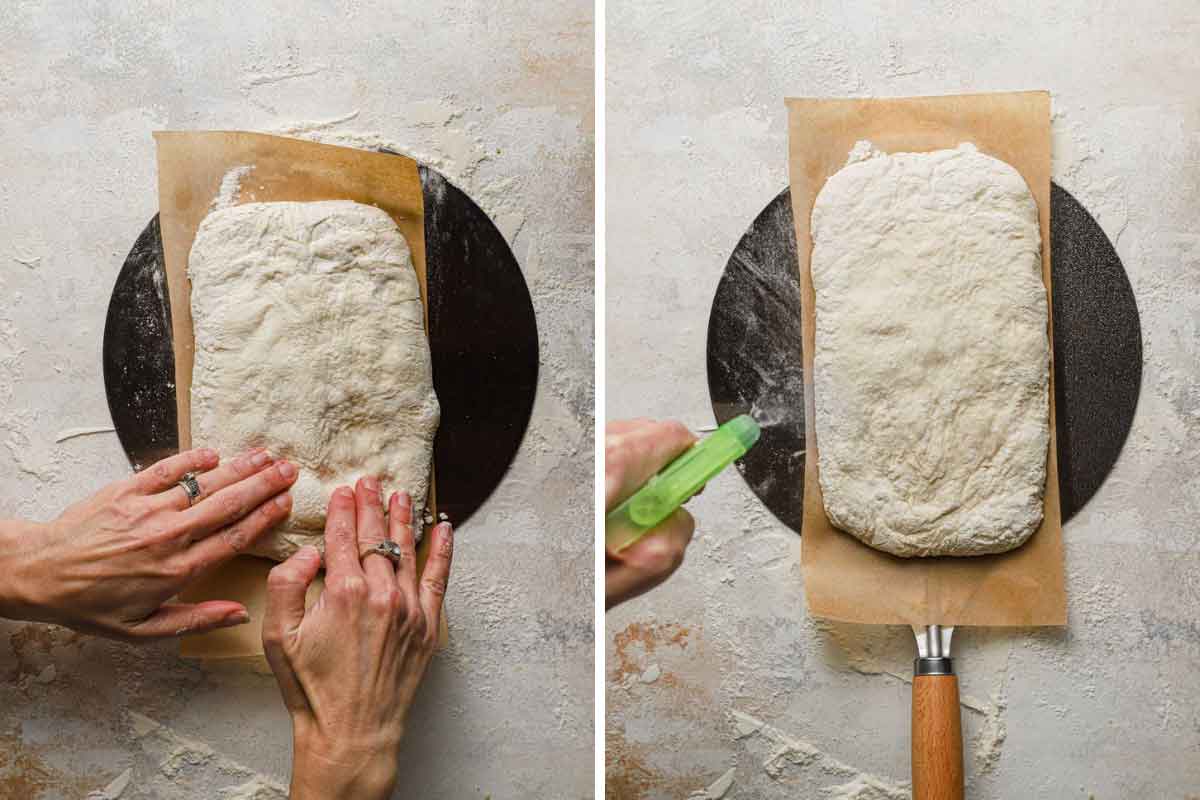
When the 30 minutes is up, you will slide the parchment pieces with the loaves onto a pizza peel. Use floured fingertips to poke the surface all over to create a 10×6-inch rectangle. Lightly spritz the loaves with water and slide the loaves onto a preheated pizza stone in the oven (you can also use an inverted baking pan, see notes below).
Spray with water twice more during the first 5 minutes of baking, then continue baking until the internal temperature registers 210 degrees F.
Recipe Notes and FAQ
A few notes and the answers the some commonly asked questions:
- Equipment – To make the most of this recipe, I recommend using the following pieces of equipment: stand mixer / bowl scraper / bench scraper / baking stone / parchment paper / pizza peel / spray bottle / digital instant-read thermometer / wire cooling rack
- Yeast – If you substitute active yeast instead of instant yeast, you will need to be sure to activate it in warm water first, instead of simply mixing it with the flour and room temperature water.
- Milk – Whole milk is preferred, but 2% or 1% can also be used. You can also substitute 2 tablespoons of nonfat milk powder (increase water in dough to 1 cup).
- Stand Mixer – Due to the high hydration of this dough and how sticky it is, a stand mixer is important for being able to manage the dough properly.
- Handling the Dough – Keep in mind that this dough is very wet and sticky; the key to working it well is to do so quickly and gently. Too much heavy-handling of the dough will result in flat, tough loaves. Use a bowl scraper when possible and if you need to use your hands, make sure they are well-floured.
- Baking Stone – If you do not have a baking stone, you can use a baking sheet that is turned upside on the lowest oven rack and preheated as directed.
- Making Ciabatta Rolls – To make rolls, use a bench scrape to divide each loaf into 6 or 8 even-sized portions. Separate them a bit on the parchment sheet so they aren’t touching.
- Storage – The bread can be kept at room temperature, wrapped in foil, for up to 2 days.
- To Reheat the Bread – Keep it wrapped in foil and place in a 450-degree oven for 6 to 8 minutes.
- Freezing the Bread – Wrap tightly in foil, then place in a ziploc freezer bag and freeze for up to 3 months. Thaw at room temperature, then warm and re-crisp the crust using the reheating method above.
More Popular Homemade Bread Recipes
- The Best White Bread Recipe
- Grandma’s Banana Nut Bread
- Copycat Pizza Hut Breadsticks
- Classic Italian Bread Recipe
- Spicy Cheese Bread
Watch How to Make Homemade Ciabatta Bread:
If you make this ciabatta bread recipe and love it, remember to stop back and give it a 5-star rating - it helps others find the recipe! ❤️️
Ciabatta Bread
Ingredients
For the Sponge:
- 1 cup (130 g) all-purpose flour
- ⅛ teaspoon instant yeast
- ½ cup (120 ml) water, at room temperature
For the Dough:
- 2 cups (260 g) all-purpose flour
- 1½ teaspoons salt
- ½ teaspoon instant yeast
- ¾ cup (180 ml) water, at room temperature
- ¼ cup (60 ml) whole or 2% milk, at room temperature
Instructions
- Make the Sponge: Combine the 1 cup flour, ⅛ teaspoon yeast, and ½ cup water in a medium bowl and stir with a wooden spoon until a uniform mass forms. Cover the bowl tightly with plastic wrap and let stand at room temperature for at least 8 hours or up to 24 hours.
- Make the Dough: Place the sponge and the dough ingredients (flour, salt, yeast, water and milk) in the bowl of a stand mixer fitted with the paddle attachment. Mix on low speed until combined and a shaggy dough forms, about 1 minute, scraping down the bowl and paddle as needed. Increase the speed to medium-low and continue mixing until the dough becomes a uniform mass that collects on the paddle and pulls away from the sides of the bowl, 4 to 6 minutes.
- Change to the dough hook and knead the bread on medium speed until smooth and shiny (the dough will be very sticky), about 10 minutes.
- Transfer the dough to a large bowl, cover tightly with plastic wrap, and let rise at room temperature until doubled in size, about 1 hour.
- Spray a rubber spatula or bowl scraper with non-stick cooking spray. Fold the dough over itself by gently lifting and folding the edge of the dough toward the middle. Turn the bowl 90 degrees, and fold again. Turn the bowl and fold the dough 6 more times (for a total of 8 times).
- Cover with plastic wrap and let rise for 30 minutes.
- Repeat the folding as in step #7, replace the plastic wrap, and let rise until doubled in size, about 30 minutes.
- One hour before baking, adjust an oven rack to the lower-middle position, place a baking stone on the rack and preheat the oven to 450 degrees F.
- Cut two 12×6-inch pieces of parchment paper and dust liberally with flour. Transfer the dough to a floured work surface, being careful not to deflate it completely. Liberally flour the top of the dough and divide it in half with a bench scraper. Turn 1 piece of dough cut-side-up and dust with flour. With well-floured hands, press the dough into a rough 12×6-inch rectangle. Fold the shorter sides of the dough toward center, overlapping them like you would fold a letter in thirds, to form a 7×4-inch rectangle. Repeat with the second piece of dough.
- Gently transfer each loaf, seam-side-down, to the parchment sheets, dust with flour, and cover with plastic wrap. Let the loaves sit at room temperature for 30 minutes (the surface of the loaves will develop small bubbles).
- Slide the parchment pieces with the loaves onto a pizza peel. Using floured fingertips, evenly poke the entire surface of each loaf to form a 10×6-inch rectangle; spray the loaves lightly with water. Slides the loaves and parchment onto the baking stone. Bake, spraying the loaves with water twice more during the first 5 minutes of baking time, until the crust is deep golden brown and the loaves register 210 degrees F, 22 to 27 minutes.
- Transfer the loaves to a wire rack, discard the parchment, and let cool to room temperature for at least 1 hour before slicing and serving. The bread can be wrapped in a double layer of plastic wrap and stored at room temperature for up to 3 days. Wrapped with an additional layer of foil, the bread can be frozen for up to 1 month. To recrisp the crust, thaw the bread at room temperature (if frozen), and place unwrapped bread in 450-degree oven for 6 to 8 minutes.
Notes
- Equipment - To make the most of this recipe, I recommend using the following pieces of equipment: stand mixer / bowl scraper / bench scraper / baking stone / parchment paper / pizza peel / spray bottle / digital instant-read thermometer / wire cooling rack
- Yeast - If you substitute active yeast instead of instant yeast, you will need to be sure to activate it in warm water first, instead of simply mixing it with the flour and room temperature water.
- Milk - Whole milk is preferred, but 2% or 1% can also be used. You can also substitute 2 tablespoons of nonfat milk powder (increase water in dough to 1 cup).
- Stand Mixer - Due to the high hydration of this dough and how sticky it is, a stand mixer is important for being able to manage the dough properly.
- Handling the Dough - Keep in mind that this dough is very wet and sticky; the key to working it well is to do so quickly and gently. Too much heavy-handling of the dough will result in flat, tough loaves. Use a bowl scraper when possible and if you need to use your hands, make sure they are well-floured.
- Baking Stone - If you do not have a baking stone, you can use a baking sheet that is turned upside on the lowest oven rack and preheated as directed.
- Making Ciabatta Rolls - To make rolls, use a bench scrape to divide each loaf into 6 or 8 even-sized portions. Separate them a bit on the parchment sheet so they aren't touching.
- Storage - The bread can be kept at room temperature, wrapped in foil, for up to 2 days.
- To Reheat the Bread - Keep it wrapped in foil and place in a 450-degree oven for 6 to 8 minutes.
- Freezing the Bread - Wrap tightly in foil, then place in a ziploc freezer bag and freeze for up to 3 months. Thaw at room temperature, then warm and re-crisp the crust using the reheating method above.
- Recipe from Baking Illustrated
Did you make this recipe?
Leave a review below, then snap a picture and tag @thebrowneyedbaker on Instagram so I can see it!
This recipe was originally published in March 2014.
Photography by Dee Frances.


Maybe it is a silly question but while you bake the first bread for 20-25 min. (you cut it in half to make 2 bread) The second bread you just wait in the counter? Will not flatten down with the longer than 30 min. rest? My pizza stone just hold one loaf.
Love Ciabatta bread. I also love the fact that you have a video. Being 79 I need to see just how you make it. I am going to make buns out of it. Thank you for all your great recipes.
I have a muscle disease so I can’t make anything that requires a lot of kneading. When I saw most of the physical labor would be done with a mixer I added it to my list of recipes to try. All along the way I thought I’ve got to be doing this wrong but by the next step I’d think that looks right. It turned out great and we tried some as soon as it cooled enough. So good! Can’t wait to try it with our home made chili in an hour or so. Definitely learned some things and know the next batch will be even better.
I have made this recipe 4 times now. The biga is so important for flavor, other recipes don’t include this step. I think the most difficult step is the shaping of the dough. I’m experienced in bread baking and working with a wet dough is one of the toughest part to master. I appreciate your detailed instructions, they are very helpful.
The best recipe for ciabatta bread!
Made this bread. It is fantastic and I make a lot of it. I do have a question though, at what point can I refrigerate the dough before baking?
Can I refrigerate the sponge and use it the next day or do I have to complete the dough making process? If I refrigerate it , how long do I have to leave it set before turning it into a dough or baking? Thanks for reading.
Very good recipe. Nice crust and great texture.
Hi i wanted to ask if I make the sponge 36 hours before I move on will there be a problem i know the recipe says up to 24 hours but I want to know how much of a problem it would pose to change that
Very good and not dificult
Great
I made this bread, and thought I followed the directions to the letter, but something must have went haywire. I used 2 cookie sheets, epecting a bit of hassle, positioning my loaves. I was right. Eventually I just went for it, and it turned out the tastiest bread I’ve had in many years. I mut have goofed along the way, to have such a hassle. It is definetly worth another try.
Are you supposed to preheat your Baking Stone before putting the bread in the oven?
Yes a baking stone should be pre heated for around 1 hr before baking
This is a crazy overly complicated recipe!! I make bread every other day using Jenny Jones no need method. I would be eating my bread while your still fiddling with your stand mixer!!
My family really, really enjoyed this bread. In fact I would like to make it more routinely. Is it possible to make ahead sponges and freeze them?
What’s your point? Proceed with Jenny
If I’m using active dry yeast instead of the instant yeast how much yeast do I use?
Use the same amount, but make you’ll need to activate it first, which means making sure the water in each step is warm and stirring th eyeast into it first.
First time ever making ciabatta. I live in a small town where I cant find it every store visit so I decided to make my own and this is the recipe I chose. It is in the oven baking now but I can tell by looking it is going to be delicious, the loaves are looking perfect, can’t wait to taste. The recipe had a lot of steps and I am not a bread baker haha, but I think it is going to be well worth it-may never buy store bought again. Also use many recipes from Browneyedbaker and they have never let me down yet.
I am soo delighted with the results of this recipe!! My house is cold and it wouldn’t rise as directed, so I warmed my microwave up with a cup of water and put my bowl of dough in it.Vola !! The dough raised and I gently folded it as directed. I got two beautiful loaves of bread.Thank you for the wonderful recipe
I truly enjoy reading your posts; they are very helpful to me. If you have any spare time, please visit super mario bros wonder and play with me. Thank you.
Wonderful tasting bread. Will make often. I do need to work on my shaping technique though. Wow, was this good. Thanks.
You’re welcome, so wonderful to hear you enjoyed it!
Hi, quick question because I am a little confused with the instructions. In step 7, it says to do the folding like in step number three but step number three is referring to the mixer. Also in step 5 when I fold the total of 8 times, is it all at the same time or resting dough in between times? Thank you!!
Hi Rosalva, I apologize for the confusion, I will make sure the recipe instructions are updated to refer to the correct step (it should refer to step #5). After you let the dough rest for 30 minutes (step #6), you will proceed with step #7, folding a total of 8 times like you did previously, all at the same time, then you will let it rest/rise for 30 minutes again. I hope that helps!
I have not made this yet, but we love ciabatta bread. Thanks for the details along with the recipe not only for baking but storing and reheating.
Hi! This ciabatta looks great. I am prediabetic and may no longer eat white bread. 😢 it would be lovely if you would make a whole grain bread recipe every once in a while. Thank you for your consideration of my request.
Will my sourbough bread pans work as well as baking stone? I do like suggestion of dropping all dough into a cast iron pot and baking with lid on until last few minutes.
Best recipe I have ever made! ” South Georgia Cook not a Chef ” Rusty
I make Sourdough ciabatta every week it starts a a bit different but basically the same recipe. First, if you like sourdough, make the starter and leave on counter (combine water and flour covered with cheesecloth) leave for 10 days or more feeding everyday with same amounts of water and flour and it will become sourdough starter ( will keep for years). Then use a cup of starter in place of some of the liquid called for in the original recipe. The other change is place the entire dough on parchment and when the oven is preheating I place a covered cast iron dutch oven in oven to preheat and transfer the entire bread dough ball into dutch oven, cover and bake at 450 for 20 min take off cover and bake another 15 minutes! Crispy and delightful. Big round loaf!
I love ciabatta bread! it so amazing!