Homemade Baklava
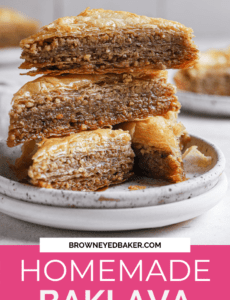
A classic recipe for Baklava, the traditional Greek and Turkish pastry made with ground nuts and buttery layers of phyllo dough, drizzled with a spiced honey syrup. Learn how to make this crispy Greek Baklava for holiday platters or special occasions!
Long, long ago when my husband and I were dating and he was still living in the DC suburbs, we happened upon a summer Brewfest. After getting our tasting glasses and sampling brews such as watermelon beer, we hit the food tents. On our way out, we walked past a little Greek food tent manned by an older couple. They were charming and the pastries looked unbelievable; we loaded up on some baklava and headed home.
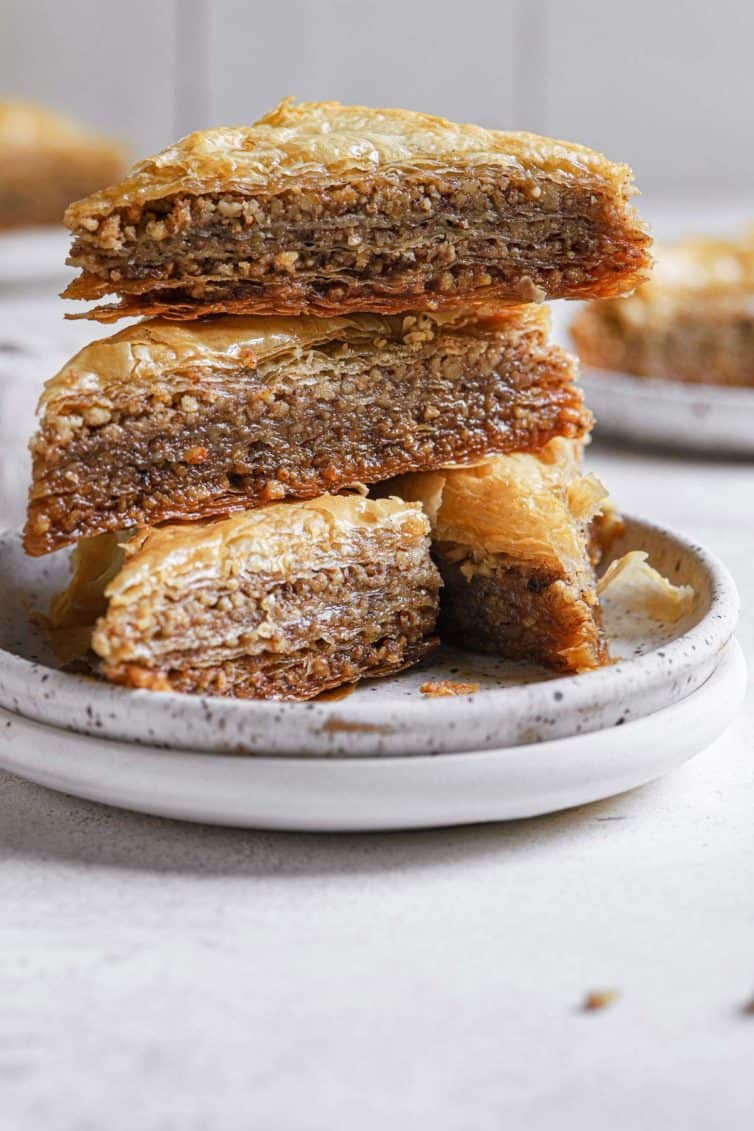
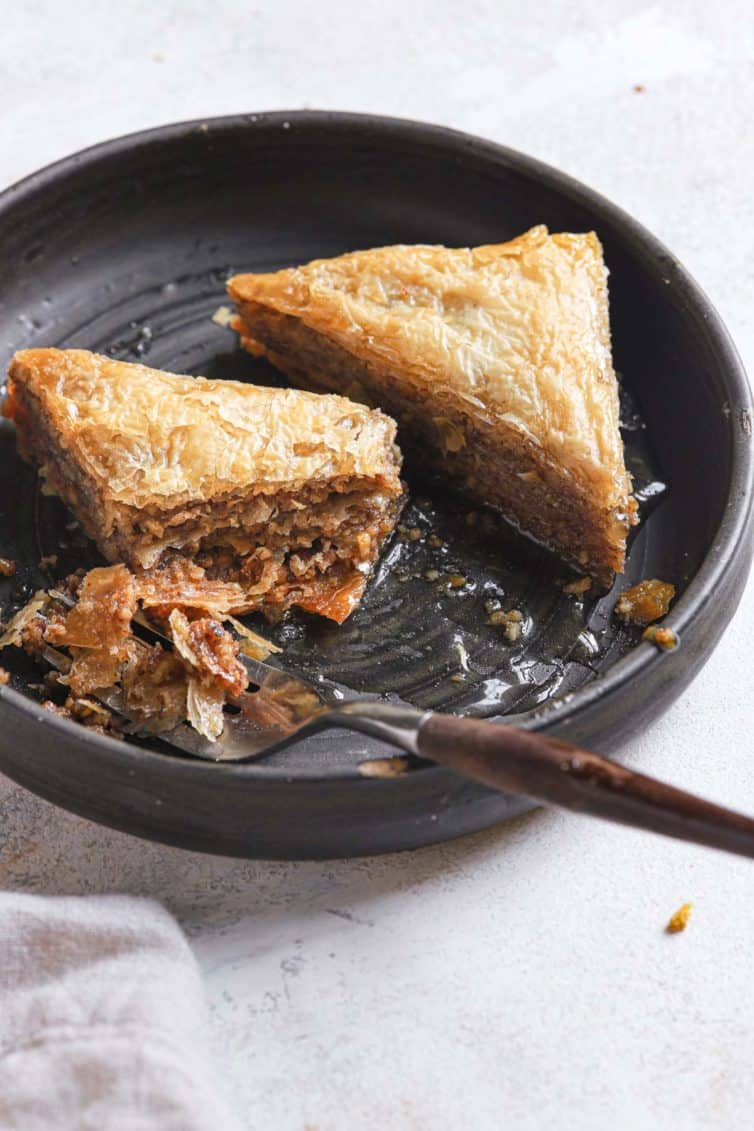
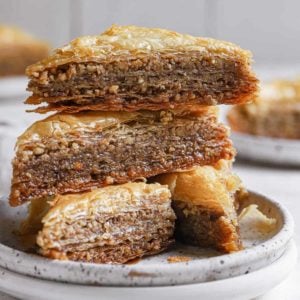
Later that night, we dug in and I suddenly remembered how absolutely phenomenal baklava is. Layers of buttery, flaky phyllo dough are piled high between sections of spiced, ground walnuts. Once baked and golden brown, the entire pan is drowned in a spiced honey syrup, which is left to soak in for hours. It’s sweet, a little sticky, a little spicy, and fabulously nutty.
I immediately emailed a friend who had deep Greek roots and asked if she had a recipe. She gifted me with her grandma’s recipe, and I made it a few months later for Thanksgiving. It was a rousing success, and it’s the only recipe I’ve used since.
The Origin of Baklava
Many people wonder if baklava is, indeed, a Greek dessert or if it is Middle Eastern in origin, so I did some research…
The first mention of a dessert resembling baklava goes way, wayyyyyy back to the BC age, which is incredible. The Greeks and the Turks still argue as to where the recipe originated, but the oldest version of this recipe (a baked dessert with layers of dough and covered in honey) shows up in the Roman Empire, and Greek and Turkish cuisine both built upon cooking traditions from the Byzantine and, later, Roman Empires.
When I do recipe research, it rarely, if ever, goes back THAT far. Amazing!
Regional Differences
Much like tres leches recipes have regional differences across the globe, baklava has similar roots in various countries. Each recipe still consists of flaky layers of phyllo dough and a chopped nut filling but you might notice a few differences. For example:
- Greece: Commonly uses walnuts and cinnamon in the filling.
- Turkey: Made with a filling of almonds, walnuts, or pistachios and topped with kaymak (similar to clotted cream).
- Iran: Cuts the baklava into diamond shapes and soaks in a rose water syrup.
- Lebanon: Made with a walnut filling but topped with orange blossom water and uses much less syrup for soaking.
This recipe leans more to the traditional Greek Baklava recipe made with walnuts, cinnamon, and a sweet honey syrup.
Recipe Ingredients
While many people find making baklava difficult, it’s a relatively easy recipe made with just a few simple ingredients.
The Syrup
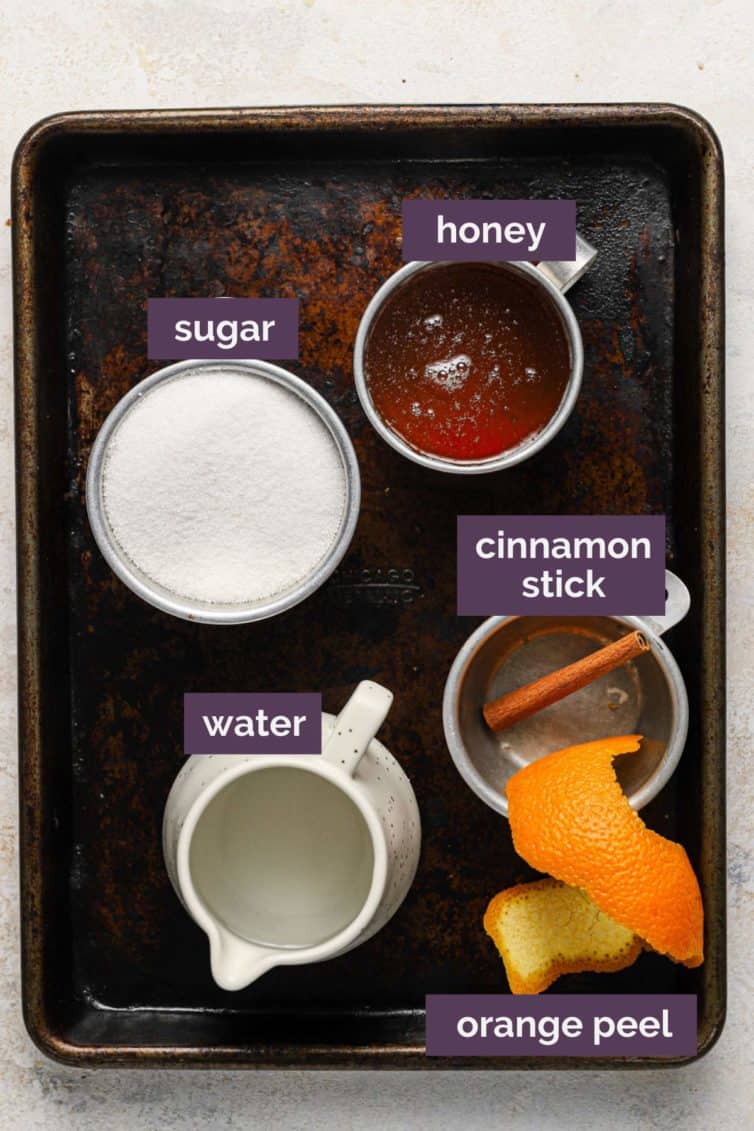
- Soaking syrup: Made from a mixture of water, sugar, honey, cinnamon, and an orange peel.
The Layers
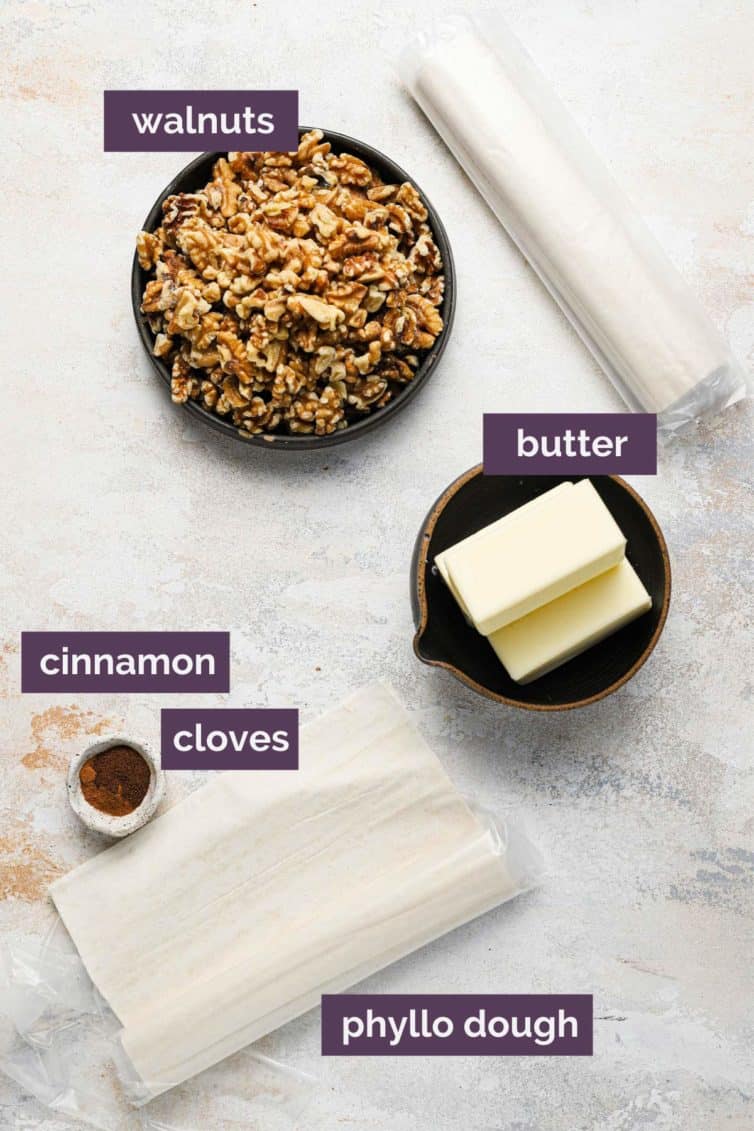
- Walnuts: Chopped walnuts are the main part of the baklava filling. You can also use pistachios or almonds or a mix of all of the above.
- Spices: A blend of cinnamon and ground clove season the chopped walnut filling.
- Phyllo (Fillo) Dough: These sheets make the flaky layers that hold the spiced walnut filling. See below for specific tips on working with it successfully.
- Unsalted Butter: Adds moisture to the baklava and aids in the flaking of the phyllo dough during the baking process.
Phyllo Dough Tips
I think the trickiest part of making baklava comes down to the phyllo dough. Here are a few tips and tricks to have the most success using phyllo dough in this recipe.
- Defrost the phyllo dough. The night before you plan to make baklava move the phyllo dough from the freezer to the refrigerator. If you try to use frozen dough it will crack.
- Cover the sheets of phyllo with a damp kitchen towel while you’re working so that they don’t dry out (they are very delicate to work with!).
- Keep the phyllo dough covered. After removing a sheet of phyllo dough replace to damp kitchen towel over the remaining sheets.
- Don’t stress if it rips. This dough is SUPER thin and prone to ripping. It’s okay if it rips, since you are piling layers on top it shouldn’t impact the baking and may give your baklava a rustic look.
How to Make It, Step-by-Step
The process to make baklava is fairly simple, albeit time-consuming. The layering and buttering of the phyllo dough will take some time so remember to be patient, the final product is well worth it. This baklava recipe comes down to a few simple steps:
- Make the Syrup
- Mix up the Filling
- Assemble the Baklava
- Bake + Soak with Syrup
1. Make the Syrup
- Mix ingredients: Combine water, sugar, honey, cinnamon stick, and an orange peel in a small saucepan.
- Bring to a boil, then simmer for about 15 minutes.
- Cool syrup before using: Set aside to cool completely while you make the filling and assemble the baklava.
Save This Recipe

2. Make the Filling and Assemble
- Preheat oven to 350°F.
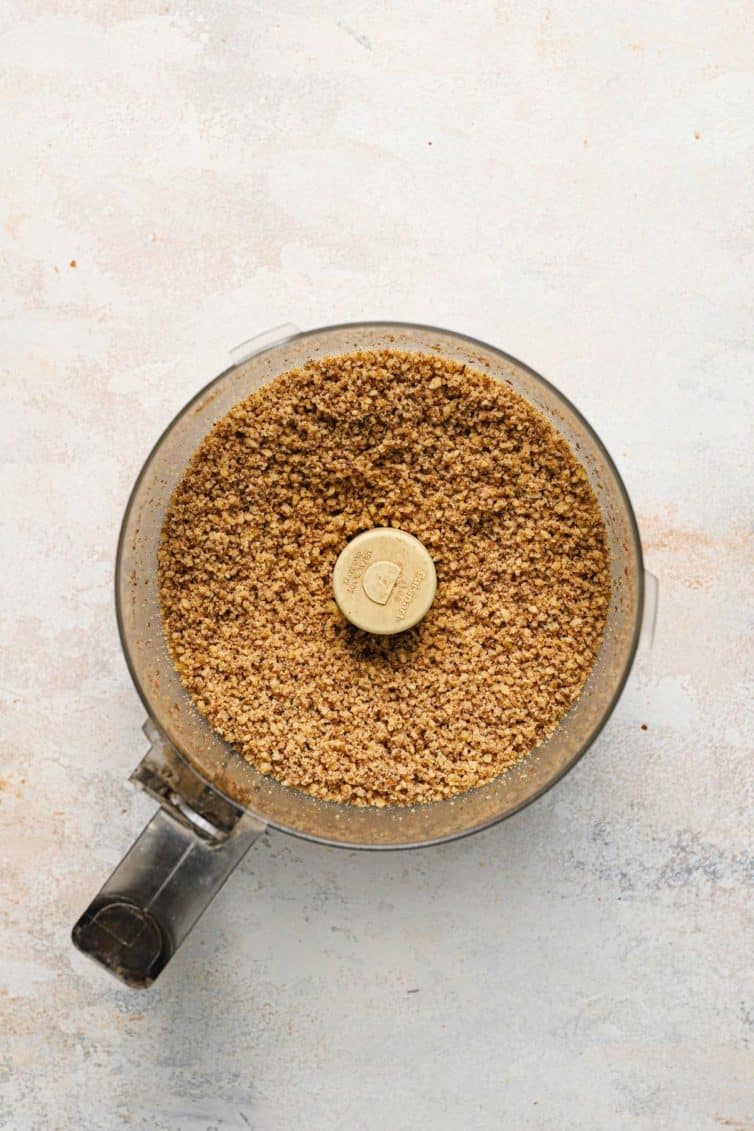
- Make the filling: Place walnuts, cinnamon, and cloves in a food processor and process until the walnuts are a medium-fine ground consistency. Too fine and you’ll end up with nut roll filling, but too coarse and the layers won’t adhere properly.
- Melt butter: In a small saucepan over low heat, melt the butter and keep it warm throughout the process so it doesn’t solidify.
- Assemble the base layer: Brush a 9 X 13-inch pan with melted butter and place one layer of phyllo at the bottom. Brush the phyllo with melted butter then add another layer of phyllo, and brush with more butter. Continue this process until you have layered 7 sheets of phyllo.
- Spread the nuts: Gently spread one-quarter of the nut mixture evenly over the top of the phyllo.

- Add next phyllo dough layer: Repeat the process of layering phyllo sheets and brushing with melted butter, this time only use 5 sheets of phyllo.
- Second layer of nuts: Spread another quarter of the nut mixture over the top of the phyllo.
- Repeat twice more, layering and buttering 5 sheets of phyllo and topping with one-quarter of the nut mixture.
- Top with last layers: Finish with 7 layers of phyllo and brush the top sheet with melted butter as well.
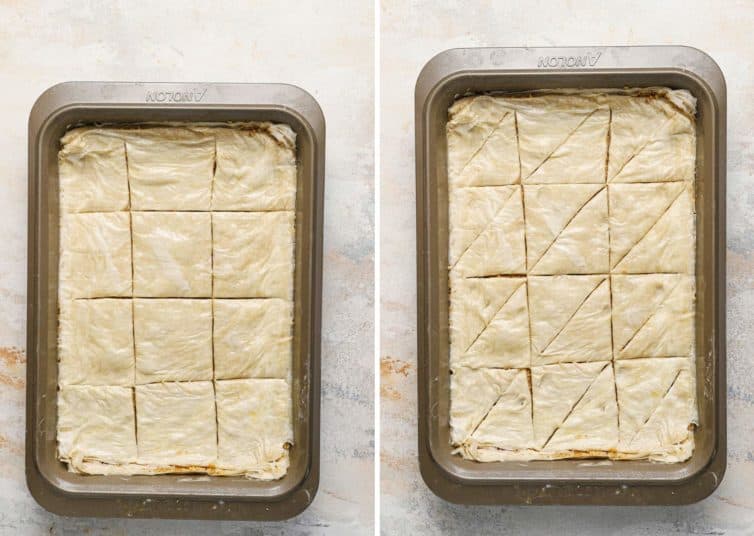
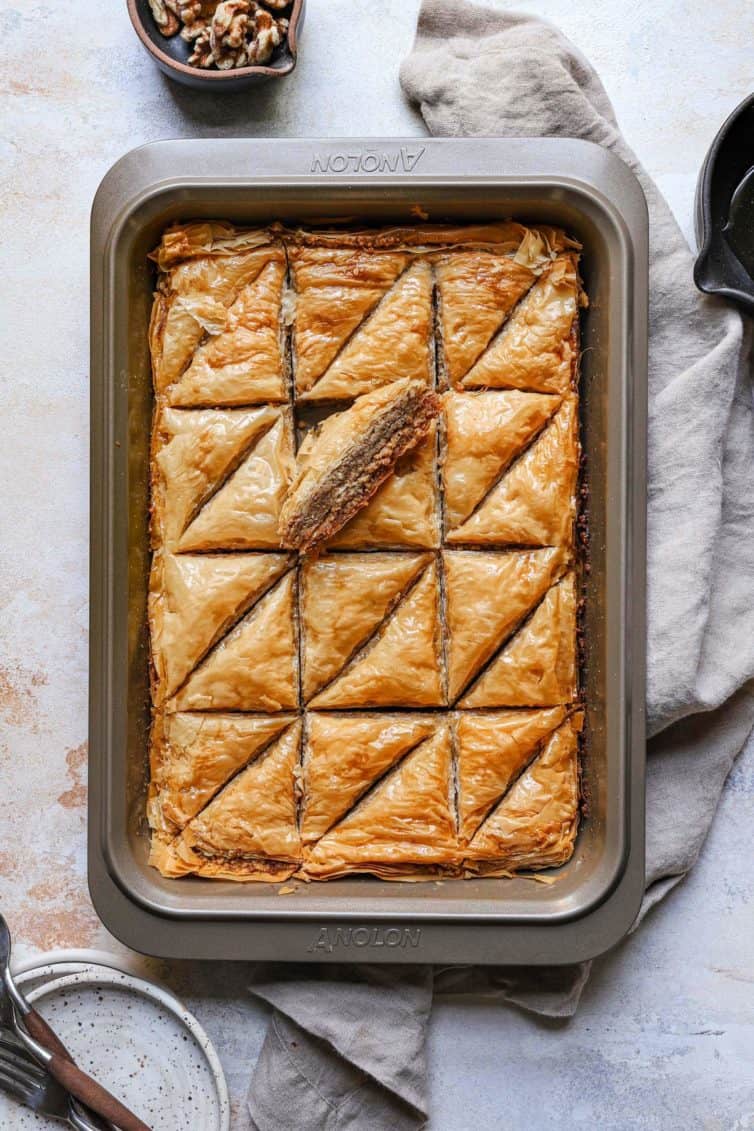
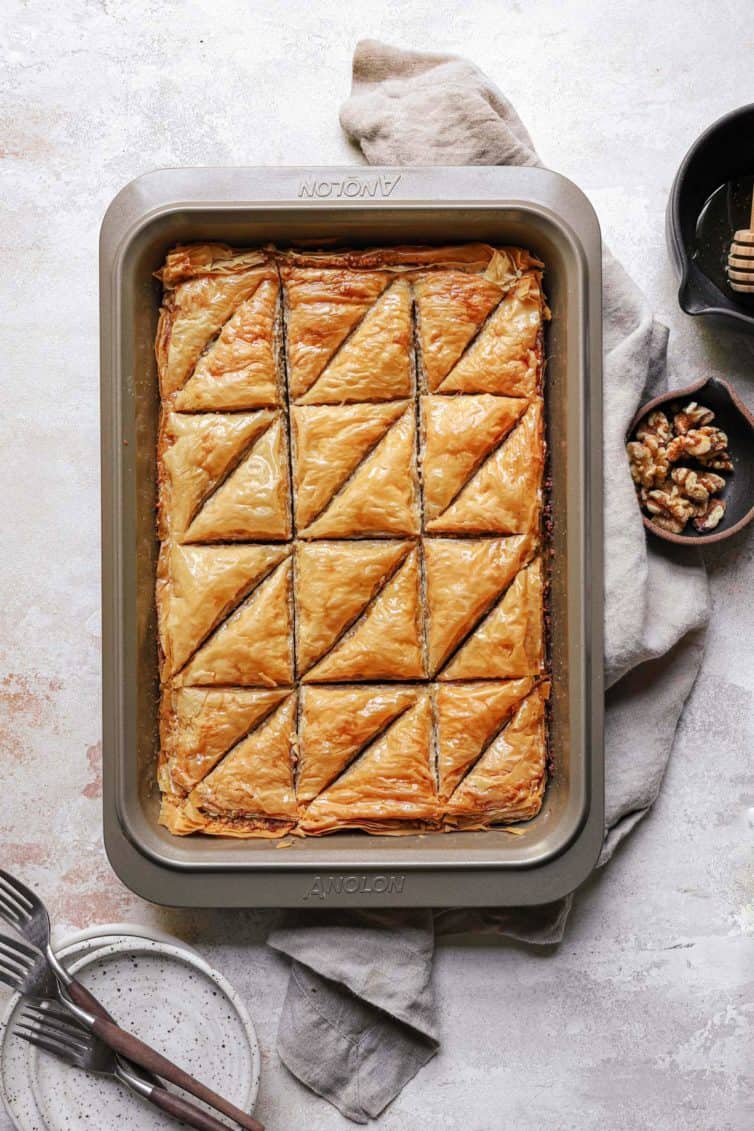
- Cut the baklava: Using a sharp knife, trim any ragged pieces of phyllo dough that has crept up the sides of the pan. Cut the baklava into 12 even squares, and then cut into triangles. You should have 24 triangles.
3. Bake and Soak with Syrup
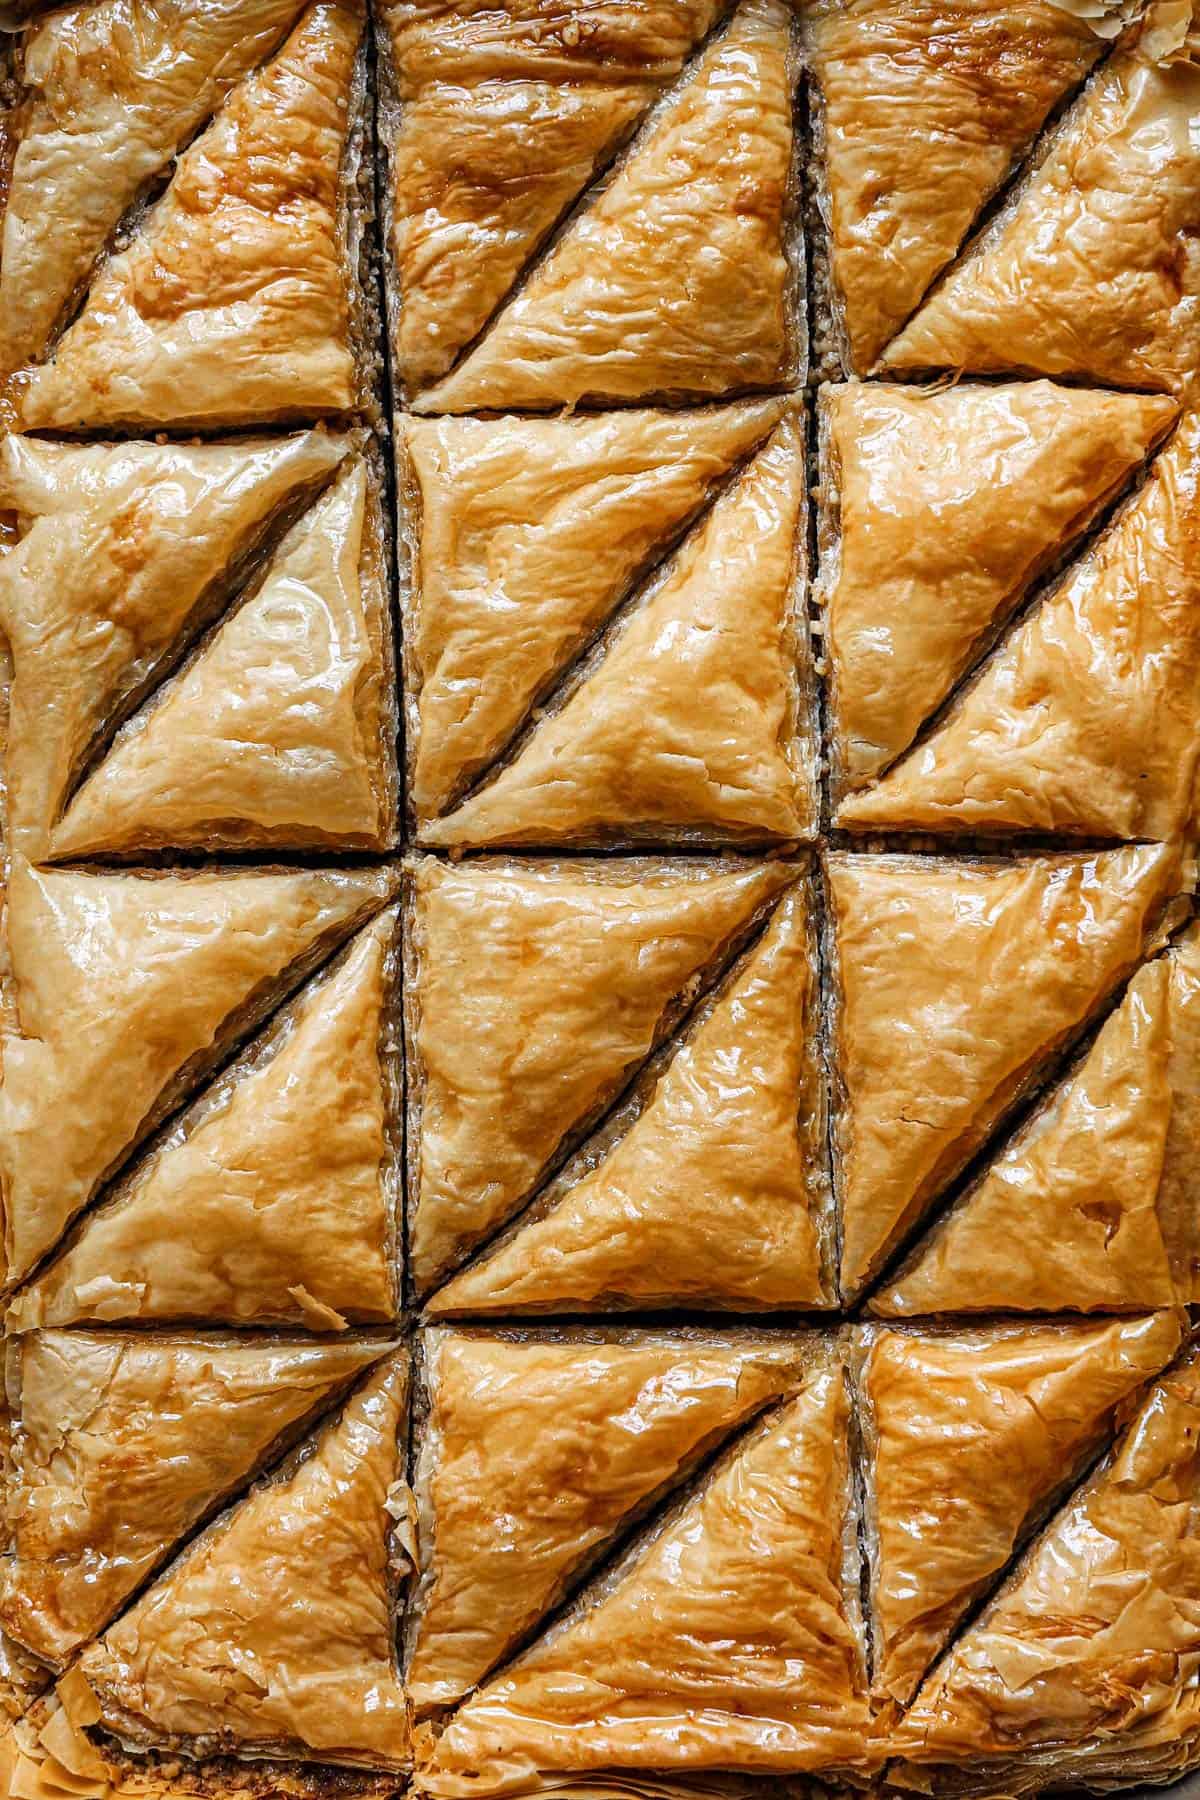
- Bake baklava: Place the pan in the oven and bake until golden brown, about 50 minutes.
- Soak with syrup: As soon as the baklava comes out of the oven, grab the honey syrup and pour it all over the top, making sure to get it into all of those crevices, as well. You’ll hear lots of crackling, which is a glorious sound! Then… you wait. At least four hours, but ideally overnight.

Troubleshooting Baklava
While the process is pretty straightforward, let’s address some of the questions or issues you might have while making it:
This is likely due to using too much butter when brushing the phyllo sheets. A thin coating of butter is all that’s needed.
Be sure that when you brush your layers of phyllo, and especially the top layer, that you are brushing all the way around the ends and in the corners. You don’t want to leave any areas of phyllo exposed, or they will dry out.
I have seen recipes online that substitute things like sesame seeds, coconut, dried apricots and raisins, etc. for the nuts in baklava. I’ve never tried any of them so I can’t attest to how close they are to the real thing, but they do exist!
Well, honey does impart a lot of the characteristic flavor of baklava, but you can do without it. A simple sugar syrup can be poured over, or you can flavor it with things like rose water. You could also use agave nectar.
Store the baklava without tightly wrapping it up in plastic. When stored at room temperature with a loose tea towel it prevents the phyllo dough from getting soggy.
Storing, Freezing, and Making Ahead
One of the BEST things about baklava is that it’s an excellent make-ahead treat and it’s even better the second day, when the honey syrup has had ample time to soak into the nut layers.
- Storing: Keep baklava at room temperature in an airtight container for up to 2 weeks to maintain the flaky, crisp texture.
- Refrigerate: You can also store in the refrigerator for up to 2 weeks in an airtight container but it will be a little chewy and harder than at room temperature.
- Freezing: You can also wrap individual pieces of baklava in plastic wrap and store in freezer ziploc bags in the freezer for up to 3 months.
- Making ahead: This is an excellent dish to make ahead of time, as it’s actually better the longer it’s left to sit before it’s eaten. Covering it with a loose paper towel or a cheesecloth will ensure that it maintains its crispness.
Serving Suggestions
Baklava makes a fantastic addition to any holiday sweets collection, wedding cookie table, or special celebration. Some of my favorite ways to serve baklava include:
- With additional ground walnuts on top.
- Topped with a little ice cream or homemade whipped cream.
- Served with a fresh cup of tea or warm cup of coffee.
Delicious Dessert Bars to Try Next:
- Fudge Ripple Monster Cookie Bars
- Blackberry Pie Bars
- Caramel Apple Magic Bars
- Symphony Bars
- Blueberry Crumb Bars
Crisp, flaky layers or buttery phyllo dough, spiced walnuts, and a sticky sweet honey syrup make this baklava recipe an unforgettable treat. This is a classic recipe that every home cook and baker needs to have stashed in their recipe box!
If you make this recipe and love it, remember to stop back and give it a 5-star rating - it helps others find the recipe! ❤️️
Classic Baklava Recipe
Ingredients
For the Syrup
- 1 cup (250 ml) water
- 1 cup (200 g) granulated sugar
- 1 cup (339 g) honey
- 1 cinnamon stick
- 1 strip orange peel
For the Pastry
- 1 pound (453.59 g) walnuts, toasted
- 1½ teaspoons (1.5 teaspoons) ground cinnamon
- ½ teaspoon (0.5 teaspoon) ground cloves
- 16 oz (453.59 g) package phyllo dough, thawed
- 1½ cups (340.5 g) unsalted butter
Instructions
- Make the Syrup: Combine the water, sugar, honey, cinnamon stick and orange peel in a small saucepan and bring to a boil over medium-high heat. Reduce the heat to low and simmer for 15 minutes. Remove from the heat and let cool to room temperature.
- Make the Baklava: Preheat oven to 350 degrees F.
- Place the walnuts, cinnamon and cloves in a food processor and process until the walnuts are finely ground.
- Melt the butter in a small saucepan over very low heat, keeping it warm throughout the process so it doesn’t start to solidify.
- Brush a 9×13-inch pan with melted butter and place one layer of phyllo at the bottom. Brush the phyllo with the melted butter, and then add another layer of phyllo, and brush with more butter. Continue this process until you have layered 7 sheets of phyllo.
- Gently spread one-quarter of the nut mixture evenly over the top of the phyllo. Repeat the process of layering phyllo sheets and brushing with melted butter, but this time use only 5 sheets of phyllo. Gently spread another one-quarter of the nut mixture over the top of the phyllo. Repeat this twice more, layering and buttering 5 sheets of phyllo and topping with one-quarter of the nut mixture. Finish off with 7 layers of buttered phyllo. Brush the top sheet with melted butter, as well.
- Using a sharp knife, trim any ragged pieces of phyllo dough that has crept up the sides of the pan. Cut the baklava into 12 even squares, and then cut into triangles (you should have 24 triangles). Place the pan in the oven and bake until golden brown, about 50 minutes.
- As soon as the baklava comes out of the oven, remove the cinnamon stick and orange peel from the syrup and slowly pour it over the hot baklava, making sure to get it into all of the cracks and crevices, as well as on the top surface. Allow the baklava to sit for at least 4 hours before serving so the syrup has a chance to soak in. (The baklava is actually best when left to sit overnight before serving.) Baklava can be stored at room temperature, covered very loosely with a paper towel or foil until ready to serve. Leftovers should be stored in airtight container at room temperature or in the refrigerator for up to 2 weeks.
Notes
- Storing: Keep baklava at room temperature in an airtight container for up to 2 weeks to maintain the flaky, crisp texture.
- Refrigerate: You can also store in the refrigerator for up to 2 weeks in an airtight container but it will be a little chewy and harder than at room temperature.
- Freezing: You can also wrap individual pieces of baklava in plastic wrap and store in freezer ziploc bags in the freezer for up to 3 months.
- Making ahead: This is an excellent dish to make ahead of time, as it’s actually better the longer it’s left to sit before it’s eaten. Covering it with a loose paper towel or a cheesecloth will ensure that it maintains its crispness.
- Nut variations: Other nuts, such as almonds or pistachios, can be substituted for the walnuts.
Did you make this recipe?
Leave a review below, then snap a picture and tag @thebrowneyedbaker on Instagram so I can see it!
Photography by Dee Frances


I made these for our Canadian Thanksgiving. They were easy to make, and came out beautiful. The only adaptation I made was I added a little vanilla extract to the syrup after it had cooled. I will be making these again.
Ooh! I made this a short time ago, and it was quite easy to make! Yours looks terrific!
Oh my goodness! I have to make this. My mouth is watering in anticipation of that salty/sweet/spicy flavour.
Yay! So glad you like this recipe. I really need to make it again soon but the only time we’re around enough people to finish it off, it’s my in laws and most of them don’t eat nuts. Boo.
Love Baklava! Can’t wait to try out this recipe.
Can I just say? You read my mind!!! Okay… Maybe, I yelled that out a bit loud. OMG! Thanks to you, I’ll be getting my Baklava fix this weekend.
The Baklava looks decadent. I’d like to make it soon. How many boxes of filo dough do I need for this recipe?
Hi Ela, Just one (16-ounce) package of phyllo.
the first time I had baklava was probably when I was a wee one. Maybe because of all the Turkish and Greek influences in my cuisine, but it was a dessert almost everyone would learn to make by the time they are 10.
The most common ones were with walnuts (English walnuts) and later when traveling to Turkey wasn’t considered a luxury with pistachios.
Looking at your baklava reminds me of Sunday afternoons when we’re gather and enjoy a piece of sweet sticky baklava.
I love baklava, but it’s so hard to find really good baklava. This certainly looks like it’s outstanding. I might have to find some time to give it a try.
This makes baklava sound so much more doable than I previously thought it was! I love the perfect triangles :)
Baklava is one of my husband’s favorite desserts (okay, I like it too) and he’s asked me on occasion to make it but I just haven’t found a recipe that spoke to me…until now.
Nice recipe. Sounds easy. I have never made baklava because I’ve always been warned how difficult it is to make. But this recipe doesn’t seem difficult at all!
I’ve always wanted to make baklava but I just never got around to it. I’ll have to try this recipe.
Baklave has always been a fearful place to go for me…..It won’t be this fall.
These look incredible and sinful all at the same time.
Scrumptious! Love baklava!
Yum!! I’m going to use pecans! :)
I just made this for the first time recently and was surprised how easy it was, with a little patience, to get that delicious, deep flavour! Your baklava is gorgeous!
Thanks so much for this recipe! i LOVE baklava and have wanted to make it for a while but was kind of scared to try:) thanks again…i can’t wait to try it!!!
Oh wow! It looks perfect!
Anyone can join the action, from children to adults, wordle today is a fun and easy-to-play game.
Looks amazing, as usual! For those who have been intimidated by phyllo, a key to working with it is to keep it from drying out. I lay it out flat and cover it with a damp towel on a sturdy piece of plastic wrap to keep that from happening. Cover it back up EVERY time you take a sheet off. It adds a little to the prep time but well worth it. Also, with baklava, the only sheets critical to the final appearance are the top couple, so don’t worry if some of your sheets tear while you’re working with the lower layers.
Hi Marla, Thanks for sharing these tips! I kept my phyllo covered with a damp paper towel while I worked, I forgot to mention that above!
Love the color of your baklava – just right!
Your baklava looks perfect. I wish I could reach through the screen and grab one!
I absolutely love Baklava!
I’ve never made baklava…I’ve always been to intimidated,but I have had some great baklava. In fact I think I almost chose a college based on baklava. Years ago at an open house my mom and I attended during lunch they served us some killer baklava and I turned and looked at my mom and said “if this is what they’re serving here I’m in!” It was the most wonderful thing either of us ever tasted…and thus a testament to my obsession with food.
Your photos are excellent, I’ve never made a baklava.
Baklava from Turkey
yes this is true baklava from Turkey
I LOVE baklava but have never made it at home…you make it look totally do-able, thank you!
Baklava is one of my great weaknesses, but I’ve never made it! Your recipe sounds very doable. Can’t wait to try it! Thanks.
I’ve always wanted to try making baklava, but the process seems so intimidating! It’s one of my favorite desserts, and your version looks delicious.
This is something I’ve always wanted to try!
That baklava looks really good!