Homemade Blueberry Jam

This delicious homemade blueberry jam is made with fresh blueberries, lemon juice, sugar, and pectin for a not-too-sweet summer treat you will want to slather on everything! Learn how to make and can blueberry jam with this easy-to-follow step-by-step guide.
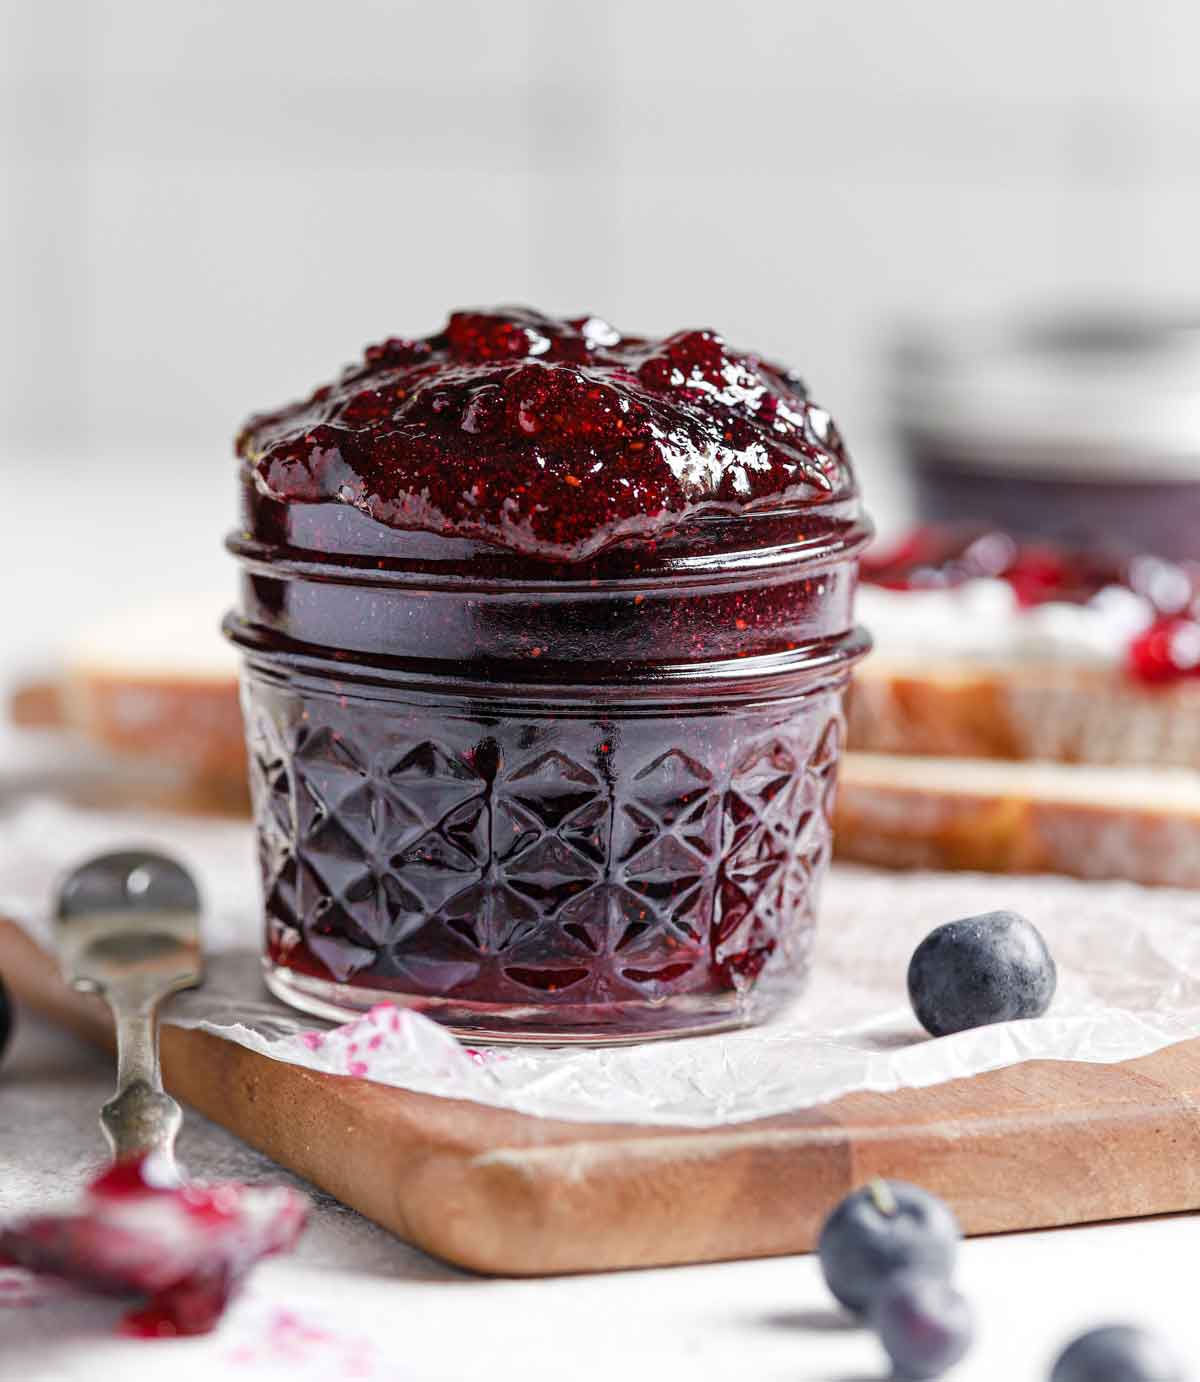
In all of the cooking, baking, and creating I have done since starting this website in 2007, I can honestly say that these jars of blueberry jam have given me the greatest sense of kitchen satisfaction since I mastered yeast bread.
Delicious Homemade Jam
Sometimes I rush around the kitchen with my mind in a million different places at once. When I make this jam, I slow down. It doesn't happen consciously, but I eventually become aware that I've allowed myself to become fully immersed in the process.
Crushing fresh blueberries, stirring the jam while it boils, carefully filling each hot jar with the mixture, and picking them up, one by one, once they're finished. I enjoy every step and can see how folks get into a serious canning habit. It's more than just filling jars with jelly or jam; it's a reminder that even though we're busy, every once and a while, we can allow life to slow down, be simpler, and be in the moment.
Ingredients You'll Need
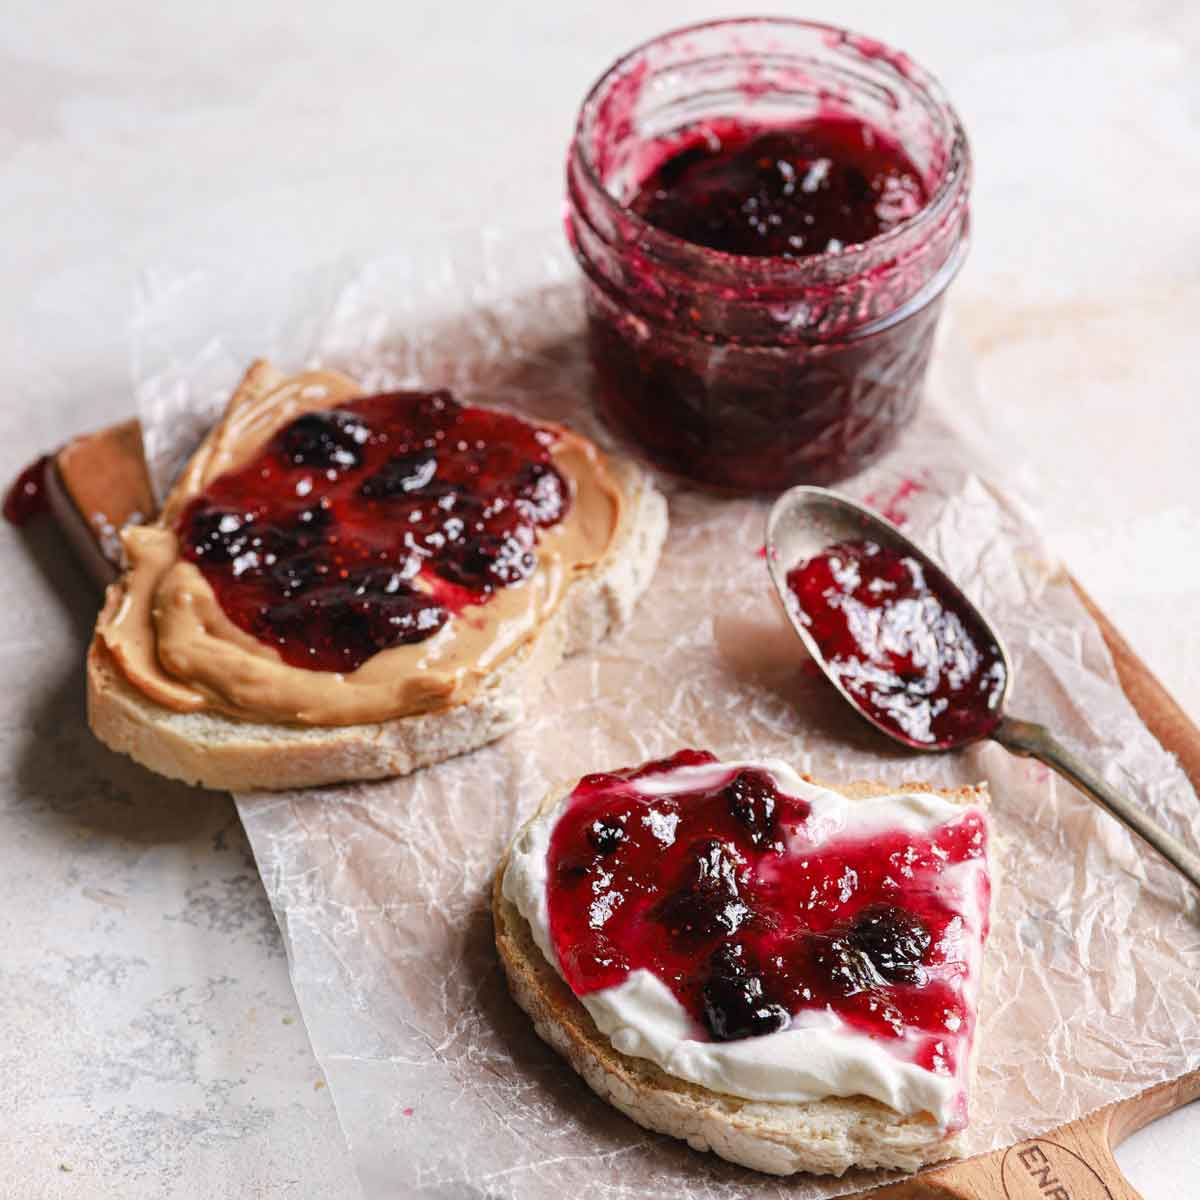
This blueberry jam comes together with just a few simple ingredients to make a preserve perfect for slathering on toast and biscuits. Whole or crushed blueberries cook with sugar and lemon juice until they reach a gelling point, then pectin is used to help obtain a thicker jam.
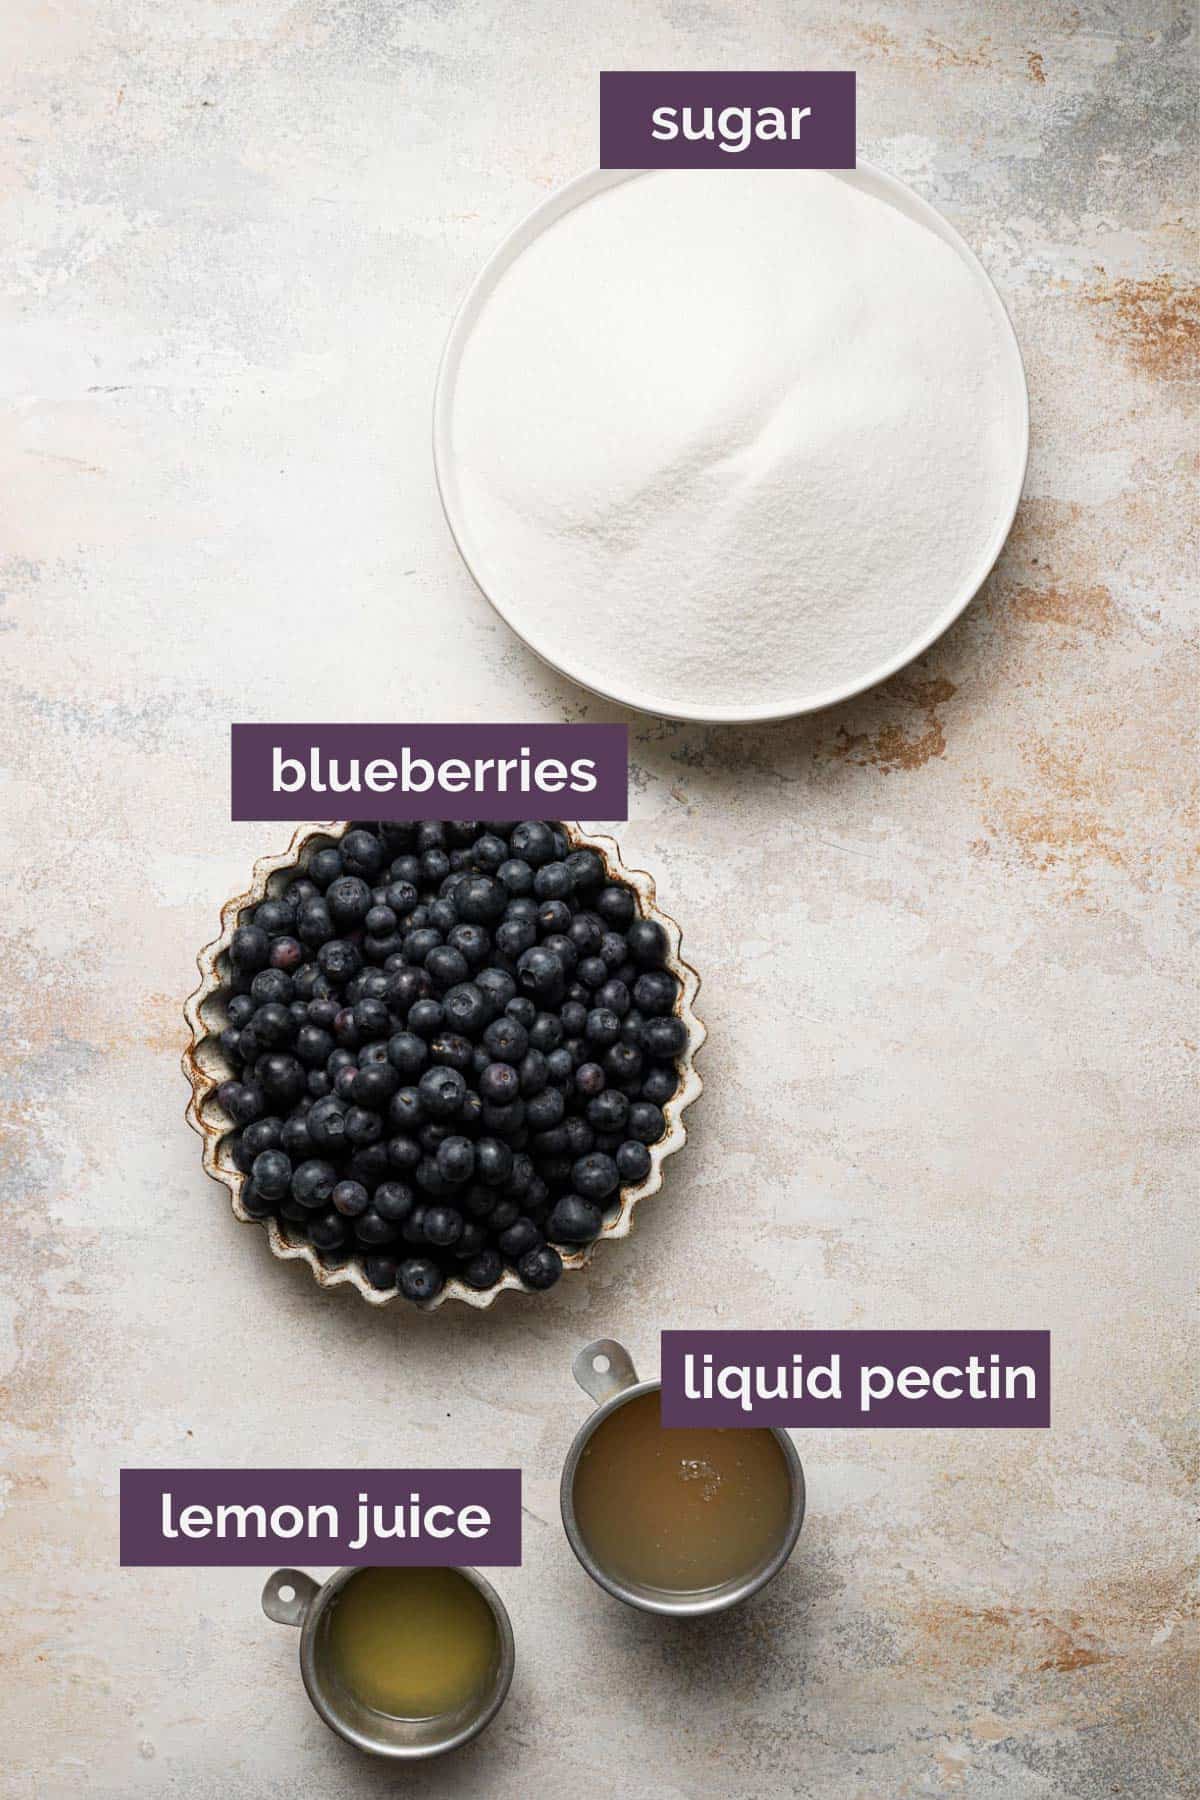
- Blueberries: Fresh or frozen blueberries work well in this recipe. I prefer fresh blueberries over frozen ones when they are in season.
- Lemon Juice: Used to lower the pH in the blueberry mixture so the pectin can set properly.
- Sugar: Sweetens the jam without making it overly sweet.
- Liquid Pectin: Helps thicken the jam without using too much sugar. Most grocery stores carry it, or you can purchase it online.
Sweeteners and Substitutions
I use granulated sugar to sweeten the blueberry jam in this recipe, but if you are looking for a substitute, here are a couple of options to try:
- Honey: Replace the granulated sugar with half the amount of honey. So instead of 7 cups of sugar, you will use 3½ cups of honey.
- Stevia: For making a "sugar-free" jam, use one teaspoon of stevia for every cup of sugar the recipe calls for and adjust based on taste.
- Other Fruit: You can substitute any other berries in this recipe (blackberries, raspberries, strawberries, even huckleberries)! Just be sure to use the same amount and crush them coarsely first.
Jam vs. Jelly
Jam differs from jelly in one main way. For jelly, the fruit is often crushed and cooked, then strained for its juices. This results in a clear consistency versus the chunky consistency of a homemade jam.
Canning Equipment
When I first considered canning, I was intimidated by the process and the extra equipment I thought I needed. In the end, I was thrilled about how wrong I was regarding the entire process and what was necessary to get started.
This is all you need:
They also sell entire canning starter kits that include the large canning pot and all the accessories you need.
Save This Recipe
How to Make Homemade Blueberry Jam
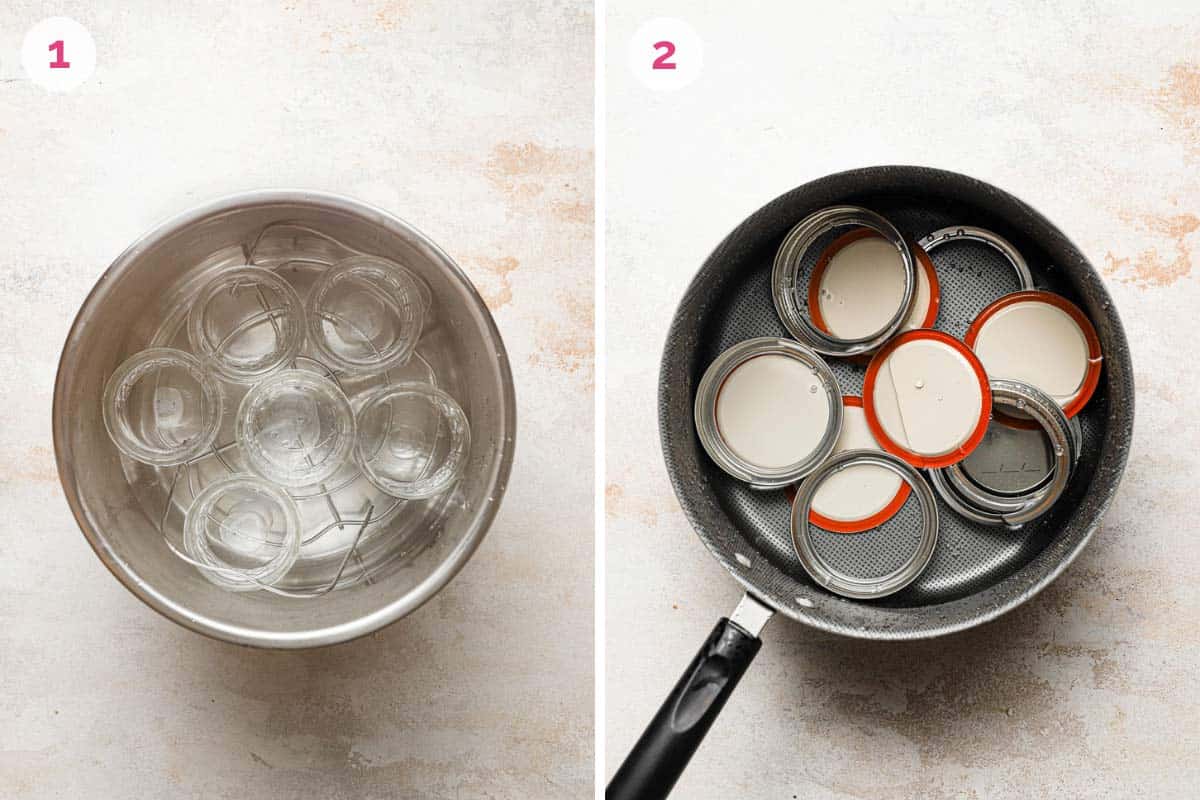
- Prepare the Canner, Jars, and Lids: You will wash all of the equipment in hot, soapy water and then place the jars in the water bath canner and lids in a saucepan to simmer and keep warm while you prepare the jam.
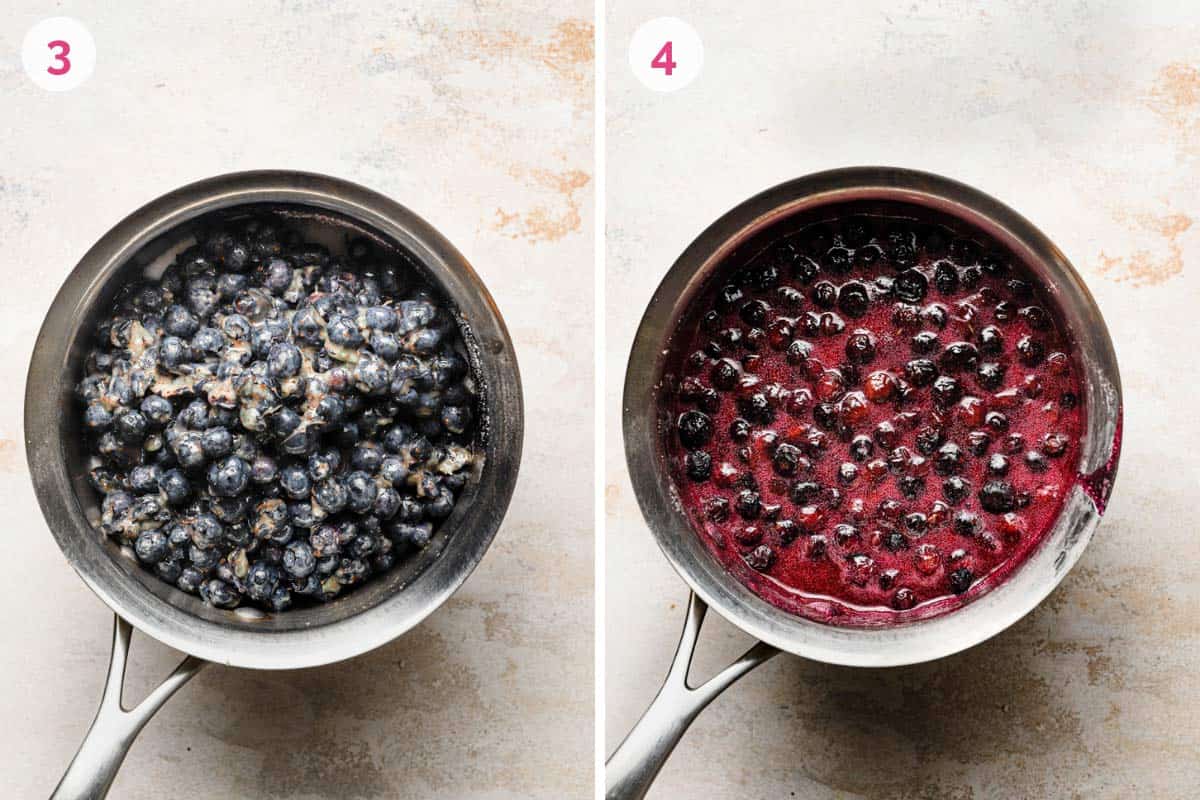
- Prepare the Jam: Crush or mash your blueberries using a fork or potato masher, then combine them in a saucepan with the lemon juice and sugar. Bring it to a boil, then add the pectin and boil for a minute longer.
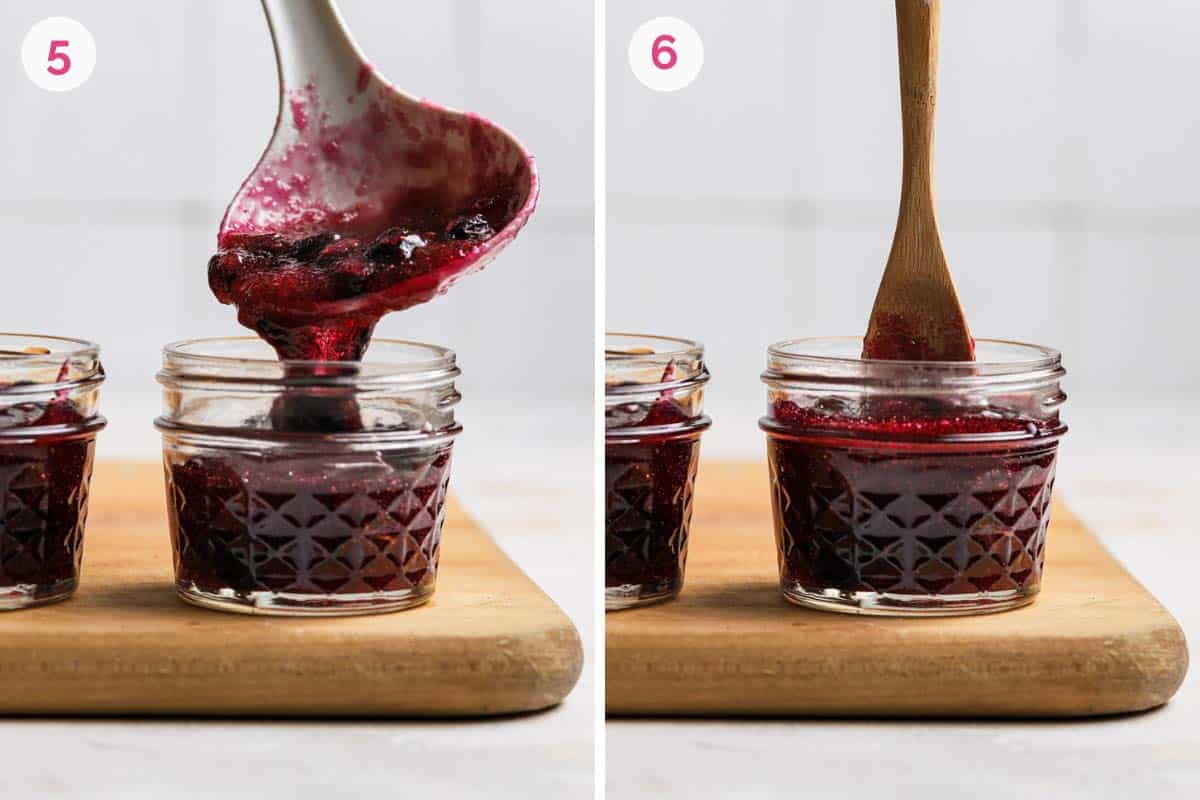
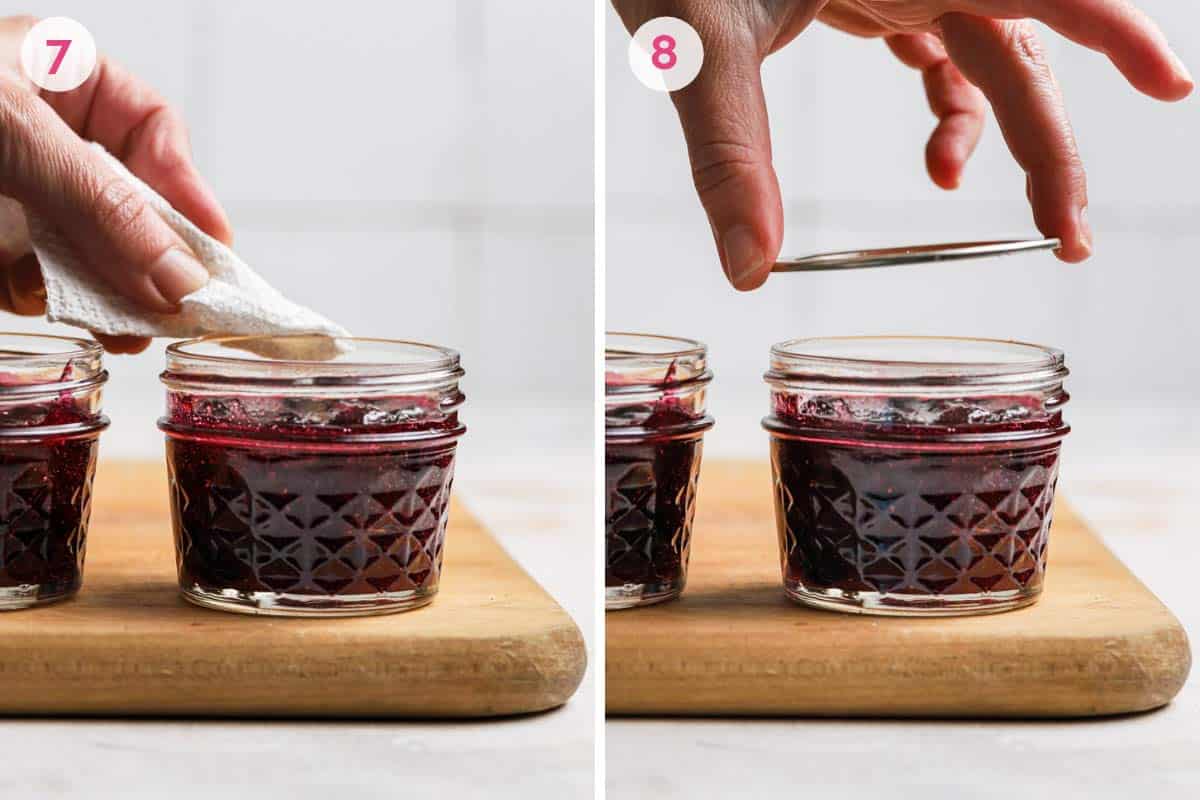
- Can the Blueberry Jam: Fill the jars with jam, add the lids and screw bands, then place the jars in the canner.
- Seal the Jars: Fill the canner with water to cover the jars, then bring to a full rolling boil and continue boiling for 10 minutes. After they sit for 5 minutes, remove the jars and allow them to sit in a draft-free place for 24 hours.
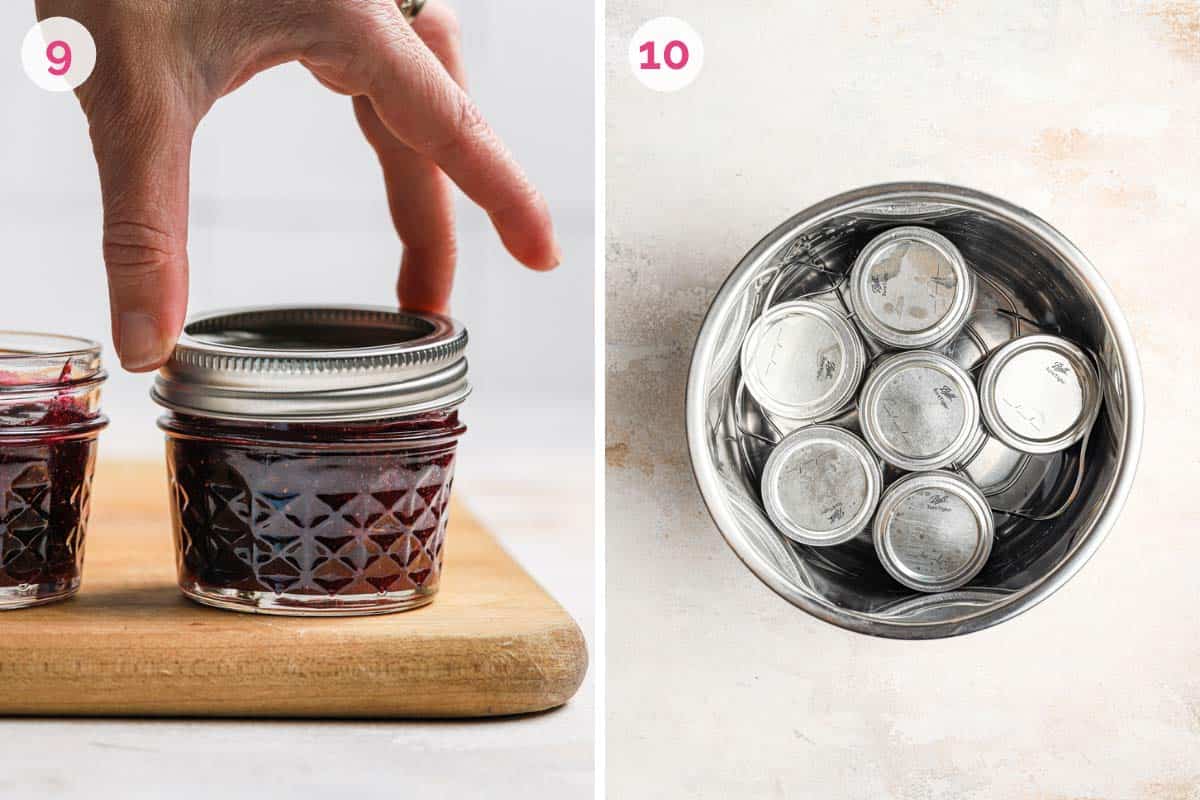
- Check the Jars: When processed jars have cooled for 24 hours, check the lids for a secure seal. To do this, press down on the center of each lid. Sealed lids will be concave (they’ll curve downward) and will show no movement when pressed.
Recipe FAQs
The easiest way to thicken your jam is to allow the sugar and blueberry mixture to cook down by boiling. Then thicken and set into a gel by using pectin.
24 hours. Once the jars of blueberry jam have boiled, they should cool for 24 hours to seal and set fully.
The lemon juice lowers the pH of the blueberry jam mixture allowing the pectin to form a gel when added to the mixture. This is what gives it that thick jammy finish.
Yes! You will just need to process each batch in the water bath separately, one after another.
Yes! Just be sure to use refrigerated jam within 3 weeks or freeze for up to 6 months, then transfer to the refrigerator and use within 3 weeks of thawing.
Storing and Freezing Directions
After you have made your jam, you will want to make sure you properly store it for peak freshness.
- Sealed Jars: Store jars with a proper seal (see indicators in "Step 5: Check the Jars" to know if the jar has a proper seal) in a cool, dry place for up to 1 year.
- Opened Sealed Jars: After you have opened a sealed jar of jam, it will keep refrigerated for up to 3 months.
- Unsealed Jars: Keep jars that did not properly seal in the refrigerator and use them within 3 weeks.
- Freezing Directions: Place cooled and cleaned jars of blueberry jam in the freezer for up to 1 year. Thaw in the refrigerator before using.
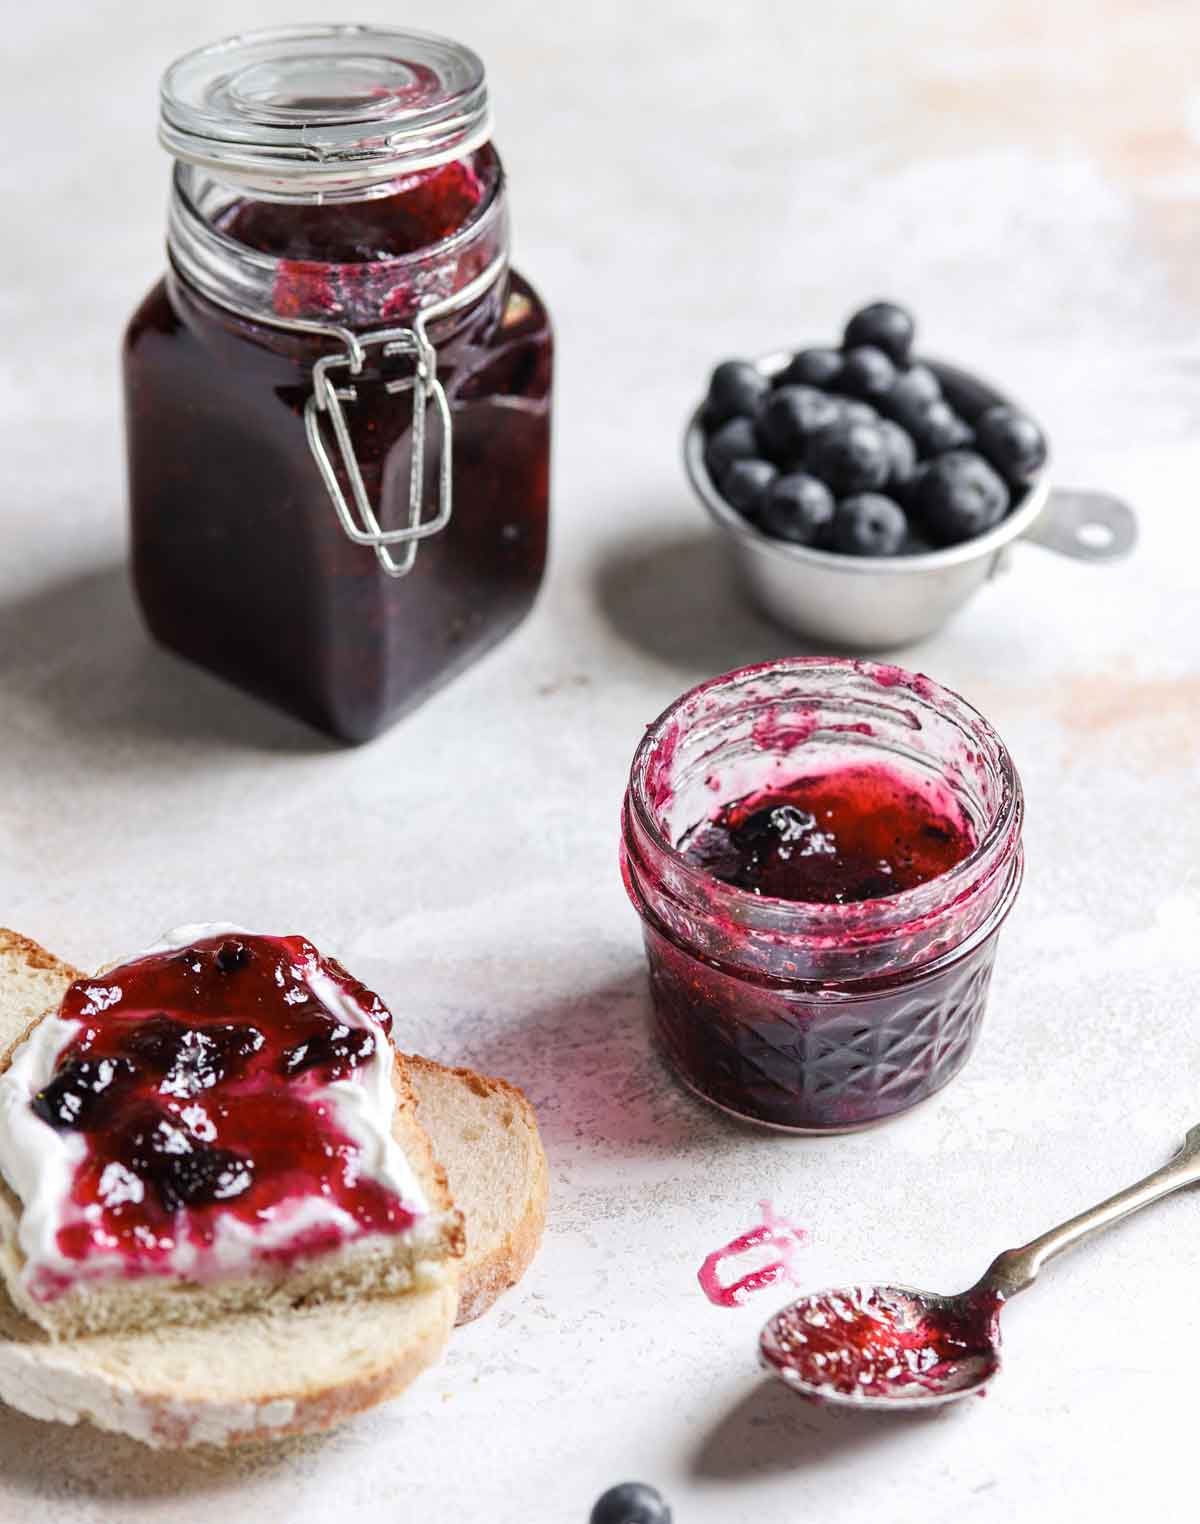
Ways to Use Blueberry Jam
- Slather on toast (made with my white bread recipe!), English muffins (or English muffin bread), or buttermilk biscuits.
- Use it to top buttermilk waffles, fluffy pancakes, French toast, and baked oatmeal.
- Stir it into vanilla ice cream or yogurt.
- Homemade jam makes a great gift! Package with a pretty ribbon and customized label (you can find some great ones on Etsy!) and share with family and friends for the holidays, a birthday, a teacher gift… any occasion!
More Blueberry Recipes to Make
- Lemon Blueberry Bundt Cake
- Blueberry Muffins
- Blueberry Crumb Bars
- Blueberry Cobbler
- Blueberry Buckle
- Best Blueberry Pie
Overcome your fears of canning and make this deliciously easy blueberry jam recipe! Made with fresh blueberries, lemon juice, sugar, and pectin, you'll want to spread this on everything!
If you make this blueberry jam recipe and love it, remember to stop back and give it a 5-star rating - it helps others find the recipe! ❤️️

Blueberry Jam Recipe
Ingredients
- 4½ cups (698 g) crushed blueberries
- 4 tablespoons lemon juice
- 7 cups (1386 g) granulated sugar
- 6 ounces liquid pectin
Instructions
- Prepare canner, jars and lids. Wash the jars, lids and screw bands in hot, soapy water. Rinse well and drain (you don’t need to dry them). Place a rack in the bottom of a boiling-water canner, then place the required number of jars on the rack. Add water to the jars and the canner until it reaches the top of the jars. Cover the canner and bring the water to a simmer (180 degrees F) over medium heat. Do not boil the jars. Keep jars hot until you’re ready to use them. Place the lids in a small saucepan, cover with water and bring to a simmer (180 degrees F) over medium heat. Again, do not boil the lids. Keep lids hot until you’re ready to use them. Set the screw bands aside, they do not require heating.
- In a large, deep stainless steel saucepan, combine crushed blueberries, lemon juice and sugar. Over high heat, stirring constantly, bring to a full rolling boil that cannot be stirred down. Stir in the pectin. Boil hard, stirring constantly, for 1 minute. Remove from the heat and skim off any foam.
- Working with one jar at a time, remove a jar from the canner, pouring hot water back into the canner. Place the jar on a heat-protected work surface, such as a wooden cutting board or towel. Ladle the hot jam into hot jars, leaving ¼-inch headspace. Slide a nonmetallic utensil, such as a rubber spatula, down between the food and the inside of the jar two or three times to release air bubbles. Adjust headspace, if necessary, by adding more hot jam. With a clean damp cloth or paper towel, wipe jar rim and threads. Using a magnetic or nonmetallic utensil, lift a hot lid from the water and place it on the jar, centering the sealing compound on the rim of the jar. Place a screw band on the jar. With your fingers, screw band down until resistance is met, then increase to fingertip-tight. (Do not use excessive force to tighten.) Return the jar to the rack in the hot water-filled canner. Repeat filling steps until all jars are filled.
- When all of the jars are in the canner, adjust the water level in the canner so that it covers the jars by at least 1 inch. Cover the canner with a lid and bring the water to a full rolling boil over high heat. Once the water is boiling hard and continuously, process (continue boiling) for 10 minutes. Turn off the heat, remove the lid and let sit for 5 minutes. After 5 minutes, remove the jars, lifting them out of the hot water without tilting them. don’t dry the lids or jars at this point. You don’t want to disturb the lids while the seal is being formed. Place the jars upright on a towel in a draft-free place and let cool, undisturbed, for 24 hours.
- When the processed jars have cooled for 24 hours, check the lids for seal. Remove the screw bands and with your fingers, press down on the center of each lid. Sealed lids will be concave (they’ll curve downward) and will show no movement when pressed. Jars that have not sealed properly must be refrigerated immediately. Use unsealed refrigerated product within a few days. For the jars that have good seals, with a damp cloth, thoroughly wipe lids and jar surfaces to remove any water residue or food particles. Store the sealed jars of jam in a cool, dark place for up to 1 year.
Notes
- Equipment: Canning pot / Canning essentials set / 8-ounce jars
- Liquid Pectin: I found this in my local grocery store where they had a little display with jars, lids, and canning accessories. It can also be purchased online.
- Sugar Substitutes: You can substitute 3½ cups of honey for the sugar OR 2 tablespoons + 1 teaspoon Stevia.
- Storing Sealed Jars: Store jars with a proper seal (see indicators in “Step 5: Check the Jars” in the post above to know if the jar has a proper seal) in a cool dry place for up to 1 year.
- Opened Sealed Jars: After you have opened a sealed jar of jam it will keep refrigerated for up to 3 months.
- Unsealed Jars: Keep jars that did not properly seal in the refrigerator and use them within 3 weeks.
- Freezing Directions: Place cooled and cleaned sealed jars of blueberry jam in the freezer for up to 1 year. Thaw in the refrigerator before using.
- Canning Alternative: If you cannot procure the necessary equipment for long-term storage, you can still make this recipe. Use refrigerated jam within 3 weeks or freeze for up to 6 months, then transfer to the refrigerator and use within 3 weeks of thawing.
- Recipe adapted from Ball Complete Book of Home Preserving
Did you make this recipe?
Leave a review below, then snap a picture and tag @thebrowneyedbaker on Instagram so I can see it!
Photography by Dee Frances.


This seems like the fruit to sugar ratio has been reversed in this recipe, especially given the use of liquid pectin.
Adding that as written this
recipe would not yield 8, 8
ounce jars.
Followed the directions provided except reduced the sugar to 3c for 2qts of sweet blueberries. The taste is perfect and canning was very successful without any fancy tools. i now have 10/10 perfectly canned jars of bluberry jam from my garden for my family and gifts. I remember my mom giving me the thumbs up when the jars “pop”. Thank you!!
You use twice the amount of sugar for a portion of berries? And use pectine? That’s insane. The usual proportion is 1 cup sugar for 4-5 cups berries. You use 700% of that. Are you sure your amounts are right? With that sugar and pectine you would end up with rubber, not jam.
Great recipe –
I adjusted the amounts of berries to sugar: I used about 6 1/2 to 7 cups of blueberries and 2 cups of sugar; turned out just fine. I might reduce the sugar next time as the blueberries we grow in the garden are sweet.
Thanks!
Followed the directions provided except reduced the sugar to 3c for 2qts of sweet blueberries. The taste is perfect and canning was very successful without any fancy tools. i now have 10/10 perfectly canned jars of bluberry jam from my garden for my family and gifts. I remember my mom giving me the thumbs up when the jars “pop”. Thank you!!
In my experience jam will not set properly if you change the amount of
the ingredients in the recipe. You
can try using a low sugar pectin
powder with less sugar.
Your recipe was excellent, easy to follow. I like all the extra information you gave, because it was my first time making blueberry jam. Only thing I did different was the amount of sugar, I used a 1 to 1 ratio, 5 cups berries to 5 cups sugar. It was perfect, very delicious. The right amount of sweetness to the tart of the berries. Thank you for this recipe!!
So sorry! I just found my answer in your notes! That’s what happens when you get old…
Can frozen blueberries be used for this jam? Thank you
AMAZING INSTRUCTIONAL POST!!!!!!
Thank you so much! I think you just took all the “skip this recipe” anxiety away from ever trying jam!
It looks so good, I like your description of the “slowing down” immersion and best of all….THAT PHOTO! Overflowing goodness!
I followed the recipe but the blueberry jam is on the runny side. How can i solve this problem after canning it?
Can you substitute powdered pectin or mix powdered with water to achieve liquid pectin
Hello again! Another question… the recipe calls for 4-1/2 C chopped blueberries… in Certo Pectin’s recipe, you start with 8 C of blueberries, then chop or crush them down to 4-1/2 C. The weight in grams stated in your recipe is 666g blueberries – is it possible that this reflects the whole berries, not the chopped? My 8C blueberries weighed just over 1100g, and reduced to 5C after crushing/chopping.
Thank you for this recipe! I have never tried canning before, but you make it sound so easy. I also featured this recipe on my blog, and I hope to try it soon.
Looks delicious! Will this recipe also work for huckleberries?