Homemade Pierogies (Potato and Cheese)

These homemade pierogies are made with a potato and cheese filling and dough that’s a dream to work with. Simply saute in butter and serve with caramelized onions for a hearty and satisfying comfort food meal. Bonus that it’s naturally vegetarian, as well, if you avoid meat or are cooking for someone who does.

Pierogies will always and forever remind me of Friday night meals during Lent. Our church had a fish fry and my parents always volunteered to help, so I spent dozens upon dozens of Friday nights during elementary school running around the school hallways with friends while our parents cooked and served food for the fish fry.
The extent of my fish love during that time was frozen-in-a-box fish sticks, so at the fish fry I always ordered pierogi; it was my go-to and still holds a firm place in the comfort food category for me.
Quite some time ago, I tackled homemade pierogi for the first time and I felt like they turned out just okay. Definitely not well enough for me to think it was worth doing again. However, about five years ago, I had a hankering to revisit the homemade pierogi and found a winner of a recipe.
What are pierogies? Where are they from?
Quite simply, pierogies are dumplings traditionally filled with potatoes and cheese (sometimes sauerkraut!) then boiled and pan-fried in butter.
There is a long-standing debate over whether pierogies are Polish or German in origin and, ultimately, we don’t know! What we DO know is that these delicious little dumplings date back to the 13th century in central and Eastern Europe. They remain a large part of the food culture in that region.
How to Make Potato and Cheese Pierogies
I know, making pierogi at home sounds intimidating and time-consuming and totally unnecessary, but believe me when I tell you that these homemade pierogi are 100000000% better than anything you will find in the frozen food aisle. No need to be intimidated! Let’s talk through the two major components: the dough and the filling.
Homemade Pierogi Dough
This dough is so wonderful to work with; it mixes together into a wonderfully soft and pliable dough that’s easy to roll out, cut, and shape. In order to give it those wonderful soft and malleable properties, an egg, egg yolk and vegetable oil are added to the traditional flour, salt, and water of most dough recipes. While this comes together very quickly and easily in a food processor, you can make it by hand, as well (see the recipe notes for details).

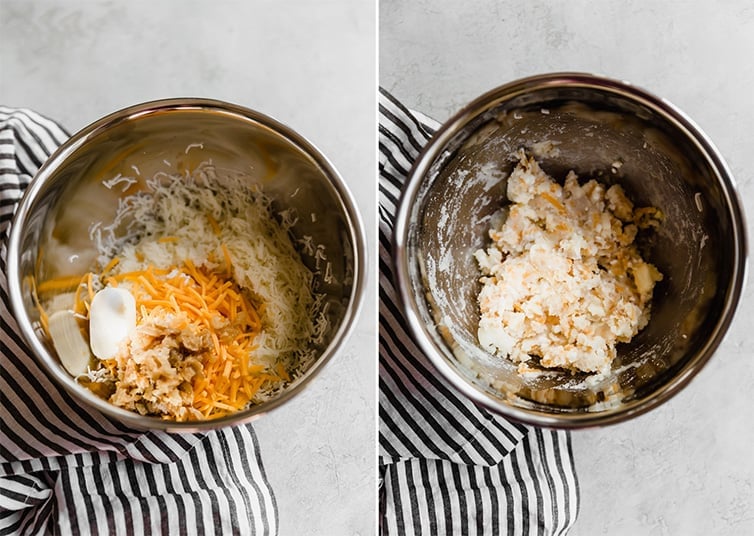
Potato and Cheese Pierogi Filling
The possibilities for pierogi fillings are only limited by your imagination! Potato and cheese is a very traditional choice, as is sauerkraut, but there are tonssssss of recipes for others such as mushroom, meat, salmon, and the list goes on and on. If you Google pierogi fillings, you will find dozens upon dozens of really unique ideas.
But! We’re here to talk about this potato and cheese filling, which is my all-time favorite because it’s what I grew up eating as a kid. Nostalgia at its best. Here’s what goes into the filling:
- Potatoes (that are boiled and processed through a ricer or food mill to keep them light and fluffy);
- Cheese (farmers cheese and cheddar cheese for a variety of flavor);
- Caramelized onions (for a punch of sweet flavor);
- Butter (just a tad, to pull it all together).
At this point you may be asking yourself:
What is farmer’s cheese?
It is made from cottage cheese that has had the whey drained off and is pressed into a solid form. It has a distinct flavor and is used in traditional pierogi, but you can substitute an equal amount of ricotta cheese if necessary.
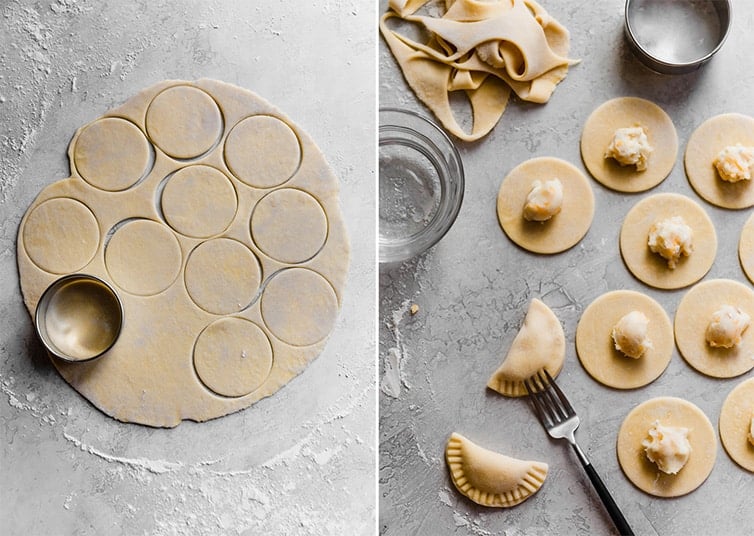
Assembling the Pierogi
This is the most time-consuming part of the process, but it’s not at all difficult and if you want to really stock your freezer, you can scale up the recipe, invite over some family or friends, and make a party of it (I know people who do this for Christmas!).
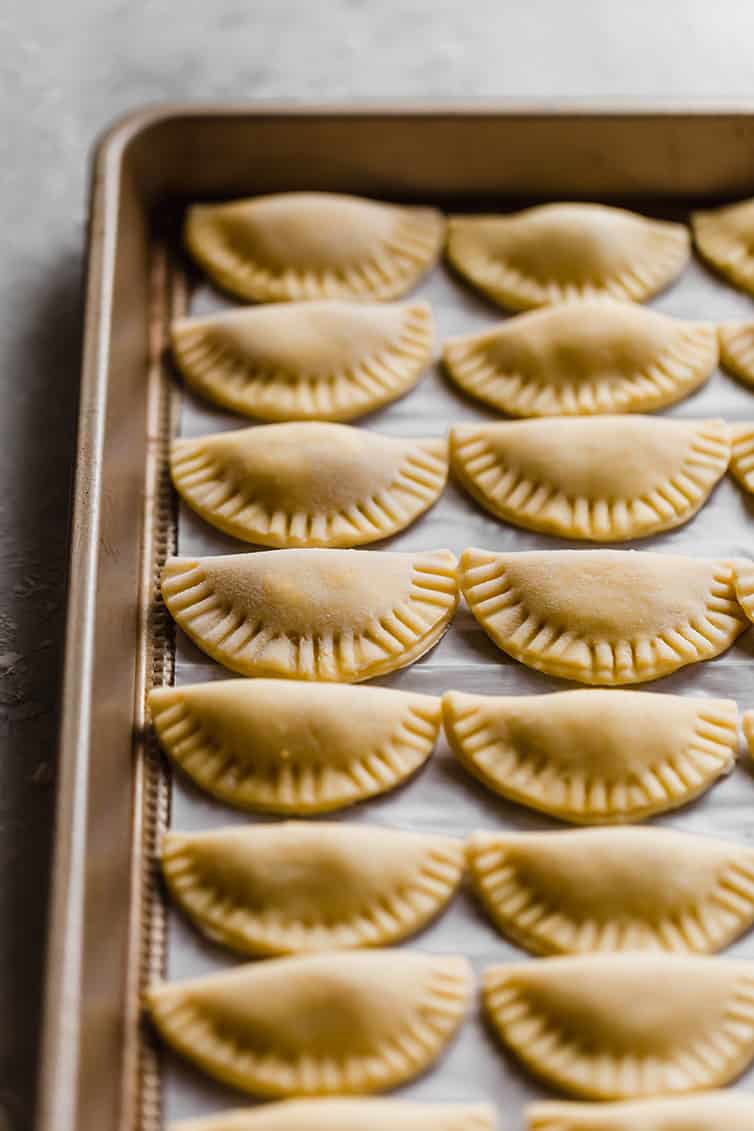
You will roll out the dough quite thin, then cut out circles, place a teaspoon of filling in the center of each, then fold over and seal the pierogi. At this point, you can freeze the pierogi or cook them within the next four hours.
Save This Recipe
You did it!
Cooking the pierogi
Pierogi are traditionally cooked using a two-step process:
- Boil
- Pan-fry
First, the pierogi are dropped into boiling water until al dente, then once drained, they are pan-fried in butter (and oftentimes, onions, as well!).
What to serve with pierogi
My mom and grandma always prepared their pierogies using a two-step process – first they would boil the pierogies to cook them through, then toss them into a frying pan with butter and onions to finish them off. SO GOOD. This is my absolute favorite way to eat them, but here are some other ideas:
- Sour cream
- Applesauce
- Fried and crumbled bacon
- Sautéed mushrooms
- Sauerkraut
Pierogies recipe notes
A few quick tips and tricks to ensure you have the best pierogi coming out of your kitchen!
- Farmer’s Cheese: You can substitute an equal amount of ricotta cheese for the farmer’s cheese in the filling.
- Make the Dough by Hand: Whisk the flour and salt, then use a rubber spatula to incorporate the egg, yolk, oil, and water until a shaggy dough forms, then knead briefly to bring it together into a soft dough.
- Many people cut up the dough scraps and boil and pan-fry with the rest of the pierogi so as not to waste – yum!
Make-ahead and freezing instructions
- Make-Ahead Dough: Once the dough is made, either wrap in plastic wrap, place in a freezer bag and freeze for up to 1 month, or use within 2 hours.
- How to Freeze Pierogi: The assembled pierogi can be frozen – place them in a single layer on a baking sheet and place them in the freezer until completely frozen, about 2 hours. Transfer the pierogi to a freezer bag and freeze for up to 1 month. No need to thaw before cooking – they can be boiled straight from the freezer.

More Lent-Worthy Dishes to Try:
- Homemade Fish Sticks with Tartar Sauce
- Beer Battered Cod
- Tuna Noodle Casserole (From Scratch!)
- Crock Pot Mac and Cheese
- Cajun Shrimp Macaroni and Cheese

Watch How to Make Homemade Pierogi:
If you make this recipe and love it, remember to stop back and give it a 5-star rating - it helps others find the recipe! ❤️️

Homemade Potato and Cheese Pierogies
Ingredients
For the Dough:
- 2 cups (250 g) unbleached all-purpose flour, plus extra for the work surface
- ½ teaspoon (0.5 teaspoon) salt
- 1 egg
- 1 egg yolk
- 1 tablespoon vegetable oil
- 4 to 6 tablespoons cold water
For the Caramelized Onions:
- 4 tablespoons unsalted butter
- 3 large onions, halved and thinly sliced
- ¼ teaspoon (0.25 teaspoon) salt
For the Potato and Cheese Filling:
- 1 medium russet potato, about 9 ounces, peeled and sliced 3/4 inch thick
- 1 tablespoon salt
- ¼ cup (59 g) reserved chopped caramelized onions
- 1½ ounces (42.52 g) cheddar cheese, shredded (about ⅓ cup)
- 1½ ounces (42.52 g) farmers cheese, cut into small pieces (about ¼ cup)
- 1 tablespoon unsalted butter
- Salt and ground black pepper, to taste
For Cooking and Serving:
- 1 tablespoon salt
- 4 tablespoons unsalted butter, for sautéing
- Sour cream, for serving
Instructions
- Make the Pierogi Dough: Pulse the flour and salt together in a food processor until combined, about 4 pulses. With the machine running, slowly add the whole egg, egg yolk, and oil through the feed tube until the mixture resembles wet sand, about 30 seconds. With the machine running, slowly add 4 tablespoons of the water until the dough forms a ball. If the dough doesn't ball up, add the remaining water, 1 tablespoon at a time, with the processor running until a dough ball forms (you may not use all the water).
- Transfer the dough to a lightly floured work surface and knead by hand until it firms slightly and becomes smooth, about 2 minutes. Cover with plastic wrap and set aside to relax for at least 15 minutes or up to 2 hours.
- Make the Caramelized Onions: Meanwhile, melt the butter in a 12-inch nonstick skillet over medium heat. Add the onions and salt and cook until very soft and well browned, 15 to 20 minutes. Measure out ¼ cup of the onions, chop them fine, and reserve them for the filling. Cover the caramelized onions to keep warm.
- Make the Potato and Cheese Filling: Cover the potatoes by 1 inch of water in a large saucepan and add 1 tablespoon salt. Bring to a boil, then reduce to a simmer and cook until the potatoes are tender and a fork can be slipped easily into the center, 10 to 12 minutes. Drain the potatoes into a colander.
- Set a food mill or ricer over a medium bowl and process the potatoes into the bowl. Add the caramelized onions. Stir in the cheeses and butter until incorporated and season with salt and pepper to taste. Cool slightly before filling the pierogi or cover with plastic wrap and refrigerate until needed, up to 2 days.
- Assemble the Pierogi: Dust a baking sheet liberally with flour; set aside. Divide the dough into 2 even pieces and cover with plastic wrap. Working with 1 piece of dough at a time, unwrap the dough and roll out on a lightly floured work surface into a 15-inch circle, about 1/16-inch thick. Using a 3-inch round biscuit cutter, cut out as many rounds as possible. Carefully gather up the dough scraps, wrap them in plastic wrap, and set aside.
- Place 1 teaspoon of the filling in the center of each dough round and moisten the edge of the dough round with water, using either your finger or a pastry brush. Fold the dough in half over the filling, making a half-moon shape. Pinch the seam along the edge to secure. Crimp the seam using the tines of a fork. Transfer to the prepared baking sheet and cover with a damp kitchen towel. Repeat with the remaining dough.
- Gently knead all of the dough scraps together into a ball and let relax for 5 to 10 minutes. Roll out, cut, and assemble additional pierogi, discarding any remaining dough scraps. [MAKE-AHEAD NOTE: The towel-covered baking sheet of pierogi can be wrapped with plastic wrap and refrigerated for up to 4 hours. The pierogi can also be frozen for up to 1 month; once completely frozen, the pierogi can be transferred to a zipper-lock bag. Do not thaw before boiling.]
- Cook the Pierogi: Bring 4 quarts of water to a boil in a large pot. Add 1 tablespoon of salt and half the pierogi. Cook, stirring often, until the edges feel al dente, 5 to 6 minutes (8 to 10 minutes if frozen). Using a wire spider or slotted spoon, transfer the pierogi to a colander and set aside. Return the water to a boil and cook the remaining pierogi.
- While the second batch of pierogi is boiling, melt 2 tablespoons of the butter in a 12-inch nonstick skillet over medium-high heat. Add the first batch of boiled and drained pierogi and sauté until golden on both sides, 1 to 2 minutes per side. Transfer the browned pierogi to a platter and cover to keep warm. Drain and sauté the remaining pierogi using the remaining 2 tablespoons butter. Sprinkle the caramelized onions over the top and serve with sour cream.
Notes
- Farmer’s Cheese: You can substitute an equal amount of ricotta cheese for the farmer’s cheese in the filling.
- Make the Dough by Hand: Whisk the flour and salt, then use a rubber spatula to incorporate the egg, yolk, oil, and water until a shaggy dough forms, then knead briefly to bring it together into a soft dough.
- Make-Ahead Dough: Once the dough is made, either wrap in plastic wrap, place in a freezer bag and freeze for up to 1 month, or use within 2 hours.
- How to Freeze Pierogi: The assembled pierogi can be frozen – place them in a single layer on a baking sheet and place them in the freezer until completely frozen, about 2 hours. Transfer the pierogi to a freezer bag and freeze for up to 1 month. No need to thaw before cooking – they can be boiled straight from the freezer.
- Recipe from Cook’s Illustrated
Did you make this recipe?
Leave a review below, then snap a picture and tag @thebrowneyedbaker on Instagram so I can see it!
Photography by Ari Laing.


Hi Michelle!
I’m from the Pittsburgh area and part Polish and I LOVE pierogies! Your recipe is delicious and totally worth the time to make homemade pierogies. My husband said this is the best meal I’ve made since he’s known me. Thank you for sharing! I don’t have a large food processor so I mixed it all in a bowl with a wooden spoon and it turned out great. The caramelized onions inside are a great touch to make the filling that much better. Now I’m just waiting for you to find a successful sourdough recipe I can try. :)
Hello. I’m so thankful for a good vegetarian recipe. I’ve been a vegetarian (off and on) for a long time. I’ve always had trouble finding vegetarian meals that interest me. This one looks like a keeper. I’ve also become a lover of baking lately and I’m looking forward to using some of your other recipes. Thank you!
Hi! Your pierogi looks very good. I’m from Poland and in my country it is national dish. We have many types of pierogi. Your pierogi are called russian pierogi and we make them with white cheese and potatoes. I add also fried onion. My mom added dry mint. I also like pierogi with fruits: plums, strawberries, blueberries. For Christmas we make small pierogi with mashrums, which are called “uszka”(in english small ears). I always make the same dough, the easiest in the world with flour and water, and i make with my hands on special wooden desk. This is hard work but I always make more, and then freeze. My husband likes fried with onion.
I have always wanted to make these. They were delicious! Thanks so much! Loved them topped with the caramelized onions and a little sliced kielbasa.
I have never had pierogies but I would love to try some homemade ones. There’s something so fun about sometimes spending the whole day in the kitchen making something like this.
I’m so excited!! I love pierogies, but I’ve only ever bought them. I haven’t bought them lately because I wasn’t very happy with the brand taste and they were expensive. I’m loving this recipe and going to give it a go. Thank you so much for sharing such a wonderfully delicious sounding recipe. :)
I might need to make these for my husband as a surprise soon. He grew up eating pierogies (his mom is Italian and actually grew up in Pittsburgh) so he introduced me to them, but we just get the frozen ones, which actually have some different flavors that sound really good–in fact, they make a spinach and feta one that I’m pretty fond of. I’m sure these would be about ten times better than the frozen version and he would probably LOVE them.
In the past I’ve struggled with making perogy dough (pie crusts is another nightmare of mine!) and just can’t seem to get it right for some odd reason. Seeing as how my husband LOVES homemade blueberry perogies with cream gravy and farmer sausage I keep attempting perogies with the hopes that one day they will turn out. Well, I tried your dough recipe this morning and I am so EXCITED to say they turned out amazingly! Thank you so much for posting this recipe! :) I will definitely be making more perogies HAPPILY in the future instead of dreading the outcome!
Hi Daphne, I’m so happy to hear you had a great experience with the recipe! Thanks for coming back to share :)
Just wanted to say thanks. I really enjoy your blog. I especially enjoy that you take the time and effort to create recipes for foods that are important/traditional to your family. I too have an Eastern European background and have loved finding recipes for pierogi, nut roll, and babka on your blog! It’s taken me a lot of trial and error to make anything that tastes close to what my mom made (like so many others, she was a “little of this and a little of that” cook – no recipe required). She’s 90 now and it’s fallen on me to carry on the traditions and find the recipes. Now I just direct my siblings and my kids to your sight. With a little tweaking of fillings (potatoes and onions, kapusta, & cheese fillings for our pierogies) your recipes are pretty close to what I helped my mom make growing up! Thanks so much!
Hi Irene, Thank you for the incredibly sweet comment, it means a lot. I’m so happy that you’ve found recipes to enjoy!
Pierogies have been on my culinary bucket list for ages but I’ve been lazy up to now lol. Growing up in Chicago, they are one of those foods you learn to love early on. Seeing this makes me inspired to get a move on and get some made. They look delicious!
Homemade pierogi’s are tough work, but totally worth it. This recipe looks perfect!
Oh my goodness. Blast from the past! We used to have potato and cheese pierogies with grilled onions all the time growing up. Love it! Pinned!
These look amazing!!
L x
http://workingmumy.blogspot.com
I have been making pierogis for years, but our tradition is eating them as a Christmas Eve meal, along with fried fish (somewhat fish stick looking) and a cabbage, mushroom dish. One year I decided I didn’t want to make them because it is so time consuming, so I bought them, ever since my kids (now grown) have helped. Our dough is sour cream based, a couple of eggs, salt and flour, mixed and kneaded right on the counter top. We do use a pasta rolling attachment on the Kitchen Aid which makes the assembling process much faster. We all have our stations; rolling, cutting, filling and forking. We do 2 fillings, one potato with sharp cheddar (and thanks to my son) sauteed leeks. The other is straight farmer’s cheese (which I order from Chicopee, Mass. because you can’t get good Farmer’s Cheese in California) with an egg and some seasoning, . We make enough so I usually have some in the freezer for a few meals after Christmas is over.
Nadine, Here in California I use the Queso Fresco Cheese from the Mexican stores. It has the right texture and everyone loves the taste! It is much cheaper than Farmer’s or Hoop Cheese which I can find at Whole Foods – they will order it for you if not in stock. Try the Mexican Cheese – you will need to break it up with a fork before putting together the filling.
Brilliant idea! I did get Farmer’s Cheese from Whole Foods one year and it was horrible….Being from the East coast ordering the cheese is now part of the tradition! But I will give Queso Fresco a try!
Wondering where Nadine orders her farmers cheese from in Chicopee Ma. I live near there and this info would be super helpful for my first pierogi attempt!
I admit that my family loves Mrs. T’s potato and cheese pierogies, but I have had the homemade version at a local folk festival, and they are so delicious! Can you tell me how many individual pierogies this recipe makes? A serving in my house would be at least 6 pierogies, so that would mean 24-36 in my house, but not sure what you are considering a serving.
Now I’m just waiting for your kapusta recipe :-)
Hi Lynne, This makes around 32 to 36 pierogi, depending on how far you take the scraps. I hope that helps!
I am so sad right now that I’ve never had a pierogi before! I must make these!!
I LOVE making homemade pierogi!! My grandma’s recipe for the dough is amazing and easy though. 1 500ml tub of sour cream and 3-4cups of flour. Whiz that in the kitchen aid and you’ll have the most deliciously delicate pierogi! A bit different from traditional. Must try your recipe though :) Might just make some this weekend!
That sounds great! I’ll have to give it a try the next time I make the dough. Thanks for sharing!
I used your dough recipe, it is very nice!
I grew up in Europe and pierogies are very well known for me. Love them!
I miss pierogies so much since I’ve moved from Pittsburgh! Although I always really liked the sauerkraut filling! Quick question, do you think that the pierogi dough could be made in a bread machine on the dough cycle?
I grew up outside of Pittsburgh as well and there was a church that would make homemade pierogi every Wednesday – they were sooooo good. My grandfather was from Poland and he would make them as well, but never passed down the recipe. I miss them now that I moved away, but I am going to give these a try:(
Hi Melissa, I’ve never used a bread machine, so I’m not sure honestly. It’s a very simple dough, so I don’t think you really need a machine. If you don’t have a food processor, you could use a stand mixer, or just a bowl and wooden spoon, and then knead quickly by hand.
If you’re going to make pierogies, you gotta make a hundred or more. They freeze perfectly and are even great baked.
My son just asked for these this morning and I said I don’t have time this week. This post didn’t help my case.. LOL
Great job :)
I would like to know how long you baked these?
Thanks
Morning, I love everthing I’ve made from your website. Yummy Great Fabulous. My question, ’cause I will be making these homemade perogies, I have no food processor, should I mix by hand or just use my stand mixer?
Thanks, Lets Eat
Hi Adita, If you have a stand mixer, I would definitely use that. Enjoy!
I used to have family friends that made me pierogis but theirs were a meat filling. These look wonderful. What is farmer’s cheese, though?
Hi Emily, It’s a white semi-soft cheese. I found it in the cheese department of my grocery store near where the mozzarella is stocked. I hope that helps!
This is fantastic! My boyfriend loves pierogis. Can’t wait to try these out for him!
I always find it so much fun when I see other recipes for pierogies! I use a recipe that was kind of sort of passed down through the family, and I put my own spin on it. :) I put sour cream or kefir into the dough, and I always work it by hand. To cut down on waste (sacrificing uniformity, of course) I roll out a section of dough into a log, snip little teaspoon-to-tablespoon size pieces and roll and press them out into a round, then fill them and pinch them closed. I have no idea how thin I roll them. I gauge by how translucent the dough is: the thinner it is, the more delicate the pierogie ends up tasting/feeling in the mouth, the better. If I can see the pattern of my countertops through the dough, then it’s thin enough for filling.
It’s such a time-consuming project that typically my (very Ukrainian) family and I reserve it only for special occasions like Christmas Eve. From start to finish it can take me upwards of about 5 to 6 hours straight, especially since I make massive batches of 150+ pierogies. But it’s always worth it!
Yours look beautiful! They probably taste just as good, too!
Hi! I just wanted to say that I do not like the way the emails are coming in now – I like getting your posts by email because then I don’t have to click over to the blog. Now, there’s no point in the email because I need to go to the blog to see the full post anyway.
Anyway, just my two cents worth. I figure change doesn’t happen unless people speak up :)
These look awesome!!
What tips can you give for making this dough by hand (I don’t have a food processor)?
Hi Daphne, I would use a wooden spoon to do the mixing and then knead by hand until it’s incorporated and smooth.
I’m making a huge batch of pierogi today for our Easter dinner! My family, alas, does not like the potato and cheese kind so I’m going to make some cheese-filled (I use a blend of ricotta and farmer’s cheese) and some filled with spinach, mushroom and feta. Non-traditional but they’re my son’s favorite. And yes they absolutely have to be sauteed, with onions!
Spinach, mushroom, and feta sounds awesome. Hope you don’t mind if I give it a try!!
It’s nice to try new things. especially when they looks soo appealing!
can’t wait to try your recipe
thanks :)
Never heard of these but anything with potato and cheese is a big yes for me!! Will be trying these soon!