How to Decorate Cookies with Royal Icing
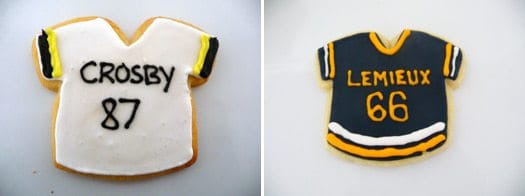
Welcome to the first in what I plan to be a recurring “How-To” series here on Brown Eyed Baker. While recipes are all well and good, there are some techniques that are best explained in a step-by-step method, with pictures included (at least this is how I learn best). As I was decorating my Stanley Cup Playoffs cookies last week I thought that doing a tutorial on how to decorate cookies with royal icing would be a great first How-To post.

I was always very good at baking snowmen, Christmas trees, angels and the like in December, slapping on some buttercream, a few sprinkles and calling it a day. Not that it isn’t good. It is definitely good. But then royal icing came onto my radar. The possibilities seemed endless – a completely smooth finish to the cookies and intricate designs? Now THAT looked fun! I’m here to guide you on a step-by-step tutorial on how to achieve any design you want on any shape cookie. Ready? Let’s begin!
Step 1: Find a Good Sugar Cookie Recipe
This might seem obvious, but not all sugar cookie recipes stand up well to heavy-duty decorating. If you don’t already have a favorite, let me point you to mine: Dorie Greenspan’s All-Occasion Sugar Cookies. They’re incredible.
Step 2: Cool Cookies Completely
Again, maybe elementary, but we’re going step-by-step here. You can’t decorate cookies that have just come out of the oven. Or even cookies that are slightly warm. They need to be completely cool before you can move on to decorating.
Step 3: The Equipment
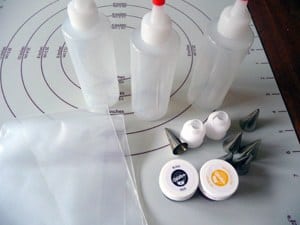
Now, you don’t necessarily need fancy equipment for decorating with royal icing, but investing in just a few decorating tips and couplers, some disposable pastry bags and squeeze bottles will make your cookie decorating experience exponentially more pleasant. Here is a run-down of what I typically use:
♦ 12″ disposable pastry bags. So easy to just throw away when you’re done instead of washing them!
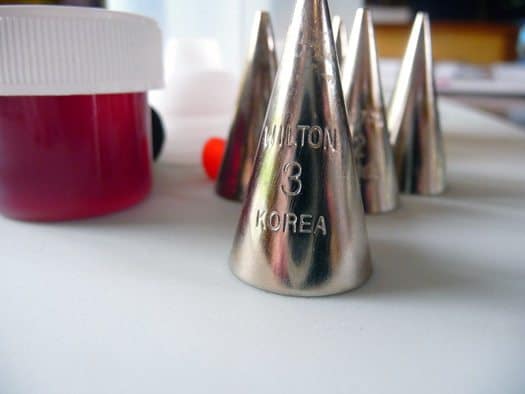
♦ Decorating tips. For outlining the cookie I use a #3 tip and anything from a #1 to #3 for intricate designs on the cookie. It’s not a bad idea to have a few of each number, as I find myself using them a lot.
♦ Couplers. These make it easy to switch the size tip you are using in the same color.
♦ Squeeze Bottles. I use these for flooding my cookies. Since the royal icing is very thin at this point, it’s a much neater alternative to a cut-open pastry bag. Plus you can put the cap on and save any extra icing for next time.
♦ Small bowls or Tupperware (to color your icing)
♦ Toothpicks.
Step 4: Prep, Prep, Prep!
This got me the first time I decorated with royal icing, and is especially important if you are going to be using multiple colors and different tips. I flew by the seat of my pants and ended up making a huge mess, it took twice as long as it should have, and I was trying to fish used tips out of pastry bags to re-use them somewhere else. Your plan of action:
♦ Write down how many different colors you will be using and take out that many pastry bags and couplers and prepare them. Also figure out what size decorating tips you will be using and fit them to the pastry bags.
♦ If you don’t have squeeze bottles for flooding, add additional pastry bags for however many colors you will use for flooding, in additional to the bags of that color you will use for detail work (if any).
♦ Have your icing colors ready and as many small mixing bowls (Tupperware works great for this) as you have colors planned.
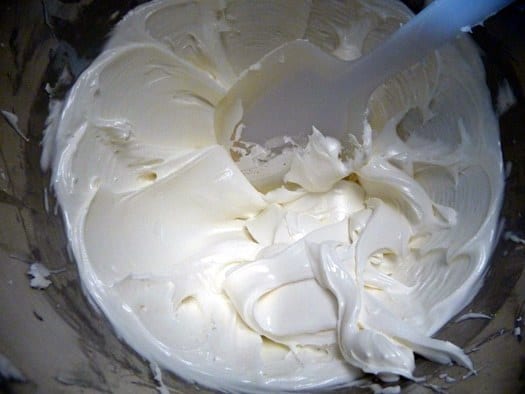
Step 5: Make the Royal Icing
The recipe for royal icing is very simple:
Save This Recipe
4 cups powdered sugar
2 tablespoons meringue powder
6 tablespoons water
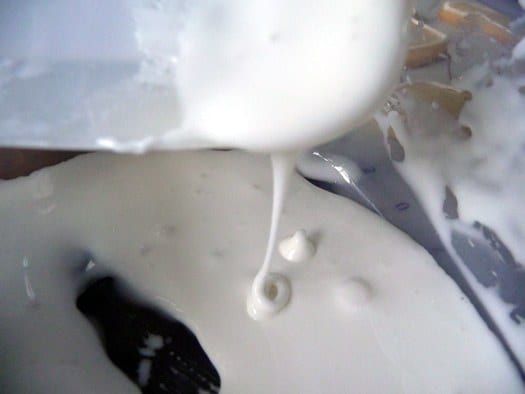
Mix all ingredients on low speed for 7-10 minutes or until the icing loses its shine. Add more water by the teaspoon if it appears too stiff. At this stage you want to be able to pipe it easily:
Step 6: Color the Icing
Divide the icing into your containers based on how much you will need of each one. Proceed to color the icing and then cover each container with a damp paper towel. It is key when working with royal icing not to allow it to dry out.
Step 7: Outline the Cookies
You will want to outline the cookies with whatever color you will be using to fill them in with. Place some of the icing into a disposable pastry bag fitted with a #3 tip and outline the outside of the cookie. I find that keeping the tip about ½-inch above the cookie while moving it allows the icing to lay on the cookie more easily.
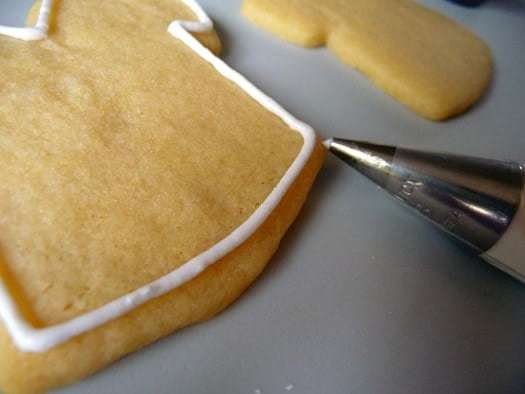
You’ll want to make sure that the outline is pretty well set before moving on to flooding the cookies, but I generally find that by the time I am done outlining the first ones are already dry.
Step 8: Flood the Cookies
Take whatever color you are using to fill in the cookies and slowly start adding a few drops of water at a time, until the icing reaches an almost liquid consistency. The test here is to pick some icing up with a spoon and let it drizzle back into the bowl – the drizzle should disappear into the bowl within 10 seconds. Once you have achieved this, you are ready.
Either fill a squeeze bottle with the thinned icing or transfer it to a disposable pastry bag with a ¼-inch hole cut off the end.
Now squeeze in the icing to almost completely fill the inside the cookie.
Then take a toothpick and gently use it to distribute the icing to any empty spots.
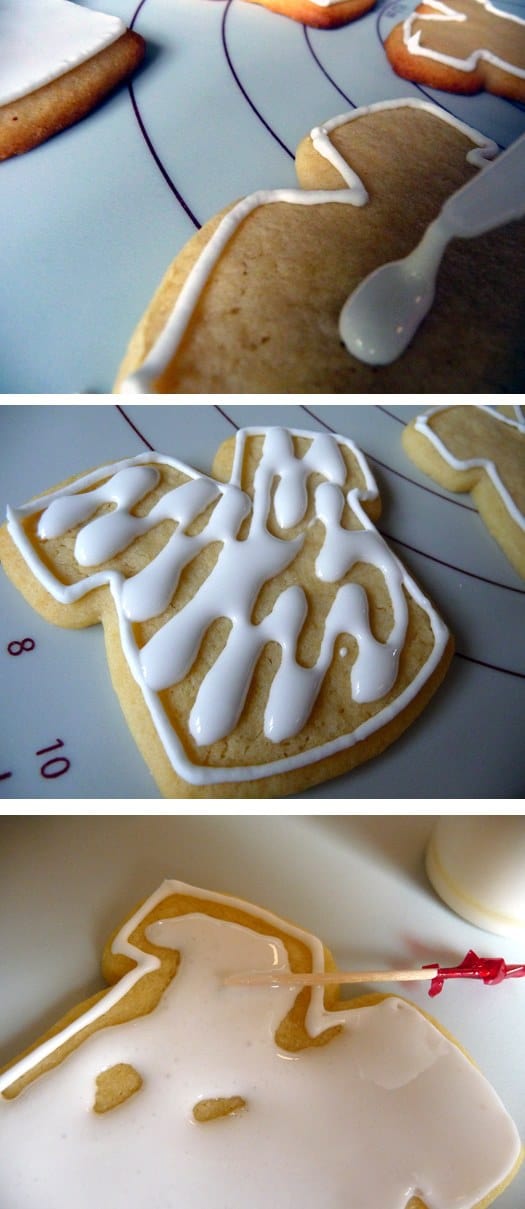
Once you are done the cookies need to dry completely before moving on to any intricate piped designs. Some bakers will let them sit overnight but I generally find that a 2-3 hour rest will do the trick.
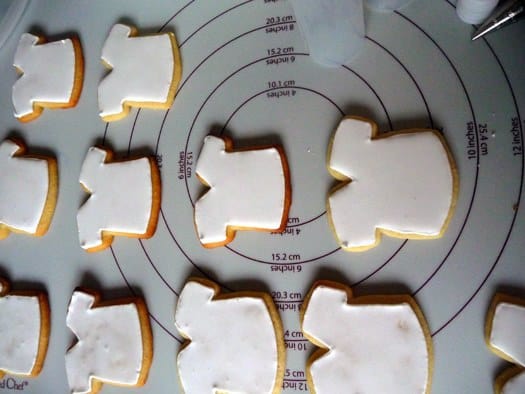
Now use whatever colors and tips you’d like to achieve the design you want!
♦ ♦ ♦
Was this helpful? I’d love your feedback on this post since it’s the first of its kind on Brown Eyed Baker! Any questions or additional tips to share?
What do you want to learn? I’d love to hear what you would like to see featured in the How-To series. A reader has already mentioned that she’d like to see a tutorial on baking bread with yeast. What’s on your list?
![]() Don’t forget to subscribe to the Brown Eyed Baker RSS feed to ensure you don’t miss any upcoming posts!
Don’t forget to subscribe to the Brown Eyed Baker RSS feed to ensure you don’t miss any upcoming posts!


VERY helpful! My daughter got some really cool Star Wars cookie cutters for Christmas. They emboss the top of the cookie with the pattern. But she got really frustrated trying to work with the royal icing. This website helped explain what she needed to know.
Wow that was fast! But, do I “glue” them when the royal icing is still wet or do I follow the steps above regarding the sprinkles? Should I let the icing harden, wet it slightly and then glue them on? Thanks so much! I can’t wait to do this!
Hi again! :) You will want to let the cookies completely dry before adding any extras on, then just a small dab of royal icing and “glue” on your additions. This is different than sprinkles, and you do not need to wet the icing at all. Just make sure it is completely try, then use fresh royal icing to glue on any additions.
Hi Brown-eyed Baker,
I am about to try these instructions in a few days, using them to bake cookie favors for my sister’s baby shower. They will be turtle-shaped cookies, frosted in minty-green royal icing. They are based on a design in her nursery. Anyway, I would like to add candy buttons (you know, the type that come on the rolls of paper) as decorations on the turtle shells (the turtles in her nursery are polka-dotted). Is it possible to use the royal icing to affix things to the cookies? Or, should I add a different type of icing to do the adhering on top of the royal icing?
Thanks!
Laura
Hi Laura, Royal icing is actually perfect for “gluing” things to the hardened/iced cookie. Have fun and enjoy the cookies!
I have a great tip in regards to the dough…immediately after mixing the dough, divide dough into 2 pieces, roll out between wax or parchment paper to your desired cookie thickness. Put flattened dough on cookie sheets (leave paper on dough) and leave in the refrigerator 2-3 hours or overnight. Once the dough is hardened, remove paper and cut out cookies! The dough stays very cold, there is less spreading and you don’t have to try and roll hard dough!
great tutorial + great recipes = a really great christmas cookie baking and decorating experience for me and my family. thank you for bringing out the martha stewart that i always knew was inside me!
Amazing instructions and pictures. Thanks so much for posting this. I made cat and dog cookies for my daughter’s birthday party favors and they turned out great–but how did you get the lettering to come out so well? Did you use a #1 tip or something even smaller? Whenever I tried to draw fine lines, the icing flow would “skip” and/or the line would be too thick (way thicker than yours, even using a #1 tip)…
Hi Maia, I do sometimes use a #1 tip for writing letters on cookies. Depending on how large I want them I either use a #1 or #2, but mostly #1. As for the icing skipping, this used to happen to me too. The icing needs to be just a little less stiff, so try adding a touch more water. That should help it flow nicely out of the piping bag. It can take some trial and error (and patience!) to get a feel for the consistencies, but it eventually comes. It took me awhile!
I was looking for a simple royal icing recipe and cookie decorating ideas to use with my 4 year old grandson. I found your website most helpful and appreciate the detailed instructions. Will be making cookies this weekend!!!!
Yay! What a wonderful activity to do with your grandson! Have fun!
hi,
i love your instruction…but mmm i’m wondering if you can make the ‘how to’ on macaroons i can’t seem to bake these babies they turned out either flat & rough or footless >_< , i've tried many many tips from the net but i simply couldn't get it right.. what went wrong? i'd really love to see the detailed step by step on this one…
Thank you for the great tutorial on royal icing. I do a lot of baking and this was one of the best set of instructions I’ve ever used! My turkey sugar cookies turned out beautifully.
So happy to hear that Mary! Hope you had a wonderful Thanksgiving!
Thank you, Michelle, I’ll try that. We need a hairspray for sprinkles!! hahaha
I have a problem when using sprinkles on royal icing on cookies or buttercream icing for cake. If I put the sprinkles on when the icing is damp, the sprinkles bleed into the icing. If I let it dry a bit, then the sprinkles do not stick. Do you have a solution for that?
Hi Georgia, What you’ll want to do is let the royal icing dry. Then, brush it very lightly with some water and then add your sprinkles. Let it dry completely, and then shake off any excess sprinkles.
Thanks for such detail explaination on icing decoration. I’m totally dummy in this. I will bookmark this for sure.
Thank you for the helpful tips and demo. I am looking into picking up cookie decorating as a hobby and this was very helpful for me.
This was beyond helpful!! You should have seen me trying to microwave my icing to make it pourable!! Ha ha ha :)
Yay so glad you found it helpful! Woo for cookies! :)
I just made footballs using your tips, which were extremely helpful. The only trouble I had was that some of them dripped down the sides. Is this because I didn’t pipe a thick enough line in some spots?
I also used the all-occasion sugar cookie recipe. Delicious once they’re baked. I had trouble with the dough, though. I couldn’t get the cookies off of the wax paper, even after chilling them for an extra 30 minutes. I ended up using my cookie cutters in a makeshift way, but my footballs are anything but perfect and smooth. Any tips?
Hi Lauren, the icing running off the edge could definitely be attributed to the border not being thick enough. I usually use a #2 tip with consistent pressure to pipe the borders. Also, making sure that the borders are dry before flooding is another important step.
Regarding the cookies sticking – if you roll out the dough between pieces of wax or parchment paper, you need to be sure to flour all of the surfaces really well.
very informative. I however do not like cookies decorated with royal icing. tried the ones from stores. Haven’t tried it home. I am wondering whether we could do the same thing with buttercream – making it thin and various consiastency? if so how do you thin buttercream for flooding? adding more liquid or melted butter?
Unfortunately the consistency of buttercream is totally different and doesn’t have the same properties as royal, so it would not dry smooth and hard.
This is so helpful! Wonderful tutorial, thanks!
I have been a “decorating fool” since I’ve seen your tutorial about decorating cookies with royal icing!! I do have a question though, it seems that the top layer of royal icing gets hard and almost dried out on the cookie after just a day or two.Like when you bite the cookie, it is almost like a candy coating. I did cover the cookies with plastic wrap. Any suggestions? Thank you so much.
Hi Liz, The royal icing is actually supposed to dry rock hard. That way you can easily decorate on top of it.
Thanks so much for posting. It is a very helpfel recipe.
But I was wondering,
Is there anything I can use to replace the meringue powder?
Would cream of tartar work?
Hi Alex, Hmm that’s a good question. The meringue powder is really essential in the icing, as it is what allows it to dry hard. I have never substituted it with anything and am not sure that cream of tartar would work in this instance. Is there a particular reason you don’t want to use meringue powder?
When letting the cookies sit before decorating, do we need to store it in a container or just leave it in the open?
Hi Zahra, You can let it sit out. I always just lay them out on my dining room table. The icing keeps the cookies moist.
Thank you for the great step by step instructions!!!
This is an awesome tutorial! I definitely have to try this for the next time I make sugar cookies! Thanks!
This is FANTASTIC!! I have looked all over the internet to get the simplest directions to decorate sugar cookies with royal icing (since I’ve never used royal icing before), and your tutorial and photos make this seem very easy. I’m baking 150 pink ribbon cookies (6″) for my co-workers to recognize Breast Cancer Awareness month.
Thanks for your time!!
You are very welcome Evelyn! What a nice gesture to make all of those cookies! Have fun!
Your tutorial is absolutely FABULOUS! I am the worlds worst baker… I followed your instructions and recipes to a T and not only were me cookies edible, they were adorable and delicious too!! I have a pic of the pink & zebra cookies in this post, http://peasandthankyous.blogspot.com/2010/10/neenies-7th-birthday-pink-zebra-art.html, and I linked back to you. Thank you sooooo much for this tutorial!!
You are very welcome, Jill! Those cookies are absolutely adorable, you did fabulous work!! Love your site too!
thanks…
Thank you so much for the detailed instructions on decoarting the cookies. I recently made cookies for my granddaughters birthday and school party but the cookies were rounded and uneven. I notice that the cookies I purchase and your cookies are flat. Any ideas as to why my cookies are uneven which makes it difficult to decorate them as well as takes away from the appearance?
Hi Janice, I have found that cookies sometimes turn out bumpy and uneven when the dough is too warm before getting it into the oven. I would try refrigerating the cookie sheets for 15-20 minutes before popping them into the oven and see if that helps!
LOVE your site!! I am getting ready to start decorating cookies for a cheerleading competition. I just have one question how far in advance do you think I can make and store these cookies?
Hi Amie, Thanks! These cookies can definitely be done in stages over several day. What I typically do is make the dough one day, then throw it in the fridge to chill. The next day I bake the cookies. If I have time I will outline and flood them. Then let them dry overnight and do the details on top. Once they are decorated you can store them in an airtight container or bag (just be careful stacking!) for 1-2 days. Have fun!
Thank you so much for your steo by step intructions. I decided to make football related cookies to send to my son. he recently left for college at University of Miami. I had time on my hands. Your guidance made this a fun, rewarding experience,The cookies look awesome. Go Canes.Thanks, ALyse
I am new to cookie decorating and making. I have never been able to bake cookies let alone decorate them. This is so helpful, i am going to start this week so i will let you know how i did, wish me luck.
Great tips! I’m so glad I stumbled across your website. In my area decorated sugar cookies start at $3 each and that adds up quickly. I want to use some edible pearls and glitter on the cookies that I will be making. At what point in the process should I add them? Should I do it right after I flood with the royal icing or wait for them to harden a bit? I’m worried that if I add them to quickly the pearls will sink. Please advise. Thanks!