How to Decorate Cookies with Royal Icing
Welcome to the first in what I plan to be a recurring “How-To” series here on Brown Eyed Baker. While recipes are all well and good, there are some techniques that are best explained in a step-by-step method, with pictures included (at least this is how I learn best). As I was decorating my Stanley Cup Playoffs cookies last week I thought that doing a tutorial on how to decorate cookies with royal icing would be a great first How-To post.

I was always very good at baking snowmen, Christmas trees, angels and the like in December, slapping on some buttercream, a few sprinkles and calling it a day. Not that it isn’t good. It is definitely good. But then royal icing came onto my radar. The possibilities seemed endless – a completely smooth finish to the cookies and intricate designs? Now THAT looked fun! I’m here to guide you on a step-by-step tutorial on how to achieve any design you want on any shape cookie. Ready? Let’s begin!
Step 1: Find a Good Sugar Cookie Recipe
This might seem obvious, but not all sugar cookie recipes stand up well to heavy-duty decorating. If you don’t already have a favorite, let me point you to mine: Dorie Greenspan’s All-Occasion Sugar Cookies. They’re incredible.
Step 2: Cool Cookies Completely
Again, maybe elementary, but we’re going step-by-step here. You can’t decorate cookies that have just come out of the oven. Or even cookies that are slightly warm. They need to be completely cool before you can move on to decorating.
Step 3: The Equipment
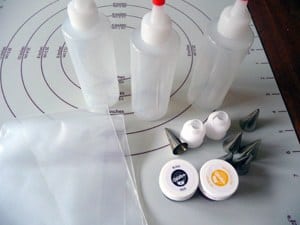
Now, you don’t necessarily need fancy equipment for decorating with royal icing, but investing in just a few decorating tips and couplers, some disposable pastry bags and squeeze bottles will make your cookie decorating experience exponentially more pleasant. Here is a run-down of what I typically use:
♦ 12″ disposable pastry bags. So easy to just throw away when you’re done instead of washing them!
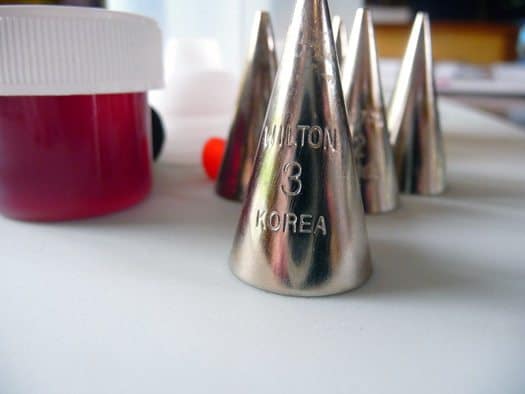
♦ Decorating tips. For outlining the cookie I use a #3 tip and anything from a #1 to #3 for intricate designs on the cookie. It’s not a bad idea to have a few of each number, as I find myself using them a lot.
♦ Couplers. These make it easy to switch the size tip you are using in the same color.
♦ Squeeze Bottles. I use these for flooding my cookies. Since the royal icing is very thin at this point, it’s a much neater alternative to a cut-open pastry bag. Plus you can put the cap on and save any extra icing for next time.
♦ Small bowls or Tupperware (to color your icing)
♦ Toothpicks.
Step 4: Prep, Prep, Prep!
This got me the first time I decorated with royal icing, and is especially important if you are going to be using multiple colors and different tips. I flew by the seat of my pants and ended up making a huge mess, it took twice as long as it should have, and I was trying to fish used tips out of pastry bags to re-use them somewhere else. Your plan of action:
♦ Write down how many different colors you will be using and take out that many pastry bags and couplers and prepare them. Also figure out what size decorating tips you will be using and fit them to the pastry bags.
♦ If you don’t have squeeze bottles for flooding, add additional pastry bags for however many colors you will use for flooding, in additional to the bags of that color you will use for detail work (if any).
♦ Have your icing colors ready and as many small mixing bowls (Tupperware works great for this) as you have colors planned.
Step 5: Make the Royal Icing
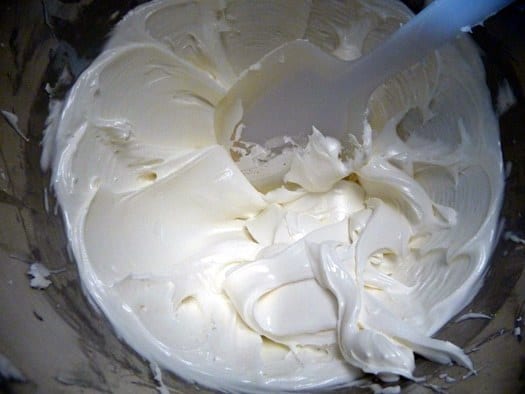
The recipe for royal icing is very simple:
Save This Recipe
4 cups powdered sugar
2 tablespoons meringue powder
6 tablespoons water
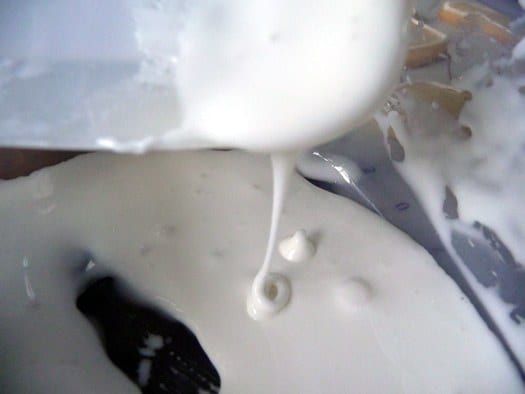
Mix all ingredients on low speed for 7-10 minutes or until the icing loses its shine. Add more water by the teaspoon if it appears too stiff. At this stage you want to be able to pipe it easily:
Step 6: Color the Icing
Divide the icing into your containers based on how much you will need of each one. Proceed to color the icing and then cover each container with a damp paper towel. It is key when working with royal icing not to allow it to dry out.
Step 7: Outline the Cookies
You will want to outline the cookies with whatever color you will be using to fill them in with. Place some of the icing into a disposable pastry bag fitted with a #3 tip and outline the outside of the cookie. I find that keeping the tip about ½-inch above the cookie while moving it allows the icing to lay on the cookie more easily.
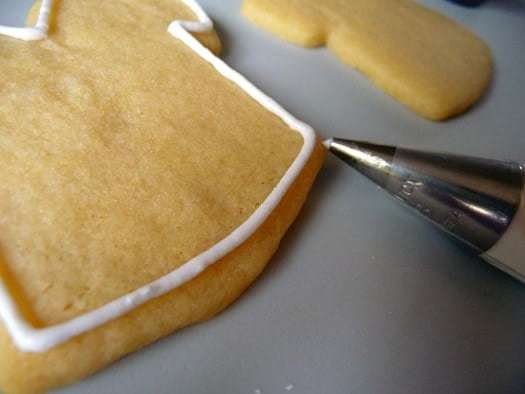
You’ll want to make sure that the outline is pretty well set before moving on to flooding the cookies, but I generally find that by the time I am done outlining the first ones are already dry.
Step 8: Flood the Cookies
Take whatever color you are using to fill in the cookies and slowly start adding a few drops of water at a time, until the icing reaches an almost liquid consistency. The test here is to pick some icing up with a spoon and let it drizzle back into the bowl – the drizzle should disappear into the bowl within 10 seconds. Once you have achieved this, you are ready.
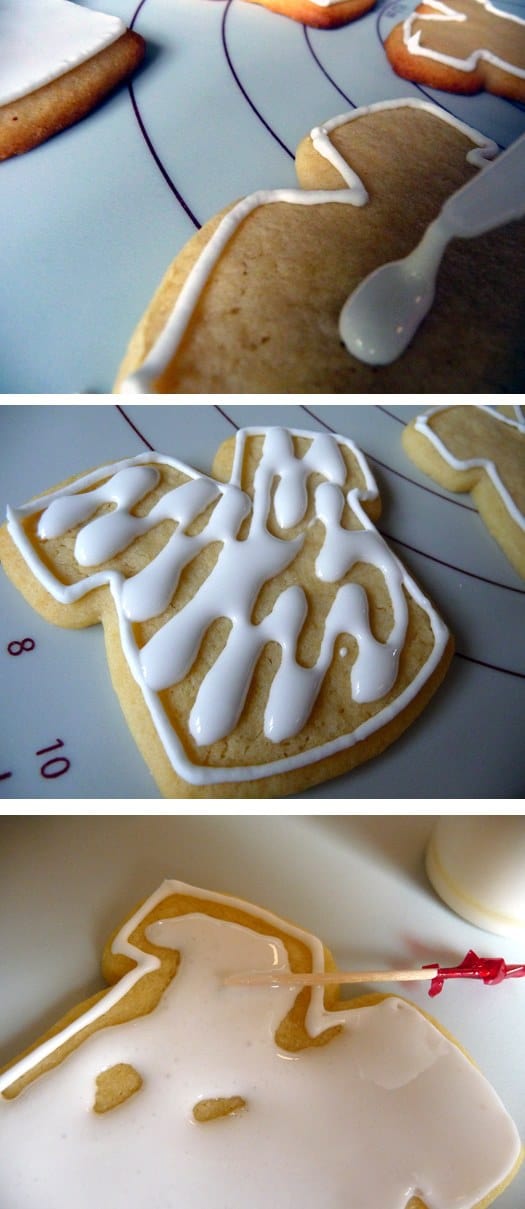
Either fill a squeeze bottle with the thinned icing or transfer it to a disposable pastry bag with a ¼-inch hole cut off the end.
Now squeeze in the icing to almost completely fill the inside the cookie.
Then take a toothpick and gently use it to distribute the icing to any empty spots.
Once you are done the cookies need to dry completely before moving on to any intricate piped designs. Some bakers will let them sit overnight but I generally find that a 2-3 hour rest will do the trick.
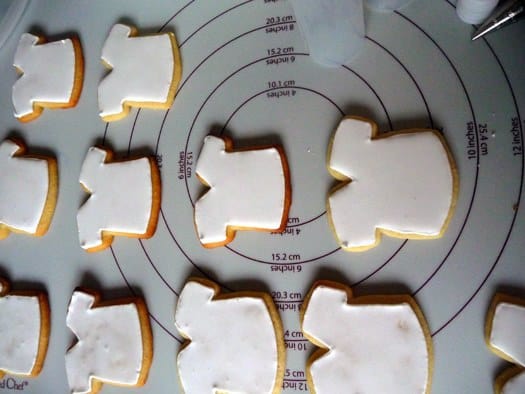
Now use whatever colors and tips you’d like to achieve the design you want!

♦ ♦ ♦
Was this helpful? I’d love your feedback on this post since it’s the first of its kind on Brown Eyed Baker! Any questions or additional tips to share?
What do you want to learn? I’d love to hear what you would like to see featured in the How-To series. A reader has already mentioned that she’d like to see a tutorial on baking bread with yeast. What’s on your list?
![]() Don’t forget to subscribe to the Brown Eyed Baker RSS feed to ensure you don’t miss any upcoming posts!
Don’t forget to subscribe to the Brown Eyed Baker RSS feed to ensure you don’t miss any upcoming posts!


These are so precious!!
Hi, whats the diference between Royal icing and color flow icing?
Michelle, did you ever think of outlining in chocolate? I am considering melting down some of those Wilton wafers (you can melt them right in the squeeze bottle) and outlining in chocolate, then flooding the cookie with royal icing after the chocolate has set. I haven’t tried this yet…what do you think? Does it sound like it would work?
I outlined my cookies last night to prepare them for flooding tonight and had problems with the icing not sticking to the cookies in several places. I followed the recipe on here for the royal icing and my cookies were completely cool. does anyone have any suggestions as to how to prevent this?
Hi Terri, The outlined icing didn’t stick to the cookies? Could you explain exactly what happened/how it looks, or include a link to a picture if possible? It will help me help you out :)
Thank you for this! I follow you in Google Reader, but stumbled across this by searching. It’s exactly what I’m looking for. Thank you again!
Thank you so much for this information on decorating sugar cookies. My first attempt was at Christmas a year ago and it took me several recipes to get a tasty cookie. As for the icing, I have been using a recipe that calls for confectioners’ sugar, vanilla, a little milk and light karo syrup and what a mess. but it is tasty! anyway, my daughter wants me to decorate cookies for my grandsons 1st birthday this weekend to look like john deere tractors. I was wondering what the difference in your royal icing and the icing i’ve been using would be? i’m not even sure it has a name, I just remember searching until i found recipe for sugar cookie icing and found this one. the icing actually dries hard enough that i’ve been able to use other colors for decorating though they are nothing compared to yours. i really want to try yours but was just curious if you’d ever heard of or used the icing i’m referring to. thanks again for this valuable information!
Hi Terri, I have not heard of the type of icing you described, but I can tell that the primary (and important) difference is that the royal icing recipe I use has meringue powder in it. That is the key ingredient and gives the icing it’s smooth texture and allows it to try super hard. I hope that helps; have fun decorating! :)
Thanks for your feedback Michelle. I completed my project over the weekend, 50 sugar cookies cut like a tractor and a red barn, and decorated. it took me forever but I did it although since it was my first time using the royal icing, i made mistakes and learned a lot! actually the icing i’ve used with the karo syrup dries hard as well but would not work for the outlining at all. the royal icing is much easier to make though. as for my other post about the outlining, for some reason in certain places the outline fell off so i went back to those places and outlined them again and had no bleeding at all. for my first attempt i thought they turned out ok. they weren’t as smooth as they should have been but i think if I keep at it I can eventually get there. This site has been a tremendous help to me. My daughter-in-law now wants some pink zebra print cookies for my grand-daughter’s 2nd birthday party coming up in a few weeks. Any suggestions? Also, do you use a stencil on your cookies to outline first or is it all freehand with you?
Hi Terri, I do everything freehand, although I do quite a bit of sketching and practicing beforehand, especially if it’s something I haven’t done before.
Brilliant! This was EXACTLY what I was looking for. Been wondering how to do that for AGES and love the detailed instructions. Thanks!
I get it now!! This tutorial totally answered all my questions!!!
Do you make 2 different batches of the royal icing to do one set of cookies? Meaning one batch for the flood icing and another batch for the piped decoration? I’m thinking that it sounds like if you make one batch, dividing it into piping and flooding, color it, etc, then do the flooding, by the time you are ready to do the piping wouldn’t the reserved piping icing have dried out? How do you keep that portion fresh overnight will the flood dries?
Hi Karen, It all depends on how much I need and how many different colors. Sometimes I will make a separate batch, but if I only make one, I cover the unused icing with a damp towel (to keep the moisture in) or you can put it in the piping bags, close off the top with a rubber band, and then put them tip-down into a glass with a little water so they stay hydrated.
Hi!
Thank you so much for this!!!! I am going to be making cookie bouquets for my older sisters in college for their exam week. I was wondering, do you know how ot make it so that you get the flooded look with two different colors?(this is kind of hard to describe over the computer), but like if I had a round cookie with a pink background and I wanted to put polka dots in it without them being raised above the pink icing, would I just plop them in there?
Hi Megan, What a great sister you are! I do know what you mean, it’s hard to explain, but yes, you just plop them in right after you flood them and they’re still wet. A short explanation is included in this post by Bake at 350:
http://bakeat350.blogspot.com/2010/12/dotty-winter-trees.html
Have fun!
i’ve always wanted to decorate cookies and yours is definitely a great help. i’ll want to try it soon. can i also ask if you have any books to recommend to me, who is a beginner in cookie and cake deco? thank you very much! (:
Hi Jasmine, I actually have never checked out any books on cake or cookie decorating, but I find YouTube videos super helpful!
Thanks for making this step by step tutorial! Can’t wait to try it out!
This step by step instructional is amazing. I have been trying to make cookies with royal icing for years and they always turned out so messy. Thanks to this, I finally got it right. Thank you so much!!! Another tip that I learned is this: when filling the pastry bags: put the empty bag (with tip and coupler already in place) in a tall glass. Fold the top of the bag over the glass and then fill bag with icing. Once the bag is no more than half way full you can twist the top and take it out for use. This allows you to use both hands while filling the pastry bag with the royal icing. This is a great way to make a possibly messy task simple and spill proof. Once again thank you so much for taking the time to do this!!!
I’m going to try decorating cookies for a baby shower this weekend. This will be my first try at this………wish me luck! :)
So excited to do this! Thank you for the how-to!
Thanks so much for the detailed description! This is just what I was looking for!!!
I just found this website tonight and came across your recipe. I don’t remember when I’ve seen a receipe so detailed and friendly. You seem to enjoy what you do and don’t mind sharing it with other people. Thank you so much. I will be coming back for other recipes, especially yours.
I have decorated cookies several times with royal icing and honestly never knew that there was an honest to goodness technique to make them perfect! Thank you so much for taking the time to make this step by step tutorial….you are a godsend!
I was looking for a new frosting recipe when I came upon this website and royal icing. I made my cutout recipe 2 different times before I gave it a go with this procedure. If I use this frosting on cookies for my daughter’s baby shower I’ll need to practice, practice, practice more. My outlining was uneven; but the outlining definitely shows the shape of any cutout cookie (onesie’s, ducks, buggy, etc.), which is nice. My husband is sampling as I write this. Not sure he likes the taste when compared to the buttercream I usually do. SO, THE BIG QUESTION IS DO I GO FOR THE LOOK OR THE TASTE? Outlining and filling is definitely more work than slapping on some buttercream.
Hi Elaine, I would say that decorating sugar cookies with royal icing definitely is not done for taste. It’s definitely not as good as buttercream, but it’s the only way to intricately decorate sugar cookies and allow them to dry completely hard.
I have always wondered how to fill cookies like this with no lines! Thanks so much, this really helped!
that was helpfull information..
I will make me some cookies to decorate this upcomming weekend.
Thanks :)
I just wanted to say thanks for sharing these great step-by-step photos to go with the instructions. I’m a visual person and tonight was the first time I used royal icing for Valentine’s Day sugar cookies and it was so easy. I actually flavored it with a little strawberry extract and then drizzled melted chocolate on top and they tasted phenomenal in addition to giving them a little hint of pink! :)
I have used a glaze to achieve the smooth glossy cookies but yesterday was the first try for this. I don’t know what happened but it looked normal going on, but did not dry quickly and this morning are still tacky to the touch. The consistency looks different too. It almosts tastes and feels a little like marshmallow. I don’t know if has something to do with the humidity in the air as we have had a lot of rain lately or not. Any thoughts or suggestions? Hope they dry more today or I am afraid they will stick to each other when stored on top of one another. Right now, they are in the cold oven.:(
Hi Cae, Hmm usually they dry completely overnight. The humidity could definitely be a factor, also could you have maybe thinned the icing too much? Those are the only reasons I can think of that it wouldn’t be dry by now.
I’m making an attempt at this royal icing thing and just wondered if the icing will stay soft in the piping bags. I’d like to outline and flood the cookies today, but then do the detailed work tomorrow. Will the leftover icing in the bags be good for tomorrow, or should I plan on making a fresh batch for the detailed work? Thanks!
You can keep the icing in the piping bags, but put them tip-down in a glass with a little water in the bottom to keep it moist. If you don’t, the royal icing will dry out and then the tip will get clogged. Happy decorating! :)
I made the ducky and onesie cookies for a baby shower and they turned out awesome! The mom to be and guests thought I had purchased them from a bakery! Thank you for the help.
I did find that for me, flooding worked best by using a baby spoon, adding icing and then pushing the icing with the back of the spoon. It was small enough to get in the corners and took less time than the toothpicks.
Thanks so much for this! It really helped me get over my fear of tackling “professional-looking” decorated cookies. The squeeze bottles are the BEST!
Thank you so much!!! I was looking for some tips on this (tried doing it on my own, and due to the fact that I did not know about the flooding part…. and adding water…. well u know, they didn’t come out the way they were supposed to).
This was really helpful and hopefully over time my cookies will come out looking like yours…. ;)
My mother worked in a bakery through college and growing up she would make “sweet and sour” sugar cookies with royal icing for nearly every holiday and event you could imagine!
Her trick to make the flooding part go much much faster is to thin the icing and then hold the edges of the cookie and dip the top of it into the icing, bypassing the outline piping entirely. She then runs her finger like a knife along the front to even it out and then lays them out to dry – it’s a little messier than the method above – but absolutely worth it when making them by the 100’s for large events!
I tried the sugar cookie recipe and your royal icing recipe last night and both were AMAZING! I cannot thank you enough for posting both in addition to your most useful play by play on how to decorate using royal icing. Thank you!
Awesome instructions! The pictures were super helpful. Thanks for doing this!!