Jewish Rye Bread

Yesterday, I walked you through how to make a rye sourdough starter, which means that today we talk about the actual bread! I don’t know about you, but for me, rye bread was absolutely an acquired taste. I remember being a kid and being totally befuddled by my great aunt’s fondness for rye bread. I didn’t quite share her affinity for the bread, and feel bad for any adult family member who had to deal with me if a stray caraway seed found its way into my mouth. The atrocity! You’d think that I had swallowed battery acid. (I was such a treat!)
It took me a long, long time to even want to try rye bread, and I was probably in my late twenties by the time I realized that I maybe, actually, sort of liked it. I’m sure that corned beef, Swiss cheese and Thousand Island dressing piled onto rye bread went a long way in swaying me to try it again. Once I realized it was actually quite good, I set about making my own. As I mentioned yesterday, I hit quite a few stumbling blocks on my way to this recipe, but I’m so elated to have finally conquered rye bread in my kitchen!
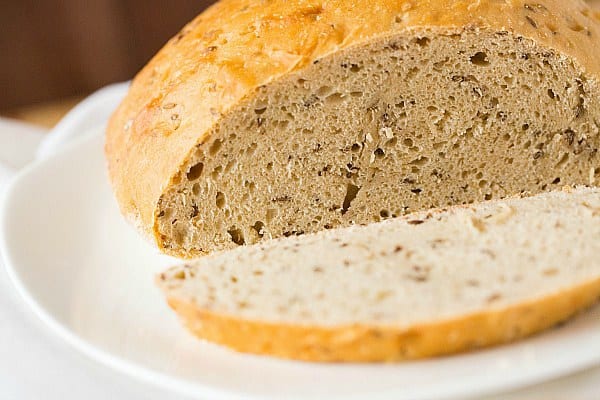
This version of sourdough rye bread is often referred to as “corn bread” because the word “corn” was used to describe any type of grain in Poland, Lithuania, Latvia and Russia, which are the areas where this bread originated. Can you believe that rye was first discovered in 500 A.D. and that dark rye bread was being eaten during the Middle Ages?! Talk about a classic!
This style of bread isn’t as light and fluffy as most commercial loaves of sandwich bread. Rather, it’s quite heavy and dense, and what I would consider moist (the recipe refers to it as “damp”). This means that each slice is substantial, which bodes well for a healthy slathering of butter on your morning toast.
Save This Recipe
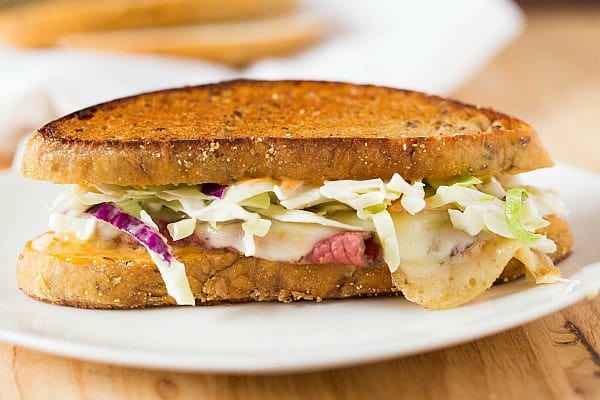
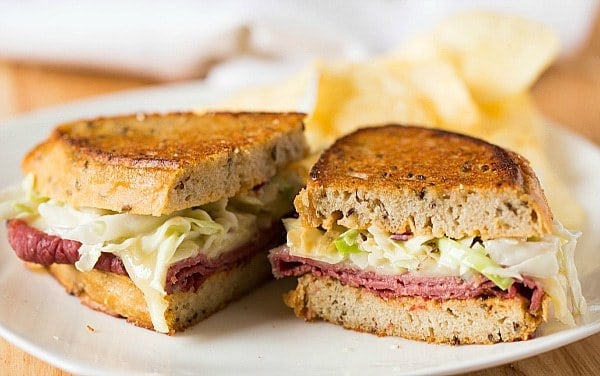
It also makes an absolutely fantastic reuben sandwich.
(I’m a Pittsburgh girl, which means that I’ll always opt for coleslaw instead of sauerkraut on my sandwiches. See: Primanti Bros.)
Kitchen projects like this are what keep my baking heart ticking. The trial, the error, and then, finally, the fabulous feeling of something turning out just right. It’s a fun, satisfying experience… plus, there’s nothing more delicious than sweet kitchen success!
One year ago: New Orleans Beignets and Creole Shrimp and Grits
Two years ago: Blueberry Bagels
Three years ago: Oven-Fried Onion Rings with Dipping Sauce
Five years ago: Chicken and Dumplings

Jewish Rye Bread
Ingredients
- 1½ tablespoons (1.5 tablespoons) active dry yeast
- 1½ cups (375 ml) warm water, 110 degrees F
- 2 cups (250 g) first clear flour
- 1½ cups (153 g) rye flour
- 1½ cups (354 g) Rye Sour Starter
- 1½ tablespoons (1.5 tablespoons) salt
- 2½ tablespoons (2.5 tablespoons) caraway seeds, optional, use more or less if you'd like
Instructions
- In a large bowl, dissolve the yeast in the warm water. Let sit for 5 minutes, or until it starts to bubble and foam. Add the first clear flour, rye flour, rye sour starter, salt and caraway seeds. Stir with a wooden spoon until thoroughly incorporated.
- Turn the dough onto a well-floured work surface. Use a bowl scraper or dough cutter in one hand to help knead the soft, wet dough. Knead for 5 minutes by scraping, folding, pulling and stretching. The dough should have some elasticity and resist being stretched. Keep the dough soft, but if the dough does not feel elastic, add more first clear flour ¼ cup at a time, stretching and kneading with each addition. Continue kneading for another 3 minutes, keeping in mind that the wetter the dough, the better the bread. The amount of flour will vary depending on how stiff you made the rye sour starter.
- Transfer the dough to a clean, wet bowl. Keeping your hands wet, pat the dough down and cover with a very thin film of water. Cover the bowl with plastic wrap and place in a warm spot, allowing the dough to rise until it has doubled in volume, 45 to 60 minutes.
- Prepare a baking sheet sprinkled with a mixture of cornmeal and rye flour (this is where the bread will be baked).
- Wet a clean work surface with water. Keeping your hands wet, scoop out half of the dough and shape into a round, handling the dough gently so it doesn't tear. Repeat with the second half of the dough. Allow the dough to stand no longer than 10 minutes; it can be placed in the oven without any standing time, and should not be proofed.
- Place an empty broiler pan on the oven floor and preheat at 375 degrees F for 5 minutes.
- Brush the loaves with water. Place the baking sheet holding the bread on the middle rack of the oven, or on an oven stone if you have one. Carefully add 6 to 8 ice cubes or 1 cup hot water to the broiler pan on the bottom of the oven and immediately close the oven door (be careful, as it will steam immediately).
- Bake for 5 minutes, then remove the broiler pan. Slide the bread out and, with a skewer, make 10 to 12 holes all around the crust of each loaf, then return the bread to the oven. Reduce the heat to 350 degrees F and continue baking for 10 minutes, then make holes once more and brush again with water.
- Continue to bake until the crust is hard and unyielding to gentle pressure, which can take up to 1 hour or longer (mine took about 50 minutes). The timing will vary depending on the amount of moisture in the dough. The bread is done when tapping on the bottom with your fingertips results in a hollow sound and the top and sides are hard. If you have a stone, you can transfer the bread to the stone at this point and continue baking for an additional 10 to 15 minutes if you prefer crustier loaves.
- Remove the bread from the oven, brush the tops with more water and let cool on a wire rack. The bread will keep for up to 1 week wrapped in plastic wrap, and also freezes well.
Notes
- First clear flour is a high-protein, high-mineral wheat flour that is used by many bakeries for signature Jewish-style rye bread. I purchased mine from King Arthur Flour.
- A possible substitute for first clear flour is 1½ cups all-purpose flour and ⅓ cup cake flour, but the cookbook author notes that the result won't be quite as good.
- The book recommends using white rye flour, which I also purchased from King Arthur Flour.
Did you make this recipe?
Leave a review below, then snap a picture and tag @thebrowneyedbaker on Instagram so I can see it!


I think there is an error re: the amount of salt. Your recipe says 1-1/2 Tablespoons. The bread was very salty; I was unable to eat a whole slice. Other recipes I have seen say 1-1/2 teaspoons. I think that is what you mean to add. The saltiness was correct.
I followed the directions exactly. It rose and doubled in an hour. I scooped it out of the bowl and shaped it into 2 round loaves. After brushing with water, and sprinkling seeds, I followed the directions and baked first for 5 min at 375 degrees and then poked and coated it with water and lowered the oven temp to 350. It’s baking now for another 45 min. I turned on the light to take a peek, and it is just flat and not rising anymore. It’s about a few inches tall. What did I do wrong?
We used to buy this as Cissel or Sissel Bread in my nieghborhood Jewish bakery. I was so glad to finally find a recipe for it.
Wow, is this the corn bread recipe from The Secrets of a Jewish Baker by George Greenstein. I own n love thst cookbook!!
The amount of water (the hydration) is very high. I think maybe there is an error in the recipe. The hydration of the sour (assuming 1 cup flour is 100gr) is 156%. That’s fine. However the total water added plus the sour creates (or attempts) to create a rye with 121% hydration. (based on my calculation of 488 gr total flour (Clear and Rye) and 591 gr of water (375 gr water + 216 gr water from the sour). I absolutely appreciate the baker sharing a beloved family recipe but I think there’s a mistake on the amount of clear and/or rye. The pics are wonderful and that loaf looks darn near perfect, but I just can’t see how a loaf can be created with 120% hydration. I’ve baked over 100 loaves of sour rye in the past 2 years and I can’t fathom that level of hydration. My recipe is 75% hydration and the dough is very wet and at the point of sticking… The high level of hydration (I think) is the reason some people have struggled with the recipe. Thanks to the baker again!
Do not use this recipe. Poorly written confusing and lacks details. Step 4 doesn’t seem to be used as you go to step 5. I tried this recipe twice and they both failed and I have been baking bread now for 5 years.
Step 2 is too subjective regarding elasticity resistance to stretching softness and wetness. A video as I have used in other bread recipes is very helpful.
I think using weight instead of volume is also an improvement.
I have never made holes in a bread while baking – what is the reason for doing this?
1 1/2 Tablespoons of yeast? Seems like way too much yeast % related to flour %
I just made it and yes way to much. Plus yeast in the starter make it even worst. Next time one teaspoon.
The flavor of this bread is great but I’m having trouble with the bread sticking very badly to the pan.
It doesn’t rise well for me even when I switched to the “white” rye flour. Flavor 10!, rise 3 disappointing 🙁 any suggestions? I’m using a nonstick baking pan and the rye flour/cornmeal on the pan but they stick trrribly I think from the water baths makes them stick like glue. Had to scrape them off with great difficulty. This last time I sprayed with PAM sprinkled the flour/cornmeal and that kept my nonstick pan from sticking the other aluminum baking sheet with just the sprinkling of cornmeal as the recipe says. Nowhere did this recipes dress the problem I needed a knife and extraordinary effort on my part to get the bread unglued from the pan.
Try baking on parchment paper.
oil spray.
Very, very good. I finally got my starter going and it’s excellent. I still can’t get King Arther white rye but found another white. I had to adjust the water to slightly less but overall the last 2 loaves have been surprisingly good. The kitchen smells like a wonderful bakery as the bread bakes. The crust is nice and hardy, chewy. I have good rise and I see now there are many, man subtle variances that can impact the final product. Rye is a tricky item, I understand that now. Thanks so much for posting a family recipe. That said, I’d love to see a video on the final forming. I had to adjust putting my kneaded dough on parchment to let it rise and then transferring the pardchment (on a pastry board) to the baking stone. Just slide the parchment off to the stone. I’m going to continue to tweak away to see if I can get even closer to the rye I grew up with; a shiny, ;cracked’ crust. The rye I got for so many years had a subtle satin sheen and the crust had deep cracks like an old beloved leather jacket. Thanks again!
I love that its such a quick loaf to make. The Rye Bread came out great other than too much salt for me. 1 1/2 tablespoons is 30 grams. I usually use 8 grams of salt per average loaf of bread. So next time I’ll change the salt to equal 16 grams. About half the salt in this recipe. I baked one large loaf an oval (450f) preheated cast-iron Dutch Oven for 50 min then took it out and put directly on oven wrack for 7 more min as the loaf felt too soft, which worked out really well. I checked that the bread was 205-210f to be sure it was done. I used normal bread flour, mixed with the rye flour. I’ll try to order “first clear flour” or use all purpose or self rising flour next time to keep the texture light for sandwich bread for Ruben Sandwiches. I used my dark rye starter after refreshing it. My bread crust did split from the rise but I’m fine with that and it toasts perfectly. I was really happy with the finished loaf of rye bread.
I think I answered my own questions….. I refreshed my sponge with this rye and I can see this recipe doesn’t go will with it. It’s a light rye “type 1150”. It soaks up water like a sponge and has a putty gray appearance…. I’ll have to wait until King Arthur gets the light rye back in stock…. and try again.
Well it didn’t quite turn out for me…. It took me a while to get my starter going, but its been perking and working for several weeks (weekly feeding). I was not able to get King Aurthor white rye because, I guess, due to the pandemic, everyone is making Rye bread… So I obtained another white/light rye. i also soured the first clear from another online store. I did cut back on the salt to t Tblsp because I have to watch my salt, but otherwise tried to follow as close as I could. My baking sheet springs so I used parchment paper. I do have have a large baking stone and so the parchment went onto the stone. My problem is that while the rise was super,, it deflated to a huge round, about 2 1/2 inches high when I turned it out for baking. (I made a single loaf). It has a wonderful aroma, but it’s still baking. I’m wondering can you make a video on this, slowing waking through the steps after the rise? I’l keep trying. I figure the dough was just too wet. Also I pieced holes in the top after 5 minutes of steaming but still had some seams open up. I think next time I have to reduce the water or use more first clear and pierce the holes well down into the loaf…. Ops, one last thing I didn’t quite get that crinkled/cracked crust nor is my crust shiny. It’s light brown but is smooth. Thanks so much for posting the recipe!
OK I finally gathered the courage and ingredients to make, ummm, try to make this rye bread. In reviewing this recipe, it calls for 1 1/2 TABLESPOONS of Instand Dry Yeast. Is that correct? That seems like a huge amount of yeast for the flour.
Thanks, DaveK
Yes, that’s correct!
Hi,
I have been try to make this a number of times, all without success. I am a total novice and I’m sure that is a huge part of the problem.
The last time, the best so far, I managed to get the dough stiff enough to form somewhat of a ball. However, after letting it rise, then turning it out onto the baking sheet it was a slimy mess again. I couldn’t get it into a ball again. (Probably should have mixed in more first clear, maybe to stiffen it?) It did rise again somewhat in the oven, but was more of a big lump, rather than a nice high and round bread that I am used to seeing.
Also, the bottom crust was thicker and tougher than I had hoped for. Any thoughts on that…. baking higher in the over than on the middle rack?
I’ll be thankful for any help or comment.
I thought I’d follow up. Finally – SUCCESS!
My problem was that I was using too much water. Since it seems that yeast and baking is truly a local thing, the day’s humidity and pressure all contribute how the dough will turn out. My not having any experience at all contributed to my problems. Now, after 5 repeatedly successful loafs I am gaining confidence. Thanks for all commenters who came long before me and to the BrowneyedBaker for hosting this site. It is a wonderful resource.
Prior to Stage One, is the starter supposed to be so runny and sickly looking? I threw out my first attempt because I never saw any sign of bubbles or fermentation. I then started over with fresh KAF Light Rye and fresh instant yeast. After over 12 hours I’m seeing the same puddle as before. Liquid separates and rises to the top. Flour and caraway slurry sinks to the bottom. No bubbling unless I stir the mixture a bit.
Does my description sound right, or am I missing something? Thanks.
Hi Michelle. Grew up outside of NYC and been eating sourdough rye all my life. I have several different starters, some white, some rye, some traditional (runny) and some dry. They all get fed differently. I generally refrigerate it soon after feeding. Then take out what I need to make bread, feed the rest and put it in refrigerator shortly after feeding. Keep for months that way. Sometimes I am away for a month or more, and it has always been in good shape. I will try the recipe in a few weeks as I just made a batch of pain au levain that will last two weeks.
Your loaf looks perfect. It’s as close as anything I’ve seem that visually compares to the rye bread we’d get from a beloved bakery in PA that operated for 75 years but closed up. The loaf was beautiful color with a chewy, leather crust and moist on the inside. It made the best toast.
I made it to day 3 and had a good initial rise of Stage 3, but after 3 hours, the starter collapsed. Will the starter still work if I continue on to bake bread, or do it need to start all over again?
Hi Priscilla, If the starter collapsed, I would start again. I once tried to push through with a starter that had collapsed, and the bread didn’t rise well and was extremely dense. I think it’s worth re-starting.
Taste wonderful but didn’t raise. I used dark rye flour, and regular bread flour. I live in Grand junction co, although is about 4500 ft. The starter looked great, nice and bubbley.
When I lived in oil city pa my bread always turned out great.
I have read your recipe over and over again……………………still not sure I am doing it right..The sour starter for jewish rye bread is my concern. It seems to be heavy, unlike other starters which I have on hand. Much like dough, it does come away from the sides of the bowl when stirred. I am on my third stage and waiting to make my bread. I must tell you I am grinding my own rye flour for this use, perhaps this is why it is a little heavier than normal. When it comes down to storing the remainder after I have used what I need for the bread, should I add some water to thin it a little than store it in refrig.? When I get ready to make the bread, I think I will use King Arthur’s wheat flour already ground and a little bit of pastry flour….what do you think and can you advise me on my concerns…………………………sincerely ann
Hi Ann, I think that using fresh ground rye could certainly be making a difference.
This looks just like my rye which is dense and chewy. I wish I had the patience to make the sour but I improvise by using a product called Deli Rye Flavor which to me tastes just like a Jewish Deli’s rye. I also use the white rye flour, first clear flour and a bit of vital wheat gluten and last but not least, a dough enhancer product (Authentic Brand) that contains lecithin, ginger and ascorbic acid, the enhancer really works wonders for the rise and also keeps bread fresh longer. I use my bread machine’s dough cycle and then take it out let it rise and pop it in oven. My old neighbor in her 90’s used to bring me some of her rye sour which I believe is the same as the one you have here and the taste was almost exactly like the Deli Rye flavor I use now minus all the labor. Your bread looks delicious! I too would not touch rye when I was a kid, I think it was the Caraway seeds that did it. Now I love it.
I have just made this loaf for a second time. On both occasions, the loaf has split in the top even though it has a smooth dome appearance when placed in the oven. Is there something I’m doing wrong?
Hi Gill, I don’t think so… I’ve had some bread split for no apparent reason. If you haven’t made any changes or adaptations to the recipe, I think it should be fine.
For some reason, my yahoo mail is not connecting. Thank you for your reply. My question was about deflation in the fridge. Yes, I did allow it to rise 5 hours before I put it in the fridge for the night. It was a little deflated this morning but I proceeded with stage 3 and it is about doubled and looks great now! I don’t think there is anything stopping me now from my first successful attempt at using a starter! Thanks again for the details. They make all the difference!
Hello, Can this recipe still be done without the 11/2 tbs active dry yeast and 2 cups first clear starter also what other changes would need to be done with out those two ingredients? (Will the bread still be good without those two ingredients?)
Hi Zac, It will be impossible to make this without using yeast; that is the most important ingredient.
This recipe really confused me and when it says make the starter, I went to the link for the starter and there are three stages and when your done it looks like a soft dough, is that right? So is that the starter all three stages done?
Hi Denise, Yes, that is correct.
I think your oven was not hot enough. And you should never wet the loaf on top, wet the air in the oven. Next time, pre-eat the oven to 500f, for 45 min, ….with a steel pan on the lower grate.Then add to the about 1 cup of boiling water to the super hot pan ! , then toss in the bread. When it starts to get dark caramel on top, , open the oven a bleed some of the heat out, till the temp hits about 350 or 375, and it’s finished baking when the internal temp hits about 195 to 200.
Michelle,
Great recipe. I’m also a Pgh girl who finds herself stuck in the netherlands of the greater Boston MA area. ( I’m convinced many native residents here have had their taste buds ruined by boiling everything to death, lol).
Anyway, I’m really not an experienced baker although I do cook. Right out of the gate it took months to find the proper flour for your recipe. Finally begged the manager of a local health food store to order the flour and I think he thought I was nuts. It took me 2 tries but I got wonderful results on my bread. However, I think your great aunt bought her Jewish Rye at a different place than where my mom got it. I have, unfortunately, not been able to get to Pgh in at least 20 yrs. When I visit it’s mandatory Iake a trip to Squirrel Hill for a “real” corned beef on rye. The bread I remembered eating when I lived in Pgh was darker (inside & out) and had a shiny top (perhaps an egg wash?) The loaves were bigger and more cigar shaped but that could be just the result of the baking pan used.
I will definitely make this again as it’s 100% better thany any Jewish Rye I’ve eaten in this area; it made toast to die for.
Now if I could figure out how to make Squirrel Hill-type corned beef; it is absolutely impossible to find around here. I strongly suspect what ‘they’ call corned beef here is of Russian decent (which I call New York style) while I’d
bet Pgh’s has German roots.
Also seeking a recipe for Salt Sticks. Last fall a cousin from Pgh visited and brought me a dozen Sticks from Giant Eagle. While they seemed slightly different than I remember (and a bit smaller but they say everything shrinks with age), I managed to eat all of them and did not share with anyone! Yes, I was a piggy, but what can I say, lol.
FYI, assuming you can even find a deli or restaurant that sells corned beef sandwiches around here, they call corned beef on rye, sauerkraut, Swiss and Russian dressing a Ruben. If you substitute cole slaw for the sauerkraut it’s called a Rachel. I glady eat either but am partial to cole slaw made with Marzetti’s cole slaw dressing.
Thanks for sharing. Don’t get me started on not being able to buy Isaly’s chipped ham, Heinz Spicy Mustard or any kind of Heinz pickles……Everytime I come across my old Heinz pickle-packer pin I can get near tears……
Michelle,
Forgot some thing in above post. While I do like caraway seeds, they always get stuck in my crooked teeth and drive me crazy. When I made your recipe I used a spice grinder to squish up the caraway seeds; it worked well. I could taste the caraway quite well but didn’t spend the next two day trying to floss out those pesky seeds. I also used fresh ground sea salt instead of regular table salt. I personally don’t find sea salt to be as “salty”, although I’m a salt person. All I have in my pantry is Kosher and sea salt. I don’t use regular table salt any more.
If you can’t find a decent spice grinder, email me & I’ll share where to get really good, sturdy ones. I don’t want to plug the store/brand on your website.
I can’t wait to try this out, I love rye breads and I’d like to see if I can make these into a pita type pocket bread. I was thinking of an alternative to hamburger buns for sandwiches. Any suggestions are welcomed.
Thanks for the great information.