Momofuku Birthday Cake
The famous Momofuku Milk Bar Birthday Layer Cake – Layers of funfetti cake loaded with sprinkles, vanilla frosting, and birthday cake crumbs!
Well over a month ago (February 11th, to be exact), Brown Eyed Baker turned 10 years old young. I wanted to share a crazy awesome amazing cake to celebrate the milestone, but I took forever to decide what I wanted to make (making prompt decisions is NOT my strong suit – ask my husband). Eventually, it dawned on me that even though I’ve owned the Milk Bar cookbook for nearly four years now and have made a few recipes from it (see: compost cookies and crack pie), I had never tackled one of their signature cakes.
The site’s tenth anniversary/birthday seemed like as good a reason as any to finally make one, but first I needed to order a few special things (explained below, but a cake ring and acetate strips), and then I got sick for two weeks, and then I had to time everything so I could assemble the whole thing during daylight hours so I could photograph the process, and SO…
Here we are, over a month later, but with one HECK of a cake to share with you!
You’re probably wondering (as I was before buying this cookbook)…
What is the Momofuku Birthday Cake?
So, Momofuku is a group of restaurants and bars with multiple locations throughout North America and Australia, and Milk Bar is the bakery arm of the enterprise. It was founded by Christina Tosi and her cakes have a cult following. Milk Bar cakes are truly unique…
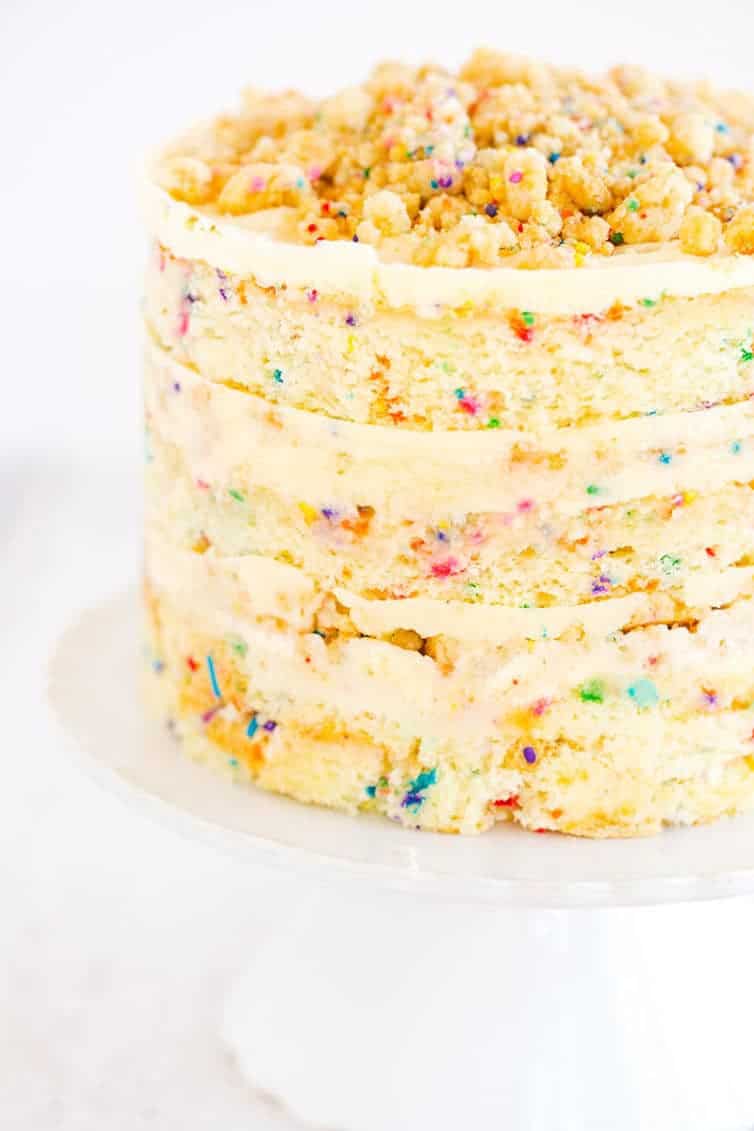
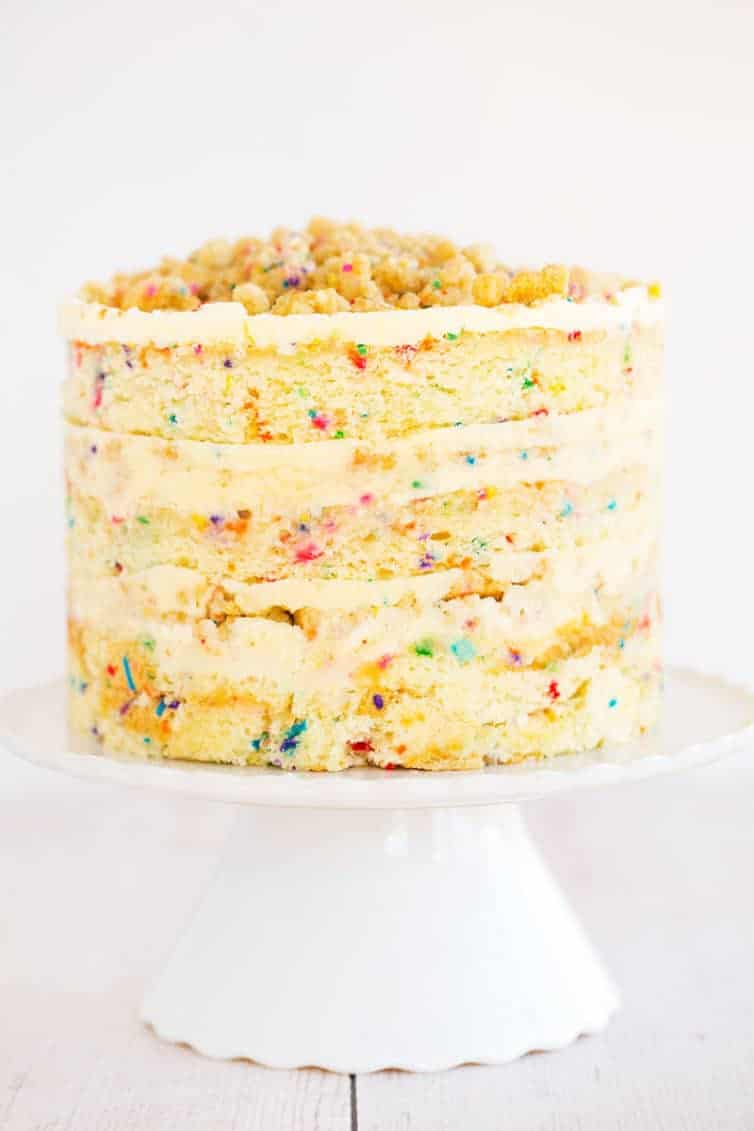
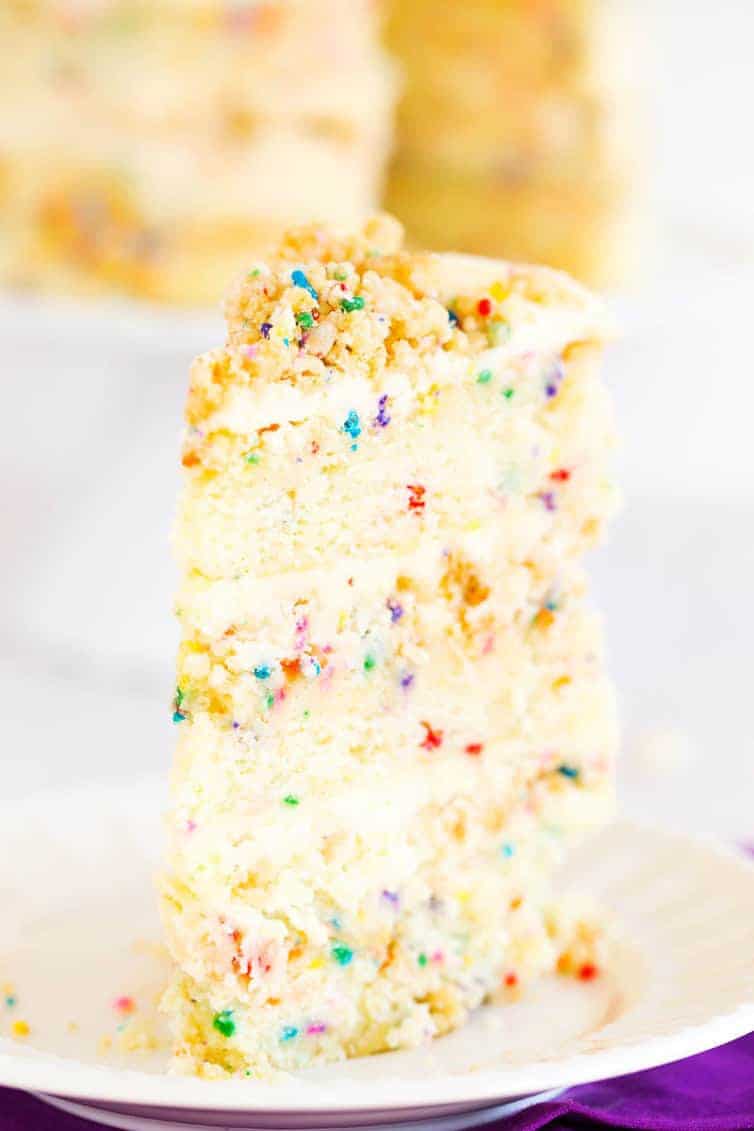
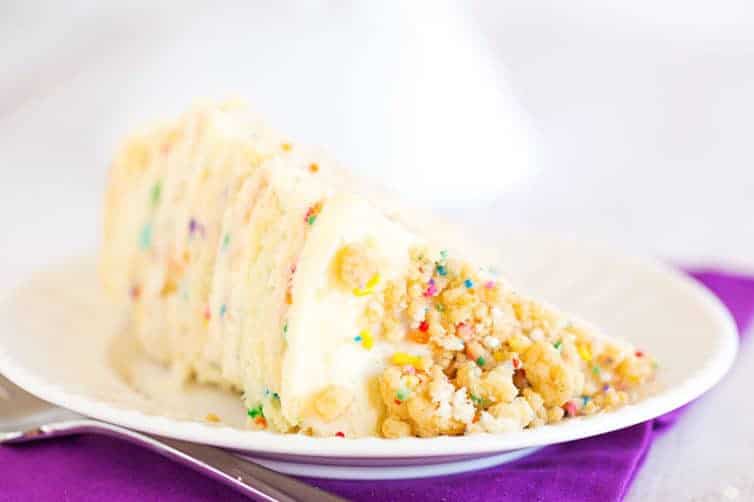
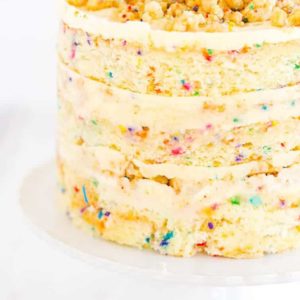
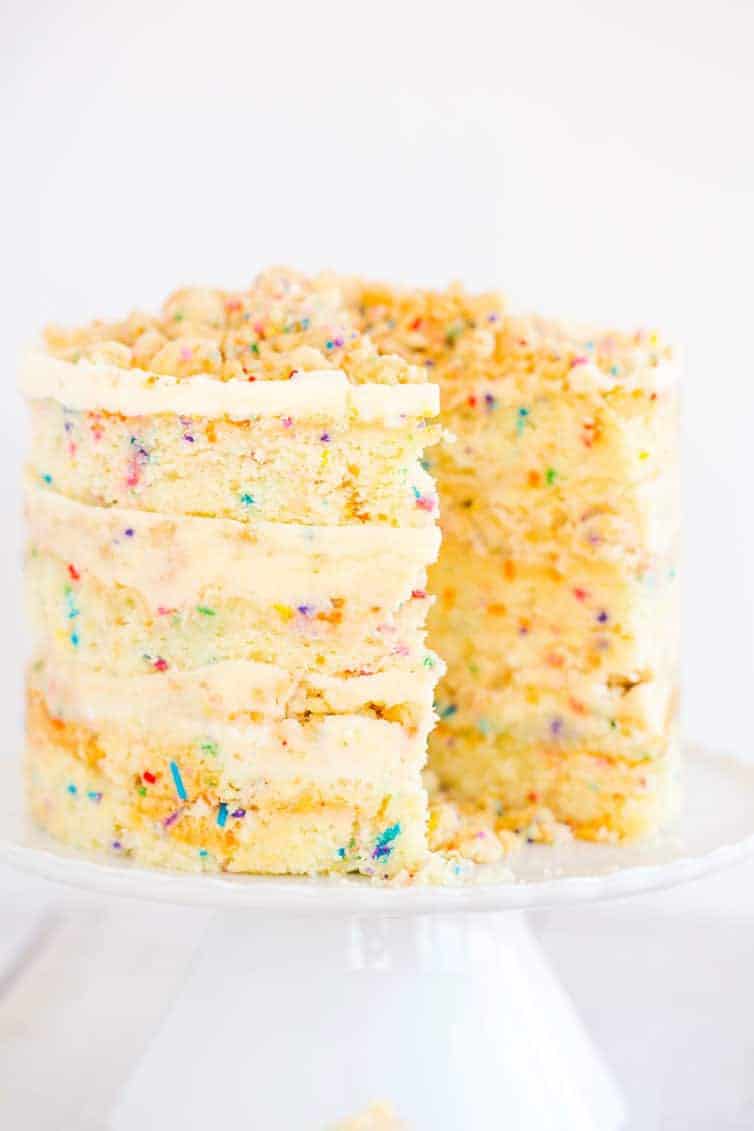
- They are baked in a quarter sheet pan, then stamped out and assembled in a 6-inch cake ring for a triple-layer cake.
- The cakes are not frosted on the sides, only between the layers and on top.
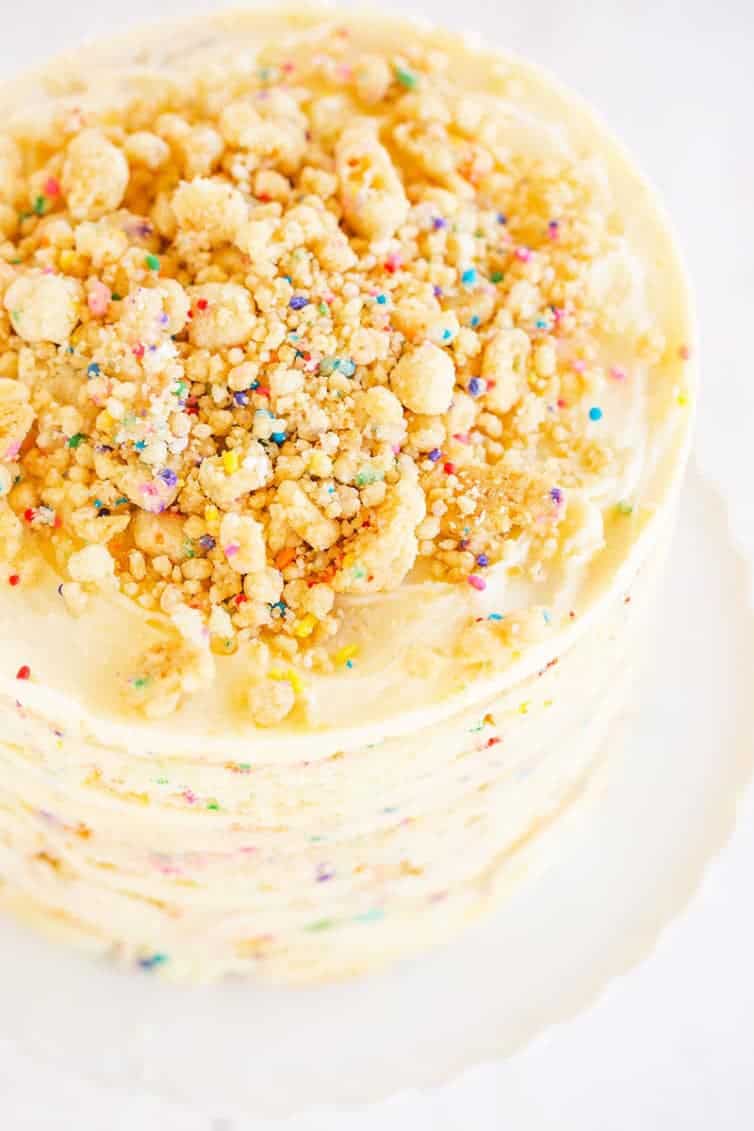
- They all include a complementary “crumb” recipe that are sandwiched inside of the frosting between layers.
- The cake layers are brushed with a “soak” as the cake is assembled to keep it moist and to add more flavor.
As you can see, this isn’t your typical bake-in-a-cake-pan-and-slather-in-frosting kind of cake.
And… it’s pretty awesome.
How to make the Momofuku Birthday Cake (step-by-step)
As I said, this is not your typical cake assembly, so I wanted to document process for you step-by-step, so you could have a picture of how the whole thing comes together. Here we go!
The Components
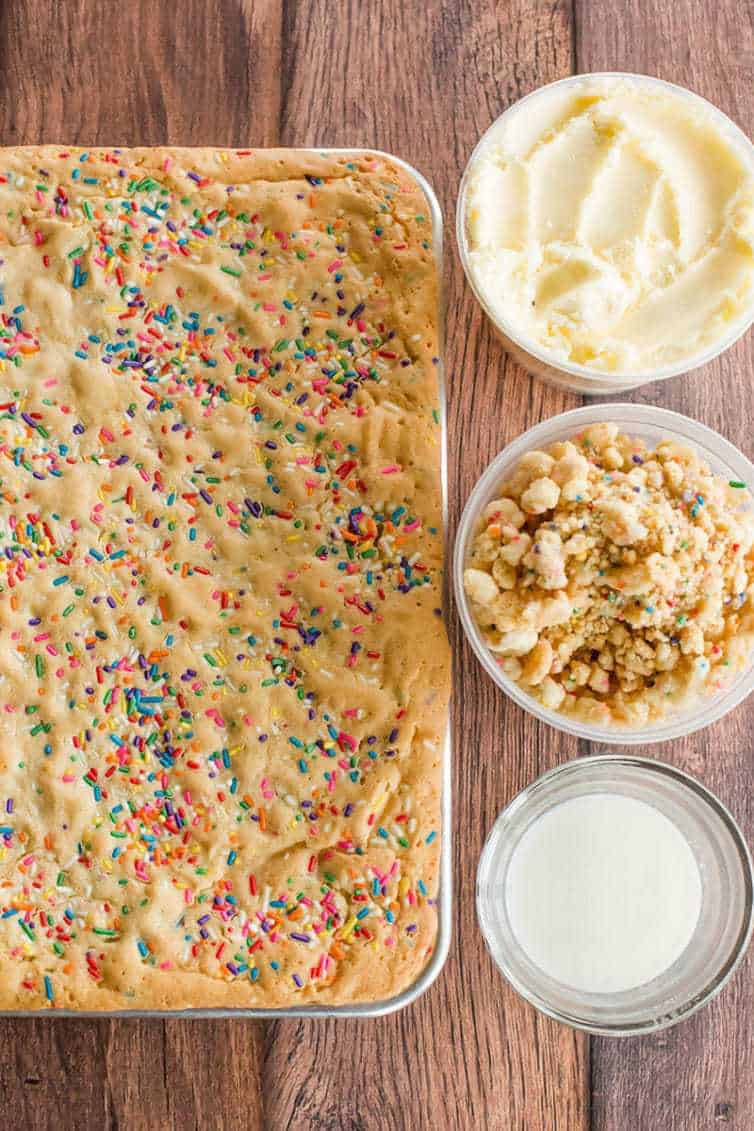
For this cake, you will make the following:
- Cake (baked in a single layer in a quarter sheet pan)
- Birthday crumbs (I could eat these by the handful!)
- Frosting (a fabulous vanilla)
- Soak (a mixture of milk and vanilla extract)
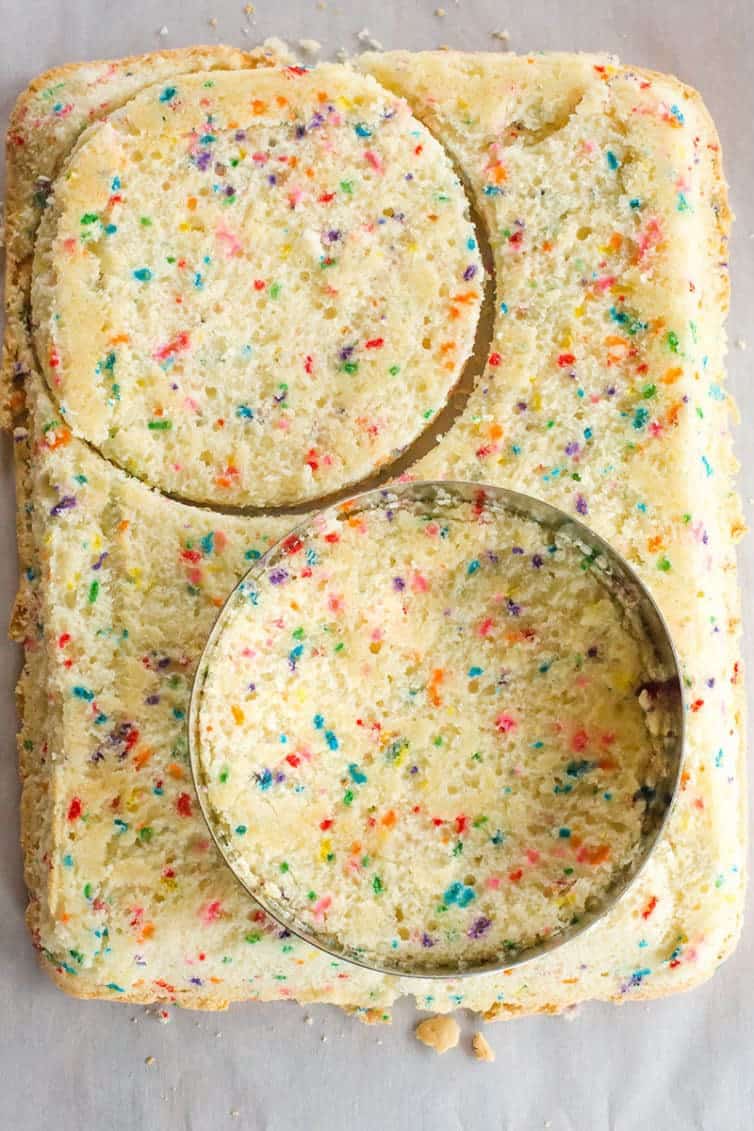
The First Layer
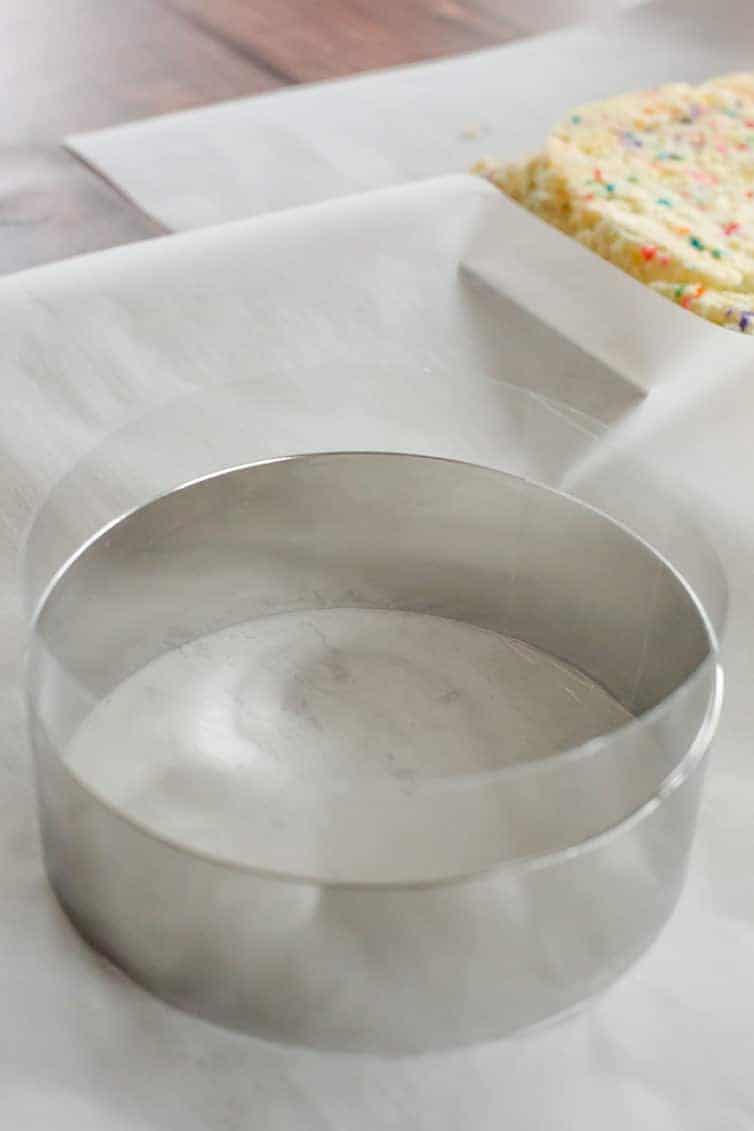
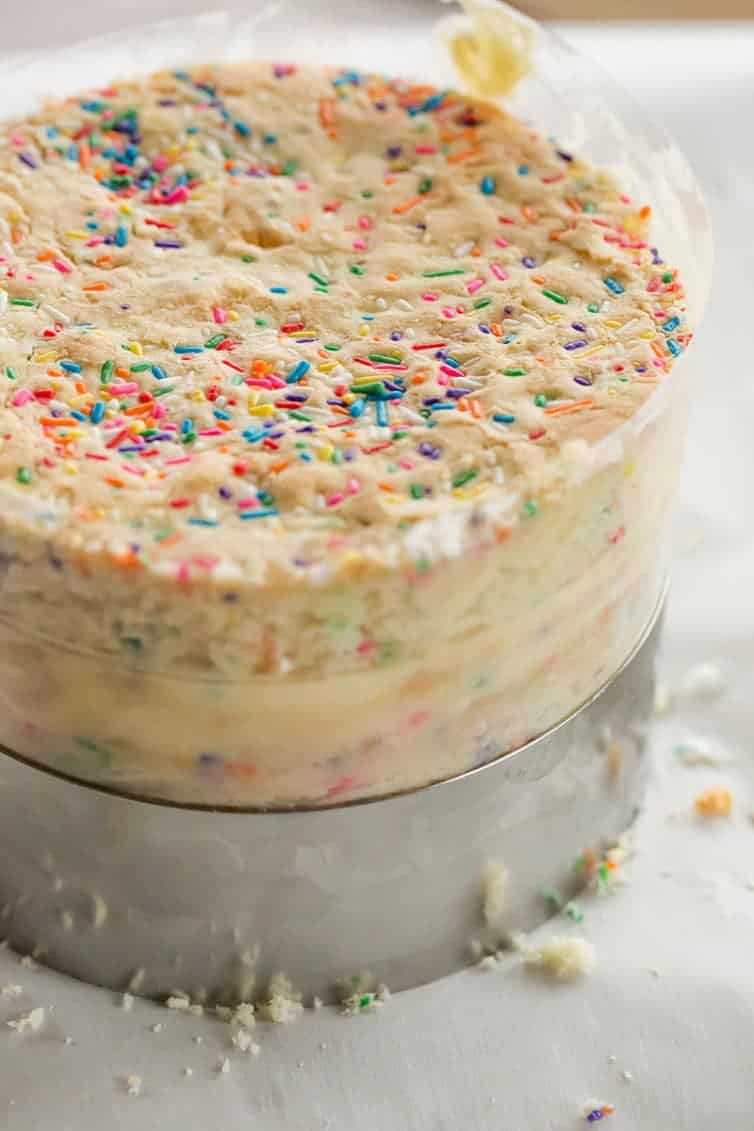
You will use a cake ring to stamp out two 6-inch circles of cake, then piece together the scraps to build your first layer. The cake ring + strips of acetate act as a mold to build your cake.
Next, you will brush the first layer with half of the soak to keep it nice and moist.
The Frosting & Crumbs
Now, it’s frosting time! You do not use a lot of frosting for this cake, and you just soaked a cake layer, so you want to be sure that if you made the frosting ahead of time, you’ve let it come to complete room temperature so it spreads easily. Otherwise, you’re going to pull up wet cake crumbs as you try to spread it.
A portion of the birthday crumbs are pressed into the layer of frosting, then another layer of frosting covers them.
The Second Layer
This whole process (cake layer, brushing with soak, frosting, crumbs, more frosting) is repeated again for the second layer.
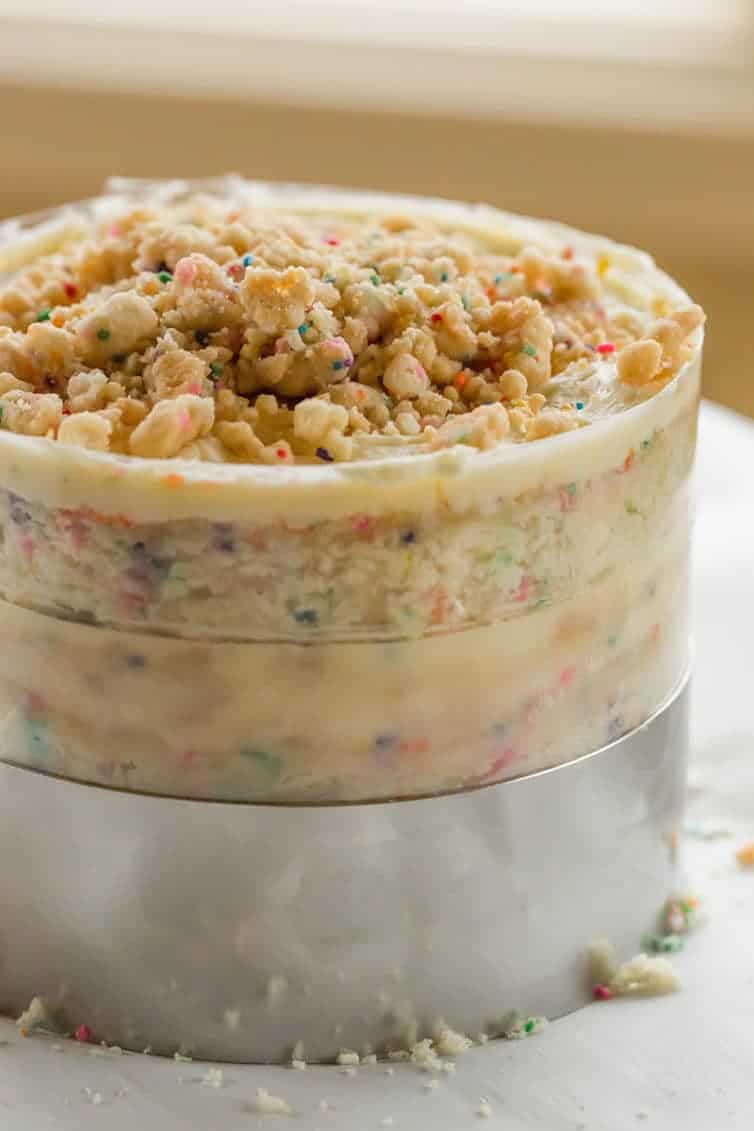
The Final Layer
Then, the last cake layer is placed on top, covered with frosting and topped with the remaining birthday crumbs.
The Waaaiiiiiiting is the Hardest Part
(ahem, I was big into Tom Petty in high school)
The cake goes into the freezer for at least 12 hours to allow it to set, then it’s popped out of the cake ring, the acetate strips are peeled away, and you’re left with an absolutely stunning cake that will wow anyone who sees it.

Specialty Ingredients
When you read the recipe below, you’ll see that there are some unconventional ingredients, specifically grapeseed oil, clear vanilla extract, citric acid, and glucose. I’ve included notes below the recipe that explain why these are included and possible substitutions for each, should need or choose to use them.
The author does state that the ingredients are chosen and used very purposefully for the specific textures and flavors that they impart. I made the cake exactly as the recipe was written.
Making & Assembling Ahead of Time
While this cake does have a number of components, they all can be made ahead of time to varying degrees. You’ll see at the end of each instruction section, I note how far in advance each component can be made, and how it should be stored. It really makes this cake much easier to tackle if you are tight on time most days!

My Thoughts on the Momofuku Birthday Cake
I’ll be honest, I wasn’t sure how I was going to feel about the Milk Bar cake, primarily because I am a huge frosting person. To have a cake with naked sides is like blasphemy to me, but I went with it and crossed my fingers. As it turns out, I feel like this cake has the absolutely PERFECT ratio of frosting to cake, and IT. WAS. PHENOMENAL.
It’s not a big cake (6 inches in diameter), but the multiple layers and components makes it rich and full of flavor, so a little really does go a long way. This was finished and photographed on a Thursday… my husband and I each had a slice in the evening on Thursday, Friday, and Saturday, and there was still enough left for people to try on Sunday (AND we were left with one piece remaining after that). Everyone who had it on Sunday loved it just as much as we did and were so curious about all of the different layers.
There are quite a number of different types of Milk Bar cakes in the cookbook, and I can’t wait to try some others! I think next on my list might be the chocolate chip cake + passionfruit filling + coffee buttercream frosting… so intriguing, right?!
If you have something (or someone!) special to celebrate, give this a try! It’s totally different and people will LOVE it!
One year ago: Baileys White Chocolate Mousse Trifle
Momofuku Birthday Cake
Ingredients
For the Birthday Cake Crumb
- ½ cup (100 g) granulated sugar
- 1½ tablespoons (1.5 tablespoons) light brown sugar
- ¾ cup (93.75 g) cake flour
- ½ teaspoon (0.5 teaspoon) baking powder
- ½ teaspoon (0.5 teaspoon) kosher salt
- 2 tablespoons rainbow sprinkles
- ¼ cup (54.5 ml) grapeseed oil
- 1 tablespoon clear vanilla extract
For the Birthday Cake
- 4 tablespoons unsalted butter, at room temperature
- ⅓ cup (68.33 g) vegetable shortening
- 1¼ cups (250 g) granulated sugar
- 3 tablespoons light brown sugar
- 3 eggs
- ½ cup (120 ml) buttermilk
- ⅓ cup (72.67 ml) grapeseed oil
- 2 teaspoons clear vanilla extract
- 2 cups (250 g) cake flour
- 1½ teaspoons (1.5 teaspoons) baking powder
- ¾ teaspoon (0.75 teaspoon) kosher salt
- ¼ cup (40 g) + 2 tablespoons rainbow sprinkles, divided
For the Birthday Cake Frosting
- 8 tablespoons unsalted butter, at room temperature
- ¼ cup (51.25 g) vegetable shortening
- 2 ounces (56.7 g) cream cheese
- 1 tablespoon glucose
- 1 tablespoon corn syrup
- 1 tablespoon clear vanilla extract
- 1¼ cups (150 g) powdered sugar
- ½ teaspoon (0.5 teaspoon) kosher salt
- Pinch baking powder
- Pinch citric acid
For the Birthday Cake Soak
- ¼ cup (61 ml) milk
- 1 teaspoon clear vanilla extract
Special Equipment
- Quarter sheet pan
- 1 , 6-inch cake ring
- 2 strips acetate, each 3 inches wide and 20 inches long
Instructions
Make the Birthday Cake Crumb
- Preheat the oven to 300 degrees F. Line a rimmed sheet pan with parchment paper or Silpat.
- Combine the sugars, flour, baking powder, salt and sprinkles in the bowl of a mixer fitted with a paddle attachment. Mix on low speed until well combined. Add the oil and vanilla and mix on low speed until small clusters form.
- Spread the clusters on the prepared sheet pan. Bake for 20 minutes, breaking up the clusters once or twice during baking. The crumbs should be slightly moist to the touch; they will dry and harden as they cool. Allow the crumbs to cool completely on the pan before using. The birthday cake crumbs can be stored in an airtight container at room temperature for 1 week, or in the refrigerator or freezer for up to 1 month.
Make the Birthday Cake
- Preheat oven to 350 degrees F. Spray a quarter sheet pan with non-stick cooking spray and line with parchment paper, or with Silpat.
- In a measuring cup, combine the buttermilk, grapeseed oil, and vanilla extract.
- In a medium bowl, whisk together the flour, baking powder, salt, and ¼ cup of the sprinkles.
- Combine the butter, shortening, and sugars in the bowl of a stand mixer fitted with the paddle attachment and cream together on medium-high for 2 to 3 minutes. Scrape down the sides of the bowl, add the eggs, and mix on medium-high for 2 to 3 minutes. Scrape down the sides of the bowl once more.
- On low speed, gradually pour in the buttermilk mixture. Increase the mixer speed to medium-high and beat for 4 to 6 minutes, until the mixture has nearly doubled in size and is completely homogenous (don't rush this step!). Stop the mixer and scrape down the sides of the bowl.
- On low speed, gradually add the flour mixture and mix just until the batter comes together, about 45 to 60 seconds. Scrape down the sides of the bowl and give the batter a final mix with a rubber spatula.
- Spread the cake batter in an even layer in the prepared pan. Sprinkle the remaining 2 tablespoons rainbow sprinkles evenly on top of the batter. Bake the cake for 30 to 35 minutes; when you gently poke the edge of the cake with your finger, the cake should bounce back slightly, and the center should no longer be jiggly. Place the pan on a wire rack to cool completely. The cooled cake can be stored in the refrigerator, wrapped in plastic wrap, for up to 5 days.
Make the Birthday Cake Frosting
- In a small bowl, whisk together the glucose, corn syrup and vanilla extract.
- Combine the butter, shortening and cream cheese in the bowl of a stand mixer fitted with the paddle attachment and cream together on medium-high for 2 to 3 minutes, until the mixture is smooth and fluffy. Scrape down the sides of the bowl.
- With the mixer on its lowest speed, stream in the glucose mixture. Increase the mixer to medium-high speed and beat for 2 to 3 minutes, until the mixture is silky smooth and glossy. Scrape down the sides of the bowl.
- Add the powdered sugar, salt, baking powder and citric acid, and mix on low speed just to incorporate them into the batter. Increase the speed to medium-high and beat for 2 to 3 minutes, until the frosting is completely smooth. Use the frosting immediately, or store in an airtight container in the refrigerator for up to 1 week. (Bring to room temperature before using in the recipe.)
Assemble the Birthday Layer Cake
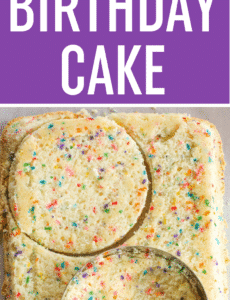
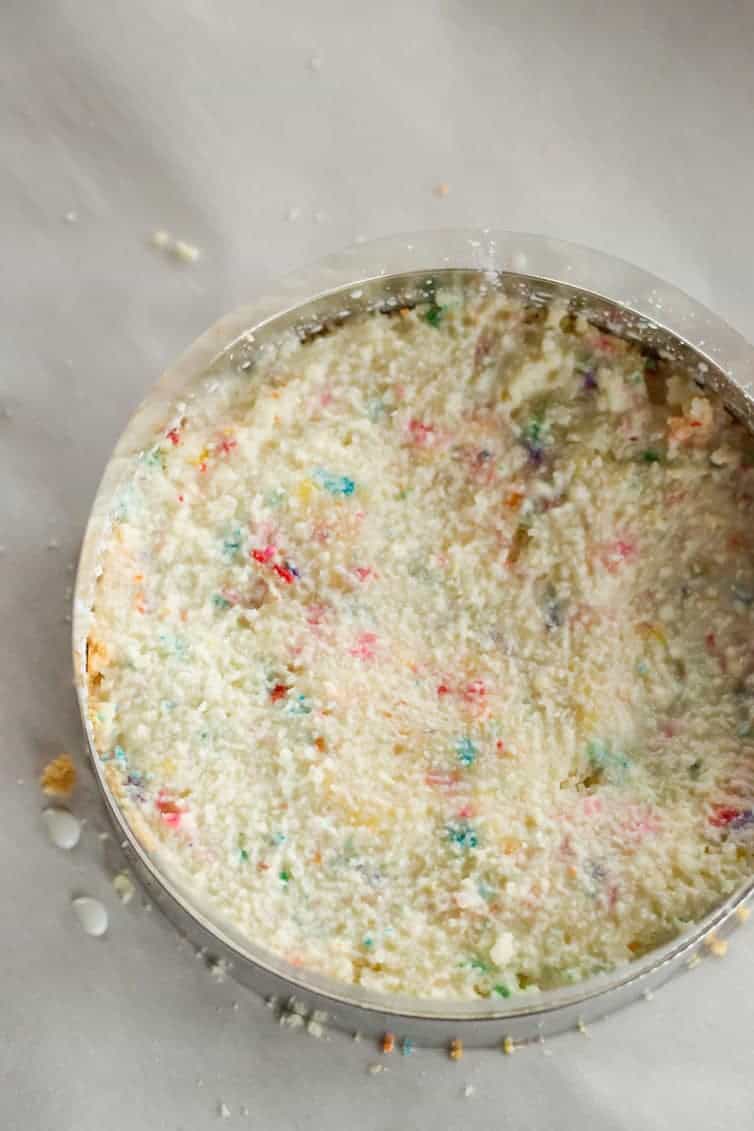
- Put a piece of parchment or Silpat on the counter. Invert the cake onto it and peel off the parchment or Silpat from the bottom of the cake. Use the cake ring to stamp out 2 circles from the cake. These are your top 2 cake layers. The remaining cake "scrap" will come together to make the bottom layer of the cake.
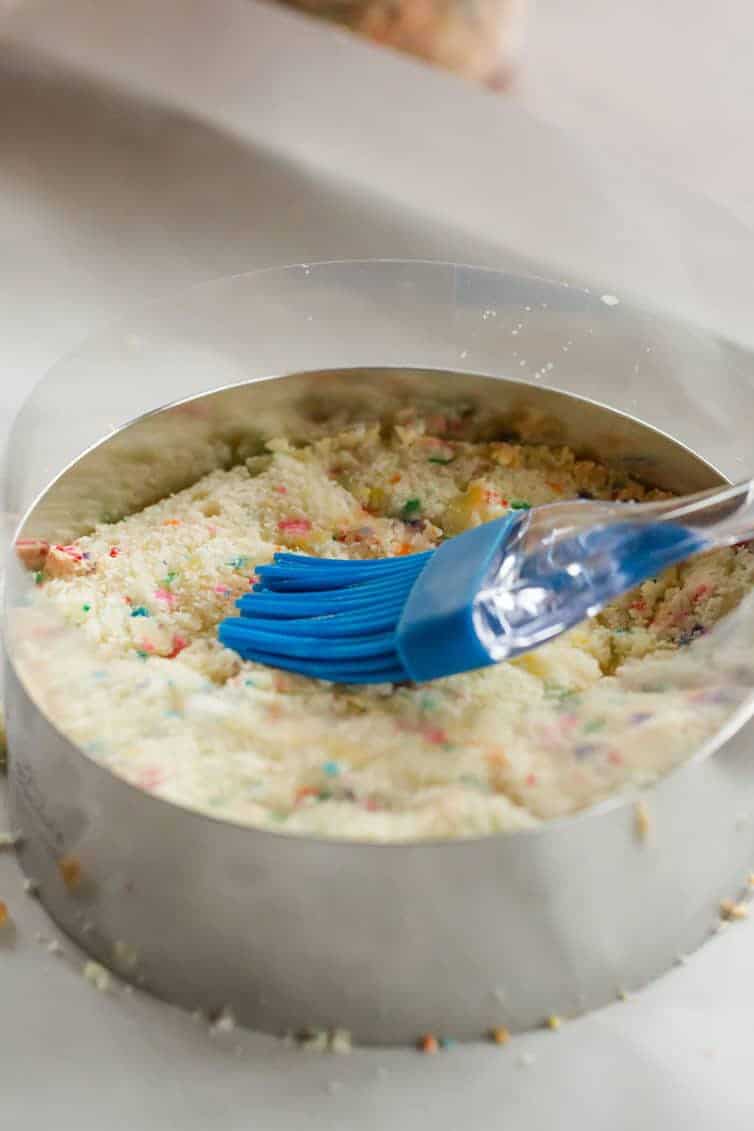
- Layer 1, The Bottom: Clean the cake ring and place it in the center of a sheet pan lined with clean parchment or a Silpat. Use 1 strip of acetate to line the inside of the cake ring.
- Put the cake scraps in the ring and use the back of your hand to tamp the scraps together into a flat even layer.
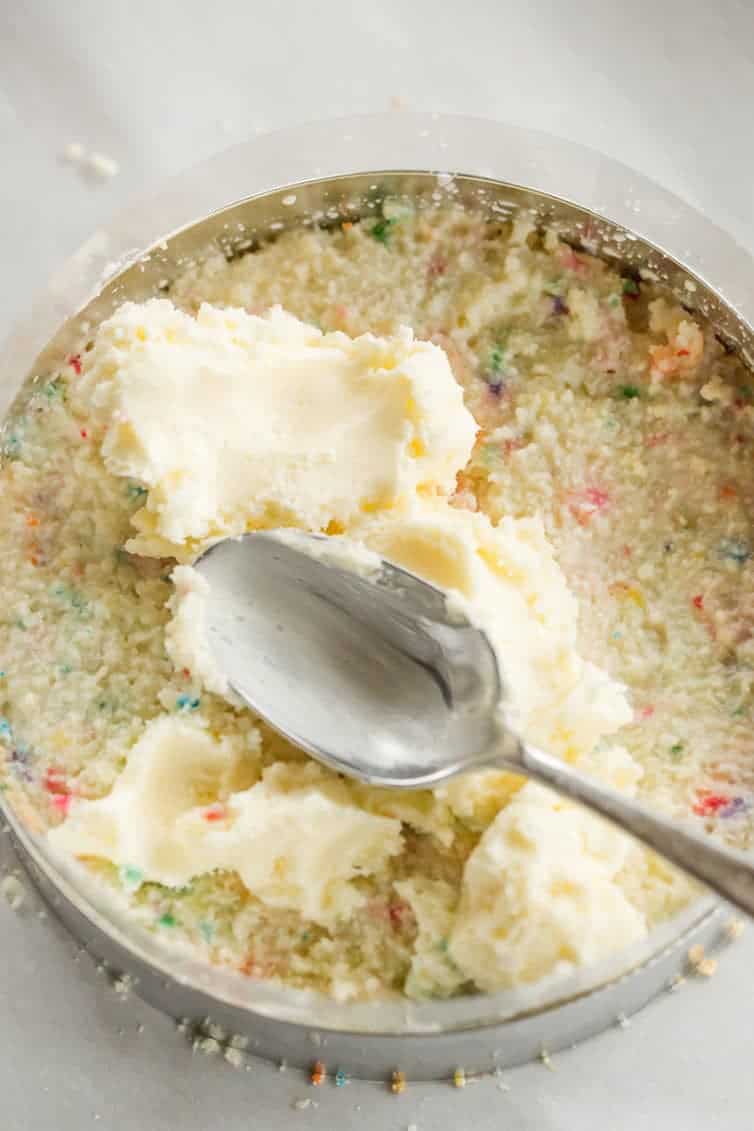
- In a small bowl, whisk together the milk and vanilla extract for the birthday cake soak. Using a pastry brush, brush half of the soak over the top of the cake.
- Using the back of a spoon, spread one-fifth of the frosting in an even layer over the cake.
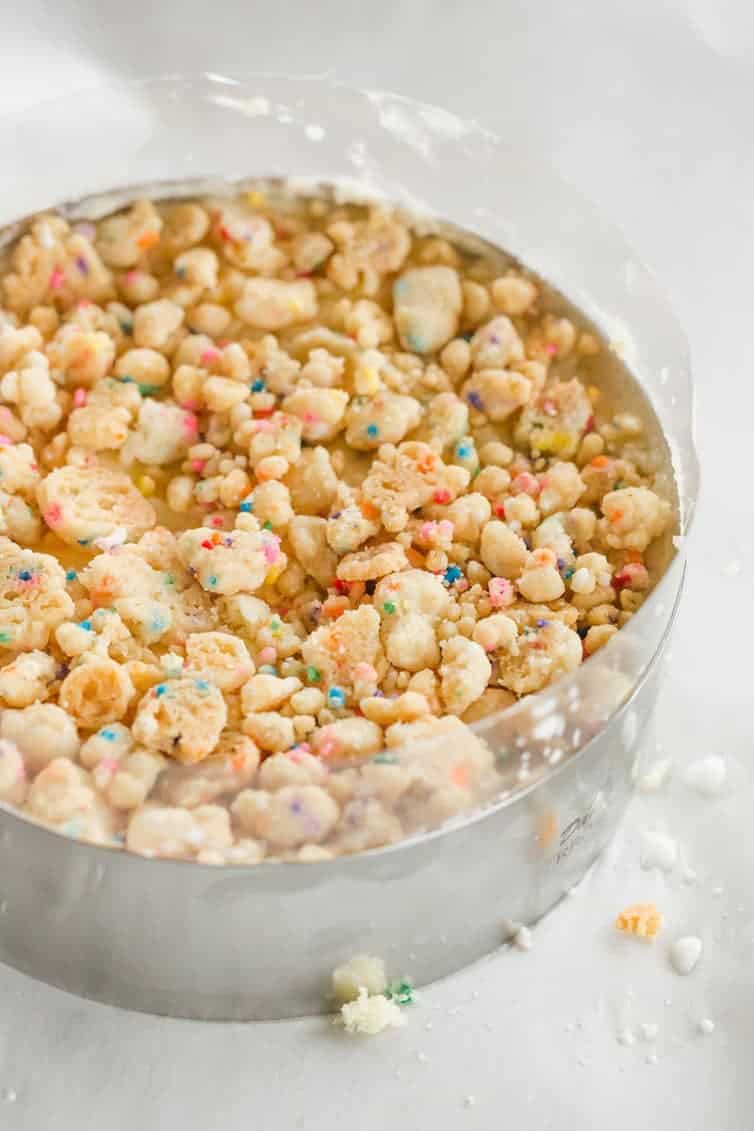
- Sprinkle one-third of the birthday cake crumbs evenly over the top of the frosting. use the back of your hand to press them gently into the frosting.
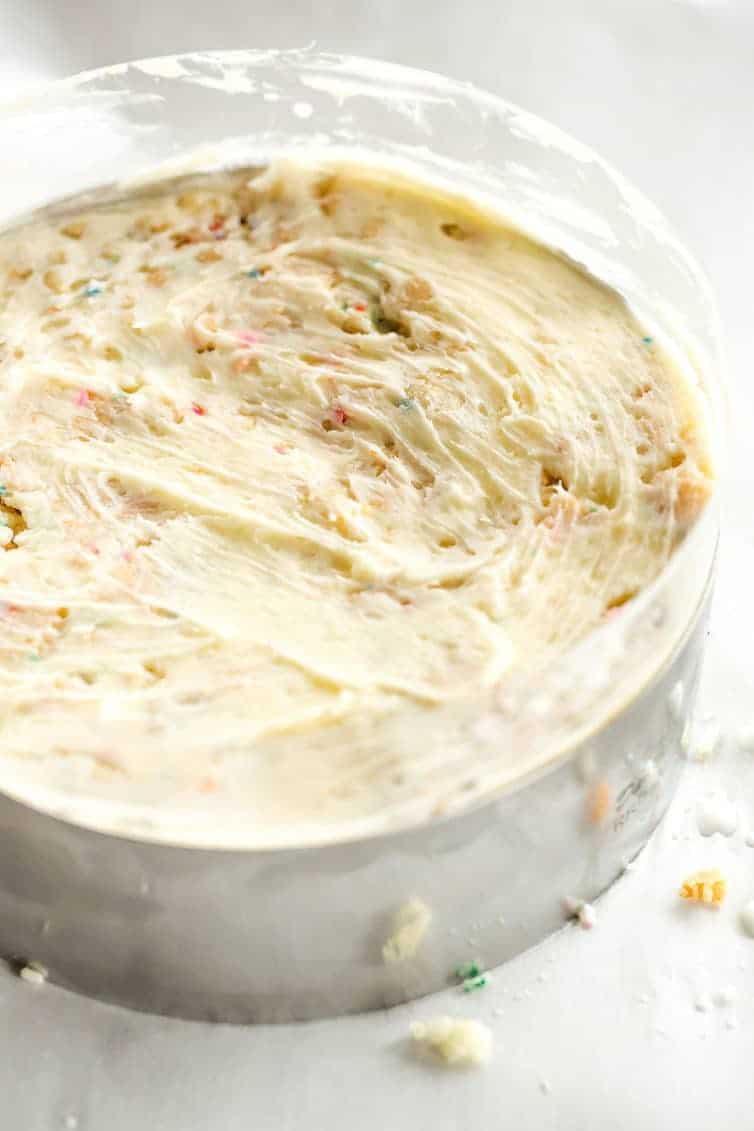
- Use the back of a spoon to spread a second fifth of the frosting as evenly as possible over the crumbs.
- Layer 2, The Middle: With your index finger, gently tuck the second strip of acetate between the cake ring and the top 1/4 inch of the first strip of acetate, so that you have a clear ring of acetate 5 to 6 inches tall. Set one of the cake rounds (the more imperfect of the two) on top of the frosting, brush with the remaining soak, and repeat the process for Layer 1 (a fifth of frosting, a third of crumbs, and another fifth of frosting).
- Layer 3, The Top: Nestle the remaining cake round into the frosting. Cover the top of the cake with the last fifth of the frosting. Garnish the frosting with the remaining birthday crumbs.
- Transfer the sheet pan to the freezer and freeze for a minimum of 12 hours to set the cake and filling. (The cake will keep in the freezer for up to 2 weeks.)
- At least 3 hours before you are ready to serve the cake, pull the sheet pan out of the freezer and, using your fingers and thumbs, pop the cake out of the cake ring. Gently peel off the acetate and transfer the cake to a platter or cake stand. Let it defrost in the refrigerator for a minimum of 3 hours before slicing and serving. (You can store the cake, wrapped well in plastic wrap, in the refrigerator for up to 5 days.)
Notes
- Canola oil can be substituted for the grapeseed oil.
- The glucose is used to keep the frosting smooth, give it body and meld the ingredients together. You can purchase glucose on Amazon, but an additional 2 teaspoons corn syrup can be substituted for the glucose in the frosting.
- The citric acid is used to enhance flavor and cut the sweetness of the frosting. My regular grocery store sells it with the canning supplies, and you can also buy it on Amazon.
- The author calls for clear vanilla extract because of the distinct flavor it imparts. My regular grocery store sells it, but you can also buy it on Amazon.
Did you make this recipe?
Leave a review below, then snap a picture and tag @thebrowneyedbaker on Instagram so I can see it!


Is there a mistake in regards to the cream cheese for the frosting? I made the cake today and I didn’t have enough frosting, even after I added another 2oz of cream cheese.
Hello I made this today started it at 11 am didn’t complete the cake assembly till 2 pm put in my deep box freezer but I didn’t read in advance needs to be in freezer at least 12 HOURS! My sons birthday is tonight today and will need to serve it at 930 pm so I’m gonna have to freeze for 41/2 hours and take out and thaw in fridge for 3 hours and serve will it be ok? Has anyone froze this for less time ?? Please reply ASAP thank you
Hi Joell, I think it should still be okay.
Do you have a preference for the brand of sprinkles?
I usually just buy the bulk ones at the grocery store, but I’ve also bought some Sweetapolita mixes that are so pretty! https://sweetapolitashop.com/
Has anyone tried to make this with gf flour? Specifically, the crumbs? The cake works fine but the crumbs are a mess. Any suggestions?
Hi if I were to make these in cupcake form would I still use the soak? If so would I soak add frosting and then crumb and freeze?
Hi!! I’m making this for my daughters Birthday next month and I’m so excited! A couple questions…Most quarter sheet pans are 12.9 x 9.6. I read on a different recipe for this cake that it should be a 10 x 15 qtr sheet pan, which doesn’t seem to be standard. Do you know which one I should use? Also is glucose syrup the same thing as the glucose used?
Thanks!!!
Hi Michelle,
I just made one of the milk bar cakes myself and was wondering if you had an answer to this question:
Are these cakes supposed to be served cold? I’ve never had an actual cake (not ice cream/mousse/etc) that wasn’t better at room temperature so that the crumb is softer, but all the recipes seem to suggest that the cake goes straight from the fridge to the table. . . How did you serve it?
Hi so you think I could omit the sprinkles for someone’s cake that isn’t their birthday?
Sure, I don’t see why not!
It sas too sweet but very pretty.
In Edible Hawaiian Islands magazine, Dania inferred that this cake could be bought and shipped. Is this so? And if so, how does one go about that?
Mahalo!
Kelly
HI Kelly, It looks like you can order it here: https://milkbar.goldbely.com/categories/cakes
wondering about the baking power in the frosting, is there a reason to use? never used before on frosting.. really curious about that..
For those of you that question the need to cut the rounds out of a sheet pan, I wanted to perhaps explain why. When you bake in individual pans, the edges caramelize and become darker. This not only makes for a “tougher crumb” but also does not allow the full vibrancy of the sprinkles to be seen. IF you want to bake in a cake pan, I would suggest you trim ALL of the sides around the cake once it’s turned out of the pan. I can offer another alternative here. CAKE STRIPS….. They will allow the cake to rise without a dome in a pan as well as not caramelize ( turn darker brown) on the edges. I have done all 3 and still find that cutting them out with a cutter is the most attractive method..
Can I use AP flour?
You can, but it will alter the texture of the cake.
Hi there I am so excited to bake this cake, I was just wondering if theres a difference between 100 and 1000’s and sprinkles? Would it matter if I used 100 and 1000’s?
Hi Robyn, I’m not sure what 100 and 1000’s are? Can you send me a link?
100&1000’s could be just colored white sugar spheres (depending on manufacturer I guess), when you mix them with the liquid the color starts coming off them. I learned that hard way, I will try again.
I baked this today and made the necessary adjustments for cupcakes. I cut the sugar in the cake by 0.5 cup and since the frosting is very thin I added an extra 1/2 tsp citric acid and instead of 1 1/4 cup of powdered sugar I used 3.5 cups. It sounds like a lot, but the added citric acid plus cutting back on the sugar in the cake was perfect! My family loved them and I will definitely be making this recipe again!!
Hi Maria, That’s awesome! Thanks so much for stopping back to share this review, xo.
I have a question! So when you say cake flour, is it a boxed cake flour? Or regular flour? Like unbleached flour?
Hi Gaby, I used the boxed cake flour.
Do you have to put it in the fridge when you take it out of the freezer? I’m worried my fridge isn’t big enough!
Hi Brooke, You should, but I think you could thaw it at room temperature too.
No words to say, you did a very awesome job. Plz keep posting.
I had bookmarked this on your site a while ago… made it for a friends birthday and it was DELICIOUS!
I have a photo but unsure how to post it!
Hi Becky, So awesome to hear! I don’t know of a way to put a photo in the comments, but if you’re on Instagram, feel free to post it and tag @thebrowneyedbaker!
this may be a silly question, but is there a specific brand of sprinkles that works best for baking into cakes, or will any of them work? thanks!
Hi Sara, I just buy the rainbow sprinkles in the bulk section of my grocery store, so I actually have no idea what brand they are, ha! So I’m thinking any will probably work!
I had bookmarked this recipe a while back and decided on a whim last night to make it for a friends birthday today. As such, I didn’t have time to go out and find a cake ring, acetate or clear vanilla (though I think I could get at least the vanilla at Michaels, but didn’t have time to go) I made due with what I could find and regular old vanilla.
I used 13×9 pan that I had at home, not necessarily the same type of quarter sheet pan, but it worked fine. I also used a 6″ cake pan to cut out my circles and to build my cake. I didn’t have any long acetate, but I was able to ‘borrow’ a couple of overhead projector sheets from work, cut them in half and tape them together and it worked FANTASTICALLY!
Overall, the recipes were super easy to follow, and I thought it was going to be really labour intensive, but it wasn’t at all! Super easy to make. I have only tried the ingredients individually at this point (and I agree I could eat those cookie crumbs by the handful), they all taste delicious, and I can’t wait to cut into this puppy tonight!
Thanks for posting this! Love your blog, I’ve had so many great recipes I’ve used from here. Keep up the good work! From one brown eyed baker to another :)
Hi Becky, Thank you so much for stopping back to share your experience with the recipe; love all of the adaptations you made! I’m so happy you found it easy to tackle; enjoy!! :)
Silly question probably.. But what are birthday crumbs ?
Hi Susan, It’s a component of the cake, it’s the first part of the recipe.
Call me dumb, but where does the 3rd cake layer come from? I only saw 2 round cut outs of the cake in the picture.
It comes from the scraps leftover after the two rounds are cut out. See steps #1-3 under “Assemble the Birthday Layer Cake”.
Hi Michelle!
Have you by any chance tried this recipe using a substitute for the vegetable shortening? Trying to see if I can get away with using something else instead, but not sure if I’ll get the same result.
Does the actual Momofuku recipe call for vegetable shortening?
Thanks!!
Hi Julie! Yes, the actual Momofuku recipe does call for shortening. I haven’t tried substituting anything else, so I couldn’t say for sure how it would be affected.
I’m planning to make this next weekend, but need to travel 75 minutes to where we will serve it. Do you have any suggestions for traveling with a frozen cake? I was thinking I would keep it in the freezer and then transfer to a cooler for the drive, and then into the fridge. Also, I see the recipe says to freeze for 12 hours, could it be frozen for longer? I was considering making it this weekend (so one week in advance).
I typically stick to fresh baked goods, so I haven’t done much with freezing, I would hate to do all that work and have it messed up at the very end.
Hi Ashley, I’ve noted this at the end of the recipe, but the cake can be kept in the freezer for up to 2 weeks. As for transporting, putting it in a cooler would be just fine. That’s the time that it would need to be thawing anyway, so you wouldn’t necessarily need to keep it frozen during your drive. I hope that helps!
The Momofuko Birthday Cake recipe could not have landed in my inbox at a better time. A girlfriend’s 40th is next week & this will top off the surprise celebration with 5 fabulous girls perfectly
Is the glucose powder or liquid? How important is tge grapeseed oil? Can it substitute do for another oil?
Can’t wait to see (& taste) the finished product!! I hope I don’t have to hashtag it with #epicfail… 😌
Hi Lori, Happy early birthday to your friend! The glucose is a thick liquid, like corn syrup. Grapeseed oil is recommended, but as I mentioned in the notes, you can substitute canola oil. Enjoy!! :)
So so delightful and Yummy… Just loved it… <3
Could you clarify one thing for me, I’m confused: do I have to do everything twice? Like make 2 sheet cakes, 2 batches of crumb, etc?
No, you make each portion of the recipe only once.
I made this cake this past weekend for a friend’s birthday and it turned out amazing!! It is seriously one of the best cakes I have ever had, and definitely the best funfetti recipe ever. The frosting is soo good and I loved the texture from the cake crumbs.
I actually found the process really fun, if a bit finicky, and it was honestly easier than I was anticipating. I really loved baking the layers in one pan and cutting them out – brilliant (plus I got to have all the extra scraps!).
It was of course a huge hit at the birthday dinner! Thanks for posting the recipe and all your tips!! I put it on my instagram @nyammcat :)
Hi Janet, So glad you enjoyed this as much as I did! Thanks for the review! xo
Thank you for the tutorial on this! I made it yesterday and turned out well. Only thing is it’s just a little too sweet! Any chance I can reduce the sugar in the cake or corn syrup in the icing without altering the final result too much?
Hi Tien, I didn’t alter any measurements when I made this, so I couldn’t say for sure what effect it might have.
Where has this cake been all my life?!! It was absolutely delicious! I never realized that cakes need crunch but apparently they do because the cake crumb on this added just the perfect texture. I also believe that more is better in the frosting department, and I really felt like this cake had the perfect cake to frosting (to crunch;) ratio. I will say that my husband who is not a frosting lover said that there was too much :/ To each their own. I did have to be a little crafty in the assembly since I don’t have a 6 in cutter–instead I stacked everything in a 6 in pot that I had (ha!) and used freezer paper instead of acetate BUT it worked like a charm and came out beautifully! I used extra corn syrup instead of glucose and I used all purpose flour instead of cake flour but everything turned out great even with the substitutions. I will definitely be making this again. Thanks for the recipe, BEB! And the photos you have are gorgeous!
Hi Kim, I’m so glad you enjoyed it!! Thanks for sharing your substitutions, as well!
Hi! I’m interested in making this for my son’s birthday, but I feel like I’m missing something. Do you only use 3/5 of the icing?
Thanks!
The other 2 fifths go on top of each crumb layer. So from bottom to top, it goes:
– cake brushed with milk
– 1/5 of icing
– 1/3 of crumbs
– 1/5 of icing
– cake brushed with milk
– 1/5 of icing
– 1/3 of crumbs
– 1/5 of icing
– cake brushed with milk
– 1/5 of icing
– 1/3 of crumbs
Hi Laura, Katy is exactly right! Except only the first two layers are brushed with milk (you use 1/2 the soak on the first layer and 1/2 the soak on the second layer) – the top layer is just covered in frosting.
Oops, didn’t mean to copy/paste the last soak! haha
Someone gave me this cookbook years ago and this cake is the only thing I’ve ever made from it! I made it for a friend’s birthday maybe five years ago – and yes, I had to purchase a lot of specialty things! It was a lot of work but worth it! I need to pull out that book and give it another go.
I wanted to order one for my birthday as a special treat! At the end I didn’t! :( Making my own sounds like a great idea for this year!!
x
Natalie
http://natalie-a.com
I have made some of the cookies from the Milk Bar cookbook but one of these cakes is totally calling my name. Yours looks like it came straight from Milk Bar.
This is just such a fun cake to make! Wonderful photographs!
My birthday is this Saturday… it’s my first one as a new mama… I think this post is a sign that I need to tackle the Momofuku birthday cake this year for myself! I’ll tag you on IG when I do!
Happy early birthday! My first as a mom felt like such a milestone for some reason! Enjoy the cake and definitely tag me, can’t wait to see it!
I posted and tagged you, but you might not see it (my IG is private). So I honestly wasn’t wowed by this. I liked the crumbs – going to steal that idea! – and appreciated the less sweet, whipped icing. But as a whole, it was extremely rich. I made 2/3 of everything, baked the cake in a 9×9 pan, then cut it into 3 3×9 strips and stacked them (that way I didn’t have to buy acetate or a cake ring.) Subbed corn syrup for glucose, and lemon juice for citric acid, otherwise stayed true to the ingredients. Fun to attempt, but I’ll pick something else next year!
I have two questions regarding this cake.
Do you have to freeze the cake or can it be placed in the refrigerator? Second question do you think piping the frosting would be easier or would it end up being to thick?
Hi Terry, It should be put it in the freezer, as the book says it sets the cake and filling. There really isn’t enough frosting used in each step to put in a piping bag, I don’t think. I would just spread it with a spoon, but like I said above, just make sure it’s at total room temperature and it will spread fine.
I have made this cake before, but did not have a cake ring nor the acetate strips so it was a bit of a mess assembling. It also does take some work. But it is a fantastic cake. We have made several cakes and cookies from the cookbook and love all of them.
I have had that cookbook for a year and have been too intimidated to try making anything! It looks so amazing!
Kari
http://sweetteasweetie.com/
I posted a comment earlier but it’s gone!
Anyway, happy birthday!
My sweet younger cousin wants to make this cake – the BA version is a little different – do you know why? No glucose or citric acid in that version… THANKS!
http://www.bonappetit.com/recipe/momofuku-milk-bars-birthday-layer-cake
Hi Sally, Oh no! I looked, but I don’t see it anywhere (didn’t slip through to spam, etc.). So sorry about that. About the differing versions… it looks like it does have citric acid, but no glucose. My guess is that they modified it a bit to be less intimidating to their large audience, if I had to guess.
Hi – I found all of the unusual things for the cake, and wanted to post back in case anyone was curious –
1) glucose – $4.99 @ Michael’s and I had a coupon for 40% off – definitely the lowest price anywhere
2) citric acid – $4.99 @ Whole Foods – not a large quantity but you barely need any
3) acetate strips – Michael’s didn’t have them, so I got them online through amazon
4) 6″ cake ring – same as acetate – my cake ring arrived super damaged, so make sure you have time to get a replacement!
5) bonus – dried corn powder – I *really* wanted to make the crack pie but couldn’t find this ANYWHERE – and I live in Boston! – including Target, WF, Wegman’s – so will have to wait to get from Amazon. Sigh.
THANKS!
Hi Sally, Thanks for sharing! Bummer about your cake ring, though! :( Mine was okay when I got it!
Hi Michelle – that’s ok -Amazon sent me a replacement and didn’t make me send back the damaged one, which always makes me happy!
If anyone needs citric acid, all Indian stores sell them in small quantities for under $3…google ur closest indian store…also cheap spices in small quanties.
I found freeze dried corn at Savory Spice Shop (national chain, limited locations) and ground it in my blender
I’ve always been intrigued by this cake but other bloggers made it seem too fussy. You almost make it look easy :)
And the specialty ingredients aren’t that bad either, the citric acid can be replaced by lemon juice. And for the cake ring you can use the ring part of a springform pan. I’m sure a lot of people have 6 inch springform pans (myself included) for making Instant Pot cheesecakes ;)
Anyway, I’ll be putting this one on my list!
I made this over the holidays and everyone at Christmas dinner seemed pleased. I was surprised by how small the diameter was but since it is so rich it served everyone fine. I bought a flat sheet of acetate at an artist supply store (~$2) and then cut it into strips. I did wash mine to reuse. I found the clear vanilla at Michael’s in the cake decorating aisle (Wilton brand). I subbed corn syrup for the glucose as I couldn’t find that in a small enough amount. It is a process, yet fun and certainly makes for a memorable dessert.
One more thing – I used the ring from my springform pan rather than buying a cake ring.
Just a tip for those not into buying special equipment with limited uses…I have made this (amazing) cake several times now but just bake it in two round 9 inch pans and split the soak, icing and crumbs between the two layers. Works great and no messy cutting either! Pictures of it here: https://bagofflour.com/tag/momofuku/
Now THAT’s a mouthful!!! I love how you broke it down for us because it really does look daunting! And then to top it off…FUNfetti! Yay :)
It is beautiful!!! I have to say, even just the sheet of cake looks VERY appealing to me…looks like the perfect crust :)
I am the opposite…not a frosting person so the finished product would probly be just right.
Happy 10 years young!
When storing cake before assembling, do you turn it out of pan after cooling and wrap, or keep in pan wrapped till using? Might tackle this in stages! Thanks
Hi Joanna, I kept it in the pan and wrapped it in plastic wrap, refrigerated until I used it.
Great looking cake. How high did it end up being?
I was wondering if the acetate would work with ice cream cake? Is the acetate reusable? Is there any reason not to use 3 6 inch pans versus cutting them out of a sheet cake? So many new products to buy….
Hi Maureen, It was about 6 inches tall. The cake ring/acetate would probably work great for an ice cream cake! I mean, I think you could probably wash the acetate strips, but I just threw mine away. I bought a roll of it, so I would just use new for the next project. I am not sure about the three layers vs the sheet cake, as I made it as directed above.
Did you try making this in 3 six inch pans yet? I bought three and was going to use them….How long did you bake?
I have, it worked fine. I liked the look if mine cooked in cake pans instead of being cut out.
I have only made her Crack Pie of all her ‘epic recipes’ and have never tackled a cake because of all the steps and the work her recipes are known for. You broke this down beautifully and major kudos to you for doing it and tackling it! WOW! And it’s stunning!! Happy 10th bday to BEB! :)
This looks beautiful! I’m a total frosting person, so you’d have to twist my arm pretty hard to convince me to spend calories on a naked cake ? But it sounds like you loved it, so I just might have to try it!
Pinning this for my son’s upcoming birthday. He’s having a Patriots party so I think I can make this with red, white and blue sprinkles??? He is turning 9 on 9/9 so he wants it to be a huge deal this year! Thanks for the idea!
Ha! I turned 10 on 10/10! (in 1970) but didn’t have the blow out party til 10/10/10 (2010…50th!) This will be the PERFECT cake to celebrate his 9 years!!!
What a great idea. I am guessing you are talking “Patriots” as in the football team? If so, maybe you could find some silver sprinkles to add to the mix as the uniform are more blue/white and silver. I know Wiltons sells silver sprinkles. Actually, I recently googled places that sell individual colors of sprinkles so I could make up some of may own special combinations of colors. So many sites popped up that offer so many sprinkle/quin options.
Good luck with the cake. It should be fun to put together.
Yes, absolutely! What a fun idea!
Just in case anyone wants to tackle this cake and needs a cake ring, my suggestion is not to buy from amazon…its less than half the price on webstaurant(dot)com. You will have to pay shipping….but u can shop other ingredients/restaurant supplies at a really low cost.
Thanks for the tip! I’ve bought some things from there before, but I live for Prime shipping ;-)
I’ve never made this recipe, but Michelle, I turned your Guinness, Whiskey, and Irish Cream cupcakes into a Milkbar-style cake, with the Guinness cake as the base, Jameson ganache, chocolate crumbs, and Bailey’s frosting between the layers, and more frosting and crumbs on top. It’s phenomenal and is a total showstopper in terms of aesthetics. My mom now requests it for her birthday every year.
Oh my gosh, that sounds AMAZING!!! So creative!
So you know how I told you my husband likes boxed cake and frosting better? I made this for his birthday last year and he said that it was the best cake I’ve ever made. That’s what he wants for his birthday every year now!
WOW! This looks incredible! My oldest step daughter loves funfetti cake, I need to surprise her with this.
Wow! Definitely making this! A special b.d. soon & this is perfect! ThanX!!!!!!!
When and where do you use the other half of the soak? I didn’t see it referenced in the recipe or in your step by step with pictures.
Ditto. I am wondering the same thing.
Hi Jennifer, You brush it on the second cake layer. My apologies for not making that clear, I’ve gone back and edited the instructions to clarify.
This looks INCREDIBLE! We don’t have any more family birthdays coming up, but I think I need to make this anyway, no reason needed! ?
Wow! This cake looks amazing Michelle, I’ve actually heard about the milk bar cake through Annie Eats blog but always thought it sounded a bit complicated and faffy.
The step by step instructions with pictures makes the process look a lot clearer, thank you!
Just finished my whole 30 today, very nice recipe to wake up too and look forward to accomplishing : )