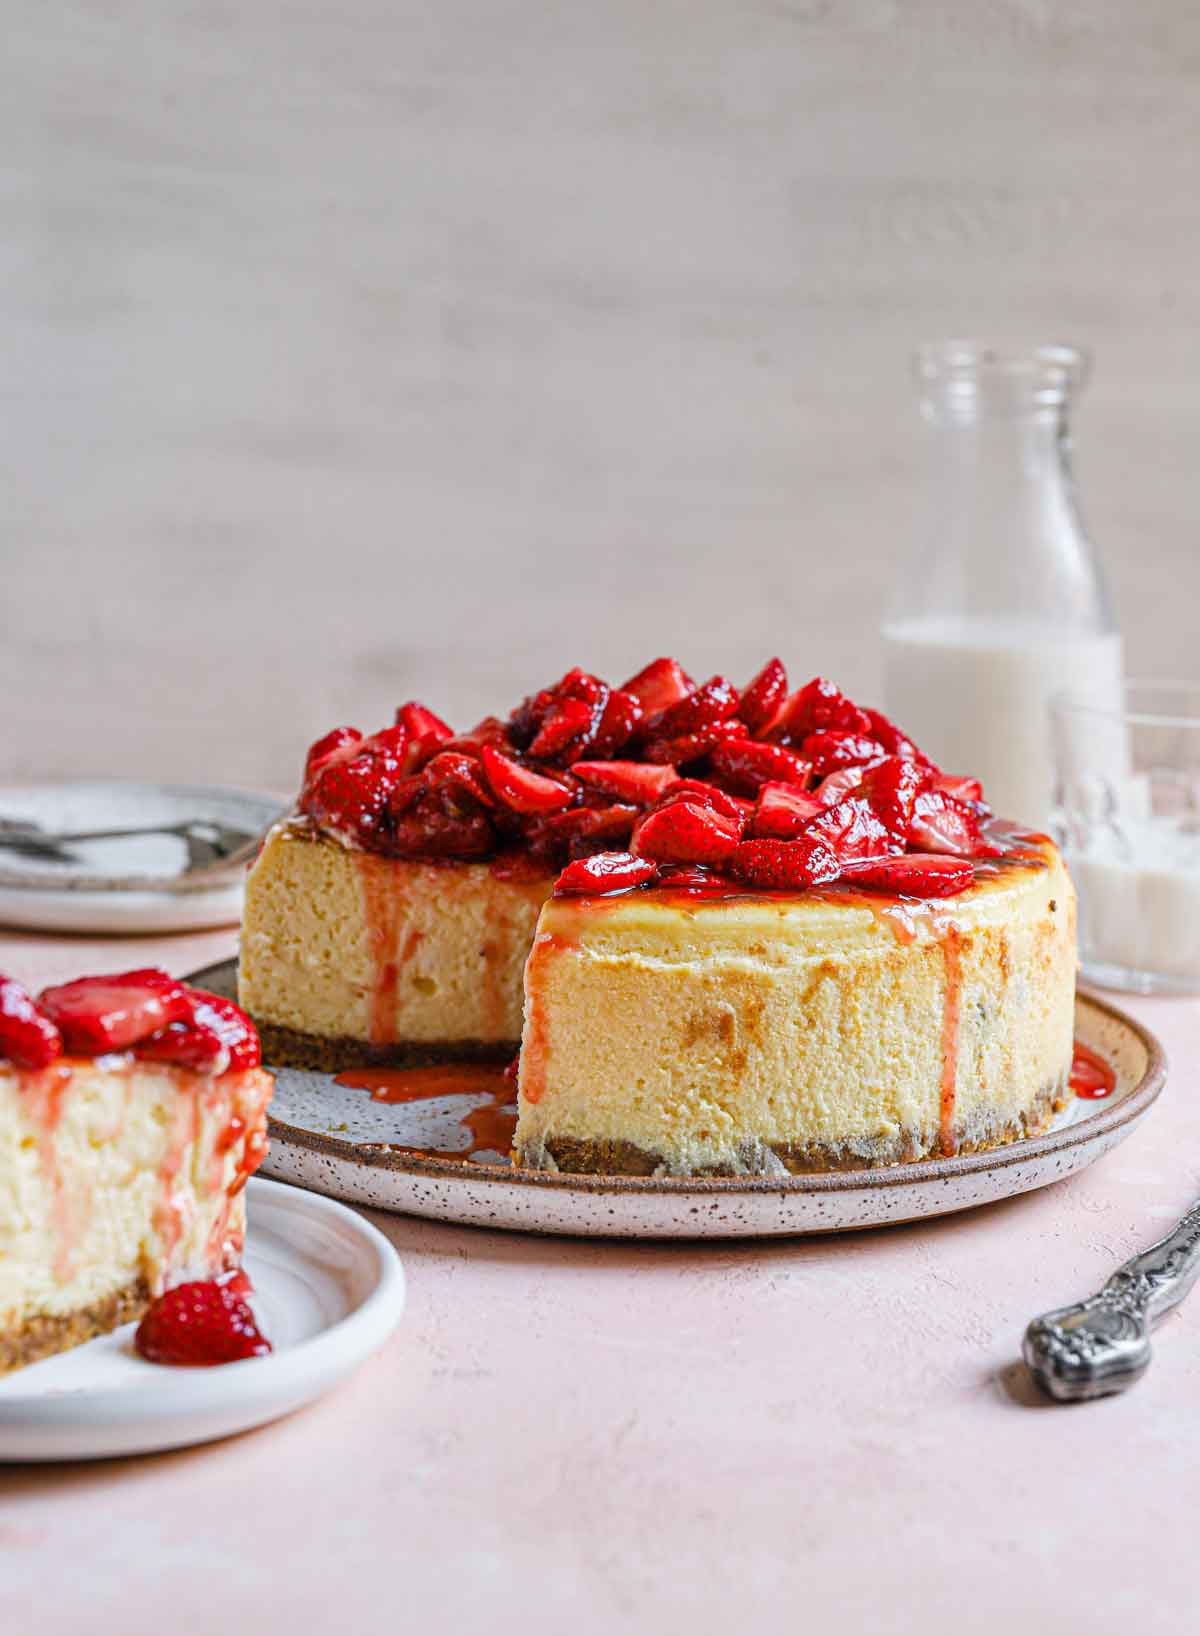
New York Cheesecake
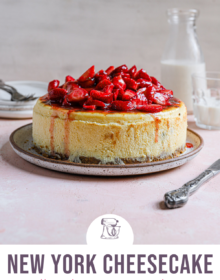
Follow this classic New York Cheesecake recipe for a creamy, rich, and decadent dessert. Serve it plain or with your favorite cheesecake toppings (lots of suggestions below) for an impressive holiday, birthday, dinner party, or special occasion dessert!
Cheesecake is one of my great loves. Over the years, I've shared many, many cheesecake recipes, including brownie cheesecake, Oreo cheesecake, fig almond cheesecake, pumpkin cheesecake, red velvet cheesecake, and peanut butter fudge cheesecake (among others!).
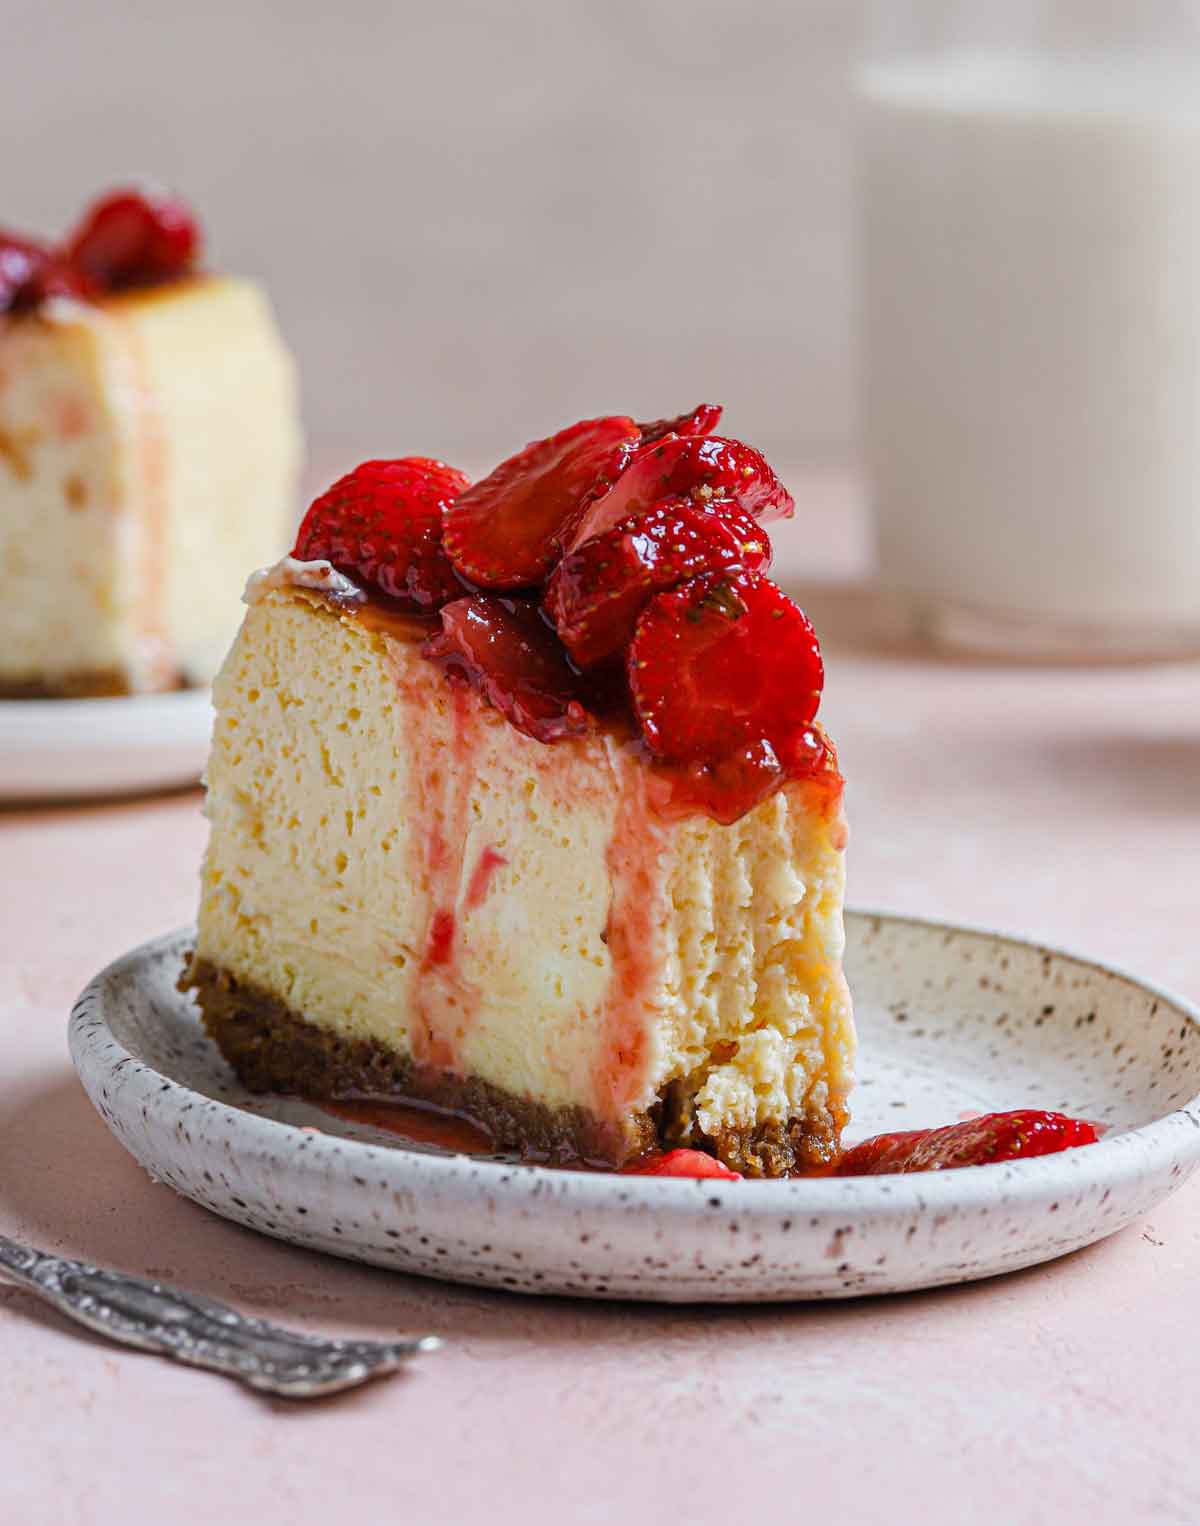
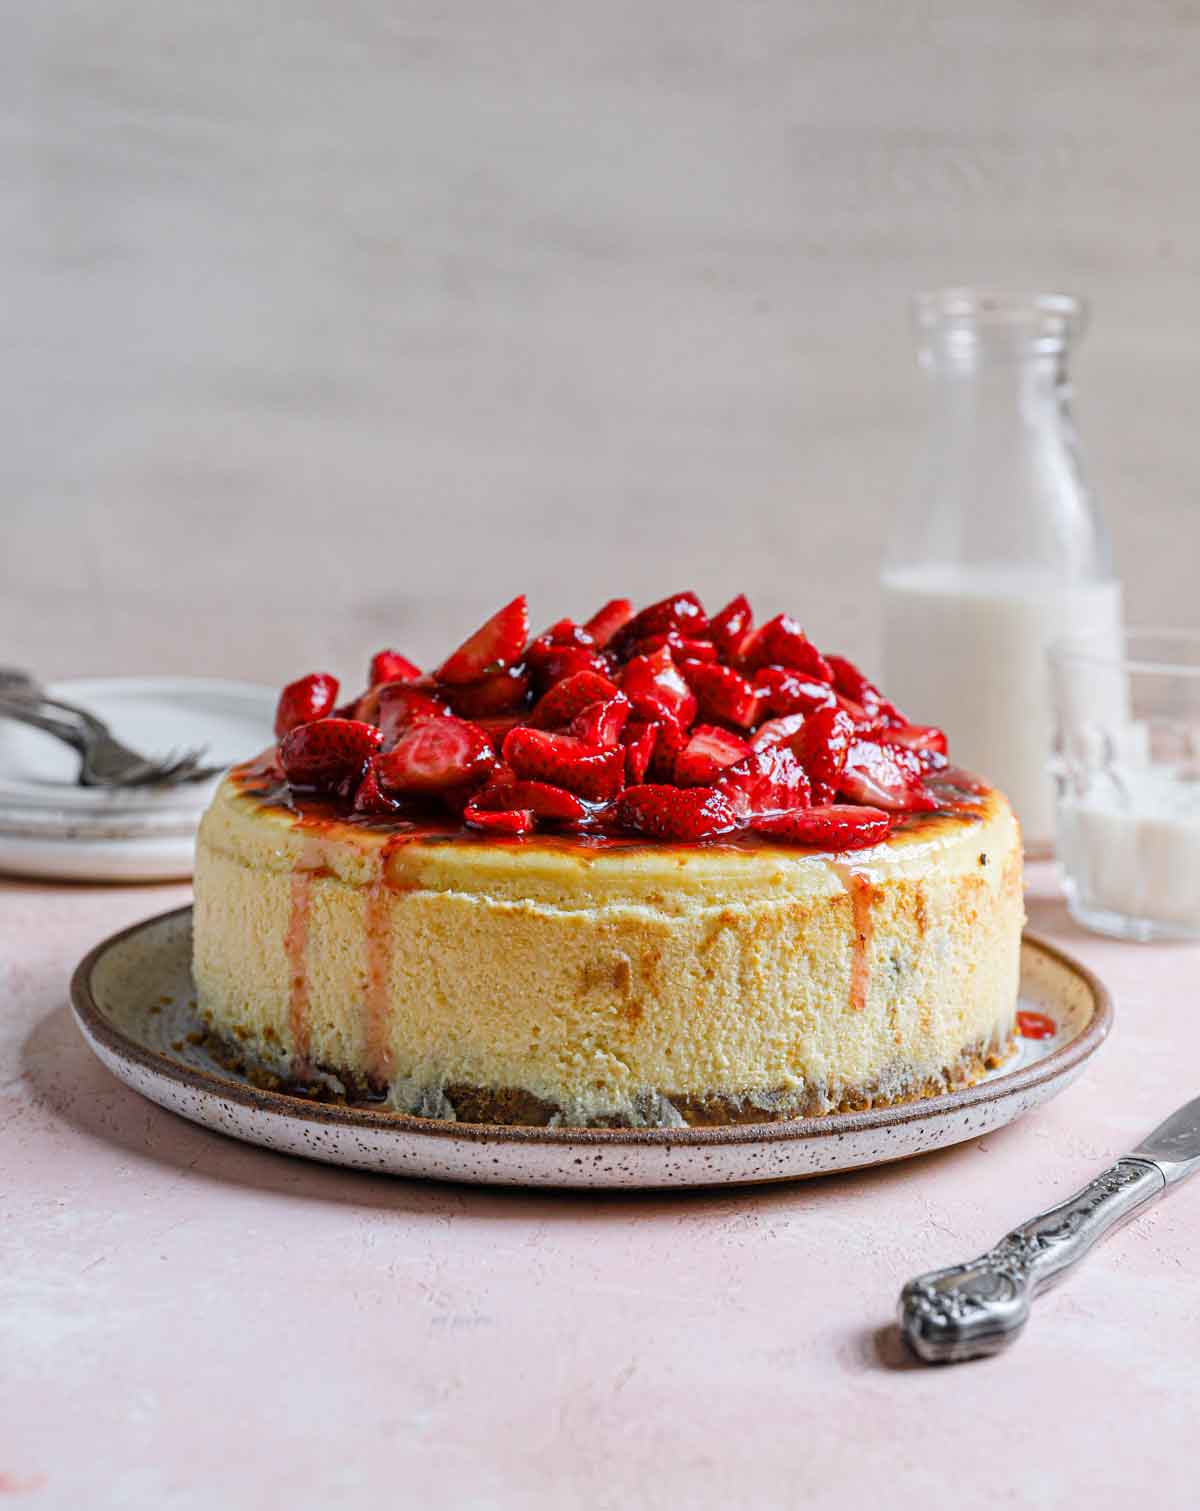
Today, we're taking a deep dive into the ultimate cheesecake recipe: New York-style cheesecake with a classic graham cracker crust and a sky-high cheesecake filling.
Why Homemade Cheesecake Is the Best
While homemade cheesecake can be a little time-consuming and look a little intimidating, it's a great recipe for bakers of any level. It doesn't require very much hands-on time. Many cheesecake recipes require baking cheesecake in a water bath to ensure an even bake and reduce the risk of cracks forming on the top of the cake, but you won't need to use a hot water bath to make this recipe (which is one of the things I love about it)!
There are two parts to cheesecake - both simple to make with basic baking ingredients; a traditional graham cracker crust and ultra-creamy cheesecake filling.
If you've ever tasted cheesecake from scratch, you know the results are absolutely, 100% worth it!
“Regular Cheesecake” vs New York Cheesecake
Almost every style of baked cheesecake has a base of cream cheese and eggs. The difference lies in the amount of cream cheese and the addition of sour cream.
"Regular" cheesecake is traditionally lighter in texture and baked to pale perfection. For a classic cheesecake recipe (not New York style) try my Oreo cheesecake recipe. Simply omit the Oreo cookies for a plain version.
New York-style cheesecake is made with more cream cheese than regular cheesecake; it's typically denser and richer and is sometimes browned on top. (Side note: another variation of New York cheesecake involves baking a layer of sour cream on top of the cheesecake at the end.)
Simple Ingredients
The beauty of a classic cheesecake is that it relies upon a simple list of ingredients to create rich decadence! I’ve highlighted some of the important ones below. As always, check the recipe card below for a full list of ingredients and quantities.
- Graham Crackers (for the crust) – You can use store-bought graham cracker crumbs or crush up whole graham crackers.
- Cream Cheese – Be sure to use full-fat cream cheese for a cheesecake that is firm and creamy, not watery or runny.
- Sour Cream – Again, use full-fat sour cream.
- Lemon Juice – Fresh or bottled is fine; the flavor is very subtle, but you can omit it if you prefer.
How to Make New York Cheesecake
Complete instructions for making this delicious New York cheesecake recipe are in the recipe card at the bottom of this post, but here's a quick recap:
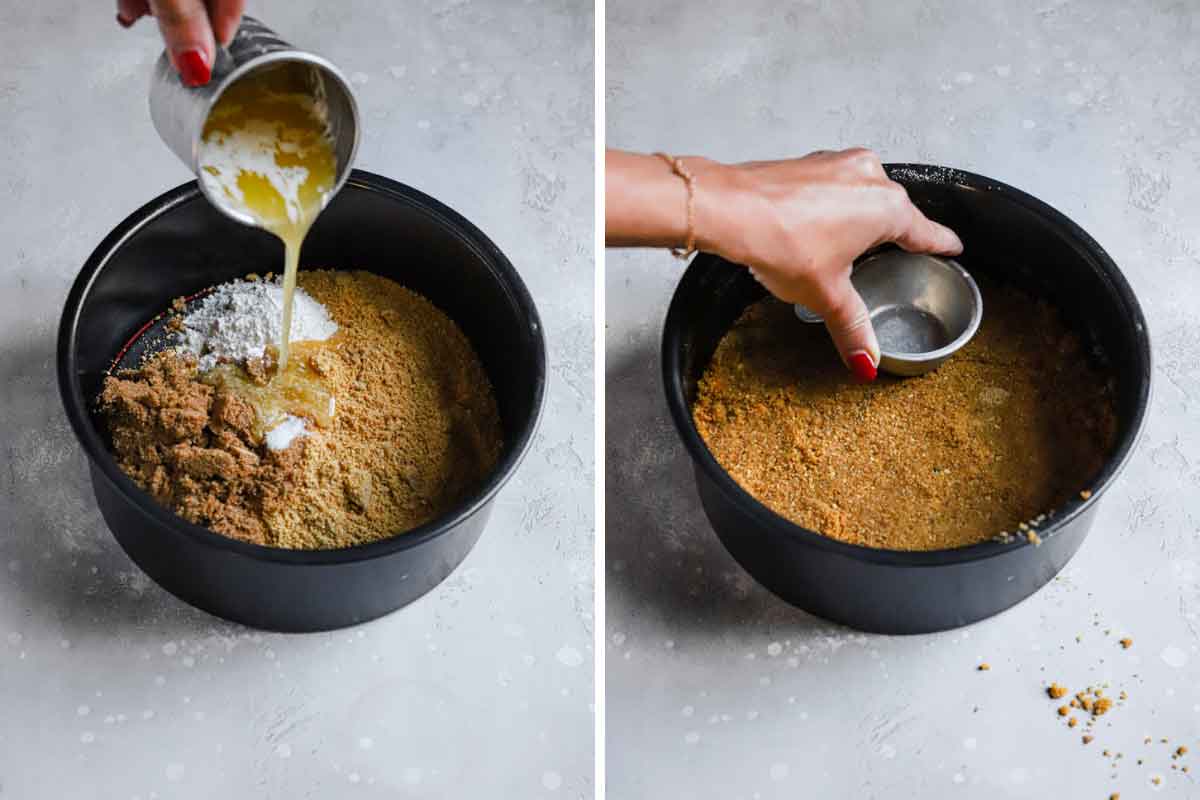
Step #1: Make the Crust – Mix together the graham cracker crumbs, brown sugar, salt, and melted butter, then press into the bottom and about an inch of the way up the prepared pan. (If you want to double the crust, you can press it higher up the pan.) You will then bake the crust and set it aside to cool while you make the filling.
Step #2: Make the Cheesecake Filling – You will mix together the filling ingredients (cream cheese, sugar, sour cream, lemon juice, vanilla extract, and eggs), then pour the cheesecake batter into the prepared crust.
Save This Recipe
Step #3: Bake Low and Slow – Bake at 200 degrees F until the cheesecake reaches 150 degrees F on an instant-read thermometer. This takes anywhere from 2 hours 15 minutes to 3 hours.
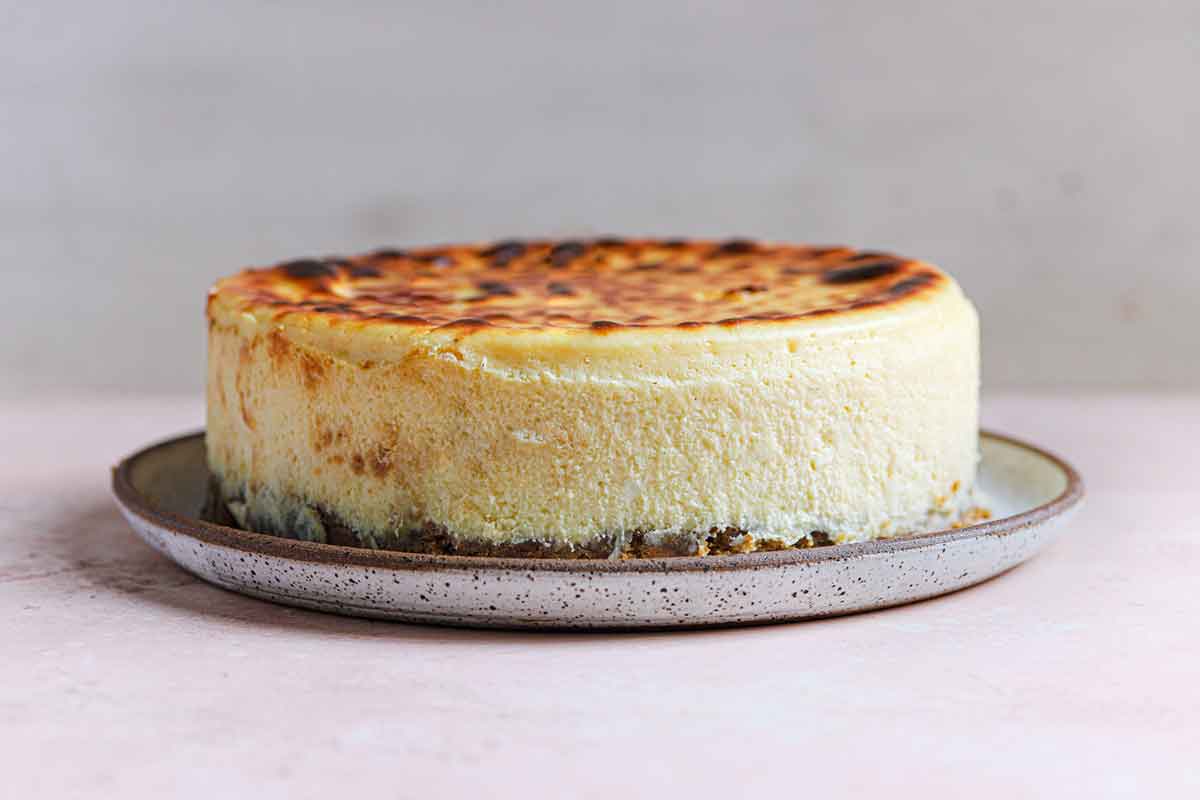
Step #4: Brown the Top – Increase the oven temperature to 500 degrees F and pop the cheesecake back in the oven for a few minutes to get a classic browned top (or skip this step if you prefer a paler top!).
Step #5: Chill – This is a crucial step! Let the cheesecake cool completely to room temperature, then refrigerate for at least 6 hours or overnight.
Revised and Updated Cheesecake Baking Method
The Original Recipe: Many of you may be familiar with the original form of this cheesecake recipe that I published in 2013. That recipe required you to start baking the cheesecake at 500 degrees F for 10 minutes, then lower the temperature to 200 degrees F for the remaining baking time. I've received a mixed bag of comments and reviews over the years - some readers comment that it turns out perfectly, while others say the cheesecake was completely burnt on top. I couldn't identify where to make changes to the recipe because every time I made it, it turned out wonderfully.
So, I re-tested it in a new-to-me oven. And it burned… and cracked. I was stumped after making so many successful cheesecakes following this method, so I did a ton of reading and research.
As it turns out, the time it takes your oven to drop in temperature makes all the difference. All ovens vary in the amount of time it takes to drop in temperature, and in this particular recipe, we're dropping the temperature by 300 degrees F. If your oven lowers in temperature quickly, you likely would not have had a problem. However, if an oven takes a long time to drop the temperature, the cheesecake bakes at a higher temperature for too long, resulting in a too-dark and cracked top.
The Updated Recipe: Since a slightly toasted top is characteristic of a New York cheesecake, I wanted to figure out how to make this work. As it turns out, Cook's Illustrated also re-visited this recipe and flipped the order of baking. START the cheesecake in an oven at 200 degrees F and finish the cheesecake at 500 degrees F for a few minutes to get that classic browned top.
This also provides another benefit - if you like a purely pale cheesecake without any color on top, you can completely skip the last step of browning with no other adjustments needed!
Topping Ideas
While a fabulous cheesecake can absolutely stand on its own, sometimes it's nice to dress it up a bit when serving to others (you could even set up a cheesecake topping bar!). You'll find a recipe for fresh strawberry topping included with the cheesecake recipe below, and here are some other cheesecake topping ideas:
- Homemade whipped cream (or from a can!)
- Salted caramel sauce (homemade is linked, or store-bought)
- Hot fudge sauce (homemade is linked, or use store-bought)
- Chocolate ganache
- Fresh fruit – Blueberries, cherries, raspberries, blackberries, etc.
- Canned pie filling – Spoon some over top of the entire cheesecake, or just individual slices.
- Fruit compote
- Powdered sugar
- Crushed Oreos or other cookies/candy
- Chocolate shavings
How to Store and Freeze Cheesecake
- Storage: Keep the cheesecake in an airtight container or wrapped in plastic wrap in the refrigerator for up to 4 days.
- To Freeze the Entire Cheesecake: Chill overnight in the refrigerator, wrap in plastic, then wrap in aluminum foil, and place in a zip-top freezer bag. Freeze for up to 3 months. Thaw in the refrigerator overnight before serving.
- To Freeze Slices of Cheesecake: Wrap each slice individually in plastic wrap, then place in a zip-top freezer bag. Freeze for up to 3 months. Thaw in the refrigerator overnight or at room temperature for about 45 minutes.
Recipe Notes & Success Tips
- Mixer: This recipe comes together best when you use an electric mixer; while a stand mixer makes an easy job of it, you can also use a hand mixer if that is all you have, just be sure to use a large mixing bowl!
- Springform Pan: To make this deep dish New York cheesecake recipe, a springform pan is essential. Using this pan will give your cheesecake height and, because the outer ring is separate from the base, the sides stay smooth when you release it after cooling. (It's impossible to get a baked cheesecake out of a regular cake pan without it breaking apart into pieces.)
- Thermometer: An instant-read thermometer is the absolute best way to ensure your cheesecake is done but not overdone. The cheesecake will continue to cook as it cools, so we're looking for 150 degrees F; baking to this internal temperature will give you the most amazingly creamy cheesecake. If you do not have an instant-read thermometer, gently shake the pan - you want a circular area of about 2 inches in the center to still jiggle slightly.
- Browned Top: As mentioned above, you can skip the browning step completely if you'd like. If you DO plan on browning the top, be sure to keep a close eye on it because it will brown quickly. I find that it darkens a shade or two after cooling, so keep that in mind, as well. Err on the side of removing it earlier rather than later.
- Chill: A thoroughly chilled cheesecake is best! While 6 hours is the minimum, overnight is even better. (Which is awesome, because cheesecake is the ultimate make-ahead dessert!)
Watch the Recipe Video:
If you make this New York cheesecake recipe and love it, remember to stop back and give it a 5-star rating - it helps others find the recipe! ❤️️
New York Cheesecake Recipe
Ingredients
For the Crust:
For the Cheesecake Filling:
- 40 ounces cream cheese, at room temperature and cut into 1-inch pieces
- 1½ cups (298 g) granulated sugar, divided
- ⅛ teaspoon salt
- ⅓ cup (76 g) sour cream
- 2 teaspoons lemon juice
- 2 teaspoons vanilla extract
- 2 egg yolks
- 6 eggs
For the Fresh Strawberry Topping:
- 2 pounds strawberries, hulled and cut into ¼-inch slices (about 3 cups sliced strawberries)
- ½ cup (99 g) granulated sugar
- Pinch of salt
- 1 cup (340 g) strawberry jam
- 2 tablespoons lemon juice
Instructions
- Preheat oven to 325 degrees F. Lightly grease the bottom and sides of a 9-inch springform pan.
- Make the Crust: In a medium bowl, stir together the graham cracker crumbs, brown sugar, and salt. Pour in the melted butter over the mixture and stir with a fork or rubber spatula until the entire mixture is moistened. Press evenly into the bottom and up the sides of the prepared springform pan and bake until the edges begin to lightly brown, 11 to 13 minutes. Set aside to cool completely.
- Reduce oven temperature to 200 degrees F. Adjust oven rack to lower-middle position.
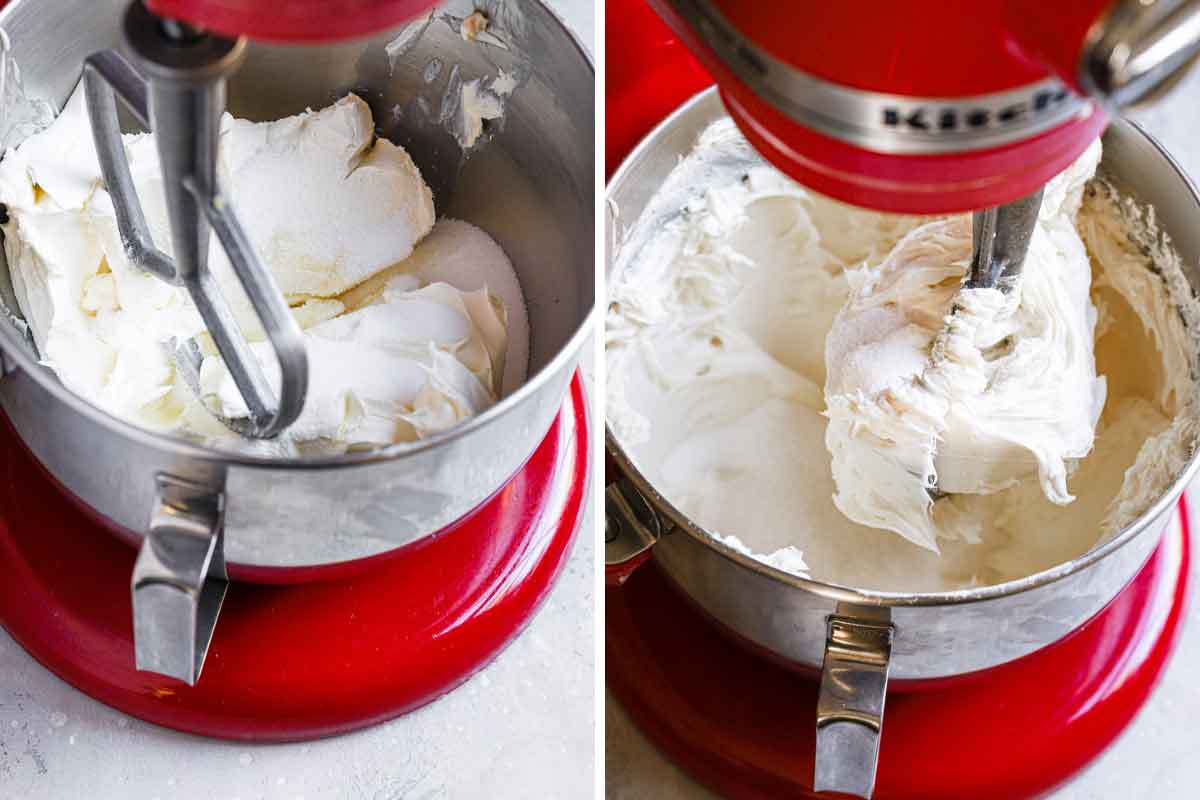
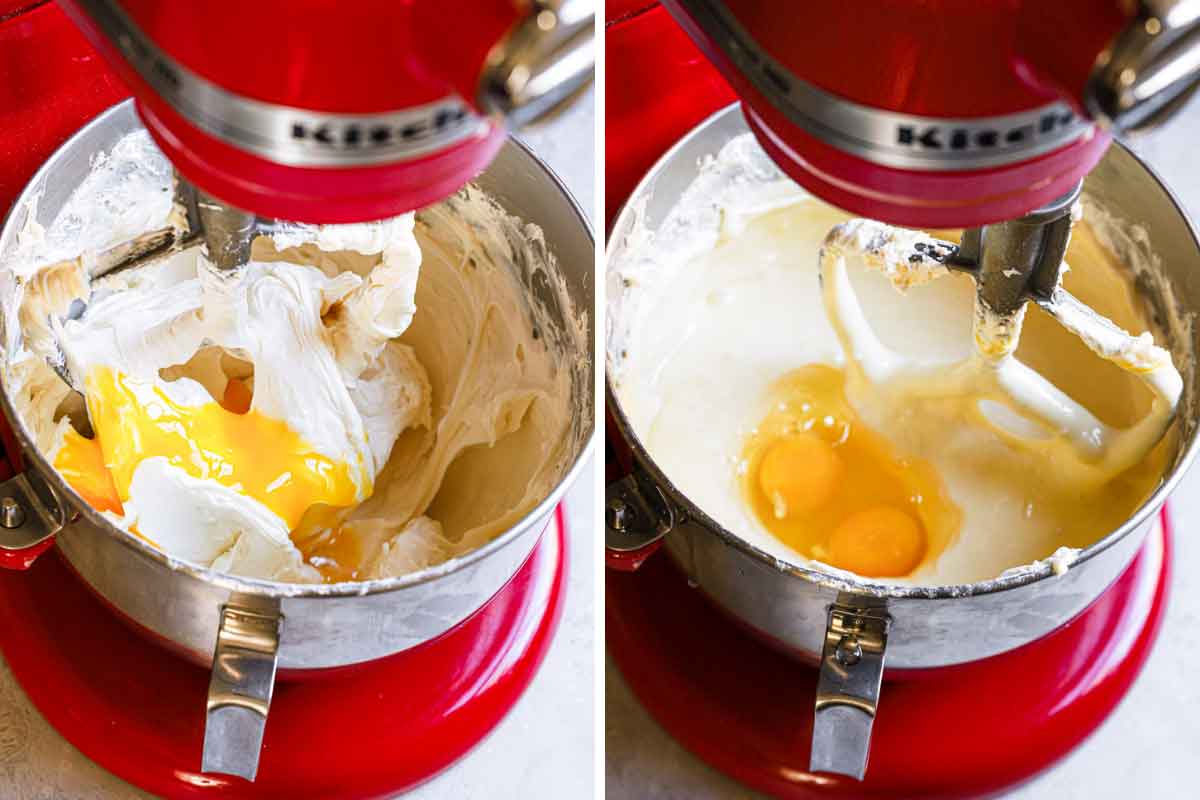
- Make the Cheesecake Filling: Beat the cream cheese, ¾ cup of the sugar, and the salt on medium-low speed until combined, about 1 minute. Beat in the remaining ¾ cup of sugar until combined, about 1 minute. Scrape down the sides of the bowl and the beater. Add the sour cream, lemon juice, and vanilla extract and beat on low speed until combined, 1 minute. Add the egg yolks and beat at medium-low speed until thoroughly combined, 1 minute. Scrape the bowl and beater well. Add the whole eggs two at a time, beating for 30 seconds after each addition.
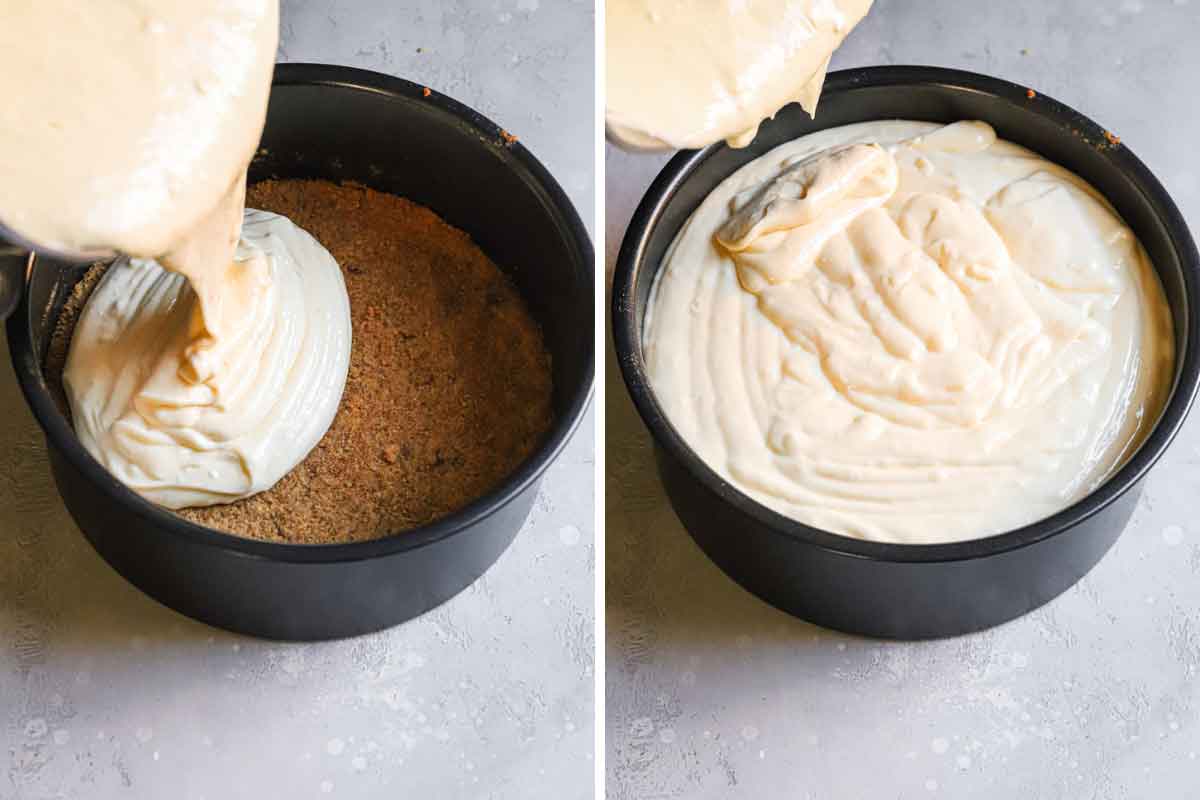
- Pour the filling over the crust and place the springform pan on the lower-middle rack. Place a rimmed baking sheet on the rack below to catch any drips. Bake until the cheesecake registers 150 degrees F on an instant-read thermometer, 2 hours 15 minutes to 3 hours.
- Remove the cake from the oven and increase the oven temperature to 500 degrees F (leave the rimmed baking sheet on the bottom rack).
- Once the oven reaches 500 degrees, place the cheesecake on the upper-middle rack. Bake until the top is lightly browned, 3 to 8 minutes. Remove from the oven, place on a wire rack and allow to rest for 5 minutes. Run a paring knife between the cheesecake and the side of the springform pan, then allow to cool to room temperature, at least 3 hours. Cover with plastic wrap and refrigerate until completely chilled, at least 6 hours but ideally overnight.
- Remove the sides of the springform pan and allow to sit at room temperature for 30 minutes before serving.
- To Make the Fresh Strawberry Topping: In a large bowl, toss together the sliced strawberries and the sugar. Let sit for 30 minutes, stirring occasionally to combine.
- Process the jam in a food processor until smooth, about 10 seconds (or, whisk vigorously until the jam is completely smooth). Place the jam in a small saucepan and bring to a simmer over medium-high heat. Simmer, stirring frequently, until the jam is dark and no longer frothy, about 3 minutes. Stir in the lemon juice, then pour over the strawberries and stir to combine. Allow to cool to room temperature, then cover with plastic wrap and refrigerate until cold, at least 2 hours or up to 12 hours (the strawberry topping is best served within 1 day of making it).
Notes
- Springform Pan: To make this deep dish New York cheesecake recipe, a springform pan is essential. Using this pan will give your cheesecake height and, because the outer ring is separate from the base, the sides stay smooth when you release it after cooling. (It's impossible to get a baked cheesecake out of a regular cake pan without it breaking apart into pieces.)
- Thermometer: An instant-read thermometer is the absolute best way to ensure your cheesecake is done but not overdone. The cheesecake will continue to cook as it cools, so we're looking for 150 degrees F; baking to this internal temperature will give you the most amazingly creamy cheesecake. If you do not have an instant-read thermometer, gently shake the pan - you want a circular area of about 2 inches in the center to still jiggle slightly.
- Browned Top: As mentioned above, you can skip the browning step completely if you'd like. If you DO plan on browning the top, be sure to keep a close eye on it because it will brown quickly. I find that it darkens a shade or two after cooling, so keep that in mind, as well. Err on the side of removing it earlier rather than later.
- Chill: A thoroughly chilled cheesecake is best! While 6 hours is the minimum, overnight is even better. (Which is awesome, because cheesecake is the ultimate make-ahead dessert!)
- Storage: Keep the cheesecake in an airtight container or wrapped in plastic wrap in the refrigerator for up to 4 days.
- To Freeze the Entire Cheesecake: Chill overnight in the refrigerator, wrap in plastic, then wrap in foil, and place in a zip-top freezer bag. Freeze for up to 3 months. Thaw in the refrigerator overnight before serving.
- To Freeze Slices of Cheesecake: Wrap each slice individually in plastic wrap, then place in a zip-top freezer bag. Freeze for up to 3 months. Thaw in the refrigerator overnight or at room temperature for about 45 minutes.
Did you make this recipe?
Leave a review below, then snap a picture and tag @thebrowneyedbaker on Instagram so I can see it!
This recipe was originally published in April 2013.
Photography by Dee Frances.


Hi Michelle
I want to thank you so much for this amazing blog, there’s not one day that goes by that i do not check it and it’s my go to blog for cooking/baking ideas.
I’m also crazy about cheesecake and i’ve been trying all the cheesecake recipes that you have on here, my friends just go crazy for them. I do have a question, i think this is the only recipe that does not use a water bath for the cheesecake, to be honest, i hate using water baths, I think you mentioned that in one of your posts how your crust gets soggy, I get the same issue. I was wondering, does this way of baking work for all cheesecakes? or specifically this one? for example other cheesecakes I tried from your blog that came out amazing but crust were a bit soggy due to water bath were the pumpkin and the layered espresso one (that one was a major hit)
I was just wondering if I can use this form of baking for the other cheesecake recipes?
thank you so much for your amazing blog.
Hi Lein, You could try baking as directed with the temperature in any given recipe, omit the water bath, and when the cheesecake is just set around the edges and still jiggles in the center, turn off the oven, but leave the cheesecake in there until it cools to room temperature. Then chill in the refrigerator for at least 4 hours (preferably overnight).
I just made this a few days ago, and it is GONE. It was seriously the best cheesecake I have ever tasted, and the easiest recipe. The texture was perfect, everything you want a New York cheesecake to be, and the flavor, oh my gosh! I made a different recipe last month, and I had a hard time getting us to finish it; in fact, I had to throw some away. It was TOO dense, so much so that I couldn’t slice it without the slice breaking into pieces as I did so, and the feel of it in the mouth wasn’t good. Also the flavor was bland. The lemon and vanilla in this are just enough to enhance the flavor of the cream cheese and make it addicting; we couldn’t stop eating it. The guys at work loved it, too. It went SO fast, that I was begged by my family to immediately make another one; the cream cheese is now in the fridge, waiting for me to make it tomorrow. Also, the height went all the way up to the very top of my pan, which I also loved. I will be making no other cheesecake recipe. Thank you!
Amazing! my first time trying to make a cheesecake and wit worked perfectly!
thanks!
For anyone who wants to use the store bought graham cracker crumbs, 8 graham crackers is about 1 1/3 cups.
Hi! I’ve made this several times and it’s a fantastic recipe. I also make your red velvet cheesecake a lot as well. My question is- I’ve been requested to make this cheesecake AND the red velvet cheesecake for two separate Easter dinners for each side of my family. Do you think I could make two of the NY cheesecakes, leaving the crust off one, bake them at the same time, and cut one in half for the red velvet cake, or would this recipe not slice as well as the recipe in your red velvet cheesecake? I’m trying to avoid having to bake the cheesecakes separately. Suggestions?
Hi Katie, I think you could definitely use the same cheesecake recipe! Enjoy! :)
Hello,
I tried this recipe yesterday and half way through I realized my oven doesn’t go as low as 200F!!
So i had to improvise and check on it a lot!!!
And when the cake itself reached 150F, it was still soupy so I had to leave it until almost 170F. The end result was good however I am wondering if there is a more scientific way of baking it, my oven minimum temp is 266F (130C)
Thanks!
hey Michelle I just wanted to ask if there was another way to unmold the cheesecake? I don’t have a springform pan and I’m afraid of cracking the cheesecake as I’m baking it as a present!
Hi Malia, Unfortunately, unless you use a springform pan, I don’t know how you could unmold it without it breaking.
What a disaster. I’ve never been so embarrassed about anything I’ve ever made in my kitchen. I followed directions to a T and I’ve got a disgusting horrible mess that I wouldn’t serve to a dying dog. So awful.
Yeah this one is NOT working for me. 10 mins at 500F has left me with a burnt top. At 10pm for a birthday tomorrow. Awesome.
You are wrong. The classic New York Cheesecake does not have a graham cracker crust. It has a type of pie crust with lemon zest that makes the entire experience lucious.
Ok I followed the recipe to a T! After the 10mins of cooking at 500 the cheesecake was a dark dark brown and cracked. Pretty sure it will be going in the trash. I’ve made cheesecakes for many years and love all your recipes, but this one did not work for me.
Yum. My son asked for cheesecake for his bday. I have never made it before so I made 3 of this recipe and had blueberry topping, cherry and strawberry available for our guests. I received so many compliments on these and no one could believe it was the first cheesecake I had ever made. Thanks so much. I absolutely love your site.
I made this for my mother’s birthday. Everyone loved it! It was super moist & tasted like it came from a New York Bakery.
I love this recipe. I made it last year for my son’s birthday and it was a hit. Everyone loved it. Now, I’ve committed to bake this cheese cake for a silent cake auction to benefit a sweet lady battling breast cancer. I’ll make the cheesecake a day ahead of time, but my concern is that it will be sitting out for several hours on a table while people bid on it. Do you think it will be okay after that length of time at room temp? Any suggestions?
Hi Beckie, I’m so glad you enjoy this cheesecake! I think it should be fine, as long as the table isn’t outside in really hot temperatures.
AMAZING!! Made this last night and served it tonight, everybody LOVED it. BEST cheese cake I ever made!! I loved the easy to follow steps, this is a keeper!!!
Can you use 6 large eggs instead of 6 eggs and 2 egg yolks?
Hi Simony, No, it will affect the texture of the cheesecake.
wow is all i have to say .. i tried this first time without water bath and its came out wonderful.. i definitely recommend this recipe :) thanks so much.. company tomorrow will love it !!
Hey! This is in the oven now I’ve just turned the temperate down to 200 but it looks burnt after being in on 500!
I just made this for my husband for Father’s Day, and his is a very happy Dad-thank you! My thermometer lied, though, and when I sliced it, we had cheesecake soup in the middle. I’m hoping that’s at least partly because I didn’t have time for it to chill partly. It still tasted fantastic!
The cheesecake turned out great, except mine was not as pretty as yours. Mine browned up quite a bit on the top? I checked it at 1 hour and 20 min. but it was not done so I baked it for 1 1/2 like you said. I do not have an instant read thermometer. Just not sure why it browned so much? I baked it on the lower rack just like all cakes I make? Any suggestions? Thanks, Kathie
This is absolutely a treasure of a recipe. I followed it precisely, without even trying to deviate, and the result was one of the best cheesecakes I’ve ever made or eaten. It strikes the perfect balance between sweet and the tart, the denseness of the cheese with the fluffiness of the egg and sugar. Simply perfect. I’m making my second one this week, and added just a pinch of nutmeg. Other than that, I see or have no need to mess with perfection. Scrumptious. My thanks, and greetings from Toronto Canada.
We followed the cheesecake portion of this recipe to a tea, timing how long we blended the filling at each minute or 20 second interval. We baked as directed and after the 1.5 hours at 200, our cheesecake was still super jiggly. I’m not sure if our oven can’t hold 200˚F or 200˚F wasn’t warm enough. We wanted to make sure the cheesecake was fully cooked because I’m pregnant (no raw eggs) so we turned the oven to 275 and cooked it until it another 45 minutes until it just barely jiggled. We don’t have an instant read digital thermometer so we stuck our meat thermometer in the cheesecake and it wouldn’t get above ~120˚F. I think we overcooked the cheesecake a bit- it cracked, but not enough to change the taste or texture. The cheesecake is amazing! Our cheesecake got golden brown on top but is firm and delicious. We simplified the strawberries by adding only sliced strawberries, a couple tablespoons of sugar, and a couple tablespoons of lemon juice. We also added just a little more than half a cup of sugar to the cheesecake filling at each step (instead of 3/4 cup) and it was plenty sweet. We LOVED this recipe! We can’t wait to try your other cheesecakes!
My cheesecake came out of the oven looking a bit spotty brown in places and golden on top which is ok with me, but sadly sometime during the last hour of cooling a big crack erupted on the surface. I’m so bummed because i made this as a gift and wanted it to be as pretty as the photos:(
My question is why do cheesecakes crack? i’ve heard it’s over beating which i def didn’t do, or too quick of cooling? I followed the directions completely and i plan to “frost” the center of the cake with a sweetened sourcream to camoflage the crater. My fingers are crossed…
Hi Lisa, There are tons of reasons that cause cheesecakes to crack – overbeating is one of them. Also, can be due to how quickly it cools and pulls away from the sides. If it sticks to the sides, it will cause cracks as well.
I made this for the second time (the first time turned out fabulously!) and when I went to turn down my oven after the 10 min, My cheesecake had completely risen above my pan looking like a souffle and was completely brown on top. What happened?!?
I have to tell you, I’ve tried more cheesecake recipes than I can count and when I found this one I never made another one again. This is by far the best cheesecake recipe that I have found and every time I make it it’s a huge hit! I highly recommend it!!
Perfect recipe Every time, Michelle! I’m an American, recently transplanted to the UK, so I had to do the conversions. I followed your recipe to a “t” and made 5 of these as Christmas presents, and all of them have turned out perfect EVERY SINGLE TIME! Thank you so much for creating this! Plain NY style is my favorite! :)
If I wanted a chocolate chip cheesecake, can I just add some mini chips into the batter?
Hi Kristen, Yes, you could do that, but I would probably toss them to coat with a little flour so they don’t sink to the bottom.
This recipe is fantastic! very detail oriented for some of us that aren’t the best cooks/ bakers. I made this for valentines day last year as a surprise for my girlfriend who worked all day. She was floored. I made a blackberry sauce because that’s her favorite. I have tried other recipes and absolutely nothing stands up to this recipe.
Hello Michelle! I tested this recipe but have a few questions:
The top got too brown so I will foil tent it. However my oven temperature drops at a super slow pace. Is this super slow drop in temperature what is required for the cheesecake?
Also I am using a convection fan oven. Do I need to adust the twmperature for the same?
Thanks, love your website :)
Hi Simran, Usually adjustments do need to be made for convection; I would follow the recommendation in your oven’s manual.
I want to make just half of this cheesecake recipe. Can I still make it in a 9in springform pan? How much would I have to change the baking time?? Thanks!
Hi Jenn, If you cut the recipe in half, you will have a very thin layer of cheesecake. If you go this route, you will need to reduce the baking time.